Transcripts
1. Introduction: When it comes to drawing
faces and difficult angles, a lot of people get stuck. Proportions and perspective on faces can be tricky
and intimidating, but they don't have to be. If you've ever drawn
a side profile or attempted a weird head angle
and it turned out wonky. This class is for you. In these lessons, you'll get a step-by-step guide to
drawing faces are all different angles and learn how facial proportions change
as the head turns. I'm your instructor for ReLu, figurative and portrait artist and founder of when Canvas. I've been studying and drawing
people for over 20 years, learning from master artists and practicing from live models. I believe figure
drawing is one of the fundamental
milestones learning art. Because when you can confidently draw a figure out of your head, you can draw
practically anything. In the next set of lessons, I'll teach you how to draw 11 different head
angles step-by-step. And we'll observe how the
phase changes with each. You'll learn how to
draw a front view, a profile upward, downward and three-quarter
views for each. This class is your first step in understanding head structure for portraiture and is the ultimate beginner's
guide to drawing faces. I can't wait to see what
you create at the end. So please share your
artwork with the community. See you in class.
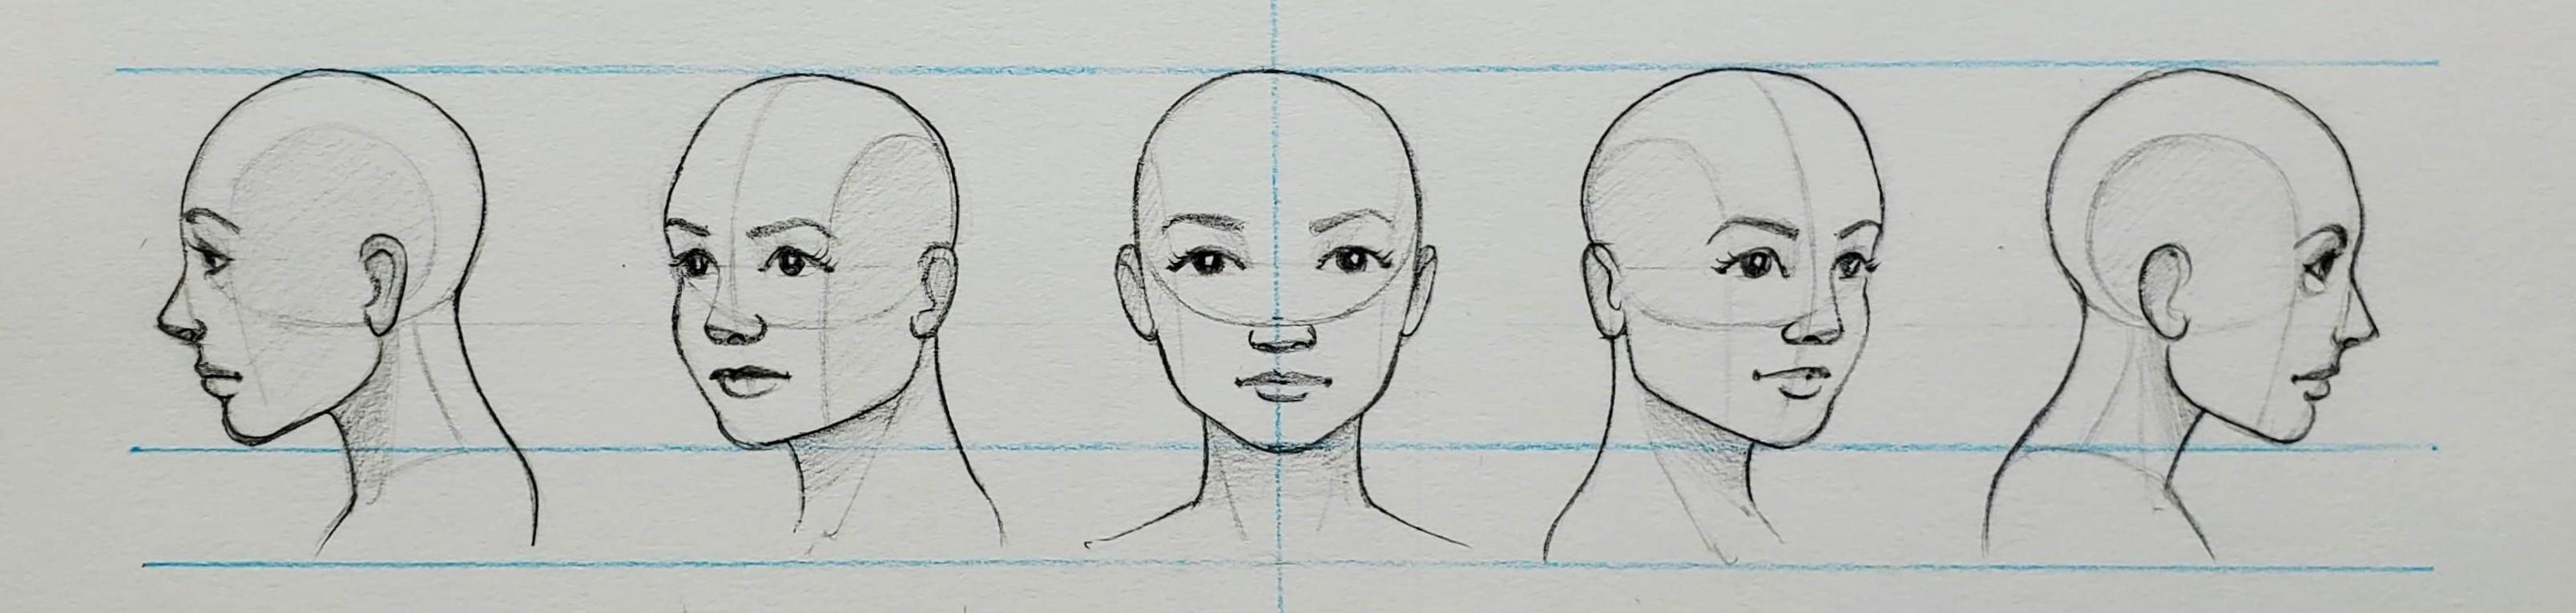
2. How to Draw a Face - Front View: We're gonna do
some head drawing. This looks easy, but it's not. It's like one of the most
difficult exercises you'll probably ever do when it
comes to drawing faces. Typically this middle row
here and is the easiest. But when it starts
to get up here, when you're looking
up at a person or it's a really awkward angle, it becomes very, very
challenging and very difficult. And then similarly, when
you're looking down, you don't see this angle, but you see the top of the head starts to be
an additional plane. We're not gonna go
into that much detail. We're just going to
keep it very simple. What I'd like us to do is
to create a grid so that our faces are all the same size going
across, above and below. I'm just going to draw a line
all the way across Here. Let's see, let's measure it
out so that it's consistent. I'm gonna make my grid. I'll make it five centimeters. My sketchbook is really big, so I'm going to do
five centimeters. You guys can do
four centimeters. Whatever works as long
as it's consistent. This is going to keep the
top and the bottom of my head together and aligned. Then I'm going to repeat this
grid down at the bottom. So I'm gonna leave a
little bit of a space. Okay, So this is the first step. If you want to put a
mark down the middle, I'm just going to find the
middle of my line here. This is gonna be the center line that I'm going to begin, that. That's the last grid
that I'm going to do. If you look at the
skull reference, we're gonna do the
first row first, just keep in mind the skull. It has no flesh on it, so it's very kind of skinny. We want the face to feel a
little bit more fleshed out. So if you go by this
line over here, from the top of the head
to the bottom of the head. If you find two-thirds
of this line, here is roughly 1 third,
Here's roughly two-thirds. So if you mark where the
2 third of that line is, and then draw a circle. But that circle isn't going
to be a perfect circle. It's going to be
slightly squished. Then I'm going to
draw in my jaw. So if you're doing
a male figure, you can make that jaw a
little bit more chiseled. If you're doing a female, then you can make the face
a little bit more round. So I think I'm going
to draw a female. I'm going to make that
shield bit more round, although you do want to make sure that you
account for the jaw. So even though it's more round, I'm still gonna be aware of
where that's kind of turning. There's my jaw, nice and easy. And then if I wanted to find the middle of this line here, that's going to be
the line of the eyes. This is my rough shape. I can put in a little
bit of a neck. And if you're drawing a female, you might want that neck to
be a little bit thinner. If you're drawing a male, that neck can be a
little bit wider. This is just a basic head shape. Then give your
character some eyes. You want to make sure that the eyes proportionately
on the face. The eyes are the same
distance apart as they are wide eyes and then the nose for the nose. From the front. I'm just going to keep it the same width as
the distance between the eyes and the mouth is going to be slightly
wider than the nose. And the mouth is going to be closer to the nose
than the chin, the opening of the mouth here. And just draw it as
a straight line. And then I'm gonna
draw a bottom lip. I don't really draw the top lip all the time if I'm
simplifying this character, but I will draw the bottom lip. If you wanted to draw eyebrows. Just remember that the
peak of the eyebrows, so the peak right here is about two-thirds
towards the outside. Then let's place the ears. Ears from the front of the face is just facing front
and not tilting at all. The ears should be
aligned with the eyes. The nose. Ears will, even though they're
not really that important for a portrait. If they're in the wrong place, then it messes up your entire
perspective so your ears are really there for how
marker of perspective, more so then like really being
of that much importance. There's my first face facing
directly from the front. She doesn't have any hair
yet and that's okay. We're gonna leave
her bald for now. Just make sure that the nose is the same distance as the
distance in-between the eyes, that the mouth is slightly
wider than the nose and that you have that bottom lip drawn in and the
eyebrows drawn in.
3. Drawing Face Profiles - Side View: What I'm gonna do
is I'm going to start to sketch in my circle. I'm finding the bottom
of the circle here. And then I'm just going to draw a very gentle line all the way across so that my circle is going to be the same
size all the way across. Then I'm going to start
to pencil in that circle. What we're just trying to
do is we're just trying to sketch out these circles first, just so that we can kind of draw them all in
at the same time. Remember, it should be
almost a perfect circle, but it should be a
little bit wider. We are drawing five of the
circle AS of the skull, and we're trying to keep them all relatively the same size. And if you find that you're
like smudging stuff, take another piece of paper. And while you're working, you can just move that piece of paper across the page so
that it doesn't smear. Now we're going to draw the
two faces from the side, one looking directly across and then the other
going the other way. Those are gonna be the ends is gonna be a little
bit easier to do their three-quarter
view once we have the sides from the side, it's not a flat shape. It's actually a
little bit rounded. And what we're gonna
do is we're going to curve this line. Whenever we draw on one side, we're going to draw
on the other side just to make it easier. You want to make sure
you curve that line. You never want it to
be super flat because that's not how faces
work. Since around. Once we have that in, we're going to start
to place the job. So if you look at the reference
picture of the skull, the jaw is roughly, you could say it's close
to the middle here, but I'm going to say
it's a little bit over, like a little bit
more than the middle. So if you find the middle of the circle and then bring it a little bit off to
the side like this. You can find it on either
side of your drawing. And then we're going
to draw in the jaw. You want to make sure
wherever you put the jaw in the middle of the
face facing front, you want to curve it
in the same place. Now we're gonna try to put
the neck and the neck part is very challenging
because a lot of us draw next like
straight up and down. And next don't work like that. Next have a nice curved to them. So we're going to
practice this curve. This is not the neck, this is the spine. Then once we have that curve, we can kind of feel that curve. Then we're going to draw
the back of the neck. So go ahead and feel
the back of your head. Feel where your neck connects to the back
of your head and how much space there is between the back of your
skull to your neck. And then that's kind of where
you want to input the neck. Then go ahead and feel your
jaw and how much distance your neck is sits from
your jaw right there. There is a bit of space here. So you don't want to make
it too close to the jaw. You don't also want to
make it too far away. Then you'll start to
see like the back of the neck will start
to curve this way. That becomes the top
of your ribcage pay. So you can put that
in as a reminder. Your ribcage is actually here. Now that we have the
heads from the side. Next we're going to
put in the nose. So again, if you need to, you can take your ruler. Let's say I want to put my ruler right up against her nose. I just want to make sure
that it's in the same spot. Wherever your nose is on
your figure from the front. You could do like a gentle
little line on either side. And that's kind
of be the nose on your figures from the
left and from the right. I'm going to tilt the
nose up a little bit. Now let's place the
eyes. So same thing. I'm gonna take my ruler and I'm going to find
the line of the eye and just do a very light
line for the eyes. Now, eyes when you're
drawing eyes from the side, It's kind of tricky because
you have to follow the skull. So if you have a
look at the skulls, it will see that
you don't really see much of the eye socket. You only see the side
of the eye socket. And very, very like
a thin, thin sliver. What you don't want to do
is you don't want to draw an eye from the
front side profile. So we're going to draw simple
eye socket from the side. So I'm going to take that line that I drew
and I'm just going to draw a curve along
that eye socket. And you want to make that curve
like right in the middle. And that's going to
help guide you to not make your eyes too
wide from the side. Once you have that curve in, what you can do is you
can draw a little arrow. So it's almost like a greater
than, less than symbol. That greater than
less than symbol. Usually it's going to be like longer at the top and kind
of less long at the bottom. It's also going to be a
little flatter at the bottom and a little bit more
angled at the top. So now we have the eyes. Now let's try to put
the eyebrows in. You can use your ruler. Your eyebrows will usually
start along your eye sockets. If you feel your own face
along the eye socket, you'll feel that your
eyebrows probably start right above
your eye socket. And then from the side, you're going to curve
around your eye socket. Knowing where that eye socket
is is really important. Once you have that
eye socket in, we're going to place the mouth. Same deal with the ruler. I'm going to find where my mouth is on my figure in the
middle and then I'm just going to put
a little mark so that I know where the
opening of the mouth goes on either side because you're drawing
a mouth from the side. It's also is a lot smaller
than from the front, at least half the size. If your mouth is this
wide, from the front, from the side, it should be
at least half of that width. So I'm going to make it
a little bit longer. And what I'm gonna do
is I'm just going to make the end of the mouth and I'll put a little
circle to kind of emphasize the sides
of the mouth. And then what you can do is
you can add lips if you want. I'm just going to
add the bottom of the lip and it's gonna
come out a little bit. And then the top of the lip, you can kind of
connect the bottom of the nose to that top lip. And then once you
have the lip in, then you can alter the
chin a little bit. And give rounder chin starting from the
bottom of the mouth. If you want to curve the
side of her nose up, you can do that too. It's going to overlap
that line a little bit. Then what's missing? Her ears, her ears are missing. So same deal with my ruler. I'm going to find the top of the ear here,
just above that. I then I'm going to
start to put in the ear. The ear should sit
right above your jaw and it should align with
the nose and the eyes. Make sure that the ears
are in the right place. Then the last thing
that you can do, this is what I do for a lot
of the side profiles is I modify the forehead
a little bit. I'm going to show you
how I would do that. So I'm just going to lighten
up this line right here. The eye socket. And I'm going to emphasize the bone that's connected
to the eyebrow. And you can see that in
the skull pretty clearly. And it's just going
to be like right here and emphasize that
part a little bit. And then I'm going
to put a bit of a curve right across
the eye socket. And that's going to
create your side profile. It's hard to draw because most people just try
to guess where it is. They're not really
following structure. We are following structure. So it's very, very
easy by comparison. Okay? This is how it starts. This is where it starts and why. Remember that this
space between the side, the face here, and the eyes, make sure that
there's enough space, at least the width of
an AI within here. Because if it's too close, It looks really awkward. Remember, we want to
make it look like it's the same person two. So that's gonna be
a little tricky, especially when we get to
the more difficult angles. I'd like you to keep
these circles, right? Keep the structure
as much as you can, like you might, if you want, you can lighten it,
but it's really going to help you
remember that process.
4. Drawing 3/4 View Head Angles: The way I start three-quarter view faces is I
start with the center line. Just like we drew the
central line on both sides. We're going to do both
of these together. If we draw them together, it'll be a little bit easier
to keep them consistent. Let's start by putting
in the center line. So if you want it to be
a three-quarter view, you want to make sure
that the center line shows more of one
side than the other. Now the jaw for
three-quarter view gets a little bit tricky. You can reference the
image if you want to kind of see how it connects. But wherever it's connecting
here in the profile view, it's going to be further back
in the three-quarter view. So don't put it in this spot. You want to put it further back. So I'm probably going
to put it like there. Now let's start to
put in that jaw. So it's going to come all
the way down like this. Remember you want
to keep the jaw in roughly the same place as in your previous or
your very first face. I'm going to put this down
so that I don't smear this. So now I'm going to HRV
this side of the face makes sure that you're thinking about the jaw on the other side
as you're doing this. Just remember you're doing
a symmetrical drawing. Whatever you're
doing on one side, you're going to try to
do on the other side. This part is kind of tricky
to get that jaw right. And now we're gonna
put in the neck. The next gonna be a little
bit trickier because you'll see a little bit
of it on inside. My neck here is just
a little bit behind my center line because I want to try to keep it the same width. I think before I put
in any other features, it might be helpful to put in
the ear because that ears, it's going to overlap
some of that neck. And it would kind of make
sure everything's in place. So if you want, you can take your ruler. Now I'm going to try to find the ear on my
three-quarter view. So again, what you
want to do is put a little tick, the bottom. Then a little tick for the top. I realized that this
ear here, too high up. When you're doing a
three-quarter view ear, an ear from the front, you only see a
little sliver of it. An ear from the side, you would see more
of the ear would actually be widest
from the side. And then three-quarter view, it's kind of in-between. So you'll only
really see one ear. You won't really
see the other one. You'll see that the ear kinda overlaps the neck a little bit. Once you get the ears that
even though you don't see any of the features yet, you already start to feel
the orientation of the head. That's actually
really important. I like to do the nose
and the ears because a, they directly relate and
be noses like once you put in the nose is very easy to see the orientation of the head. I'm going to start
with the nose. So I'm going to again use
my ruler and just put a little mark along the center line where I
think the num should go. Now what I'd like you to do
when you're drawing noses, when you are drawing. A simple knows. Let's say your nose
from the front is like, IS, your nose from the
side is like this. Now your nose, that's
three-quarter view. What I'd like you to do is
think about a triangle shape. Your nose from the side. That triangle shape
is still there, but it's more like
a half triangle. Like this underside
is a half triangle. When you're doing a
three-quarter view, knows that triangle. Notice if I split this
triangle in half, it's this type of triangle. You're a three-quarter
view nose is going to be larger on one side and
smaller on the other side. Do you see what I mean? So
do you see how this part of the triangle is wider than
this part of the triangle? This part of the triangle is greater than this
part of the triangle. Here it's exactly half, half, here, it's
half of the middle. And here it's kind of like one side is greater
than the other. Now that's actually really, really important to
understand and to apply. What I'm gonna do is I'm going to put in the line of the eyes too so that at least I
have a starting point, very light line across wherever
the line of the eyes are. I'm going to start
to think about the nose as starting
from the midline. Like if you feel your eyebrows
where your eyebrows end, There's the eye
socket and then it connects into your notes. From the brow ridge to
your nose is like this. You're only seeing one side
of the line of the nose. You'll notice that the nose does not sit on
your center line. The nose comes above
your central line. Don't put that nose right
on the center line. Makes sure that the nose is in addition to that center line. Then let's say you want to
curve this side of the nose. And you want to make
sure that if you do put a plane of the nose that
you sketch that in. Remember the triangle is
going to be bigger on one side and smaller
on the other side. Once we have that nose in, everything else is going
to be easier to place. But again, the nose
is really tricky. Let's try to think
about the eye socket, because in a three-quarter view, if you look at the skull
examples over here, you will see that one eye socket is a lot more visible
than the other. We want to make sure
that we identify that early on so that
the eyes makes sense. Where you've started to curve, that knows, that curves
right into this eye sockets. So you can go ahead
and turn that into more of a round shape. And that's gonna be one
side of the eye socket. Then if you take the edge of
your nose and you go all the way up and you
want to mark where your other eye sockets starts. This line of the nose aligns
directly with your eye. That's where the
other eye socket is. And you can very gently
draw in the top of that eye socket should
align with the EMS. There's the top of
your eye socket. If you want to draw the
bottom, that's fine. You can just put in. In line. Now we're going to place the eyes
within that eye socket. Remember, when you are drawing
three-quarter view eyes, remember these triangles is the same thing when
you're drawing an eye from the front,
curves like this. When you're drawing
an eye from the side. It's more like this. See how the triangles
are still holding up. Now when you're drawing
a three-quarter view I, your curve is going to peak
three-quarters of the way. Like this. You can kind of draw
in one side of the eye to be wider and then the
other side to be less wide. And again, you want
to do this together. Now I'm going to erase
that eye socket. Then start to turn
that into an AI. Notice that the
peak is different. The other eye that kind
of curves from the nose, you want to try and
draw in this eye, it's at a slightly
different angle. But you want to make sure that the height of these
two i's are the same. The width is going
to be different, but the height
should be the same. Once you have the eyes. Let's try to tackle
the eyebrows. Try to put them
in the same spot. What you might notice
about eyebrows is that they go past the eyes. Sometimes you'll see
someone with very, very short eyebrows, but usually your eyebrows are
wider than your eye. It makes sense it's supposed
to protect your eye. Having really short I
rose is not as common, although it's pretty common in kids like kids have
very light eyebrows. If you're drawing kids, you don't want to give the kid
like really dark eyebrows. Usually the more
testosterone you have, the darker your eyebrows are. If you're drawing a male, you might want to
make the eyebrows a little bit more dark
and pronounced. One of the things that I always adjust when I'm
drawing a structure, drawing like this is
the cheekbone because our cheekbones is very pronounced in a
three-quarter view face. And right now I didn't
put those cheekbones in. The face feels very
flat from the side. So let's put the cheekbones in and I'll show you
how to put them in. I'm just going to erase inside
of the face a little bit. Imagine where the
eye socket ends. Then that's going to be where
that cheekbone comes out. In the three-quarter view, you'll really start
to see that curve of the cheekbone and it disrupts
your line a little bit. Then usually the forehead
here is not that round. And so what I'm gonna
do is I'm probably going to make it a
little bit flatter. Our foreheads are generally flatter unless you're
drawing a baby, in which case baby
foreheads are pretty round. And then if you wanted
to kind of emphasize the flattening of that ball, you can kind of
put that in on the In profile here, as well
as three-quarter view. Some people swear by this line, others don't really care. But I think it's
interesting to kind of understand where IT pros.
I'm going to put it in. Then from the front, you might see just
a little bit of it. For the ball starts to flatten. Some people say it makes it
look more 3D. So there we go. Let's put in the mouth. Let's take a minute here. Fine. The alignment of the once you draw in the mouth as
like a horizontal line. Remember that with
three-quarter view, okay. The mouth is can be a little bit more curved than from the
side and from the front. Because your mouth is
supposed to be round. Wherever you end up
putting this line makes sure that it doesn't
go past the nose. Like this line here
doesn't go past the nose and this line here
does not go past the nose. Then notice how it's like
right in the middle, like my center line is
right in the middle of the lips and
it should not be. And that's the part that
is very, very confusing. Find the center line, like the literal center line, and then skew that
central lines. So now draw a new
center line because your lips have a bit
of a curve to them. The central line is
not going to sit on the first center line that we drew is going to sit above
that just like the nose. Let's draw that bottom lip. Let's now modify the chin, making it more round here. Then if you want to
draw the upper lip, you want to make sure that it is three-quarter view and not
just a view from the front. Usually I made the upper lip
darker than the lower lip. It's an shadow. Congratulations on
making it this far. This is your base
for learning how to draw faces from the side
and three-quarter view, and these are the
most common points of view for drawing portraits. Usually speaking, when you
are illustrating a portrait, the most satisfying angle
was that three-quarter view. And it's also one of
the most challenging. So if you made it here, then hopefully you
will feel a little bit better about placing
angles of heads. And then the next part of this drawing is going to be drawing the heads in
more difficult angles, especially like looking
up and looking down. I will see you in
the next video.
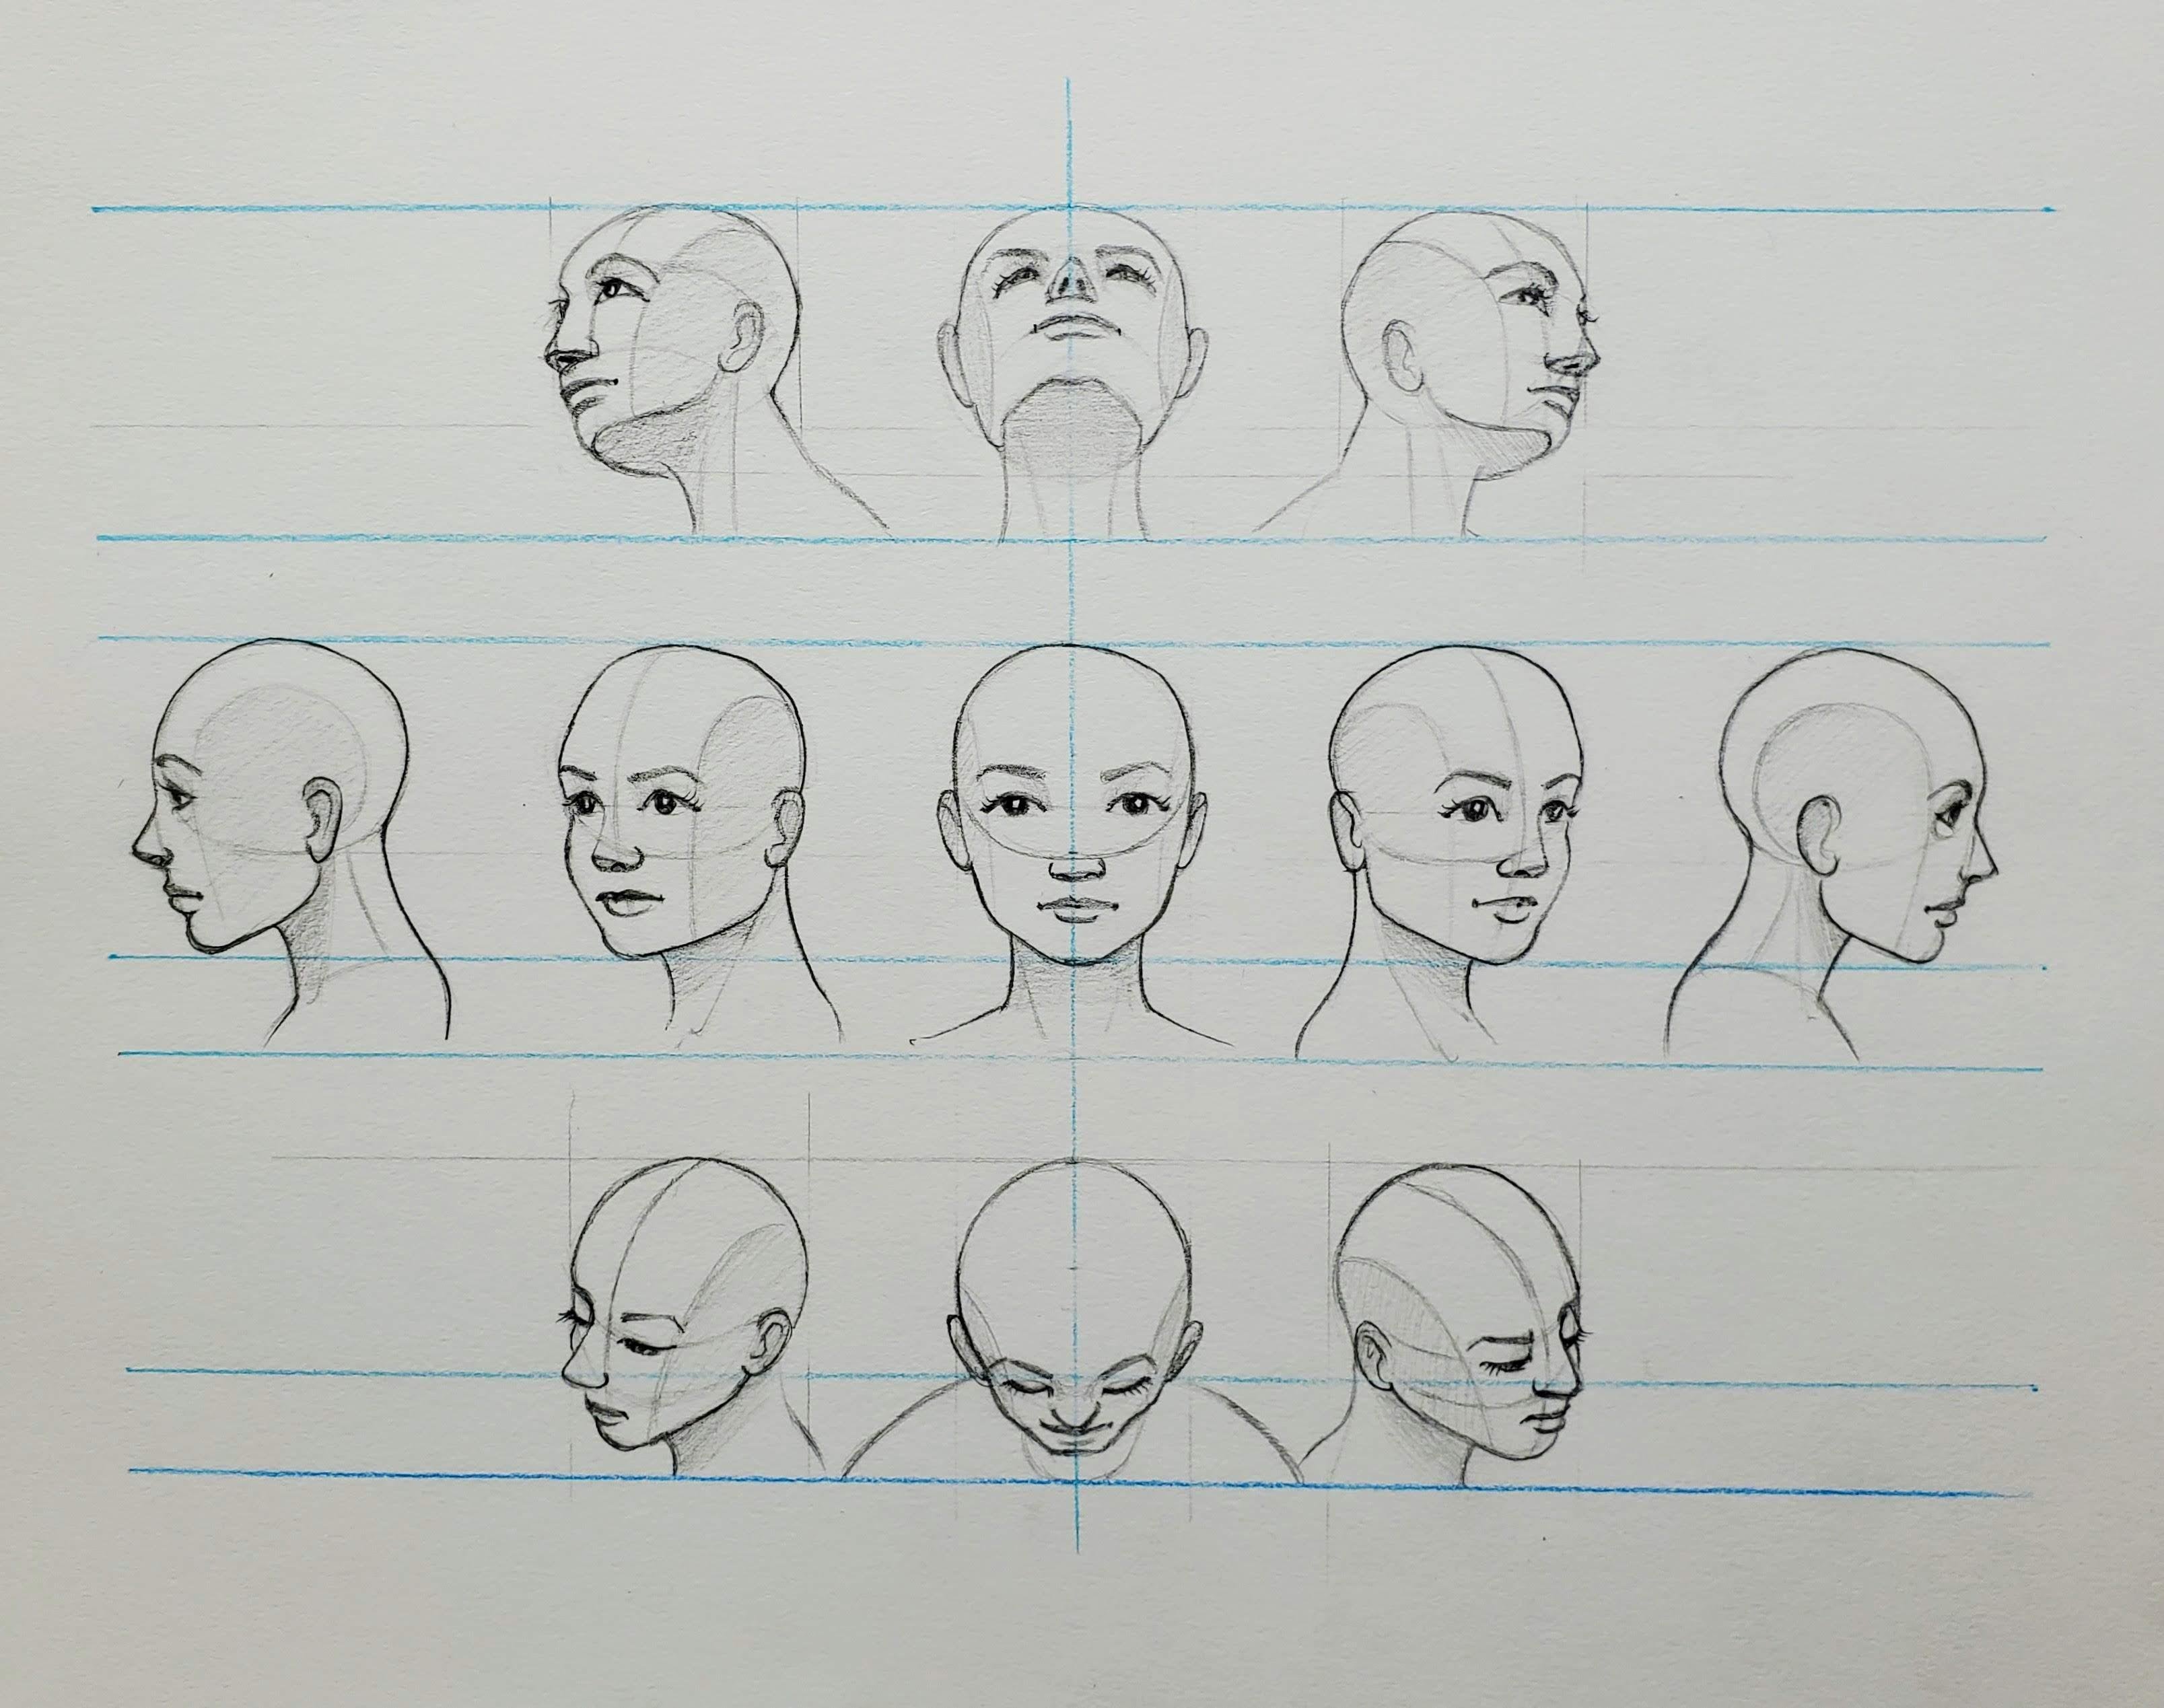
5. Head Drawing - Upward & Downward View: This part is really tricky, so I'd like you to
reference the skulls. Let's start by drawing a
head facing up and then the head facing down. Again. Like if you can remember, the size of the
circle is two-thirds. This distance. If
you want to make sure that you measure
that out for yourself. Then I'm going to try to
match the size of my circle. Then we're going to try
to fit a circle in here. Remember that the circle
is not perfectly round. Little bit more like an oval. Once you sketch that out, I do want you to have a
look at the skulls here. You can see that the
roundness of the cranium, when I turn this, see how that circle gets longer. The circle is actually longer. Looking from the top, you can kinda see that
it's longer at the top. And when I do this, it's a little bit more squashed. If my face is turning
up like this, you'll see that the
circle actually gets bigger at the bottom as you're seeing a little bit
on the back of the skull, you don't really see it
because there's a neck here, but I just want you to know that the head is a
little bit bigger. Okay, So now we're going
to adjust that circle. And we're gonna make that
circle a little bit bigger. And I don't know if you noticed, but it's a little bit skinnier towards the bottom and a little bit lighter
towards the top. Now we're going to draw
the bottom of the jaws. So if you look at the shape of the bottom
of the jaw here, you'll start to see
that it's like a curve. That curve sits a little bit
above the back of the skull. We're going to draw
in that curve. So if you notice, if
I put my pencil here, you can see that the
curve is halfway, so there's a little circle here and the jaw
is about halfway. Let's think of this as
the bottom the jaw. And then we're going to
bring the neck muscle down from here. Then you're gonna
start to see like once the face is distorted, you're gonna start to
see like the width between the opening of the mouth and the bottom of the jaw is
wider than this distance. Whereas if you look at the skull normally it's not
quite in perspective. So exaggerate that perspective. If you look at the
general proportions of the head when it's
tilted like this, look at them center line of the eyes and cut
them where it is. Take a mental note of how
far up at the top it is. It's quite far. So let's draw that in and
draw in the line of the eyes. Kind of want to
fall on this curve. I'm going to reference
the skull again, but at the bottom
of the nose and the bottom of the eye sockets are kind of along the same line. The cheekbone goes through
like halfway on the nose and the mouth is definitely closer to the nose than
the bottom of the chin. With that in mind, let's draw it in the nose. Let's draw in the eye sockets. Then I'm going to put
this middle line, makes sure that the middle line curves with your other lines. I just wanted to make
sure that the mouth is still the same size. So I want to make
sure that I put the corners of the
mouth in properly, just kinda reference
my drawing underneath. The upper lip will be much, much thinner than the lower lip. I think I'm going
to move the chin down because I feel like
this is not enough. If you can always modify, then the ears. Remember this line that
you drew from the top of the eye socket and
then the nose. You want to put the
ears along this line. So when your ears are lower on the head means
your head is tilted. Now we can put in the eyes. The reason why I
drew the eye socket is because I want to contain the eyes within the
a socket and kind of follow this line here. Then the bottom of the eye
is going to curve this way. Then for the eyebrows, I know the eyes looked like they're really
bending downwards, but that's just
the way faces look when they are in this position. I'm also going to draw a
neck and then you can erase the back of the head here is you're not
going to see that. You're just gonna
receive the neck. And the neck usually has some muscles here that you
can finish the sketch in. There's my head
looking directly up. And now we're going to
draw a head looking down, the head looking up as harder
than the head looking at. So let's look at what a sculpt looks like when
you tilt the head. Here it is, looking straight on. And then let's see what
happens when you tilt it. When you tilt it, you can see that this shape is the same shape as we drew
for the head tilting up. Same kind of shape. So it's longer than
these circles here. Because the circle of the
skull is not quite a circle. I kind of want to bring
this line down a bit. So I'm gonna do that because they don't want my
faces to run into each other. The top of my head is going to be like roughly around there. This should be the bottom, but I'm gonna go a
little bit lower. Then I'm gonna make sure that my head shape a lines
from top to the bottom. So you want to
make sure that you put in this alignment here. Once you have those
lines sketched out, then try to sketch out
nor not quite circle. You'll notice that the head, once it's distorted like
this, It's not quite as long. Look at the length
of the head here, and then look at the
length of the head here it's a little bit shorter. The heads not going to go
all the way to the bottom. So you want to make
sure that the bottom of the head is a little bit shorter than you
would normally do it. I want to make sure
that I put in the jaw. You can't really see the jaws like you can see the cheekbone. So let's just draw in this
kind of shape but opposite. It's like a squarish shaped, like a trapezoid
shaped like this. Usually when you're looking
at a face that is looking down the shoulders are
actually like here. If you want to sketch
in the shoulders, It's because your view, you're looking down at them. So the shoulders are actually
going to overlap the head. Now, if you haven't
looked at how high the eyes sit on the
head looking up. We want to match that on
the head up and down. So we want to make
the eyes a lot lower. So if I reference my skull, I can see that the eyes, if I had to measure
it and say It's boat. One natural width, 23, it's about a third of the way down instead of halfway down. That a third of the way. So if I go from here to here, There's a third, okay, so my eyes are actually
going to go down here along this line. Then your nose started and draw nostrils here for your
face looking down. My skull doesn't have a nose, but if it did have a nose that would stick out a lot more. Let's pretend it
has nodes and let's just make like a triangle
shape like this. We want to make sure that
your triangle shape, whose the same width as
your nose in the center. Always check your proportions to make sure that
they are consistent. Then let's draw the mouse
and the nose is going to overlap the mouth here. Then for the eyes I
like to sketch in the eye sockets
and then I kind of know where to put the eyes in. You want to make sure that
the eyes are very, very thin. If you notice that
you're drawing a person and then it
stops looking like them. What looks strange? And I think in mine
it's the nose. I feel like I made
her nose too big. I'm gonna make her nose
a little bit smaller. And I think also like instead
of drawing her eyes open, I think that's also
what's causing it to look in the mirror. Because when you
think about eyes, they sit on a ball. If you think about an
eyeball like this, right? And the eyes are looking down, the eyelid is gonna do this, and here's the top eyelid, and then here's the bottom line. Whereas if an eye is looking up, kinda like the opposite. That's why my eyes were looking weird is because I
didn't curve it down. That looks better. I'm encouraged the eye down
and you probably won't even see her pupils. Give her some eyelash and then
give her some cheekbones. If you bring a curve all
the way up from promoters. And then to her, I
form of this curve, of this up here is actually
pretty high on her head. So the higher the ears, the lower the face, the lower the ears, the more the face is looking up.
6. Head Drawing - 3/4 Upward View: We're going to draw the
faces from the side. So this is three-quarter view. But then we want to draw
three-quarter view like this. It's time to look at
the skull right now. If we look at the skull
from a three-quarter view, you'll notice that you can
see the bottom of the jaw. You'll also notice
that the skull is more compressed than if
it was like this. All of the curves are
going to echo this curve. This curve moves up. Now throws up nose curves
up, eyes curve up. Look at the eye socket. It's
curved up the cheekbone. We want to start with the
jaw because we can easily identify this shape
and we can kind of match the shape to
the head tilting up. Let's start by
drawing two circles. We're going to draw
the one on the left and the one on the
right together. So I'm going to base my circle off of
this character here. Now we've got our grid. Now because the face is
tilted three-quarter view the bottom of the sphere of the skull is going to
be more compressed. So I'm going to leave it there, the same shape as this
three-quarter view here. Now that I have my
circles drawn in, I'm going to figure out
where that jaw goes. If you referenced
the picture like the bottom three rows there, you can see that the jaw, it echoes this shape and
it goes not quite as low. If the head is tilting up, I want to figure out
where the back of the head is. Just
draw a line there. That's kind of where
the jaw, It's gonna go, the jaws gonna
kinda go from here. You'll notice that the
job overlaps the ball. Draw in your center line first. So you see how the center
line is here, right? So I'm gonna draw a similar
central London here. Then that's going to
reposition my jaw. There's the middle of my head. You can see the middle
is actually here. I'm just going to sketch out
where I think the ear grows. Alright, so you'll notice that the center of that curve has
to match your array here. So whenever curve you put here, the center of your job is
going to align with that. It's a little bit tricky, so just do your best. And then for the neck, usually the neck
kinda does this. It's going to be
more curved out. If you're drawing a
guy, you might want to do the Adam's apple here. I feel like my center line has to be a little
bit more even. So I'm just going to
adjust my circle here. That's looking pretty good. So before I go into
any more details, I want to try to match
it on the other side. Whatever you draw on one side, you want to draw
on the other side. So I'm gonna start
with the center line. Then mark where I
think the ear is. So if you find this
distance here, right, It's kind of like
a little bit lower than the center of that circle. So I'm gonna kind of guessed
that it's about there, that's where the
jaw is gonna go. Then I want to curve this. Infer, because it's
three-quarter view, you're gonna get this curve. This negative shape
here is going to help me match the negative
shape on this side. I realized the mistake here. You can see that my
ears are not aligned, is here, she's looking up, the ears are really, really far down
and then here the, It's like not aligned. So let's try to match the years. Just going to reference
my skull again because your ears are, they usually end where
this jaw bone ends here. So actually they are going to be higher in the
three-quarter view. Now I want to match the
curve of the chin and I'm just going to draw a curve here so that I know where to put the nose. Okay. So when you're drawing a nose that's kind of
like three-quarter view. You want to start outside
of the center line because your nose is actually comes
out from the central line. And you want to kind of match the shape of this
chin a little bit. So if you want that
notice to come out, I'm going to try to
match similar shape. You want to match that shape
and I'm just going to shade it in so that I know it's
like the bottom plane. Then I'm going to add a nose. So that nose is going to
start it on the face, overlapping this circle
and out to the side here. Okay, so now I'm going to
echo this curve and I'm going to figure out where the
eyes go. Code that. Code this. We want to make sure
your curve is parallel. Now to draw a three-quarter
view eye socket, this is gonna be a little
bit challenging because let's talk about
three-quarter view eyeballs. If you have an eyeball and
the eye is looking up, then you would have the
center line like this. And then the other center line
would be going like this. Then your eye would actually
go on long this curve. And then the bottom of the eye is actually going to curve up. So think about the ball, think about the center
line and then think about how you want to put in the eye. You can kind of just like
sketch in the shape. If you are comfortable. Just know that the bottom of the eyes is
going to be curved. Then this I, you would
not really see as much. Then I'm gonna put
in the eyebrow. Then when the eyes looking up, it's definitely not going
to be a full round iris. The iris is going to be more
of like an oval shaped, more like this kind of shape. So if you think about eyes looking in different directions, here's from the front, Here's from this side. If you think about like which
direction it's looking in, that iris shape is going to change to an oval so you don't want to make
it super round. You can see where
I put my eyes in the corner of the intersection
of these two lines. Make sure that the
top of the eye is aligned with the
top of the ear. And the bottom of the eye
curves the same way as the job. The eyebrows are going
to curve like they're gonna curve along
the eye socket. If you feel your own eyebrows, you can see that the front part of it sits along
your eye socket. So if you know that when
you're drawing eyebrows, you want to make sure
that they aren't itching your ISOC ones that are
in the front anyway. Then if you wanted to
draw the neck muscle and just kinda comes down
from behind the ear. I feel like my nose
is a little bit long, so I'm just going to adjust. Make sure that you
are trying to stay consistent and two new drawings. And last thing I'm gonna do
is I'm going to add a chin. If you wanted to add a chin
to your face in the front, you can you can just modify your jaw to kind of have
a bit of that chin. I want to add a bit
of a chin here. So I'm going to
make this slightly curved and then
make a slight curve here that I've set myself up for a curve for the mouth and
then occurs for the chin. So I'm gonna do the same
thing on this side. It's kind of like two-thirds,
1 third proportions. You'll notice that the
two-thirds 1 third proportion is very common when
you're drawing faces. And now for the mouth and
the follow this curve and just draw the center
line of the mouth. Then I'm gonna draw the bottom. Let's make sure it's curving up. I'm going to adjust the job because it doesn't
look the same. You want to make sure that
consistency is there, right? Especially if you want to be a character artist or
you're doing a comic. They'll also see more of the shoulder at the
three-quarter views.
7. Head Drawing - 3/4 Downward View: Now we're going to draw
the heads from the bottom. And luckily it's a lot easier. The three-quarter view
face on the bottom is relatively easy because you
don't really see a jaw line. It's more like this. You can see the ball. He's a little bit
distorted like you kind of see like the
bottom of the circle here, though it's a little
bit wider here. I'm a little bit narrower here. And then look at the
shape of the face. It's pretty triangular limping. So let's sketch that in again, we're going to draw
both at the same time. I'm going to try to match
the shape of the skull here, but it's going to be
on a bit of a tilt. So I just wanted to make sure
that I have the right fit. I'm going to draw
myself a little grid that aligns it really. Once I have those in, then I'm going to try to draw that distortion of the
skull, of the roundness. So remember it's a little
bit wider at the top and a little bit more
narrow at the bottom. So it's going to
dip below this line here of a strange shape. But if you think about the center line as
like doing this, a little bit easier to
kind of wrap your head around and once you
draw that center line, and then I'm gonna
do this same thing. So if you have a grid like me, you can just match
the negative shapes. So I've got a little triangle here and another triangle here. So we just want to match. Then draw the center lines. Make sure that that central
line is very curved. Because if you're doing
three-quarter view looking down, it's
pretty curved. You want to emphasize the
form as much as Ken's now, you're gonna draw the chin at the bottom there with
two little lines. And then I'm going to draw
the shape of the side of the chief which I
can modify later if I wanted to give it more
of the cheekbone here. Think about where the jaw is, kind of how you want to
lease it on either side. So I'm going to match the
ears. Actually yours here. On this side here, I wanted to try to make
them about the same. Remember your ears and your
nose never stops growing. So if you want to make
somebody look really old, then give them like
really big ears. Once you have the head shape and let's guess where
the neck window. The neck usually
goes behind the ear. Again, the shoulders would kind of start a
little bit sooner. Now let's try to match the nose. Here. You don't see the
bottom plane of the nose. We want to be a little
bit more aware of that. So I'm going to find the line of the eyes from the
line of the ear. Want to make sure that the
curves are echoing each other. These lines should be at least parallel or if not
in perspective. Now, what I'm going to
draw is I'm going to draw the triangle that's kind
of in-between your eyes. Then that's going to show
you where your nose. So I'm gonna make the nose
overlap a little bit. Now let's do the eyes. The eyes remember they're
going to curve down. So I'm gonna go a
little bit below this eye socket because you're gonna see
it as a triangle, but it's going to appear
like it's closed, even though the eyes are open because they're looking down. Also the eyebrows are also
going to curve this way so you can curve the ends
of the eyebrow down. But overall, the arch still needs to follow
the rest of her face. You just want to make
sure that again, your eyes are curving down. Your eye on the other side of the nose is born to
be in less wide. Basically, you just
have to keep in mind that there are curves on the face and you
have to follow them. These curves, whether
they're curving up, whether they're putting down the mouth should be the
opening of the most should be closer to the nose,
then the chin. You want to make sure that
the eyes share a curve. I have to edit the
ears because I want them to roughly align. I'm going to attempt
the ears one more time. You basically want to align it with the center line
that you're drawing. If you wanted to add a
little bit of shading, that's totally up to you. Sometimes I'd like to
shave the top of the ear was at the tops of our
ears are generally redder. So it just gives it a
little bit of depth. Just adding a very
slight shadow. Healthy introduced that depth
because usually next are in shadow on because the head
casts a shadow on the neck. A little bit darker.
If you wanted to also show trained eye lids. That's another area where there's usually a
little bit of shading. Then if you wanted to draw
this other circle here, you notice that this line
echoes the shape of the head, but it also aligns with the eye. So you can draw that
in if you wanted to, for your other other angles. Small, not draw that in
just for consistency. Then some people actually shade this line because our head
is a little bit flat. On either side. I can put over gradient
to kind of indicate that the sides of the head flatter. When I'm shading, I'm using
the side of my pencil. Slightly different texture. Okay, so I have finished my head drawing
in different angles. I hope that it wasn't too hard. Again, if you find
yourself struggling, that is totally normal. These heads are, It's
very difficult to do and it's the most difficult
to keep them very consistent. So just do your best. And if they look a
little wonky, try again. And then you can also
draw with tracing paper. If you trace your
head on one side, trace the better drawing,
and then flip it. You can also use a mirror. So if I hold up my
drawing to a mirror, I can immediately
see what's wrong with it. So a couple of tricks. You can hold your piece
up to a mirror or you can use tracing paper and
figure out what's wrong. You can also take a picture and cut it in half and then flip the picture digitally
and work from there. So if you are working digitally, it's a lot easier because you, it's kind of flipped the image. But I do prefer if you
try your best to draw it. I hope that was helpful and I will see you in the next lesson.
 Winged Canvas, Classes for Art Nerds