Transcripts
1. Introduction: Hello and welcome to easy
drawing cute and cartoony cats. My name is Krista and I made a fun and easy
course for you. Here are some of the
things that you will learn how to draw
using basic shapes. What makes cats
cute and cartoony? How to relax and be playful. Draw 11 cats in different
pulses and situations. How to enhance your drawing
skills in an easy way. And tips for developing
your confidence. Also, drawing cute
and cartoony cats is like two gifts in one. Learning a new skill and be
very happy at the same time. That is hard to beat.
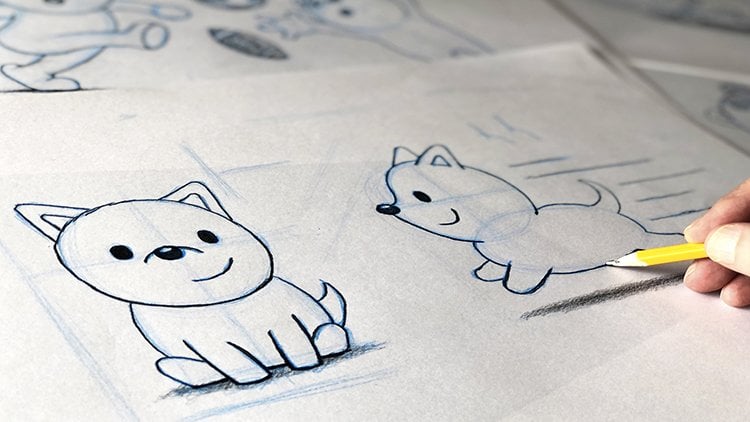
2. Simple Cat: I thought we will start by drawing a very
simple cat front view. We will start by
drawing a simple shape, a circle looking
something like this. We will draw a guide
line in the middle here, and another guideline
in this direction. Then we will use half of the circle to see how
big the body will be. So we'll draw another line here. We will make a little box
looking something like this. It's a little bit smaller
than the width of the head. When it comes to guide lines, lines don't worry if
they are very rough, If they are tilted a little bit or a little bit
crooked in the end, when you finish your drawing, it will look very good. Why we place guidelines
like this is that it's much easier to have
reference points where, for instance, place the eyes, the nose and how big
certain things are. We're going to use this
guideline for placing two eyes. Go ahead and draw two circles, one on each side of the
middle guideline there. Now you can use this
guideline to place them approximately the same
place on each side there. We can also go ahead and define eyes may
be a little bit better, we'll see what we're doing, something like that, and I don't have to be exactly
the same size. Then we will leave
a little bit of a room here on the top of the eye as she shade the
rest of the eye slightly. Why I leave a little bit of room on top here
is that it gives the character a
little bit more life with this little glimmer there. Now we have drawn the eyes. We can have another
little guideline here, and this is where we're
going to place the nose. The nose will be a triangle,
looking a bit like that. And then we will draw two
curved lines up to the nose. The cat is smiling. Yes, that looks good. It's always nice to
draw a happy character. Now we can completely
the headline, I worry if the head is
a little bit wobbly and it's not a
100% round circle, it will look cute Anyway, we can also use this
point, the guideline, to draw two lines out on need side hair that
is in the middle of these two points and
these two points and we're going to use
it to place the ears. So go ahead and draw a triangle. Then we will have
another smaller triangle to show the inner
shape of the ear. Then we can go ahead and do
the same on the other side. Up like that and up like that, there you have your
first cat head. Now we can go ahead
and do the body, and instead of
having the squared, it looks a little bit strange
when it comes to cat, we will draw a much rounder form starting from the
head stair to where the guideline meets
the head round shape. Then you do the same
on the other side, looking something like that. When it comes to, if
you feel the line is not 100% what you want to be, just use your eraser. It's your best friend. Remember this, that you're not after drawing
something that is perfect. This is just an exercise. So feel free to be draw as many crooked and
wrong lines as you want to because it's just an exercise and this
is about learning and not Making a masterpiece. We're going to put some
front legs here to you and we're going to draw them and using this
middle guideline to draw them on each side. If you have a problem
to find the same width, just use your pencil and you'll see that they're approximately the same
size, the same width. And we're going to make the corners a little bit
around there on each side. Here, the same here. You can draw as many
guidelines as you want to to see that you are placing each line approximately the same place that
you want them to be. Now we can complete
the line where the cat, the cat is sitting. Yes, I think we should put a
little tail on this one too. And we will draw
it out here from this side, not all the way down. We will leave a little bit
of room there and draw a quite fluffy tail looking
something like that. Big band up. I'm trying to make this area a little bit
wider than this area. You get a very nice
fluffy shape to one side. Of course, we should put
some whiskers here too. We can place them
either in here, but when you have a lot of details in the face
and not so much rooms, it's always good to move them
a little bit outside here. Go ahead and draw three
whisker lines on each side. Looking a bit like
that, I try to make the top whisker
longer than other ones. There you go. There's
a very good start. And I have to say also why I use a blue pencil
to start with it is that I just want to
sketch around and find the lines and draw as many
guidelines as I want to. Later on, I will use a black
pencil to define the lines. If you don't want
to do it this way, you can start straight up with a black pencil, it's no problem. But I recommend you to at least try it with a colored
pencil to start with. Because when you have a rough
sketch in the beginning, it's so much easier
to go ahead and find the lines that
you're looking for when you're
using black pencil. Later on also, you can leave all these blue lines to see what you're
actually been working on. It's almost like you're
drawing a little bit of a blueprint and
it's like a memory, a reminder for you to see
what you have been doing. It. Nicer way to learn a new skill when
it comes to drawing. To see your progress. I started to complete the
headline and then do the ears, and now we're going
to do the eyes, trying to make them
as round as possible. Then we're going to make
sure that we are leaving that little space
of light there. And then we're going to do
a little bit of shading here when it comes to making things looking cute. It's good to have in mind that things that are very
round when it comes to shapes like a round head and big round eyes is very good also that the
proportions of a character, if you have a very big head and very big eyes compared
to the rest of the body, makes it much more acute
when you're drawing, trying to keep
these proportions. If you want the
character to look cute, I will do a shading in
the other direction also. This is if you want to have your shadow even and you have a
problem with that, you can start by shading it in one direction and then you
do a cross shading later on that should make it
easier for more even look. We'll do the same
with other too. Don't worry if the shading lines are going outside of any
lines. It doesn't matter. It will be as you,
that is noticing that when you
complete the drawing, all those little
things fade away. It's going to make sure that I, strengthening the
line, les around eyes. We can go ahead and do that. Little nose, happy mouth. Always nice to draw
happy animals. They should make you smile
too. And the whiskers. And then we have that
fluffy round body. And those little very
simplified front paws here is something
that you can do. Also, if you want to add
a little bit of detail, just draw two lines on each paw. And then you get
some tiny cute toes. Then the tail, Yes,
that looks good. You should also strengthen the
lines underneath the feet, underneath the cat, like this. This is a way to connect the
character to the ground. You can also do it
just a little bit slightly on the tail. It's not so heavy, you
don't have to overdo it. You can always attach a character by drawing
stronger lines underneath it. We know that it's
connected to the ground. Another thing we can do
is to do a little bit of shading to draw a shadow. It's another way to make
sure that you know that the character is
placed somewhere. You can destroy us. A little bit of a little shadow around
the body like this. Then we can shade it gently as with the eyes. Don't worry if the shade is
crossing some of the lines, it will look okay in the end. I'm just making sure
that the shadow is the closest to the body. It doesn't have to be
a very strong shadow, a little bit like this. It can be as many crooked
lines if you want to. We can also draw
some stronger lines when it comes to the pulse, and this makes it pop out a little bit from the
rest of the drawing. The same, can we do, we can strengthen the lines
underneath the head slightly, something like that. Now, the head should
be popping out. If you get a little bit of
too thick lines or whatever, just go ahead and erase
it and re draw the line. Just be as relaxed as possible. Think of, that's very
funny lesson to draw. And don't take it too serious because when you're relaxed, it's much easier to learn
and it's also much more fun. There you go, your first cat. Very simplified, is just starting with the
ball and then we made that little box
and a very round shape. A good work. And see
you in the next lesson.
3. Balloon Cat: The next cat I thought
we will do will be of let's say a balloon
in shape and it will be more from the side. We're going to start to draw, let's say squashed
balloon maybe, but more like a rectangle with very soft edges,
something like this. This is as I discussed
earlier also it's very nice that you
have a colored pencil. And you don't put
so much pressure on it that you can search around and try to be very playful and find the
lines you're looking for. There's the shape of the body. I will start with the back
here using that soft line, and then we will go down and draw the first
leg here in the back. Looking a bit like this. Now when we have placed the leg, we will also draw a guideline for where the other legs will be
connected to the ground. Also, we can do a, another
guideline for the middle of the body also that is
parallel with the ground line. Then we can have the
other leg in front here. And it will be also angled
a little bit like this. And we're going to draw it about the same size as the other one. Yes, we can draw the belly line here using the outer
shape of the balloon. And I think this line will be the leg will be
as the little bit on top of the belly line? Yes. And then we can draw the
underside here, up there. And then we will have
the other front leg angled about the same
as the other run here. And then from here we
will have a round, nice shape going back up into the top side of
the, the balloon shape. But we will continue over this line since
we're going to have some very nice ears here for the cat looking a bit like this. And then we can draw the
top of the head there. And then we can draw the other ear triangle shape. And then we can go ahead and do the rest on the top of
the back of the cat. I'm not going to complete
these two lines. Got a little bit
too bulky there. I'm not going to complete
these two lines. I'm just leaving a little
bit of room because we're going to draw
the tail there. Later on we will start
up here and then we will do a little zig zag shape on the same, on the other side. Nice flowing tailor. If I get too many
double lines or there some lines that I
have no use for, I can ask erase them. As you see, I'm not freaking out if I have to redo something. It's never about doing
something that is perfect. It's always about
searching for what you're looking for
and just trying to find that and making sure that you enjoy the process
of looking for that thing. It's also important
that you don't take yourself too seriously. Go ahead and laugh about
what you're doing. Now, we're going to
do a little bit of a middle line like
we did for this cat. But since the head is
a little bit tilted, this line will follow, Follow this line there. You have the guideline
when you look at, slightly from the side. And we're going to use this
guideline to place the nose, and it will be a triangle as we deal with the lost
cat looking like this. Of course, we should
make it happy, even have an open mouth. And I'm just going to angle the mouth slightly so it's
following this guideline. Yes, I think instead
of having open eyes, maybe this cat is actually
having closed eyes. And we're going to make
to both like this, seeing that the cat is really
happy and playing around. And I got another
double line there, so I'm just going back
and erasing it slightly. Yes, that looks good. Then we can draw some
whiskers in this time, I'm just going to draw two whiskers on each
side of the face here, looking
something like this. Lastly, we shouldn't
forget about the F here, and it should be
somewhere around here. Just go ahead and
as with other legs, just make them a little
bit angled like this. And you can also
may be shaded just slightly to show its
status on the back side. Then we should add just
a little bit of shade here connecting the
cat to the ground. When it comes to my lessons, I don't want to force
you to do anything. I encourage you to
try different things. And if you really
feel that shades or shadows are not
really your thing, you don't have to do them. I'm just asking you for
at least to try them once and see if it works
for you in your drawing. Let's go ahead and define the lines with the black pencil, starting with the back leg here. Then we can do the front
legs, then the belly. I'm taking care of a straight cat and she
doesn't want to live inside, she always wants
to live outside. Even though when it's
minus, it's cold. In the summer she looks quite
a lot like a normal cat, but in the winter
she eats a lot. Let's say that she has a
shape shoff and she's very, very cute and very stubborn. There you have the body
and let's go ahead and do the, the tail. When you're drawing,
you don't have to draw with a single line. You can draw with a bit as many small
lines if you want to. Let's do what? This feels
more natural for you. I will encourage
you to maybe draw with smaller lines
in the beginning. It gives you a little
bit more of a control. Let's go ahead and finish
the eyes and the nose, then the mouth, and then
we will shade this part. Don't try to shade
the mouth too much, though it shouldn't be taking
over the picture too much. Most important lines up a
little bit too wide there. It's more important
that you have a strong and high
contrast around the eyes. Too much focus
going to the mouth. Then we have the whiskers. Yes. Then we can do a
little bit of shade there too, not too much. We can have just a
little bit of shade here underneath the cat, here on the ground,
placing a nice shadow. It doesn't have to be
a very strong shadow. Just make sure that the
strongest part is underneath the body and not strongest
on the sides here. Then we can connect the cat with a little bit
stronger lines. Also, we can do
stronger lines here. I just want to say to
you that when it comes to lines that are overlapping, is that if you have a line like the back
leg looking like this, this works very good. But if you do the line
crossing like this, it's very hard to
read the drawing. Actually, it's better to, to have one line that is overlapping
the other one because this is a way to describe that this leg is on top of the belly, the same as the back
line of the cat. This line is on top
of the tail the same. These two lines are
just connecting. So they are on the same place. But this line here is
underneath the belly line. Because if you draw too many interconnecting or
overlapping lines, it's very hard to
read the drawing. It's just something to
think about. There. We have a side view
of a very happy cat. Good work. Can see you
in the next lesson.
4. Snowball Cat: The next cat. I thought we
will do it a bit like this. That is a little
bit, you see it, a little bit from the side and it will be
sitting this time. As with the first cut, we will start by drawing a
big circle for the head. Looking like that, we will have a guideline
for the middle. Then we will take half of this, half of the circle and go down here to see how big the body is. This body will be quite fluffy and it will
be quite round. Let's go ahead and draw big
round, nice shape like this. And also the same
on the other side. This line will be a little
bit longer than this line. It's just to give a little bit of variation into your drawing. Also, when it comes
to the bottom here, we will have to the
bottom log like this. Imagine that it's almost like
you put together pieces of a snowman as we did
with other cat. Here we will do not just a
straight guide line like this, we will have following
the outer line, since we're seeing the cat
slightly from the side, then it's going to do
the same here with the lower part of
the body there. You have the guideline for
this cat as we talked earlier. Also, don't worry if
the guidelines or any of your lines look a bit crooked or they are
a little bit tilted. It will look good in the end. When you complete the drawing, let's go ahead and strengthen
some of the lines here. We see what we're doing, something like that. We're going to use this
guideline to place the eyes, and we will make
some nice round eyes here and leave a little bit
of glimmer on the top there. Since we are seeing
this cat from the side, just imagine that when
you're tilting the head, this eye will be
quite nice and round. But the other one that
is on the back side here will be more like an oval shape. It's not quite as
round as a circle, it's more like an oval shape. You get a little bit
of perspective there. We can shade ice there too. Just making sure that you leave that little spot of
glimmer of light. Then we can place the eyes, we're going to place the nose that we're going to use the eyes for a guideline and then we
can place the nose down here. We will continue
to use a triangle, but it will be a little bit
softer edges this time. And then of course
it will be smiling. Strengthen some of
the lines here for the eyes looking like that. And then we're going to
place the ear and we will have it somewhere around a par. I wonder if we should do a
little bit different ears. We can have them more of band line going
out to a point there. Then we will have
the inner ear shape here following the
outside lines. Now we can complete this line because the other ear
will be on the back side. Let's go ahead and move the
sky slightly as you see. You can always go back and
move things and change things as much as you want to just because you
have drawn something, it is not set in stone. So we will have
another ear here, also with slightly bent lines. Yes. Erasing that
little double line. Yes, it looks very cute. And then we can go ahead and draw some whiskers for this cat. Going to draw three this time. I just want to make
the top one the longest I have to
actually erase these. I'm 100% sure that you
will remember them from last son because I thought we would put
out the tail here. It will look a bit like
the first tail we drew. It's not going all the
way down to this line, so there's a little
bit room there. I'm drawing a big fluffy end and going back a
little bit narrower. Yes, look skew. In this case we're not going
to place any legs for it, so it's a little bit different. Look, you see that you can make your
character very clean and you can actually
leave certain things outside of your drawing
and don't have to draw exactly
everything every time. Let's go ahead and
define the lines with the black pencil. I'm going to start with eyes, making sure that we have nice lines for the eyes here. This is to make sure that the first thing that you
look at in the drawing is where the highest contrast
is, the strongest lines. It's always nice
that you start to look at the character
in the eyes. It's a bit, when you
look at a real cat, it's very nice to look at those big beautiful
eyes they have, see what's going on inside
of them if they're happy, and maybe they are a
little bit mischievous. Maybe they have played
around and made a mess and just trying
to look innocent. I had a cat that
didn't say anything. Actually, it was
very, very quiet. The only time it
meowed was when it was it really had to go to
the toilet and it didn't want to go on the toilet inside. It always want to do it outside. And it has hadn't been to the bathroom for
quite a long time. And that was the only
time it said meow, but in the beginning, we could have it in the bed
so you can sleep with us. But sadly, my girlfriend
got a little bit allergic. He knew it couldn't be in the in the bedroom and in the bed. But sometimes you knew it
snuck in there and one time, one time it was in
the bed and we caught it instead of just running away or
complaining or something. But it did. It
played dead there. And just pretended to be
completely, it was so funny. I love cats. They always have a very great personality.
Sorry about that. I'm just going to say that
I'm just completing the body here as we have
discussed earlier. Also, don't worry if the
lines are a little bit crooked and they may be a little bit not going 100%
where you want them to be, but don't worry about that. Either you erase them
and you redraw them, or you just leave them there. The next time you're
doing this drawing, they will look so much better. I will encourage you to
save all your drawings. It will be like a
track record of what you're doing
and you can actually see that you're getting
better and better. It helps you and encourage
you with your drawing skills. I'm just going to strengthen
some of the lines here. I will strengthen the line here. Here you can see that it's popping out a top
of the headline. And I will do the same here. I will draw just a little bit, I got too much of a double, a stronger line as a stronger line here on
top of the other ear. And you see that the other ear is disappearing a little
bit in the background. Then we will draw a
little bit stronger line on both sides here. That means that the head is on top of the body. We
can do the same here. A little bit stronger line
here over the tail lines, showing that the body
is on top of the tail. Even though we don't
have any feet, anything strengthen the line
here underneath the body, showing that this
little cute creature is connected to the ground. I will add a bit of a little
bit of a shadow here also. The story I told you earlier is something you
can think about. I don't know if you own a
cat or maybe a friend that has a cat or maybe you have a favorite cat that you're following on the internet. Just trying to find
some personality things that is going on with that cat and incorporate it
in your drawings. It will help you
a lot, trust me. The same thing goes
when it comes to names. Try to name your characters
as often as possible. It will give you
some extra detail. Usually something that
you're not been thinking about will pop out and you
can add it to your drawing. There we go, a
little bit of shade. I'm just making sure that the strongest parts are
closer to the body. There you go, your first
three cats based on very simple shapes,
looking very cute. I will ask you to
show your drawings. It's the best way to
draw your confidence. Show your works to
friends and family, and post and share your drawings with your fellow students. Because when your
confidence grows, it's so much easier for you
to learn new drawing skills. Good work and see you
in the next lesson.
5. Standing Cat: Next up, I thought we will draw a cat that is standing up. And we will start by drawing a heat that is not perfectly
round like a circle. It's more like a novel shape, looking something like this. Then we will have a guideline. Remember you can be as
rough as you want to. We will have the body and
it will be the same height, approximately as the head,
looking something like that. And then we will have two
guidelines on each side, forming a little
box for the body. Another guideline for
the middle of the head. There we're going
to define the head. And the head is going
to be a little bit more square, so to say. In the lower parts here, it's almost like the cat has cheeks that are quite going
down towards the body there. I think I was a little bit too generous with the line there, so let's go ahead and
go back and erased it. Then we're going
to draw two ears and there will be a little
bit drooping down slightly, and then will do the same
on the other side of the head, slightly drooping. Then we can continue to draw
the top of the head here. Nice round shape? Yes. We're going
to place two ice. Going to place them
on the guideline, one on each side here. They're going to be
round and we're going to draw the eyes completely
black field in like that. And then I'm going
to place a mouth. We will place it here
in the middle there, following the guideline
to ban lines like that. And I may have a
mouth that is open. Let's go ahead and draw a
novel shape down there. And then a little shade, maybe you start to recognize
this little fellow from, from the Internet. Probably do. We're going to draw the
body and we're going to use the guide line on this side to draw
a nice round shape, going up to the headline there. Then we will have a round shape for the leg going up
just a little bit. And then we'll draw
a little belly line. Then we will do the same
on the other side here. Draw a nice round shape
up towards the head. Nice round shape of the leg. We will do is we will
do a little bit of an overlap overlapping
line there, just showing that we have a bit, that the bodies may be
tilted slightly to one side. This is just to give a
little bit of variation. I think this cat will
be maybe a little bit shy or maybe it's
anticipating something fun. We will draw the other
front legs up here, and it's going to touch the guideline in the middle there. And I'm going to do the
same on the other side. This hand or arm will be just slightly
over the other one. The cat looks maybe a
little bit shy and maybe it's doing something a little
bit nervous with its hands. I know children can do this sometimes also we
will draw a tail. And it will be not going up
completely from this line, so just a little bit higher up, it will be a little bit wider here in the
base than in the top. Yes, I think this looks good. Let's go ahead and define the
lines for the black pencil. And I will start with the eyes, drawing them very black
high and nice contrast. Don't do the other eye. Then then do the mouth. And then shade the
mouth and make sure that you don't
shade it so strong, it's not going to be
as strong as the eyes, so be a little bit
lighter on your hand. We can do the outer
shape of, of the head and continue to be as loose and rough on your
hand as you want to. There you have the
other. I am here. As you see sometimes I don't
follow the blue lines, I'm just finding a new line
that I feel is better. You don't have to be super strict to follow
your first rough. And then they have the body, that little little belly. Yes, we can draw the tail and those little
anticipating arms. Yes. Looks good. Then we can add a little
bit of shade this time. We will not shade all
the way under the body. We will do a little
bit of shade where the legs are
touching the ground. Just a little bit on each side. Just make sure that
the strongest part of the shades or shadows
are closest to the body. Then we will strengthen
the line here. Also to connect the
little kit to the ground, I think I will just go ahead
and strengthen the lines here closer to the mouth. As you see, you
don't always have to draw everything
that is on the cat. This time we left out the nose and we are not
drawing any whiskers, but you can still recognize
that it is a little cat. Remind yourself that you
can always have a lot of different variations when
you're drawing good work. And see you in the next lesson.
6. Dancing Cat: Let's continue with the same de, so this time I think it will be a
little bit more playful. We can start by drawing
the head again. This time I think we will
angle the little bit. We tilted a little
bit to the side, we will have a guideline. Now this looking like this for the head there you have the rough
lines for the head. The body will be the
same ***gth as the head. And we're also going
to draw a little bit of a guide line down
from this line. It's going to help us
to place the first leg. Imagine that you have a
line going down like this. The long flowing line go up a little bit like this. And then we will have
the other leg and it will be drawn up like this. So go ahead and draw a bent
leg looking like this. Then we're going to have a
very nice and long shape here for the back of the cat, the other side of
the, of the body. And I got a little bit
of a double line there, so I'm going to erase that, making sure that it's
a little bit clean. It's easier to read the drawing. Yes, it looks nice. Now, we can go ahead
and draw the head a little bit better. Yes. And the other side, having those heavy cheeks and will draw about the
same ears for this one, it's a little bit drooping. Not a lot, but
just a little bit. And do the same
on the other side here as without the drawing. Don't worry if the ears are not the same shape
or the same size, it will look good in the hand. Anyway, once you have
completed the drawing, everything will fall together. And we should also eyes
placed on the guideline, there being nice round shape. Then we will have
the happy mouth. Then we will have
the same open mouth, looking a bit like this. Yes, let's go ahead
and draw the arms. And the arm will start
somewhere up here. And then we will be bent inwards and going back out again. It's bending its
leg or front leg. I should say these cats
are quite anthropomorphic. Maybe it's better to say
that it's bending its arm. Now we can complete
the line here. If you have some lines that
you feel are disturbing you, we'll go back and erase them and clean the
drawing up a little bit. Now we can do the other leg too, a nice round shape there, and then the butt on the back of the cat, somewhere around here, we will have another
arm and we will have it stretch outwards, slightly down and
going back up again. It's a nice flowing line like
this, something like that. We can go back and
erase this line also. It looks very cute. We can go ahead and find a lines
with a black pencil. And I will start with the eyes. When you're drawing a character
like this that is very clean and you feel that there's something you
want to add, please do it. I mean, if you want to
add a nose on this cat, just go ahead and
try with a dose. A triangular nose or a big nose, or a small nose,
just play around. I'm 100% sure that you will find a very
interesting design, a very nice character. There you have the
mouth, we will just do soft shade, not too strong. And then we will do
the outer part of the body, the ear. If you feel that your lines are getting away a little bit, just go back and use as, try to stay as
relaxed as possible. And just being in mode of flow and thinking everything is just fun and exciting
when you're drawing. Because this is not
any school exam, it's just experience
and a new skill. And just being very happy to
learn something new there. You have the legs, the
body, and then that arm. So this is a very, very
nice playful dance, struggling around being
very happy and playful. We should also have a bit
of a shadow for this one, and I'm not going to
connect it straight up here because it's going to be a
little bit up in the air. I'm just going to be doing a little bit of oval
shape underneath it. Slightly like this now We feel that it is
high up in there. Skipping along as you
did when you were a kid. Or maybe you are still a kid, I don't know the age of you, so maybe you're still in that mode that
you can skip along. It's a great mode to be, as with other shadows, to make sure that the middle
part is the strongest. You don't have to
draw it super strong. It's just indication that
the cat is up in there. I think I will go back and strengthen the mouth
again a little bit, maybe a little bit
more on the ice too. When this drawing, I
think we will leave out, we will leave out the tail to get it in a more
cleaner shape. But if you really
want to add one, draw a wild and
crazy tail there. When it comes to the
composition of this one, it's very good that not all of the legs are
looking the same. This leg is nice and
long and stretched, and this one is bent up on the same sign as the bent up leg is that you have a long
and nice flowing arm. Where you have that
stretched out leg, you have a bent arm.
You're mixing matching. And give me a little
bit more variation and also a little bit more
tension into your drawing. It's always nice when you have something that
are in motion, is going to strengthen a few
of the lines that we see that this leg is on
top of the other leg. We can do the same here. Also strengthen the
line a little bit, just making sure that
there's some strength and tension to the chin. I'm going to go back
a bit to clutter. When it comes to smudge
marks, don't worry about it. Just leave them as they are. If they are maybe a bit too intrusive into your drawing,
you can erase them. But just remember that this is just a fun and
playful exercise and you're not doing an exam or
you're doing an artwork, it's just playing
around and having fun. There you go. One
playful dancing, happy cat, good work, and see you in the next lesson.
7. Resting Cat: Since the cat had been playing around a lot, the last exercise, I thought it will be a
little bit calmer this time relaxing on the pillow. We're still going
to tilt the head a little bit since it's going to be resting
on a pillow here. Will draw a head with a little bit of a
guideline going like this. And the another
guideline up here. Yes, from here we will
have a body that is about the same ***gth as the body on the head is about
the same ***gth as we've done with
the other Ts here. Where do from here we will have a nice long line flowing
back up into the head. So let's go ahead and draw a
nice long curve like that. Then we will have
two little legs, then a little belly, and then the belly
going up like this. I think this leg got a bit, maybe a little bit too small. Let's go ahead and
add just a little bit more to that leg and then let it go up
into almost the body. We're going to leave a
little bit of room here because I thought this
little kitty will be maybe scrolling on
his or her mobile phone. We can do the shins for
this one approximately. Can draw a line all
the way around, almost going to place
the ear there later on. But this time we will
place the ear on the back side when it
comes to this cat. So let's go ahead and
draw one ear here. I think I will erase a little bit of line
there on the other side. Something like that. I'm just variating this
drawing a little bit because I wanted the head to feel that it is a little bit
turned to this side. So that's why I draw the ear, it's overlapping going over the other ear and this one is sticking out slightly,
but not on top. Down here, I think I will
move this guideline slightly, just little bit slightly, turning it more to this side. Before we draw the
facial features, I thought we will
draw the mobile phone and it will be a rectangle. That's a little one. I don't know what model of
phone you are having. Maybe you have a very
special mobile phone so you can add it to. I have a very old phone, so I only actually
have one camera here. This kit has a little
bit more than one. It has two cameras. I believe we just a
little bit of room here. There's some room between
the head and the arm, and I will just make
a little band here. Have the cat holding the phone. It will cover the
corner of of the phone. Let's make sure that you
leave a little bit of room. Because when you
get too many lines going into the same
place like this, it's hard to read the drawing. It's better to leave it a
little bit more of them. Can also erase the
line a little bit from the mobile phone, cellular phone or
whatever a phone is called in the country
that you're in. Now we can draw the
other hand and arm, So you have in the middle
here of the phone, I will draw a curved
line going like this. The same curve line
going up like that. The arm will be a little bit thinner appear than
it's down here. And also, I will erase
maybe a little bit of the side of the head there, leaving a little bit more room. Yes, that looks good. Well, we can draw the rest of the body when it comes to cats and the rest, but I understood is that they're not sleeping
like us humans. They sleep quite light. They wake up quite often. And that's a reason why they are in rest mode so
many hours per day, especially when you have
been playing around, you need a lot of rest. Let's go ahead and draw
the eyes on this kitty. Two round circles
on each side there, and then a little mouth. This time we are not going
to have an open mouth. It's more relaxed. Maybe we can put out some eyebrows for this
cat when it's browsing. Maybe it's on Instagram, scrolling on cat pictures. I think that looks good. We can draw a tail also. We're going to have it, not
the same angle as this one. So let's go ahead and draw it a little bit
more straight down, looking a bit like
this line got the way there, there you have the tail. Lastly, we can add the pillow, and I have to
actually erase this, a little reminder there, because the pillow is
going to be quite big. I will draw some lines
going out like this. A nice flowing line going
up into the ear there. Something like that. And then we can do the
same on the other side. And we can start
somewhere around here doing a nice
flowing weaving line Going back into the head. Yes, let's go back and clean
this line up slightly. That looks good to give the cat a little
bit more of a weight. We will do some shading
here on the pillow, it will be a little bit
on this side of the head. Then we will have some shade here under the body,
going up to the head. It doesn't have to be
a very strong shade, just a bit showing that
it's very comfortable. Let's go ahead and define the
lines with a black pencil. And I will start
with the mobile. And maybe your
phone has a sticker so you can draw the
sticker there on the phone if you'd like to then draw the arms on on each side. Don't continue with
the rest of the body. I think it's time to
sharpen a pencil. So hold on. It's always nice to have a
quite sharp pencil. So let's go ahead and
draw the head here. I can say that I'm a bit of
a dinosaur when it comes to mobile phones and
social media, et cetera. I got my first Smartphone when, when I was about
40, is quite late. I'm still trying
to catch up with everything that's
going on out there. Hopefully, one day it
will be quite close to what most people are
doing on the Internet. The eyes and eyebrows. Of course, cats don't
have eyebrows as we do, but it's always a nice thing
that you can add to drawing. You can make them
look like this. That is maybe a little bit
almost sleepy and relaxed. Or it can be turned inward, looking concentrated or angry. And they can be high up or low. When you're redrawing this cat, try to draw different sets of eyebrows for it and see
what happens to it. It's a nice tool to change the appearance of your
character and the mood. There you have the
pillow. Then let's go ahead and draw the shade here. It doesn't have to be
a very strong one. Just a little bit the same
thing on the other side. Maybe make this
line a little bit more strong as usual. Don't worry if the shadow line is crossing any of
your other lines. It doesn't matter. It would look good in the
end when you finalize the drawing and you can go forth and back and see how strong shadow
you want to have. Let's make sure that it is quite the strongest,
closest to the body. And we can also go back and strengthen a few
of the lines here holding a little bit more
strength on the mobile phone here you see that the one is on top of
the other hand there. Very relaxed Kitty. Of course, it's possible to add
more shadow here where the pillow and legs
are on the ground. But I will leave it
like this because when you're adding a bit
too much to a drawing, it loses the focus of what
you really want to portray. In this case, it's
very nice to have this very nice lazy cat with two legs sticking out,
being super relaxed. There you go, three little
kits in different modes. Good work can see you
in the next lesson.
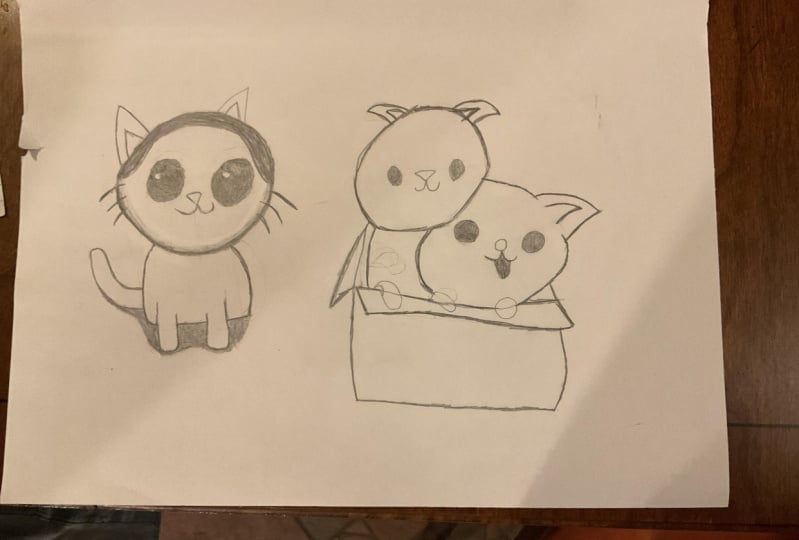
8. Two Kitties In A Box: The next drawing we will do
will be two cats in a box. We will start by drawing. Perhaps they will have about the same design
as the last cat drew. You have an oval shape. There will be angled
just slightly, a little bit to the side,
not a slightly like this. Also we will have
another guideline. It will not be straight
in the middle because it will be looking slightly
to this direction. There we have one head, and then we will draw the other head. And it will be angled
in the other direction. It will have the same
shape as the last one. Looking a bit like this.
We can another guideline, we'll put it just
slightly higher up. Then we will have the middle. We will have the middle guideline
somewhere around there. So now we have the two heads. And then we will
see we will have the box about the same
height as this head. Let's go ahead and draw a
little guideline down here. That will be the bottom of
the box they're sitting in. Then we will have
two little hands here on each side of the
guideline for the head. Then we will have another one here, looking
something like this. Now we can start to place
the top of the box, a straight line here. Then we will just let one of
the cheeks go down a little bit because we wanted to drop
over the edge of the box. Then we will just contain
a line out there. And then we will have a line going in behind the head there. For the other cat, it will
just have one of its hands or paws on the box edge here,
looking something like this. And then we will continue
the box line there, and then it will go out
somewhere around there. A little bit too much
of a double line there looking
something like this. And then we will just draw up a little bit of that cat's
body up into the headline. We can draw that headline now, not so much higher up here, because we will draw
the airs later on. I just want to see where the body and the
heads, et cetera, are. First, we can define hoops. We can define these
lines a little bit better as we have
discussed earlier, Don't worry if the lines are a little bit
wobbly or crooked. Everything will look good once you have finalized
the whole drawing. Now we have the body
for the second cat, and now we can put a
little corner here. And then we will draw
a line up up into the, we can do is called
flaps, I think. So for the box. Just want to make sure that this line is not going
all the way out. So I will angle this box
flap line a little bit more downwards, the long line. And now we have one of the flaps there and then we can draw the edge flap also sticking
out a little bit like this. I'm making sure that I don't put too many lines
in the same place. Just leave little space here, in a little space there. Now we have the flaps
and the corners. We will draw a little bit
of a bent line here too. Have some variations to the lines for the
box going up there. Then we just imagine that you have a little
line going down here. It's also a little bit bent. Now we can draw the
bottom of the box. Yes, I'm not going to do the flap on this
side because I don't want it to be too many
details around here. The best focus will be
going up into the heads. We will continue by drawing this cat and it will go up and around something like this. And I will just make a little
bit of adjustment there. Draw the ear, and it's going
to be a little bit droopy as with the previous cats there. Then we can draw the inner ear looking something like this. Then we will to eyes and we place them on the,
on the guide line. Still doing that round
and black eye design. You have the eyes and now
we're going to draw the mouth. As I discussed earlier, we will add a little bit of nose shape for the
ones, not just the mouth. And I will make a round
nose for this cat, then have these two happy
lines going up into the nose like this. I think I will let the mouth be open and shade the
mouth slightly. Yes, I'm not going to draw
any ear for this one. We just imagine that the
other ear is tucked in when the other cat behind it and maybe they are
snuggling a little bit. We can continue this
line up a little bit, then we will draw an ear, will look a little
bit different. Moreover, a curved line up
into a point not to drop. Then we can finalize the
top of the head there. Then we can go ahead
and draw the ice. And I will start with this one. I know approximated that
there's some broom here, and there are another eye about the same ***gth from
the guide line in the middle. Yes, this cat will have a triangle nose
looking like that. Of course, it should be smiling that yes, it looks very cute. There you have two cats
snuggling in a box. What I understood why
cats like boxes so much is that they feel very
secure and safe in the box. It doesn't matter, they don't
think about how big it is. Even the lion will try to get this huge body
into a small box, and it looks really,
really funny. Let's go ahead and define the lines with the black pencil, starting with the
nose and the mouth. Then a very gentle shade, not too much pressure for
the mouth and then the eyes, making sure they are nice
and round and black. Yes, looks good and on the head, don't worry about
the lines being wobbly or crooked
or anything else. Continue to draw and have fun. I think you have realized by now when you have
completed your drawing, that everything falls
together and it looks good. There I have the air
that is sticking out, We can actually do the box. Now, the stray cat I'm taking care of, I built three houses
for her in wood, but she doesn't like them. What I have to do
each winter is to build a house for her
out, cardboard boxes. So she loves this
material quite a lot. And I give her some blankets and also I have
warm water bottles for her and it's
very, very cold. She's definitely a box cat. The only time she came in, it was it was below 20 degrees and it was
really, really wind. And that was the only
night she has been inside for what is
five years now. She is the boss, she doesn't
like to live inside. I think she has a very
good life outside. Now, I'm completing
the second cat here, ending with the nose. There you go, two
cute cats in the box. I'm just going to
strengthen the line down here to make sure that we have some weight to the box that is grounded to the surface here. Lastly, what you can do if you want to is that to
get a little bit of variation in this drawing is to shade this cat a little bit. Be very ugly on your hand to see how much pressure
you need to have. I'm starting with a little
small area to test it out. Now I will just do the
rest of the cat here. You can be as rough as you want to try to be quite light on your hand so you
don't make it too dark because you can always go back and add some more
pressure later on. But it's hard to make it lighter than
the only option is to use the eraser there. You have a little bit
of a light shade, maybe I will just make it
slightly, Slightly darker? Slightly, yes. I think that's good enough. As I usually do, I prefer to have some shade to the bottom of the object
that is touching the ground. So I'm just going to do a
little bit of shade down here a little bit. That's the same with this cat. I will be quite
light on my hand. I'm just going forth and
back until I'm happy with the strength and the size
of the shadow as usually. Just make sure that the
shadow is the strongest, closest to the object that
is touching the ground. Something like that. I
think this looks very good. Two cute cats in the box, probably having a
very good time. Good work. And see you
in the next lesson.
9. Cheek Poking: The next drawing will
also be a cat in the box. We will start with
the head again. We'll be somewhere around here. More of an oval shape
than a complete, so round circle
looking like that. And then we will
have a guideline, two guidelines for
the head like this. And then we will take the heads and measure how
far down the box will be. The box will be
somewhere around here and maybe at a slightly
bigger than the head. But we will start by drawing some facial
features for this one. First I think I will continue
to draw that round nerves, happy mouth we've,
but this time it will be a little bit more narrow and you will
find out quite soon. We will have two eyes here. I will draw them very lightly
to start with like this. And then we will
make a little B line crossing over the eye
and not too long, a little bit shorter like this. Then we will have the eyes
sticking out like this. It's the A covering the eye slightly. And soon you will find out why. We'll draw the top part of this head first and
this time the ears will be more alert, sticking
out like this. Do the same on the other side, there is coming up
somewhere around here. And of course, you
can do as many guidelines as you want to see that you have the ears
about the same place. If you see that you're
a little bit off, you can always use your eraser. Bit too broad. Line there, wide there we have
two alert ears. Got a little bit of my beard. Sorry about that.
Shins are like that. Is that the other cat will
stand behind it and push in. Words like that, just
playing around on this side. We will make a
little little hand with the finger
going in like this. That too will have
a line like that. To go ahead and draw a
very simplified hand, you can also erase this
line if you want to. There you have one hand. And
then we can continue to draw the bottom half of the side
of the head on this side. The other cat will be
standing behind it. I think I will start
actually by drawing a arm of the cat
going in like that. And then a little bit down here. Then I have the
little hand there and then a little finger and
pushing on the sheet, looking something like
that, Very, very playful. Maybe Clean this up a little
bit as usual, you see that? I'm just laughing and not freaking out if some lines
are not going perfectly. That's where I want them to be because it's not important. Maybe a little bit of
an overlap there too. Is it there? He has the head and
poking of the cheeks. Now we can start to draw
the box for the cat. And I will just make a
line going out here. Then the body up,
something like that. And then we will do the
body on the other side. And then we will
have two front paws, the hands if you want
to drawing well, on each side of the
guideline there, they don't have to be exactly
the same size or anything. And then we can continue the
box on the other side here. Then we will draw the box
out from the and then make a no idea why I'm doing so
many double lines today. It's probably just one of those. As just draw the
side of the box, we will see the
box slightly from one side just a little bit. Then draw the little flap. Then we can draw the front flap. I don't want this line to
be too similar to this one, so I'm just going to lower it slightly and then
draw a line across. It can be as B as you want to. Then from this corner, you
can also imagine that you have a line going
down to the ground. Then we can do the
same on this side. From this corners have a line going down to
the ground there too. There you have the
bottom of the box, the same here as the imaginary
line going down there. And then you can draw a line up to meet the other line there. You have the side of the box. Now you have maybe it's surprised or just the other
cat to play pranks on it. Maybe it's both
surprised and happy. Going to do some strength on
some of the feature part. We see what we're
doing later on. Let's go ahead and
draw the other. The head will be at the
same line as this one, but not completely angled, looking somewhere
along like that. And just make sure that it's going over this air
because I just want to the cat to have
some space behind the other cat,
Something like that. Complete this line also. Yes. And then we can have
the other ear here, making sure there's enough
room for, for the ear. Then we can let the come
back into the body and just make sure that you
leave some space between these two lines so they are
not connecting too closely. Because it will feel like
the coming from the head. Because it will feel like the arm is coming from the head. Why I drew it this
way now is to see that you can actually draw
things without the guideline, But I'm going to add
a guideline now. After I have drawn all the
other outer shape of the head, I will make the guideline
somewhere around here, I think. Yes, I think will look good. Now, we can place the nose
somewhere around here. And then a smile, probably
a little bit mischievous. Then I will draw this first, I will try to see if it's
a good place to place it underneath here, somewhat. I think this can look good. And then I will see
that it will have approximately the same
distance from the middle line. Yes, I think this.
Okay. Or very good. Maybe even Then I will go
ahead and draw this ear too. I will make it a
little bit more point as I did with other ear. Going up like this. Yes. Since the head is a little
bit turned towards this side, that's why I draw the
ear behind the headline. We should have a body for
this little cat also. Let's go ahead and start by drawing a shape coming out from the box
beneath the flat there, going up into the head. And then we will
add a little leg, an oval shape on the back of the cat line curving up can a little bit
of the line here. We see what we're doing. The
cat should have a tail too. A little bit higher up
than the line here. Somewhere around
here, we can have a curved line going up
into the back again. I'm making the tail a
narrower hair here. It's a little bit
wider where it's going into the body there. I have two cats playing around. I know that there are
some cultures that are squeezing and poking when
it comes to the cheeks. We don't do it so
much in Sweden, but I've been living in quite a lot of
places in the world. And there are some places where people can't resist squeezing, not just the cats cheeks people. Maybe you live in one of
those areas, I don't know. Just making sure that we're going to see
what we're doing. Messing up the
drawing so much as I'm doing at the moment. Yes. I think that's
a good start. So let's go ahead and define the lines with the black pencil. I will start with the
nose and do the mouth. And do a very gentle
shade for the mouth. Chelines, maybe it's not
called that in English, I don't know, but I'm sure
you know what I'm meaning. Then the other Y, then I can go ahead
into the head with those alert ears because cats
are speaking quite a lot. With their ears is not just the rest of the body and the tail they
are communicating, but they're showing the mood and an intention quite
a lot with their ears. I'm going to complete
this box cat first, before we start drawing mischievous cat in
the background. When you're making
this exercise, go ahead and add something to the boxes where
the cats are sitting. Maybe it's the favorite
food of the cat you have. It's your favorite food. It can be anything that you can imagine that can make the
drawing interesting and funny. And whatever you
want to do with it, maybe it's just the name
of the cats on the box. Who knows there's the body. And then we have the head. Remember you can be
as rough as you want to sometimes when you are very rough with your lines, it actually makes the
drawing more alive. Can very clean lines one eye and then the second eye. Going to strengthen this line a little bit also we
really feel that And this cat is in
front of the other. Cat can do the same here. Strengthen the
lines for the arm. Can do some strengthening
also on this side, yes. Then we're going to strengthen the line where the
box is touching the ground and
slightly to the side. Also we can do some strengthening
of strengthening of the flaps to get a
little bit more dynamic. And as you see, I
got a little bit of smart share but
I'm just going to leave it It's okay way
it looks like that. As with other drawing, let's go ahead and shade
one of the cats slightly. We're being very gentle. It's always good to try
out this shading on a small part of the
body that is isolated, like this little
hand or the tail. Before you start with
the rest of the body, don't worry if the
shade lines are going outside of your lines. No one will notice that when you have
finished the drawing. It's the same also that when you're shading and maybe some of the lines getting a little
bit too dark leave them. You can always go
back like this line, I have to actually
see it afterwards. This line is a little bit stronger than the
rest of the lines, but I'm 100% sure that most
people don't notice it. But what you can do
is just the rest of the drawing slightly around it and 99.99%
of all cases, it will just fade in to
the rest of the drawing. Yes, I think this looks good. We will just make
a little bit of strength underneath the cat, showing that it is
connected to the ground. For once, I will just
leave out the shadow so you can see how a drawing
looks without any shadow, or shade or anything
on the ground. Now we have two cats in two pictures playing
around with a box. I think they look and
very playful. Good work. And see you in the next lesson.
10. Kitty Waving: When it comes to drawing
cute and cartoon cats. Of course, there's one
cat we can't forget. And we will start to
draw this cat by drawing a circle that is a little
bit more oval shape, slightly looking like this. The head will be tilted a
little bit to this side. Let's go ahead and draw
a guideline like this, and then another guide in
the middle of the head here. Something like that. When it comes to the body, it will be about the
same height as the head. Go ahead and a guide
line down here. Then we will have to slide
little guide line going up to touch the guideline
there. Yes, it looks skew. I think we will draw the body first and then we will
draw the facial features. Why I drew this guide line
down here is that that will be the middle of the leg down here. We will draw a nice long curve out going up into the head. As you see, I'm
searching and trying to find some nice line
is always easy to go back and erase whatever you're doing, something like that. Then this is one of the legs, And then we will have leg, or actually 1 ft
that is raised up, the under side of the
foot is facing you. Let's go ahead and draw
a round shape that is slightly oval looking,
something like this. Yes, now we can draw a
little curved line down here showing where the leg
is, something like that. And then we can have about
from the middle of this foot, a curved line going
up on the other side, going back into the
head like that. When we are in this area, we will draw a hand
that is the beginning, it will be slightly
on top of the face. We are drawing a
little bit of a thumb. There will be a bit of
a double line there, a quite shabby hand like that line going up
into the hand there. Then we will have a little
line for where the sleeve is. Just make sure that you
leave a little bit of room between the thumb
and the sleeve. Yes. Now we can go ahead and draw the
rest of the head here. I will flatten out the lower part of the
head a little bit. Then we can go up and follow the circle again,
somewhere around there. Can you do the same here? Just making sure that
I'm not I don't want to put the facial line straight
into the thumb lines. I'm just moving it
slightly out a little bit. Then follow the curve
line up a bit like this. Then we can place here, it will be about
in the middle of, we have two lines out there in the middle of these two points. And these two points, we have done this before, you know it. Then we will make a curve to a point and then another
curve on the other side. Yes, do. The head will be overlapping the air slightly but not on top. Then we can draw
top of the head, but not quite all the way. We're going to draw
a flower up here. I'm just making a little
round shape first. Something like that and then
from this shape we will draw that curved here,
looking something like that. Got a little bit of a line. The escaping yes, in the middle here we
will have a round shape. Now when we have this
line here, we can. It's not called leaf flowers. What is called petals? I think I'm, if I get it wrong, we'll draw some
petals. For a flower. We're going to start doing like this as we have
discussed earlier. Also, I don't want too many lines going into the same place. It's very nice that they end up on top of the petals
and not down in here. Try to do that. I think we will have five
petals for this flower. I got a little bit
to Mandale Stairs. I'm just going to erase
it slightly there. We got a little petal, and we're going to do
the facial features. And I'm just going to use this guideline and that will
be the top of the eyes, they will be quite oval. And then the same using that middle guideline here
to put the other eye. Yes, remember it doesn't
have to be super precise. It will look good.
Anyway. I will make this quite dark. Yes. Then we will have a nose. And the nose can draw a
very slight guideline here. Between these two points, we will have a nose that is
centered around that line. It will also be an oval shape. I think you have
guessed what character that it's very popular one, it's a very happy says hello. Quite often we should do a
little line for the dress, a little half circle. We can place the other arm. And we will start a little
higher up than this line, so you get a little
bit of room there. If you want to, you can just measure these arms so they
are about the same size. Then we will draw
a little thumb, the short little hand
going down into the body. And then a little sleeve line to just remember to
leave a little bit of room here between the
sleeve line and the thumb. Lastly, we will
draw some whiskers. I think I will put one whisker somewhere
on the guideline here. Quite long one and then
a little bit of shorter one there. And do the same here. One whisker, a long, the guideline on a
little longer one. There's a lot of
variations to this kitty. Please go ahead and add and subtract whatever
you want to. Maybe you want to
have a bow here. Maybe you want to have
a different dress. Just use your imagination
and mix it up. Then we will, of course, go ahead and define the lines
with a black pencil. I will start with the nose and then go
ahead and do the eyes. Do the other eye, remember you can be as wild and crazy as you
want to with the lines. It doesn't have to be a very
super smooth character. Of course, you can draw lines looking like this
if you want to, but you can also draw
lines that are shorter. More jagged, just go ahead
and draw that flower. And then the opening
for her dress. I have drawn her maybe
a little bit wider than she usually is slightly. And you can of course, slim down slightly
if you want to, please go ahead and draw the preferred kitty that
you want in destroying him. Just remembering to leave a little bit of room
there between the lines. If you hear something
in the background, I hope my audio
filter is removing. Most of this is my neighbor upstairs moving
around and cleaning. I think it shouldn't
be a problem, but I'm sorry, you
can hear something. And then lastly, we
will do the whiskers. I think I prefer to have a little bit of shade for
this character, a shadow. I know that I have not seen many drawings putting a shade
or shadow underneath her. If you feel that it is
disturbing for you, go ahead and ignore this. Doing a very, very
soft shadow here, adding a little bit of by
lines outside of the shadow. I prefer to do this. I
think it gives to drawing a little bit more life and then strength on it closer
to where she's standing. And I will also add a little bit more weight underneath her. She's connected to the ground. We can also do a little bit of strength on the foot here as showing that it's to you and maybe a little bit more
strength underneath her head. There you go. One happy kitty
waving and saying hello, good work, and see you
in the next lesson.
11. Moon Cat: Let's go ahead and draw
the next cat here. And we will start by drawing
a circle, nice and round. Well, this time then
we're going to add a guideline and another
guideline here like that. Then for the body it
will be not all the way, so maybe 75% of the
height of the head, it will go down
somewhere around here. About that place? Yes. We will draw some guide lines going up to the
head on each side. If you feel that it's getting
a little bit too uneven, can of course set and just move the line
slightly outwards. We're going to draw
the head first. And we will draw
a line going more outwards towards this guideline. And then we will make a
round shape out there. And then we will go
back into the head. It will be that the cheeks
are quite pointing. Do the same on the
other side here as draw them out a bit further
out than the headlines. And then going back and doing the same on
the other side here. Yes. Then we can complete
the headline. Maybe this line should
be a little bit rounder. Just a little bit.
Yes, that looks good. Then we can draw some ears, and the ear will start
slightly higher up than the. It will be a slightly bent
line curving up and then ending in a soft point and then going back into the head again, looking
something like that. And then we will draw an
inner airline that is starting about there
and going down into wider area down there. And then we can do the
same on the other side. Remember that you can draw as many guidelines as you want to. Can have another one up here. Round line going up
to a soft point, then another line
meeting the other. Then we can do that
inner ear shape too. Don't worry if the ears are not 100% the same size
or the same form, It will look good in
the end even though you see that everything is maybe a little bit
crooked at the moment. Once you finalize the drawing, everything that
will go away there. We have the basic
shape of the head and now we're going
to draw some ice. And I think they will
be closed this time. You know how cat can be having very smiley eyes when
they are closed. We will start the line
somewhere around the guideline and then going down in the
bend towards the middle. Something like that. Then you can do the same on
the other side, a little bend going
down into the middle. Two smiling eyes. If you just imagine that
this line is continuing, then you will have
a little nose here. I think we will make
it quite round. We should have two
smiling lines going up into the nose looking like this. This cat will also have a
marking here in the head. I'm sure quite a lot of you will recognize
this character. It will be a crescent moon, I think it's called
Draw a circle first, then in there there will be. Another line dividing
up the circle. The name for this character is what moon is
called in Italian. There's a little clue for those of you who don't
recognize this character. Now we can go ahead
and draw the body. And I will use this
guideline to draw a soft curved line
going up into line. We can do the same
on the other side, going back into the
headline there. Then we can have the
front pause here, a little bit further down, the bottom line there. And then going back
up, curving back out. We can do the same
on the other side. And line that is
curving back out. Yes. Maybe I should angle this one out slightly
more. Just a little bit. Yes, this looks better. You can also place three
little lines here, Two little lines on each foot. I don't know if it's
hard to count today, it seems to have some
little toes there. We can have this line. Can continue with a line that is slightly curved up on
each side slightly. And then we will
have an oval shape here that is angled out. I'm not going to complete it. I will leave a little
bit of room here. Then we will draw
a soft round up here towards the
body line there. We have the back pole, we
can those little pole, I know what is called
pots, something like that. It's going to make it
a little bit softer, a little bit smaller
as you see it. I don't think it's
enough room here for those little tall marks. I'm just going to move this
line slightly outwards. I think this looks better. As you see, you can always
change and move and erase whatever line you feel is
not really right there. A drawing should be a very
organic and a living organism. Let's go ahead and draw back
pole on the other side. And you can also, if you want to draw a little guideline
out there so you have about the same size,
something like that. And then we can draw the pole
marks, something like that. Maybe I should move them slightly to the
left a little bit. Yes, I think it looks better. And then another curve line here for the back leg there. The little moon cat is sitting, resting, and feeling
very, very happy. We can go ahead and draw
some whiskers for this. One can do one whisker on each side of the
guideline there, doing them slightly curved. Yes, it looks very nice. Then we should have a
little tail for it also. So let's go ahead and
draw out the tail here. Just the little one looking
something like this. Or maybe it should be the
same width all the way. Let's try a little wider
tail and see how it works. Just a little bit y, I think this looks much better. You can go ahead and change
the angle slightly there too. Yes, I think this looks good. Let's go ahead and do the
definition with a black pencil, starting with the nodes, then those smiling eyes. It's always nice to see a cat smile with
eyes in this way. And then the headline. Remember that you
can be as rough and draw as crooked lines. You want to, don't feel any
pressure when you're drawing. Just be very playful and relaxed and just be
looking forward to see where the line is going and what your hand and pencil
are discovering there. I have the ears and
then the crescent. We can do the whiskers. I like that. And then we will
go ahead and draw the body, the front pause when it
comes to this character. Of course, there are about 1
million different versions. This is not the official
version that is in the TV series and
in the comic books, but I like this to sign a lot. There's nothing wrong
with the original, but I like when a cat is very fluffy and have
very round shapes, more of the proportions
of a kitten. And then the other leg, and lastly the tail. Yes. And then we can strengthen
the lines just slightly, where the cat is in contact with the ground just a little bit. We can strengthening
the poll lines here. Also the cheeks. I also realized earlier that I say shins sometimes
for the cheeks. I'm sorry about that. I hope I've added
out most of them. But if there are some shining
is that is shed in Swedish, it's quite close to sin. And I'm quite often
mixing it up, but I think most people will understand what
I'm talking about. A little stray line there. It's just about to erase whatever line you don't
feel comfortable with. I will also draw
some shadow here to this little moon cat. Just a little bit. This cat is mostly grayish, but I'm going to
draw it now with a non shade because it's
easier to see all the details. But if you prefer
to have it gray, of course you can shade it. I think the color, colorless gray, more of a warm gyne If you have
this pencil at home. Let's go ahead and
feel free to to shade it some more beer there that got away as usual. Was making sure that as dark as shade is
closest to the body. Yes, I think this
looks very good. One little moon cat. Good work. Can see you
in the next lesson.
12. Round Cat: The last cat we will do
will be a fluffy one. We will do it a
little bit different as we talked earlier
about what makes a cat cuts to have a very round form and usually a very large head
compared to the body. But in this case, it will be that the head is quite small, but it will still
look very cute. We will start by drawing
an oval shape like this. The head will be a little
bit tilted to one side, so we can go ahead and
draw a guideline like this and another like this. Then we will have a larger ball. So to say that is
almost a circle, but it has a little bit more of a squashed circle shape to
it, so something like this. Then we will draw the outer
shape of the head here. It will be a little
bit overlapping on this side for the headline. But here, the head line and the body line will go
into a single point. Then we can draw
some ears on this, 12 small triangles
on each side here. Then we can complete
the top of the head. Then we will have a
little nose here. That is a novel shape. And then two smiling lines. Yes. And then two eyes can
have them quite wide apart. We are drawing,
this is just to see that you don't have to
always draw a very, very big head
compared to the body. You can vary from time
to time if you want to. It's just that you
remember that you keep all the shapes quite round so the cat
looks very fluffy. Let's see, somewhere around
from this line down to here, we will have the start of the back paws looking
something like this. Now we can draw the bottom
here going out to the side, and there we will
have the back pole. It will be looking
about the same, just leaving a
little space there. Yes. Then we will
have the front posts, they lay on their back and they put front legs up like this. It's super cute. So we will do that
looking a bit like this, putting the front pole about in the middle
of that guideline. And then we can
draw the other one. And we can have it maybe
slightly further down. So they're not 100% level. Yes, that looks very good. Of course, we should
have a tail for it also. Let's go ahead and draw a
little tail on this side. I'm making it slightly thicker
in the end here and then going down in a nice
band line into the body. When it comes to
drawing the cats, you don't have to squash them
all in on a single paper. If you prefer to have them
on a separate papers, just do what is most
comfortable for you. There's a good start.
I thought with this cat, do some spots. Let's go ahead and nice curved lines and then we can shade this area and
shade the whole tail. Then there should be a spot
on this side too, She, then we will have a line
that is going into the eye, then going back up and also
doing that extra bend. Then we can shade
it with the ear. Yes, I think it looks good. Let's go ahead and define the
lines with a black pencil. Can start with a
pulse this time. Is making nice round lines and a line up into the here. As you see, it's possible to draw with just a
single line like this if you feel that sometimes it's a little bit hard to do it and you see that
the line is getting away, just go back and draw
with multiple lines. I just encourage
you to try both. It is a little bit
easier if you draw multiple lines in the
beginning, from time to time. Just try to draw a nice long line and see
how it works for you. As you see, I'm
not freaking out. If the line is getting away, I'm erasing it and
just going back and drawing multiple lines. Number, have the little
ice here on like that. Then lastly we
will do the spots. Just make sure that when you draw lines for the spots that you don't put too
much pressure on it, on your pencil because
the spots should never be as strong as the outer
lines of the drawing. Then just go ahead and she, you don't have to put
a lot of pressure, shade it slightly, don't worry if the shade lines are going outside of
the other lines, It will look good anyway. Yes, I think this looks good. It can maybe strengthen some
of the lines here slightly. I think this looks good. So there you have
a very cute cat. Even though it doesn't have
a huge head, it looks very, very nice and cute because you still have a very
nice round shape, giving that very
lovely expression. When it comes to drawing things that are looking cartoony, it's all about keeping
things very simple. This is a last drawing. I want to thank you for
taking this course. I hope you had great fun and learned a lot
and smiled a lot. Finally, show your drawings. It's the best way to
draw your confidence. Show your work to
friends and family. Post and share your drawings
with your fellow students.
 Christer Hägglund, Illustrator / Author / Game Developer