Transcripts
1. Who am I + Class Brief: What's up, everybody,
My name is, I'm a professional artist
for more than ten years, specializing in traditional
art as well as digital. You can see some of
my favorite words. Doing deals. I managed to gain more than 900
thousand subscribers. Social media, when which I teach and showcase
some of my best works. But enough about debt. In this tutorial, I'm going
to teach you how to draw your favorite character
with three steps. First, we've got the
sketching process in which we learn how to draw the face and body using geometrical
shapes and guidelines. In the second part of the teach you how to ink your drawing. And finally, in the third stage, we're going to color the join using Copic markers
or colored pencils. So without further ado, your pencils down to business.
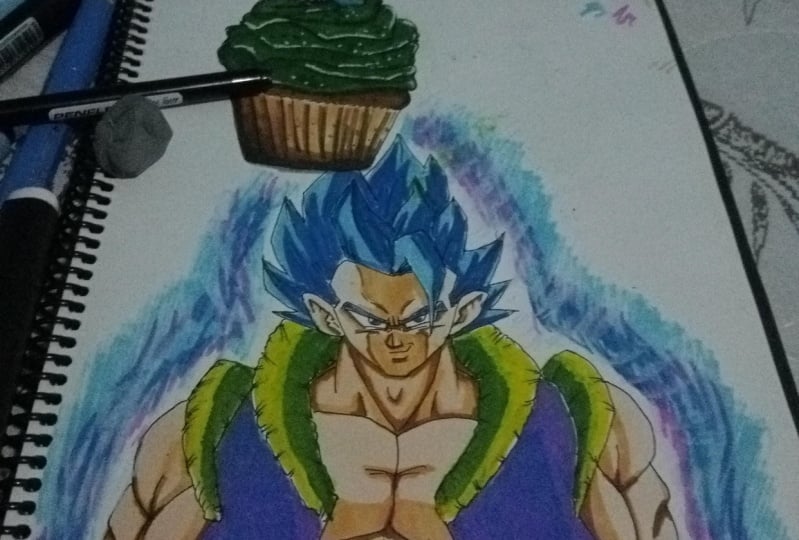
2. Sketching & Inking Gogeta: So today we are going
to go Gita super same blue from the movie
DragonBoard super broadly. Now, if you check
the description box, you can see all the materials I'm using for these tutorials. As you can see, I already
drew a perfect square. Each side is four centimeters, but you can draw it in any size. You want to just make sure to
use a suitable paper size. Okay, let's get started. This is gonna be a frontal pose. I'm going to start by drawing the wrinkles between the eyes. Would add one more
line right there. And then we can
draw the eyeball. So as you can see, it gets thicker
towards the edge. I'm going to add some
random lines right there. To create the eye. We are going to simply
use three lines. Make sure to draw the bottom
line with a nice curve. Will draw a curve to
mark the bump above his eye and some lines to
create the checkmarks. Then we'll place the pupil at the center slightly to the left. And I'm gonna do the same
process for the left side. If you want, you can use a ruler to keep the right proportions. I know that drawing the
left eye is always harder. Awesome. So once
we're done with that, we can move to the nose. So to create the nose, I'm going to drop five lines. First to draw the
shape of the nose and then add the shaded area. Next, I'm going to
draw them out really close to the nose with
their very tiny gap. And we'll give him a nice smirk. Mark the bottom lip, and then we can draw
the shape of his face. We'll do that by
using five lines. And now I'm going
to draw the ear. So first I want to draw
the shape of the ear. And then later on I can
add all the details. Once we're done with that, we can draw the hairline now as opposed to
the older Cogito. Cogito doesn't have
the widow's peak. The hairline looks more
like go home and go cool. That's what we saw
in the trailer. Now we'll draw the spike from the front and we'll draw it
covering is a little bit. And next we can draw
the rest of the hair. So first I'm going
to draw two curves to indicate the neck muscles. Don't draw one
spike on each side. If you want, you can
use these guidelines to help you keep the
right proportions. And then all I have to do is just add the rest of the spikes, mainly by using two
to three lines. Awesome. So next, we
are going to draw some random lines from side-to-side in the
direction of the shape. And once we are done with that, we can focus on the torso. So first I'm going
to start by drawing the neck muscles
and the trachea. Next I'm going to draw those
fluffy thing is on his best. It looks like he got a snake
wrapped around his neck. As you can see, it gets
thinner towards the edge. Next, we'll draw those fluffy
thing is on the shoulders. The thing I'm going
to draw a bit longer. You can draw it either way. Next, I'm going
to draw the chest simply by drawing two curves. And then we'll draw his vest. You give the indication
that it's blowing in the wind because I'm going
to draw an hour later. Next I'm gonna close the
chest and add the abs. Will add is Belt and
close the torso. Some more details to the chest. And now we can draw the arm. So again, if you want, you can use a roller to
keep the right proportions. I'm going to start
with the left side. I'll draw the shoulder. Then I'm going to add the bicep, the tricep, and the forearm. I'm gonna do the same
process for the right side. And I'm going to refine the belt by adding
all the creases. And to finish up the sketch, I'm going to add details to those fluffy thing
is on the shirt. Awesome. So we are done. We just sketching part and now we can move on to
the inking process. For the inking process, I'm going to use 0.10.05. Those are the sizes of
the tip of the black pen, which I'm going to use for the body, I'm going to use 0.1. But for the facial features, the eyes, the nose,
the mouth, etc. I'm going to use 0.05. That will help me get the
details much more accurately. Of course, make sure to rotate the page so you can have your, and HM, your natural hand
movement and state Bayesian. Awesome. So once we are done
with the inking process, I'm going to take the
notorious charcoal eraser and get rid of all the lead. And I'm also going to use my eraser stake for
those stubborn. And we make sure
to clean it really well because you don't
want to smear the lead. Later on when we use
the Copic markers.
3. Coloring Gogeta: Okay, so once it's cleaned, we can start using the Copic markers. For
those who don't know. Those are alcohol-based markers, which means they can
blend very well. Which will check the
top left of the screen. You can see the exact number of coping abusing for
this tutorial. However, if we don't
have any Copic markers, you can just use
colored pencils or use your HB pencil and
do some shading. For this join, the light source will come from both sides. Because like I said
before, I'm going to draw an hour later on, I'm going to start by
coloring the vest. I'm going to use some
gray purple tones. Start with the brightest one. Then I'm going to use a midtone, that slightly darker tone. And finally I'll use
the darkest tone. And next I'm going
to do some blending. So I'll use the mid-tone. And then the brightest star. Awesome. So this is the
look I'm going after. I'm gonna do that same
process. The right side. Next, we are going to draw
those fluffy thing is, I'm going to start with
a very bright yellow. Then we'll use the midtone. And I'll create the darkest
shade by using Y 28. That's a goal to top. We'll do some
blending, of course, again with the midtone and
then the brighter tone. And I'm going to do
the same process for the remaining areas. Awesome. Now, we're
going to color the belt. First. I'm going to
start by using PO2. We're going to cut
out the edges. Then I'll use the mid-tone
color at the center. And finally, the darkest tone. And like always, we're
going to do some blending. Awesome. So now we can
focus on the skin tone. So I'm going to use
three different tones just like always. We'll start with the body stone, which will be easy or 0. And as you can see, I'm leaving some blank areas on the
areas that sticks out more. Next, I'm going to
use the mid tone, that's 17, a reddish brown tone. And finally, the darker tone,
darker brown, mid-2009. As you can see, we
have minimal use. Now I didn't forgot
about the blending. I'm going to do it later on. For now I'm going to
focus on the neck. And we're going to
do the same process like we did before. I'm going to start
with a lighter stone, leaving some blank areas. Then we'll use the midtone
to mark the shaded areas. Now I'm going to
do that blending. Finally, I'm going to
use the dark stone, the very dark brown, for the darkest areas. Awesome. So I'm gonna do the
same process for the chest, the abs, and he is left arm. Awesome. So before we
will continue to face, I'm going to take the
colorless blender, gets number 0, and I'm
going to use it on the blank areas just
to soften those edges. Awesome. So now we can
focus on the face. And unfortunately, I forgot
to hit record that part, but just take a minute and do the same process
like we did before. First, we'll start with the brightest on filling
all the areas. Then we use the mid tone
and color the shading. Because the light source
will come from both sides. It means that the center of
this face will be darker. Then we'll use the darkest tone for their most shaded areas. For example, below the
bottom lip, on the nose, right below the wrinkles between the eyes and on the
bumps above his eyes. I'm going to add some
more on the cheeks, just like you get
Takahashi love. And we'll use the midtone again. Awesome. So we are done
with the skin tone. As you can see, I colored
it in the style of urea Takahashi and early
today your sheet, Yamamoto. Okay, so now we'll
continue with the hair. So first I'm going to color
the eyebrows with B12. If you noticed in the trailer, they use some
different blues for super same blue as
opposed to the series. And the same goes for the eyes. It actually looks
more like rigid as latest transformations to
the same blue evolution. Awesome. So once we're
done with the eyes, we can focus on the hair. So I'm going to demonstrate how to color one spike of hair. And then I'll do the
same for the rest. So I'm going to start
with VO2 and with first brush strokes in the
direction of the shape. I'm going to fill
this entire area. Next, I'm going to use
the midtone that B26. I'm going to do
some blending with a brighter stone. Again. And then I'll add
the darkest tone. We then minimum, use. Awesome, So this is the
result we are going after. So I'm gonna do the same process for the rest of the spikes. We are not done yet. Now it's time for the, OR, I'm going to use
lots of color pencils. We'll use some blues, some purple, pink,
and some to kill. So I'm going to
demonstrate how to color one portion of the aura and then I'll do the
same for the rest. Okay, so first we
start with some blue. Then I'll use some purple, pink. Tone will do some two keys. Some more pink right
there. Some purple. I'm not putting too much
pressure on the tip, just spreading two colors. Next, I'm going to use
the blue tone again. And I'm going to draw
the shape of the hour, so some tiny flames. Now I'm going to
use a darker blue and I'll add one more
layer to the frame. Now, I'm going to use
the brighter blue again. And I'm going to apply more pressure in order
to blend the blue tones. Next, I'm going to
add some dark purple. And this is mainly going
by the feel of it. So I'm going to add
some more pink bubble. If I want to blend the colors, add some more two keys. Then I'm going to use the
white colored pencil to blend the colors just to
make it look smooth it, but I'm not going
to color the edges. Okay, I love that those
edges are a beacon. More awesome. So this is the result
we are going after. So I'm going to do
the same process all around. Good Gita. As you can see, these are all, looks much more different from the hour we saw in the series. Again, this is due to the new animation
style of Chin tiny. To finish up, I'm just going to smear the frame using my finger. Okay. Now what you want
to do is lower the volume a bit because I'm going
to try to go citizen loop. So this is how you draw
super same blue go Gita. As you can see, I drew it
in the style of you yet Takahashi and early
delta Yoshida memorial. I hope you guys and girls
enjoyed this tutorial. Let me know what you
think about it in the comment section. That's it. Thanks all for watching. And I'll see you
on the next video.
 Yair Sasson, Artist