Transcripts
1. Introduction and Supplies You Will Need: And Hi, friends. How are you? I hope you're having
a great day today. I'm excited about sharing
this project with you. This is a drawing and
watercolor painting project that I designed,
especially for kids. You do not need to have any drawing or painting experience at all to be successful
with this project. I will guide you step by step through all the steps
that you need to take. Today we are going
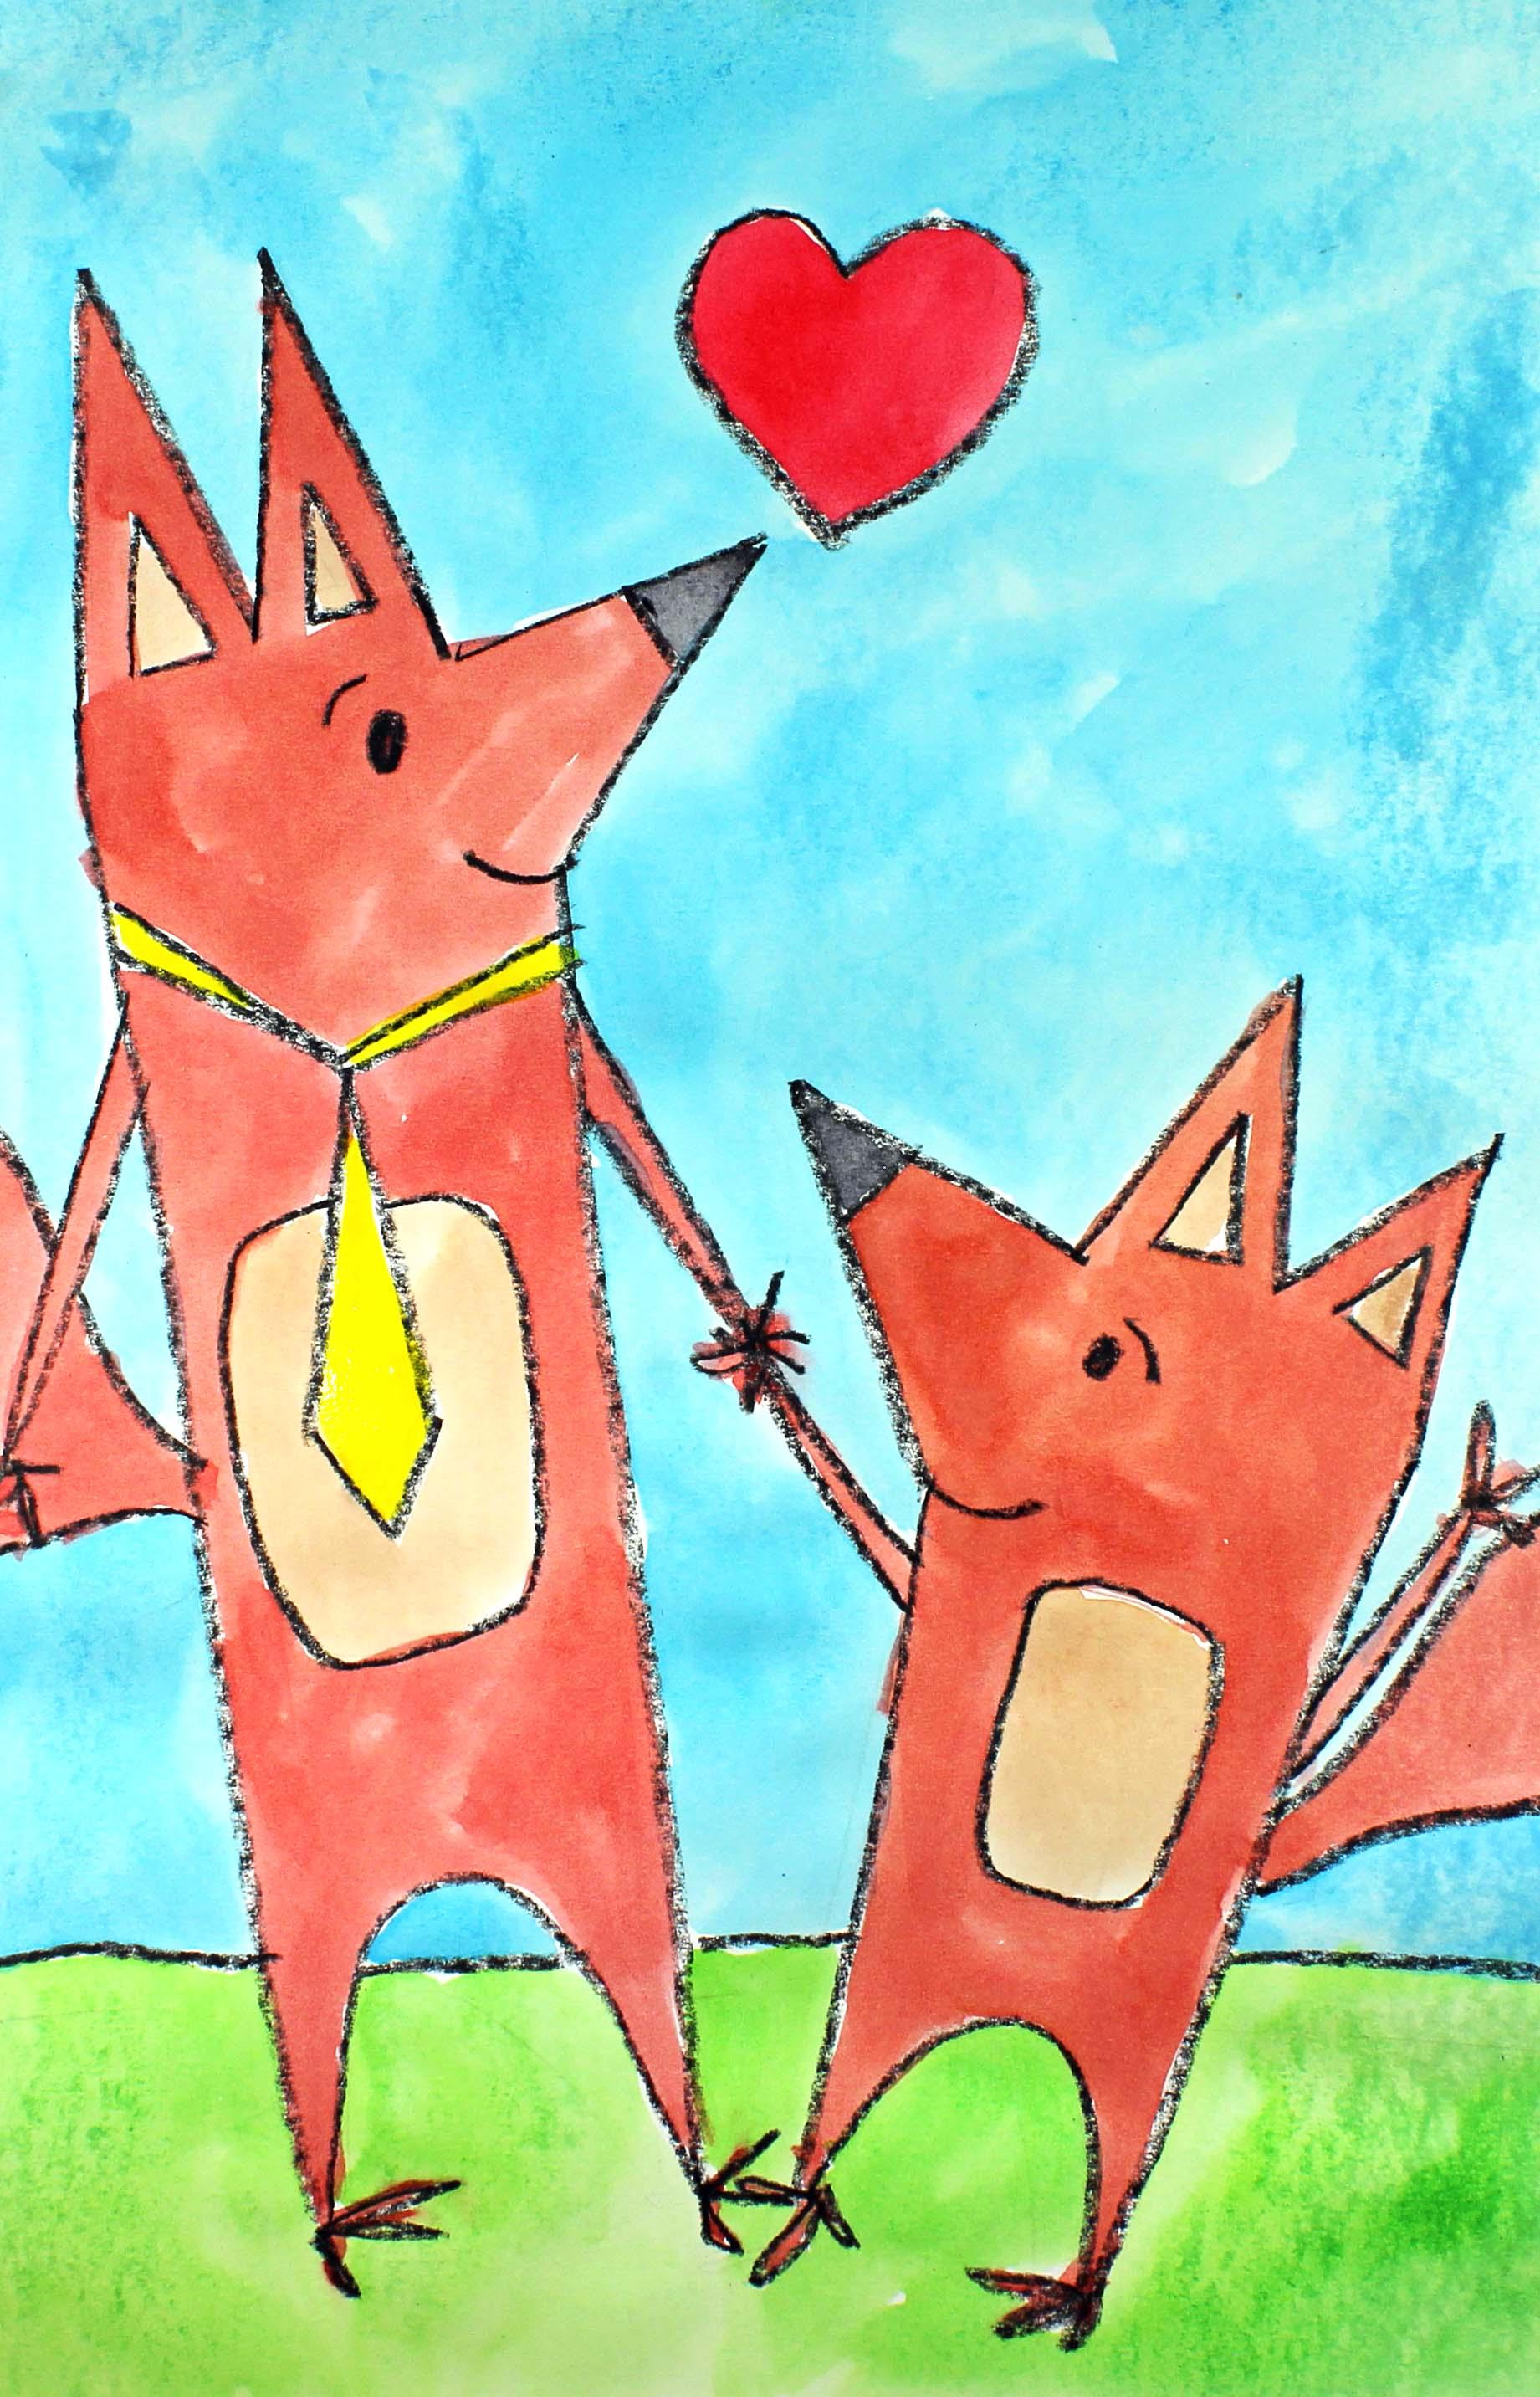
to be creating a big fox and a little fox. Now, this could be a daddy
fox or a grandpa fox, or an uncle fox and a child fox. Let's talk about
the supplies and the materials that you will
need for this project. The first thing
that you'll need is a piece of watercolor paper. You will need a set of watercolor paints
and a paintbrush. You will also need a cup or
a bowl with clean water. You'll need a paper towel
and a black crayon. Go ahead and gather all of
those supplies and materials, and I'll see you back
here in the next video.
2. Step 1: Draw Two Foxes: In this step, we are
going to draw our design. So let's get started. The first thing that
we're going to do is take a look at
our piece of paper. And on this side of
our piece of paper, on the left hand side, we're
going to have a daddy fox. And on this side of
our piece of paper, we're going to have a child fox. Okay? So what we're going
to do first is pick up our black crown
and close to the top, but not touching the top, we're going to make two upside down Vs that are
connected together. So let me show you. I almost actually looks like the letter M. So we're going
to make the letter M tilted a little
bit to the side. Actually, I'm going
to make this part a little bit longer right there. Now what we're going to
do is we're going to make a slanted line coming out from that letter M. And this is going to be
the nose of our fox. Now we're going to
come back in with another slanted line and
stop about right there. So these are going to be
the ears for our fox, and then this is
going to be the nose. Inside the ears, let's add
a little bit of detail. Let's add a triangle
and a triangle. We're not going to fill that in, but we're going to fill that in with paint a little bit later. Now we're going to
make a little line here at the tip of this V, and that's going to be
the nose of our fox. You might not be able to
tell it's a nose quite yet, but you will in a moment. Alright, now what we're going to do is we're going to come from this line right here and we're going to make a slanted
line coming down. So let me show you what I mean. So we're just going to
make a slanted line coming almost all the
way down, not quite. I hope that you can
see that on the video. Alright. Now what we're going
to do is we're going to do the same thing on this side
coming down from the nose. We're going to make a
slanted line coming down about the same length as this line, this initial line. Now we're going to make a
curved line coming up and then coming down and connecting
these two lines together. Now, at the bottom
of these two lines, let's make some feet. Remember, this is a cartoon so that it doesn't have
to be very realistic. Alright. So those
are the foxes' feet. Now that we have the basic
outline for our dad fox, we're going to start
on our child fox. Okay? So what we're
going to do is the same shape as
this right here, but in a smaller form. Let me show you what I mean. So we're going to come about
halfway down our piece of paper on the right hand
side of our piece of paper. You might have more
room than I do, or you might have less, but just work with
what you have, okay? This is your artwork, so it will look different from mine. Alright, so we're going to
make a slanted letter M. Two Vs that are stuck together. And now what we're going
to do is we're going to make a slanted line coming down. And then what we're
going to do here on this side is we're going
to make the fox's nose, the child fox's nose. So we're going to come
out and then come in. Do you see how that is?
So these are the ears, and then this is the
child fox's nose. Now we're going to make a
slanted line coming down. And then what we're
going to do is we're going to make a curve line, and we're going to connect
these two slanted lines. So notice that the body on this fox is a little bit smaller
because this is a child. Let's make some feet. There we go. Let's
add a little bit of detail to the fox's
ears and to the nose, just like we did
for the daddy fox. Alright. The next thing
that we're going to do is we're going
to create the arms. And these two foxes are
going to be holding hands. So what we're going to do is we're going to start
with the daddy fox, and we're going to make
two slanted lines coming down and meeting about right here in the middle
of these two foxes. And then what we're
going to do with this smaller fox, the young fox, we're going to come up
with two slanted lines, and we're going to meet
here in the middle. And then we're going to
make some little fingers. And those are going
to be the hands of the child fox and the daddy
fox holding each other. They're holding
each other's hands. Alright, let's add a little
bit of detail to our foxes. Let's add another arm
for our child fox. And if you can't fit this arm
onto your piece of paper, in other words, if it goes off of your piece of
paper, that's okay. You don't need to add it
if you don't have room. And then for the daddy fox, maybe I'll make slanted
lines coming down, and I want to remember to
put the hands at the end. Alright. Now what we're going to do is we're going
to add some eyes. So I'm going to put my
dad's eye right here, maybe a little eyebrow, and the same over here
with a little eyebrow. So you don't see both of the eyes because they are
looking at each other. You just see one eye. Almost like their faces are
turned towards one another. Let's put a little smile here at the bottom of that line that we created for the nose
and a smile here. And then what we're going to
do is we are going to make a tie for the daddy fox. So I'm going to
make a line coming down and a line coming down, and then the same on the other side and meet
right here in the middle. So this is going to be the
neck tie part of our tie, slanted line down,
slanted line down. And then two more lines
coming to a point. So do you see how
that turns into a tie that the daddy
fox is wearing? Now, in real life, daddy foxes do not wear ties, but remember, this is a cartoon, a fun cartoon, and it's okay. It's okay if we put a
tie on our fox. Alright? So let's make a little bit of a tummy area for our Daddy fox. And then let's make
a tummy area for our child fox. There we go. Alright. The next thing that we're going to
do is we're going to make sure that we give
our foxes a tail. So a tail for the child fox
and a tail for the daddy fox. And I'm not going
to be able to fit a whole tail onto
this child fox, so I'm just going to
show part of the tail. I'll come up like this,
and then I'll come out, and it's like the tail is going off of the
piece of paper. And then the same
thing on this side. And if you can fit a whole tail onto your piece of paper,
go ahead and do that. That would look
awesome. There we go. Now let's give something
for our foxes to stand on. So I'm just going to make some
ground right here, a line. So basically what I did
is I made a line here, jumped over my foxes, and I came out the other side. And then the last thing
that I'm going to do is I'm going to create a
heart here at the top, nice big heart because these foxes really care
about one another. Alright. If there's
anything else that you'd like to add to this drawing, go ahead and do that now. Some people like to add some
little grass down here, maybe a pine cone. If you'd like to
add some clouds in the sky or some leaves,
it's up to you. I am going to just leave my
heart in the sky. That's it. But you can add anything that
you'd like at this time. Alrighty. So when we come back, we will start
painting our design.
3. Step 2: Paint the Design: In this step, we
are going to apply some watercolor
paints to our design. So let's get started. The first thing that
we're going to do to prepare our paints is
we are going to add one or two drops of water
to each pan of paint. And what that will do is it
will soften up the paint, and it will make it a lot
easier for us to use. So we're going to take
a moment to do that. It really helps. So now that our paints are softening
up, they're dissolving. What we're going to do is turn our attention to our design. So we have a daddy fox, or it could be a grandpa
fox or an uncle fox. And then we also
have a child fox. And what we're going
to do is we're going to paint these a reddish color, a red fox color. I'm going to show you
how to make that. We're going to use a
mixture of red and brown. Then what I'm going to do is I'm going to paint this
bottom area down here. I'm going to paint that green, and I'm going to
paint the sky blue, and then I'm going to
paint the heart red. If there are different colors
that you'd like to use, go ahead and use them. I'm just going to be offering
you some suggestions. Okay. So the first thing that we're going to
do is we're going to create some red for our foxes by mixing
some colors together. So I'm going to dip my
paintbrush into my water, and then I'm going to get a little bit of red
onto my palette. Put a little bit
of red in there. Then what I'm going to do is I'm going to
rinse my brush out, and then I'm going
to add a little bit of brown. All right? So you add a little
bit of brown, and what that will
do is it will create a reddish brown color so it's not super red for your foxes. It's more of a reddish brown. And what I'm going to do is I'm just going to
start painting. I'm going to try to
stay inside the lines. But if I get a little bit outside of the
lines, no problem. I'm not going to worry
about it that much. That happens to me all the time, but I do try my best. So I went around
those ear triangles, and I'm going to go
around the tummy because I'm going to make that a little
bit of a different color, a little bit of a
different shade. And I'm just going
to finish painting this little fox I'm going to make sure
that I paint his tail, his arms, and his fingers. So this is his tail right here going off of the sheet of paper. Remember, I couldn't fit his whole tail on
there, and that's okay. And his fingers there and
his arm and his toes. Alright. See, I went a little bit outside of
the line, but that's okay. Now I'm going to start
with my big daddy fox. And I'm going to speed up this
video so you can watch me, and then I'll be back in just a minute. All right, friends. I'm finished painting the
main part of the fox's body, and for the inside of the
ears and the tummy area, I'm going to create
a light brown. I'm going to dip
my paintbrush into the brown and add a
little bit of water, and that will make a
really light brown. That's what I want to do for my fox's tummy and the
inside of the ears. Alrighty friends. So I'm finished painting
the foxes' bodies, their tummies and the
inside of the ears. When we come back, we will
start painting the background, and then we will finish up
with the tie and the noses. So I'll see you back
here in the next video.
4. Step 3: Paint the Background: In this step, we
are going to paint the background of our design. So let's get started. As I mentioned
before, I'm going to paint this area
down here, green, like for grass and
then blue for the sky, and then red for the heart. Then I'm going to
decide what color I'd like to paint
my tie on my fox. Sometimes it looks
really great to have a red tie however, because the body of the
fox is a reddish color, I think I'm going to
choose a different color, but I just don't know
which color quite yet. So I'm going to start
with the background. I'm going to start
with the blue sky, and I'm just going to paint slowly and carefully
so I do my best work. It might look like I'm painting quickly because I'm going
to speed up this video, but I am going to be painting
slowly and carefully, and you can watch me. Alrighty friends.
So I'm finished painting the background,
including the heart. And now I've decided
that I'd like to paint my Tai yellow. So I'm going to go ahead and do that a really bright yellow. So I'm adding a lot of
paint onto my paint brush. That way, my yellow paint
will be very, very bright. Then the last thing that
I'm going to do is I am going to paint some black noses. And I usually paint
with my black last because black
is a very powerful, strong color, and I want to make sure that it
doesn't spread around. So I'm going to be very careful and paint those cute
little noses black. Alrighty friends,
I hope that you had a lot of fun
with this project. I had a lot of fun teaching it, and I will see you next time.
 Em Winn, Teacher, Art Instructor, Artist