Transcripts
1. Introduction and Supplies You Will Need: A Hi, friends. How are you? I hope you're having
a great day today. I'm excited about sharing
this project with you. This is a drawing and
watercolor painting project that I designed,
especially for kids. You do not need to have any drawing or painting experience at all to be successful
with this project. I will teach you step by step all the steps
that you need to take. Today we are going
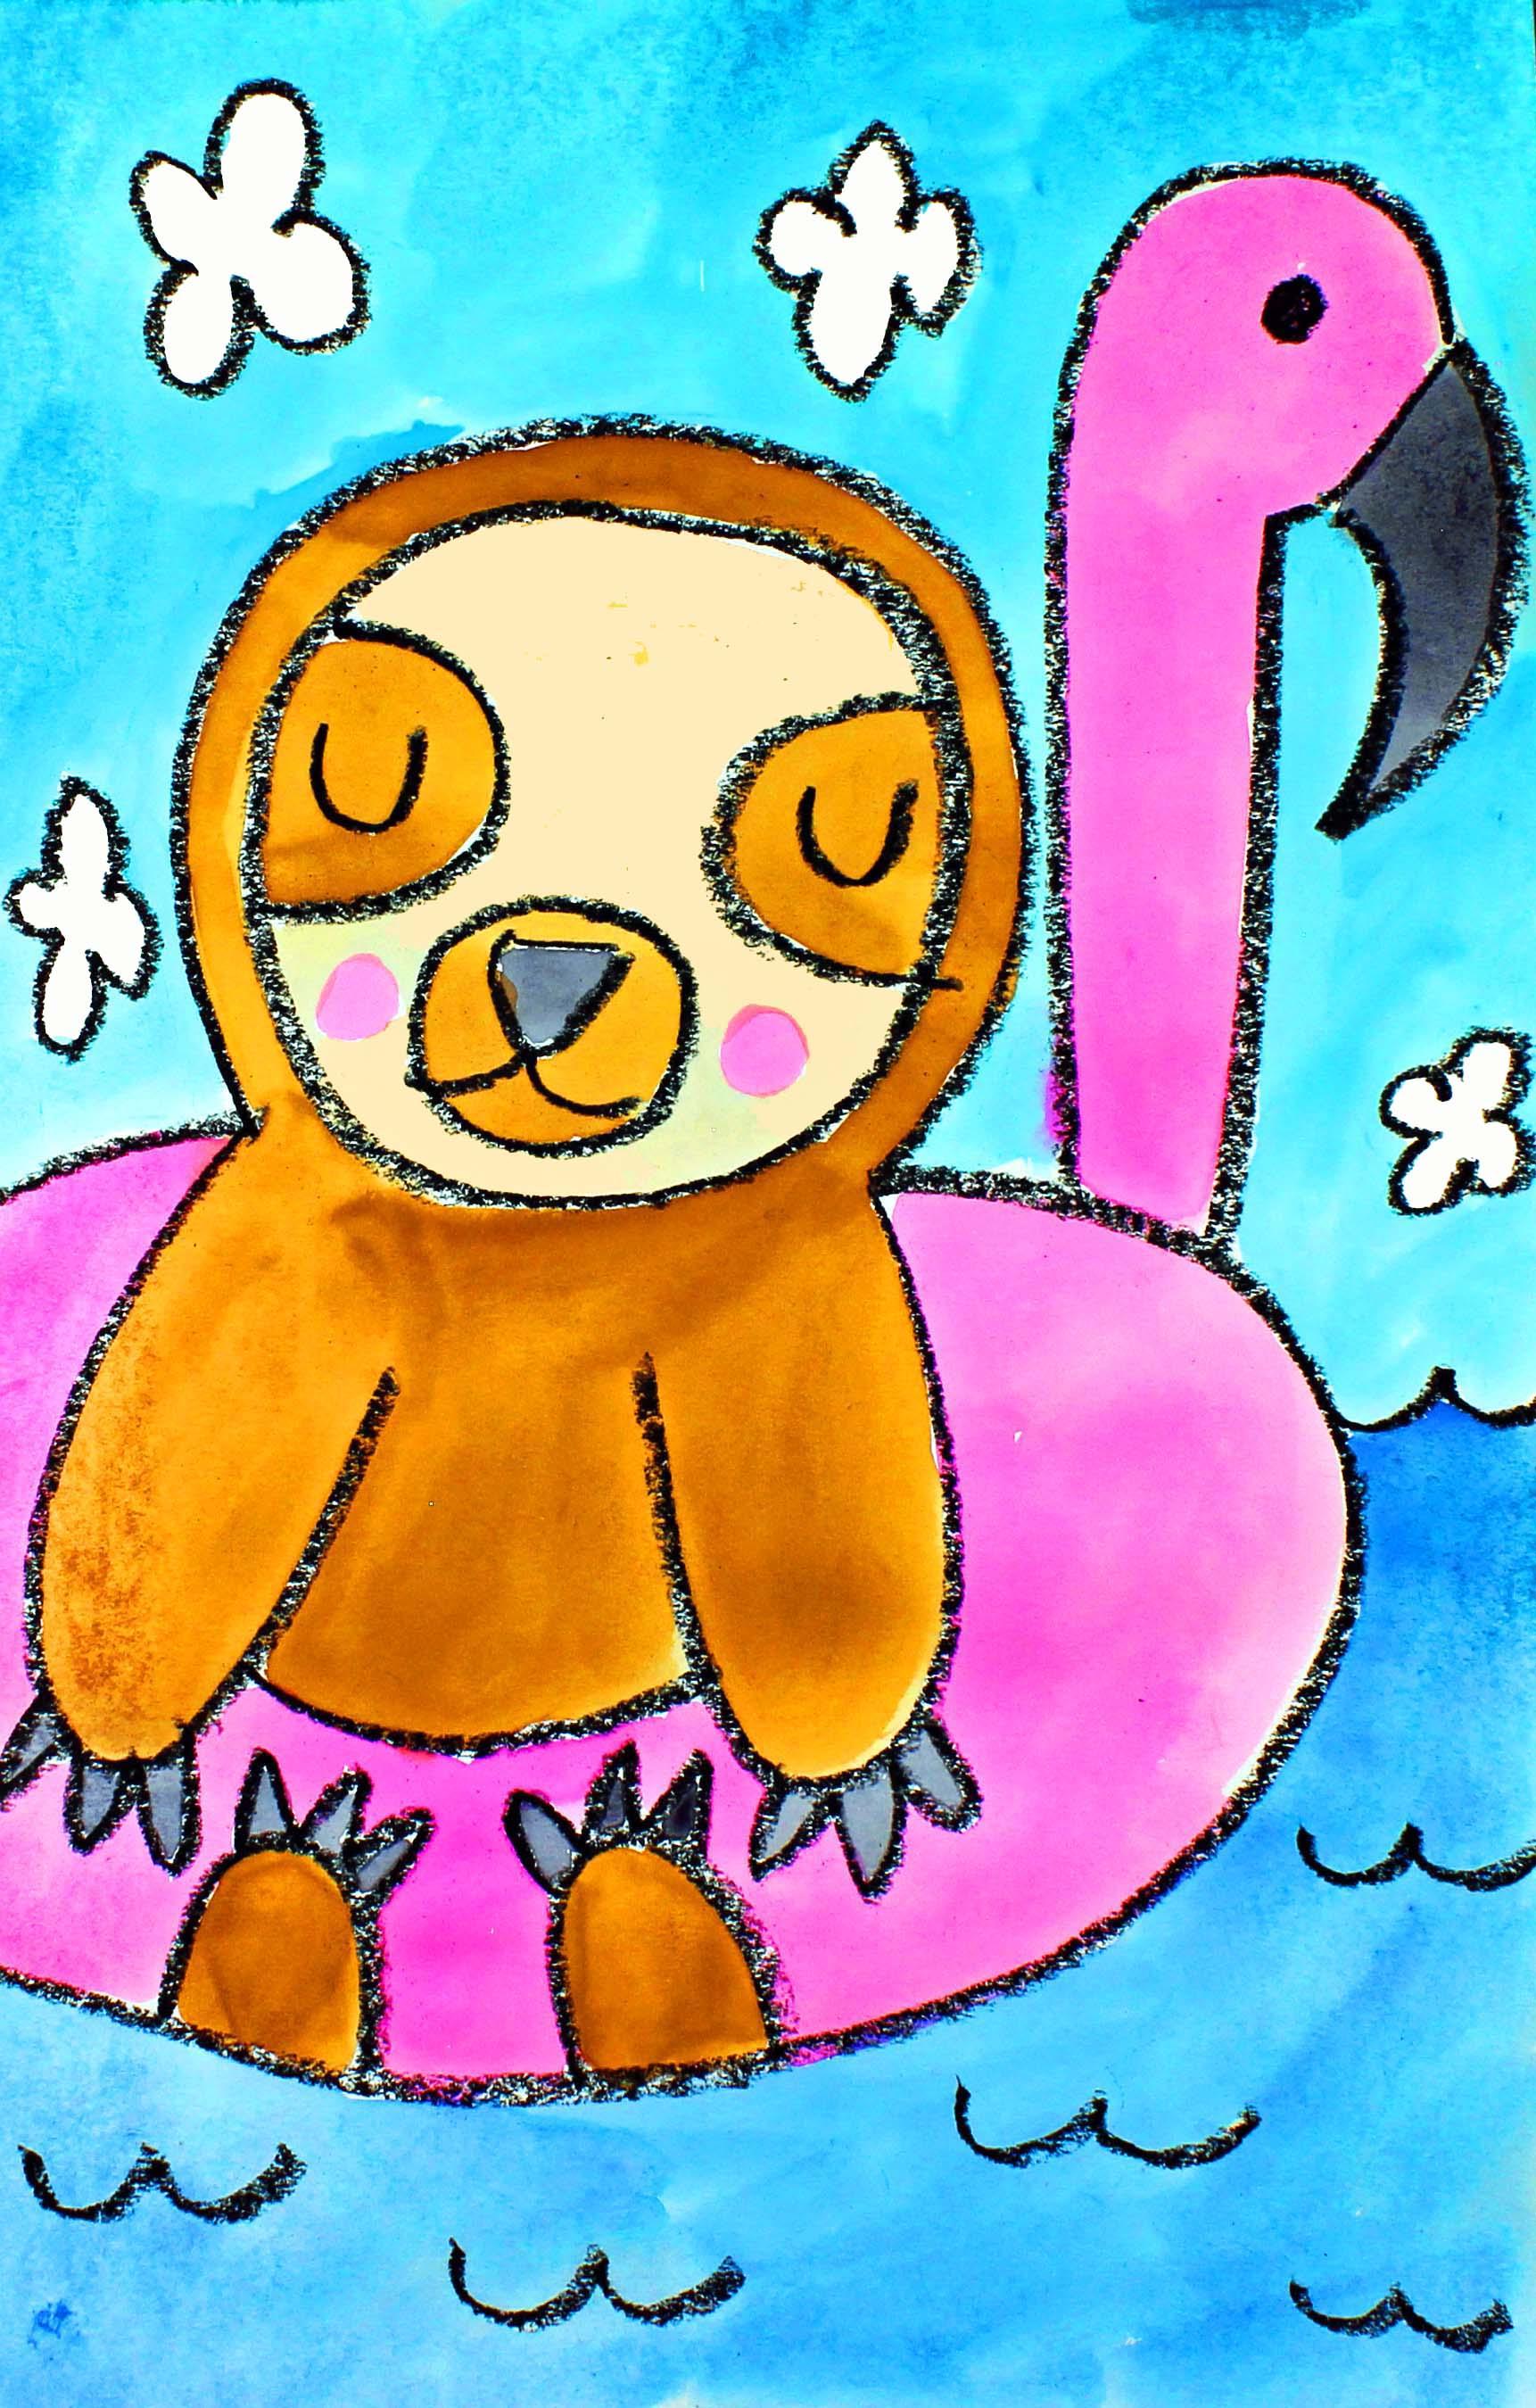
to be creating this cute little sloth who
is in a flamingo floaty. Let's talk about
the supplies and the materials that you will
need for this project. The first thing
that you'll need is a piece of watercolor paper. You will need a set of watercolor paints
and a paintbrush. I like to use a paint
brush about this size, but if you'd like to
use a different size, just use what you have
available to you. You will need a cup or a
bowl with clean water and a black crayon or a black oil
pastel and a paper towel. So go ahead and gather all of those supplies
and materials, and I'll see you back
here in the next video.
2. Step 1: Draw a Sloth Design: I In this step, we are going to draw our design. So let's get started. We're going to be drawing
a cute little sloth who's going to be sitting
in a flamingo floaty. So what we're going to do
first is we're going to pick up our oil pastel or our crayon, find the middle of
our piece of paper, the middle of my piece
of paper is right here. And we're going
to make a circle. Now, this circle is not
going to be super huge, but it's not going
to be super small. It's going to be medium size. So I'm going to make a
circle about that large. We want to make sure
that the circle is big enough so that we can see features inside
of our sloth's face, meaning we want
to be able to see his eyes and his
nose and his mouth. Now what we're going to do
is we are going to make another curve line
around the circle. Let me show you what I mean. We'll start about right
here and we'll slowly draw a curve line around that
circle. There we go. Now what we're going to
do is we are going to draw some arms coming down. And what we're going
to do is start here at this part of our curve line. Make a curve line
coming down and then back up and the same
on the other side. Curve line down, and
then coming back up. This is going to be one arm, and this is going to be the
other arm of our sloth. Now we're going to make some
fingers in of point tee. They're actually
nails, aren't they? Then right here, coming from this curve line to
this curve line, we're going to make
another curve line connecting those two lines. Alright, so that's
going to be his tummy. Now that we have our head and our arms and our
tummy for our sloth, what we're going to do
next is we are going to make our floaty, our
flamingo floaty. Part of my floaty
on this side of my piece of paper is going
to go off of the piece of paper because I have run
out of room, and that's okay. Your floaty, you might be
able to see the whole thing, or you might go off of your
piece of paper, as well. So we're just going
to work with it. So I'm going to
make a curve line. If I had enough space, I would keep drawing and
drawing and drawing, and then I'm going
to come around. And then I'm going to
end up about right here. Okay? So this is our
floaty right here. And then this is our slough. Now what we're going to
do is we're going to make a flamingo head and neck
right here in this space. So I'm going to
make a curve line that comes down and it
touches the floaty. It's almost like an upside
down J. Do you see that? Now we're going
to come down with a straight line in just a
little and then come back down. Now we're going to make
the bill of our flamingo, so a curve line coming way down, and then way back up. Now we're going to make
an eye for our flamingo. Now we have our flamingo floaty, and we have our sloth that we still need to put
some features inside of. So let's make some curve lines coming out from the
side of that circle. And then this
little guy is going to have some curve
lines for his eyes. So he's closing his eyes, relaxing in the sun. Then we're going to
make a circle here. And inside of that circle, we're going to make
a soft triangle, and then we're going to make a smile coming out from
that triangle. There we go. Now, coming down
here at the bottom, I'm going to make the
sloths feet coming up. So two curve lines. There's one and two, and we're going to put
some nails on there, too. I'm just putting three.
Remember, this is a cartoon, so it doesn't need
to look realistic. Yay. Okay. That looks awesome. Now I'm going to put
some background design. So I know that this little
guy is floating in the water, so I don't have any
space over here to show the water because my floating went off of the piece of
paper, but that's okay. I'm going to make some water
here over on this side, and I just put two curve
lines hooked together. And then I'm going to make
some more curve lines like this hooked together. And this will
represent some water. Now that we have our water, we're going to put a
few clouds in the sky. If you'd rather put something
like a sun or a bird, you can go ahead and
do that, but I like to put big fluffy clouds. Maybe I'll put a
small one over here. Maybe another one here. There we go. Oh, I think
he looks super cute. Alrighty friends,
when we come back, we will start applying
our watercolor paints. I'll see you back here
in the next video.
3. Step 2: Paint the Design: In this step, we are going
to paint our design. So let's get started. The first thing that
we're going to do is we are going to add a drop or two of water to
each of our pans of paint. This will dissolve the
paint a little bit, so it's easier for us to use. So I always encourage
students to take that step. Okay, now that we are dissolving our paint
just a little bit, let's turn our attention
to our design. So what I'm going to
do is I'm going to paint my flamenco floaty pink. I'm going to paint my sloth brown in his
face a lighter brown. And the background,
I am going to paint blue and a different shade
of blue for the water. So I'm going to start
out with my pink, and I think I also want to make some little pink
cheeks on my sloth. So what I'm doing is
I'm taking some paint, and I'm putting it into one of my wells because I want my
pink to be fairly light. So I'm adding more
water than paint. I'm not using the paint directly
out of the pan of paint. I want to mix it with
quite a bit of water. And I'm going to make
some circles here. And these are going to be some little cheeks on my sallot. I think that will
look really cute. Now that I have some
pink on my cheeks, what I'm going to do is
I am going to bring up that pink paint by hovering
over that paint and touching. And what that will
do is two things. I will dry the
paint a little bit, but it will also
lighten the color up. You don't have to do that part, but I just wanted to
show that to you. Now that I have my pink cheeks, I'm going to go ahead
and I'm going to paint my flamingo flote pink. I like this color. It's not too light and
it's not too dark. It's just perfect. I'm going to try to stay in
the lines inside the lines. However, if I go a little bit outside of the
lines, that's okay. It's not going to be
a problem at all. That happens to me all the time, although I do try to stay inside those lines. Alright. Now that I have my
pink flamingo painted, I'm going to move onto
the face of my sloth, and I'm going to use brown. And I'm going to make
this brown pretty light. I want it to be pretty
light so that we can have a different brown on
these areas right here. So I want this brown
to be pretty light. I'll just add a little
bit more detail and dimension to our artwork. So let me go ahead and paint
this area light brown. It's almost like a tan color. I'm being very careful when
I'm going around the cheeks, because if I go over the cheeks, then the pink will just
blend in with the brown. We go. Now what we're going
to do is we're going to make a little bit of a darker
brown by adding more paint, a little bit more paint to that. Let's test it out on the foot. A little bit darker. Here we go. So I'm going to paint the feet, the arms, the
details in the face, the Tommy and this
area around the face. I'm going to paint the
darker shade of brown. It's not too much different, but it is different. Alright, friends, so now I
have my sloth all painted, and I am going to paint
the nose of my sloth and the nails and the beak of
my flamingo black and gray. And I'm going to do that last. I like to use my black last. So I'm going to
go ahead and wait until after everything
else is painted, and then I will come back and
I will use my black paint. So in the next step, we will be painting the background
and the nose, the nails and the beak. See you back here
in the next video.
4. Step 3: Paint the Background: In this step, we are going
to paint the background, the nose, the nails on
our sloth and the beak. Alright? So for the water
portion of my painting, I'm going to use a darker blue. For the sky, I'm going
to use a lighter blue. I'm going to make sure that I try not to get my
paint into my clouds. But if a little
bit goes in there, I'm not going to worry
about it too much. And then at the very end, that's when I will use my black for the sloth nose,
nails, and beak. So let me go ahead and do that. I'm going to paint slowly and carefully so I do my best work. I am going to speed up this
video so you can watch me, and then I will be back to
chat about what I have done. So I will see you back
here in just a minute. Alright, friends, so I'm finished painting
the background. What I'm going to do next is I'm going to create some paint for my sloths nose and his nails
and also the flamingos beak. So I'm going to use black, and I'm not going to make my
black super dark dark black. It's going to be more of a gray. So I'm going to add a
little bit more water to it than paint. So I'm going to be
very careful as I'm painting in
these small spaces. Alrighty friends, I'm
finished painting my design. I had a lot of fun
with this project. I hope that you
had fun, as well. I look forward to
seeing you next time.
 Em Winn, Teacher, Art Instructor, Artist