Transcripts
1. Simple Anatomy with basic shapes Trailer: Hello Skillshare members,
my name is Sam or Sammy. I will be your instructor
in this Skillshare class. In this class we will
be talking about how to improve your
anatomy and specifically how to study anatomy using figure references by breaking down the anatomy
into simpler shapes. I hope you guys
enjoy this class and find useful information from it. If you do, make sure to continue following me
for future classes, let's go ahead and get
right into the content.
2. Lesson 1: Simplifying the Male Form into basic shapes: Welcome to my class on
improving your anatomy. In this lesson, we
will be going over simplifying the anatomy
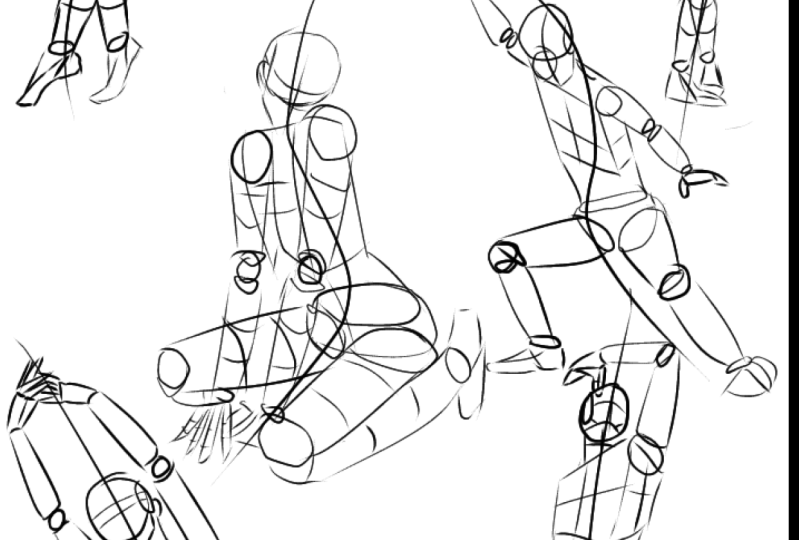
with basic shapes. Here I've got six
different figures. We're going to be doing this in three different stages with three different levels
of simplification, starting from the
simplest and working our way up to a slightly
more complex form. Now what you'll often see if you work with different artists
or if you've watched any artists and you'll
see lots of artists with a variety of the
method of a cube. A circle, circle for the head, got circles for the
shoulders, the hips. Then you just have
your basic lines. Now, I'm not going to be
teaching anything like this. This is a good place to start. However, it will be
best to move on from this stage quickly because
this is a very 2D figure. We'll start working on, is adding characters who use three-dimensional shapes
to define our figures. So instead of just a square, will do a cube, the side there. And then instead of just
a circle for the pelvis, we'll start looking at
using more of a cone shape, sort of like this, almost like a potted plant. Then from there you slowly
start to slice into it. You can get your legs. And then for the
shoulders you're looking at more of a cylinder. Sign on a cylinder, more
of a spherical shape. But not quite, not, not necessarily fully circular, but you're looking at
more of a slanted shape. And as we move along the line, I'll walk you through even
a more advanced version of this that will get you
more of a shoulder look. So let's go ahead and
start for this will be going ahead and tracing
over these references. I have the link for
these references down in the class description. I should go without saying don't trace other artists work and
then claim it as your own. But as far as using
references for anatomy study, it is definitely recommended, especially in the
earlier stages, to use life photos
to learn from. So we'll go ahead, we'll start
with this guy right here. When you go ahead and lower the opacity on this first group, I'm ready to go ahead and just define these with
very simple forms. Depending on the artist They like to start
in different places. You'll generally find artists
who'd like to start with either the head or the torso. Personally, I like to
start with the torso. So we'll go ahead
and start in here. We'll define the center of
his mass is right here. Now this gives us a good idea of where the middle of his
rib cages from there, about the bottom of where
his ribcage will be. If you don't know your
anatomy super well, It's basically between the
nipples and the belly button. Go ahead, put a
line through there. Go ahead and trace out. His general center
of mass will be leaving his shoulder
out on this side. But because this shoulder
here is overlapping, go ahead over that. Now we want to define this
into more of a 3D shape. Twin, see his side is
starting about here. And then I'm actually
going to put a middle line down
on the science. Well, in C, about right here, tilts upwards and we're actually seeing more of
the top of his shoulder. He so we'll go ahead and add a line up here to
define the top. Go ahead, make
small adjustments. I'm actually going to go
ahead race just a little bit up here. There we go. Now let's go ahead
and along the back. Renewal Hindu, something
cold, drawing through, drawing through his
basic where we're drawing something we can't see yet are probably won't
even be able to see. Super were to draw through. We draw the rest of
the cube on this side. And then we'll go
ahead and go through we'll define where his spine is. We go ahead, give
a spiral shape and then move it down
into his pelvis area. Like the pelvis next helps define the center
of mass of our character. So like I said, our pelvis is really going to
be a tapered shape. Sort of like a party planner. This is made to look sort of like how a pelvis would look. Like a pelvis bone when we'd have the pelvis
sort of like this. But it's still very
simplified shape. This bone here, it'd be a good, good idea to learn this
bone at some point. But at least at this point, we're going to keep it
real simple and just go with dislike
potting plant shape. Now for men, this is
more of a straight on, straight on shots like this. You kind of see the
top of it there. But for the most part, the emphasis down here
enough for women. Hips are oftentimes pointed a
bit more down and see might be looking at a shape a lot
more like this one here. You got a line that goes
through to define direction. So let's go ahead and we'll add this to our character over here. Sort of sketch that in. And then it's going
to go ahead and connect down here like that. And define where the center is, which is just about here. Now let's go ahead and we'll
come back to the legs, but let's go ahead
and do his shoulders. So at least in this
stage is simplification. It's going to keep
it real simple. And we're just going to use
slightly squashed spheres for his shoulders. Just like this. If we want, we can
use contour lines to help define the
direction of them. Just like that. And then we can even add an additional line just to
help define that a bit more. Just at the bottom here. This would be the muscle
that would connect to our pectoral muscles right here. If you're familiar with
any muscle anatomy. From here, we'll go
ahead and start by using just simple lines to define
the center of his arms. And then down to
where the risks are. For arms generally, more of
a cylinder shape works best. We're not going to
really worry about muscles at this point, but just create a cylinder shape and then go ahead and
add a contour here. Just to help you
understand the direction. We don't understand what
I'm saying by contour, what you can often do
to help a 2D shape, especially when you're just
defining the simple shapes. To make a 2D shape
appear more 3D. You can go head and
add additional lines. Just like that. I don't like this and this will help our eyes see that
perspective on it. Now what you can, oftentimes get is you'll even
start incorporating something like this
into your actual peaks. So if we said this was like
forearm, what you might get. Let's go ahead and lighten
this up that much. If you have a shirt on him. You might use this to help
define that 3D shape. So you might use
something like that. We're doing something
similar over here just to help
our eyes see it. And this will help
us internalize those shapes as we're
studying the figure. We'll go ahead. We'll do
the same thing over here. Just nice cylinder. This nice contour lines. We can even continue
that through the form. Just like that, kind of connects everything,
puts it all together. All righty, Let's go ahead
and move down to his forums. Forums. We're gonna do
pretty much the same thing as we did for the upper arm. We're going to start
just the cylinder shape. Going to move it down
to where the wrist is. An end cylinder shape off, we'll just add the
little contour line. Some people that
they like to do is that this pivot
point is they'll put a sphere and this
kinda helps them understand where
the anatomy twists. So if this helps you, I would definitely add the
sphere there for yourself. Personally, for me, I don't
find it very helpful, so I don't draw that in. But whatever it's going
to help you understand the basic structure
of the anatomy most is what I would
recommend doing. Go ahead and move over
to this forum here. We'll add in the shape. Now your cylinders don't even have to be perfectly straight. So let's see. I'm sort of doing
twisted cylinders that help resemble the shape. You can actually
even take this to a further extreme gestures. You might have your
shoulder right here. And then you might even do sort of an extreme shape
like this and your gesture. That can really help
create like some, some dramatic in your pose. And you kinda build the
muscles on top of that, which we won't be talking about. In this lesson, you
kind of start to add some of that extra on there that can create a
cool dramatic look. So let's go ahead and contour. And we'll come back to
the hands and the second. Alright, so now
for the leg here, what we're gonna do is
we're going to add almost like a circle cut here and
a circular cut right here. This almost replicates
look of underwear. So from a front view would
look something like this. So we're basically just
creating underwear. If you've ever seen like this, action figures were great and
something similar to that. Then we'll go ahead and add in an action line right
here, that bottom leg. And then just here. Even though we can't see
the entirety of the leg, we want to go ahead
and just draw through. It'll help us when we're
actually drawing the full leg. It's actually get a better
idea of what we're doing. So now from here, go ahead and put a cylinder in. Don't actually worry about it connecting to this right here. Go ahead and just put
the cylinder and just like liking and actually go through slight and
whatever is under it. This will just help this
cylinder stand out on its own. Then we'll just
flatten that out. And then right below it, we'll put another cylinder
for the lower leg. This point, don't
worry about the knee. This stage is simplification. We're just trying to
get these basic shapes are not need to worry
about anything complex. And the knee,
again, if it helps, how you're seeing it, feel free to add a cylinder in there. But again, personally
for me that it just doesn't help
my personal flow. Whatever is going to help
your mind understand what's going on there as what
I would recommend you do. So we'll go ahead. Do the same
thing for this, like here. We're gonna go ahead and
draw really light right now. We are going to
draw the whole leg. We're going to draw through. So we've got a
cylinder right here. And then this cylinder right here. Alrighty. Need low head. Connects the cylinder
and a contour line. Then we'll do the same up here, darken the lines where we
can actually see our leg. Just like that. Now if we turn off our
reference real quick, latency, he really good
looking mannequin. We've got a few
things missing now. Are missing our hands, our feet, our head. And then just a few
of these weird, awkward spots where
nothing's connected. So let's go ahead
and work on those. We'll start with the hand. Now. No hands are generally one of the
scariest things to draw. But at this point, we're just
kinda simplify the shape. We're not going to
worry about any of the complexities
that come with it. So let's go ahead and
start. Just like this. I'm gonna go ahead, get the back of the
hand and the poem. It's going to look, draw
a line right through it. Now I'm going to draw a really
simple shape for our thumb is try to do it with a
slightly smaller line. Just like this. Nothing complicated. Which can cut about the
halfway point where I joined. Then because the fingers
are all in one chunk, just going to go ahead
and separate that into one big shape. Just like that. Keep it simple for now. We'll save complicated hands
for later down the line. Once we've gotten a bit
more into our anatomy. For the sand here,
we'll do similar to one big shape like this. We've got a thumb
protruding off. Just do a simple thumb shape. And then one shape just
for these fingers here. Just keeping it real simple. Let's go ahead and
move down to our feet. These are basically just
going to be wedges. So from a side view,
they would look. Something like this. And then from a front
view, like this, 360 view, we're looking at
something like this from a top view and looking at
it like just like this. Go ahead. Kind of get this back
area here. Then. You just kind of
add on the rest of the foot. Just like this. Don't worry about containing
all the toes right now. Just keeping it nice and simple. The modes get the side here. Go ahead and do the same thing for his other foot like this. Create our back shape. Then. Just this little wedge. We create the side, almost like ninja looking feet. Now, let's go ahead. Just simply do a
simple connection of the different cylinders, just like this will
follow the knee. The arms means following
the elbow a little bit. No need to make it fancy. Do the same for the torso here. Again. No need to make it fancy. You continue our
sideline down like this. Now let's go ahead,
add the head. Now for this view, his back does come out just a little bit, so we'll add his back. Just like that. Let's go
ahead and add his head. Now for the head. This is gonna be
basically a sphere shape. Two sides that are
a bit flatter. They'll come down into a chin. Then we'll have a jaw. From the side view. It's a bit less of a sphere
and it's more ovular. Then you have the jaw coming
down a bit more like this. Kind of a nose that
protrudes sort of like that. Then the neck that
connects to the cranium. Just like this. Let's go ahead and locate where those different features
are on a character. We'll go ahead and
lighten the shapes round. Lean, see, sort of a side here. I've got ovular shape here. I'm going to make sure
we get the full cranium. It's a bit hard to
see with his hair, but we can see sort of along the rest of the
shape of the head. It's cranium probably
comes to about here. We'll go ahead and
add some lines that will help us understand
what the shape is. We'll put a line to define
the top of his head, down to the side of his face. Got his jaw. Just goes to about here. Back around side of his face. Ear just about here. Turn the opacity up just
a bit more for the face, we can make sure we get details. Eyeline, nose line method, it's just about down there. Go ahead and hide
a reference now in go ahead and see our
simplified figure here. You'd want go ahead and
clean up a few details here. So let's go ahead and
connect his leg back here. We can go through just makes sure that that back leg doesn't show through anymore. Make sure we re-add
are contours though. Keep things look nice. Little head nice
and up some lines. None of this is
necessarily necessary, but especially if you want
to present your pose, you want to show it off. I think can be nice to just
nice and up the lines a bit. Alrighty. And there we go. Here we've got our first simplified character. If you join me in
the next lesson, we'll go ahead and take
these same concepts will apply on our
female character here. And then if you continue
to stay tuned for future lessons will
slowly go through. And it's slightly more
complex, simplified shapes. Hope to see you in
those next lessons.
3. Lesson 2: Simplifying the Female Form into basic shapes: Hello guys and welcome
to our second lesson. In this lesson here, we will be working
on breaking down the female form using the same techniques that we use to break down the male form. Just like the male one. We're gonna go ahead and start by working on our torso here. Now once I'm actually
going to do first though, and this one is I'm
going to do something which is the line of action. Now, this is, this is
a form of gesture. I won't go into a lot of the, the more detailed
parts about this. But for this gesture, we're just gonna go head. We're going to follow the
spine mover layer here. Okay? So I'm gonna go ahead
and follow from top of the head down to the spine, and then down to
where the legs are. Now from here, we're
going to go ahead. I'm going to start
working on the torso. Now again, we'll be doing a similar shape to
what we have here. Very QB, very blocky. So we'll go ahead and start
just forming out the shape. Just kinda like this. For the female form, you may be tempted
to, as you do this, go around the breast. However, when we're blocked
out this form where we're actually doing is we're actually making a representation of what the bones
underneath would be. So go ahead and skip going
over the breast for now. And as we go through and we fill in extra pieces at the end, that's when we'll get that. But for now, we just want to get the form that's underneath. So we'll go ahead and
connect this here. Now we'll turn this
into a 3D shape. Will start to cube it out. We'll create our center
line down the middle here. We can even give
this a bit more of a ribcage shape if we want. Kinda like that. Alrighty
will follow down spine. We can draw through
again if we'd like, just so we can see
what the shape that we're unable to
see what look like. From there, we can
draw the spine through down to the pelvis. Now, like I hinted at
in the previous lesson, the female pelvis will actually see a lot
more of the top here. Again, if we were
doing the full pelvis, it would look a bit more
like this with a scene, more of the top here. So as we draw this in, we want to make sure that our pot shape is a bit
more tilted forward. So we'll go ahead and start
top of the circle here. And then he'd out of it and
then it will connect here. Go ahead and create a center line crossed
there like that. And here we have about
where the site is, right about here. Okay. Now what we can do, we'll go ahead and
work on adding arms. Again, similar to the last one. We have the spherical
shape, not quite spherical, kind of like a, a slightly warped sphere that we're
using as their shoulders. Slowly placing that
in the same location. Right here. Place it on both sides. Now for over here
because it's a bit more in perspective and it's
a bit further away. We're compressing that a lot more than we are
for this one here. If you have a bit more of a view of just makes sure that you're following those shapes of
perspective as you go through. In filling this detail out. Then we see we have an arm that similar to the leg up on this first figure
is not in our view. So what we'll do is
we'll draw through, if you remember from
the previous lesson, drawing through is where we're actually
drawing something. We can't say. This is to help us actually
fill in all the shapes are. So if we look, we can see here her arm goes back about here, and then it's going to
connect down to her arm here. So using straight lines, you can get an idea
where that is. And this will help us place it. So it's just very lightly sketch in that cylinder
shape for the arm. Just real lightly. That way we can tell that it's a shape than redrawing
through four. So I can actually
see right here the I misplaced this because it's not lining up with
her other arm. So let's go ahead and do that real quick and
we'll give them another go. So who here? The shoulders here
and ends here. It's going to about here. And then down to the arm. So we'll go ahead and extract
this upper arm first. Place right here. The arm coming down,
just like this. There we go. Now let's go and
get the other arm. This arm, it's a lot simpler to Jocks can
see the whole form. So again, we'll
just be going with that cylinder shape again. Keeping it pretty simple where the arm connects
to the shoulder. But I like to do because
we have the shape here. It's like just kinda
put the arm of it into the shape and actually kinda
connect them together. Because especially once we
start studying muscles, these actually
overlap each other. And the muscles all sorta
connected to each other. And so as we're building
out this basic shape, having them connected like
this will really help with envisioning with that
supposed to look like. Because ultimately
this shoulder is actually going to be over
it. Kinda like this. And we'll get into that in
future steps for some of these other characters will have a bit more advanced structure. But for now, we'll just make sure that we're overlapping
those like that. Now we'll go ahead and
get the lower arm again, like I mentioned in
the previous lesson, if you want, you can kinda
put a ball joint here. And actually for the
sake of example, I will put ball
joints on this one. Personally, I don't use them, but they have definitely served
helpful for some artists. So whichever you end up finding most helpful is
what I'd recommend doing. So for this example, I'll go ahead and use it. We'll create our cylinder here. Add some more contour lines, continue the direction of it. And this will also just help your brain see it as a 3D shape. As interpreting. Just like that. Like last time, we'll come
back to the hands and feet as sort of a last thing to do. So we'll be continuing to simplify the swarms
until we get later. Alright, so let's go ahead. We're going to add in
some lines for the legs. Now if we look at it, it looks like we have a curve
like this. For the leg. You can see for this
first joint here, the curves outward
and then back inward. Them for this leg here, we sort of get just a
very small tilt this way. Smaller tilt back almost. There are a lot
more rigid shapes. So it's kind of
sketch that in length that we're gonna
go ahead and make some lines on here to kind of create to finish off creating this pelvis shape for where
the legs are gonna be. Again, pointing back to
the previous lesson. In essence, if we're
looking at the shape front on creating a shape like this, sort of like do that again. We're basically
creating almost like a fear familiar with like those old action figures or Barbie dolls sort
of underwear look. So we're creating
something like that. Then what we can do is we can use these
spaces right here. We can then sketch lines off and those
can become my legs. Whatever this here is. Alrighty. Now from here, we'll go ahead. We'll create our cylinders. So we'll start with
this one here. Cylinder is going
to end about here. Then we'll just sort of do, especially for legs,
especially in the female form. We can do very curved
cylinders just like that. And a cylinder ends about here. And we're actually going
to do, we're going to take for the cylinder. That it's ending more like this. So with this being what
we're drawing through. So this is on the other side. This is what's actually
on the foreground. Make sure to add a contour lines down the
side around the cylinder. Then we'll go ahead and create a similar cylinder
on the other side. Draw through, so cylinders
coming up like this. And then on the other
side of our character, it's tapering like this. You can see it kind
of goes right here. With this being with
center foreground. I know our sketches
getting real messy. Oftentimes what I'm
doing when I'm creating a character is I'll
create a first layer. There'll be very sketchy, very messy like this. And then once I'm done
forming everything out, I'll end up creating a new
layer and I'll go over it and I'll draw only what the eye
will actually be able to see. Like a lot nicer
with my line art. Now for our studies, we don't necessarily need
to worry about that. If you're maybe presenting
it than maybe yeah, you want to show
it off a bit more, but definitely don't need to
worry about that right now. Go ahead, go down the
side here with a contour. Didn't have a front
line right here. And then we'll go ahead. Circle that through. Create that 3D shape. Then work on the lower legs and add just a ball
here for the knee. Again, you don't
have to add that if it doesn't help your workflow. But if it does definitely add that to help a vision the form, because a lot of
this right now is not even about creating. It's not about creating amazing
piece of art right now. And it's not about creating
phenomenal anatomy either. This is about helping
train your eye to see the shapes in 3D. To start seeing the form
in the simplified shapes. Then as you start
doing free drawing, or like freehand drawing, you'll start to
see these shapes, especially as you do
your different studies, you'll see these shapes in your characters and you'll
know how to simplify them. And so, you know you're creating your
character like Okay, well I'm going to start with this nice cube
shape for my torso. And then I can create this
tapered shape here for an arm. Then I'll use lines sort of place where I want
my character's arms to be. Then, you know, you know
that you can use the spine, then get down into the pelvis. You can create this pot shape
lymph from the pot shape. You know that you can use He's lines to sort of show
you where the legs are. And then you start trialing
them into cylinders. Eventually before you know it, you start having
a full character. This is really all we're
doing here is we're just training our eyes and
we're training our hands. But a lot of these,
we're training our eyes. How to see this, how
to be looking at this, how to know what's there. So let's go ahead. We're gonna move on to
the hands and the feet. Now, you saw this
last time I showed with these wedge shapes. And then from the wedge shape sort of went down like that, you kind of create this
weird wedge foot shape. Now the same thing
will apply here. However, obviously
she is in high heels. So we'll go ahead and start
by creating this basic shape. This one's more of an aside
views with a side view there. And then there we go. We've got our wedge. And then we'll just sort of
create more of a curvy wedge. Whereas last time it
was very straight. This time, we'll just
sort of curve it. Makes sure that define
what the site is. And then we can actually just
sketch in the Basic shoe. We don't really need to
worry much about it. Just like that. Then on the other side, we'll go ahead and put
in that wedge again. Just like this. Then go ahead and add
that nice little curve. If we want, we can continue down our contour lines
through the feet. Then I'll sketch in the shoe
over here to there we go. For the hands will do the
same thing we did last time. We'll start with one basic. It's not quite a rectangle
or square shape, but it's just sorta like this. It's a trapezoid
sort of like that. And it'll be it'll slant down towards where the pointing
finger is or the index finger. Your finger is, you
get your index, your middle finger,
and your ring finger. You've got your pinky and the thumb kinda
comes off on its own. So we'll just do that. Then we'll just keep it real simple for the fingers for now. Basically it's going to continue with the simplistic shapes. Here. Tweets got a
square, square, square. And then we'll do just some
proportion squares for where the fingers are
bending right here. Go over. Now over here we
can basically see no detail as far as the hand. So we'll just sort of sketching. It's really simplistic. Shapes, bit of detail for
the finger, kinda like that. That's all we'll do over there. Now. We didn't get much into the neck and this one just due to how the perspective
ended up being done. But how do you the
neck over here is we'll continue with
the spine line here, 0 through to the head. None kinda go from
the shoulders, create a line over the top here. Then once we get
into further detail, this will start to
branch off and become the collarbone that we won't be worrying about that
in this stage. And then the neck is just sort of a gradual
rise up into the cranium. Now the big thing to note, so you have a cranium here which is not actually
completely spherical. In the front. It's sort of some spherical, but if you start to
look from the side, it's a bit more like this
middle point being about here. So from here, neck is going
to connect about here. You're halfway point and the
next is going to connect about halfway then to the back. Then you had the chin come out and the neck then
come out from that. So this is sort of what our connection here is
going to look like. So as we create our neck, we didn't see her cranium
is coming back here, which is where the neck
is then connecting. And we've got her chin. And because of the
way she's twisted, her neck here just sort of
tapers somewhat directly up. Alrighty. Then for the neck, we're going to go
ahead and define where the side of the neck is. The neck is more so
of a cylinder shape. Sort of like we're sort of like a really short version of what
we're doing for the arms. So we'll go ahead. Add a nice round contour line. Will define where the frontiers. And sometimes what I'll
do is I'll even draw through the top of the neck, actually going to about here. So if you ever draw a character
completely from behind, or even only has 360 behind, you have it like this. You know, their chin
comes down to about here. The neck we'll do is the
next actually coming up to about here. The neck actually
goes a lot higher in your head than you
might initially think. And so when I'm
drawing my character, I'm actually just going to draw through he dropped towards the neck is and I'm just
going to lighten it. Still want it. They're sort of lightened in the bit so we can go ahead
and sketch in our head. Now for here, the first
thing I like to do for the head is like to find
out where my cranium. So it seems like the cranium
is going to about here. And then our cranium was
probably ending around here. So we'll go ahead. We'll sketch in that
spherical shape. Again from the front,
it is going to look a bit more spherical. I would say cranium. It's probably on a
tad lower than that. So we'll just go ahead
and adjust that. And then we're gonna
go ahead and create a line for the front. This is to define where
the center of the front of the faces will add a
circle on the side. And this is actually
the ad more of a flat shape to the side because we don't
want it fully spherical. Because once you get to the
side of the face and actually started to get rather flat. So we'll go ahead. We'll flatten out there. And from the middle
of this shape is where the jaws
going to come off of. So the jar will come
from the halfway point there is the edge of her face. Then sorted down
into this shape. We'll go ahead and add eyeline. Right here. I like to do
right above the eyes. Some people like going
right under the eyes. And then some people also will do above and under the eyes. I'll either do just
above the eyes. Are L2 under the eyes or I'll do over the eyes and
then also under the eyes. So then here we can go ahead and continue the
flattening of the shape. This additional
shape right here. I won't go very much into
facial anatomy in this class. I may go into this
in a future class and how to place all the pieces. But just sort of from the spot here we're going to add and just like where that
cheekbone and B. And then we'll
finish off the job. We've got a job
right here and it's sort of the size of the
job, just like that. And then we have the ear, which should be just about here. So from here, if we
turn off our reference, we can see we've got a
pretty good looking shape. The only thing we really
have left is we're gonna go ahead and just
connect a few of those pieces. So we've got the knees. And we'll just kinda quickly
sketch in those knees, they're in future lessons. We'll go more into how much do more simplification for the knees but still
placing them. Well, we won't worry
about that right now. Same thing goes for the elbow. Just sort of sketch in what
currently looks right? And we'll work on some of
those more advanced shapes in future lessons. Here. Go ahead. We'll sketch in sort of
this fatty but here, because this point we're
going over and we're getting not just the bones, but we're getting those last
pieces of iron, her stomach. You can go ahead, continue that line down. And then if you want, you can go ahead sketching our
belly button real quick. At this stage, if you are
wanting to just sketch in the close lines, you
could do that too. So her clothes kinda go like that so we can
sketch that into. You don't need to,
but if you wanted to, you could do that here. Let's do it here for example. Then this here is where we would then just sketch in her breasts. And I won't be going
very deep into how breasts work in
this class either. The main thing to keep
in mind is that breasts, and you've probably
heard this before. Breasts are not circles. Breasts are more like teardrops. So they got to shape. More akin to this. None if we were to copy
that, flip it over. You would have this
would be unless he had a very strong
like push-up bra, she would actually have
all of this space here. In-between them. You would have depends on
how old your model was, but you'd have about here. You would then have
facing outwards. We'd have the nipple placement
about here and here. So we won't be going very
deep into that past this, but that's just kind
of gives you an idea of where that would be. So it's just sketch
these in real quick. Just keep that in mind. A more teardrop shapes. They're not, not, not balloons, or at least air balloons. Water balloons are
oftentimes uses. Good examples though. So you can keep that in mind. In college, you gesture line right over where
the nipples might be. Just kinda help with seeing
the motion of things. And then there you go. If we go ahead, turn
off our references. Now say both are male
or female figure. We can see we've really
simplified them down. Now what I would do before
moving on to the next lesson, because we will be moving into a bit more of advanced shapes. I would go head, I would grab a few references. You can either use the
references that I used. I put the link to where I got these in the description
of this class. They've got a lot of really, really good references,
but I know there are also a lot of really
good ones out there. I would go ahead and
get some of those and I'd go ahead and
practice these shapes a lot. If you don't have digital art that I'd go ahead and use
tracing paper or a lightbox, something like that to practice. Either way, I would practice
these forums a lot. And then once you've done
maybe five or six of them, you can even do more than that. Once you've done a few of those, go ahead and come
back and go ahead and move on to the next lesson.
4. Lesson 3: Defining the Male form with simple shapes: Hello guys, welcome back
to this next lesson. In this lesson we're
going to be going over the next stage in our studies. As you can see right here, I've already done the
simplest form for our male and female
character as I walked through in our
previous two lessons. What we'll be doing
here in this lesson, we will actually be going
through and we'll be using simple shapes to continue adding to the detail
of our character. So here we're going
to start actually working on defining some of the muscle groups
and a bit more of the anatomy past just
the simple shapes. But continuing to that next day. Go ahead and take a look at
our male character here. For the model, I
picked a bit more of a muscular character. As you can see, we have our reference
on a low opacity. It was turned up real quick,
so you can see it here. It's aren't referenced here. Then over top of that, we have again at a low
opacity, a sketch. This is again just
a simple sketch based off of our
previous lessons. Now we're gonna go head. We're going to start adding some additional definition
that we're not, that we weren't looking at
in the previous lessons. Alright, let's go
ahead and get started. Just like before in
the previous lessons, I still like to
start at the torso. And I go from there. So as you can see, I have very much
angular shapes here for like the ribcage
in my initial sketch. But we're going
to start actually making this look a lot more natural. Let's go ahead. I think I want to start
at the collarbone. That's oftentimes it's
a nice place to start. If we turn off our sketch and we look at just our reference, we can see the
collarbone is not, It's not necessarily a straight
curve or a straight line, but rather is kind of
warped depending on what our muscles in
the area are doing. If you have a character who's
got a lot less muscles, then you are going
to see that being a bit more of a straight line. But with this
character who's got a lot of muscles on top of that, it's going to be a
bit more angular. Now we're not going to
copy exactly what's there, but try to, try
to study from it. So we'll go ahead and sketch
in just that right there. That kinda connects up to
the top of the shoulder here into similar
thing right here. And then kinda connects
to the shoulder. Now one of the ways that
we're actually going to create a more 3D looking shape. Because in this stage
we're actually going to stop adding all of those contour lines that we've used here to help
define the 3D shape. And a lot of how we're
going to continue to have that 3D shape showing a full piece is by having
overlapping lines. So instead of the
shoulder where you might have done is just your shoulder and you continue to the arm. But you can instead, you have the overlap there. You have them the
arm connected here. Then it would go
down to the torso, which may also
overlap and places. You see this form
here looks very 3D without needing to add that additional contour
to define the 3D shape. So that's what we're
doing right here, is we're not just
going to connect the shoulder to this line here. We're going to add just a bit
of an overlap right there. Now we're going to
come back here. We wanted to find where
it separates from being sort of the front
plane of our character. Tourists side planes. The liver going to do that, especially with the
arms at the armpit is a great spot to
start defining this. We've got the armpit
just about here. This is going to separate
the arm and half as well. You can see that kinda
continues through that contour line there. Then it's going to come down. We're going to define a
bit of the chest here. Now, our character here does not have a super defined chest, at least not with his
arms up like this. But we're actually going
to go ahead and add a bit of a chest here anyways. And this is because
we're not just trying to necessarily replicate
fully our character here, but we are also wanting
to create something new, sort of add a bit more to that. So we are going to define just a bit of a
chest shape here, even if it's not necessarily as defined in our
reference picture. See definitely make that loads go ahead and
do that once more. At in just a bit
of a chest shape. Doesn't need to be perfect, doesn't need to be
anything extravagant. Just like that. And
then we have nipples, judges sketch in real quick. Now, something to take
note of is for men, the nipples are generally
even when stretched. Generally just a pretty
simple shape like this female nipples
vary a lot more. You may see something
more like this. The nipple there, or are more
of an oval shape for men. It's generally more of a circular shape even when
stretched like this one. So with his arm up like this, this one is being touched
up upwards a little bit. This arms out stretching
quite as much. So we're not seeing the
same sort of stretch there. Alright. That's going right
down the middle there. And then they interests sheet line goes through
the middle right there. Now we're going
to go head sides. These again, like before we
were doing a bit more of a, just a straight line down. We're gonna make
sure we incorporate now just this bit of a curve, curves down and this is
going to be following the ribcage here, right there. And then for the ribcage, instead of doing
these straight lines again like we did before. We're gonna start
of hint at what it's going to look
at the skin level. So especially on someone
who's a bit thinner. And I can even show you over
on this reference here. You actually do see some
of that definition of the ribcage through the skin. So we'll go ahead. Just have it curve. But we get some of this
ribcage right here. Just like that. Right? Then let's go ahead. We'll sketch in the hips. Once again, even
on thinner models, you still see some of
this hip that comes out and then back in. So obviously this guy is not
super ripped that we are adding a bit more toning
then maybe he actually has. Go ahead, Go out. And that's going
to come back in. This kinda like this. And then from there, you have almost this
underwear shape again. For my men especially
I like to do almost a boxer shape like this. Then shaped just kinda
comes down right there. This will start at
the top of our legs. We'll come back to
her legs there. Let's go ahead and
actually move back up to her arms at this point though, where we have our biceps now, the way that muscles look
under the, under the skin. And I'll do kind
of a top top view is to start if
this is our elbow, this is a shoulder.
For the bicep. You have what's
called the tendon, which is it's sort
of like a bungee. The muscle is on top of the tendon that connects
to the bone here. And then from the tendon you
have the Bicep on top of it. And then it connects once again to another tendon
on the other side, which connects to the
shoulder in the armpit area. That's defining
that shape there. Now the tendon can
vary in length. You can have a
really long tendon. And that'll create
generally a bit of a bigger bicep That's
a lot shorter. He ever see those arms? That the bicep kinda looks like that and then there's a decent amount of
space before the forearm. That's because it's got a
bunch of longer tendon. And then you've got some
with much longer ten, sorry, with much
shorter tendons. This is going to create for
a longer looking bicep that generally is going
to have a bit less mass unless they're
really, really ripped. And then on the bottom side you have a similar
thing with the tricep. Sort of like that. So that's what we're going to be
sketching out here. So go ahead and start
with the bicep. Obviously we got armpit here. This defines the shoulder shape. We then have the other side
of the tendon go in here. Just going to give us
a bicep about here. But there is going to also help define our shoulder shape
just a little bit right here. I'll go ahead and actually
clean up my lines here. But then the other side, this tricep, That's
a shape like this. Then here still have
connecting in their elbow. And then what we have here, we'll have our forearm muscle. Now. We've got our arm right here. You've got a bicep. Tricep. This muscle is gonna go down about the
middle of the arm. It's going to connect
sort of like this. And it's going to
come down and it's going to follow through. Down to this point right here. Says good luck. Sort of like if you ever see a really
buff guy and he's got those forearms and that muscle that kinda goes through past his elbow and said bit of
like fleshy part right there. That's the forearm muscles. Can it go ahead
and come through? Fine. That just kinda like that. And we'll continue his
arm on the other side. Just like this. You'd see part of the muscle
there go over top like that. Now, I'm not going
to have this part defined quite so
much when I have it taper off into a bit of a thinner
line, just like that. There we go. Let's go ahead and get the
other side. Once again. But the armpit here, biceps gonna be
here, tricep here. Go ahead and get her
tricep first this time. That we'd be seeing the back
of the arm a bit more here. We would definitely
see a bit more of that tricep just due to the pose not seeing
too much tricep. Then let's go head sketching
that bicep right there. Okay. She going to scooch this muscle over mics
aren't bit more like here. There we go. Now likewise on
the other side or the other part of
the arm, go head. That forearm muscles. Now, let's go head. The neck, which kind
of goes down here. And then you've actually
got this back muscle here. Now, what you get kind of shows up in the
front view like this, looking like it's looking it
looks kinda like it's part of the shoulder but it's
actually part of the back. So you have your guy here, your shoulders, your spine, and come out into the hips here. You got your shoulder
blades here. Nausea, a more muscular back. Your back actually
starts to go up. Just like this is you really
define those muscles. So what we're getting here
is on our character here, those muscles are
large enough and especially because of
the way he's flexing, we're just seeing those
just past the neck here. So that's what we're
sketching in there. Not much to be said there, but that is what we're doing. It's again, I'm glad go ahead and adjust her
chest muscle here. If you're working
digitally as you find areas that you think, maybe I placed them
Natalie bit wrong. Feel free to adjust it. Try not to use it too
much as a crutch. It's good, especially when
you're getting started out to do lots of pen and paper. We can't necessarily
make those adjustments. Just to kinda make sure
that you're focusing on getting the anatomy
right the first time. But it's always good to make
adjustments as you see them. Erasing things were neat. Be that way you're learning. If you're never
correcting your anatomy, if you work in your characters, then it doesn't matter if you realize that it's incorrect, you're not training
your arms properly. So it's always good
to just kinda work on fixing those mistakes. And if you can't erase
them and redo them, this is better for
training your brain. So we're gonna go head. Go back to our face here. This is not necessarily
a facial anatomy class, so I'm not gonna go into lots of detail on
how I'm doing this, but I'm just kinda sketch it
in its basic shapes there. You got side of his face here. Just sketching it in.
We've got jaw right here. Because of the
angle of the head. We are seeing a bit of
the top of his head. We're going to do I'm
just going to sketch in that hairline. Just like that. Here. It's got eyebrows, eyes right here. Knows. Sketch this in real quick. Nothing fancy. God is lips. Just keeping that pretty simple. Some point I may do
a class that breaks down facial anatomy
and put more where I can go into how to craft a
nicer face than this one. But this is all we're
gonna do for this class. You can go ahead and
sketch in a bit of those muscles that branch off from the collarbone. Adam's apple right there. Okay, We're gonna
go ahead and move down to his torso here. Again, this model is
not super reliable. We are going to be
drawing anatomy over him. So we've got obviously the
belly button right here. I'm just going to sketch
that in real quick. For the belly button. Don't just do like a straight
line or anything like that. What I like to do, to do sort
of like this half circle, I just have a dividend
a little bit. Just give us a good idea
of what we're looking at. Nothing too crazy though. Then. We're gonna go ahead. We're gonna give
this character apps. Now. Six pack abs, eight Pack abs, what have you? There's all these
different variety, but we're gonna do is
from the ribcage here. Let me go ahead and start just sketching in
the genital area. These apps are going to be, these are going to start about where the
ribcage tapers down, come round for this round shape. And we'll just taper down
a little bit right here. If you've ever seen those like muscle anatomy
illustrations, you probably familiar with
this sort of shape right here. Then from there, we're going to start just finding
that central line. Just like that. And then we're going to start
defining these abs. Now what you get is you
get three amps here. And then what you have here
is it's not quite an app, but it's just sort of that shape that continues down sort of like a tendon down
into the groin area. Start with this
first right here. It's going to give it
a nice tapered shape. The second one,
and they all kinda get slightly bigger
as you keep going. Again, abs vary a lot. Some of it, some of it is
up to just aesthetics. But he's going to continue
just sort of like this. And then lastly down to
that last AB right here. And that shaped just kinda
continues down there. The AMX going to make adjustment and just
move all of these down. Just like that. And
move this shape up. And there we go. Hi, Let's go head. Move on to the legs. Now, for the legs, what I like to do is
I actually like to start down at the names. Some of the reasons for this, because I like to
work the leg muscle, muscles from the knees up
just fine for the way I work. It works the best light. That means C for
the leg muscles, but you get to
kinda have a shape. Not necessarily unlike the
bicep, sort of like this. You've got the tendon up there. Going from the knee up
almost into the groin area. This muscle there, and then
you've got the back muscle. It will actually show through
on both sides as well. So the reason I like to
start with the knees, sit this nice neat shape here. Then is base from the tendon
there up into the, the knee. The knee up, up into
the groin area. Then it's going to come through, tapers out and around. And then once again
back to the name. You do that on the
other side to our knee. Just like that. Coming through. Now, on the other side we have the back leg muscle
show a front view. It's going to taper out
just here from the knee. Eau Claire, I'll
kinda like this. You actually see that
just a bit on both sides. Then on the side view here, we do it just a bit more. It's going to come
around just like this. Then the other side
we get down here, just a small section
here where Ni is, we just get a bit of flesh there that then goes into a cat. So in the front calf muscles
just going to show like this where it just
kinda protrudes a little bit then comes back in. But what it looks like, and I'll do a side view
sort of goes like this. Down to this bottom
part of the leg. For the most part,
while you still have the tendon down here, the majority of the calf is contained in the upper
two-thirds of the leg, with the rest of the leg having
a lot less muscle define meant that there got it
coming down to the feet. The same thing on this side. See it a bit on both sides
of the leg will actually add just a bit more
refinement because we can then scan. We just kind of have
his feet right here. I'm just going to sketch
in a simple shape, not unlike what we did before. Just without drawing
through. Do the same. Just right. Keep bringing back then backups the leg. Okay. And then on this one, we don't actually have
any hands to look at. But we would just be doing the same simplification
that we have right here. So at this point,
what we can do, we can turn off our initial
sketch. If you want. You can go ahead and sketch
in his kinda shorts. Or if you were
doing a nude model, than just leave it as is,
I'm not going to do either. I'm not going to
sketch in any pants. I like seeing the
additional anatomy. Go ahead and turn
off the reference. See your character right here. We've added just that bit
of extra shapes here. And he's looking pretty good. If you join me in
the next lesson, we will go ahead
and work on doing the same steps on
this figure here, adding a bit more of
that muscle definition and a bit more of that detail. Now with the female model, we're going to find that unlike the male model where we have
all this definition here, creating a static
female character. We're not going to have
quite as much definition. Even though all the
same muscles are there, we're not going to draw
them with the same. I keep saying definition, right word, the same definition. Definitely look
forward to that video and join me for that and I will see you guys
in that lesson.
5. Lesson 4: Defining the Female form with simple shapes: Alright guys, welcome back. Today we're going
to be continuing our class on creating
characters from simple shapes. In this lesson, we're going
to go ahead and continue on with our female model here. I'm going to be
showing you how to add some additional
definition to her and making a start to
look like a bit more of a fully
fleshed-out character. So as you can see here, I've already gone
through and done the first stage
is simplification as we covered in lessons 12. And now here we went to
continue what I taught you in less than three here
and less than four except for our
female figure here. So for here, as you can see, we've got this great pose. This is provided
by a Dorcas stock, which was 18th-century stock. If you're interested in getting these references,
please go ahead, take a look in the description
down below for the class. Let's go ahead and
get started here. Like last time I told you I
like to start in the torso. I like to do same thing
for the female model, and we'll start here
with our collarbone. For turn off our
sketch real quick and turn up the opacity
on our reference. You can see here that unlike our male model
and the previous ones, with her humming a lot
less muscle definition that we do have much more. Just a straight on line
for our collarbone. So that's actually
where we're going to go ahead and get started. Go ahead, lower our opacity. Here. You go. Head, starting
from the shoulder here, down into the collarbone. Make straight line leading
off to the shoulders. Now I'm actually going
to go ahead and just get the neck here right away. The next going to come up from here into the back
of the cranium. Cranium being just
about right here. Then from here and get the
other side of the neck. Now we can see on our model because actually
twisting her head a bit, which is resulting
in just a bit of these wrinkles right here
from the skin turning. We're gonna go ahead and just
sketch that in real quick. Then we'll loop, remove my sketch real quick just to show you on our reference here. We've got this right here. Now this has also
created from the neck. This can happen when Elizabeth more strain on the
neck where there's a bit of pulling on the skin because
you've got some almost like tendons in the neck
here that help you move your head around. And when the head is
twisted back like this, you sort of get that
divot right there. So we're gonna go ahead and just sketch
that in right here. Just like that. You don't
necessarily have to add these, but I really enjoy adding this bit of detail
to my character. Really adds what I feel, exhibit more of a
dynamic feeling to them. Now, we're gonna go head, followed down our character
here and define right here, which is where the rib cages. It's gonna go ahead, go to our back right here. It's going to come in
just sort of like this. Now like the last lesson, I talked about how without using these contour lines that we used in
the previous one, which is where we're kinda
ramping around the shape. The way we're going
to make some 3D is with the overlapping object. So in the previous lesson, I used the shoulders
as the example here. Where we have the lines
overlapping, we have shorter. Then the overlapping of the
arm coming out from that. Now, this applies to all obviously a lot more
than just her shoulder. And so down here I'm
actually going to apply this concept to our torso here. I'm going to continue this line through and then go back here. And I'm gonna go
head Easter adding in lines going to bring
down to the hips. This here obviously shows
that whatever is here, overlapping, what's down here. Those are beautiful
scribbles I just added. Anyways. So we're
gonna go ahead, have the overlap right there. What we get here is because our sign is obviously
right here, or side plane is that this here is actually the
back right here. We're going to add just
that nice curve there. Now we're gonna go ahead
and go onto the other side, like we talked about
in the first lesson. The second lesson,
we're not going to worry about the
breasts quite yet. Now in this model, we actually have relatively small breasts. But like the previous lesson, I am going to be exaggerating
certain points of anatomy for emphasis to help you
understand what's happening. What's going on there? So once we get there, I'll go into a bit
more detail of how to make them
with the proper way. And we'll talk about how
that ends up working with different types of brows
as well. Go ahead. It's continued. The ribcage is going
to continue this way. I'm not going to draw
in all that detail, but it's going to
continue just up to here. Now, this pose is
great because we have one arm up, one arm down, which is going to
create a lot of different places for study. We're going to go
ahead and start with this arm that's going up. We actually get just a bit of the back here that
connects to our arm. So if our armpits here, this here is just
a bit of muscle. That connection sort
of from the back up into the shoulder blade. The shoulder blades.
What's controlling this part of the
muscle right here? This is connecting right
into our arm quite nicely. From there, we're
gonna go ahead and define in where shoulder is. That's gonna be this
muscle right here. Just like that. And
I'm gonna go head. And we're not going to add
too much definition to it. We're going to add
a bit more than I would normally do just for the case of study, which kinda continued
to keep prosthetic. We're not going to add
too much definition. Unlike what we did
with the male figure. Now from here, armpit, what we've talked
about with the, the tendons in the
previous lesson, that same thing's
going to apply here. We're going to have
bicep like that. The tendons connect right there. We've got a nice
trace right here. Just like that. Let me go ahead, lower the definition
on that just a tad. Then we'll go ahead and
add in that forearm again, this is going to be the same
as the previous lesson. It's going to come
sort of like this. Overlap over that muscle. Just a little bit more. Go ahead and come
back to the hands. Just a little bit. Kind of focus on those
their own separate thing. So we'll go ahead and
get the other arm. So we've got the shoulder
right here. Similar shape. It's going to connect
down into the armpit. From the armpit here
we have that tendon. It's going to connect out
and to bicep like this. Then got a tricep just
in the back here. Just keeping that
relatively small. We'll have a bit of overlap from the shoulder to help
define 3D shape. Then got our forearm. Just like that. The elbow around to the hand, dt once again, we'll come back
to you just a little bit. Alright, perfect. Now, in the previous lesson, one of the things
we talked about is this back muscle here. Now this here we're not
seeing quite as much as in the previous lesson just due to not quite as much
muscle definition. But we aren't getting
enough of that back there. We do need to make sure we
add that connection there. Just like that kind of connects right off of
the shoulder there. All right. Now from here, we're gonna
save the head and hands per liter and we're gonna
come down to where these hips are. Now. Kinda got some of
it here already. What we're gonna do is
we've got the ribcage here and often the ribcage. And it go ahead and make
sure we get that hip. The other side there. Then, similar to
the male character, I like to just sketch
out the underwear shape. It helps define
where the links are. So then, just like this and
you can see underneath, I have that shape that we've
talked about in lesson one. Listens wanting to sort of cone-shaped were square root
of sketching over that. Then on this side, we're seeing just a bit of the buttocks just going to
come through just here. Right off where the hips are. Now we're just gonna
go ahead and erase wherever we drew in. The hands are. What can often be helpful to get a good line is still draw through all the way and then just erase whatever
is not actually visible. This just helps get a
nice accurate line. Now from here, if we
continue down from where the Center
for character is, even though she's wearing this one piece, we
cannot isolate. The belly button
should be about here. And I'm actually going to
sketch that in, if anything, it just helps me know where
the different landmarks are. Now like the previous one, we are going to add a bit of
definition that's not there. And so I am going to
sketch in her abs. This will be, again, a lot more subtle that
are more muscular model. We'll sketch in generally where
that shape's going to be. The final middle line. Then sketch in basic muscle definition right here next to where the rib
cages sort of like that. Now what we can oftentimes do once we've got that
definition in there. So just go ahead and lighten
a lot of these lines, both in opacity and
in line weight. Line weight, especially
a lot of people get caught up with trying
to lower the opacity. But lowering the line weight is really what's going to make it look a bit less defined. We're gonna go ahead
and erase through their thinner lines and Lorene
opacity where applicable. Just kinda keeping
that whole shape just a bit simplistic. Just like that. Now for the legs again, like in the previous lesson, I talked about how I like
to start with the knees. And the reason for starting
with the names that I can build the
muscle up from there. We go ahead and start
with this front knee here. Let's get to them. Like the previous time we
talked about this shape here for this muscles, which we doing that same shape. Just like that. And I once
again got back muscles. They'll help find the rest
of the shape. Go ahead. I actually grabbed
different color. Let's go and just grab
that nice dark blue again. Go ahead and let that end. And from the buttocks here, go ahead and have an
overlapping shape. Just kinda create right there. We've got a business
meeting part right here where the knee is in the calf will
come off after that. Here we have the knee
just about here. And then lightly
draw in that line. Go to here. Liz, where that muscle
is going to lay there. Now we've got that back muscle. We don't see much of that. Now we've got the calf here. You go head to find
that right here. It's kind of a side. They kind of got this bone
underneath it that goes from the knee to about here. And then you have the calf
kinda want both sides of that. Sometimes it's helpful, just sketch in where that
bone is going to be. Then define the Cath, made sure that you define
the calf on both sides. The calf isn't in the back. I mean, it isn't the
back but you're able to see it on both
sides of the legs. So make sure as you're
sketching it in. Remember to add that calf
muscle on both sides. The exception being
if you're talking strictly a side view, then you're going
to see the calf, more like that within the
knee coming up here and all that beautiful jazz writing. Then brings us down to the feet, which again, we
will come back to. Good and just nice. And line up right here. Okay? Now, do the same thing here. Now what we can do, this
is almost completely sideview, calf or leg. That is, go ahead and
have this definition. We'll use this as
another time that we can define that 3D shape. We having this
overlapping shape here. We have the capitalist definition continuous
curve in a bit, especially because
of the high heels, which is going to
force that calf to tense just a little bit more. Then we have this line
come down and that really creates a nice 3D looking shape. We've got a bit of a curve
here in the front defined by that lower leg bone. Needs got a bone
that protrudes here, here, and on the other
side to that ankle bone. All righty. So now what we've got
left at the face, the hands, the feet, and the breasts. Let's go ahead. We'll actually just
start the feet just so we can continue working
from where we were. We've got the heel of the foot, the top of the foot which
will curve down like this. Then taper out for
where our toes or app. That'll come back to the
ball of the foot here. Have that nice curve back
into our he'll lean. Go ahead and actually just
sketch that shoe over top. We're not going to put
my focus into the shape, but it is really just
outlining along the foot. Now, we'll do the
same thing here. We've got the top of the foot to print out into the toe area. Doesn't taper over
the ball of the foot. Back to the heel, protrudes right
out from the leg. Then Scott, these
high heels, again. Come around. Just like this. There you go. There's
our foot shape. Go head, move to the hands. We're going to do here. I like to just follow sort of this cube
shape I've got here. Now I like to add just
a bit of curve so it doesn't show off in a Sally's q. And it come here, add
the knuckle here. Then you just a few
knuckles per the fingers. And the fingers, fingers are oftentimes one of
the hardest things for us artists to draw. A good way to keep the fingers simple is just keep it based in a two to joint modes. He got first joint. And you got your second joint. Now fingers are technically
three joints, but it can, oftentimes make it
simpler for most poses. Yet the hand here, they're just sort of
treat it like it's two jointed just when
getting started. And then as you
continue, insert, move more into these
complex shapes where you got a three joints. But for now, we're actually
just going to go to joints for this character. So we got this finger here, joint one, just straight out. That joint to just, just a bit curved down. Do the same here we got
joint one, joint two. And if you see, you actually
got this third joint here. But we're not going to
worry about that right now. That's a bit more advanced. And for now, just
so we can make sure we're actually getting
their fingers down. Is doing to join. One. Joint to joint one. Joint two. Nothing goes through. It's nice and upright lines, but now we don't have a thumb here on the sand. So move on and we'll have
that for the next hand. Splint having
followed the anatomy, I'm actually going
to shrink this in just a tad because I think
it'll look a bit nicer. Just taking kind of a
creative decision there. Alrighty. Go ahead and move up
to this hand here. Now here we gotta hand in
a much different pose. A bit more foreshortened. We have a lot of shapes that
are overlapping each other. But the basic concept
still applies. You've got to do
this cube shape. Now for here we
do have the thumb which kinda has its
own tapering off. She will have basically
just joint one, which is the ball of it. And then just joint two. You can do three joints for
the thumb a lot easier. You don't have the bulb. And then just sort of like this. You got 123 if counting the
ball of the thumb is joint. But we're not really needed
that for this pose here. Now, the fingers, we've got just so nice
curved shape for this. We got joint one, joint two. It's got pretty flat
shape coming back down. Joint one. Joint to joint one,
joint 21 joint. There you go. It's pretty simple. Hand is just kind of connects to the
rest of the arm there. Just like that. Alrighty. Now we're left with the face
and the breasts will come, go ahead and do
the breast snacks. Now, I alluded to
in less than two that the breasts sort
of like a water. So water balloon has
the point at the top. And then if you're holding it
from this point, come down. New taper kinda like this, kinda like a teardrop. Is all of the water
to the gravity pushed downwards because breasts
are mostly comprised of fat. This is this is obviously affected by gravity
in a similar way that a teardrop would see
often getting like anime, breasts that are like this. And then they're
just like, Yeah, no, no, no, no, no, no, no, no. This is not what
we're doing here. Now, unless supported
by a bra of some kind. The breast oftentimes have shaped sort of like
this in-between them. So if we were to draw from
a complete front view, her breasts, sort of like this. It would have all this
space in between them. Now, good way. Figuring out the, how you do the anatomy of
the breast, so good, a good point of reference
is to imagine you have two water balloons connected to a string hung behind the neck. So this, the first few times
you can kinda sketch this as you
got this string. You got the water balloons
connected to them. It's going to come
out like this. It's going to take for backup. Now one of the other things
is the breast actually connects into the armpit. So with a raised arm, you actually going to have the fat of the breast
pulled upwards. So even if you have
an older model and say her breasts
have started to sag issuer to raise her arm, then you would actually see
that start to pull upwards. Similarly with the arm down, you're gonna see
gravity taking a bit more of its pool
with a bit less stretch. You got that there.
Just like that. Now, one other thing
to mention is if you have a model wearing a
strong push up wrong. And what you might see. So if you've got a
torso right here, whereas baseline, the breasts are going to,
let's try that again. You're going to taper out. And they would sort of
come back up like that. With there being
this space here. If you have a
powerful push-up bra, honestly, just a brown general. And what you might get is
something a bit more like this. And this is where you
get cleavage from, is when you have a bra
pushing them together. Baseline. That's not what
our anatomy is going to get. An even large majority of bras aren't gonna give you
that same kind of cleavage. So as we do it, we're going
to come out from the armpit, create a teardrop shape, taper back just like that. And I'm actually just
this breast here just a little bit down, just like that. Then come around like this. As you can see, we got
that shape right there. Now that shape right
there in the middle. Then we can do, know, round this out just a
little bit more. Actually. Breasts are definitely one of the more temperamental parts
of female anatomy is he tried to figure out what
it should be doing there. Especially because depending
on how your character is moving can adjust so much. You can get there. How to create a line through
to define where the nipples. And I'm gonna go ahead
and actually undo this and I'm going to draw more what this specific model has. Somewhere to go ahead
and erase this here. In this model, it's
relatively flat chested, so we're actually just going
to I'm just a bit of a bump. The protrudes out here. And then similarly,
we have just small bump out from the armpit here. Less is more realistic to as to what you actually
have this model here. Again, if you're
doing a nude model, her nipples would
lay about here. And here. For this model here, I'm just gonna go ahead now, just real quick sketching
this one P, she's wearing. Nothing special, not going to go ahead and add any
wrinkles or anything. Now lastly, we have
her face here. So I'm gonna go head, start around cranium,
just tear but define. Shave her. She create here. We've got the jawbone
here coming round. Now again, we're not going to be using contour lines to help
with some of the 3D shape. We're going to go
ahead and sketch in her hair just with a
pretty simplistic shape. And then it looks like
she has her hair in a ponytail or even like a button type
thing. So we'll do that. Sketch in the ear. Just like that. Got her nose. Again. This is not a facial
anatomy course, so I'm not going to go over a lot of what I'm doing as
far as the facial anatomy. I might, I might do. Classic gets a bit more into the facial anatomy
in the future. We're sketching
this in real quick. Eyes. Sort of color and pupil there. But a line for the shadow
under the I just helped to that 3D form their eyelid. Then got her lips. And there we go. We go ahead and turn off our reference images.
You just take a look. I'm going to thicken up some of these lines
and the arm here, just so they match. The passage that we've gone for the rest
of our character. The clean up any lines
we want to clean up a bit of a stronger shape. They're just too
Any last touches that we think may make our
drawing look a bit better. Because even though
this is a study, it's nice to make our
studies looked nice. There we go. And actually going to go ahead and lighten this
even just a tad and large. It's just kinda wearing
this Leah tarred. There we go. We've got
our female character. Nice and drawn out here. There we are. All right. Thank you so much for joining
me for this next lesson. Go ahead and join me in
these last two classes. We're gonna go head and
or last few lessons, I should say, we're gonna go ahead and take these
last two poses. We're going to go ahead and
use them to actually create our own characters
using these poses. So instead of just
simply trying to recreate simple poses are the slightly more
in-depth poses. We're going to use
these and draw our own characters over them. So go ahead and
join me for that. And I hope you guys have
a great rest of your day.
 Samuel Ben-Ezra, Artist and IT Technician