Transcripts
1. Class Trailer: Hello Skillshare members
and welcome to my rendering one-on-one
class on the human body. In this class, we're going
to be taking you through how to ink your sketch and prepare
that IQ for rendering. I'm going to talk
you through how to create a color palette. I'm going to walk
through how lighting works using simple shapes, how to use selection layers, and lastly, how to
render your character. If any of this
sounds interesting, make sure to take a
look at my class. It'll be helpful
and informative. I hope you guys have a
great rest of your day.
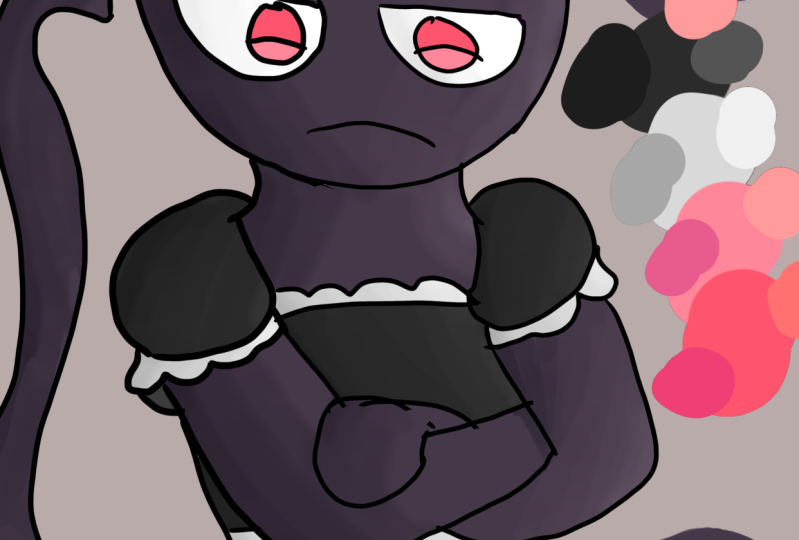
2. Lesson 1: Inking: All right guys, let's go
ahead and get started. Here we have our sketch from our previous class on simplifying characters
into basic shapes. In this lesson here we're
going to be going ahead and working through how
to ink character. Now in a class about
rendering, you may be asking, why am I talking about
how to incur character? And this is because
inking is actually crucial part of
our process sink. Whereas many people may think
that the aging process, something done separately,
we're just going to put down darker lines over everything and that's all it's gonna be. There's actually a lot
more to the inking phase. Not all of it will be
covered in this lesson here, this was mostly a quick
walk-through of it. But I just want to get
you familiar with a few, a few different
processes I should say, and some techniques
that will help improve your renderings
down the road. The main thing I
wanted to talk about is the line weight
of your lines. This is going to make a big deal when working on your rendering. So before we even start inking, we actually need to establish where we want to be
drawing our light, where we want to be
drawing our shadow. So in this case here, I think I'm going to
have my light source about here shining
down on our character. Which means our
shadow is going to be more on this side
of our character. Now the main thing
that this means for our character is
that while inking, we want to make the lines
closer to the light, much lighter and the
lines on the side of the shadow much darker and
specifically much thicker. We don't necessarily have
to go to this thick. It's more so a question
of design on your part. So a lot of it's
going to depend on what style you end up
wanting to go for. But going something
like that on this side. And then a lighter over here is how we're
going to want to do that. So let me go ahead and
actually demonstrate using just the torso. And then not gonna
make you watch me eat the entire
piece in real time. I'll simply speed that up and show you the
entire process. So let's go ahead
and go ahead and lower the opacity aren't
torso quite a lot. What this will
allow you to do is see what your actual
line it's going to look like pretty well when
it go ahead now. And you can our character. So when I start over
here on the light side, it's going to start
with the breast here. When you use the line weight starting from thin
and I'm going to slowly move to a
slightly thicker line as we go around the breast. If you don't like you're lying. Heavier Undo button,
especially for those curves. Definitely utilize the
ability to use it. You want a nice long,
confident line? Just like that. And then
we're going to do a lot of the different transitions
and leveling. So if we were doing a cross
hatching child stadium, you might put some
cross hatches down here to indicate the ribcage. Really where we want to have our lines is where there's
more of a exact plane change. So we're gonna go ahead and
somewhat limit our usage. And then once we actually
two rendering our character, that's what we're
going to start to see. A lot more of our definition
and shape come in. Right now we're going
to create more of a 2D looking character and allow our rendering to really
define that 3D shape. Now that said by no
means should we make her character look flat and
using methods like overlap, such as this, we
can go ahead and just add a bit more
three-dimensional appearance there. I'm gonna go ahead because
this is a closed character. Go ahead and add just a nice
thin line, which define. If you notice one
of the bad habits I get into as I zoom in way too close while inking is best
to as much as possible. Stay a bit more zoomed
out while you're inking. So just helped you keep
more confident lines. Because you won't
have to ink as far as a distance to
get those lines. But it also just makes
sure that you can see more of the full picture. So you'll definitely
see me zooming in a bit more than I probably should and I'll catch myself and zoom out. That's something that you notice yourself doing
the same thing. Definitely try to
stay out of the habit of zooming in too closely. That will really, really
help you down the road. When it go ahead. Straighten out this
line a bit here. Then I actually think, yeah, I actually don't
like my lines here. They're just a bit too thick. So one of the tools I'm
actually going to utilize through Clip Studio Paint
is this a just line? And it's going to
narrow this line a bit. Not all tools have this
and if that's the case, I'm sorry if he taught like
your lines to redo them. But for me, there we go. I've just thinned out
those lines right there, but that way we've
got a bit more of the contrast between
our shadow and light. Go head. The crotch area here,
bringing that into the hip. Right here. Now one of the things
I'm doing right here, because obviously
we have some line here that wouldn't be seen because our hand is in the way they did is I went through it. I'm going to create
a new layer here. Now I'm just going
to ink the hand. And then what I'll do is
I'll go back through. I'll just erase this right here. That way we could get nice long confident line
that just went through. Same thing that we
talked about with line width is going
to apply here. This lower part of the finger is going to be less
exposed to light, so I'm going to make
it a bit thicker. And the top of the line. And I have just a bit
thinner than the bottom. And this will help with some
of our rendering stage. I'll go through some
of that as well. Once we actually
get to that lesson. Go ahead. Finish off
this finger real quick. Well that's a bit too dark. Okay. Finalize this last finger. Just a tiny bit more here. All race. Alrighty. So that's the basic concept. I'm going to go head now, merge these two layers. I'm going to eat the rest of our character and I'll see you in
the next lesson.
3. Lesson 2: Creating Color Palettes: Alright, so we have
our finished line art. Go ahead and turn off
our sketch layer. And now begs the question, how do we create
a color palette? Let me go ahead and show you. First off, what we wanna
do is create a new layer. That way we're not
painting on our ink layer. We want to define what are different colors
are going to be. So we can see we have our
hair, we have our skin. We have this one piece or character's wearing
some high heels. And we're going to
have some colors in the eyes and probably
in the mouth there. So let's go ahead and
start defining those. We'll start off with the skin. Skin Oftentimes up in our
color wheel here is going to range between more of a yellow color and
more of a red color. A lot of this is
going to vary off of our lighting,
personal preference, ethnicity for this
character here, I'm going to go with more
of a reddish skin colors. So we're going to start by
just picking a base color. I think I'm going
to go something like this as our base color. May even go a bit more
to the red with it. I'm kinda paint this under our line art and kinda
see what that would look like as a base color. I definitely like that. So I'm gonna go with
that for a base color. Now let's go ahead and
pick a skin color. They want to go with the
skin color, hair color. You want to go with
a brown for that? I might even go with a slightly more like red brown like that. I think just to kinda go on
the other side because it got a lot of browns
and reds for her. One piece. When you go with sort of
like a muted blue color, maybe one like this
for our base color. Then let's say eyes. I think we'll go with
I'm going to say brown. Again. I'm actually just going
to use the same color as the hair, the eye. And then I think for her shoes, I'm going to make them
really pale blue. Now what we're gonna wanna do
here is we're going to want to select a shadow color
and the light color. I don't get very
fancy with this. What I'll do is for my shadow, we're going to decide if I want it to more of a
warmer or colder shadow, then want to go a bit warmer. So I'm going to move
my hue a bit more towards saturated side on the red side because we're
already kind of a red. Just kinda play with
it a bit till you find something you like. So this is our base
color and immovable, orange, something like this. Let's see. It looks pretty nice. You can kinda see
what that would look like on our character. Sophie had base color here if
we were to comb or shadow, sort of painting what that would look like. That's not bad. Colors look pretty
good together. May actually go more
this direction though. Why? This maybe go with
this for our shadow? I think I like that a bit more. Let's see what that looks like. Yeah, I like the the
mesh of that color more so when you go this
far, our shadow color. Now going back to
our base color, I'm just going to select
bit of a brighter color. Just like that. See once again, if we throw this down, we already go over this
slightly with this. They might actually
want to add a bit more towards the red. Yeah, sort of like this,
more of a peach color. I like that more. So let's go ahead
and go over this. There we go. And here we've got our
color palette for our skin. Then we're gonna go ahead, just take the same steps for
all these different colors. Blend them back and forth
until you like them. I won't make you watch me
go through all of that. But just using the same
techniques I used for the skin. I use that for everything else. Then once that's done, we'll go ahead and
get to rendering.
4. Lesson 3: Lighting and Rendering Basics: So a great question
must be asked. We have this character. Now what? That's
a great question. So when looking at rendering something as
complex as a human, it is best to break it down
to its simplest forms. I'm not going to
be doing that for every single piece of
a database because that would take much longer
than you're wanting to spend on this class. However, if you do
have interest in that, makes sure to let me know
I'm definitely interested. And up to the idea of
making a class that covers every single piece of anatomy
and a lot more depth. But for the basics
of this class, I'm going to be simply using
a sphere and I'm going to use our blue is
a nice example. So go ahead, we'll create
our sphere right here. Now I'm going to go
ahead and walk you through what we can
do to make this look three-dimensional
because right now all we have here is a flat color. So how do we make this
look like a sphere? Well, we'll go ahead and start by grabbing
our shadow color. Now what I'm gonna
do, I'm just using Clip Studio Paint, round brush. Regardless of what
tool you're using, they'll have a round brush. And if you're just
working traditionally, these same steps apply
pretty similarly. Just the actual application
to your tool will vary. I'm going to lower the
hardness just a little bit. Lower my brush density a
lot for Photoshop users, you'll be looking at
adjusting your opacity. So when it go ahead
with my shadow color, I'm just going to
start going around the very edges and
having down kind of at the bottom here defined
as our most shadow form. I'm going to try to
make sure I have this nice rounded shape. Or we lose it. I can grab a brighter
color, I can go back. And now what I've
defined here is the difference between
where our light is and where our shadow is. If I adjust this
attorney ECM basically turning where our light sources, which now we basically have two colors with a very
small gradient in between. So what we can do now is we can grab one of these
colors in between. If you see over here
on our color wheel, if I select fully shadow, we're here fully late. We're up here. Somewhere here in the middle. You see there's a
bit of space there. So I'll grab just
this middle spot. I'll start to paint that in. As you can see,
we start to build up more gradient and do that. Again, as I do that, I'm actually going to
lower my brush density even more just so it's an
even softer transition. You see that now we've got several variants of
colors throughout. I'm going to grab
our shadow again. Sure, my color palette
and then just a bit more to the bottom here. Now what I can do is
I can grab our light. I'm going to very lightly
add that to the top here. Now we're not just going
to go to the side here because this is a sphere and a similar thing will apply once we start rendering
or character. So what do we do with
the edges over here? Well, we'll actually have, because this sphere, so some of that's going to be
facing away from the line, will actually have just a bit of a darker color going
along the edge. This is going to
help round of phi. It's not a real-world word. I'm using it anyways. It's going to help
round defy the shape. Just like that. We've put our light back and now the one thing we can do that's really going to
make this pop race. The two things is firstly, we can go ahead with
our highlight color. Just add a nice solid
point right there. You can even if you want, grab an even brighter color. Just paint that in. And I'm Kevin tensions in doing
this in your whole piece. Then you can even do that
during your color palette step. Or if you decide later
you're going to do it. You can only describe it later. Blend that in a little bit. And the last thing, because if you notice as
we get into our shadow, it starts to look less round. And what a lot of people
will end up doing, which is really not good, is to grab an even darker color. And then just keep, keep going around their shape. And hoping that by putting
a darker color on there, it'll start to look more round. Will be actually wants to do. We wanted to add what
is called a rim light. Now this is where the
light is going to reflect back up
from the surface. It's on, onto our sphere. So I'm going to grab a color slightly lighter than
our darkest color. Going to go head. Just paint that on real lightly. There we have right
here. Now rim light. Now this point, if it's still not looking three-dimensional, then you can start looking
at potentially darkening. Just a bit, uh,
your shadow there. It's completely fine. Just a little bit. Don't go overboard. I've just darken it just a tad. Let's go ahead and make sure our rim light still
shows through. And there we go. Now we have a sphere. So we're going to be using this same concept on the
entirety of our figure here. Sound interesting. Perfect. Go ahead and join me
in the next lecture.
5. Lesson 4: How to use Selection Layers: Alright, so we have
our color palette, we have our inking, and you know how to render color now. So now what do we do? Well, we're going to go ahead. I'm going to put a layer right under ink layer, this one here. I'll actually just
go ahead and name this layer real quick
so we don't lose it. We're going to go ahead and start putting our colors down. Now, the way I like to do this, to make sure that I get
a selection that is perfectly inside
of our line art. I'll go ahead and
take the fill tool, grab a color, any color. I actually fell on the
outside of our character. Now if you start to
get stuff like this, it means that we need to
try and close Gap and just finished with it a bit. So we can see we still
got a bit of a gap here. We'll go ahead grab
my line art tool. Let's go ahead and
quickly fill in that gap. Especially when working
with really thin lines, you can oftentimes result in a bit of a struggle in trying
to fill in our full layer. So you may need to spend just a bit of time
filling in gaps. Okay. Looks good. So then we'll
control, select that color. Control Shift I on your
keyboard to invert. Then on a new layer, go ahead, fill that in. And actually if
we turn off these will see we filled in there too. Let's go ahead and just
select, delete that. I'm actually going to go ahead and sign this nice gray color. Now what we're gonna do is
we're going to create what are called clipping masks
are clipping layers. We're going to use these
for selecting because, well, we're going to start
by rendering on each layer. So we'll render on
the skin layer, on the one-piece layer, on the hair layer, all of that. Ultimately, we're going to
be rendering on one layer. And so as we do this, we're going to want
to make sure that we can always select our original colors in case
we ever need to isolate them. So we'll go ahead
and start making new layer, rename the skin. And then for Clip
Studio Paint users will see this button right here. You can select it. It'll add
this little pink line there. That is the clip layer. So you can see if we tried
to paint over character. So we can only painting on the layer that
is underneath it. So then we're gonna go ahead
and take our fill layer. I'm gonna go and fill in
sections a skin here. Feel free to just go
over the eyes right now. We'll come back and do the rendering of the
eyes separately. Hand, legs, and then
that's her shoes. Looks good there. We'll create another one. Make it a clip layer. We'll call this one hair. Fill in her hair right there. Make a new one. Call it one piece here, one piece right here. And then last one. Go ahead and fill in her shoes. And then create one more
over top of everything, even over top of the skin, we'll call it eyes. I actually didn't end up
selecting color for the IY, but what I do is I
grab the skin color. I just desaturated of the bunch. Glow head. Actually use a hard
round identity. Just fill in the eye highlights. I'll add the eye
color a bit later. I generally like to do that
after I've already rendered the highlights. You
don't have to do it. That's just how I
like to do things. And here we go. We now have our character and they are completely colored in. What we can do now is we
control select one of these is you can see it puts a selection layer
around our character. I can only paint within that. The other thing we're gonna
do on each of these layers, we're going to turn
them into Photoshop. It's called Alpha Lock here, it's just called lock
transparent pixels. We're going to go
ahead and assign that. Each of these, Here's what this will do,
similar to selecting. So I won't be able to
paint outside of it. Now ultimately what we'll
be doing is we'll be rendering first individually
on each of these. So I'll render in
shadow on the skin, and then I'll render in
the shadow on the hair. And then after all of that, I'll likely go onto
a top layer and I'll go ahead and just nice and things up across the board. Now some of the reason we do that instead of just staying on the individual layers is
mostly place of time. And it'll just give
us a lot more freedom in a piece such as this. It's a bit less necessary because of the simplicity of it. But it's a good habit to be into that as you
get to some more complicated like
pieces, illustrations. Then once you get
into more of that, that you're already
in the proper habit. So that's what we're gonna
be doing for this piece. Go ahead, join me in the next lesson where
we'll actually start throwing down some nice, beautiful shadow
onto our character.
6. Lesson 5 : Rendering your character : So just like the inking lesson, I will be walking you through the different steps that we'll be using to
render our character. And then I will be doing
the rest of this as a time-lapse for
your own sanity. So we're gonna go ahead
and do that using our torso here for
the one piece. Now, I'm leaving this sphere that we did here
in his reference. There'll be able to
help us remember the different portions of shading that we'll
be looking at doing? So we'll have our dark color. We're going to have a rim light. We're going to have a bit
of this gradient that will create from the base
color to the shadow. And then we'll start
throwing in some highlights. Will go ahead and
start with our shadow. We're going to be
using the hard round. Lower the hardness. I'm going to lower
the brush density. Let me go ahead and
start right here, defining and some
of that shadow. So obviously we're
going to have some of that shadow right
here at the end. We also need to remember the
things that are going to affect where shadow
was going to land. So we have her
breast right here, which is going to cost some
extra shadow underneath it. But it's also going
to cast some shadow because the breast is round. It's going to cast some
shadow down here as well. So we'll go ahead
and paint that in. Now on this side, because
the arm is stretched upward, this is stretching
the breast a bit. And so the shading
will not be quite as intense on this breast as it
is on this breast over here. We'll still go ahead. Put in just a bit of
that shadow there. Lay down some more
shadow down here. And lay down the shadow
in the crotch area. Now, it is likely not. Our character would have a bit
of a stomach here as well. So we can actually go ahead and add the shadow that would be cast from the stomach when we move on to
our gradient stage. Work on just sort of easing that ink because right
now this looks a bit weird. But that's okay because we're starting with our harsh shadows. We'll move into the
gradient thing. Similarly, our character
is outstretched and she's got her ribcage here. She's a bit of a fitter person. So we're gonna go
ahead and define some of that shadow
that would be created by the indent, the ribcage. Once again, it's not gonna be this extreme once we're
finished with it, but we are just laying in where there's defining
features are. Right? C's are, I would say, where are major pieces of
gradient are going to be? We'll actually have just
a bit here to in-between the breasts cast
from this breast, blocking light from
getting in-between them. These are gonna
be the main spots that are shadows going to be. So we're gonna go head now using the same thing that we
did on this sphere with the gradient to wind, to select an in-between. Probably right here. I'm going to go ahead. Sir, gradient in
that back a bit. The goal is to make nice
three-dimensional shape. Using this process. Similar to the sphere, we're going to
follow that shape. They're brush strokes. We're going to follow
the shape as clinicians can lower my brush
density even a tad more. This helps make the
gradient smoother. An area where we
really want to make sure we allow ourselves to just take all the time we
need to do it properly. Go head. Got a bit
more of that shadow back being cast, but rest here. Make sure we follow
that rounder shape. Start doing the same
for this breast here. Now, start to add a
bit of that gradient. I'd say don't be shy. Don't be afraid to go too dark. You want to make sure you
have those nice dark colors. But also don't be afraid to remove some of that shadow
that you've laid down. If you think that is excessive, it's really, it's really
something kinda gotta fill out. There's not necessarily
a way that I can just definitively tell you. Where the light's going
into land because it's going to vary
for every pose, every character, and
every lighting situation. You just want to feel it out. One of the things here, because I am currently
shading with pretty much no regard
for where the hand is. But when we go back, we're
gonna go ahead and add some shadow that is generated
from the hand there. Okay. Now let's start defining out worse stomach is now one
of the things I oftentimes do in my sketch layer is I'll sketch out more of
where the features are, but I won't eat those internal. Because I'm going to save
a lot of the defining that for women were actually
rendering our character. I actually want this to be. I wanted to have a
bit of a stomach, but not too much to
want to make sure that we mostly go light. Don't have too much of a drop
shadow under the stomach. So I'm actually going to brush out what we have right
here just a bit, just so it's a bit flatter. They still want our character to be more fit than anything. Ribcage here. Then head, start pushing back some of that
intent shadow from the rib-cage because
we don't want it to be quite intense, but we do still want
it to be notable. So we'll grab maybe a
lighter color here. Just to sketch in there. Kinda the way I see rendering,
It's like sculpting. We start with some of our bigger shapes
and we solely just sculpt in the rest
of our character. Sometimes with sculpting the add a bit more that was there. Other times you take away. Sort of interact
like a sculpture. It's okay to put something
down that you don't intend to stay. If it helps you. To kinda Format, Shape, Format where the color is
deemed to be the shadings need to be. Okay. Ribcage is looking pretty good. It's pretty subtle. Like quite a lot. She gonna go ahead and grab
our shadow color again. Justice, strengthening in
some of our shadow over here. Let me go ahead
and move back in. Shadow under the hands again. Just like that. Fine. Once against my shadow
onto the breast. Start to go back through, make any changes where
we think it necessary. That looks pretty good. Now, what I'm gonna go ahead and do is I'm going to add
that rim lighting. Let me go head. Said that right here. We see that really adds to
that three-dimensional shape. Now I want to grab our lighting. I like color here. Wanting to lower my
brush density even more. So want to be real careful when you start to put in light. You don't want to just, you don't want to accidentally cover up all the shadow you just did. Hey, I'm going to add some of that light
onto our ribcage here, trying to make sure
I slowly work it in. I want it to look natural. Even while I'm doing that, make sure to feel free
to grab your old colors and push back the lighting where you feel
like you may have. Done just a bit much. So we still want to
make sure we breed, rank the we maintain, oh my goodness, English is hard. Want to make sure that we
maintain those shapes that we've put down. Now. Go ahead and set a bit
of highlight here on the edge that seep into
the rest of the shape. I'm actually use that lighting. Just a bit of a rim lighting
under this breast here. Now take a look. Really, really like what we
got a likely continue to make some adjustments once I get to the final stages and I've
rendered everything else. One of the things
just looking at this is I do want a bit of
a darker color even, and I'll actually
just add that to our color palette
up here at the top. Just like that. Because I do think I want to add just a bit
of a darker color. That's going to happen is
we'll make a color palette. You like what you had. But wants to telling
a character, you just think there needs
to be a bit of a dark color. So in this case, I
just want a bit of a richer color to contrast
some of that light. Only going to put this color and the very darkest places
on my character. So for instance, I'm putting
it on this breast here, which is more
towards the shadow. And it's more, it's not
stretched like this one. So I'm going to put that
nice rich color on this one. I'm going to put it
under the breast. Then let's blend some of that. And likewise, I'm putting it on the darkest part of
our character over here. We'll still may ensure to
maintain that rim light. I'll just put a tiny
bit just in the crotch. Just where it's darker
than everything else. Push back just a little bit,
barely noticeable crime. And then likewise, we can even do the same with the highlights. We really want to
take our highlights to a more intense place. I'll throw it onto
my color palette. Comes through. Just a nice solid
highlight here. If we really want one. Each of the part of
the breast that is pointing towards the light. I could even just add a bit of that
highlight right there. And then have the rim lighting. Sort of finish out that
shape on the other side. This Presser do a similar thing would just having
a taper out a bit. Just like that. Again, through all this, just make sure you
maintain your shapes. There we go. Now this lesson was a bit
longer than our other ones. But here we go. That's our rendering. If you want to take
a look as I run through the rest
of this character, go ahead and take a look
at the next lesson, where I will go
ahead and talk you through what your
student assignment is. While I'll have the rendering of this piece just
in the background, just to keep you company, make you not get bored. Hope to see you there.
7. Class Assignment : Thank you so much to
those of you who've made it to this
point in the class. I really appreciate you guys. I hope you found
the information in this class to be helpful
and informative. If you did, please make sure to leave a review down below. Please share it with any
friends and family who may be interested in learning what
I've taught in this class. For your class assignment, we're going to go ahead and
have you fallen through with the steps taught
in these lessons? If you followed
my previous class on creating characters
from basic shapes, go ahead and use that
character there. You take them through
the steps taught in this class on how
to render them. Otherwise, feel free to go ahead and use any
characters you may have drawn. You have any questions for me, makes sure to ask them
down the discussion. I'll make sure to answer any and all questions that come my way. I hope you guys have a
great rest of your day. You enjoy the rest
of this rendering.
 Samuel Ben-Ezra, Artist and IT Technician