Transcripts
1. Intro:
2. Tools: abusing the clay by For Brianna, it's pretty thin paper, but I like to call her. How are we using an age B pencil for sketching and prisma color premier colored pencils. And I will be also using this Lex colorless blender by Prisma caller to make too far beer soft and fluffy and you will see And I will be using wide in jail, Ben or maybe jelly roll and this being jibe marker by unit Posco.
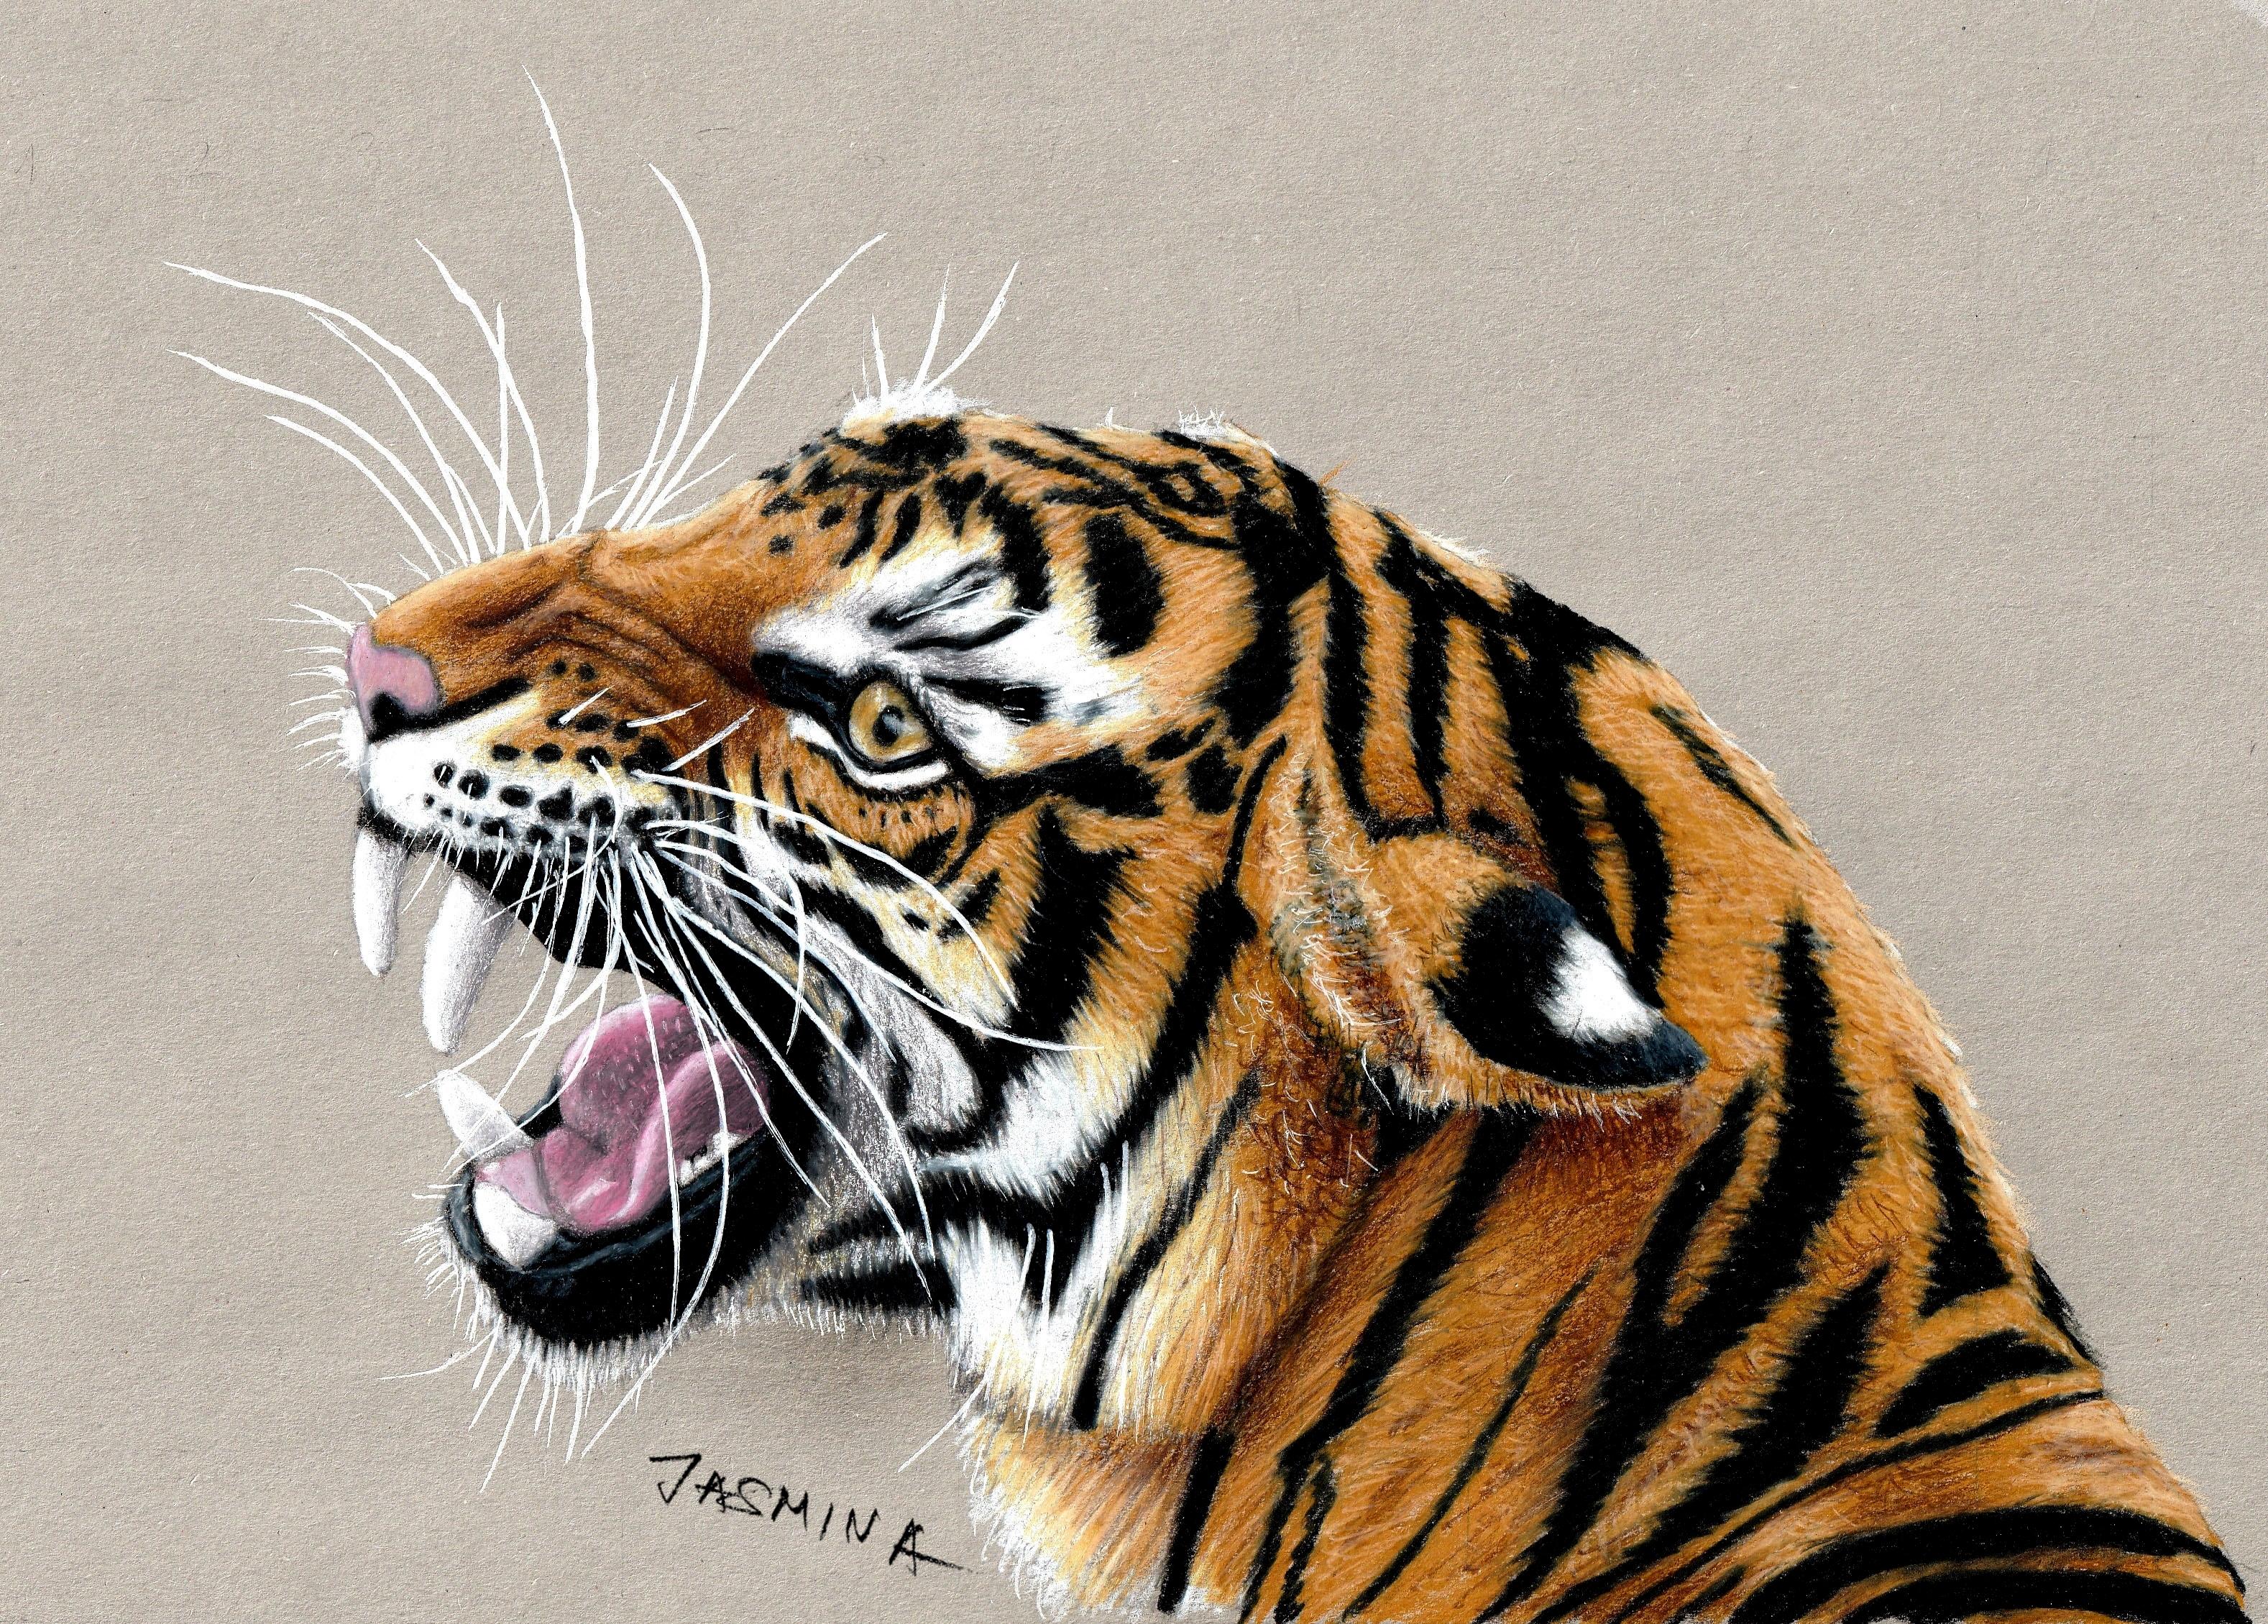
3. Preparing for Sketching: Hey guys, did just mean let's draw this tiger. This is a public domain image, which means that we can use it for free for our projects. But let's first it plays the Greek over the reference photo because I want to draw the outlines using degreed method. And I want to place it on the integrate Draw the image editor for the artists that I have developed for and this purpose. And you will find this image attached and also the reference photo and even my pencil sketch so that you can take a look and create the same catch. Okay, so I want to draw this picture by using degreed method, and first thing is course to create agreed, so you can enlarge the picture or you can make it smaller. But I recommended drawing a bit larger image so that you can go much more into details. Okay, so I want my sell to be two millimeter watch and I just have to mark dots, so I just want to mark that's every second centimeter and here at the bottom of Islam. And now I just have to connect the dots. As always, I'm using an aged beef mental for sketching. Don't press very hard when creating degreed. - And now I'm same here. The Portugal. I also want to make the cells to centimeter high. Same here on the left side. And now lift just could make them. - And I just want to mark cell swift numbers and also with letters.
4. Sketching Part 1: Okay. And now we have to plays the outlines from the responding sell to to sell off our paper. So I I always start with the eyes and I just want to find a cell for the eye. This visible is six d. So 60 here we have I and I just want to start off lying. Teoh, I So here you have to find all this line and they don't have to be perfect ing in the same blaze. But just approximately. I will be with touching my sketch and reference photo with green over death, since you can check it out. So what I want to offline is, um, facial feature and actually the just between the white and the black far and actually do brown for so the stripes and the edge between the white and brown for so I'm not going to I was line every single hair, not even device curse, because this is something that just can fear out at the end. But of course, you can always like what you need, and he also is recourse. - So here's the nose, - and here I want to draw a bit bigger cannon. I guess this he has only this one. Can I? So here on this side, I want to draw the direction. Both cannot. I want to make them a slightly bigger and of course they are yellow in your reference photo . But I'm just going to make them wiped. So to make them more stand out in the paper. So it's here somewhere to make it bigger. We're going to say that I'm going without any order. Just over my hand takes me. I started one facial feature and then just jumped to an honor without finishing the previous one. But it's OK here we have the edge between black and white Barb and the order for And why some Probably going to erase this. I just need to know our news. I mean, before I color it with more than some. And when I actually want to draw with the black form, it can be confusing to which stripe is black and which is like, Ron or, um what? I just put it X and inside of the area that I want to call her with black. So you're just market for yourself just the way you want, because when I raised agreed. I won't know exactly which stripes is or ever really have to pretension and to I don't think a lot of time. So it's simpler just pretending. So I know that I have to colorist with with a black council. Same here, okay and right place. How much did the tigers have? Different strives. I mean, each of them has its own unique stripes, so you can actually feel here. You can. I mean, if you drop them like a bit left or right, it doesn't matter. Eso, as I mentioned, I don't want to sketched of whiskers begins. It will be complicated too. Draw are on them. But if you don't have white ink jump and you can draw them now with a white pencil and just do it cooler around them.
5. Sketching Part 2: - So I just, um, color some of this tiny black stripes with the new to be pencil because I'm just going to go over them with white pants with a black pencil, so because I don't even have a space to to mark that X. So I just call it really okay and also match. I'm just going to create it whiskers at the end of drawing for do drawn black and white areas and ordered tongue. So let's areas the Greek use this plastic razor for larger areas. And I use this mechanical a razor for tinier areas here. Ahmadi off lines that I want to that I don't want to raise. I have this brush for makeup to eliminate. The dust is not good. We touch the paper too much fingers. I just I just want to raise a bit of this with the great, but anyway, I'm going to cover it before pencils. Just a little big, particular older background
6. Drawing the Black Fur Part 1: okay. I want to draw the eyes first. And I used warm great 100%. - So under next we can draw futile like pencils. I just use long, great 10% to treat, highlight or it or even better, if we use white and they're weak. Some highlights even over the virus. Now you can cuter draw area by area, or you can draw its layer by layer. For example, I want to start with black stripes and actually to caller all the black areas first. And I just want to continue with the I and I use a while sharpened black pencil. So here, very carefully around the on. - And just make some of the time. Here's go order honest by this, outlining with a black pencil, it can change shape off the ice, so just can't. And now, as I mentioned, I'm just going to cooler two black stripes and actually all the black farts. So I just want to split this work into some manageable faces to make its simple or to understand it's all. You have to breast very hard to create an absolute black color because that's very important and, of course, tried to follow the direction of the tears flow with the hair's growth, I can see that I have forgotten this one strike years to draw now and cooler it is all. We don't go into details now in this step, just a place the basic older for the stripes. And after that we have to create a white far and also Braun heart care. But to actually run far and after down, we have to work going to be just and and the edges dreamed different corners of the form. - So here also very carefully around nose and here do muzzle to preserve proportional shape off Rudy's futures. But when you call her the Stripes, you can actually relax, and there you can make mistakes because they can be different than in the reference bottle .
7. Drawing the Black Fur Part 2: okay, I think I have colored them home. All right. Now, before we move to the white far, let's just greet the highlights overdue black skin. And I'm using warm great 10% for death. So here around the eyes de I, and here the lower eyelid and also here the skin. So wherever it is highlighted, also this form does Bri eliminated. So it's not black anymore. But it's a bit degree. And also let's call order nos. We can give it a round shape, using a bit darker, cubed warm here in the shadowed areas and just a bit white you up to make it stand.
8. Drawing the White Fur: and now we can color to watch areas, the teeth and the wife far with a white Vensel. I just want to erase lives. But I still can see where I want to draw the Ken IVs. So I just tried to make dick edge of the Kenna's very sharp and clear. And here you can see how it stands. Aldam great paper here also the highlighted parts of the tongue. So everything that is awfully white can a color in this step also here to eat. - I know we can also colored white far and same here. You're just have to follow the direction, the hairs, floor and growth. - You have to call her very carefully next to the black areas. - So if you go over down, there won't be absolutely black anymore, and you might apply when you pick up the black substance, you can apply that over the white area. So this is we don't need that. - Of course not everything is black and white, but we're just flying to basic colors for now, and we're going to work on this later on. So here we have the edge between the white and, uh, and a brown form. Just take a look at the color reference photo here. We already have a bride to brown for And also here over a year. No, I want to shade this the cannons to make them more three D because they look brief life for now. And I started here into shadowed areas using a warm gray 50% and here on the right side, up pressed harder and just release the pressure. Once I shayt towards the highlighted area and I just want to blend the edge between these two callers with one great 30% and never concede Get kinda round shape. And also, here's some guy shadow All right. Under do black skin again using warm worry 50% And here the same or this guy. Okay, so same here with this to here. Just a shade some areas on the left and right side to make it look last flocked and same here. So here we have to shade somehow here to meet area. Hey, Awesome.
9. Drawing the Brown Fur: OK, but we're not done yet with white. And like far we're going to go into details much more later on, eh? So for now I suggest the caller the rest of the far and then we're going into details. Not now. I want to use it. Golden road to color Doubront part of the tiger far. And of course, I'm following the direction of the hair scrolls and I'm also going to use yellow poker. Eso more pencils we use the better result way will get, that's all. This is pre long step and and here you have to creed to draw this far with patients And after that we're going to create highlights and shadowed areas. But for now we're just placing the basic color, the basic brown color. All right, they're notice how the white for now stands out even more. But before that, let's introduce one more color over this to brown areas, and I used yellow ocher it so you don't have to cover the cool brown area just the sour in some places to make it a bit too. Did I get a bit more colorful or actually, the more colors we have two more realistic to drawing will look. So if we use only one caller, it looks flat. It's a particular here into highlighted areas, because this pencil is quite brighter in particular here, over the white far, said the edge between the white and the brown. Far as you can see, the reference photo is kind of you can't say, Where is the clear edge between this so far, So they actually gradually flow into each utter. So used this pencil to go over the white, far from a bit here, fossil all Sunday around Mosul.
10. Creating the Shadows over the Brown Fur: Okay, Now let's greet a shadowed areas. Order Braun far and I use dark on her furnace. So wherever you see that it's a brown for is less illuminated just and and created hairs with dark number, for example, days wrinkles. I have just on pressed too hard because this is very dark pencil. So here, also under the ear, has to be very, very dark. And now here you can go much more into details and actually draw hair by hair because there are don word placing two basic colors. Now we can focus on details. So here we have the shadow cast by the ear. This is almost black for here and here. Also, we have here overlapping here. You could also use a works colorless blender to blend it, because if we're pressed very card, we can create too dark colors. And if we don't want that, which is go with the fans up. And after that we just blended with a blending with a rack. Schoolgirls blunder. Here we had Lafi for over a year here. Also, you have some shadowed areas, and now we can draw the rest of the shadowed brown. For it was a dark brown, which is quite broader than dark number. And here, just the blend the edges between dark number and this golden road. And also wherever we have darker areas, we can go over with the dark brown, for example here. But who knows? So everything that is darker than the basic caller off the far and here's some details don't. So I just forgot to color the I call them Road when I used to stand so before, so the tigers eyes aren't usually orange, something between the orange and green. Here we have some time of sections. We have to call her with dog wrong.
11. Creating the Highlights over the Brown Fur: now let's create a highlighted parts of the brown hair, and I want to use an eggshell for that, and I just go over this golden road. As you can see, it can be bright and up easily, and it's also do hair by hair and just greeted Highlights were necessary. You can even use cream if you want to make a highlights even brighter. As you can see now I do. It is it looks less two dimensional. - So here to hear next to the edges or actually the edges on the brown hair should be brighter. You can see that it becomes broader, easily us. I'm going with this Spencer over the brown areas. We can't even press too hard because it's great. It's gonna three to right. So use a well sharpened eggshell and just Greek hair by hair, particularly here next to the wide. For to make that great in transition between the white far and grown for and here also, you create a highlighted here's aborts. You just make them less events, and it now looks more like hair and last two dimensional. So here you have to drop her bank patiently and to take your time is this really requires a lot of work. And you said you can see that the Black Stripes are not good. We are going to work on them later on because we're not done with Dominic. Of course, you can choose the order and what you want to created de Dios and here, above the ear, brown hair is very bright, so you just harder and make do. Here's dancer. And of course, this fluffy here grows in the inside. Here. You can even add a bit of white here. Why? First, we're going to add some of the white hairs at the end of drawing together with the whiskers and to plant it some last step. But we can also create a lot of these with color pencils, so if you exaggerate, you can always go or it with Golden Road forward. Some brown pencils. Here we have longer hairs. Just it was a well sharpened eggshell and just press very likely I can see you can treat. Here's this way. E. Just want that bit. If black here it's not, as I mentioned, forward edges. The care should be very bright because it's the most illuminated over the actors
12. Blending the Black Fur: you know, we can blend these the black stripes with the wife scholars blender. And to do that, just place the tip if it over the black stripe and draw outwards. So this where you're going to create a black. Here's before the white and the brown hair like this. See? And the hairs will be blended, actually blurry, which is what we need here. See if you place the tip or it and you just move outwards. The black stripes. So you don't have to use any pencil here. But of course you can. And so this is what we have to do with each and every black. Strive that you see how it looks mount. Does this tribe experiment the daughters? But if you want to draw some longer black fears over the white or brown far, just draw it like this. You also place over the black stripe and draw it outwards, but then also just blended with a wax collarless blunder. Eso sense Here I really have nothing news to say. I'm just going toe what you listen to Listen, some music and and I will be back with the next step. And of course, pay attention to do here is growth
13. Shading the White Fur: Okay. Now, the next thing is to darkened the white farm. So here we have a bomb. D I way have a sunken area here, so we have to darken it. I'm using warm great 50%. And here, Awesome! Next to the skin. No. So the word for when fund in shadow, it will become great. And although this want us far and we would think that they shouldn't be cored, it has to be colored. No, I can see how it has gonna bent. Area looks like that. And here also, you hear this part is not even I can't even see that in a reference photo. But the tigers usually have this here, this sunken area so we can add that to and I just want simple a little bit with warm grade 20%. You can also use cool grays. Even French graze so again to the same here. But actually I have dark and disbarred with a wax colorless blender, but just want to darken it a bit more. And also here this area which is also fun in shadow particular here This area
14. Drawing the Nose and the Tongue: Okay, now let's draw. Let's call her just his nose with pink and then we're going to use the same fancy for the dunk. Kill like this. I know we can call her the dunk and press very hard. Of course, the squirrel cooler is like to live it, but we're going to fly in outer bands over duct. So now it's a first that budgets Corot and breast very hard, and you can also go but over the white Corbyn so that we green highlights. So that is good, because we can still see the highlights. But of course we're going to highlight these areas again. And now it's the second layer. Let's apply Clay Rose. This is a very good mental for for the gum for the tongue. So this is last week, but I had toe blind a bank offers because they were trying on great paper. And it's this clay roses or B Harley visible. So let's caller over the dunk. So even if you draw human portrait, it's this Spencer Clay Rose is very good for the gum with the lips without lipstick. Particular male loops dunk government so and, of course, escaped. Now let's work a bit more on the tongue. Good. Using one great 50%. It's a warm, great works very well with these flashy colors and your course, this area has to be very dark. So I want to use even warm grief. 70%. - And of course, this highlight to be and almost white. - I want to call her more one great 50% these broader areas. - No , I can I have some details. Like those tiny middles are to call them the divers and gets on our guests. Have him there dogs.
15. Drawing the Whiskers: and now we can finally draw the risk. Er's and I'm using this unit. Bosco. One millimeter marker. And that's all Everywhere. Where you see them. Just fly over drawn area and try to use relaxed hand. You have tiny hairs. Whiskers. Okay, something like this. I have also here we have also on your chin and for the smaller one or tinier, I want to use a writing job. Done. So here we have a lot of thinner whiskers. So here, also over the tongue and teeth just everywhere. And we can also brighten up some areas like your feet. Good hands. If you don't like some of the worst girls, you can just illuminate down with a knife. Work your nail or you can make them finger. That also lets make them here over area. So here, wealthy. And of course, some of the white far that goes overdid black far or over the brown far interest. Greet with the wide end job, man. And also, if we want to bring it up on this So here, above the I, we also have and here we have two whiskers. - Okay , so now that's it. Get awesome wrong here I think my emotion. I hope that you enjoyed this tutorial, that you have learned something and I would like to see your drawing and see what the next story abide by.
 Jasmina Susak, Pencil Artist