Transcripts
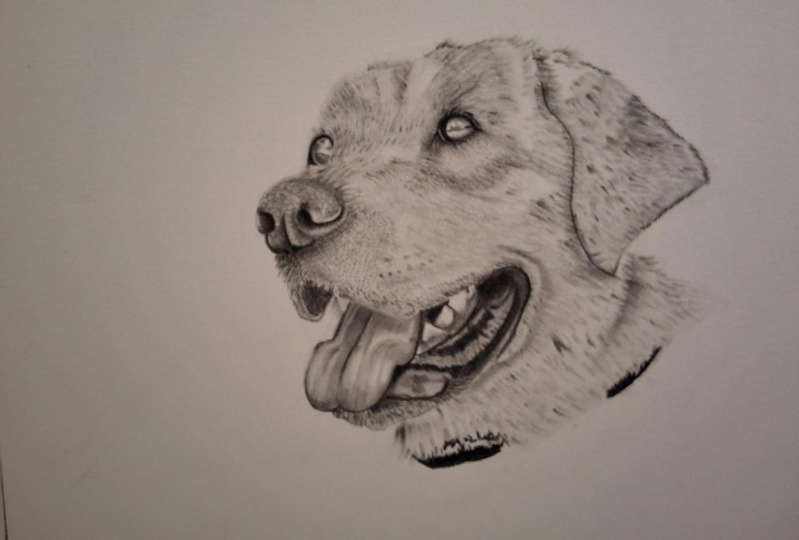
1. Introduction: What's up? My name is Braiding Messer. I am a charcoal artist. YouTuber and online content creator. I have made a handful of step by step drawing tutorials like the one in this class on my YouTube channel. Um, I've made videos on how to draw lion draft. Great white shark, a hammerhead shark, kookaburra bird, all sorts of stuff. But I wanted to do a sculpture class because I wanted to offer a step by step garage toiled . It was a little bit more in depth and had a little bit more of that traditional class structure than you see on YouTube. So in this one, I'm gonna be taking you guys have a draw, A labral retriever. Step by step. I'm gonna have a list of all the tools that you'll need. You're not gonna need a whole lot in the class description of this video. And yeah, I hope you guys enjoy it and, uh, see you in class. Peace
2. Outline & Form Framing : Okay, So to start, we're going to be using a graphite pencil, a 3/16 and number two smarter and who raised her mental click eraser and a mono zero every sir. We're also going to be using soft, medium and heart rated trickle pencils, a piece of tone check paper, a sandpaper strip and last but not least, the brush. So whenever you're looking at your reference image, one of the things that I like to you as I like to identify the basic shape of the image. So in this case, I'm going to start by outlining the shape of the nose and because we're using a graphite pencil, there's no need to press very hard pressed very lightly. We're just trying to get a basic idea of what this drawing is going to look like. And the cool thing about this step with the graphite pencil is that you are totally not committed. If you put something down on to the paper and let's say you're proportions aren't where you want them to be. You can go ahead and hit those with with an eraser and start over. That's not a problem at all, But now, here What I've done is I've outlined the mouth and now I'm mount lighting the eyes. It's important to note in this step that we are essentially framing the image for our charcoal. So that's when the reasons why I say they're not committed in this step is because this is basically just a set up stage for the charnel to come. But here what I'm doing is I'm also highlighting any areas where there's going to be darker values in the image places where I'm going to be laying down a darker tones. And he was gonna outline the outside of the year. Like I said here, I just messed up. Something's gonna hit that with my models or a racer. Boo. No big deal so much the time people tend toe freak out if they don't nail it perfectly the first time. And that's something that, um, you just don't worry about, I don't worry about it, and you shouldn't either. But here I'm just going to outline the teeth and just very lately, just get the basic outside contour of those teeth down. Then here, when it comes to the mouth, the jowls of this dog, I'm just gonna go ahead and seen. If you look at the reference image, you can see how there's a different different tonal values. I'm within the mouth. There's a lot of lighter value, and then there's darker value and kind of ah, really smooth texture. So when we get to the charcoal, I'll show you how how to nail that texture and bring that out in your drawing. Okay, but now it is going through, and I'm just highlighting all the places where I'm going to be laying down darker tones and this creating a darker value. Because if you look at the reference immature, there is very much that underlying form that we want to make sure that we speak to when we lay down our charcoal. And in this initial step with the graphite, this is one of the ways that we achieve it. What I'm doing here is I'm laying down what I like to call form lines, and essentially, what the's do is these more or less frame the underlying form within our image, and these are meant to be just a guide for us. When we go to lay down that charcoal, there's no right or wrong way you can lay down is many of these form lines or as little of these form lines Aziz you want to. Most of the time, artists that are still very much developing their techniques might use a little more. Maybe artists that are more on the master level. They might use little to know form lines, and that's completely up to you. This'd just something that I like to do, because I find that the more guidance that I have, the more accurate of a rendering. I can give my reference image, and if you're into commission pieces or something like that when it comes to pet portrait, then this could definitely help you.
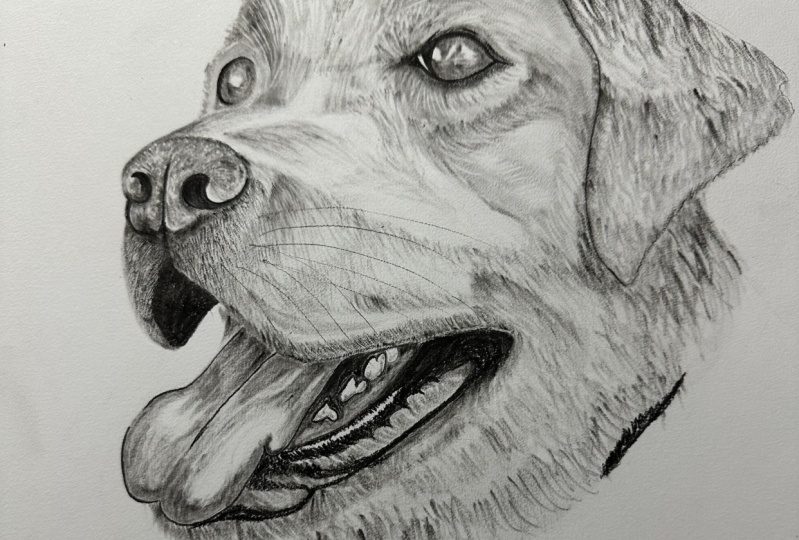
3. Nose & Base Layering : Okay, so now we're gonna lay down our tone check paper, and what I've done is I've taken himself charcoal and some medium charge alive, crying to them onto the sandpaper strip Here. Now, I'm just gonna take number three smarter, and I'm just gonna very lightly start rubbing in some soft charcoal into the darker values of the nose. And the biggest thing to remember with this step is to focus on the darker values first. And the reason why you want to focus on the darker values first is because when it comes to charcoal, you want to save those those lighter values, and then here is you can see like this one of the reasons why I said, you know, if your outline isn't exactly how you want it like don't worry about that because you can go through here with your graphite after you do with an eraser and you can restructure the outline of need be. But I'm just gonna go in. I'm gonna pack in that soft charcoal in areas where I know those tones are going to be darker, and thus it's going to throw a darker value for us. But with every stroke of your smarter. You want to keep in mind that underlying form and understand that that is the only thing you're worried about In the wake of what you're trying to convey, texture will come. We'll all show you how to how to convey texture later on. But this is that initial layer. Remember, the approach that were using here is called the Three Layered Method, which is essentially we're using soft, medium and heart rated charcoal pencils to, um, convey our end product R N drawing. So here I'm just kind of slightly moving away from the nose. And I'm just laying down that initial layer of charcoal that I will be layering at a later step. You might be thinking, Well, why are you laying down all this charcoal when you have a lot of texture to convey? And one of the things that I like to do is I like to retrieve a lot of my detail, work with my erasers, and I'll show you how to do that later. But now I'm going to take my brush check and make sure it's the proper tone that I need. I'm just gonna go in here is gonna, um, very lately start smearing that charcoal around and you can use mugger work or brushwork for this step. One of the things you'll find with brush workers, you're able to move a lot quicker than with us. Much of work. Not only that, but it gives you a much smoother aesthetic right off of the bat. So that's what I'm doing here. I'm slaying down just that. That initial layer with the full understanding that I'm gonna be going back, I'm gonna be retrieving a lot of my detail, work with my razor work. But what I'm doing to them was packing on more soft charcoal onto my Smoger. And I'm essentially building up those values and making them darker worthing where they need to be. And this is in an attempt to make sure that I am accentuating the value scale. But now here what? I'm gonna do something. Take a soft charcoal pencil and I'm gonna go in. I'm gonna start packing in an extremely dark value. And now here you can start to see why I started with the soft powder charcoal so that I could really get a nice, smooth blend with those initial lighter tones. Um, and this is in an attempt. Like I said, to help me accentuate that value scale. Yeah, I was gonna put a nice define line right here. And what this is gonna do is gonna bring the outside part of that knows, found. And then it's going to push in the underside, the inside of the nostril back. And this is gonna help us speak to that. That three dimensional forms we have to remember no drawings, air only ever going to be in two dimensional space. So it's our job as the artist Teoh understand tricks of the trade so that we can bring out that that three dimensional look. Even though technically a drawing is the ultimate illusion, especially a realistic style drawing. It's that illusion of three dimensional space because it doesn't exist right now. What I'm doing is I'm taking my 3/16 mutter, and I'm just pushing the charcoal around and making sure to adhere to the form that I want . If you look at this nose in the reference image, one of things that you'll notice right off of the bat is that this nose is extremely smooth . It's it's very around. And so that's perfect because with thesis mutters, we can make sure that we are speaking to that. And then here and you can see we have a lot of texture. There's a lot of pores and stuff on the on this dog's nose. And so this is one of the ways that we can go through and we can convey that kind of look, I'm basically just stabbing the paper. And then if it looks a little abrupt or a little a little too sharp, don't worry about that. You can go in with your brush like this, and you can state it real late. And what this is doing is this is, uh, basically softening up the texture while at the same time still allowing it to come through for our viewer. Now we'll take to you whom power tools. I love this thing. So you're basically just stabbing it. And this is one of the things that I want to show you with you. Who is that you can move a lot of charcoal very quickly and you don't need to hit the paper very hard. It all because it is battery operated. It's going to move a lot of charcoal very quickly, and so it's very powerful, so you make sure that you're aware of that. But as you can see, you can go through and you can lighten up bits and pieces of charcoal, and this will give you a really, really nice aesthetic. And even here, if it's a little too abrupt, don't worry about that, because you can take your smarter like we're gonna do. Here is 3/16 and just very lightly hit the paper. Nice Tate circles, and as you can see it, it softens up the look while at the same time not completely basically getting rid of all of the detail work that the who just put down onto the paper. There we go. That's nice. No, no, 12 years. I was like a medium charcoal from one of the reasons why I'm using the medium charcoal is because it has a little bit more binder in it. It throws a slightly lighter tone slightly later value. Then the soft Terkel does. And so, in the wake of detail work, it's perfect because we can go through and it rests on top of the soft oracle. Very nicely and it allows us Teoh do a lot of detail work. But the cool thing about this step here is that I'm barely touching. The paper was going in a nice little tight circles and you can spend you can literally spend hours on detail work when it comes to your medium and hard, Charles. But I'm gonna switch up. I'm gonna go to a soft charcoal. And I was gonna pack in more charcoal here, and this is gonna give me that really nice, rich black. This is the darkest of our values. Now I'm gonna switch it back up again. I'm gonna grab my medium charcoal. I was going through in a more or less kind of just highlighting all of the white spots that I laid down with the who raised her. And if it looks, uh, a little too dark because if you look at the reference image here, the top of the noses very white as a very, very light value, you can go through with you, and you can lighten that up. But the big thing to remember about the dog's nose is that it is really up to you as to how detailed or not detailed. You want to get your response to my brush? I'm just softening this up in the rear on to listen three.
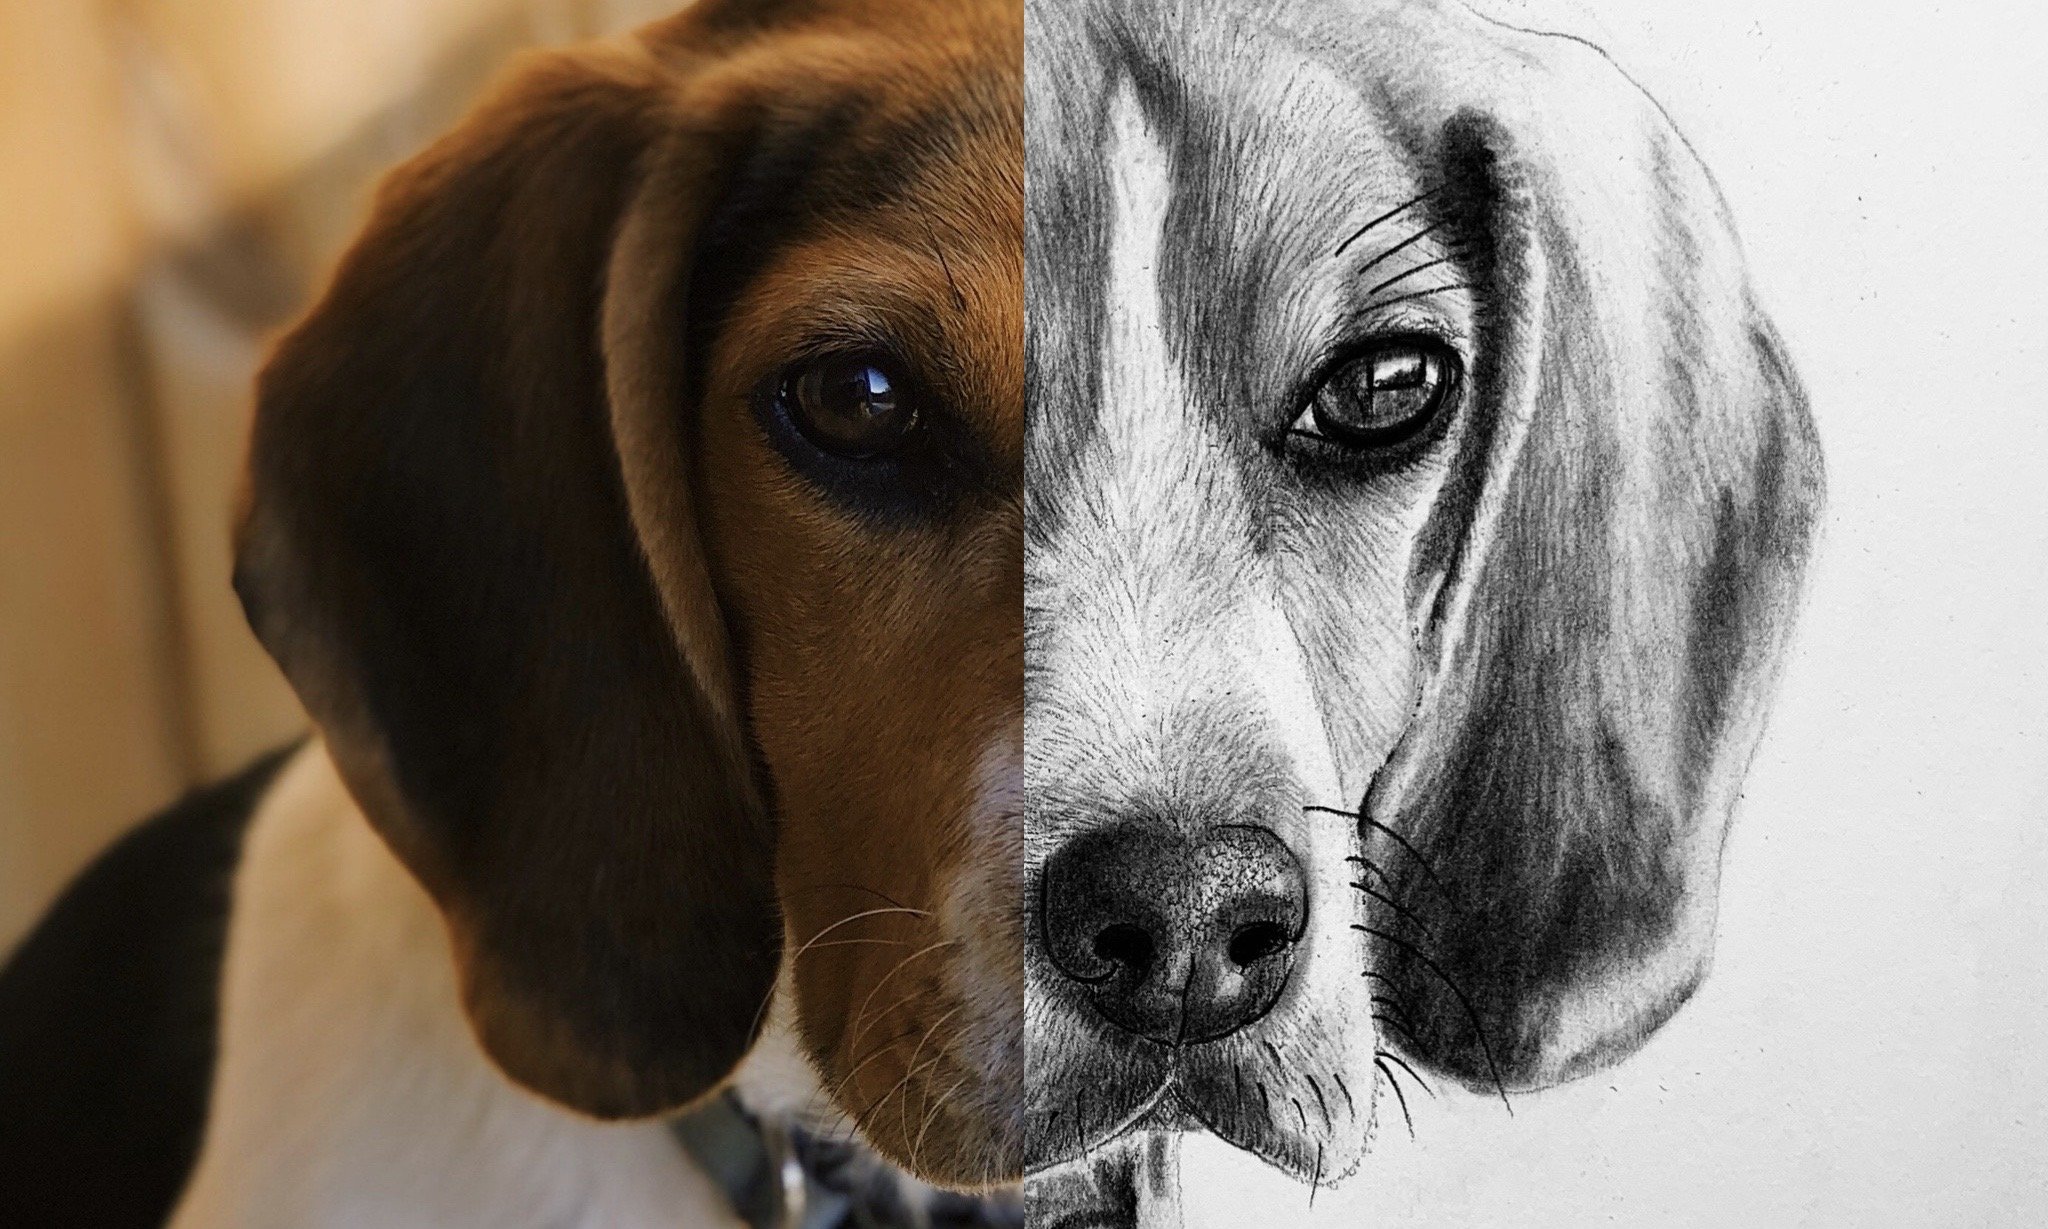
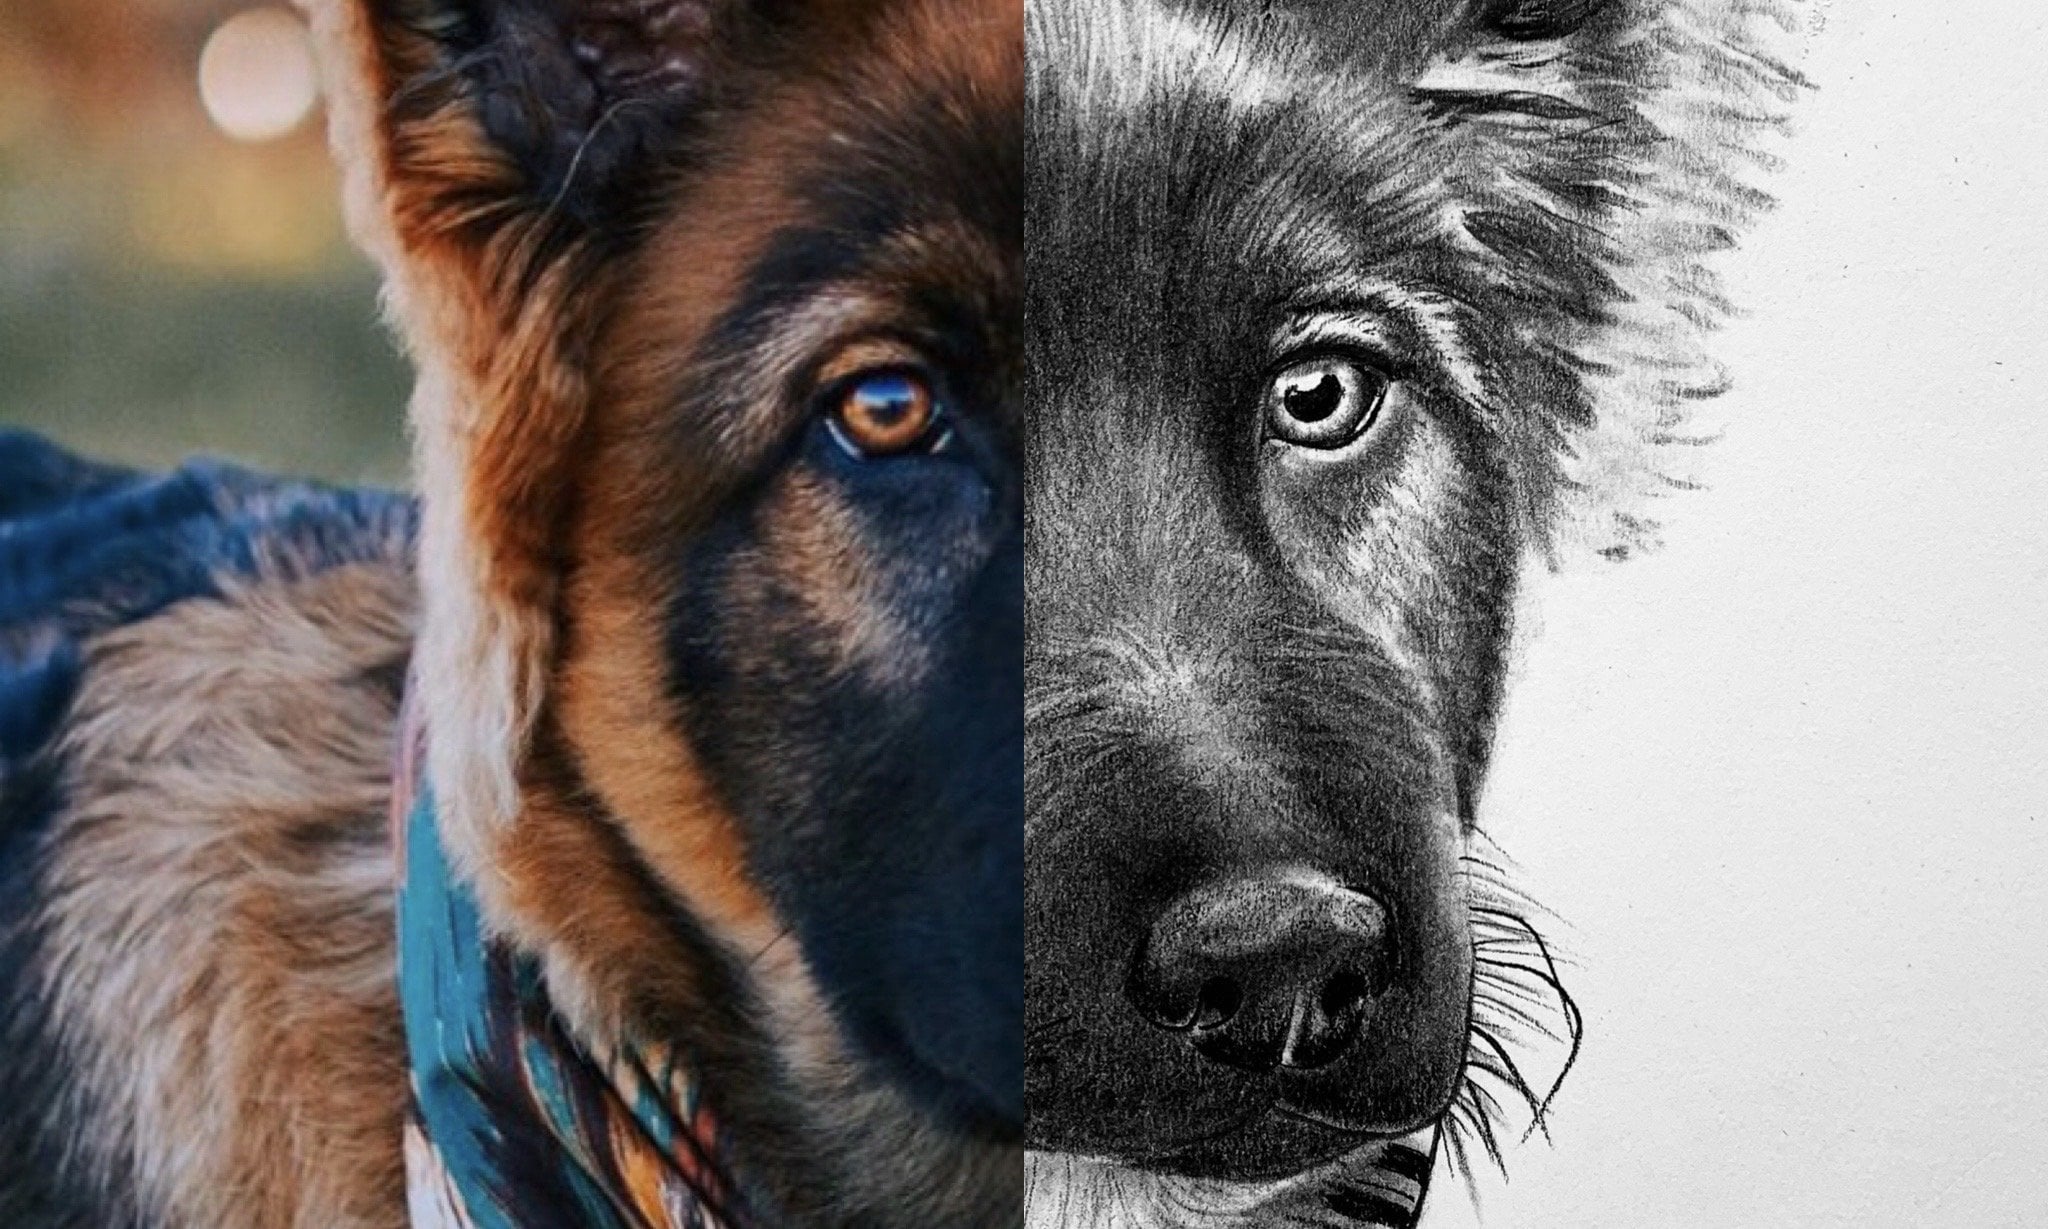
4. Eyes & Hair Texture: okay, Not here. What we're gonna do is we're going, Teoh, do what they call retrieving the detail work with our monetary eraser. So what I'm doing is I'm just doing short, quick polls, and I'm being sure to pull my eraser in the same direction as the underlying form. So as you can see right behind the nose in the reference image, the the bridge of the top of this now goes up and then over. It's important to note here with this step is that this is just one layer tour overall detail work here on the outside edge what I'm doing as I'm pulling my eraser, I'm going back and forth. And this is just more or less breaking up that that light line that I had with the graphite things keep making it look a little bit more realistic. And you can use in a who eraser or you can use the model zero eraser. I've found that the mono zero racer is best for this step. But the biggest thing to make sure that you're conveying that that realistic look that's in the reference image for this Labrador is to just do nice short, quick pulls and then that way it looks, um it looks realistic. The last thing you want to do is do a really long pole and have a nice, long looking hair where it should be a short hair. So just keep that in mind. But this one of the reasons why I love using this approach the three layered method is because it is extremely forgiving. If you take away too much charcoal in one place, it's very easy to go back through with a smudge er or brush and add more charcoal and dark and and bring that darker value back and then start over again. But here, you can really start to get a good idea, and you could start to see that texture. But now what we're gonna do is we take our medium charcoal. I'm gonna put a line here. We start off not pushing too hard, and then gradually push harder and harder as I come back around. Eyes could be tricky, but I find with dogs that if you start from the outside and then simply work your weight in intends to be a little easier. Put terms very lightly. Gonna add the the outline of the images and the other reflection of the dogs. Either we see and I'm gonna take a 3/16 much. I'm splendid ing the medium charcoal together that we just laid down with our medium pencil . And you take your time with this step eyes. It's very easy to overdo eyes. So the trick with them is to get in, do what you need to do and then get out. The last thing you want to do is overworking I So you're communism was going through. It was very lately blending all the areas that need to be blended. And if you're unsure, just refer to the reference image, and there are no men. Do is I'm just gonna beef up thes lines still a little bit where they need to be. I'm just gonna push a little harder. And as you could see, this gives me, uh, heavier line quality. Okay, so now I was gonna go through and I was gonna continued Beef this up and there's the cool thing, too, is that there's any dark spots that you need to convey in the for. You can actually convey that with your smarter. Now we're India's one. I'm going with her brush. Make sure we have the proper tone that we need. I was gonna go through it is gonna add some more chocolate here. And like I said before in the previous lesson, this is that initial layer and the reason why we're doing this Because the type of approach that we're utilizing, we are going to be conveying all of our hair texture by retrieving all of our texture with Armando Zero Racer. So that's why we're doing it like this. But as you can see any areas in the reference image that need to be a little bit darker, I'm just go ahead and build up those darker values in this step. That way, when you go through and hit it with your eraser, you'll be able to see it under the texture. So essentially what we're doing is we're we're laying this charcoal down with the understanding that it's gonna show through and be what we want it to be. You know, two or three steps from now, and if that seems a little confusing, don't worry about that. You'll understand it as you draw with this technique more and more. But not here with the year. If you look a reference image, we do have some texture to bear in mind. So we're just pushing and pulling texture away from the year. And then here we're taking our larger, smarter and we're just laying down, beefing up any dark tones around the eye that need to be beefed up. And one of the things you'll find is when it comes to comparing this mergers with the brushes as they both move charcoal very quickly. But you have way more control with this merger's than you do with brushes in the wake of pinpoint accuracy. But here, as you can see, you can convey a certain level of air texture. Um, with your, uh, Smith work, it's not finite that come with your, um, mano zero eraser. But I wanted to show you this just so you guys were conceived what smelters can do for you in the wake of their capabilities. But the biggest thing to remember here is just that underlying form. Always remember that in case now we're in news, we wanna make sure that our eraser tip is clean and we're just doing nice short throws. Nice short throws. Now, the trick to this step is pick a small area on your reference image, and then just focus on that that area, and then when you're done with that area, move onto the next area and so on and so forth and do that for the entirety of your drawing . This isn't This is a very important step, because essentially all of these all of this little line work is there. Imply it lines, meaning that they're not defined lines. Okay, so now what we're gonna do is we're going to take our medium charcoal. We'll do the exact same thing that we did with the other. I We're hitting the outside contour with nice to fine line. We're beefing it up on the top where it needs to be beefed up. Okay, looks good. If you need to beef it up a little more, then go ahead. Okay. You know, what we're gonna do is we're gonna take our 3 16 smudge and where it's gonna pull the trickle down and up from the bottom. And what this does is this insurers that nice round Look, that eyes have. Okay, now it's good. Now we're going to take our medium charcoal to go through. It's gonna define some defined this image that's in the reflection of the dogs. I looks like there's a little farmhouse for something here. There were. That's nice. Remember what I said about eyes? Get in and get out. It's very easy to overwork and I So just keep that in mind then here looks like we have a slightly lighter value. So we want to push. Ah, a little lighter. And if it looks gritty, don't worry about that. We're gonna go through and we're gonna hit that with us with our smudge or work, and that's gonna soften and blend it all together. Really nice. It was dark in this up. When it comes to the eyes, darken up that very top in the very bottom first and then work your way into the eye. And that will ensure that nice rounded look. You were splitting the soul together. Soft unit up. Here we go. Okay on to listen for
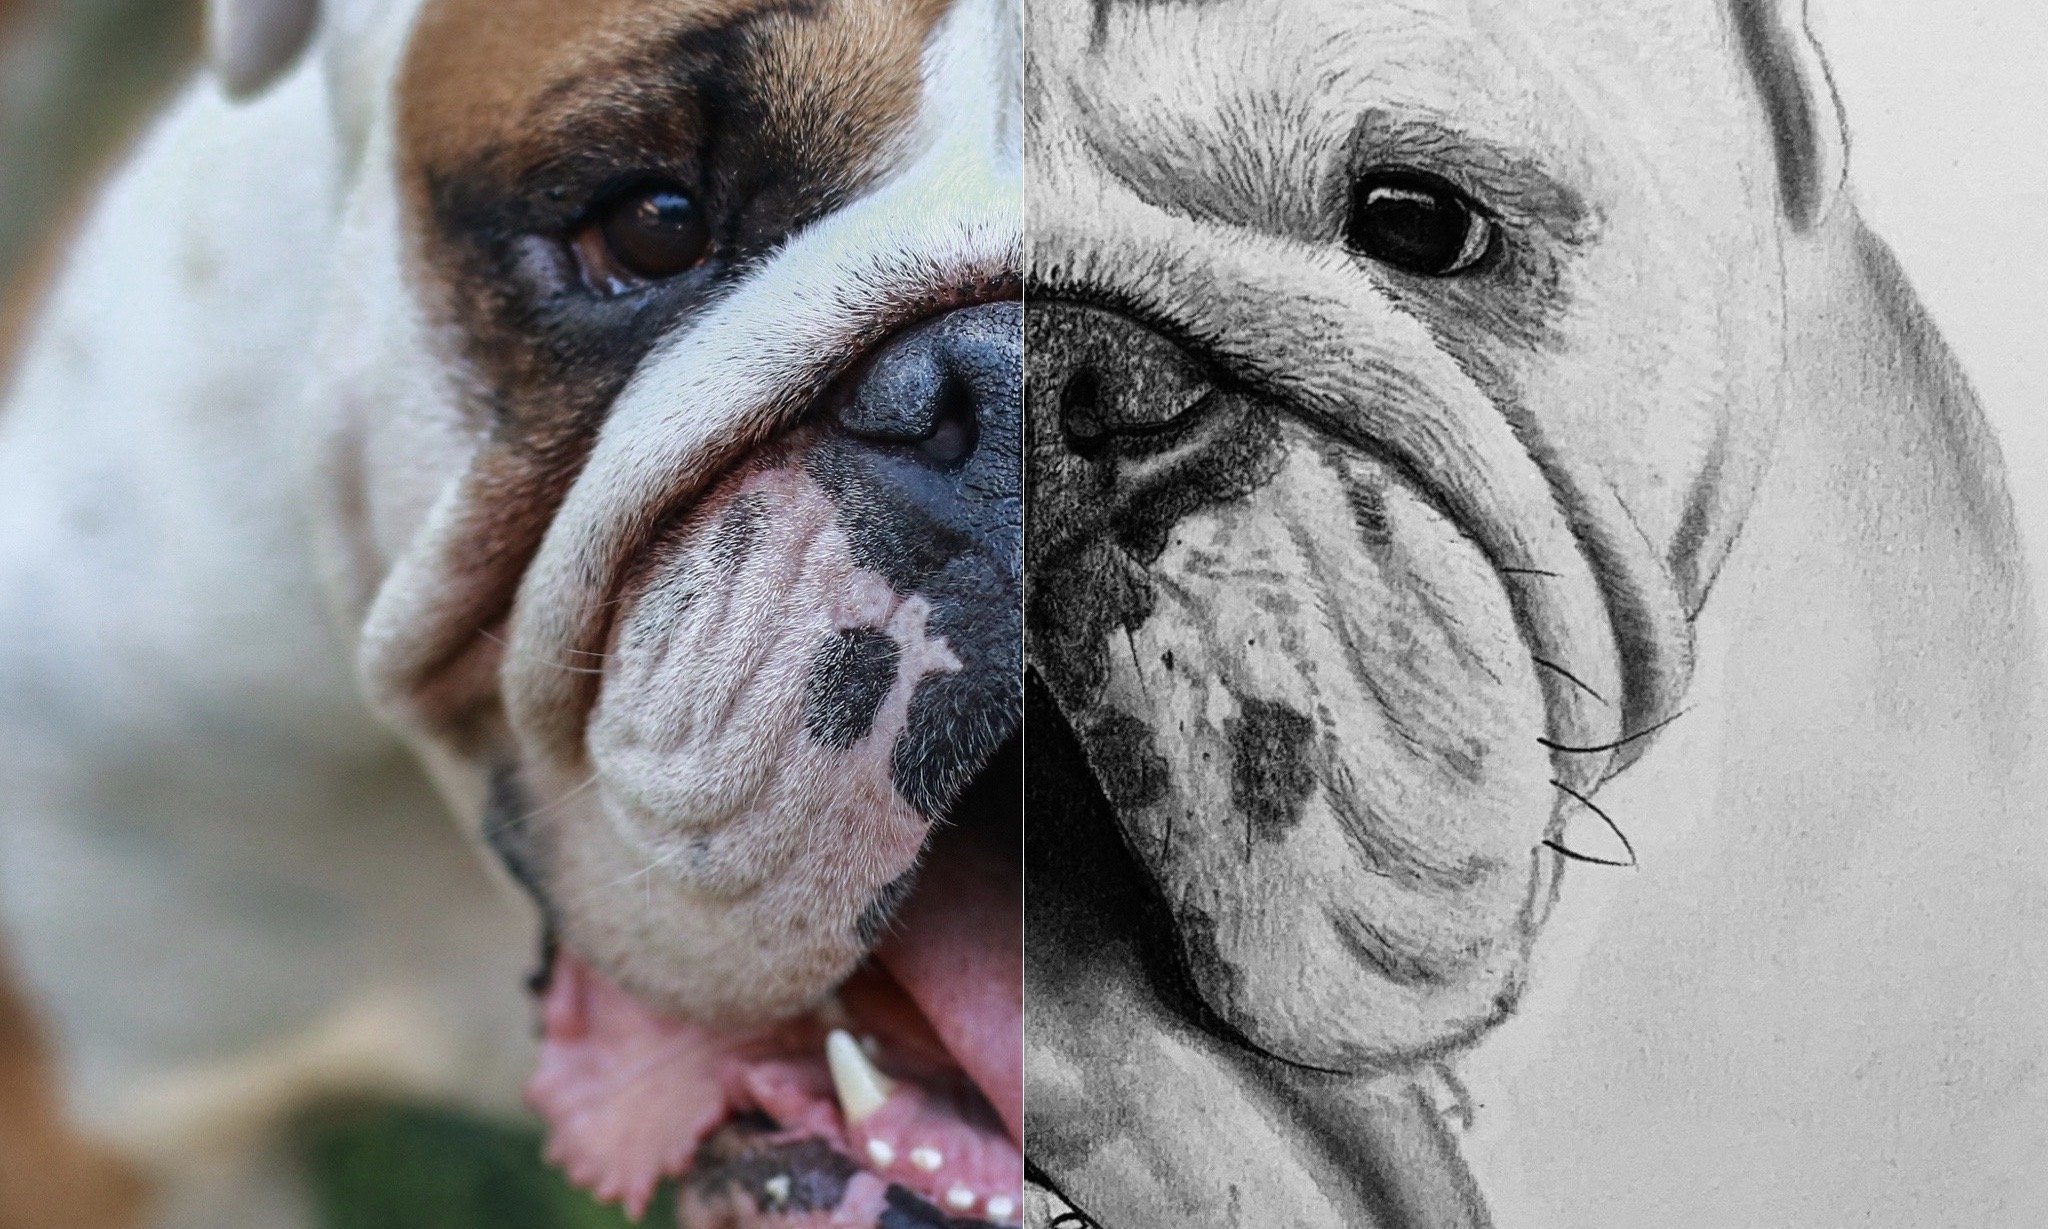
5. Underlying Form & Detail Work: snow or news. We're taking our 3 16 smarter or just doing a quick little tone Check making sure you have the value that we want And it works going through and very lately with your application very lightly touched the paper and ensure in this step that you were pulling the charcoal in the direction that the hair of the dog is flowing. Because what you have to keep in mind with this step is that you are ensuring that you're conveying the underlying for of the dog's head. I hear what I'm gonna do is I'm gonna take a medium charcoal, and I'm just gonna build up the top of this I And as you can see, there's a lot of texture immediately above the eye. So what I'm doing is I'm just pulling, um, the charcoal across and then I need to lift up. I'm just I'm lifting up and then I'm leaving it alone. This is one of those things where you just kind of used to be light with. It Looks like there's, like, little scratch, but the dogs I hear it's gonna put that in. Okay, now we're gonna take our larger, smarter. It's going to a little tone check. Make sure it's the value that I needed to be. And then I was going through and remember how he said Start from the bottom and then the top of a night and then work your way in. That's what I'm doing here. Just beefing this up and essentially rounding these eyes out. Okay, so now taking my models Europe, making sure that I have a nice clean tip going through Mr. We Nice quick polls. Yeah, we are all the while understanding that I have that underlying form that I need to make sure that I am conveying with each stroke merrier and a quick trick that you can use for the monitor razors. If you have like a razor, you can take your monitor or racer and you can actually take that razor and you can cut it at a diagonal, and that'll give you a really, really sharp edge to work with. For those extremely fine lines in some dogs, you hear what I'm doing is I'm just basically dabbing the paper because I use that soft charcoal. There's hardly any binder, and it also it lifts off the paper very easily, which is great, cause the last thing that we want to do in this step is over work about the paper. But now you're starting to see why we laid it down with the brush. And now we're going through with our eraser work and bringing out that that furry detail, that furry texture. And of course, this is just one way of bringing out that for and dogs. It's It's by no means the only way. Okay, here, I'm gonna take my medium charcoal. Remember what I was saying about the medium charcoal? How it brings out a lot of your able to bring out a lot of detail work with it? Well, essentially, that's what that's what we're doing here. Any place where there's if you look at the reference image, there's almost like little shadows in between each first strand, each hair strand. But that's that's what we're trying to convey here. We're just going through and and very lightly hitting any spots, any detail, work that we need to help us convey that that realistic look that we see in the reference image. Okay, you hear what I'm doing is every time I hit the paper. I hit it and I pulled it with the charcoal. And then I rotate my charcoal head. One of the reasons why I'm doing that. Well, I hit it and then I rotate, Hit it rotate is because I want to make sure that each and every time the charcoal touches the paper, it gives me, um, the least amount of surface area on the tip of the pencil so that I get a nice thin line. I want a nice thin line when it comes to this to this dogs here. And that's one of the things you'll realize, because that's gonna vary across this drawing. If you look at the reference image, this dog's hair is different links. For example, the hair that's right behind the dog's nose is extremely short. The hair that's around its eyes a little longer than the hair that is back towards the dog's ear is even longer. And then the hair beneath the dogs chin is so long that there's actually lumping together. So just keep that in mind. What I was going through names, adding another layer that's that's all this is is this is another layer of medium charcoal to rest on top of that self charcoal and that a recent work t give us that really nice furry texture that we want. Then hear what I'm doing is I'm speaking up where the ear rests on top of the head. Here we go. Okay, but this is one of those things worried. It just it takes a lot of it. Takes a lot of patients. A lot of times these drawings that I work on take me hours and hours. You know, I'm here. I'm squeezing this drawing in 2 60 minute class. But the main point of this class is that I want to show you the techniques. Because if you can understand the techniques in the fundamental approach that I use, then when it comes to application for you and your own drawings, hopefully you'll be better for So that's the hope, but not here. I'm doing the exact same thing that it did around the eye. There's that base layer were going through. And we are, um, pulling charcoal with our racer work to give us that initial layer of detail that I was going through. I'm just softening it up. You sure with this step. You know, if you want to soften up, you hit it really lightly because the last thing you want to do is basically Nolan void all of the detail work that you just spent a lot of time conveying. I was going through and just doing nice tape polls, nice tape polls, and you could start to see that detail work. Really? Really Come out. We're doing the exact same thing on this one. Try and get that initial. Later. We're gonna be going through with medium charcoal here. I want to start building this up. It's nice. Short, quick polls. It's all over doing here. It's very easy toe to put too much in. So the big thing is just to go slow, take your time, and all of a sudden you're gonna start getting the aesthetic that you want. Okay? Now, here, As you can see, this part of the drawing is extremely dark, so it's going to put a nice define line right here. Well, let it fade out to nothing. Just go through Mr Packing in a lot of sharp. Clear. This is why the soft charcoal works the best for your darkest values. because there's hardly any binder in it at all. And so because of that, it conveys a very rich black. There we go. So now we're Indio. Take our 3/16 smarter. Shouldn't go through is going to some blending. And essentially, what this is doing is just softening it up for us real nice. Here we go. Biggest thing with that step is just make sure that, um, you don't overwork the paper. This muggers, along with the brushes are extremely powerful. And the reason why is because they move a lot of charcoal very quickly. So, um, you know, charcoal works kind of like cutting hair. You know, you can always you can always add more, just like you can always cut more hair off. But it's sometimes if you go if you overstep sometimes. So it's a little hard, um, to go back, so just keep that in mind. But I hear what we're doing. We're taking a hard charcoal. Our charcoal in the three layered method has theme most amount of binder in it, and because of that, it throws the lightest tone. So the inherently the lightest value, Um, and it rests on top of the soft and medium trouble very nicely. So I'm just making sure that, uh, my pencil is extremely sharp and I was going through and I'm doing short poles, everything with the Labradors short poles because their hair is so sure. I want to make sure that you would hear too short and sweet. Then here, working down from the nose, we want to make sure that we're pulling in the same direction that the hair lays in the reference image. And this will speak to that realism for us because when it comes to conveying texture, a lot of the times, you cannot forget about your value, your value. You know you don't want to be throwing and laying all this down with a soft charcoal. Let's say, because that's very, very dark. You know, if you have a medium or, ah harder, hard charcoal, you can use that and that will convey a lighter value and thus look more realistic thing you're drawing. But this is one of those steps where it takes takes a while. Don't be deceived. It does take time. But here I'm just gonna grab this big smudge her. Now I'm just lightening up my tone. It's making sure that it has Thea the type of aesthetic that I want before I put it on to my paper. And this is another trick that you can use, You know, if there's any areas where you need to have bigger swaths, if you will in your shade work like if you actually look here. But if you actually look up right above the dog's mouth or its cheek is there's actually waves, if you will. And if this looks a little too jagged or a little too abrupt, don't worry about that. Because we're gonna be going back through with our brush and we're gonna be softening this all up and blaming it all together, just like this year, so much the time when it comes to this method, it's just all about knowing what your next steps are going to be. She was gonna this Yeah, that softens that up real nice. Now we're gonna go through with our with our eraser. We're just gonna retrieve all of these lighter values. So basically, when it comes to a lighter values, that is a big thing to remember. You can either do what they call leave value alone, which is essentially a complete white space. Or you can do what they call a retrieve your lighter values, which is essentially what we're doing here with our with our eraser work. We've laid down charcoal, so we haven't left it alone. But now we're retrieving those lighter values, and that's giving us the initial layer of our detail work for for explaining this all together. Getting really nice soft look, as you can see when it comes to your smile, your work. The big difference between smuggle work and brushwork is that with special work, you have a lot more control or with brushwork. Brush works all about moving quickly and softening things up. That's so that's how I use it. So here is you can see Member. How was talking about the cheek and how it's almost got those waves? Well, this is how I'm conveying those waves, conveying it with a buildup of charcoal, and I'm just going through. I'm just retrieving those lighter tones. Nice short poles. Make sure the tip of my eraser is clean, so you know, if you're halfway through and you need to make sure that your eraser tip is clean so that you continue to pull really nice, um, lighter values. Go ahead and stop and clean your Easter, too. It's not here. It's gonna take my charcoal, and I'm just gonna start adding an extra layer. This is, of course, a hard charcoal. So I was gonna continue to build that layer from the nose moving down to the bottom of the cheek. And if you need to go through and lighten up in you these shadows or change the form like that was little bit to Jagan. So in order to match the reference image, I just rounded it out. You could do that. I don't feel like, you know, you have to follow these steps verbatim. You know, these these tutorials are meant just to be a guide for you. You know, the more knowledge you can soak up, the more you can apply to your own drawings. The arms going through my charcoal. Essentially, what I'm doing here is I'm just highlighting those those lighter values that I've created with my models or a racer. I want them to be side by side. So you have a white retrieved value, and then you have a dark line right next to it to highlight it. I want that. I want those differences in value to pull through because that's what's going to really make the drawing pop. And it's also one Teoh showcase, that underlying form for us, which is the key to realism, but not her own news. I was gonna load up my 3 16 smarter, and there's some dots here where the whiskers are. Some was gonna go through and kind of lightly, lightly dabbed those and kind of kind of build those up. If you need to go through and soften up anything you can, you can do that as well. And this is also another way to be able to convey kind of that that rough, furry, furry texture in your drawings. Here we go. Okay, But then here on this one, if you want to start from the bottom and pushed your way forward on this part of the drawing, you could do that as well. The biggest part of this step is just just don't stone over work it. And that's why I'm a big fan of slavering my charcoal Zen layering my different tones and textures is The last thing you want to do is is overwork your paper terms need this with fresh real quick. Soften it up. Okay, so now I was going through the medium charcoal, and I'm just continuing. Teoh convey as much detail work as I can. The big thing with this step is whenever you touch the paper, always try to leave white space in between all of your touches, all of your touch points on your paper. The reason why you want to do that is because the viewers I subconsciously will pick that up. Ah, lot more than if they were to pick up, say, just your dots just on top of each other because then you have kind of a clump kind of a mass right, And that's not good. That's that's not what we want. That hearing is going in any parts because if you actually look at the reference image, there are lines that are longer, and then there's like dots and more like clumps of of, of darker value. And so we're just speaking to that Here. This is how you do it. Let's go through and just handle each one of those spots one at a time. There you are moving on to listen. Five
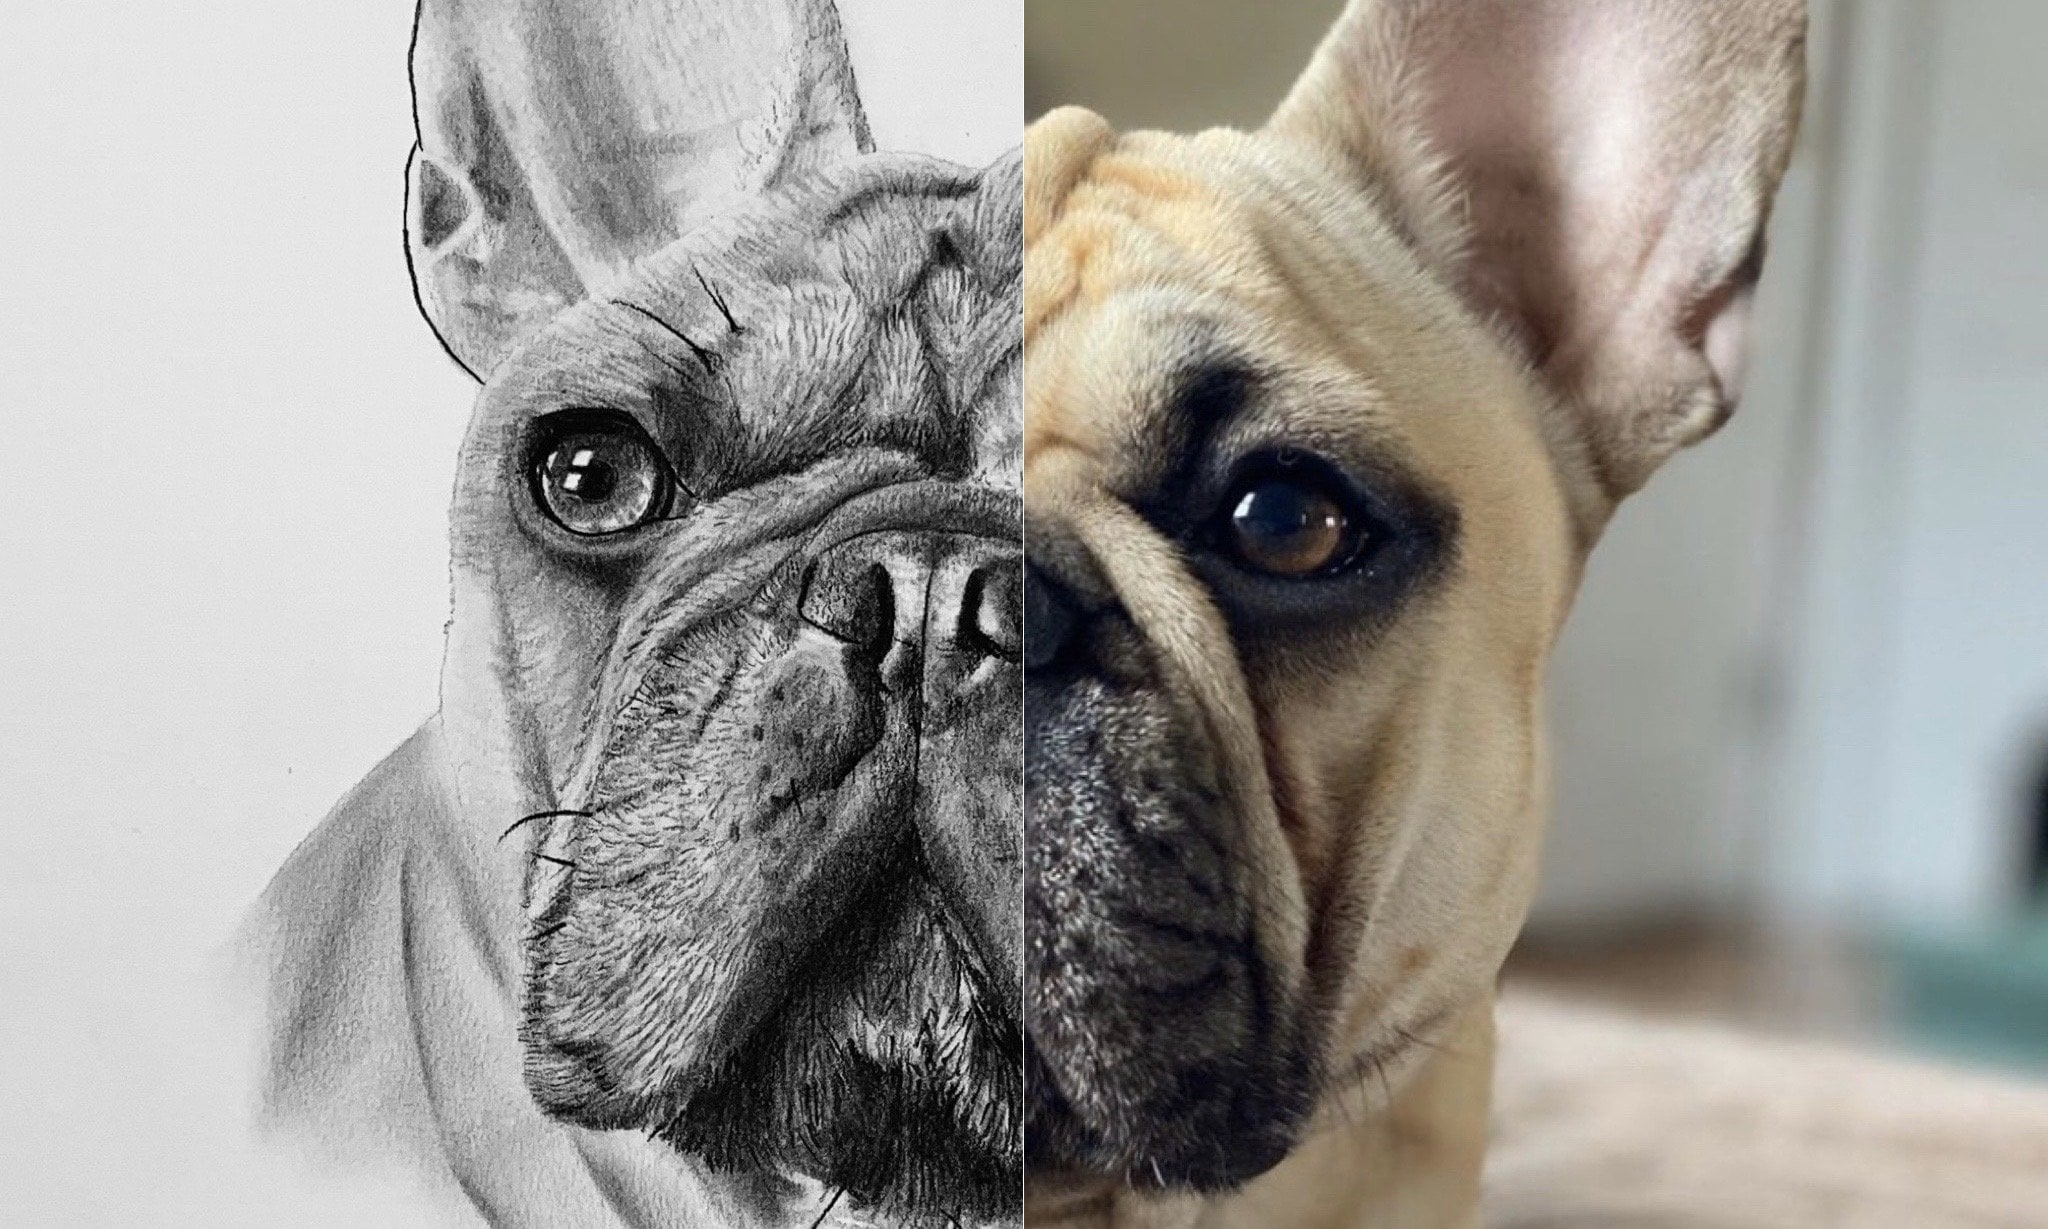
6. Mouth & Finishing Touches : OK, moving on to the mouth. So we'll be taking a 3/16 murder, and it looks like there's a little bit of first showing through right here is gonna pull this. Looks just like this. Leave a little bit of white space between that fur on the tongue excreting, actually, because I'm gonna grab a larger sponger, Do my little tone, check this park, actually pretty dark. So what I'm gonna do is I'm gonna start from the bottom, is gonna slowly work my way down way to go start from the bottom, work my way up, and you can either use a smuggler or brush. But I find that I like to use the smudge Her for the tongue was clean this up, actually monitor a razor, actually actually gonna race all this. And now I'm gonna do something, actually outline the tongue. There we go. That looks a little bit more accurate to the reference image. And then I'm just going to continue to build this up with with my smarter. So when it comes to the tongue because of it, like it's nature, especially in this reference image, you want to start from the top and then the bottom and then work your way up towards the center of it. And you don't need toe. Put down a lot of charcoal when it comes to the tongue. And the reason why is because through your brushwork, you'll be able to really smooth it out because the tongue, as opposed to, say, other textures on a dog, the tongue in the nose or some of the softest, smoothest textures. So, um, that's one. The reasons why you don't want to go to dark with him. But I was cleaning this up here with my mom is a research. We're gonna do some, uh, do some light work on the edges, but then here, for there's any spots where you wanna make sure that you have a lighter value, you can go through. And you can really get finite with exactly where that detail works Gonna be with your models are a racer. Okay, so now we're gonna take a medium charcoal. I'm gonna go through, and I'm gonna put a nice to find line right here. Don't tell that Freed off into nothing, it will start from the bottom action, and they're going to start from here and pull that down like that kind of fade off. Pull that around the Pulitzer on Let that fade off into nothing. Remember, I say about the fine lines. A lot of artists don't like to use them because they find that they make their drawings look cartoony. I disagree. I think that if you use them in the right ways, you can find a nice happy balance between define lines, implied lines by not mismanaging your line quality or your line. Wait. No one's gonna go with her brush. Smooth. This allowed. So that's what I was saying. This is that nice, smooth texture that we want. And then if there's any places where you feel like it needs to be darker, you can go through with your smarter. You can build that up just like this. Here we go. That actually I don't like any of this. So I'm gonna completely erase this. We're gonna start over. I was gonna go through with my graphite pencil times going to re outline everything that was outlined before, and I wanted to show you guys this. This is one of the reasons why when it comes to our initial step withdrawing out outline and framing our form. Don't think that you're committed. Here we are. We're halfway done with this drawing, and I just erased half of my my outline. But I did it with the understanding of knowing that I can go through and I can do whatever I want. And you as the artist you have that power to. You know, if you're unhappy with something, if you feel like you need to redo us, we can get your proportions a little bit more accurate. Go ahead and do that. That's not a problem. It'll I know. What we're doing is I'm going to go through with soft charcoal powder. I'm just going to take my 3 16 smarter, cause it's a little smaller. So I'm able to get in there with a little bit more pinpoint accuracy, and I can really start to pack in that charcoal. But here, I want a little bit later tone, little lighter value on the value scale. And this is just like the for Okay, this is an initial. Later. I'm gonna rub this all through with the understanding that I'm going to be going through with the medium and soft charcoal and really packing in the darkest values just like this. Just make sure that your soft charcoal pencil is sharp so that you can get in there and and really put your charcoal where it needs to be. But this is the big thing, accentuating that value scale. Remember, complete white to complete black and then all of the values in between. That's how you really are going to make your drawings pop. That's really how they're gonna jump off the paper so many times. Artists either aren't aware of that or they forget. And because of that, their drawings don't have the potential that they could have if they were just, uh I understand that they really need to convey the value in their drawings. But now here, if it looks a little greedy, don't worry about that. We can go through with are smarter work. We're blending. Essentially, we're blending all of that charcoal together, and this is giving us a nice, smooth gradation across our different values. But this one, the reasons why I was saying we were laying down that initial lighter tone to not not really worry about it, because now, as you can see this. The jowls of this dogger really starting to come together for us. But the biggest thing with this is make sure that you're referring to your reference image and that you're pulling your charcoal in the direction that it needs to be pulled so that you have that nice, realistic look. And also, you know, if you feel like this part doesn't look the way that you wanted to. Don't worry about that. We're also gonna be going through with brushwork and softening this all up in blending it even more. But here, I'm just going through it myself. Charcoal. And I'm just putting charcoal anywhere where I'm going to need to convey that that darkest value, that, of course, I'm using this merger to blend it all together. Yes, that looks nice. Okay, Now I'm gonna hit with my brush real quick, but just very lightly. Very lately. Make sure that you're pulling the charcoal from the teeth outward, because that's the direction of the way the light is heating the gels that's defining the line right here that I was going through my medium charcoal, and I'm just essentially highlighting any of the shadows that need to be highlighted in the jails of this dog area. Do a little tone check and make sure I have the value that I need then here on the front part of this dog. I'm just gonna pull this, as you can see, just like the hair that we did on the face of the dog. This is that initial layer. Okay, Now we're switching it up, go into our smaller, smarter and same type of thing, starting from the bottom, pushing up. And this is just giving me more, uh, texture to work with. When it comes to the hair on the chin of the dog, it's going through real late, pushing and pulling to get some of that that hair. Then, you know what I'm doing is I'm taking my soft terrible, and I'm just packing in that dark value anywhere where it needs a that if you need to go through enlightened any places up, you could do that with your mom's or a racer. Eraser is the smallest racer in your arsenals for us. They're the tip of the erasers. Were able to really get in, find places and and lighten it up. But I hear I'm just taking a medium charcoal, and I'm doing exactly what we did for the rest of the dogs faces faras, the hair texture. You can see that some of the hair underneath the tongue is longer. Other pieces of the hair as we move back along the bottom of the mouth get a little shorter . So just make sure that you're paying attention to that. And you're watching your the length of your stroke pulls. You're opening a nice, thin defined line, dolphin. You hear that? I was clean this up. Here we go. Okay. So now I'm just doing a little tone check making sure that I have the the value that I need . I'm just going through and softening this up, dark ing up the underlying form of my dog. Here. You can see this. Here's a little too far forward, so I'm just gonna cover that up with some charcoal, grab a little bit more soft chuckle here. Okay? And you can see the texture of this year is a little different than the rest of the dog. So here I'm just going to redefine where that line is for the year and the one of you is. I'm barely touching the paper. And then I'm stumped, pulling sideways. This is left to right, a complete left to right motion. And I'm barely hitting the paper. And whenever I need a little darker tone, what I do is I rotate this merger and that'll allow me to pull the fresh charcoal on the adjacent side of this merger onto the paper. So here, I'm gonna take some charcoal I was gonna pull. It was going to find this slide way. Are you see how I was able to push that here back with very little effort? The holders will go through with an eraser later, and we'll, uh, putting this all together. Maybe around years, I'm just taking my 3 16 smarter. And I'm just adding detail work. That's what we're doing here is barely touching the paper and pulling down if need be. This is giving me a really nice aesthetic, one that a lot of people like, when it comes to for. And then here. Basically, what I'm doing is I'm just pulling and clumpy in this hair together. Remember how he said that this dog has different hair links? Oh, this is something to keep in mind. So now I'm describing a bunch of charcoal and I'm just very lightly going through. And I'm darkening up the're of this lab. The hair was taking my models or a razor, and I'm retrieving those lighter values. Now I'm switching back to my brush, and what I'm doing is I'm just hating any parts of the dogs for that need to be darkened up . As you can see, there was a nice implied line right there, so I was able to convey that with just my brush work. And now I'm switching up to my 3/16 merger. And essentially, what I'm doing is I'm just pulling, and I'm making sure that I'm following the form of the hair that's clumped in the reference image. And this is really speaking to that texture of hair that's underneath the dogs chin. Remember, the big thing with dogs and dog hair is that it's all implied lines, essentially meaning that the texture of that hair is going to be very, very soft. But here, I'm just gonna put in the collar road. Quick. Great! Go. That'll put it somewhere right here. We're gonna build this up This is the soft charcoal here. It's making sure that's all built up. Give us some, form them to a medium charcoal. And I'm just gonna basically put a nice line on this color there. It's kind of just beat this color up. Don't take my 3/16 merger. It's kind of planning this all together. Let's go through anywhere that needs toe, have more texture built up. But I hope you guys are starting to see that it's really the same techniques used over and over again, just in slightly different ways. T get that overall, you know, form and texture conveyed that we need Teoh in orderto have, Ah, realistic pet portrait we go that's looking pretty good. Kind of blend this together a little bit. Let's take 3/16 go through just finite detail. And like I said, guys, you know, when it comes to this technique, you can spend hours, um on, uh, on your drawing me personally, I like to spend anywhere from 10 to 14 hours on a single piece. Eso Clearly, I can't convey all of the detail that I would like to convey in these tutorials, but at least you can get a really solid foundation to build your own skills off of. And that's that's the hope with these tutorials is that you learn different techniques. And of course, you know, techniques are just techniques without applications. So the application really is going to come down to you and how you want to use them in your future drawings. But if you like destroy will definitely follow, Mr Creations, I'm gonna be coming out with a lot more tutorials such as this, or I'm gonna be teaching my approach and showing you guys all the techniques that I like to use. Teoh Conveyor. Really awesome drawing. So there you are, Paula.
 Messer Creations, Artist | Author | YouTuber