Transcripts
1. Introduction: are you tired of searching for work shaped templates that are suitable for your lesson plans? If so, why not start with a blank page and create whatever you want with Adobe Illustrator High Mining was mooring Schlosser and I write lesson plans based on picture books in this class , I'll show you how to easily create a work shape using the paint brush tool, the shape tours and the text tools in. Adobe Illustrator will start off by finding inspiration to design a work shape with a plan and guide from there will set up a work space with a few essential tools. Then we'll use the paint brush tool to trace copyright free images. After that will create containers for writing, using the text tools and the shape tools. Finally, I'll walk you through the steps to save an export. Your work for printing. By the end of this course, you should be a pro at creating worksheets for your learning community. You can use the skills learned in this class to create rubrics assessments and exit tickets . I started using Adobe Illustrator to create worksheets when I worked for book pages dot com because Adobe Illustrator is a vector program. I never worried about my images. Looking pixelated, I knew that whatever I created, an illustrator would not lose its integrity if the image is needed to be resized. Learning how to make your own work shoots is important because it gives you the freedom to tailor your own lessons. You'll consider the learning outcomes that are important for your learners to document. This course is aimed for educators who want to design work shades with specific learning goals in mind. No longer will you have to fiddle with worksheet templates that don't meet your needs. Instead, you'll be able to create exactly what you want with Adobe Illustrator. For this class, you will need access to Adobe Illustrator. A very basic understanding of illustrator is helpful but not necessary. You'll be able to follow the directions in this class even if you're trying illustrator for the very first time. You'll also want to download the Worksheet Planning Guide, which can be found in the resource section in this class. This guide will help you develop ideas for your final project. Take a look at the next video toe, learn about the project you'll be creating for this class
2. Project Overview : What skills are your learners developing? Right now, Pick one of those skills and get ready to design a work shape that you can use tomorrow. You'll need access to Adobe Illustrator for this project. If you don't have illustrator yet, you might want to try it for free first. As of this recording, they are offering free trials. You begin your project by working on the worksheet planning guide. This guide will help you brainstorm and sketch out ideas for your work shape. The link to the guide is in the resource section of this class. After you're done brainstorming ideas, you're going to set up a work space and illustrator. Next, you'll use the paint brush tool to either trace or draw an image. After that, you can use the shape and text tools to create containers for writing. Next, you'll save your worksheet design and get it ready for printing. The final step for this project is to take a picture of your worksheet and upload it to the Project gallery. I chose this project so you'll finish with a worksheet that you can use tomorrow with your learning community. I look forward to seeing the work shades you create. Let's get started by finding inspiration for your design. In the next video, I'll guide you through a brainstorming project that will help you design your worksheet. See you there.
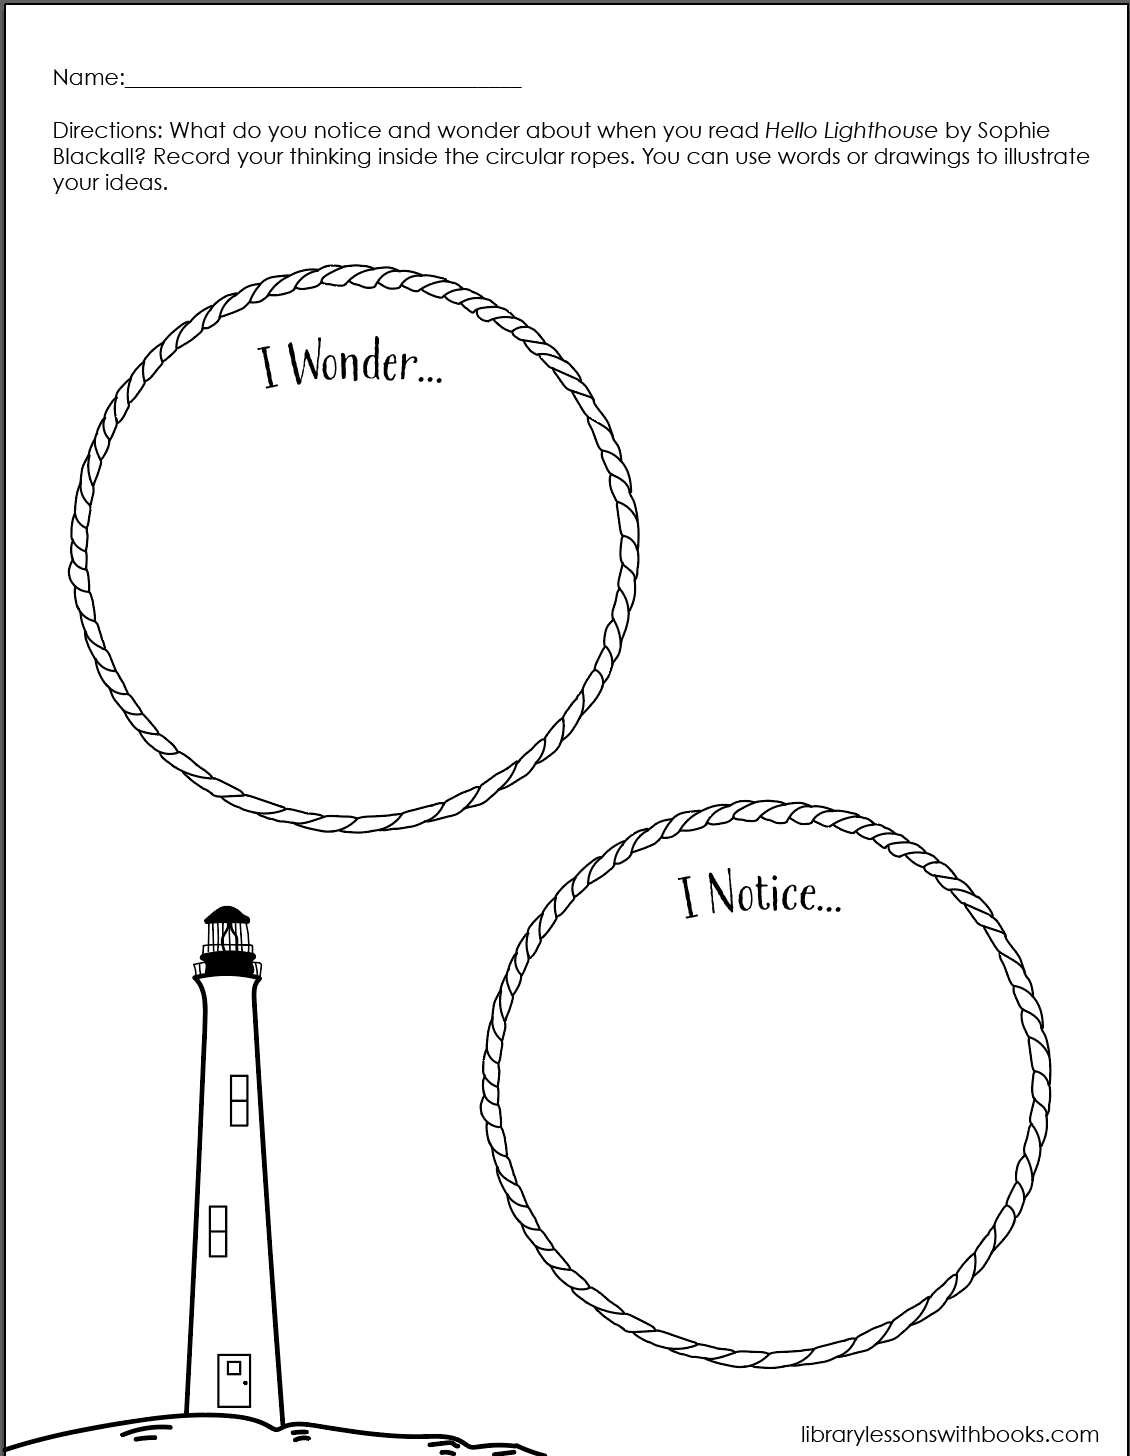
3. Planning Your Worksheet: before we get started Designing worksheets with Illustrator it's important to make a plan in this movie. We'll think about what we want learners to dio and why it's important. We'll also brainstorm ideas for designing our work shades. If you haven't already downloaded the work she plan and guide, you might want to do that. Now it's in the resource of section of this class. The first question in this guide wants us to think about what we want learners to dio. I want learners to notice and wonder while they're reading picture books. The's skills are important to develop because they help us understand what we're reading and inspire us toe learn more. The elements that will help guide learners in this practice is a note taking chart to record what they noticed and what they wonder about. I have a picture book that is perfect for this kind of lesson. There's a lot to notice and wonder about in this book. Hello, Lighthouse. I'll probably add an illustration of a light house somewhere on my work shape, so add that to my inspiration box. As I've read the book, I noticed there are roped circles that show life inside a lighthouse. This is pretty significant to the story, so I think I'll add them to my work shape. They would make the perfect containers for recording what learners notice and what they wonder about. Now that I've bottled How to use the worksheet planning guy to gather ideas for your work shape, I'd like you to give it a try. Think about what you want learners to dio and what your worksheet needs to help guide them through their practice. Keep your finished planning guide handy. You'll use it to help design your work shape. Let's go to the next video, where I'll show you how to create your own workspace in Adobe Illustrator So it's ready for designing a worksheet. See you there.
4. Create a Workspace: imagine designing a worksheet on a blank piece of paper. You'd probably grab an 8.5 by 11 sheet of paper, a dark pen and maybe some shapes for tracing. Well, we can set up the same kind of work space on Adobe Illustrator. In this video, I'll show you how to open up a work space and arrange essential tools so that you'll be ready to design a work shape. Let's get started with creating a workspace for designing worksheets by opening up a new document. First, let's click on the Create new button, then select the letters template. Next, we'll go ahead and name this document. I'm going to name it a low lighthouse. Since that is the book that we're working on for this worksheet, I see that it's already set for 8.5 by 11 sheet of paper and that the orientation is set to portrait, which is what I need for this project. I'm not going to worry about sizing for a bleed, because my worksheet is not going to have any color around the edges of the paper. The color mode is set to see M y que, which is exactly what we need for printing or work. I'm happy with the resolution of 300 peopIe I because that is pretty standard for printing . Okay, we're ready to click the create button before we get started with illustrating our work. It's a good idea to set up a work space that works for you. The first thing I like to open is the layers panel. To do that, I go to the toolbar and click window. Then I click layers. Now let's talk about some of the tools that will be using to illustrate our worksheet. The first tool I want to talk about is a paint brush tool. Let's double click on it so we can look at our options. The first thing we noticed is the fidelity of the stroke. If you want to be really accurate with your tracing oven image, you'll want to move the slide bar over to the accurate side of the scale. If you're not as worried about the form of your tracing, you can move the slide over to the smooth at. I suggest you go ahead and play with both extremes so you can see the results. I'm gonna go ahead and do that nap first, I'll slide it over to the accurate side of the scale and click OK. Next, I'll draw squiggly line. Now for a smooth stroke. I'll double click on the paint brush tool and move us all the way over to the smooth side and click. OK, and here's another squiggly line. Now let's compare the two strokes. I can take a close look by clicking on the direct selection tool and selecting both strokes . I'll do that by clicking and dragging. Do you notice that their arm or anchor points on the accurate stroke than there are on the smooth stroke? This. They'd be important if you want more anchor points in a path to edit. Personally, I like to keep the fidelity set right in the center. The next thing I want to point out with the paper stool is the Edit Selected paths option. I'd like to check this off because if there's a part of the stroke that I'm not happy with , I could make changes to it. Let me show you what I mean. I use the direct selection tool and select to choose a part of the stroke that I want to add it. I can move the stroke around and also delete it by hitting the delete button, because I'll be using the paint brush tool a lot. I'm going to click on it and then click on the fly out Arrow. I'll then push the tool up to the upper left hand corner of my workspace. I'm going to do the same with the shape, tool, the line tool and the text tool. And now my workspace is ready to create a worksheet when you're happy with the workspace you've created. You can say that so you can open up the same workspace without having to go through these steps every time. To do that, go to the toolbar and click window, then click workspace and then new workspace. Next, you can name your workspace whatever you want. I'll name this one worksheet and then click OK, and now I have saved a workspace that I can open whenever I want to design a new worksheet . Now that we've gone over how to create a workspace for designing work shades, I hope you'll feel comfortable with creating your own workspace. Feel free to move those essential tools around in any way that works best for you, and you might find some other tools that you enjoy using. So go ahead and add those two, and you're always welcome to take a picture of your workspace and uploaded to the Project Gallery. In the next video, I'll show you how to find a copyright free image that you can use to trace on your work shape.
5. Finding Images That Are Free To Use: think of an illustration you want to add to your work shape. Do you know how to draw it? If not, don't worry about it. I'm going to show you how to use Google images to find pictures that you can trace for your work shape. Now you might be thinking, Isn't that a copyright violation to take somebody else's picture and trace it? Well, I'm gonna show you how Google Images has a search tool that will help us refine pictures that we can use to trace for our work shapes. In this video, I'll show you how to search for a free image using Google images. Let's get started by going to Google images. I'm going to look for an image of a lighthouse, Aiken trace, so I'll type the word lighthouse in the search bar. Now I'll fill to the search so the results will show images that are free to use. First, I'll click on tools, then usage rights, then labelled for reuse. Let's look at the results. I want to find an image with a clear outline. This will make it easier for me to trace the image with the paint brush tool. I like this image here because I'm noticing a lot of straight lines that will be easy to trace. Let's click on the link to the file to make sure we can use the image. I'll scroll down to find information about licensing. I'm noticing some conditions that make me a little apprehensive about using this image. Let's see if I can find an image I can use without conditions. I like this image from nps dot gov. The lighthouse stands out from the background, which will make it easier to trace the outline. Let's click on the link to see if there any requirements for using the image. I see that it's from the National Park Service, but there is no information about attributing credit for using the image. Let's read about fair use just to make sure I can use this image to trace the lighthouse. We can do that by clicking on Learn more. Now let's click on what is fair use. It says here that certain uses of copyright material is okay. Teaching is mentioned here. The courts look at four factors to decide if using an image is fair use. Let's look at the four factors and see if they apply to my situation. Okay, The 1st 1 Courts typically focus on whether the use is transformative. That is whether it adds a new expression or meaning to the original or whether it merely copies from the original. Well, we're just tracing the outline, so yes, it is transformative. Next, using material from primarily factual work is more likely to be fair than using purely fictional works. Okay, check. We're using a real picture of a lighthouse. Borrowing small bits of material from an original work is more likely to be considered fair use than borrowing large portions. We are just using a small portion because I'm tracing the outline off the lighthouse. It's not the complete image of the lighthouse, which would be the heart of the work, which would not be allowed if we were to copy the entire lighthouse uses that harm The copyright owners ability to profit from his or her original work Well, by tracing the lighthouse were not prohibiting the person that took that picture from making any money. So I feel very good about using this image to trace for my worksheet. I hope by now you have an idea of something you want to draw for your worksheet. Go ahead and use the tips that I showed you in this video to help you find an image that you can use. Save the image and get ready to trace it. In the next video, I'll show you how to use the paint brush tool to trace that image.
6. Trace an Image with the Paintbrush Tool: Are you ready to start tracing your saved image? In this video, I'll show you how to use a paintbrush tool to trace an image of a lighthouse. You're welcome to follow along with May by using the same image that I'm using for this demonstration. You can find the file in the resource section of this class, but if you already have your own image saved, that's great. Let's get ready to trace in this video. I'll show you how to trace an image using the paint brush tool. Let's begin by placing the picture. I want to trace onto the art board. To do this, I'll go to file place and then click on the image I want to put on the art board. I'm going to click and drag the image so that it'll be placed squarely. Now I'll click outside of the blue lines to place the picture. Let's go over to the layers panel. Do you see how the image of the lighthouse is showing up on this layer? I'm going to name it Lighthouse by double clicking in the box and then typing the word lighthouse. I want to make sure this image days in place while I trace it, so I'm going to lock it by clicking on this box to the right of the view button. I need to add another layer to trace the lighthouse. I'll click on the create new layer and then type in the word trace. I'll make sure this layer is highlighted when I'm tracing the lighthouse with the papers tool. Now that my layers air set, I'll grab the paint brush tool and start tracing. I can do that by clicking on the tool here or simply by clicking the letter B on the keyboard. And I want to zoom in a little bit on this pictures. I'm going to click Command or control Plus, and if it's too large, I can click command or control minus. And now I'm ready to start tracing. First I go up the side of the lighthouse and then I'll go up that side of the lighthouse. Okay, let's see how that looks. I can click on the view mode for the lighthouse to make that picture go away, and we can see it looks pretty good. I'm noticing something here. So what I'm gonna do is click on the V Key or the selection tool. It's easier just to clock the V. Get rid of that. Now I want to go back to the brush tool, so I'm gonna click, be and then go to the view mode against We can see that lighthouse. The next part I want to work on is this black shape, and here I want to fill it all in with Black. So let me show you how to do that. What we want to do is create a complete shape that is close of the inside. When we fill it, the color won't spill out all over the place. So let's go ahead and get the brush key with the letter B, and we're going to outline this shape and make sure we close it by reaching each endpoint together. Now let me get the view mode off so you can see how to do how to fill this in with black. So what we do is we get our selection tool. I click the letter V to easily get that and click on that area, and then we go down here to the color and fell. Let's go back to the Let's click out here and then we'll go back to drawing. Grab our brush tool again by clicking the letter B, and I'll show you how to do that again. We'll work on this shape up here so we'll start here and we make sure we end there, too, so that the color stays in this shape and at all. Get that us. You can see how to do it. We clicked the wiki, or you can collect the selection tool. Select the shape. Go down here to the Phil and it's filled in. Okay, lets go back. Put the picture back up. All right. The next thing will work on is the light source. Even though we can't see it, we can imagine what it looks like and draw it in ourselves. So I'll grab the brush tool by clicking on the letter B and I'll just draw a straight line going up. Maybe something up here. Let's see how that looks. I need to draw the line. All of it down further year. Yeah, on a zoom in on that And fix that. So grow the selection tool. Get rid of that Graham brush tool and do a better job going a little bit further by clicking command or control Plus and connect that now to reduce the size or zoom out. I woke like the Commander Control Key and the minus K. Okay, let's go back to our picture and I can see we need some light lines here. So I'm going to make my stroke even thinner and then just draw some lines going up. And you can see I'm kind of making my own lines, which is absolutely fine. And if you're not happy with the lines you're making and you want to do straight lines, you could click on the line tool. And as you're drawing the lines, make sure if you want a straight line, you click the shift key as you draw your lines, and that will make your lines perfectly straight. Let's go back to the brush tool, and I'll add the little up too thick. Go back. That one's a little bit so I'm gonna go the selection tool. Get rid of that. Let's get rid of this while we're here and then grab the brush tool. I want a little thinner than that, so go back to the selection tool click on that line and let's go down okay, and that will want to create some windows so I will click on the rectangle tool. I'm going to click and drag until I see a shape that I like. I'll click on the V Key or the selection tool, and I like that except for I think I want the stroke a little bit thicker. That looks good and I just need a light across. I'm going to click on the line segment tool and draw a line across Click on the Wiki or the Selection tool. And I like this and I think I just want a copy of Just put another one down here. So I'm going to use the direct selection tool together all of the lines, and I'm going to at it a copy at it Paste. Now I have another window right here, and I'm just gonna move it into place. Think I'll put it right. Right? That looks good. And then we just get a door so I'll use this rectangle tool again. Let the wiki maybe add a little window in there. Click the wiki again, see how I like it and then maybe I use that brush tool just to add a little doubt here for a little door knob, and now we need to add a foundation so we'll use the picture to help guide us with that. We want to imagine that it's coming off the page here. So start from there. We'll see how that works. Good. I just had some lines here to give it a little bit of depth, and there's our finish. Lighthouse. How did you like using the paint brush tool? It's my favorite tool to use what I'm tracing the outlines of images. I'm curious to see your work in progress. Feel free to take a picture of what you traced and uploaded in the Project gallery.
7. Creating Containers For Writing: How would you like learners to respond to directions on your work shape? Will they write their answer or draw a picture? Perhaps they'll do both. In this video. I'll show you how to create containers for recording ideas, using the shape, tool and the paint brush tool. You'll see how I found inspiration for these containers in the book I am using for this class. When working with the book Hello Lighthouse, I noticed circular ropes that border different scenes. Each scene illustrated what was going on inside of the lighthouse. I thought it would be interesting to incorporate the circular ropes in the worksheet. Circular shapes work well for writing or drawing ideas. Let's begin by hiding the view of this lighthouse. Next, let's create a layer for us to draw our circles. I'm going to click on the Create New Lawyer button double click in the label area, and I'm gonna call this rope. Now I'll draw the circles using the Ellipse tool going to click on the your Lips tool. And as I drag it on the paper, I'm gonna click the shift key. This way, the circle will hold its integrity. If I didn't hold the shift key. You could create any ellipse shape, so I'll show you what I mean. Make sure there is no Phil set for the shape. See, here we have a line through the Phil. We want to make sure there is no fell so that when you print the work shape, you won't see white inside of the circle. I want to have another circle inside of the first circle, so I'll click on the Ellipse Tool. Press the shift key, draw another circle. Click the letter V to move the circle. I want to fit it right inside the other one. Okay, that looks good. I'll create a rope effect by drawing curved lines between the two circles, and then I'll connect the lines with the loops. - Now I'll get rid of these dark lines that I used to help me make this rope, and I'll do that by zooming in command or control, plus clicking on the line and then click None. So now it's still there, but we don't see it anymore. You could just get rid of it if you wanted to buy uh, clicking delete. Now I'll go to the next line and do the same thing. Click on none. And now that line is gone. Well, the line is still there, but you just don't see it. The next thing I'd like to do is to group everything together. So it stays as one whole object. And the way to do that is to click on the group selection tool, click and drag over the entire shape. I might have missed some here, so I'm gonna try that again, and I'm going to group it. So that way I could move the whole thing around to do that. I go to Object Group, and now, if I click the shift K and I have the selection tool selection tool, the shift key. I can change it to any size I want and move it around. I want to copy this. So I'm going to click the group selection tools and I'm going to go to edit copy at it paste. And now we have two circles of the same size, and I'm going to move this by clicking the selection tool and moving it down here and hoping you have an idea on how you're going to make a container for recording ideas. on your work shape. If not, don't worry about it. Feel free to use the shape tool and just play around the different shapes to see if you can find a container that feels right to you. The next step is to add text inside your container in the next video. I'll show you how to do that. So you there.
8. Adding Text: Now it's time to add some text to your work shape. In this video, I'll show you how to add text on a curve as well as in a text box using the text tool. Now let's add some tax to our work shape. We'll go over to tools to do this. We'll show you how to use the type on a path tool and the type tool. Let's get started with the type on a path tool. I'd like to add the text, I wonder in this circular rope, and I wanted to be on a little bit of occurred, and I want to do the same here, but I want it to say I notice un occurred. So to do that, we'll click on the Ellipse Tool. It's here, and I also have it up here. I'm going to make sure that there's no Phil, so I'm going to click on that and then click on none. Now I'll have, ah, a line that has no color, and I imagine the text being right here on this line. So now we'll click on the type on a path tool and all right, I I wonder. Dot, dot dot we'll highlight its. I can change the size of it. And you could also change the font. Appear if you like with the, uh in the character area. Okay, that looks like a good size. I'm gonna go to the selection tool and I'm going to move this around so it fits right underneath the top of this road. Okay, I like that. And I want to copy the same thing down here, so I'll click on this. I'll click and it copy at it. Haste and move those down here to change the words. I'll have to click on the type out of past Tool. And I'm using the delete key to delete those letters. And I'm going to write notice, click on the selection tool and see how that looks good. I just want to move it over a little bit more. So use my arrow key or I can just go even faster by Louis by dragging it. And now let's write the directions. I'll do that by clicking on the type tool, clicking and dragging the box. We'll start with the name and then I'll write the directions. As I write the directions, you'll notice that as I type the title of the book I'm going to switch to from regular font style to italic directions. What do you notice and wonder about when you read Hello Lighthouse by Sophie Blackwell. Record your thinking Inside the circular ropes, you can use words their drawings to illustrate your ideas, and now we're done with our text. Did you get creative with typing on a path? If so, you're welcome to share in the project gallery. In the next video, you'll learn how to put all of the elements together so that they're pleasing to the eye.
9. Finishing Touches: Do you remember that lighthouse we traced in a previous lesson? It's time to take that lighthouse and size it, so it's perfectly on our work shape. Now work on the worksheet to make it look a little bit better. First I'm gonna click on the text and move it down a little bit. See how that looks good. And now I want to add the lighthouse down in this area here. So let's hide these. We do that by clicking on the view mode, and then we'll bring up the tracing of our lighthouse. We want to group everything together so that we can size it all together. So we're going to click on the group selection tool. Select all of this. Well, I guess that would align their Let's try again. Then I'm going to click Object Group. So now it's all grouped going to click on the selection tool, hold down the shift key as I make it smaller and I'm going to move it over to the left. I'm noticing this is off the page. So what I need to do is on group everything so I can get that off. So object on group I'm gonna click on that little thing and delete it. All right, Let's bring the ropes back up to see how all this looks. That looks pretty good. I just want to add a little bit of brush there to kind of complete that line. So zoom in by hitting command or control. Plus get the brush tool by clicking the Beaky. And there we go, The last thing I always do on my work shades as I write my name over here on the bottom right hand corner. So to do that, I'm going to grab the type tool, Make a box down here, and I'm going to type library lessons with books dot com. Click on the selection tool so we could move it. And there we go. We're done with our work shape. Are you happy with the way your worksheet looks? If so, meet me in the next video, we'll show you how you can export it for printing
10. Export For Printing: Are you ready to print your worksheet? Great. In this video, I'm going to show you how to export your file so it's ready for printing. Let's get our worksheet ready for printing. We'll go to file export export as we're going to keep this as a PNG file. The reason why we want to keep it as a PNG file is because Onley the black, will print everything else will stay transparent. We have it set at a 300 peopie I resolution, which is perfect. And now we have a PNG file ready to print your 8.5 by 11 shade of paper.
11. Conclusion : congratulations. You now have the skills to create your very own worksheet Using Adobe Illustrator During our time together, you learned how to brainstorm ideas to make the perfect worksheet for your learning community. You also learn tips on how to find free images to trace. You learned how to use the paint brush tool to trace and draw images. You practice creating containers for writing. You also practiced using the text tool and the shape tool to design elements for your worksheet. I look forward to seeing how you use these different tools for your design. When you're ready to share your work shape, take a picture of it and upload it in the project gallery. I hope you enjoy this class. If so, please follow me on scale share. I look forward to seeing you in other classes.
 Maureen Schlosser, Writer