Transcripts
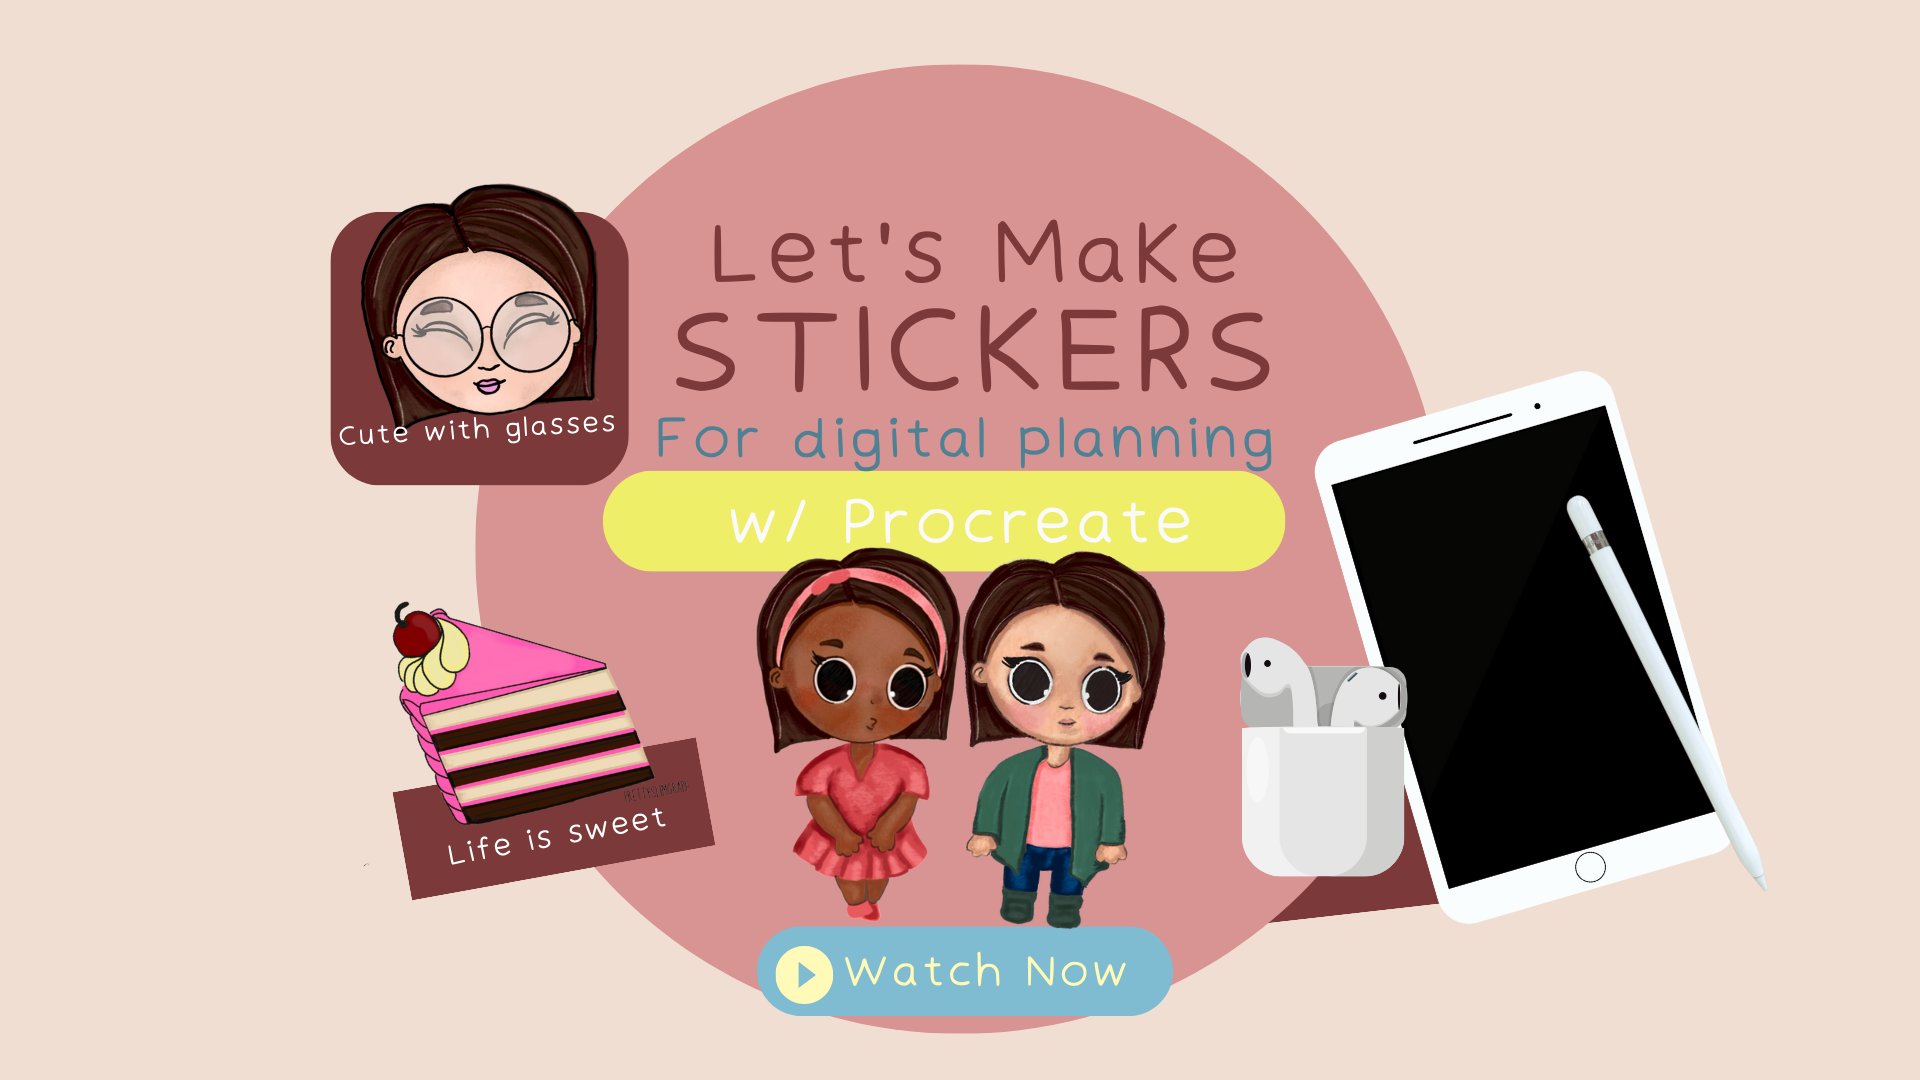
1. Intro to class: Hi, my name is Christina, and this is my very
first Skillshare class. I'm going to be teaching
you how to turn your illustrations instead,
beautiful stickers. I make stickers and
sell them on Etsy shop. So I used a program
procreate to do this, and I use a silhouette cameo
to print out my stickers. So in the next videos, I'll be going over the
materials needed for the class, how to find inspiration, the class project, and other resources to
use for the class. So whether you're a beginner or an expert in all
things about stickers, anybody can benefit
from taking this class. I encourage you to
follow along with me in to actively do it. That's the best way to
learn, in my opinion, but feel free to just watch if that's what you
choose to do as well. And I'll see you
in the next video.
2. Materials: Let's talk materials. So for this class you are going to need the following materials. You're going to need your iPad. If you are not yet digital and you still use a
sketch, but that's okay. You can use the sketchbook
with your pencil and you'll just have to scan it in and
to your computer system. And it should give
you the same result. You're also going to
need sticker paper. This can be any kind
of sticker paper. This one particular
is labeled paper. You can also use that. But any sticker paper rule, do you need your laptop or desktop that you use
for your program? And this case, we will use
your printer ecosystem. And that's going to be my
silhouette cameo machine that I will be using
for this class. To see you in the next video.
3. From sketchbook to Procreate: Alright, so I have
my sketch book open. I previously drew
out the animals. I decided to use those for the stickers to create for
this particular class. I've already finished
her sheet and I'll show you that
in just a moment. But I want to quickly
go over how to pull your illustrations from the
sketchbook onto procreate. You would basically,
you can do it two ways. Pull up my procreate app here. You would press the
monkey wrench sign and you would select Add. And you have two options. You can take a photo or
you can insert a photo. Let's go and take a photo. And basically you
would aim shoot. Take the picture. And then it'll ask
you if you want to use this photo or retake it. You select Use Photo. And it brings it in
and you can crop in or minimize it whatever
size you want it to be. And then another
way you can do this too is you can go back into the same thing again and
you can insert a photo. And if you have
it there already, you can bring it in. I'm just going to
throw something in here because I don't have that. You can bring that in
the same way and you can crop it and move it around
like so if you need to. All right. I'm going to hide
both of these will actually delete them
because I don't need them. Once you have it
finished and completed, it'll look something like this. And I have it looking like this because
once you bring it in, It's going to be
two full opacity. And it'll look like that. You just gonna go back
to that layer active. You remember when you
do these individually, it's going to bring
up different layers. You just have to merge
them all together. And you do that by tapping it. And then it'll ask merge down
and then they'll tell you, but there's nothing
there to emerge down. So it's not gonna do
that for me right now, but essentially this is
what it will look like. And then you have to lighten
it so you can trace over it. So I usually bring it
down to about 30%. And that slide enough
for me to do it. And then I'll just work. I'll work my way
around one at a time. I will blow this
up big like that. I will select studio pen. This is the pin I
most commonly used. I will select studio pen
and then I will begin to need to add a new layer. If I don't, it's going
to do it in 30%. So I needed to be nice and bold, so I will trace it in. At this point. This is a time where
I decided what I want to keep and what
I don't want to keep. If I want to make the
legs extend out more, I can do minor corrections. In this setting. It's much easier to do. So I'm gonna go
ahead and erase it because I've already done this already and I came up with something
like that. Let me hide it. That's the finished product. And I have this actually in the resources tab
for those of you who are not quite yet
ready to draw yet. Or if you just want
some cute stickers that you want my cute
little animal stickers. There. It is. In the same format like this. It's going to be in
a PNG format where it doesn't have the white
background in itself. You upload it to something, it'll just be the images there. I'll talk a little
bit more about that class project
a little bit later. I just want to pop
in my colors so you guys can see
the finished look. That's to finish look. And I usually send
this to myself. I will hit the Share
button and I send it as a JPEG and it'll pull up
where it wants me to go. I hate mail, but I'm not
going to send it because I've already sent it
to myself previously. So that's pretty
much it from how you go from sketchbook or paper, regular paper, to the
iPad or to your program, whichever program it
is there to be using. In the next video, I will see you guys there.
4. Finding inspiration: When you're looking
for inspiration, inspiration can
come from anything. I usually use the
Internet as a basis to find what I am going to do. As far as their stickers. I basically Google
things that I like. I will use that to put together
a complete sticker sheet. So I'll go on Google
and this is coffee. I will select images. Basically bring up coffee
cups, coffee mugs. And I will look at these and
whichever one appeals to me, I will go on and look. Sometimes I will look at
the real portraits and sometimes I will look
at clip art images to gain an idea of
how I want it to look or to get other
inspiration ideas. But whenever it
is that you like, do you like coffee? Do you like food? Do you like animals? Do you like people? Whatever you are into is basically the grounds
for your inspiration. Let's say for example, you are not a person
that is drawling. That is not drawing. You're just starting out and
you're a beginner. You can basically go on Google
and that can help you out. And you can look for
things in step-by-step. And it will pull it up whenever you're drawing style is if you select all and you
don't do just images, it will pull up videos, it will pull up articles. Also have the images there, but you can also go to
images and click on that. Then. I meant step-by-step,
step-by-step, step-by-step. And then you can look at the different
pictures that they offer. And they will give you step-by-step instructions
like this one. You an idea of how to
create that flower. Same thing if you
wanted to animals, you can type in here how to
try animals step-by-step. And it will do the same thing
pretty much for animals. Whatever animal that
is that you like, it has every type
of animal on here, if you like, and so on people
and your people, person. You can go on different websites to get that information so
you can go to barriers, Unsplash, there's picks B.com. So you have different
websites that cater to that. And at the top they usually have different tabs where
you can select. Then you can put on there
whatever it is you want. So I pick food and it'll show
me all the food categories. Those are a few options for
you to do that you can try. This has everything,
textures, patterns, people, all everything that you can basically see or
know or want to do. And that is pretty much it. I mean, the choice is yours. You have unlimited
options to do.
5. Designing sheet in Silhouette Studio: This is silhouette
Studio designer edition. You can download
the free edition and you can use that a
worksheets the same. We're going to start in
design our sticker sheets. So I'm going to pull in
my saved images onto it. And it's going to come in pretty big because it's
a pretty big file that I had in Procreate. I usually like to type in how big I want the sheets to be. I don't have to keep
minimizing and pulling up my screen up and down. So I'm going to do seven binds hand just to make sure everything
fits in the border. You can see it
resized down here. That'll pull that in there. In the first step to this, we have to make a
print and cut sheet. We are going to print the
images on a sheet of paper, but we need the
registration marks. Print onto the paper. And those registration
marks tell the silhouette cameo what to cut and had a credit based on what
you put in there. I see my border. My images are going a
little bit over the border. So I'm going to pull
that and fix that. I'm going to minimize it some more just so I can fix that. We're going to pull that
here in the center. That's on the black square
and the black lines, we'll print that
transparent background. That's fair. Will not print on the sheet is just the dots, just the black lines. Now the thing is on.
We can start going hit to the process of
creating our stickers. Right now as I have it now
it's one sheet and I cannot move the images individually. I will go to the butterfly icon, and that's the trace panel. And we're going to open
that up so we can cut it. I select that and it's
gonna make a box. If you don't get everything in the first time, no problem. You can go ahead
and adjust that. In fact, there's a
yellow pigmentation that is around the images. And you need that
basically to see how the silhouette machine
is going to cut it. I'm going to increase
the threshold. As I do that, you're
going to see that yellow pigment spread
into the image. And that's going to help
to create a neat cut. And that is what the
registration marks pick up. I haven't on solid fill, I'm gonna go to
outline and to be able to move the images separately, I need to trace them and detach them from
that back border. Usually takes a few
moments to do that. I don't experience any
anything Let's test to see. Okay. So it did it. Now I'm going to take
that back sheet That's their off and you see
the images are detached. I'm going to delete that. I don't need that any longer. I can move the images around freely and rearrange and
resize and add anything. Basically, I want to now attach. We have the images and then
if you like the space, that's where you're going to make sure nothing is
touching each other. You don't want to
have them spaced out a little bit API to
make some things smaller. That's the best thing to do to make everything fit and go. If you have to turn
some things around, you can do that as well to make everything fit
onset of page properly. So now I want to
create this thicker. When we did that trace feature, it actually created a
line around the images, but that line is Matt knee. And let me show you what
that looks like presently. Okay. Here it is presently. Inside. I could see some things that there anything that
has a red is going to cut. You want this to look
as nice as possible, especially if you
plan on selling it. If it's your personal sticker
sheet, then that's fine. But if you want to sell it, you don't want to have anything look undone and when they
peel off the sticky, you don't want it
to look on cat. I can choose what I want
to cut in that cut, but the easier route to do
would be to create an offset. And I can control how
the stickers are cut. With an offset. So I would select the picture
that I'm going to do. I will create an offset and it creates that border around it. So it gives a little bit
of a white background on it for the sticker to give it that extra
sticker effect. Now, if you wanted it
close like it was before, you can do that, you can
go ahead to print it, to send and let it go. But in this case, I like more of a
sticker effects, so I use the offset quite
frequently with it. Now that it's selected, I am going to change
that offset color because I already have a
red cut line in the back. And so I don't want
this the same thing. I want to change that. I'm going to do that
for each picture. Select the picture, create the asset and change the color. Now you can do this, changing of the asset
color while it's selected because the offset
is what is selected. If you try to do this without, if you try to do this before, I'm like if I was to do this
now and change the cut line, it will change the line that's already around the picture. And that's not what I want
because then the machine will read to cut twice and you'll
have a double cut image. We're going to
change all of them. This only five, so I
shouldn't take that long. Then I'm going to put
that black there. Were wanted to
take a peek at it. I'm gonna hit Since see in this view I can see that I have to cut lines already. In the picture. I have everything set
to red at this point. Now, in this simple view, it hasn't shown like that, but you can select
different things in different ways
you want to click. I can actually
select line and it will only register that black. I have created.
Now in this view, I noticed that two of my images
are touching each other. So I want to go
back and fix that. And also I noticed something here that I don't want as well. And I will go back and fix that. I'll go back to Design. I'm going to kind
of draw a box on just enough to get
both of these images. I'm going to move down. That takes that away. And then I'm gonna do the
same thing with the coy fish. I'm going to do just as images. I'm going to move it around so it's not
touching anything. I don't want it to be outside
that border and I don't want it to be touching cell. I think that's pretty
good like that. Maybe, maybe not. Let's see what I can
do with the turtles. Let's see this sound. Centered. Bring my coy
fish down just as savvy. That looks good. Now
that it looks good, I'm going to go back and now fix that part
that I don't want. It. Does everything black is going
to basically create a cut. So I will double-tap
that, Double-click. It comes up, delete points, I can press on a point. And that brings that they're basically delete until
it's completely done. And that corrects that. To check in, I go to sense and make sure
everything's perfect. I don't have anything
affecting my images. Everything's good,
crisp and clean. Then my registration marks
are there and there's nothing affecting those as well. So it's good to go and print. Though you go back
to the design page. You just hit File and
you select currents, It's going to bring
up your printers. And then you will take
your sticker sheet and you will go ahead and print that out onto the sticker sheet. I'll be back with the next video on that particular topic.
6. Cutting the print: I like to use an old mat
that's not sticky anymore. I will put washi tape around the corners to hold
the sticker sheet in place while the machine is cutting it and it
won't move around. And then when I peel it off, it comes off easily. Once your machine is loaded, then you come back to this
screen on your computer. This basically
shows the settings. Mine is a preset
setting that I use for my stickers because I
want that kiss cut Look, I don't want it to
penetrate the full sheet. So I have my blade set at
the lowest, which is one. I have the fourth set at one, and I have a speed of eight. I learned the sentence
by trial and error. There is a test feature
here you can practice with, but if you're ready, you just go ahead and hit Send, and it'll send it to the silhouette cameo
to begin cutting. I won't show me cutting it. It's pretty clear on that part. So I'll just return back in the next video with
the finished result.
7. Finished sticker sheet: Once it's done, I get
very excited about that last initial
sticker appeal. I usually put my
personalized speakers in my planner or things
that I write on. We're going to stick it in a
blank section of my planner. Jessica, you can see what
the sticker sheet looks. What the stickers, sorry, Liz. I'm going to take the
turtle, the brown turtle. Appeals. Place. Beautiful. Nice.
8. Class project: Class projects. So you made it to the end. Hopefully you've been
following along closely. Hopefully you've been
creating why you have been watching
the dead silence. I would like for you to post to the class project section. Sorry, what you
have come up with. Show me your illustrations. Show me your rough draft. You can download the free
resource that I spent. Show me that in your colors. Rather your project is finished
or unfinished or revenue. Have a beautiful sticker sheet. Just show me what
you've come up with. I love to see what you
guys have created. Um, I've had a lot of fun just explaining this and doing
this video to show you. So I hope that you guys
enjoyed watching as well. Thanks again, just thanks
again for watching. Take care.
 Christina Williams, Illustrator/ Watercolorist