Transcripts
1. Introduction: If you're a fan of the
Good Notes app like I am, then you probably love to
use its different features. Including the option to
create sticker packs. Digital stickers are basically little pieces of clip
art that are pre designed and arranged
so that you can easily import them into
your journal pages, your planner or whatever else you're doing in
the good notes app. They're pretty fun
to make and it's also cool to make your
own custom designs. You can make these to sell
them on a platform like Ts or you can just make them
for your own purposes to share with your friends. If you have a stationary or planning based social
media presence, you might want to have
your own collection. So that's what we're going to be making in this course today. In terms of materials
you're going to need, I would recommend
that you have an ipad with the Good Notes app, because that's where
we're designing. However, you can use
other kinds of apps like notability or similar that can still use a
sticker function. But we're just focusing
on Good notes six, the most recent
version right now. I'm also going to be using
procreate to draw my stickers. By the end of this class, you'll be able to turn your artwork or your doodles or
whatever other graphics you want to make into stickers. And you'll know how to export your sticker collection
out of good notes. If you want to
share it, send it, sell it, whatever
you'd like to do. I'm your instructor for this
class. My name is Rebecca. I am an artist and
a graphic designer, and I also just love good notes and designing
stuff for the ipad. I've literally just
spent the last two weeks designing notebooks and stickers for good notes based on my art. So I'm having so much fun with it right now and I'm
excited to share, I have a whole other
class on how to design the interactive linked notebooks that you use in an Apple. Good notes, so you
can check that out if you're more interested in
the notebook side of things. Today we're going to focus specifically on
digital stickers. So if that sounds fun to you, let's get into the class and
make something adorable.
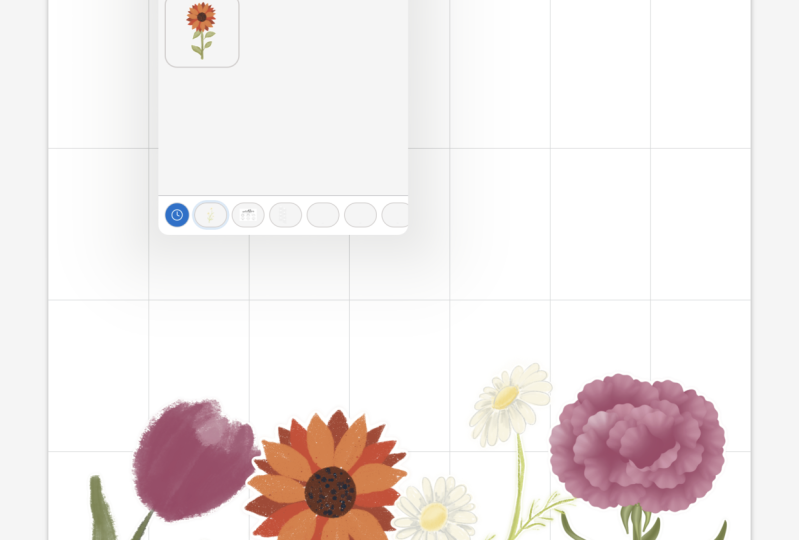
2. What are Digital Stickers?: Okay, this is good
notes. Open on my ipad. You can see a bunch
of my folders here. Now I'm using Good note six,
this is the newest version. So we're going to be basing
all of this off of that. And for this first lesson,
I'm just going to give you a little explainer about
how the stickers work, where to find them, just in
case you're not familiar. So if you want to dive right
into the design process, you can skip ahead
to the next lesson. I'm just going to open
up this notebook. This is actually
a horizontal one, but we're working vertically
today. That's okay. I'll just zoom in
a bit. Right now I have it in navigation mode, so that basically
means I can tap on different interactive
features and it'll move me around
through the document. But in order to
use the stickers, we want to be in editing mode. That's just going to click
on the little pen there. And now we have our tool bar available with all our
different features. Stickers are right here. It's a little star with a
little sticker around it. I guess you tap on that, it'll bring up ones you've
used recently here. But if you tap it again, it
brings up the bigger menu. And you can scroll down
here through the bottom, through different
sticker collections. And we're going to be
creating one of these, for example, here's
one I've made that's just some
watercolor leaves. It allows me to tap on the sticker and add it
right to the design. I can scale it and size it. Now you'll note that
as it goes bigger, this is going to get
a little bit blurry. Hopefully you can
see the sticker itself is not super
in focus anymore. And that's just because graphics have a limit to how
big they can be. So we're just going
to keep that in mind when we're designing
stickers as well. A notable feature
of the stickers is that they are transparent. There's no background on them. We're going to be
talking about how to do fully transparent like this. But also how to
put a white border around your sticker in
case you want it to look a little bit more like a traditional sticker which
usually has a small border. The thing we want
to avoid is having the full rectangle with
a white background. So we're going to
make sure that that doesn't happen when
we create ours. Now these sticker collections
are pretty fun to make and you can import
them and export them. So if we go back into
that sticker menu, and if you wanted to add one, you scroll to the
end here and there's a plus sign. We tap it there. We're going to go back
over this when we have our designed sample pieces. But here I would add
the collection and then either go to add
photos and add them from your photo
library or import from your Google Drive or wherever else you're keeping the files. Once that's done,
you would hit Create and you would have a new
collection like this one. If you wanted to export this, you're going to just tap
on this arrow right here. And we're just editing
the collection. You can click on
these three dots and there's a share option. It prepares the export, then it allows you to export. It says as an archive,
a zip archive. But actually when you look at
the file on your computer, for example, I believe
it is a collection. So it's just a very proprietary
good notes file format. At this point, what I
would personally do is air drop it to my computer where I organize all my good notes, notebooks, and sticker
packs on my desktop and then put them in my Ts store or whatever else I'm
going to do with them. That's the basics of how sticker packs work in good notes. If you're more familiar with an older version of this app, there were other
options where you can add in a sticker sheet as like a notepad or a notebook and copy
and paste from that. You can still do that,
but in my opinion, this sticker book feature is
the most efficient method. So we're just going to be focusing on that for this class. And I'll also note that
I don't believe there's a limit to how many stickers
you can put in a pack. I think this one I have here
has over 50 stickers in it, so I don't think
there's a limit. That's the basics of what a sticker pack is
and how we use it. Let's move into the next lesson and start designing
some stickers.
3. Drawing Stickers in Procreate: In this lesson, we are
going to be designing our sample stickers
for our pack. Now, a couple things to discuss
before we start drawing. I have created a square canvas. You can use any shape you like. I just like to
design in a square because I find it just
a manageable size. And I've created a canvas that
is 3,000 by 3,000 pixels. I'd like to work at this bigger size because this
makes sure that my stickers can be made a little bit larger without
going too blurry. But of course, it also
depends on how big you designed them like on the page. You can also use either RGB or CMYK color palettes when
you're setting up your file. Either works, but
you can use RGB, which has a bit
more vibrant colors and is intended for digital use. That's perfectly fine to
use for this project. Now in terms of how
we design these, my preference is to
create a sticker sheet. So that means I do like
several illustrations on one sheet and they
all look cohesive. Because I've designed
them all together, This is just my preference as an artist and an illustrator. I like to make sure
that everything's in the same color palette and
stylistically the same. For example, I did this bird
illustration where I did all the birds together and then I ended up exporting
not just the birds, but also the berries
and the leaves as separate elements to create a sticker pack that had all of these individual graphic assets. This is the method
we're going to be following to make them
all on one canvas. But you can also just
do a single design, which will be faster, but you only end up with one sticker. It's completely up
to you. Now, working back here in our blank document, I'm just going to
clear this layer. A couple of notes on
designing stickers. My preference as an
illustrator is to use brushes like the six
pencil and soft pastel. Those are my two favorites.
I use them for everything. As a result, my art style is
a little bit sketchy and you can see you zoom in a lot white space through
the illustration I did. I like this style and that's how I designed
my stickers too. But as soon as you take away the background to
make it transparent, you'll see that that's also
going to be see through. If we were putting this onto
a journal page with lines, then we would see right
through the sticker basically, if you were designing with a brush that was really smooth. So let's say you were
going to go into inking and use the studio pen. Like this brush, even if
I was filling in a space, is not transparent
When you zoom in, it's a solid block of color, it's a totally different look. Both are perfectly fine,
these are stylistic. But if you have an art style or drawing something that is
more sketchy like this, you may want to put it
on a white background. We're going to do that after we complete our sticker
sheet, as just an example, you don't have to, but that basically means just having a white border
around your design. Let's make a couple of quick doodles to use
as our stickers. I'm just going to keep things really simple and
just do a bunch of heart shapes, all right? So I drew just four
sketchy little hearts. And I'm just going to grab this and resize them so they're
a little bit bigger. I'll put them in the
middle of the page. These are a demo stickers. Like I said, stickers don't have to be fancy or complicated, but we're just going to make
some hearts as our example. Feel free to also do hearts
if you're just trying to learn this process,
make them cute. It doesn't have to be fancy. I have drawn all of
these on a single layer. You don't have to,
but ultimately we want each of them on
a separate layer. I'm going to go up to this
Select tool right here. I'm going to go into
free hand and I'm going to select each heart. Then in order to open up
the menu that we need, we're going to do a
three finger swipe down. I'm going to swipe down that opens up the
Copy and Paste menu. We're just going to
click on Cut and Paste. That will basically
take that out of that layer and put it
in its own new layer. I'm just going to do this each time for each of these stickers. Of course, if you draw each
element on its own layer, you don't have to do
this, but frequently I find that is not the case. At least when I'm drawing now we have all of our stickers
on their own layers. We can turn off
the background and see that they are
pretty sketchy still. This is okay, it's not bad
to have a sketchy sticker, but you may want to add
a white background. In the next lesson, I
will show you how to do that extra optional step.
4. Adding White Borders: In this lesson, we
are going to put a white background
behind these stickers so that we can export them without them being
fully transparent. The first step is
just to turn off your white background layer so you can see where
we're working. I'm going to go through
each of these one by one and show you
how to do this step. It's a pretty simple process, so I'm just going to duplicate the layer
that we're working on. I'm going to first
do the blue heart. I will swipe and duplicate it. Then I'm going to pick the
one that's on the bottom. That means it's lower down
on the list of layers. Next I'm going to go into the magic wand section for adjustments and go
down to gauge and blur. You can use your
pencil or finger to drag this slider to decide
how blurred you want it. I'm going just for a little bit. I want it at 6% we
have that 6% blur. If you wanted your sticker to
have a bigger white border, you might want to go
all the way up to even 10% But I'm just going to go for six for
this moderate border. Basically all we've done is made a blurry version of this. When it goes blurry, it extends beyond the edges of
the original design. When we select it,
it actually selects a bigger space than just the interior normal design.
I hope that makes sense. The next step we are working
on, the layer we blurred. We're going to click
on the Select tool we were on freehand before. We're going to go to Automatic and we're going to
click on Color Fill. Now I'm going to make sure
that I have selected white. I have white here as my color. We're going to just tap
on the blue and drag it. See it says selection threshold. And I'm going to go for
about 90% there we go. But the percent is going to dictate how wide of
the border that is. Basically all we've done is
selected this blurry layer. We've then selected the
shape of the full blur, and then we've filled
that with color. That's all it really is. In
order to finish the sticker, I'm just going to pinch these
two together so they merge. So now we have this sticker
with a white background, so you can see the nice
sketchiness of it, But it would be able to go over a journal page
without any problem. Next, let's do it
with this heart, and I'll zoom in a little more when it first
duplicate the layer, select the bottom one. Then we blur it, gauge and blur. I'm going to go
up to 6% perfect. Then we will go to
the select tool, automatic color, fill, tap and slide to adjust how big of a border you want to go all the way, it'll
fill the full page. But if you just go
up to about 97, that's how thick it is there. You can go down to
make it really thin, but I like it around 90% Again, if you want to adjust the
thickness of the border, then you can play with
both the percentage for the gagen blur step and also the percentage for
the color fill step. Now if you didn't like the
fact that the sticker edges are lumpy because it's just going to where the edge
of the sticker is. You can also do this
step totally manually. We'll immerse that one. I'm just going to
add a new layer right below the green one. Then I'm going to
grab a airbrush. I'm going to select hard brush. It's a little big,
but you can also go in manually and draw the
sticker shape that you want. It doesn't have to be automatic, but the automatic process is helpful if you're
doing a lot of them. You want them to be
really crisp and precise. I did a pretty sloppy job there, but you could
take your time. And then you just, you just want to fill in the
background with white. That's another way to
do the white border. As I mentioned, not all
stickers need to have this. Lots of them don't. But if you
have one that is done with a sketchy style or something slightly transparent, you
may want to add it in. I'm going to just clean up
the rest of these and add the backgrounds to these
two using this method. And then in the next lesson,
we'll start on exporting them and getting them ready
to go into good notes.
5. Cropping Transparent PNGs: The next step is to export
these and crop them down. What I mean by crop is
we don't want to have all this extra space
around each design. For example, I'm
just going to turn the background on for
a moment right now. If we exported this, we'd have this amount of space
around the design. And that doesn't look very nice. It's not very fun to use it in good notes when it has
this much extra space. We basically want to trim the
canvas, so it's this big. If you were just doing
one illustration, then that's not really
a problem, you could have just designed
to the full space. But if you do an illustration
sheet like this, you do have to do a
couple extra steps to make sure that you have a transparent
background preserved but also individual
cropped graphics. As a starting point,
we want to make sure again that all of our stickers
are on separate layers. Next, we can go to the tool
section here into Actions, and click on Share Layers. Rather than the
regular share image, we're going down to PNG files. When we do that, it'll export
each layer individually so we don't have
to do it multiple times. It saves a lot of time. Well, tap on PNG files or layers and now it gives
us a bunch of options. And I just want to
talk you through the options here so that we
understand what's going on. If we went right to
save four images, it would save them to the ipads camera roll and that's okay, except it will not allow us to crop those
images just to be down without adding
a white background so it won't preserve
the transparency. I don't like using that option. The option that I
do most of the time because it's fastest
is to go air drop. I put them on my computer and
then I just on my desktop, crop them all really
quickly there. Then I will just send
them back to my ipad. I find that to be
the fastest method. And it's also pretty
straightforward. You just open it on
your computer and crop the image when you
open it up in preview. But you can also do this in your ipad by sticking
in procreate. What I'm going to do just to
preserve the transparency is I'm going to save
files right here. And you'll just save
it to the file section rather than the camera
roll of my ipad. Once we're done
that, we're going to go back out into procreate. Here's the gallery with
my recent stuff we're going to import into procreate. These are all my files on my ipad and I'm just going
to select each one of these. I believe you have to
do them individually. If you have a lot of stickers, this could be more
time consuming. But you'll see that it
opened, just the blue layer and I can turn off the
background and there we are. We're just going to go in
and import all four of those stickers because we already did a demo one,
So I'll just delete that. Now I have all four
of our hearts as separate procreate
projects because there's always a lot of
ways to do everything. Another method is to
select this layer, this is our original design, and duplicate it four times. Then you could go into
each one and just delete the layers or the stickers that
you are working on. Depending on how many
stickers you have on a sheet, that could be really time
consuming and annoying. There's just different
ways you can go about it and none
of them are wrong. It just depends on what's
best for your work flow. We have our four designs here. We're just going
to go in, remove the background, and crop them. I'll start with the
blue. I already turned off the background color. The reason that I'm not selecting
this and just making it big is because it becomes more pixilated as you make it large. You can do that if you want, but I don't want it
to go pixilated. All I'm going to do is go
to the Action tab Canvas. Crop and resize and
then just shrink this down so that it's not touching
the edges, but it's close. There we go. Done. Now that's it. I'm going to do that for
the other three as well, And then we'll move
on to importing them into good notes
as a sticker pack.
6. Creating Sticker Collections in Goodnotes: In this step, we're
going to turn our individual stickers into a sticker pack in good notes. This is pretty easy, so
we're not going to have to worry about any
complicated steps. First, I'm going to select
each of the designs. In procreate that I
want to be a sticker. I have each of these
designs cropped to be the full size of the canvas. They all have a white
background on them and they are transparent in the rest of
the design I have selected. Now we're going to go
to share and save them as PNG because that's the format that preserves
the transparency. Now in this case, we
are good to save it to our camera rule and that'll
be just the fastest method to import it into good notes
even though we couldn't use it earlier
because it adds away background only when
you're cropping. Love the complicatedness
of it all. We'll tap on, save four images. Just going to save
it to my camera rule and we can exit of this
and go into good notes. We are back in our
little planner page and we're going to
create our sticker pack. I'm going to tap on
the sticker design, scroll down along
the bottom here, and click on the plus sign to create a new sticker
pack or new collection. They call them collections. We can add in our title here. I'm just going to
call it hearts. Perfect. Good thing it
read my messy printing. You can import from this option. This is if they're in files, If it's in your Google
Drive somewhere else, if it's in your camera role, you can just go to Add photos. We can tap on the four stickers and hit Add. There we go, easy. As now, we'll just hit Create and our sticker
collection is ready. So you can tap on the
sticker, you can add it. You see here, it doesn't
want to be that large, but with the white background, you can't see
through the design. That's how I prefer when I'm
doing something scribbly. As I mentioned,
all stickers have a threshold at which
they become too large. You don't want to
use it that big. But who would want to put
something that big on your planner in terms of like a small useful little
sticker? Very cute. That's basically
it. You've created your sticker pack at this point, you can find it down here in the lower menu and just tap on it when you
want to go to it. I believe you can also add
stickers just by tapping with your finger and it automatically opens
up your recent pack. And now you're free to use your stickers for whatever you like. As I mentioned before, if
you want to export these to sell them on a platform
or share them with friends, or basically just give
it away in any method, you just want to go back
to that sticker tab. Click on the little
arrow beside the title, the three dots, and then
share your collection again. It'll export it as a
dot collection file. You can airdrop it
to your computer, you can save it to your files, and then e mail it to
somebody, whatever you like. But this whole method of creating sticker
packs is really easy. It's very intuitive once you
understand all the steps. Obviously it is a few convoluted steps to
create these things, but you'll find that it's
not that complicated at all. Hopefully you can make lots of cool sticker packs
in the future. Now before we wrap up, even though we've already covered basically
the whole premise, I'm just going to show
you in the next lesson how you could also
use Canva to make some more geometric shapes and tabs just in case you want to do something a
little bit different. We'll talk about that there.
7. Using Canva Shapes (Optional): I've opened up Canva
here to show you another option in terms
of creating stickers. However, I will say that this is a pro feature when you are
going to export a design, even though we have
nothing here, I'll just show you you want to export. And you go down to download. We're going to
download it as PNG. This is warned me, it's empty. But we'll go to PNG and you'd want to do transparent
background, which is a toggle that only
works for pro accounts. If you don't have
that, like I said, you don't need to do this step. You can just use procreate. But it is also fun to
create stickers in Canva. I'll just show you very
simply what I mean. Canva has a really
big elements library. This has both shapes
and also graphics. Now in terms of using
canvas graphics for things, you can use them in a
pretty versatile way as long as you're doing it
for personal use only. You're welcome to check out canvas license agreement
about how you can use media. I would not create any
stickers out of anything from the graphics library if you are planning to sell
them or share them. One of the things we can use and have fun with are
the Shapes library. The shapes are free to use. I'm going to just be going
down into this section. Here we have a ton of different shapes that we can change and change the color of layer
and do interesting things. For example, I'm just going
to grab this little arrow. Put this sidebar away. Imagine like a tab on a
notebook or stationery. And you can make that
a different size, even just a simple
shape like this. You could export and just
make it transparent. Save it as a PNG, it would go
right to your camera role. And then you could easily add
it to a sticker collection. But you can get more
creative with it too. Let's say I just duplicate this, and I'll change the
color to be pink. And now we have like
more of a layered look. I'm not doing a very
inspired job here, but I'm just saying that you can play around with
the shapes and make some interesting things that you might enjoy using
S stickers as well. This can be a good option if you want to make stickers
for good notes, but you are not super artistic or you don't want to draw a lot. You can just play
around with the shapes and make different kinds of images or little
graphics like that. Again, port at your camera roll added to the good notes
sticker collection. Same way as we did before. I just wanted to
share that one other option before we
wrap up the class. Now we'll head into our
last little lesson to talk about the class project
and some final notes.
8. Class Project Instructions: We've made it to the
end of the class and I hope that you have learned some really cool skills
that are going to help you make the sticker packs that you've
been dreaming of. A couple of notes before we
wrap up as a class project, I would love to see the result of your sticker pack creation. All I'd recommend
doing, You don't have to upload your
sticker pack here, but just take a screenshot
on your ipad or take a picture of
it on your phone, whatever is easy for you. And upload that to the
class project section and I'd love to see what
you've come up with. As I've mentioned, stickers
don't have to be complicated. They don't have to be big
or highly illustrated. They can be anything you want. I'd love to see your creativity and what you've decided to do. If you have any questions
or any thoughts, suggestions, anything like that, there's a discussion board
for the class you can post in there and we
can chat and also check it out and see if any
of your fellow students have posted anything
interesting or questions that maybe you
haven't thought of yet if you liked learning with
me. I really hope you did. I have a ton of other
classes out there, as I've mentioned
at the beginning. I also have a class on how to design the notebooks
for good notes. So you may want to check that one out if you haven't already. But before you leave this class, please do consider
leaving me a review. It really helps out with my
small creative business, like it helps other students
know that my content is enjoyable and interesting
and educational. And also, I just really
love reading your feedback. I appreciate it a lot
if you want to check out more of my content outside of the
educational setting, I have a Youtube channel
where you can see all sorts of creative things I'm doing with my art business. I'll put the link here in case
you want to check it out. And that'll do it for our
class. So we're all wrapped up. Thank you so much for
being here and sticking around to the very
end. I appreciate you. I hope it was
interesting and that you now have the skills that you wanted going into this class. Have a great day. Good
luck with the rest of your creative projects and
I'll see you again soon, bye.
 Rebecca Wilson, Artist