Transcripts
1. Introduction: Hi there. I'm Olivia who is behind digital boss creations. And I'm so happy
that you're here because I'll be showing you how to create digital planners using Canva and PowerPoint.
Let me tell you. It's super CP easy to do. And you don't need any graphic design
experience. Trust me. I'm someone with no prior
graphic design experience. I've had years of
experience creating cute, fun and engaging
digital planners. And I've managed
to make an income by selling digital
planners every month. Was I sleep literally. You're creating digital
patterns for personal use. Or you want to sell
you this as a planet, as an Etsy or Shopify
or on your blog. I caught you. This is the class B. You alternate Guinness
looking to create easy to do by engaging and
functional digital planners. This class will teach you an easy step-by-step process for creating digital planners. We will go through everything that you need to
know about creating digital planners using
Canva and PowerPoint. I will give you free access to this digital planner that's fairly editable using Canva and you can use it
for commercial use. There will also be
a bonus section on creating digital stickers. However, I will not
teach you how to sell your digital
planner on Etsy. I will not teach
you how to create a digital planner
using keynotes. I will not teach you about
SEO and they will not explain the Canva policy on using fonts and graphics
commercial use. What you'll need for this
course Is Canva palpate, a desktop or a laptop. You can use your iPad or tablet, but I don't recommend it
as it doesn't give you all of the functions and
accessibility that you need. However, if you want
to use it, you can. Just a willingness to learn
to create digital planners. In this class, we'll be creating a digital planner cover with a binder ring and a background. You'll learn how to create
pretty patterns using canvas, graphics elements and tools. You'll also get to create
four different plan of pages, including a daily planner, a weekly planner,
calendar planner page, and a notes planet page. I'll also teach you two ways to hyperlink your
digital planner tabs. So the first way
is by using Canva. One way is by using
PowerPoint and also how to add shadows to
your tabs using PowerPoint. So you also will get a bonus section in
creating digital stickers, where I'll show
you how to create four different digital
sticker tight. So lastly, thanks for
staying this far. But remembers complete
your class project. All of the information is in the class projects
section below, as well as a resource
and inspiration cheat. Also, you'll get a 30% discount to migrate digital planners, Like a Boss Base. Where if you're
looking to create digital planners
to sell on Etsy. This course is for you. Again, all the details
is down below. And also don't forget
to visit my website, which is digital
boss creations.com, where I give you
further advice on Etsy, SEO and lots of free
resources as well. Once again, thank you for taking the time to watch this video.
2. Digital Planner Size + Dimensions: In this video, I'm
going be showing you the standard size of a digital planner and how to start creating a digital
planner using Canva. So at the moment, I'm on the Canvas homepage. I've looked into my account
and I have Canva pro, as you can see here. So what you need to do is
head over to create a design. As you can see in
my suggested part, I have Gerardo, which
is 8.5 times 11 ". If you didn't have journal, you could type it
in the search bar. Or you can go to custom size
and type in 8.5 times 11 ". And then select,
create a new design. What Canada does is it opens up a new window with the size and the
dimensions that we want. Here we go. We have the 8.5 times
11 " size right here.
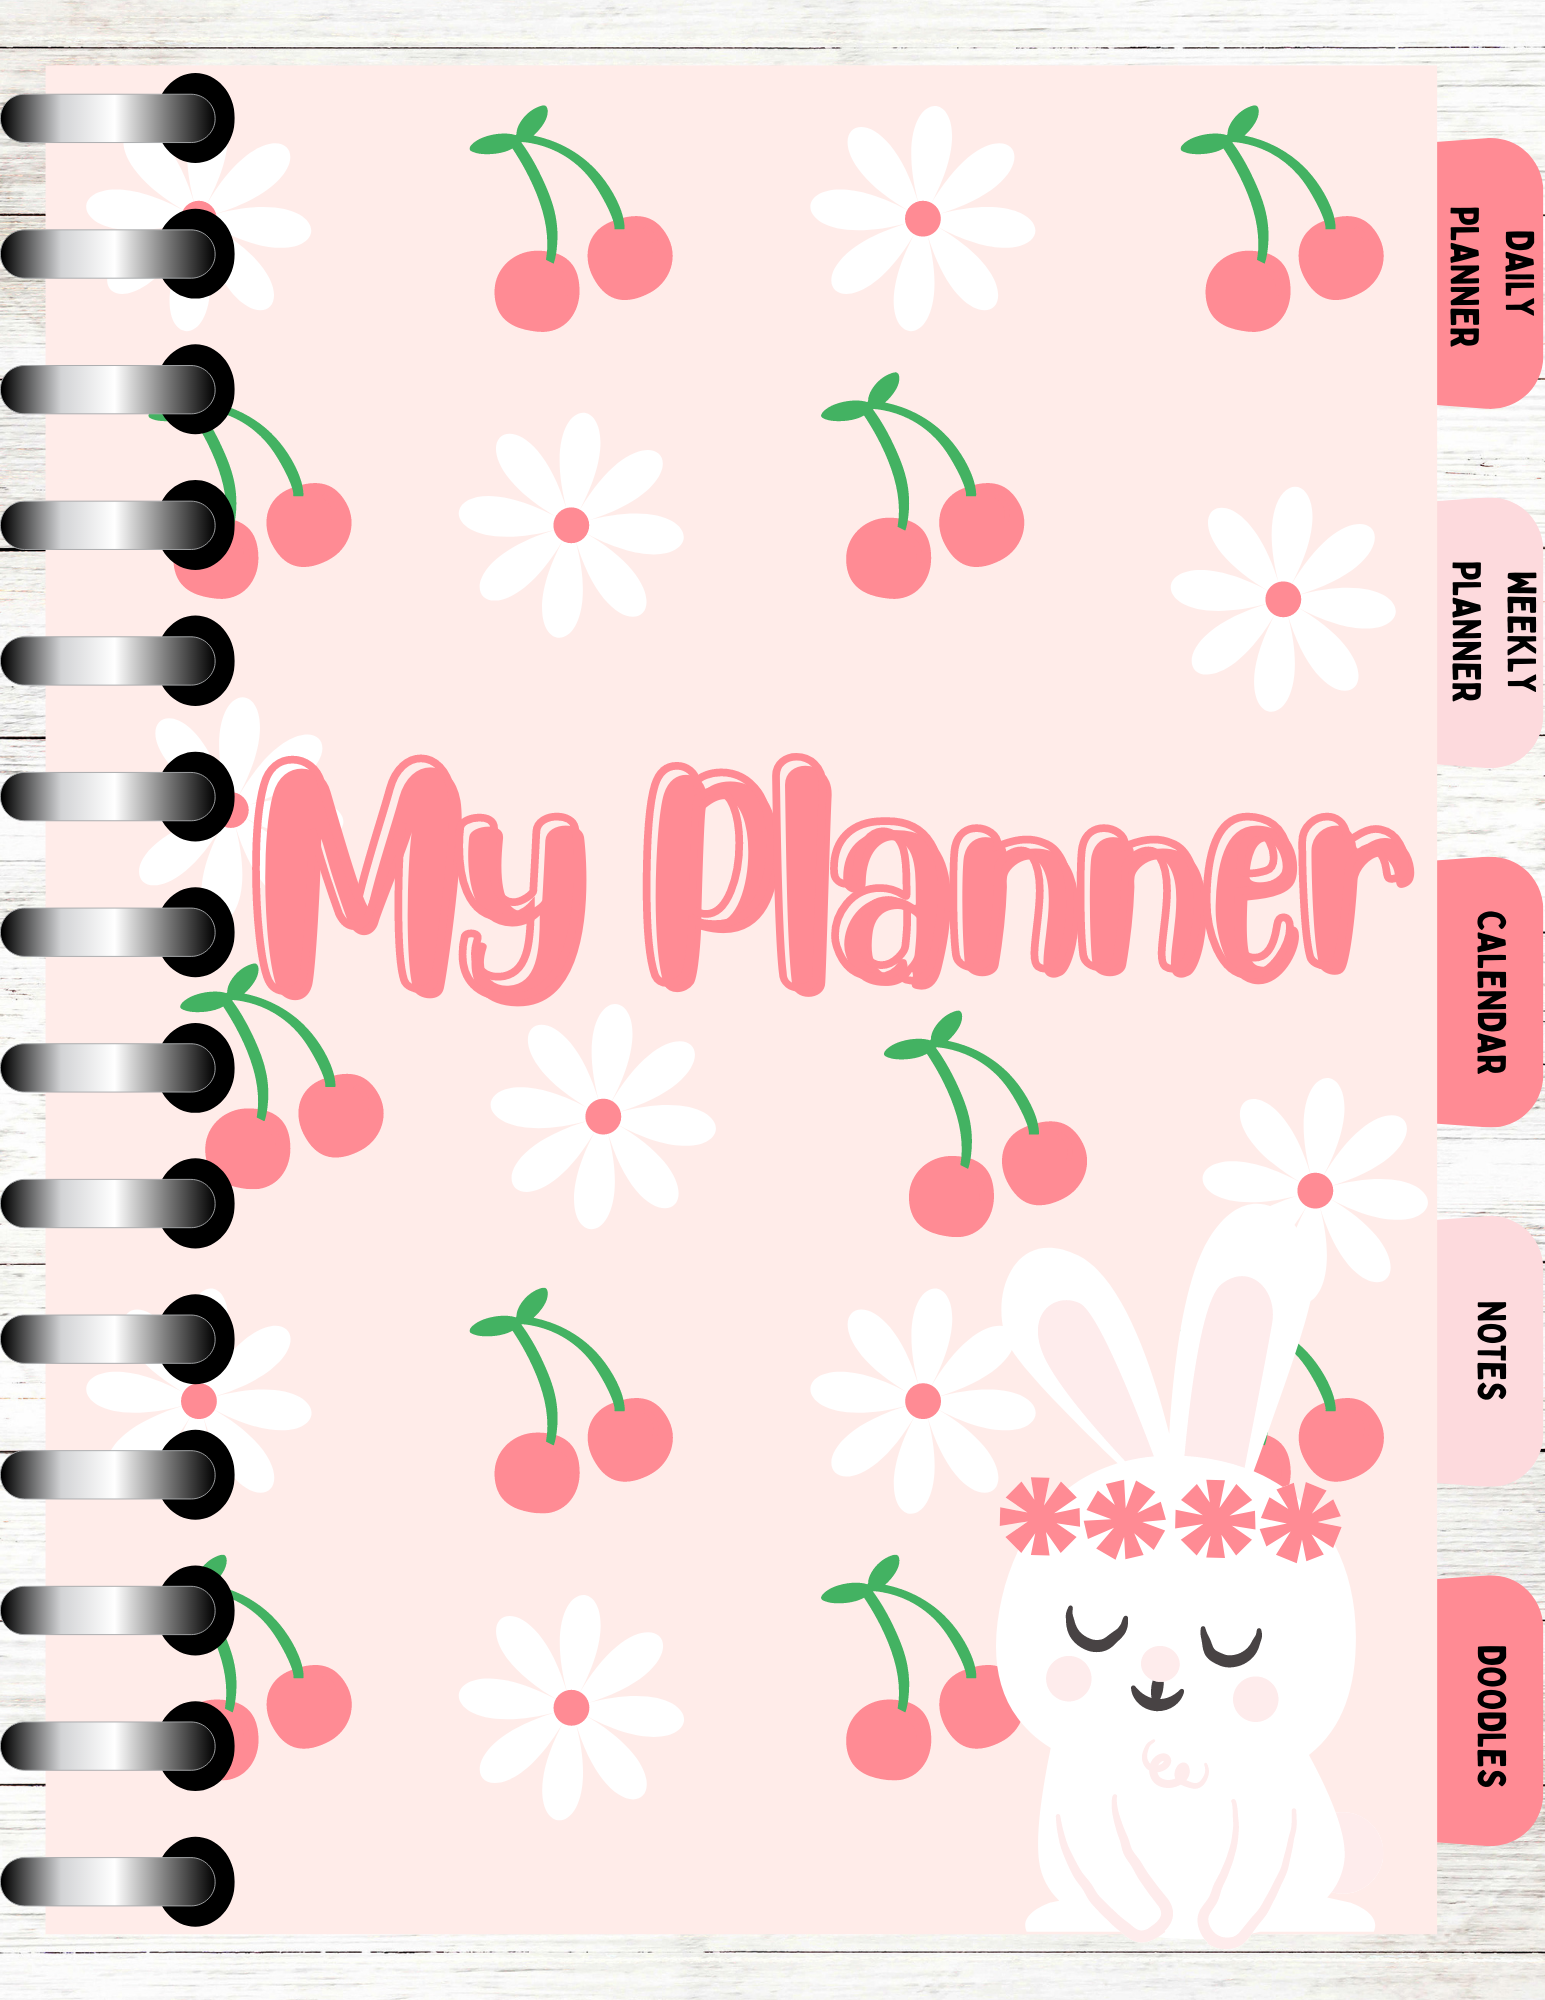
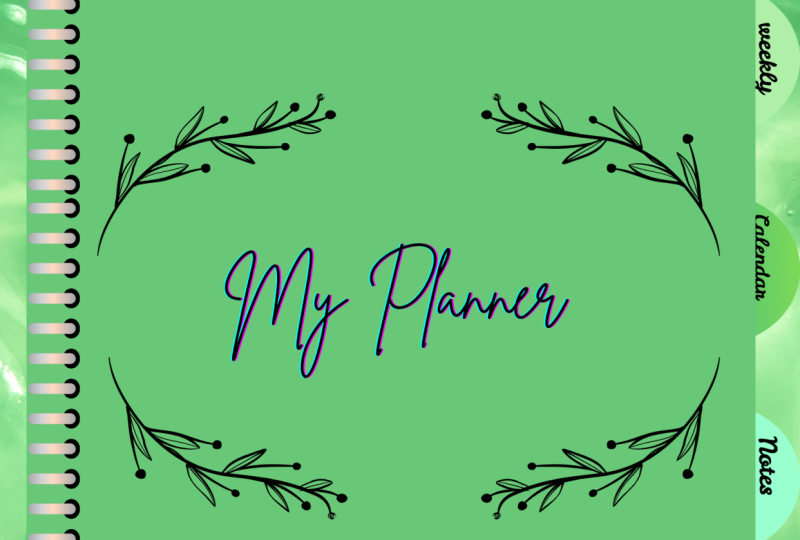
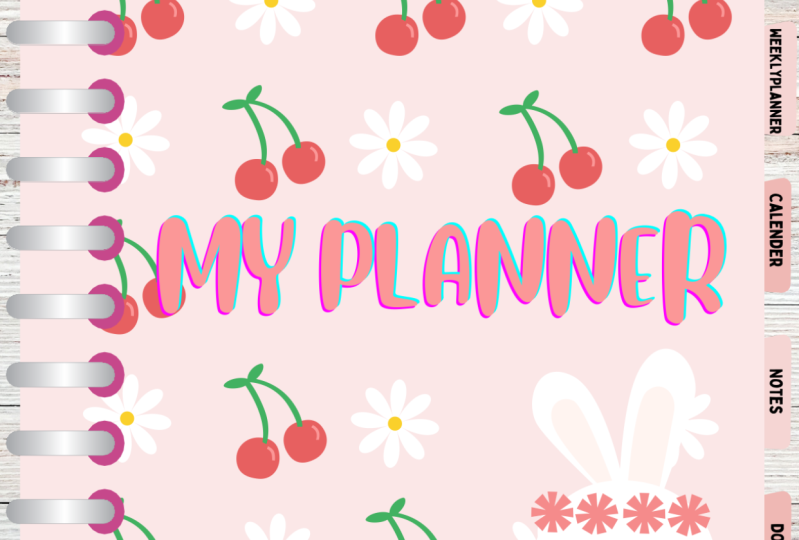
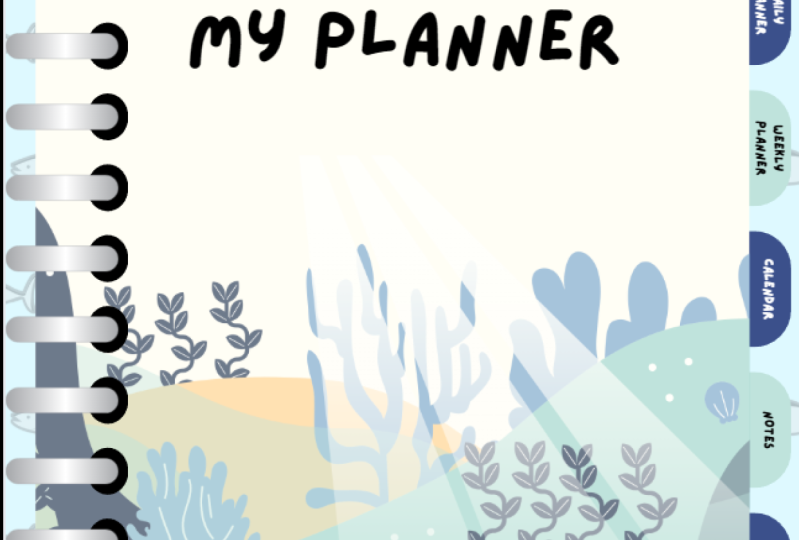
3. Creating a Digital Planner Cover: Hello and welcome to this video. So in this part of the course, we'll be creating a
digital planner cover. In front of you here, I have variations of a planner
cover that I have created. Both of these kind of covers will be
available for download. But for this video, I will be recreating this
panel cover right here. Also, I'll be adding a background and some
binder rings to this cover. So what I'm gonna
be doing is I'm just going to add a page. And then I want a background. So I'm going to go
over to photos. Usually I have a
wooden background to give more of a realistic kind of fill
to my digital planner. But you could, for instance, have a color, backgrounds. You can change the background to a particular
color that you want. Or you can have any background that you want
with the digital planner. But what I'm going to be
doing is adding the ground. And I am going to pick, Let's pick this one. Let's pick this one here. The next thing that I'm
going to use I need, I need to create my planet page. So I'm going to go over to elements and then
lines and shapes. I'm going to click See All. And then I'm going to select the square shape,
which is right here. So what I'm gonna
do is I'm going to make it more rectangular. Like so. So it looks like a page. And leave a bit for us halves
on the right-hand side and also fit for our binder
ring on the left-hand side. Next, I'm just going
to change the color. And the color that we want
is we want the same color, is this color hair color
if I use the same color. Okay, So the next
thing that I want to do is I want to
add a binder ring, some guarantee curves, elements. And I'm going to type in bind. In Canva has loads
different binder rings. As you can see, some of them are the majority of them all
with the Pro package. But if you look for really UP, able to find a free, find a ring like so. This one doesn't have a
crown, means it's free. It's not with the Pro package. I've just placed
the B9 during that, I've just expanded it to
make it a bit bigger. And I placed it on our
page and they're going to the page a little bit bigger. So you can also change
the color of the ring. I'm not too picky
with the ring color, but I just changed
this part of black. Okay, so next thing we need
to do is recreate graphics. So we've got for our cover, Say what we have is
we've got some flowers, some cherries, We
got some text here, and we've got a
bunny rabbit, right? So what I'm gonna do next
is go into its elements. I need to type in flower. And this flower right
here, which is free. And I'm going to place
it over the hair. I'm going to change it to white. And I'm going to change the whole circle inside
this right here, which which the hex
code is ff 894. And I'm going to place it there. So the next thing we need
is we need some cherries. So we want this
cherry right here. I'm going to place it there, but mostly going to change
the color. Like so. Okay, So next thing
I want to do is I want to duplicate
the cherry hair. And I'm going to
duplicate and let's Cherry the number one. Then I'm going to
do the same for the flowers and multiplicate 11. And another one down here. I'm going to move this like so. The next thing that
I'm gonna do is I'm just going to fast. I need to look in the
page and click the page. And then I'm going to
give it some more. And then I'm going to
click this padlock here until say I'm going to
unlock in a binder ring. Just go to this padlock, right? Okay, Certainly it is. I'm going to highlight
all over graph it and select Group. Want to make them a
little bit bigger. So I'm just dragging the edge
to make it a bit bigger. Then I'm going to
select Send to Back. Sorry, Send Backwards. Said that these graph
it so behind the B9 during the next thing that I'm going to do is now
duplicate this. So I've just press Command
T. I have a MacBook. And then the next thing I'm
gonna do is duplicate again. And then I want to
send it backwards. Like say, oh, okay. So now we want to add
a little bunny rabbit. Has, you can see I'm just going to go into the search bar of elements
and type in funny. And as you can see come the picks up loads of
different bunnies. So just want to choose the funny I should be here yeah. Sits right here. I'm just going to
make it a bit bigger. And I'm going to
change to cut us, to make the cut and
the bunny white. I want to make the flowers
on the bunny's head. This orangey, pinky color. And I want to change
the accent colors, like pink, light pink color. And then we've added also bunny. I think this just adds a little bit of flavors
who are design? I'm going to delete this flower. Okay, So the next thing
I'm going to do is select text because we want to add
text on our planet cover. And then I'm going to
select this one here. Can we get thicker? And then I'm going to go over to this drop-down to
change the font. And the font that I'm
using is blueberry. Now I'm going to change
the text to my planner. So as you can see, with this cover page here, I've added an effect and
I've also changed color. Say to do that,
I'm just going to select font or Sarah text
and then go over to Effect. Thanks, clicks, splice. And then I want to
change the color. Orangey, pinkish color. Like say, delete some of the crop it in the way. Might delete this one as well. Then place it there. I'm going to ungroup this section because
I want to add another cherry down here. So I wanted to, I could make the border of this texts like
the orangey color. I think that looks a bit better. But having done is created
a digital planner cover, and it will super easy to do. We just added some graphics
to make a pattern. We added a binder ring, a page, background,
and some text.
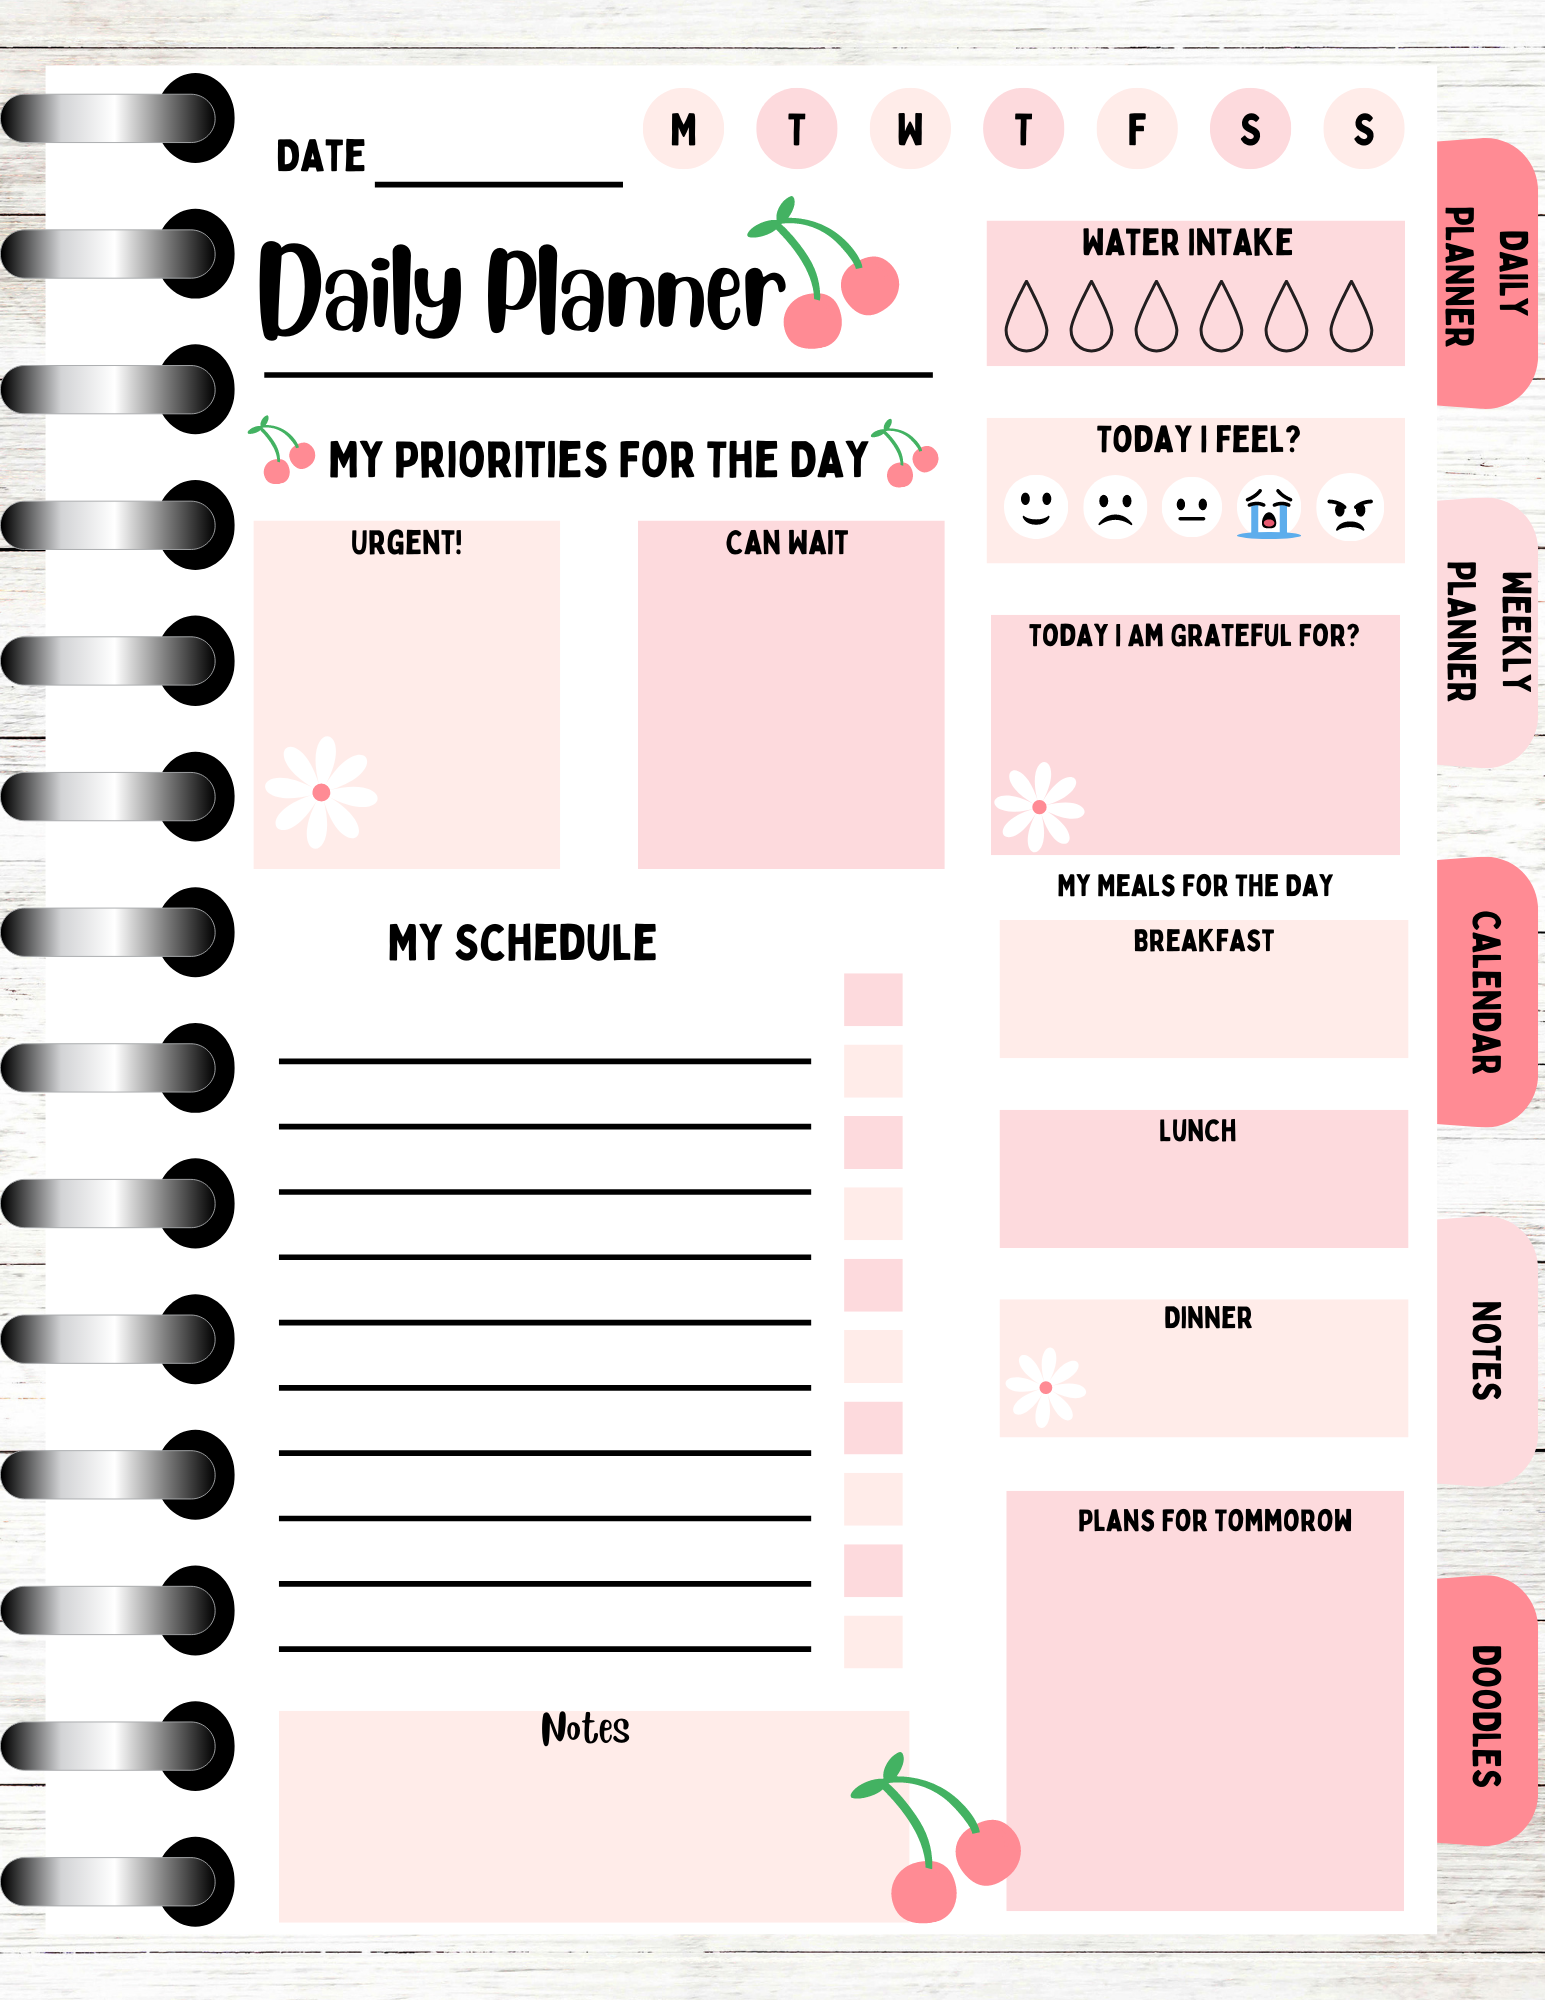
4. Creating a Daily Planner: In this video, we
are going to be recreating this
daily plan template. So what I'm gonna do first is I am going to hit
this button here, which is to duplicate the page. Then what I'm going
to be doing is I am just look in the page n, but I am going to delete
all of the elements, all the graphics, and
all of the texts. And I just want to keep the
binder ring and our page. I want to change the color
of our page to white. Then let me just
look it in again. Okay, so now having a look
at our daily plan template, as you can see it
consist of text lines, circles and text boxes, some graphics, more
texts, lines and boxes. So the first thing
that we're gonna be doing is we are going to
be creating this top part. So it's the texts
line, texts lines, so the dates and daily planner, and then some circles for
the days of the week. So what I'm gonna do is I'm
going to add some text. One text, I'm just
going to click this. Place it there, and you can
change the text to blueberry. Then I'm just going to
type in great place. The next thing I'm going
do is I'm just going to duplicate this and I'm
going to make it bigger. Type in Bailey. Then I'm going to
place that case. So next I'm going to add a line, some elements, engraved
lines and shapes. Click seal, and then align
and winning in a line. Right? Then we need a level line below. Our daily planner. Might change the way
of the line to three. Actually change it to three. Then the next thing that we
need to do is we need to create some circles for
the days of the week. So I'm going to
click the circle, shape the hair and can drag it in because I
want it to be pretty small. Then I'm going to place it. I like. So I'm going to say is I'm
going to change the color. Say I'm going to keep with
the theme so many uses Ping. Then I'm going to duplicate it. And I'm going to
select this color. I kind of want it a bit lighter, so I've clicked on the color
and I'm going to drag this, just make it nicer. Like so. And then what I'm gonna do is I'm going to
duplicate the circle. So I've just highlighted the
circles and click Duplicate. And then I just need some
more. We need seven. Next set. To ensure that the circles
are say, a straight. Canva has a really good tool. Symbol initiative is just
highlight everything, like say, click on the three dots,
hair, press position. And usually this would be highlighted and I
could click on it. We'll tidy up and it will
straighten up my circles, but it's already straight so I don't need to
use a tidy up tool. Okay, so the next thing
that I want to do is I'm gonna duplicate texts. So I'm just going
to duplicate that. And then want to change the
texts two days of the week. So Monday Monday, Tuesday, Wednesday,
Thursday, Friday. Oh, I've missed out one. Monday, Tuesday, Wednesday,
Thursday, Friday, Saturday. I missed one. So we just need to
add another circle. Let me just see men
change the text to Tuesday, Wednesday,
Thursday, Friday. Oh, I've added an extra week
on Saturday, Sunday, my bad. So I was correct the first
point, but that's fine. So just to leave that one. So I'm going to move
this over here. You've got Monday,
Tuesday, Wednesday, Thursday, Friday,
Saturday, Sunday. Okay, so the next thing
that we need to do is we need to create these
boxes over the hair. And this is for
the water intake. And this is four. So I put some face
hairs are kinda signify how the users feeling that day. So they feeling sleepy, they can tick off sleepy, they feel unhappy, they
can happy, and so on. So what I'm gonna do
is create some boxes. So I'm gonna select
this box over here. And I'm going to place up there. Then I'm going to duplicate it. Put another one there. So I'm going to
change the color, change it to that color. I might actually make this
color a bit more lighter. So a little bit lighter. What I'm going to do
is I'm just going to undo everything. Okay, back to the
original color. And then I want to change the color to make it
a little bit lighter. Say, I'm going to change the color for
these sac whose hair? And the good thing about
Canva is that it picks up, picks up the aisle. The good thing about Canva
is that it picks it up, that I want to change the color. So I can click Change 0, and it changes my original color of this color to the
new color that I want. You go, It's changed the color. So now I am going to
change that color. And it's forgot what
color is the light pink. Okay, it's this color here. So the next thing that I am
going to do is I'm going to add the water droplet,
save in elements. I'm just going to
type in water drop. And I'm going to select
the free water drop. This kind of like this one here. All right. Let's just stick to
the one that we had. I'm going to paste that there. Just duplicated the water drops. And then chinchilla that
they're nice and aligned. What I'm going to do is I'm
going to look in the box, highlight the word drops, position, and select tidy up. And now they're
nice and aligned. So next I'm going to
duplicate the text. I'm going to write is water. Hey, I'm just going to
paste that hair like so. Say for an Xbox we
want some basics. So I'm going to do is just
type in element's faces. And it comes up with some faces. Going to collect on
the Smiley face, change it to white and
make the face features. Kn, next one. So you got sad face changes. Why change the facial
features to black? Hey, we've got a neutral face. Had to double-check
what birthdays men say. I'm going to change the
color to white and black. So we can have an angry face. I can't change the thing. So we can have a crime
face, change it. Why? What else? We can have an angry face. And this will be our last one. Place up there. I'm just going to zoom in a bit. Just straighten everything cup. Then again, I'm just going
to click on the box, K to the three dots
to lock in the box. And then I'm going to highlight the thesis past position
and then tidy up. Next, I'm just going to
duplicate the text place that I am going to write him. How I feel I can write instead today. Now, the next thing that we need to do is we
need to add small boxes, the grass cheap books, and the others for the
priorities for the day. Let me just scroll up. What I'm going to do is just unlock this box to replicate
it and place it there. And then I'm going
to duplicate books. Okay, It's a bit too big, so I'm just going to make
it a little smaller. Pace up books. They
could tad bigger. Then I'm just going to
duplicate this text. And I'm going to type
in my try beauties full day Schooler and paste that. Again, I'm going to
duplicate the text. And I am going to type in
Han that's typing urgent. Urgent. And then I'm going to
duplicate this type Han. Han, right? Hey, so next I'm just
going to change to books to this color. Just gonna meet the boxes
up a little bit like so. Okay, so next I'm going
to duplicate that. And we want to pick gratitude, but takes it there. And then I'm going
to add some text. Change it. Tea today. I great. For oh, it's been grateful for. That is kinda like a
tongue twister today. I'm grateful for so I'm
going to paste it there. Okay, so the next thing
that we should do is rainy. Some more boxes. 70s add some boxes
for the meals for the day and plans for tomorrow. I'm going to paste
the next books. Books, this one, and just make sure it's
nice and straight. Then I'm going to
duplicate the texts and just change the text
to my e-mail's. Hey, again, I'm just going to duplicate
its hex and in correct. None. Hey, Cindy is going to change the color. If clicked the wrong color,
hair color, eye color. We need another book. So just duplicate It's in a box. And now we can add in. It's more. So it all makes, they're
all means complete. Just going to change
the color of this box. So now we need to
create a schedule. Sam, Can I just duplicate
this tax place at hair type in my bedroom? So we need some lines say, well, I'm going to do
is just duplicate the line that we already have. ***** it in. And then
just duplicate signs. Say, once I've done that, I'm going to highlight
all the lines. Press position to tidy up. And now it's nice and neat. Then next, we need to
create some checkboxes. So I'm just going to duplicate this check box or this box, make it smallest
and dragging it in. And then I am going
to duplicate books. So how many do we need? So we need 1 234-567-8910, maybe. Three already. 45678910. Sims going to highlight
all the boxes. Press position, tidy up. You can make it can group them together
and see if it will. Let me let me make them smaller. So I'm going to ungroup. Just going to make sure it
might be a bit too big. I think they are. So I'm just going
to delete them all. Just make this a bit smaller. And then just do it all again. So we need 102345, 78910. Just highlight in all the boxes. Press and position and tidy up. 1 234-567-8910. I am just inline and everything. Hopefully they might have
made them too big again. Yeah. Because time is a charm, right? Say that, bring it in and make 1567, 8910. I think we've done a similar gonna highlight
what the book says. Press position, tidy up. Okay, oh, let me just
change the color. Next. I'm just going to duplicate
the book and place it duplicate in the text. And then I am just getting to know because
this is all nights. Then I'm just going
to change the color. Have I just changed the codons? These ones again, I keep
picking the wrong color. Okay, So now we have created
a daily planner template. So what we've done, we have added texts,
lines, lines. And so just to make it a bit more engaging
and to go with the theme that we've
got going on here, what I'm going to do is just
copy the cherry you have and I'm going to paste it somewhere. Trying to think of a
good area where I can put the cherry cherry, make it a bit smaller. Tilted way. And then I'm going
to copy the flower. Just paste flower and
have another one. Maybe just add another cherry next to this flower. Hey, there. Just to add a little
something to the template. So yeah, we have finished the daily planner and this
is our final product.
5. Creating a Weekly Planner: In this next video, we are going to be
creating a weekly planner. This is the weekly planner
template in front of you. And again, it just
consists of texts, circles, boxes, most
hex, more boxes. So let's get started. So what I'm gonna do is I'm just going to duplicate this page. But before I
duplicate this page, I just want to let you
know that I did change the font of our main text to Bobby Jones instead of having it as
blueberry throughout. Okay, so I'm just going
to duplicate this page. Then what I'm going
to do is I am going to delete everything. You're just going
to unlock the box. Delete that. I'm just going to keep the title text
and I'm going to change it to Week
two weekly panda. So what we need to do is we need to create some
circles at the top. And there are some text
inside of the circles which signifies the
months of the year. So January, February, March, April, May, and so on. So let's see that I'm going to do is I'm just
gonna go over two elements. Click seal, fur
lines and shapes. Then I'm going to click
the circle shape. I'm just going to make
it a bit smaller. I think that's the
right size I want. And then we need to
duplicate it one more time. So 345 678-910-1112, K. And I'm just going to
highlight all of the circles, move them in a bit. And then I'm going to do is just bring
them close together. Like say. Okay, and then I'm just going to highlight all the cycles. It's the three dots go two more. Press position and then
tidy up haze to next. What I want to do is I want to change the color of a circle. So we have got this color hair. And I think it's this pink. I'm just changing the color. Okay, So next I'm
going to paste text. And then I'm gonna go
to the drop-down here. And don't want to change
the text to Poppy chains. Okay, and then I'm going
to delete the text and we can re, put j for January.
Seem in a bit. Then I want to place it
might make it a bit bigger. Okay, So next thing that
I want to somewhat to duplicate the safe KNN. So I'm using Command D. I have a MacBook
and then I wanted to change the texts to
the days of the week. So February, March, April, May, June, July, August, September, October, November, and then
lastly, December. Okay. Now that we've done that, we need at small tax and
then also align and swell. So what I'm gonna do is just
duplicate this text layer. I'm going to type in week 0. Then I'm going to grab
a line from lines. And I'm going to place that. I'm going to change
the way of the line. So going to this
symbol right here, but it's just a line style. And I want to change the
weight of the line three. Okay? The next thing that we
want to do is you want to do our weekly panel. So you would add a box with
syntax of a box next to it. This is for the user who
donates its digital parallel. They can put in what
they're doing for the week. So Monday they could
be doing X Y said, I have no appointment and
the meeting and cheesy, we can go for a job. So they just put in
what they want to do for each days of the week. Okay, so we need to add a box, shapes and click the square box. Let me make it small. Like say. Then I'm going to
add another book. Just drag it along. So the next thing I'm gonna
do is highlight the boxes. I'm going to go to the free dot. So what I'm gonna do
first before that, I'm going to go to group. Then I am going to
press Duplicate. We need seven boxes. They've got 345-67-1234
by 67 boxes. I'm going to change the color, change it to paint. Changing the colors. And the last one. Okay. Next thing we do is just
duplicate the texts. Okay, to place the text
there even a little bit. And I'm going to
change this to Monday. Tad bit smaller and see if I
can paste it in the middle. If it will, let me okay, I want it right in the
middle of this box. For some reason it
won't let me do it. Okay. That's fine. So I'm going to just
duplicate the texts and place it and put cheese day. And then I'm just
going to do the same for the rest of the boxes. Say, right. I have to make them smaller. So let's just change
this to ten as well. Just to make it cohesive case and can duplicate texts. Stay the same. The rest, so say Friday. Today. Obviously, we want Sunday. So I'm just gonna make this a bit neater. Okay? I think I might do is
just extend this book's a little bit more a
day for all of them. Just ungrouping the boxes. Just snapped in a bit more. What you've realized with making digital planners as well
as a lot of configuring. You're going to have to minivan
stuff about just to make it more to how you want
your pattern to look. I want the text to be
precisely in the middle. Anyway, I could do that. It's extending the fall. There you go. So all of them all of the
texts are in the middle. Okay, So the next thing
that we need to do is we need to add these
three boxes here. So I'm just going to
duplicate this box. And I am going to paste it. Stand out a little bit. What are these boxes for? So we've got three boxes when Phil important
appointments. The other foot goes for the week and the other
box is important to do's do enough, but you might have some more room to
extend the boxes a bit. Kid has put his books. Let's make this book
slightly bigger. Yeah. He can. This book's hair. Then I'm just going to
highlight all the boxes. Go to the free dots, press position, and it's
already nice and tidy. Next thing we'll do is
just duplicate the text. We want some text there. We want to put important let
me just see me in an opec. Important appointments indicate that. Then This one week. The next one is pulled. My stand out a bit as well to make to utilize all the
space that we have. Then the next thing
we do is just change the color so we can change
this one to the darkish, pinkish color today
to that color. And then want me to do is just
duplicate this box place. It might actually extend
this box a little bit. I'm just extending the
other boxes as well. Make it I'm going to
make the books are lined with the boxes hair, this one hair, bringing
it up a little bit. And then I'm going
to duplicate Sunday. And just put in, we have
created a weekly planner. Say what I'm gonna
do is just going to duplicate the graphics
that we've got hair, so we've got the cherry. And I'm going to
paste the cherry. Let's paste another
one like this. And can copy the flower,
the flower hair. You can put an upper one. Then let's add another one at another one. So I'm just playing around
with the graphics just to make it a bit more appealing. I might just add another Cherry. Okay, so now we have
created a weekly planner, and as you can see, it was super easy to do. It's just consist of texts, circles, and lines, and boxes.
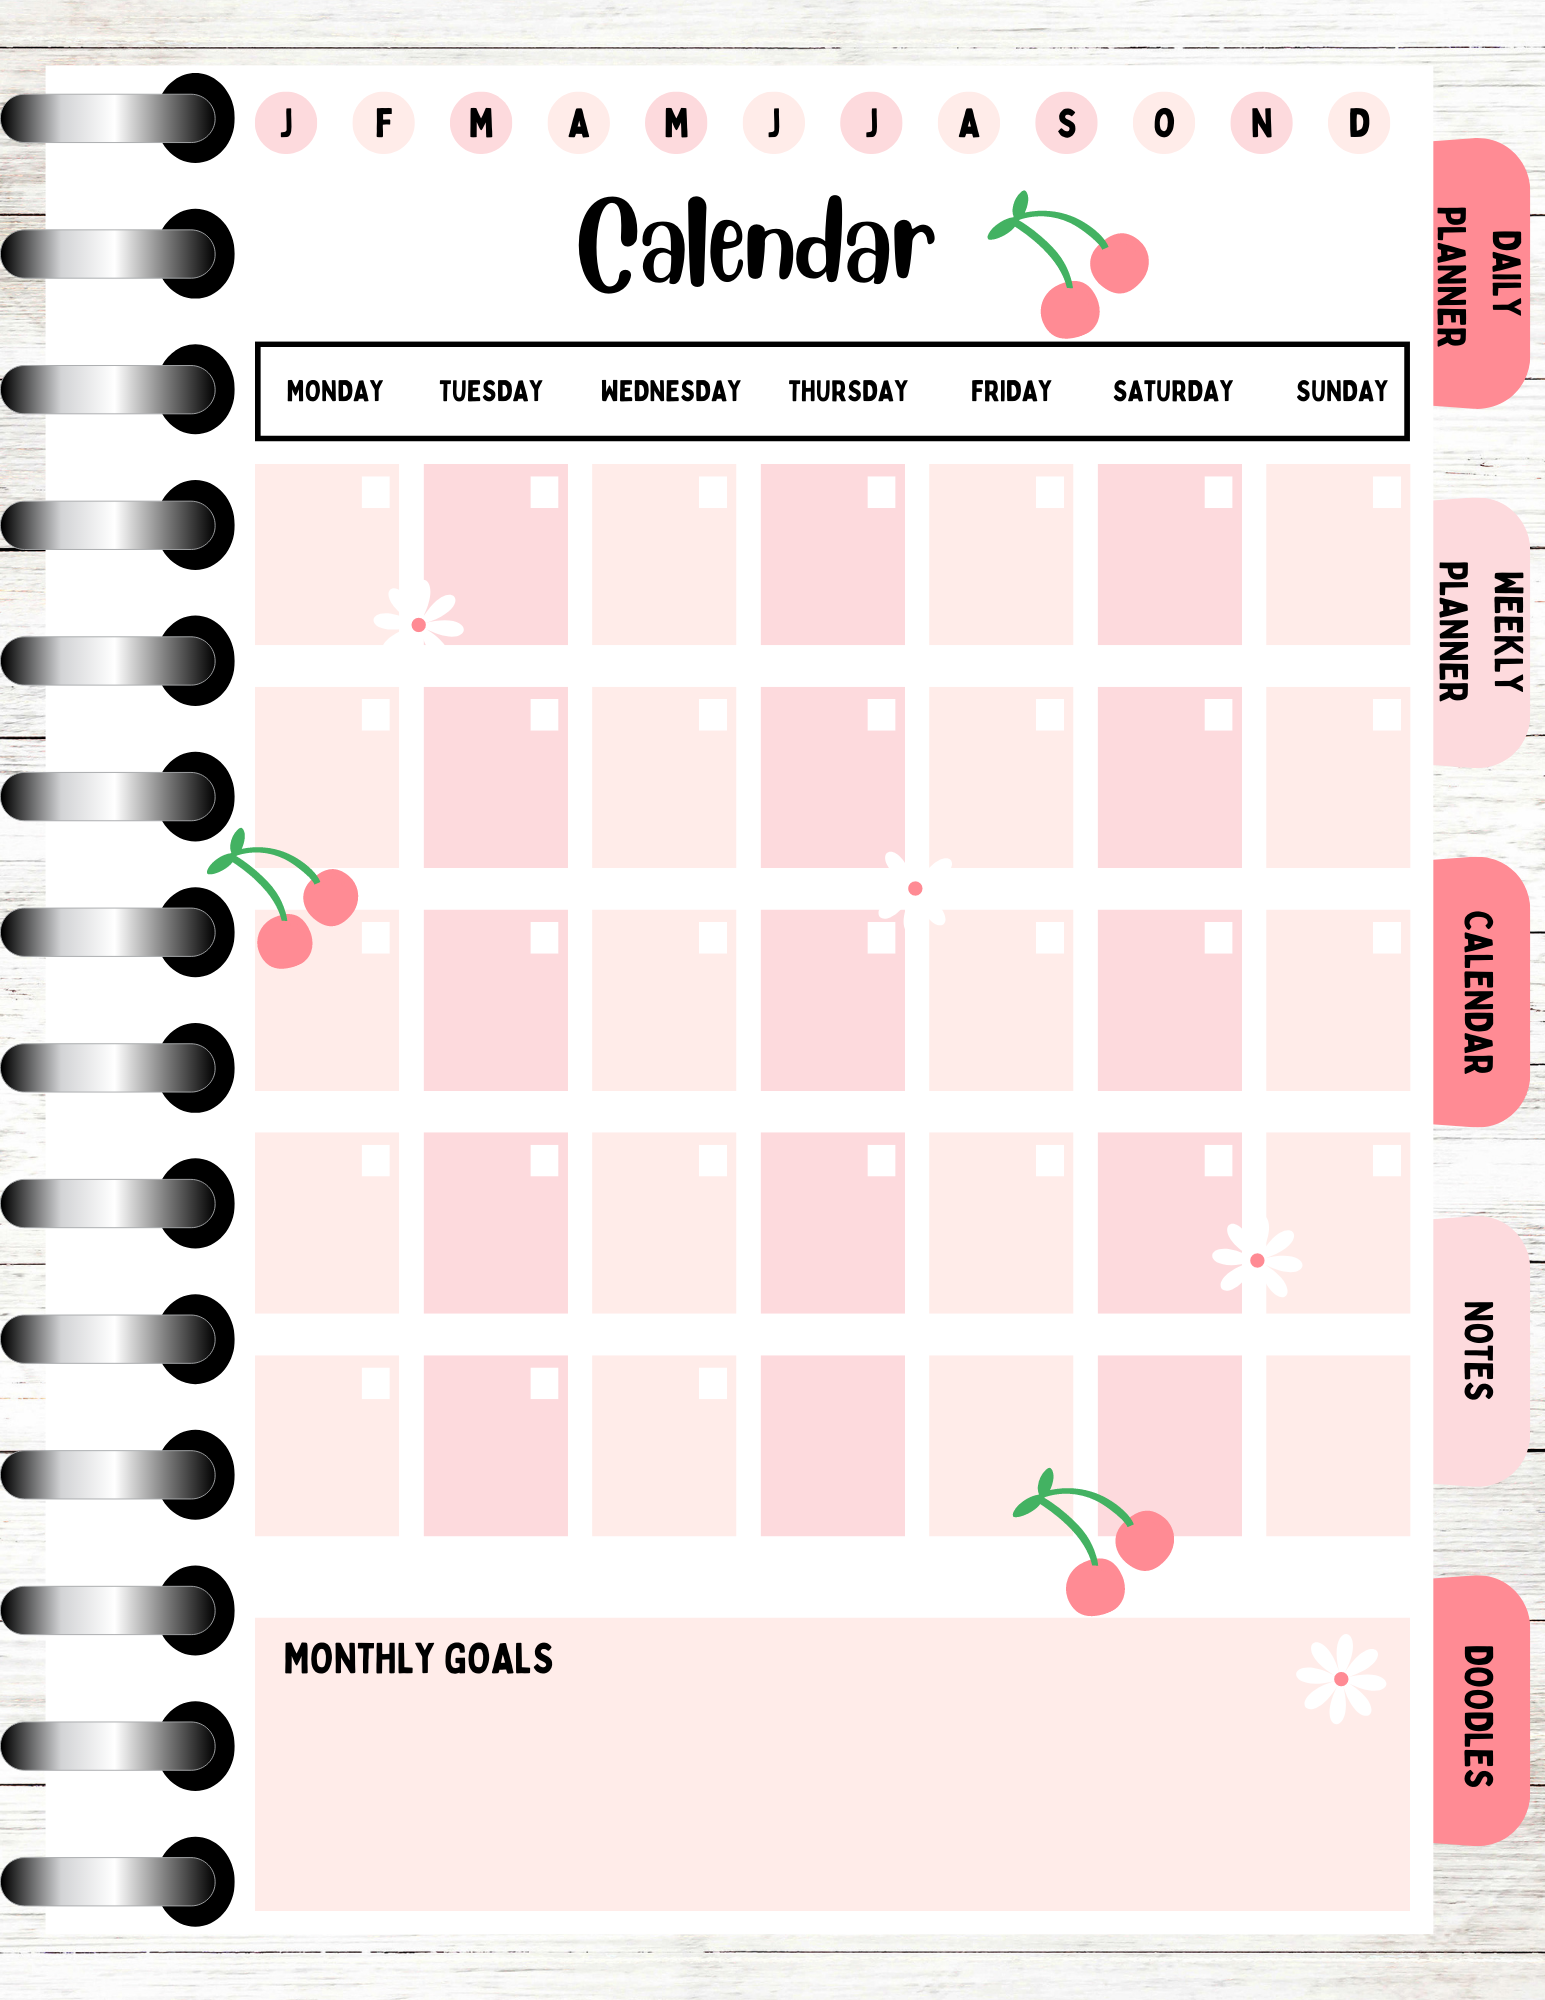
6. Creating a Calendar Page: In this video, we are
going to be curating a calendar page.
In front of you. Here is the calendar planner
template that we have. Say this again consist
of a line box, more text boxes and
some more text. So what I'm going to do is just duplicate a
weekly planner page. So I'm just going to press
this Duplicate Page button. Then. I'm going to do is
just delete all of this. And I'm going to
delete that as well. I'm just going to keep our
heads and I'm also going to keep the days of mumps at
the top of our page hair, even though we don't
have it on our template. I think it's a nice feature
to have on a calendar so the customer can cross
off which month they're on on the calendar page. It is just change the title to just place it in the middle. Like so. What we need is a book. At the top. Text boxes with
books is inside of the box. Let's do the actual
calendar first. Let's just create the boxes. So what I'm going to teach,
just head over to elements. I'm going to click
lines and shapes. Then I am going to
select a square shape. So I'm going to place it here. And I want to make it a bit rectangular in PET K. Let's begin. I'm gonna do
is just change the color. Change it to our
light pink color. Then I'm going to
add enough books. I don't want this to be
really small books to add inside Of main books. Then I'm going to change
the color to white. Now I'm just going to
group everything together. And then I'm going to
duplicate it six more times because we need seven boxes for the
seven days of the week. So 1, 2 3 4, 5 6, 7, 1 2, 3, 4, 5, 6, 7. Because you can see we've
got off the page a bit, so just highlighted
everything and I'm just dragging this or end,
make it smaller. Like say, Okay, so the next thing I'm gonna
do is change the color. So I want to make it
into our pinkish color. So now we've got the boxes. We just need to
highlight everything, grep and then just duplicate it. I think four or five
more times. 12345. Then I'm just going to highlight every fake press
position and tidy up. Now, everything is
lovely and straight. Then I'm just going
to delete four of the little boxes because
we don't need that. Right? And there we go. We've created our calendar. So the next thing I'm gonna do is I'm going to go
over to Shapes. Click on the square. Make this up. Place that the meta
title up a bit as well. Did you write, get a log? And then I'm going to
change the color to white. The border style. So the Buddha wait, 23k. Let's begin. I'm just
going to duplicate our text at the top. Place hair. Then I'm going to change it. Monday. You just save in a bit. Now we've got Monday. Second to duplicate that. I'm going to duplicate
it and put cheese day. When when stay. He say when say Pres Friday. They ever made an extra
one thing kid did. You didn't need that one. And then Sunday. So I'm just making
sure that everything is nice and aligned. Okay. So we've done that part. The next part is we need to make the goals box at the bottom. So I'm going to do
is just duplicate a border that we've made over there and bring in a bit. So I'm gonna get
rid of the border. And I want to change a color to the light
pinkish color that we have. Then I'm just going to
duplicate the text and put in the place that like so. Okay, so we have created
a calendar page. So again, I'm just going to add some graphics to a calendar. So I've just copied the cherry
from above weekly planner. And I'm just going to
place a cherry there. And let's paste number one. It's pace. Then next I'm just
going to copy flower. You can put one there. One there. And says
just add another one. Like say. Okay, we have now
created a calendar page.
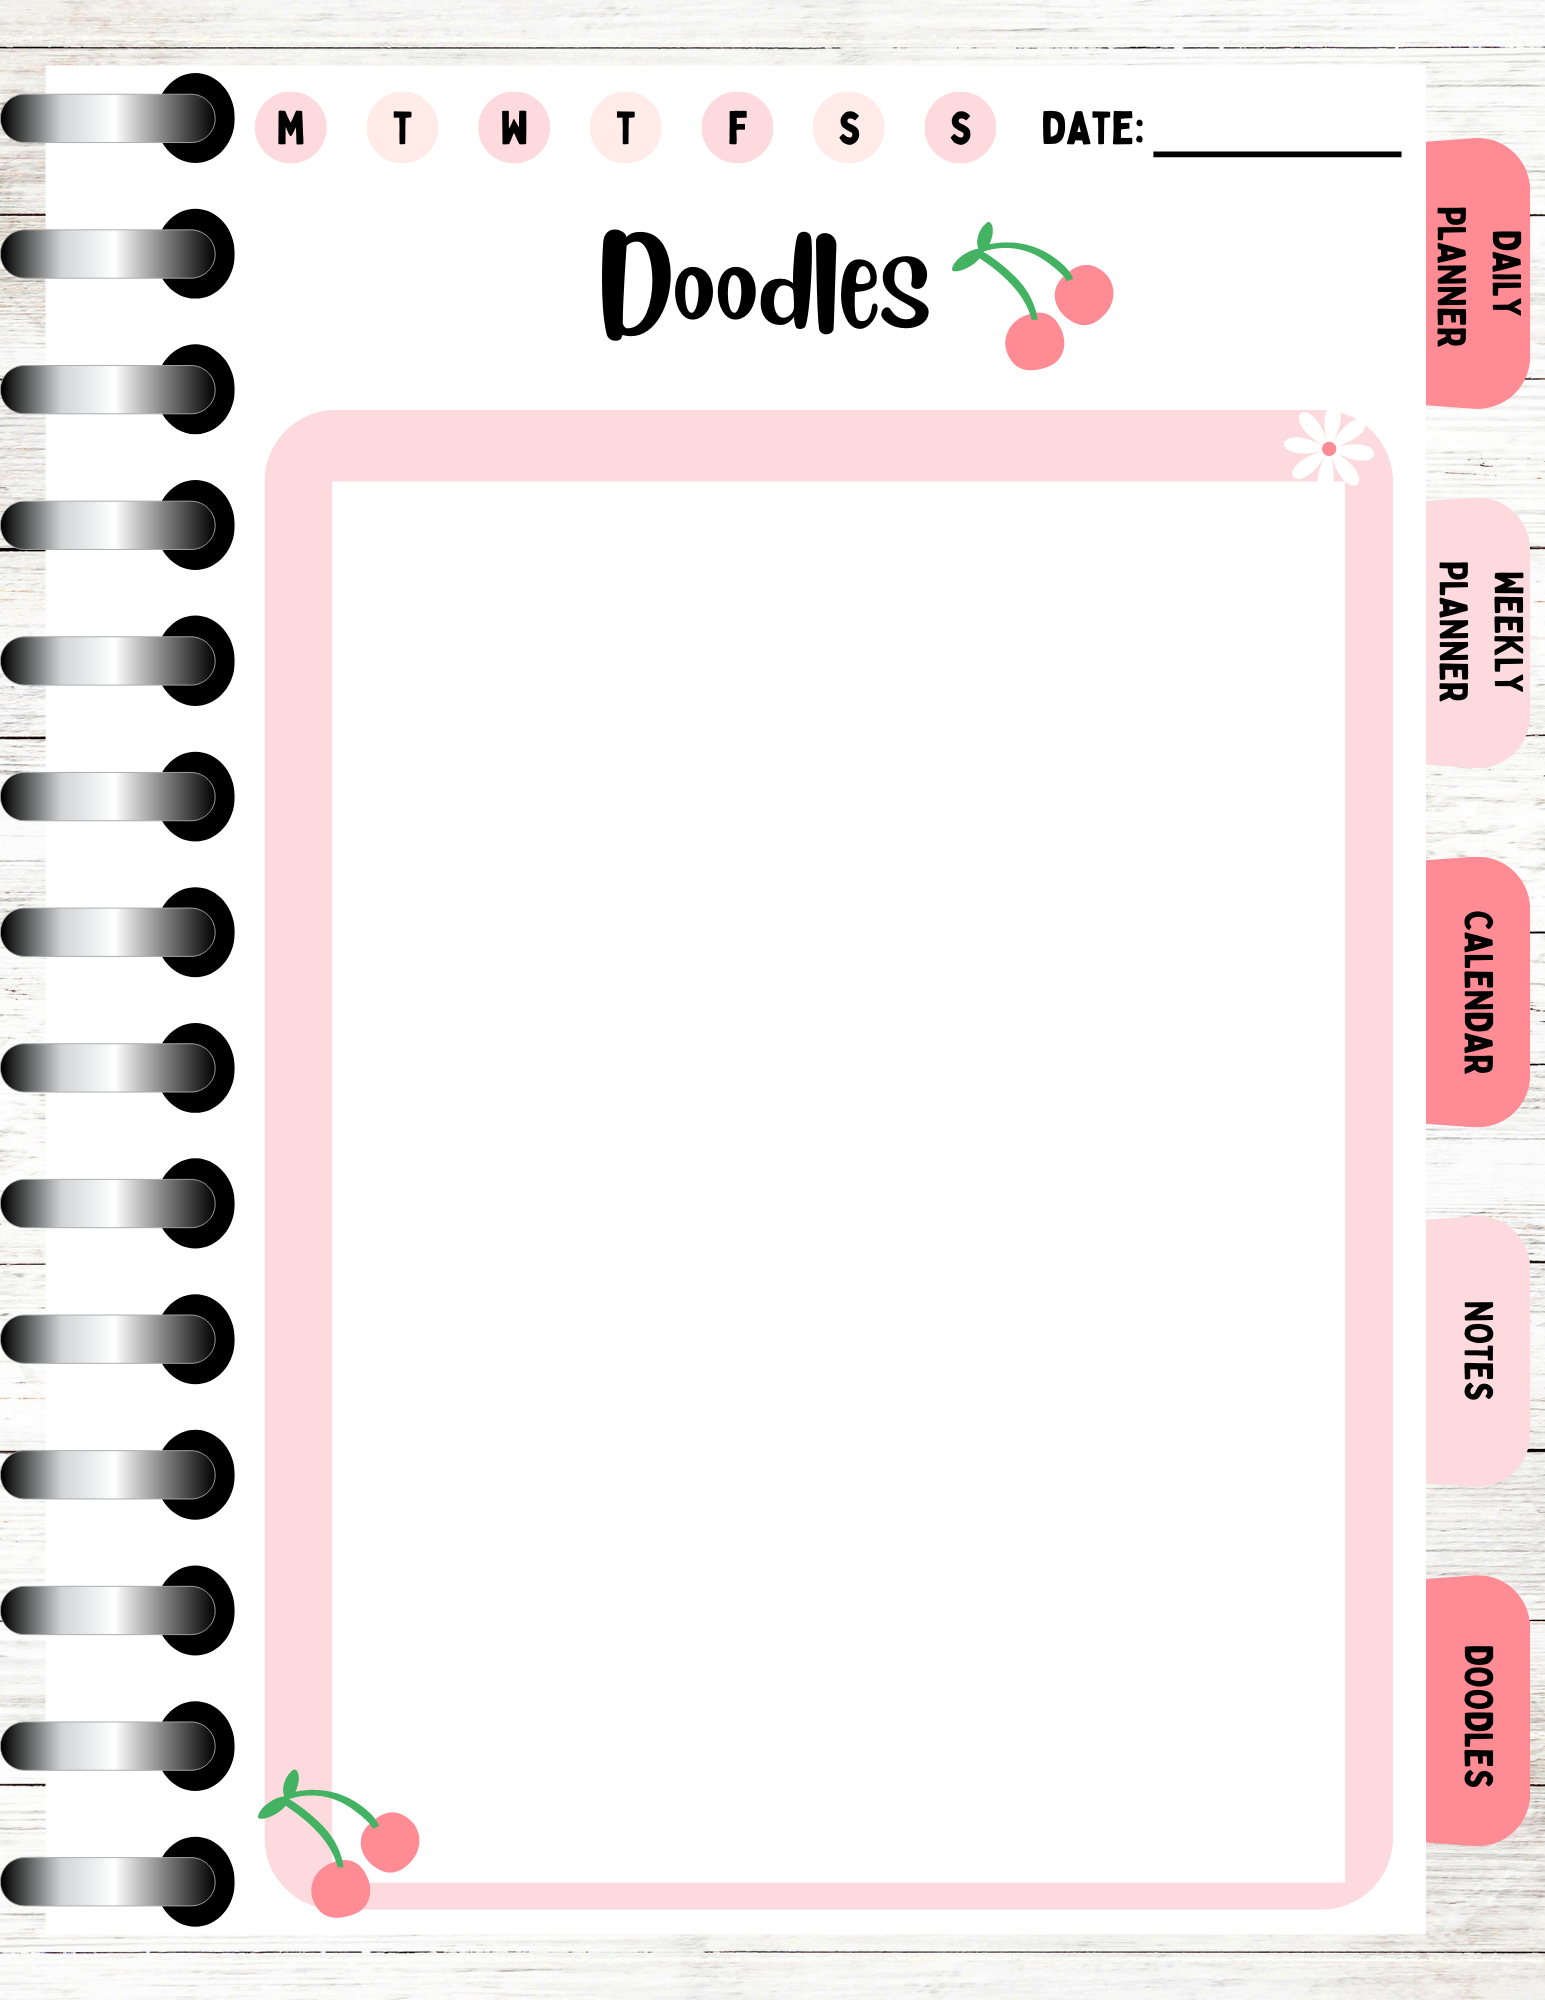
7. Creating a Notes Page: And again, literally it
just consists of texts, lines, more texts and
circles and more lines. So what I'm going to do is just duplicate our calendar page. Then again, I'm just
going to delete everything apart from header. And these circles at the top is going to
change a title tonight. And then I'm going to delete some of the
circle is at heart, so we need seven I
think I deleted yeah. 1234567. Okay. We've got seven hair. And then I'm just
gonna change the text to Monday, Tuesday, Wednesday, Thursday, Friday, Saturday, and Sunday. Just want to make sure
that everything's nice and aligned and straight. Okay? And then what I'm gonna do is I'm going to make it
a little bit bigger. Just highlighted everything,
and I'm just dragging the stop button to make
it slightly bigger. Alright, so the next thing
that I wanted to do, so I'm going to copy this text there and I want to
change it to date. Then I ain't going seven elements right now
and lines and shapes. Just want to add a line. Make sure that the lines
nice and straight. Then I'm just going
to change the border, the line weight to three
k with the knights page, I want to add a
shape on the page. So I want to add this
shape right here, which is called the
round is square. Then inside the shape as well, I'm going to create my
lines for the notes. I'm just adding this
Hair Dragon down. Make sure this is centered. Want to change the color. And then just check in. I'm going to lock
in a shape name, just make it a bit
more centered. One thing that you could
do to make sure that it's centered as good precision
and select center. And it makes it centered. But obviously because we
have spine during hair, It's actually doesn't make it centered because
it's in the way. But that's just a
cool little tip. If we don't have
this and you have everything nice and straight, and you want something
to be centered, position and click Center. I think that's
nice and centered. So I'm just going to
look in the shape. And then I'm just going to
duplicate this line and place it here and drag
it along to the end. And then another cool tip. If you want to
make sure that the lines nice and straight, you can go to File and
then select ruler. Where is the real else? I show rulers and guides. And then if you drag this down, this is your real and you can check to see
if it's straight. And as you can
see, it's nice and straight and track it back
up and it disappears. That's another cool
tip that Canva has. Say I'm just going to
duplicate the line. And lots of times until we get to the bottom case. And now we've done that. Just needs highlight
all the lines, press position, and tidy up. And everything is nice and tidy. Had a case. We've created our notes page. Next, I'm just going to add
some graphics to our page. Just copy that cherry. And I'm going to place it right. I'm gonna copy of flour and place a
flower right here. Might place enough one
down here as well. And just place the
cherry hair-like. So we've created this nice page, or you could also do as well. So I'm just going to
duplicate this page. Is he could get rid
of the lines and then add a box inside
this box here. We can make this white. Now I'm just going to
bring the charity front. And then we could put doodles. We can keep it as
nights as well. But we can have this blank
page hair, say the customer. The user can doodle
on this page, they can add their
drawings or they could use this as a
nice page as well. So instead of having lines, you can just do like
a, a blank page, like so they can input anything that you
want to on this page. That was it. So we've created a nice page and
we've also created a doodles page as well that could be used
for our next page.
8. Adding Tabs To Your Digital Planner: He needs to go to element,
lines and shapes. Click seal. Then the shape that I use for my tab is the shape right here. And it's called rounded shape. Seems like click on the shape. Up. Rotate it. Make sure that it's nice and
straight. Bring it a bit. And I'm going to place it here. Then right-click send to back. It's a bit too big, so I'm just dragging it
in a bit. There we go. We've created our first tab. Change the color. I'm gonna change
it to this color. And we need to create
how many moles have. So we've got one tab, that's for the daily planner. He's level one for
the weekly planner. For the Calendar,
Notes and doodles pages for more tabs
that we need to create. So what I'm gonna
do is just select Duplicate, sent back, duplicate, sent back, duplicate, sent back, and just one more, duplicate and send to back. So we should have five taps yet. I'm going to do
is just highlight the tabs because we've
got quite a bit of space. I'm just going to
separate them out a bit, or space them out a bit. So the next thing I'm
gonna do is I'm just going to highlight the tabs. Okay, to position
and select, tidy up. And now it's just made everything all nice
and neat and tidy. Okay, so what I'm
going to do next, so I'm going to
change the color of the next tab to this color. I'm just seeing if it goes. Maybe I might owe. Okay. Just checking to see if
I like this color combo. Yeah. Okay. So I've just changed it to this reddish pinkish color and then to a light pink color. Now, what we need
to do is we need to add text to our tabs. So I'm gonna go over to tap. And then once it's
finished loading k, I'm just going to click
on that text right here. And I'm gonna
change it to daily. Lana. I want to change a font to Bobby Jones mutase and the text around a bit smaller. Then just placing the text on the top light so we could change the color
to white and see if we can change, keep it as black. Let's just keep it
as black for now. Then I'm just going
to duplicate its hex. And then me to change it. Week the Anna, I'm going to press Enter
between Dalian planet. Just say that plan
is at the bottom. This one is calendar. This one is a night. This tab hair is four. It will let me change. It is for tea towels. Every day we go, we have created our
tabs for our planner. Say what we're gonna do
next is I'm just going to highlight taps and the text. I'm going to group it
together, send it back, and then I'm just
going to copy it and paste it on our planner pages. Like say, on each of
our planner pages, just copy and paste, sent back, paste,
paste and paste, and send to back. And there we go. We've added some tabs with some texts on the tabs
to our planner pages.
9. Hyperlinking Your Tabs Using Canva: In this section, we are
going to be Lincoln or taps using a helpful
tool in Canva. Before you start
linking your tabs to the page that you
want to link to. Its best to name the pages. So you can see here, I've got daily planner for
my daily planner page. I've put the weekly planner
for the weekly plan page, calendar for the calendar page, notes for nights page and
doodles for the doodles page. And this will help because
when you go to link your, your tabs to your planner page, you can easily search for the page that you
want to link it to. And I'll show you right now, what you need to do is
just click on the tab, go to the free dots hair. Click the link. And then you can search for the length that you
want daily planner. So that's how it is already
linked to the daily patella. But I'll just do it again. So daily planner. And then click Done. You can do it for the next one. Say for this tab or weekly
planner page three dots. Click the link. And then I can just search
for weekly planner. And it will come
up and clicked on. When you have a lot
of pages name and the page naming
your pages will be crucial if you want to be fast and Lincoln your
tabs to your pages. Say, I click on the
tab, three dots link. And this is the calendar page. Or you could click
on the tab, right, click select link, and then search for your
page than tonight's page. So again, click on the tab,
right-click. Let's link. Search for the page, utils, utils page,
and it's done. Okay, so what I'm gonna
do is just highlight. I'll just copy the taps and we're going to paste
it in each of the pages. My previous video, I
showed you this already. But I'll just show
it to you again. Because now we've
actually hyperlinked tab, paste, send that
pace, send to back. Okay, so we've got all our
tabs and then hyperlinks. The next thing that
we need to do is we need to download our planner. But before I do that,
I'm just going to change the name of a planner. Say I'm just going to
write funny and cherries. A tool downloads. You just click Share. Scroll down to dominate thing. You want to download it to a p, d f, print file. This file right here. People, all of the
pages to be downloads. And then you click Download. And now it's just downloading
the k. So that's it. That's how you hyperlink your, your tabs using Canva.
10. Checking To See If Your Hyperlinks Work: In this video, I'm going to
be showing you how to check on whether or not your
hyperlink tags work. So what I've done
is I've downloaded my digital planner and
Harry is in front of you. So now I'm just going to click
on a daily plan and tab. And the kids brought me to
the daily planner page. And I'm going to
do the same thing for the weekly planner tab. And it's taking me to
the Weekly Planet page. Say the calendar,
the calendar page, notes and notes page, doodles, new doodles page or
hyperlink tabs work. And that was it for this video.
11. Hyperlinking Your Tabs Using PowerPoint: In this tutorial, I'm
gonna be showing you how to hyperlink your
tabs using PowerPoint. Say what ECT is, just head over to share at the top right-hand
of the screen. Thanks. Scroll down some more. And then scroll down. Sit PowerPoint. And then click Download. What this does is dominating our digital predator to palpate. Okay, so now that we've uploaded our digital panel on PowerPoint, what I like to do is I like to go through each of the pages, just ensure that everything
is nice and intact. So I look at the text, the graphics, the elements, just ensuring that everything, how it's meant to be nothing. Nothing, it's been moved around. But everything
looks pretty good. Good. And also what you've noticed
is that I've actually deleted the tabs on the
other planner pages. And I did this on Canvas before I download
it onto PowerPoint. And the reason being is
because I want to start off hyper linking my tabs Bus, creating a template
basically and then copy and pasting this tab. These tabs onto the
upper planner pages. This is because it's easier
instead of hyperlink in each of the tabs for each
pages as we go along. So once I piping into
these tabs hair, I can just right-click, copy and paste it on each
and the other pages. So before we get into hyperlink, hyperlink in our tabs, what I'm going to do is I am going to create some
shadows to our tabs. Clicked the shape. And as you can see, I've got the format shape
here on the right-hand side. But if that is not there, then you can right-click. And then scroll down
to Format Shape. And it will appear on the
right-hand side of PowerPoint. So to add shadows, you just click this button
here which says a bet. And then you can add a
shadow to your tabs. So this app is
already got a shadow. So I'm going to create a
shadow for the next tab, but I'm gonna make it the same. So our transparencies A5, size is 94 or blast, wow. And angle is 90, and
distance is four. Okay. I'm just gonna do it for each of the each other, the other tab, so transparency is A5, size, 95, 90, 12. Okay. So we've added some
shadows to our tabs. I personally like adding
shadows to the digital, the digital planner task
because it kind of gives it a bit of realism to our design. Adding a little shadow, but you could go ahead and adjust the shadow
effects to your tabs. But I just kinda like a
subtle, realistic look. You could also add a shadow
to the page if you wanted to. Thanks. Little shadow like that. Which again kinds of ads to the realism to
the digital planner. But I am just going to keep the planet page neutral
with no effects to it. Okay, so the next thing
that I'm going to do is I'm just going
to start hyperlink. Can all tap. So what I'm gonna
do is click on the shape. I'm going to head over to
insert and click on shapes. I'm going to select
the square shape. And then I'm going to make a
rectangle on top of our tap. The next thing that I'm
gonna do is I'm going to right-click the rectangle shape. Scroll down to link. Next is this document. Slide titles. And we want to say Shay or
page with the daily planner, tap, say perhaps slide too. Then the next thing to do is to head over to Format Shape, no fill, and no line. Then that tab is hyphenate. Say we just repeat the same process for
the following tabs. Say rectangular shape, link. Slide titles. Weekly panda is slide
Free. Press. Okay. No fill, no line. Sentence t that one more time. A female Times Square Shape. Place that shape over the tab. Right-click. Link. Slide titles. Slide for is the calendar page. I feel no line. Then let's do the same
for the next tab. Shape. That's how you can go. Our tab. Right-click leg. Slide titles. Slide five, because
that's the next page. And then let's do
that one more time. Shapes. Placed the shape. Tab, right-click, leg. Slide titles. Scroll down to slide six, okay. They feel in a line. And if you've got steel, this one to no fill, no line. Now because we have
hyperlinked our taps, say to double check on whether
or not the hyperlinks. We can go down to
this symbol here, which is Reading View. Click it. And then
we can check to see if the tabs actually work. And let's just try it again. So we've tried to daily
planner, weekly plan. Let's try calendar and doodles. So they all seem to work. Alright, so what I'm gonna do now is I'm going
to see if I can. Great everything. I've just highlighted
everything. Okay, Let's scrape the
hyperlinks together. So we've grouped the hyperlinks. See Harry group them. So now let's see if we can create the hyperlinks
and the tabs. Powerpoint is a very, very tricky when
you're grouping stuff. Okay, so now it allows me to grip the tabs and
the hyperlinks. So what we'll see is
right-click group. And it's grouped
them all together. So now because I equip them the tabs and now in
front of the page. So what we'll do is
go right-click tabs. Then I'm going to
click Send to Back. And it's probably going to
go behind the background. Now when kit the
background Send to Back and it should appear in
front, backgrounds like so. So now I'm going to
do is just copy. And I'm going to paste the
taps into the next page. And I think it's going to do
the same thing as before. Back. Then we go up, bring the
background to back as well. Sent back home paying. Let's click Paste,
then send to back. Then the background. Send to Back. Night. Pace. Send to back to back. The last page. You want to paste. Sent back. Send this to back. Okay, So we have
now added all of tabs to our pages and we've added hyperlinks
to as hops as well. So again, to
double-check this stuff, check if whoever the
hyperlinks work, we need to create the 3D
view and just check to see if they work and
yet they do work. Okay, so the next thing
that I'm going to do is I'm going to now export this
file to a PDF file. So it needs to do is go to file. You can click Export and it
will export it to a PDF. Just make sure that the
file format is PDF. Another way to do this, if you go to File,
click Save As, and you can change the file format to PDF
and then click Export.
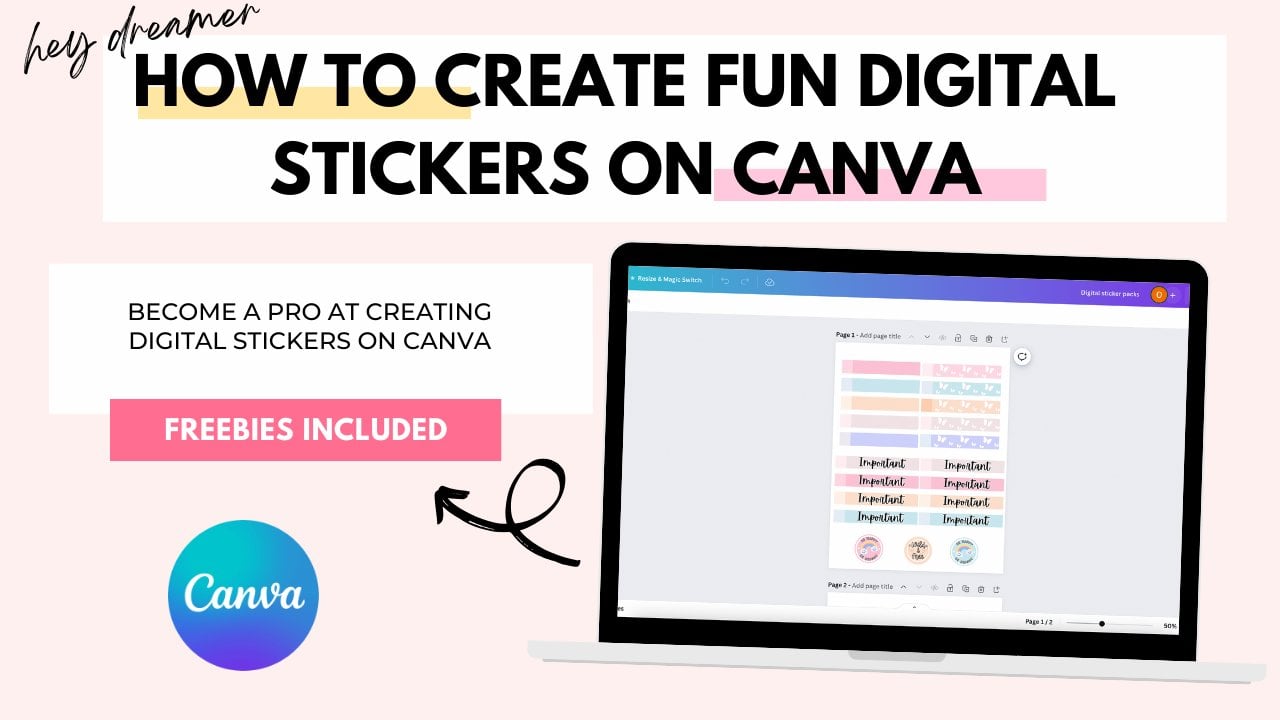
12. Bonus: Sticker Size + Dimensions: So welcome to the
bonus section of this course where we will be
creating digital stickers. Before we get to creating
our digital stickers, just want to show you
the size that I tend to use for my digital stickers. Say as you can see in front
of you, I'm on Canva. And I again, click,
Create a design. Then I search for a square, thicker canva, and smartly
brings up a square sticker. Size.
13. Bonus: Creating Digital Stickers: Okay, so in front of you hair, I have full digital
stickers that I've created. So I've got this boss babe
motivational sticker. I have a memo, sticker, hair memo, tap sticker. I have a bookmark
stick her hair, and I've got a weekly
planner sticker as well. So what I'm gonna be
doing is I'm gonna be re-creating these four
different stickers. Okay, so the first one that
we're going to recreate is the boss babe, motivational
quotes sticker. So the first thing I'm gonna do is I'm going to add a page. And then I'm going to
head over to text. And then I'm going
to select the text. And what I'm gonna do
is I'm just going to click this drop down here. And I'm going to let
Bobby Jones condense. Say, Hey, I'm going
to write boss, make it a little bit thicker. And then I am going to
duplicate the boss pay. Mostly going, it isn't
just going to increase the spacing in between
the words or the letters. Sorry. So I'm just going to just drag this
along circle 46. And I'm going to make
this one E6 as well. So I've just added some
spacing in-between letters, trying to make it a
bit more centered. Alright, save. As you can see how I've added
some effects to us hex. So I'm gonna do is I'm
going to go to effects. And I'm going to select the glitch effect
that we've got hair. I zoom in a bit. You can see it. Like say, you can't increase the
offset if you wanted to. And the direction. You can now say change the color to the red and
greeny bluish color. But I'm going to keep it
as the pinkish color. Say with the bass part. I did is I used the
hallow effect and I changed the color to a
pinkish color like so. So now we've got
these two effects that we've added to our text. Okay, so the next
thing I'm gonna do is I'm going to create a bot. What I'm going to do is
go over to elements. And I am going to click
on lines and shapes and click seal on a square k. So now the books
in underneath him, fats EVA one we're
going to do is, well, just to make
things easier, I'm going to create these
two texts together. Just to make things
a bit more easier. Okay, and then I'm just
going to create a book. And I'm going to change the
color to a pinkish color. I might change this the
bay bit, this pink. Next thing that we need
to do is we need to add a speech bubble to our template. And we're going to
have its elements and type in speech bubble. And I am just going to click
the speech bubble hair. I think this is actually a bit different to the
one that we have. It's fine. So I'm going to press right-click
and send backwards. Well, I might actually change
the speech bubble, I think. So I'm gonna go over
two lines and shapes. Instead of search
net fruit elements because I think, yeah, So I'm going to
leave this and found our speech bubble soon. And I'm just going to change
the colors of white and then send speech bubble too bad. We've got a speech bubble. The next thing we see is we
just need to add some shapes. So we've got some heart
shapes and he got this lightning shape
over there as well. And it is just fine heart shape. Is this one for some
reason? Go back here. We need a heart shape. I'm going to use this hot. I'm going to rotate
it around there. And then I'm just gonna
change the color to white and duplicate it like so. What I'm going to do is
I'm just going to lock in the square shape, highlight the two hearts. Rotate it around. So I highlighted
it and duplicate the hearts and just
rotate it around a bit. I think it's let me, okay, let us just
get rid of that. So I'm just going to duplicate the heart instead
because it wait, let me turn it. And then Cpk, the other one. And then we gave got two hearts. And then we've got
like a lightning bolt shape over there. And so it's right here. And it's called solids
lightning shape. Since gonna click on
that, rotate this, make it a bit smaller and just change the
color. There we go. We've created a
motivational quote sicker. Okay, so next thing
that we're going to do is we're going to create this memo pad sticker. So what I'm gonna do
is just add a page. With this sticker. It
just consist of squares. And there's a shape,
hair and some lines. To make the pattern. We just need a square
shape, which is right here. And I'm going to
paste in the corner and make a square like so. So now I'm just going to change the color, that pinkish color. And I'm gonna tip and place it opposite of square shaped
that we already have. Then I'm going to duplicate
the square again, paste another one there. And I'm going to change it
to this light peachy color. Duplicate that one and
place it there like so. I don't want any
white marks showing. So I'm gonna do is just see
if I can bring everything in. So I'm just going to
send that out front. Okay, so now we've got a pattern or the starting
point in a pattern. I'm just going to group
everything together. And we're just going to
duplicate a pattern along. And as you can see how we've
actually made a mistake, made the square bit larger. I think I've just track
that in a bit too much. So I'm just going to delete that and I'm going to
create this again. Cape Patton say. And then I'm going
to highlight it. Could read it altogether
and then duplicate it. Again. There we go. We've created this
checkered pattern. Okay, so the next thing that
we need to do is we need to create our actual memo pad. So this bit hair
with some lines. Sam, go over to this
shape right here, which is called rounded square. And then going to place it
in the middle and just drag it along to my desired shape. Like say, then I'm just going to change the
color to white. So the next thing I'm going
to do is I want to add some dotted lines and we
go back to this line. And I'm just going to place
it and drag it across. And then I'm just going
to duplicate my lines, these pressing Command D. And
now I just want to log in. I think I've created
too many lines. Weren't that many lines. Okay? And then what I'm gonna
do is just highlight all. So we need to look in
our pattern as well. So I've just highlighted
our pattern block to n. Then I'm going to hide it, aligns, press position, tidy up. I'm also going to just
make it a tad bit smaller. There we go. We have created
memo pads sticker. Sticker that we're going to
create is a bookmark sticker. So what I'm gonna do
is just add a page. Then I'm going to select
the bookmark shape, which is this shape right here. Now I'm just adjusting
the size to my liking. And now I just want
to change the color. Let's change it to
this pinkish color. And with our bookmark, we've got some hearts and
you've got some stars. I'm going to say she's
head of its elements. We want lines and shapes. Then I am just going
to click on a hot. Bring that in and place it here, change the color to white. Then I'm going to duplicate. Duplicate again. Next
you want to add a star, clicked on this star
shape right there. Paste my star there. Again. I want to change it to white. And then I want to duplicate
my star, place it there. The next thing I'm gonna
do is I'm just going to look in my shape, selected the shape,
going to more, click the lock,
the Padlet button. Now I'm scraping my
shapes together, so my pattern together. Great. Now I'm just duplicating the
pattern we've just created. There we go. We have created a
bookmark sticker. I'm just adjusting it a bit. But yeah. So we created a
bit much thicker. And the net sticker
that we are going to create is a weekly
planner sticker. I'm just going to
select Add Page. And with this weekly
panda literally consists of boxes and texts and
some graphics behind it. So I'm already on elements. I'm going to select
the square shape. So I'm going to put it right
there and track it along. Like so. I'm going
to change the color. And now I want to add
small boxes, elements. Square shape. Say we need seven
boxes going down. Change color, and then
I'm just going to duplicate it seven times 234567. Look in our shape in, so I've just selected the shape, go into more highlight
in the squares, moving them up a bit. The three dots position was all nice and tidy so it didn't need to select tidy up. The next one I'm going
to do is I need to create a square or
rectangular shape. Next to this square shape. I'm going to click duplicate
and bring it across like so. And then I'm gonna
do the same for each of the squares, 1234567. I hasten it. Something I need to do is
I need to add some texts, semi negate text. The text. I want to change my text
to more sugar thin. And I'm just going to
make that a bit smaller. Then change it to m For Monday. Then I'm going to duplicate. Then they choose stay. Stay. Stay. Friday, Saturday, Sunday. Okay. I'm just making sure
everything's nice and aligned. Next, I'm just going
to duplicate the text. Again. Going to type in week. The Lana. I'm going to do is I'm going to unlock square box and just extend it a bit so I can fit
the weekly panda header. Okay, so I'm going to look at again the texts and
then go over to that. I'm going to select background. And I'm going to change
the color to white. I also want to decrease
the spread and the roundness and k. So we've added a
background to the text. Next thing, and the last thing
is we want some graphics. The graphics that I
use for this week, the panel is some hops. Same. I've just typed
in hearts and elements. And these hearts right here. I'm going to just
place it there. I'm going to crop the graphics. So what I've done
is I've selected, so I double-tap the graph it, and I'm going to drag it
in to crop my career fit. Then I'm going to send it back. Thanks. Behind
shapes, the texts. Like say. So what I'm gonna do
is I'm just going to defecate graphics again. And I'm also going
to crop pumpkin, probably going to crop it
to hair because I just want this graph right here. Then again, I'm going
to send backwards. So just right-click. Sentinel black was
making sure that it's behind the shape. And then what we're
going to use, I'm just going to duplicate fat graphics there and crop it CE to about there. My carpet even more. Just keep these
ones here, like so. And then I'm just going
to send the graphic. There we go. We've created a weekly
plan, a sticker. We have created four
different stickers. The week we've had a sticker, we've created a bookmark
sticker and memos pads sticker, a motivational quotes sticker. That was the end of
this video tutorial.
14. Bonus: How To Download Digital Stickers: So in this video, I will be showing you how to download your
digital stickers. Say there are
different methods take depending on your
digital sticker type. If you have a background
with your sticker, say for instance, this
boss babe sticker, we have a pig backgrounds. And this memo pad sticker, we've got this
checkered background. To download these two stickers. Just head over to share, download and ensure
that the type is PNG. And then let's download. That's for stickers
with backgrounds. So the postpaid Zika has a background and the memo
pad has a background. Safer stickers
without a background and their standalone stickers. So like this sticker
that we have hair, the weekly pattern, a
sticker that we have hair. You need to add a transparent
background to it. And what you need to do
is go head over to share. Instead of just straight
away click in downloads, you need to click
transparent background. And as you can see,
it's only with the pro feature
that allows this. What this does when you click transparent background
and you dilute. It removes the white background
and you'll just have a standalone bookmark sticker or stand and nine
weekly plan a sticker. That was it for this video. And I hope he found it useful.
15. Using Your digital planner in Goodnotes: Hi there. In this video I'm just showing you
that I've air jobs, this digital planner to my iPad. Now if imported this
digital planner to GoodNotes and Harris, the bunny digital planner. As you can see, all the
tabs are hyperlinked. The calendar page, notes page, doodles page that
all hyperlinks, the colors, the scenario, think it's very
clear and intact. So I'm just writing up
the, my priorities. Cool client. Go shopping. He can easily write on the digital planner
using GoodNotes. Like everything's
fine, Chernobyl, and easy to use. But you can get creative
with your digital planner. You can add stickers to it. I'm just scrolling
through again. One last time to to show
you what it looks like.
 Olivia Davis, Digital Planner and Graphic Designer