Transcripts
1. Welcome!: Hi, I'm Olivia condition
supposed creations here. And I am so glad that
you're here today. In this course,
I'll be giving me the lay down and
teach new and how to sell digital planners or
digital products on Etsy. So stay tuned. Here is the how to sell digital
planners on Etsy course. In this course,
you'll learn how to successfully set
up your Etsy shop, nested xy digital listing, and ultimately become
a post baby cry. Tell me if this is
you use someone that wants to start making
your passion into cells. You want to learn
this central secrets in becoming successful
on Etsy and D, What's increase clicks,
engagement and cells and Etsy? If yes, then this course
is perfect for you. Hi again, I'm
Olivia and I've had a few successful see
shops where I sell digital products and make a
steady income every month. And guess what, you can take. So I'll be your Etsy
guru for this course. But I'm also digital
clutter in Theseus, a Canva expert and the digital
channel product creator. By the end of this course, you will have learned
Etsy is best practices. How to find product
inspiration ideas, how to create an
Etsy business plan. You'll learn a bit about
SEO and keyword research, how to set up yet C-sharp. And as a bonus section on ways
to promote your Etsy shop. So quickly, what you'll need for this course is access to Canva, Google Docs and sheets. You need access to the Internet
and laptop or desktop. And also the tenacity to learn. This course also includes free digital downloads that will help you in your Etsy
business journey. Included in the downloads
or an Etsy business plan. Competitor analysis worksheet, a keyword research worksheet, budget and income sheet, and Etsy listing
description worksheet, Etsy listing template. And lastly, thanks
for staying a spar. Remember to complete
your class project. All the info is in
the section below. You also will get a discount
30% off to my panelists. I could phosphate course
where if you're looking to create digital planners
and sell them, let's see if this course
is definitely for you. And don't forget to
check out our website, which is digital
creations to come back at Beth advice and Etsy SEO and there are lots
of free resources. So once again, thank you.
2. What is Etsy: So what exactly is Etsy? An FCC own words? It states, Etsy is the global marketplace for
unique and creative goods. It's home to a
universe of special, extraordinary items, from unique handcrafted
pieces to vintage treasures. So to summarize that, Etsy is a online
marketplace that allows small businesses to sell the special items that you
won't find anywhere else. So what can you sell on Etsy? You can sell anything from
handmade items like jewelry, personalized items such as
Marx glosses and home decor. Vintage items like
home deco again, jewelry things and typewriters, and craft supplies like beads, gemstones for begins
knitting patterns. Digital items. This is the category
that we love. In this category you can
sell principles, trackers, planners, digital artwork, digital stickers, and
digital planners. So what I'm gonna do now is
I'm just going to show you a quick little demo
of the interface. Hair. At the top. We've got some categories. Because we're coming
up to Valentine's Day. Etsy has smartly put a
category for Valentine's Day. We've got jewelry
and accessories, clothing and cheese,
home and living. But in parties, toys and
Taemin, art, collectables, craft supplies, gift cards
and gifts and gift cards. We've also got some
further categories, hair. And then Etsy algorithm has picked up what I've
previously, Let's tap. So I've looked at some bracelets
and some cat pictures. So he's got some bracelets
again because it's picked up that that's
what I'm interested in. Then you've got this part. We can browse collections
for more inspiration. Stuff around Valentine's Day. This part is like
home, home favorites. You can shop selections
and stuff from their blog. So what I'm gonna
do is I'm going to pick a category and I'm actually going to pick brace
and charm bracelets. And at the top here, it shows us the bread
crumbs of how they got. So charm bracelet. So we went to all jewelry,
bracelets, charm bracelets. And terrorists States how
many of the products that we, Harris States how many of
the products have ads? So there are 250,000
results with ads. You can shop by interests
with the brace sets. So they've got all these
different categories and traveling cats, dogs. And then here is
where we get to see all the lovely charm bracelets. See at the top. Usually they are ads. As you can see, this is at, at, by an umbrella
jewelry at, at, at. Scroll down a bit
more more brace. And that's just essentially the the picture or the bracelet, the title, reviews, price, and the name of the seller. So let's click this bracelet. Hair will. Let me. Okay. Hey, say this is the gold burst stone
and initial bracelet. They've got a lose of keywords
and that's high Tool. Hand, left hand side
is the product photos. So you've got a selection of different photos.
You've got their price. And this is a physical product. So stay in the
estimated delivery of you's going to order today or combat in life to dissent for February and out
slowly in a few days. Because it's a
personalized products. You have some options. So you can change the
buffer zone to your liking. And at an initial, here we got some reviews, 9,000.295 thousand reviews
live in say that right. So 9,295 years. Yeah. A lot of reviews. And so they got some
reviews for this item. But you can also look for
reviews from the shop as well. On the right-hand
side here we've got the product details. You can click this button
here to learn more on it. They order the details that you need to know
about the product. Will say if you wanted to find
out more about the seller, he could click on the name. And it will take you
to their Etsy shop. You can see here they're
based in Manchester, England. They've got, well,
they've had 68,000 cells. The announcement. And you can have a look
at all the products that they are currently selling. Slaves of different products. They've got 100
products altogether. Okay. That was a quick
little demo of Etsy. And some of the
key things that I personally like about it is
that it's user-friendly. As you can see. It's
very intuitive. The algorithms know what
you're looking for. What you want, is easy to use and the design is
simple as well. Okay, so that was
it for this section and I'll catch you
in the next one.
3. What are Etsy's Policies?: In this section,
we are going to be looking at Etsy is policies. Ensuring that you follow
these policies is very, very important if you don't want to be banned
from selling on Etsy to Keith three fc policies or what cannot be sold in xy, managing your Etsy shop, and privacy and data protection. So what can you
not sell on Etsy? So number one, prohibited items, and this includes alcohol, drugs, new content, dangerous
and hazardous products. The other thing
that cannot be sold an Etsy is providing a service. You are unable to provide a writing or designing services, modification and repair
services or rental services. Those are not allowed
to be solved an Etsy. And the last thing
that cannot be sold, an Fc is reselling. So what this means is
that you can't sell an item that you did not make. So the next part of his policies is managing
your Etsy shop. So you must comply with
policy around this section. So this includes
providing honest, accurate information to FC. And in your about section is ensure that
your shop content, such as any texts, photos, or videos, used
to represent yourself, your shop or your listing
abides by Cs policy. Ed to accurately
represent your items. In listings and photos. You cannot create any
duplicate, any duplicate shops. So the reason why
this part is in this section is because
it prevents people from, for manipulating clicks are
cells of their products, for the purpose of manipulating the search of their product. And lastly, you must represent the intellectual
property of others. Again, say the next part
is data protection. So states that you are responsible for protecting
the personal information. You must comply with
the legal requirements. So this could also
depend on the countries such as Europe with GDPR is be mindful of persons,
personal information. So e.g. you can't be
messaging someone about your your customer's
personal details.
4. What are Etsy's Fees?: Okay. In this section, we are going to be looking
at some of these fees. It is central to know
about the fees on Etsy as you don't want any nasty surprises
when you make a cell. So there are three
main Etsy fees that you need to be aware of. The first one is listing fees. So essentially, you'll
be charged around $0.20 for each item that
you list on Etsy to sell. And don't worry, I will
take you free this feature when we start
setting up your Etsy shop. The next phase is
transaction fees. So when you make a cell for FC, you'll be charged 6.5 per
cent of the listing of price. So if you're setting
from the US or Canada, the transaction fee will
not include sells fees. So that's something to
be aware of if you're from the US or Canada. And lastly, off-site at Phase C purchases offsite space on Google and other search
engines and social media. If a customer purchases your
item via the Fc of SIADH, you will pay a 12 to 15%
transaction fee for that. Yeah. There are a few fees. And if you want to
start selling on Etsy, looking at these fees fast is something that he
needs to do because you need to be sure that it's
warfare that you make profit at the end of the day before you make your decision
to start sending. Let's see.
5. Where to Find Inspo?: Finding inspiration. So the first step and create digital planners, It's
finding inspiration. You need to figure out what sort of digital pen
is used to create. What is the desired
going to look like? What are my key features? And just try and
generate some ideas on what sort of digital
patterns we want to create. My startup for ten, less. Finding inspiration is
Pinterest and Google. So I'm going to head
over to Pinterest. And in the search bar, I have put digital
planner design. And then pinterest
has pulled up. So Digital Pattern Design. And it's just the case
of having a look at the signs seamless out there. There's lots of digital
patterns. One head. When digital stickers hair. Again, digital
patterns designs on. Pinterest also has a lot of free tutorials and how to
create digital pattern. If you're still unsure and how to create
digital planners. Pinterest is a good place to
start if you want to learn. But yes, it just
have a look to see what designs are out there and just try and get some
ideas and you can save them to your
Pinterest board. Okay, so the next place
I like to go to is Etsy. And in the search bar, I've just put digital
planner and it's pulled up thousands
of digital products is a key place to go
because you can have a look at your competition
and see what they are doing. Say let's click on this one and just take out
their digital plotter. Say they've got this pot head. And the digital planners got an index page
with hyperlinks. They've got 20 plan of covers, which is quite cool. And just have a look
at the product pages. So they've got mood
tracker, gratitude page, monthly calendar, weekly
planning, flexion budget. Just kinda see what
they're doing. And then kind of make to see what
they're doing and then make yours better. So have a look at the key
features and try and see if you can make yours better than
their digital planner. Something that I do. Okay, So that's close this down. And then let's have
a look at Google. I've just again, just
put digital planner in the search bar and
I've gone to images. And as you can see,
there's lots of designs. Can just getting some ideas, engage in on what sort of
digital planner you can create. The layout, colors, key
features, what scrap it. Just getting some AI is down. So fat was my start at the
ten for finding inspiration. But digital planners, It's
Pinterest and Google.
6. How to Decide Which Digital Planner to Create: How to decide what digital
planner to create. So I haven't less
of ways to help you decide on what
digital pen and Sikri. Let's start with trends. So one way that will help
you to decide on what digital planning to create is to find out what is
currently popular. You can do this by searching for digital planners and kind of
figure out what is trending, what colors and fonts a popular one place I like
to go to is Pinterest. Pinterest is really good
for finding out what colors Peter at the moment. So what I've done
is I've searched for color palette
in the search bar. And it brought up some
popular color palettes. People have been searching for. The main minutes pastel colors. These are very popular
at the moment. Pesto, and this could be
because we're going in spring of spring colors. But you can also type in the search bar aesthetic
color palette. And it will show you some
color palettes as well. Fat people have been searching for aesthetic color palette, which is kind of popular
currently as well. So Pinterest is
really, really good. I think I've emphasized
a lot already, but yeah, Pinterest is my go-to. Okay, so now popular designs. What T of a popular
design satellite. So kind of gauge a competition. Going back to the
Biden inspect video, when we look to see what were the most popular
digital planners, what do they have in common? What were the key features
that was similar? Just have a look
to see what people do and what is popular
at that moment. The next one is keywords. So when we search for
digital planners, what are the popular keywords? We can try this out on Etsy. So I'm just going to
type in digital Canada in the search bar. And as you can see, Etsy has brought up some. He was in the drop-down menu
of the search bar, say, digital planner 2023,
digital planner, iPad to two panels,
stickers, digital pen. A template is GoodNotes, digital planner,
ADHD, and so on. So this is a good
way to find out what people are searching
for in the search bar. But we will also
touch on this a bit later on in the class. Okay, so the next point is
to know your limitations. So what I mean here is to understand than time and effort, you wish to create a product. If you don't want to spend
hours or days on a product, then don't create
something fancy. Basically, if you have a full-time job and you only
want to dedicate an hour, that's okay, but
make sure you find something to design
within those limitations. Also, know your abilities. When you first start
creating digital, digital planners, your
ability will not be the best. But that's okay because over
time you'll be a prayer. You should try and set
yourself limits in specific time frames. So e.g. if you're first starting out, you should identify what you can and cannot achieve
in that first instant. Spend a lot of time and
effort creating a product. Which is really hard, because some of us are perfectionist. But your products can
be improved over time. So don't worry, just spend as much time as you can create
inner products and trying not to get it really perfect in the first instincts just
to get it out there. So that was this
section and how to decide what digital
planners create. And I hope that was helpful.
7. How to Find Profitable Digital Planners to Sell: In this section, we'll be
looking at how to find profitable digital
planners to sell it. So the first point that I have
is to research, research. Research, research is key. I cannot stress this enough. There are so many
different free resources out there that can help you find profitable digital
patterns to create and sell. And we'll go through
some of these. So the first point
is etsy search bar. So we've briefly looked at Etsy search bar in
the previous class. However, I will just show you another way to find profits, profitable digital
palettes to sell. So if we just search, one thing that I
like to do is I'd like to go through the alphabet. So a so in the drop-down, we've got digital planner. Adhd is a digital planner, Android's digital
planner and budget. Digital planner
and habit tracker. Might be Digital
Planet black girl, digital pen and bundle. C. Japan to cover this panic
can do to plan a cat. So these are all
things that people are searching for in the
Etsy search bar. So this is a good starting
point to try and figure out what you could create that could potentially
be profitable to sell. The next point that
I have here is e. E rank is really
good Etsy SEO tool that you can use to find
profitable digital planners. So what I'm gonna do is I'm just going to type in
digital planner. In the search bar. Then E right, has got, has brought up some
related searches. And then she can see it shows you what keywords that people are searching for in
relation to digital planner. So what I tend to
look at is the ETC, competition in E rank, say ADHD digital planner. The competition is quite low. So this could be potentially
a good discipline as to create and sell. Digital teacher planner. 2023, digital kind of GoodNotes, map, digital planner,
which she did. Digital planner for ipad, digital budget plan of iPad. Does she talk wedding
planner to all of these? Could potentially
the ones in green, the good digital panel to create some of them we actually saw in
the Etsy search bar. So digital planner, black girl. We saw that in the
budget planner as well in the search bar. Okay, so the next one
is Google Trends. What I have done is I've
searched for Google Trends. Sorry, I search for digital
planner in the search bar. And I've put mine, as United States is
a country that I want to search a
search term under, but you can change it according to your country
that you would like to put United States
down because it's where I get the most
traffic and cells from, even though I'm from the UK. So the date I've put
down is past 12 months. So as you can see, there's
interest over time. It can add the last year. And January is the peak, is the highest because the new year people
start to buy planners. It's got like a sub-region
interests or Hawaii. It's quite high. Then say, I tend to their cat
related queries. You can see here it's got
digital painter 2023, 2023 planner, free
digital parallel 2023. And then it's got how
to make digital punch. So good Mondays, digital
planner, PLR pattern. So this is private
label rights platter. So feel you want to
create a planner where the customer can use that, can modify and customize
it but then sell it on. That's what PLR sense for you, given them the commercial bytes. Keep IP header. Cls, PLO. There's something
about teachers. Can the digital planner. But you can also say as well. So let's do like this. Hi, I'm nine of the
past seven days. What it comes up if e rank
FC digital bullet journal, full focus panel, digital. So you can search on
Google for these ones. If you're unsure, like I'm
unsure what this one means, full focus digital
financial planner. And then we can do past 30
days if there is an HD budget. Yeah, So there's only a few. Google Trends is a
good place to kind of research and the cap, potential search terms that
people are searching for. The public. The public is super,
super useful. I just said digital
planner in the search bar. And I put the United
States again. Then what I tend to do
when I went to find digital pen is to sell right at the bottom
to alphabetical. And just to look at potential digital palace
that I could sell, you can start a free trial with them and it shows you
the search volume. And click wanted to as well. But also you could bring
it back to E rank. Say, let's search for Sacha, something that search for just kinda ADHD. So I've copied the
E rank search bar. C or E rent comes up. So it's got these keywords. For ADHD. Just kinda the competition
is very low, which is good. But also, I will go back to Iraq later on in the
course because you could actually use
these keywords in your Etsy product
description or title, but we'll touch
on that later on. But as you can see,
ADHD, digital planners, good, profitable digital panel that you could create and sell. Okay, so let's head back. Alright, so that was
it for this section. And I'll catch you
in the next one.
8. Creating Your Etsy Business Plan: In this section of the course, we are going to be
focusing on business plan. Having an Etsy business plan is key to your success on Etsy. You need a clear plan. Outline how you plan on achieving on running a
successful business. I've created a high
level business plan that is free with this course. And I'm just going to
take you through it. So I've just divided. So I've created a table and
there's about seven Part, seven rows to the table. And we're going to start
off with owner background. There are some questions
around why you want to run your own digital
products business. What are your main drivers for sine online business or
your hobbies and interests? Do you have any
training and details of future future training courses that you
want to complete. And I've just put that, I want to start an online digital
product business to make extra money and I like to
read and love Harry Potter. No training, but I
plan to take the how to create digital
planners like a boss babe. Then hair is all about
the digital projects, products that you want to sell. So I just put a planner. But the questions are,
what will you sell? Describe this central product
you're going to sell. So maybe it's a certain
type of digital planner, like an ADHD digital panna. Maybe that's the product, That's your main products
that you want to sell. Then the next part is
Objectives and Key. Objectives and goals is key. You could, it's like the
driving force to keep you motivated and getting your
business up and running. And so the question is, what are your objectives and goals for your digital
products business? And I've put, I want
to add at least $1,000 a month selling
to so planners. But yeah, I would have about four to five
objectives and goals. Sort of just one. Say market analysis. Say Who are your audiences, who, what are their
demographics? Who are your competitors? And then describe an overview of the digital products market. I've just put women 21-75,
that's my audience. And they live mainly
in the US strategy. So what we do to
execute your plan, to ensure it says, what methods are
you going to take? Hair I've just put I
will see X amount. So I will sell, sorry. I will sell X amount of digital
planners every month by. So that's what I'm want to do, but how would I execute that? So I've put by by running ads, by per million on Pinterest or other social media platforms. And the workflow organization. So how will your
business operate? What are your product
creation methods? How will you deliver your
products to your customers? What other payment methods? What are your terms and policy? What resources will you use? I've just briefly put I
will work from home during the hours five to seven each day and tend to
three or weekend. I will use Canvas, create
messages, planners. Or we use Etsy,
which will provide me with the resources,
for instance, digital delivery and
payment, sleeve financials. And I've put 200
pounds as my budget. So speaking of budgets, I also created a budget
and income sheet, which will also be
available for download. And hair. In this table here, I've created a budget
little table where the resource that
I've used is Canva, which is 11, 99. And I've also use
creative February curve, which is ten pounds in February because where you
can get graphics and fonts. And I will say I
also run some ads, which was 40 pounds. And then on the income part, I've laid out all of my cells. This is all hypothetical, by the way, this is not real. Real prices are real fees. But we've made, and since cells and the
space of a few days, and this is the price
of the products. And this is how much I've
made of these cells. However, there are fees. Fees are hair, and I've got the gross income of
how much I actually made, which is 158 pounds, 95. Then have this bit is like
a little analysis part where I've put down
the expense amount, which is the 61 pounds 99, and then the income
amount which is 158, 95. My true income is 96 pounds, 96. For selling these planets, which is not too bad even
though this is hypothetical, because this is any null
space of a few days and I've managed to make 100 pounds. So I've also created a competitor
analysis spreadsheet where you can analyze
your competitors. And I think this is really, really good because you can scope out who your competitors are and identify
what they're doing well and what they
could improve on. Once I've selected this
digital planner hair. And this digital planner is created by creative
dream as code. So in this section
here you would just put the name so creative. And they have made
a lot of cells. They have made
around 50,000 cells. Product is the ***** ton of price. The price is two pounds. A Fiverr is on South amendments, and I'm going to
put the true price, which is around six strands. So looking at the products, they've got an index page. They've also got some
digital stickers, and they've got lots of digital
planner covers as well. So that's property, their
main strength index page. Because 20 digital planner weaknesses. I think that their weakness
is that they don't have that many planner pages. So they've just got
these kind of pages is when semen say monthly calendar, weekly planning,
gratitude, new tracker, budget, reflection and notes. That might be their weakness. So you can see some of that
extra pages hair. I think. To say not enough kind of pages. Pages. So you can make more planner
pages and they're, the design is not. It's pretty simple. It's just the planet curve is
just the same essentially, but the colors are different. Say that could be
some ink as well. So it design planner,
Very simple. That's a few
weaknesses that I've identified that there's
not enough pan of pages. Maybe you could add some
more fun planner pages. Like maybe some
worksheets will make some fun self-care pages. And the design of the
planet is very simple. So maybe you can try and make your swatches panel
more engaging. And having those
extra planner covers, you could make them different. Make them extremely different from the rest of
the other planner. Cup is instead of just
changing the color. So, yeah, so that's just my
observation of fat products. But this is really good, the competitor analysis, because like I said
before, it's good, is a good way to kind of analyze your competitors and
just really delve deep in what you could do to create even better digital
planner than your competitor. Okay, so that was
this section we looked at competitor analysis, budget and income spreadsheet, and Etsy business plan. So I will catch you
in the next one.
9. What Platforms to Use to Create Digital Planners: In this section,
we'll be looking at ways to create digital planners, but mainly focusing
on how you'll go about digital panel creation. Okay, so we need to understand how you'll create
your digital planners, what platform you use, and the additional
resources that you need. Something that you need
to consider before creating digital
planners is the how, how are you going to create
your digital predators? What platform are
you going to use? The think about how much
you want to spend on this platform and whether you need training
on how to use it. If there are any free
courses you could take? Or what is your budget for a
paid course or two, maybe. So in this part, I will take you through four different platforms that are best for creating
digital planners, especially when
you're a beginner. So all these platforms, I'll be taking you
through either free or affordable to use. The platform or website is really good for
creators to patters. And I am slightly biased. I will visit, but it's Canva. That's because Kappa is amazing. It has everything he needs
for create digital patterns. It's literally by go-to
and it's free to use. However, there is a, there
is a paid version cover Pro, but it's only 11, 99 a month. But they have loads of different elements
that you could use. Laser different shapes.
You can add your own, you can upload your own images. It's super easy,
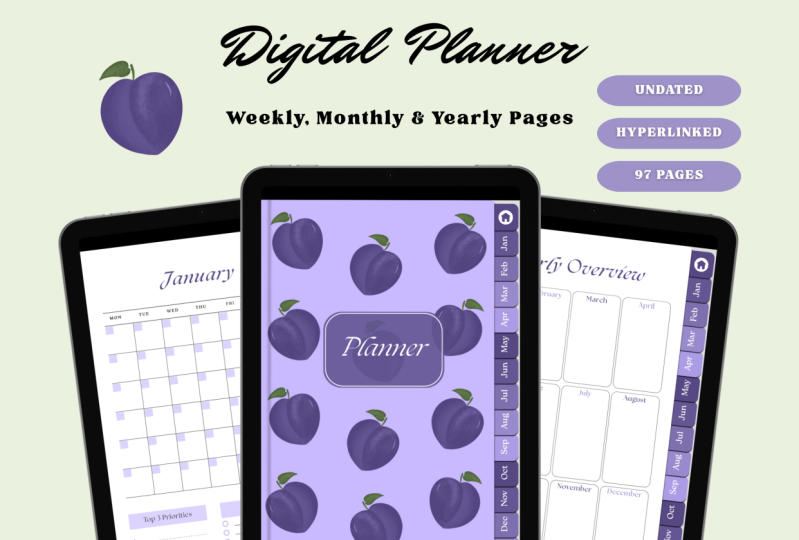
super user-friendly, and perfect for beginners. This digital planner right here, I created in the
digital planner course using Canva tips and tricks. If you want to know how
I created this panel. But Canvas is really easy. You can hyperlink
your tabs as well. And you can hyperlink
if you will, is create index page. You can hyperlink that. I think the AT khan
Really with Canva is that you can create up
to 200 pages per design. But you can use a third party merger to
merge two pages together. So you can create 200 pages and this desire and then
create another design. Download both of those designs, then merge them together. So that's an option. But Canva, It's
really easy to use, as I keep mentioning, and it's free to use some
of the elements of free. Say by typing, let
me type in flower. And you can change the size to free pie
filters and Hara, the free graphics that you can use for your
digital planner. So fat was Canva, and the next one is PowerPoint. Go into PowerPoint. So it's
the same digital planner. And palpate is for all users with access
to Microsoft Office. You can use it on any device, whether Apple or Android. But create digits partners. Again, using PowerPoint
is really easy to use. Particularly if you're familiar with Microsoft Office programs. It's not. So you do have to pay. You could ever pay a
subscription for around $8.25 or you can pay with
the onetime purchase of 399. But this is, concludes the
whole of Microsoft Office, not just palpate,
so it cleaves Word, excel and so on. But it can, palpate, has lots of different shapes. You can upload your graph it. You can hyperlink. I tend to use PowerPoint to create my
tabs. The hyperlinks. Also use it to add shadows. With my tabs and pages. You can also use it to
create planner rings. So these brings his hair. I've taught it before. It comes out really,
really nicely. And there's lots of
easy tools to help with alignment and fat palpate. I really, really recommend. Say the next one is keynotes. Just taping keynotes. Kinase is probably one of the most popular software to use to create digital planners. I think digital planner
create is tend to use keynotes on their iPad
versus their desktop. It is an apple program which
comes with any Apple device, and this is free. It's similar to PowerPoint
because they both use software
applications created for making presentation slides. It essentially has the
same functions. For me. Personally, it did take some
getting used to I oh, I see. I am Apple user. I have a MacBook Pro and iPad. But for me, I use
PowerPoint more frequently, not just for creating
digital planners, but in my full-time job. So I'm more used to
PowerPoint and then kainate. So it does take some time for
me to adjust to keynotes. But you can do the same thing, agile in graphics,
fonts as well. You can add your own fonts. So when you upload your
fonts to your computer, it will automatically
be struck down part. You can, it's good for
alignment to add shadows. You can hyperlink. Your leg, can hyperlink your tabs and
your index page as well. Shapes. Shapes that it has that many shapes as
palpate, I will say. Can add your graphics
and this part here. But yeah, it does get some getting used to if you're
not used to Keynote. But once you do it, it's pretty simple to use. So the next one I'll be
showing you is Google Slides. Google Slides is one of the most straightforward
programs to use when creating
digital planners. It's, again, very easy to
use entirely user-friendly. You do not need to pay or install Google slides
onto your device. Both Android and Apple
users can use slides. However, there are
some drawbacks. And Google Slides or it
lacks features and tools, which is seafood way. You can add effects and shadows. You can't import your foot. You can import graphics. If you go here, you
can upload graphics. It doesn't have
that many shapes. It has the shapes that you
would need for the tabs and for created your
dishes parallel lines. Boxes, like it has lines, doesn't have that
many elements in it. It's quite hard to align your objects as
well that I found. And you're kind of
stuck to the fonts. That they have, the Google free Google fonts that
they have hair. But even though it
has some limitations, it is a great program to use if you are a beginner and you want some big free
and just looking to create simple digital designs. My top four platform sees when
creating digital planners, especially when
you're a beginner. So there are other ones
like Adobe InDesign, Adobe publisher that
those ones needs, you would need training for. And if you want something to, if you want to learn quickly and how it's created
as planners using an easy platform that's
affordable as well or free, then I recommend these four
platforms in front of you, kava, PowerPoint, Keynote,
and Google Slides.
10. Creating Templates is Key!: The one thing that
is a must in your, in any digital product
business or templates. Templates are literary life. I use templates daily, whether it's for
my full-time job or for my digital
planner business. And Harrisburg reasons
why templates are key to your success in the
digital plateau or digital product business. Firstly, it will save you
so much time by having a set of templates available to your everyday business needs. It will help you
streamline your brand by keeping the flow smooth
and well organized. Also, helping customers
identify your brand with ease. It will help you to create lots of variations of a
digital products are. Having a set of templates helps you create different
patterns each time. This leads me on to having the ability to create
unique due to planets. Now that you've, you've created some digital
planet templates, you can spend more time
defining or really creating unique digital planners using the templates
as your basis. And lastly, you can focus your time elsewhere
in your business. Because having template save you a lot of digital
planner creation time, you can now focus at time on other aspects of your
business. So e.g. marketing, maybe
you want to spend some time marketing
your digital planners, or maybe you want to
build an email list. And she needs some
extra time to do this. Now having some templates, this allows you the time. So this, so this leads to this kind of entwined with
the first point, saves time. By saving time Laozi to focus on other aspects
of your business. And also you can
use templates for basically anything in terms of your digital or digital
products business. You could use it for mockup
images of your products. Your product
description templates. You can create pay bid nodes sent to your customer templates, Email Templates,
social media posts, templates, Pinterest and
pays, the list goes on. So as you can see, there are many templates. You can create a news multiple
times for your business. What I'm gonna do is
I'm going to show you just a quick demo of how to transform a simple
plot, a template. So I've got a cadenza
template hair into this Hawaii template
using Canva. So the first thing I'm gonna do is I'm going to change the font. I'm going to vertex, go to this drop down. And I'm going to use
an uploaded font, which is baby girl regular. And then I'm going to click Change all because
I want to change all of their Alice fun
to Baby Go regular. And now it's changed
across all of my design. The next thing I'm
gonna do is I want to add some elements to my design. I'm going to use some
cute Hawaii graphics. Sydney's this rainbow
graphic up here. Rotate it around. Then I am going to pick
this star right here. These are all free graphics
that you could use in Canada. Then I'm screwed
to duplicate it. And then I'm just
going to add some more of these
graphics would head. And I'm going to add
another one hair. Then I'm going to add the
strawberry graphic and paste. Rotate it. Paste it there. Okay, so next what I'm gonna
do is I'm just going to change the color of the boxes. So I'm gonna change it
to this light yellow. And I want to get
rid of the border. Say I've gone to these lines and click this to get
rid of the border. Now, I want to change
the color of these. Let's cut it up boxes say I want to change it to this
light pink color hair. No, I thought it's
just clicks on this shape to this color. Paddle bit hair, and
select the color. And then I'm just
going to do same. Actually what I'm gonna
do is I'm going to ungroup this and I'm going to delete all the
other boxes like so. Click this box. I want to get rid of the border. Get rid of the border again
off the little square. And then I'm going to highlight all of the boxes together. Go over to the three
dots and press Group, and then duplicate
it seven times. So that's 12456. I've got seven. And then highlight
all the boxes. Guys position, make sure
it's nice and tidy. And then let's group. And now I've groups these
boxes together and I can delete these ones. And then just duplicate boxes. And then again, just highlight what says Press
position and tidy up. So it's nice to
in-group together. And then I'm just going
to bring the graphics up to the top front. This one, Bring to Front. Then now I'm just
going to change the color of these boxes hair. My could do is I can
actually delete it, get rid of these excess, and then change the
color of the last box to yellow and get
rid of the border. There we go. We have created cat into a
Kowalski calendar template, and we use that basic template and created something
fun and colorful. And it took less
than 5 min to do. That is the benefits
of having templates. Like I said before, they are key to your success in the
digital planner business.
11. Outsourcing for Fonts and Graphics: So one thing to think
about when creating digital planners
is where are you going to get your
graphics and fonts from? Yes, you can use Canvas free
graphics for commercial use. However, you want to set
yourself apart from the rest. And by outsourcing for
your graphics on and even for your planner or digital panel templates
can help to achieve that. So here're a few or four
different platforms that you can use to get
graphics, fonts and templates. So the first one is
creative for brca, which is my go-to place to
get graphics and fonts. It's extremely affordable. At the moment. They have a yearly access for only 59 pounds and that's
equivalent to four pounds, 99 a month, which is
super, super good. But they have lots
of different font. So let's just click
script fonts. And then it brings
up thousands of fun that you could use for
your digital planners. One good thing about creative
February career as well, is that all their fonts and graphics or include
commercial licensing. So what this means is that
you could use this font on your products and sell it on because it's giving you
the license to do so. Let's have a look at
some of their graphics. So I'm just going to
click the graph it. And they've got a whole
bunch of graphics. Again. They've got over 6
million graphics available to choose from. But also a really, really, really good thing about
creative for Pre-K as well, is that they have
free resources. They have free fonts,
free graphics, free templates for free,
for commercial use. So you don't even need
to buy bonds or graphic. If you choose not to. It's up to you if
you want to or not. But there are free options
within creative fabric, which is really, really good. It's just having a look to
see what kind of catches your eye and what you can
use for your issue subpoena. You can also get plotted
templates as well. So if I just search
panel and play, they didn't want to
be creating tannins. You can download
a planet template that catches your eye
from creative February. And this one's Tampa. So you can get the camp. Once you've downloaded this, you can get the Canvas
link for this plotter, this weight-loss planner,
and then make it your own. It's pretty cool and saves
you a lot of time as well. If you don't want to be
creating a digital planners. It's a platform that I
like to use is Etsy. Etsy is a good place to get on graphics and also
templates as well. Hair or if he template,
click on this one. It's come to fast forward. So it's a bundle. And you just need to ensure that you can use it for
commercial use. So here we go, since this font can be used
for commercial purposes, you also have graphic, flower and templates as well, so they probably have
Canva templates. Next is quite a lot
to choose from. The planet templates that
you can use on Canvas, but you can also just have a normal panel
templates as well. You don't need to
upload or you don't need to use on Canva. Let's have a look
at the next one, which is Creative Market. And Creative Market
is more tailored, I would say it falls
professionals. So it does mean that
the price is a bit more expensive than Etsy
or creative for brca. However, you can still find
some really cute gems. Affordable Jens, should I say? Let's have a look
at the graphic. You can just click this one, the modern Gallery. This one's $39. And they had
different licensing. So personal uses by nine
daughters and commercial use. For commercial use, you
can use that graphic on a product and then
sell it on slightly more. So it's $10 more than
personal use. So it's $49. So it depends on how
much you're willing to spend on graphics, really. But I will say it's real
high-quality stuff that you get the Creative Market more
say than creative paprika. They gave me wrong
created for brca is really, really good. But sometimes I have gotten stuff now which are
not that great. But with Creative Market, you can ensure that the stuff that's on it
is really top tier. So that's why the price is a bit more than
creative February. And they also have a
lot more stuff as well. And creative for
brca, say the fonts. Again, they have loads
of different fonts. Just make sure that if you're buying a font or graphic
that it's commercial use. And they also have
planner, template, panda, a fitness trainer, wedding planner,
self-care planner. There's all different
plans templates. So the next platform
that you could use to outsource for
graphics is Fiverr. You could get someone else. Basically, you can pay someone else to
create your graphics, fonts or even your
whole digital panel. There are lots of
graphic designers. And if I type in planner, K, No, no, I graphic designer. So there are a lot of graphic
designers on Fiverr is just a matter of finding a suitable graphic designer
that can tell us your needs. I can create graphics, looking for maybe digital
planner creation if I type in digital, show. Lot of stuff, see, yeah, so there are people
out there that will create your digital
planner for you. Which could be quite good
if you don't want to spend time creating digital
planners, you can get, you can pay someone to create
digital planners for you or digital stickers for you. So there are loads.
There's there's yeah, there's lots of options
out there for you. Really, if you want to
outsource your graphics, which I hundred percent
think that you should say. Because like I said before, it will help you set yourself
apart from the rest. So that was that section and I'll catch you in the next one.
12. Build Your Product Base!: Bill jaw, product-based. This is essential if
you want to reach as many customers as possible or sell more digital planners. But also to get, ETC, to notice you. Yeah, absolutely
loves active sellers, actively engaging
on their platform. Once you've created
your first product, keep going until you've created at least ten digital products
that you can sell on Etsy. But don't stop there. Unless you're wondering The
Lucky minorities that does extremely well from the
get-go and you're earning thousands a month with
those ten products. If you're not one of
these minorities, then continuously build
your product base even if you have no cells. Consistency is key when selling digital products or
digital planners and Etsy. However, you need lots of
high-quality digital products. Don't escape from this box. It has to be high-quality. And this is achievable, especially when you sell different variations
of the same products. Sample. Changing the color
of the products or planner, or the size of the product. Maybe it's your sudden
it as a US letter size, one listing, but on the other you're sending
it as an A4 size. But once you start selling consistently on Etsy and
have your bestsellers, you'll then be
able to gauge what works well and eventually slow down the number of
digital products or planners you create
to sell on Etsy.
13. SE0 & Keyword Research: In this part of the course, I'll be going through SCO
and keyword research. What is SEO? Seo stands for search
engine optimization is the process of getting
organic search engine traffic. In the case of Etsy, having a good SEO in your product description,
title, tags, and your overall Etsy shop, or improve your products and your whole shops position in
the search results pages. What this means is
that you'll have a greater chance of getting
your products being seen. One of the ways to improve your Etsy SEO is to
incorporate relevant keywords. Live a good search
traffic potential. We've briefly touched
on keywords already, but essentially
they are worse at customers use in the search bar. There are two types of keywords. So the first one being
short tail keywords. And they're usually no
more than three words. Say e.g. digital planner. That's a short tail keywords. However, more specific keywords are called long tail keywords, which could be something
like Buddy, self-care. Digital. Cities see the difference
between the two. Digital pad and bunny,
self-care digital plotter. Long-tail keywords are
more prolonged, specific, closer to what the
customers are looking for, and closer to the
point of purchase. Short tail keywords
like digital planner, a broader and less specific. Okay, so now that
you've understood SEO and keywords, the
following videos, I'll be taking you for
a house of finding relevant keywords for
your digital plateau or your digital products.
14. How to Find Relevant Keywords: In this part, we'll be
looking at how to find relevant keywords for your
digital panel or products. We briefly touched
on ways to find profitable digital
planners to sell. And it's really
interludes with finding relevant keywords as to find profitable digital
planners to sell. You're looking for keywords. I'm pair in the Etsy search bar or on Pinterest and Google. But now we are going to go into a deep dive into
keyword researching. But before we do that, I just wanted to note
that there are a few handy keyword researching
or SEO websites, specifically for
Etsy, that you can use to help you find relevant
keywords for your products. So we've got E rank, Etsy haunt, mom and lead the
Laura collude Lambda. And for this video, I'll be using E, right, which is free to use all the others you
have to pay at a rank. Let's say you have a
paid version as well. But I tend to just stick to the free version because
it really meets my needs. Before we get into e rank, I just wanted to
show you my planner. So this is, this is my scenario. Basically, I have researched
the digital market and found that when she
planners are profitable Local, local petition digital products
to start selling on Etsy. I've created a pretty basic
witchy theme digital panel. Yeah, so it's pretty basic. And if you do want to
create a witchy planner, then I would research
a bit further. And what that entails. Things to include
in a witchy planner is like a tarot card. Plotter. Page and moon phases
pages and spells planner pages really have a research of what that entails. So don't copy me,
but you will get this planner for free as well. I finished the final products of my witchy planner
and I'm ready to take the first necessary
steps to list it onto Etsy. But before I do that, I need to reception keywords. So what I'm going to
do is head over to E. This is E rank at the moment. This is what it looks like. I have the free version. And I'm just going to go into the search bar
here and just type in which she panel. And you can see, the first thing you can
see is witchy planner. The average searches. It's green, everything's green, which is what we like. So every searches is 1207, average clicks is 1,254. So clicks is how it
shows you per month how many people click on that page when searching
for that keyword on Etsy. And then this is clicks ratio. Yeah, this is the ratio
of clicks a searches. And this is the
ETC, competition. So competition shows you how many of your competitors are using the keyword to rank. We have a few keywords, hairs we have,
which she Planner, which is digital planner, which he planners, stickers
which you plan and printable. Digital planner, Witchy Witch, GoodNotes pan out,
which he planted kit. We've got a few good keywords. So I've also created a really high-level
keywords research table. And what I'm gonna do is
I'm going to fill this out. So I'm going to put in witchy
to Anna in my short tail. And the clicks for this was 1.2. Let's just put 1,200. And competition was just
round it up to 6,700. Witchy digital planner is another good key words
and that's a long tau. So let's type in Ritchie. She digital piano. It might show me the
clicks because I have the the free version,
but that's fine. So the competition is
T. Chief thousand 200. And witchy planners
stickers say, if you're going to
say if I wanted to create stickers with
which you've kinda, I could this too
cheap Hannah stickers and competitions around 300. And then we got tissue
to plan of which she came out she didn't she This one's thousand 200. Right cheek. Good news. Panna. Maybe didn't. Goodnight. Goodnight says in nap that you can use
on an Apple device, and it's a note-taking app. With that app, you can
upload digital pan is ten. Then you can use
such as kinda on the app, typing the competition. So it's 644. Okay? So we've got those keywords. Sometimes what I like to see, so X6 click on keyword
as well. It does. You can see the
amount of clicks. And it just goes into
a little bit more of a deep dive into that keyword. But we've only got two
keywords out of that. But if you wanted to find out the clicks, you
just click on it. But there is a quota
of five searches. Five searches. So I've
already done two. I can only do three
more searches. This is just with
the free version. So okay, so we've got
some key words here. Another thing that I like
to do is I like to go on to C. And what I'm gonna do is
I'm going to type in ci. See what comes up. I might have to change it
to which she digital plan. Okay. So I wouldn't get,
but actually pan out. So let's click on this
one because this one's on the first page,
right at the top. Then what I like to do, well, I like to analyze
the title fast. So they've got with cheaters
Japan, a dark mood. Free terror, stickers, modern Mitch Mayne
rituals, which journal? So these are quiet
kid key words. I mean, choose which channel. And then if you scroll
down right to the bottom, you can see some more keywords. So they've got main magic. Magic, Full Moon, Ritual, chile, long tail, carrot, channel, night. Let's put it there. No modern mistake. Next step. Okay, so we've got some more key was obviously a soft
light moon ritual, main magic towel journal. These things actually have to be included in your
planner as well. But for my planner,
like I said before, it's just a basic witchy
digital planners. It's really incorporate any of the witchy elements
stuff that's come out. That this one say you didn't just stop
there with one which she planner you would continue
for each planners on ETC1, not all of them, but the
ones that catches your eye. And that's on the
first page of Etsy. And they have a lot of reviews and they're the best
seller and popular. So I'll have a look through
each of them just to gather the keywords that
they use in the title, even in the description. And like I showed you the related keywords right
at the bottom of the page. So another thing
that you could also do is some woman says, I'm going to click
on this panel again. And I'm going to do
this one, this one. And let's do another one. Lsd. In this one. I've got full hair. Just bring this Abraham. So E rank is actually a very good tool where
you can compare listings. And I can put a URL
into this part here. Each of these digital planners, It's just pacing the
URL and that part. And then press compare. This one says emphatic listing. So what it does is it
compares those digital, witchy digital planners that I selected for some reason
this one is embarrassed, but then it shows
you the daily views. Total views are less than age, total amount of hearts, quantity available,
an image count. And then also you can the cat there keywords that they
are currently ranking for. Okay, So this plan ahead has got some keywords and
that will read. But these two, they have a few key words and then
highlight it green. So I am going to take these
keyless, say, good night. And I think we've
got these ones. Let me just check. Okay, So we have
modern which panna? Hoops? I might take? Cough planner. Yeah, So I'm gonna take
golf Pana and go sit. Hi there as well. Oh gosh, I given d and I've got so many tabs open. For now. We've got a good variety
of different keywords. So we've got some short tail, got some long-tail key. Okay? So I'm going to stop
that here for now. But say this was this section on how to find relevant keywords
for your product. I hope that was useful
and you can now find benefit keywords fill digital planner or
your digital products. And I'll catch you
in the next one.
15. How to Set Up Your Etsy Shop: Okay, so now we're getting to
the fun part of the course. In this section, I'll be guiding you through how to set
up your Etsy shop. How to set up your Etsy shop? Here are the steps you need to take in order for you to
set up your Etsy shop. So the first one
being shot manager. So once you've logged in to your Etsy count is
select shop manager. But don't worry, I
will show you this. The next step is
naming your shop. Then it's setting
up your billing. So make sure you have your
bank details to hand. Setting up your shop
security, so your password, etc, and then start
stocking up your shop. So adding listings to your shop. Those are the key steps in how
you set up your Etsy shop. Okay, so let's actually
do all this stuff. I'm going to do same. I'm on a moment. I'm just going to click sign in and sign in using
my Etsy account. So now that I've signed in, I am going to head
over to shop manager. And now I need to name my shop. So as mentioned, head don't
sweat it because you can change the name of your shop as many times as you
want it to be honest. And I'm just going
to type in pretty pretty that is, go one-by-one. That's already taken. An African me some
options here so I can do pretty to C to D. Okay, let's stick to this one. Critique. Digital GB. Say I'm going to save
and continue that. And then here you want to
see how you'll get paid. For tax purposes. You can set if your
individual or your business. He said hair may sell us on
Etsy fall into this category. And then just fill out the
tell us a bit about yourself, your tax address, and
your bank details. So I'm going to do
this off screen. Alright, so once you set up
your billing information, the next step is
your shop security. And here you just set up your
two-factor authentication. So just select an option,
our text message, phone or on the desiccator. I pronounced that correctly. So what I'm gonna do
is I'm going to select text message, press Continue. So here I'm on the set up two-factor
authentication via SMS. So just putting
your phone number and click send a code editor. The code will come to your phone and you
just type in hair. Again, I'm just going
to do this off screen. Okay, so then once we set
up our shop security, the next step is to
stock up our shop. We have to add one, at least one listing
to our shop, which I'll show you how
to do in the next part. So I'm just going to
click this just to show you what it looks like. So to create a listing, we need to add photos. You could add a video
if you want to. But the main part is to add
a title about the listing, description, renewal
options, tags, price, quantity, delivery options, and uploading our digital
file in this section. But I will show you this in
the next part of the course. But that was it for this part. And I'll catch you
in the next one.
16. How to Create Etsy Listing Photos: Righty. So now that we
set up her Etsy shop, I'm going to show you how to create images or mock-ups for your listings, say formulas. The first is I'm going to
download my witchy planner. So we click Share,
go to downloads. And then I want to
download it as a PNG file. And then I'm going to click
Download is just downloading. Okay, so once that downloads, but I'm going to do is I'm
going to head over here. And I've essentially
already created an Etsy listing
template or template, which will be free
for you to download. But usually the standard
Etsy photo list inside is about 2,600 pixels
times 2000 pixels. And that's the size
that see recommend. And it's a size for
these templates here that I've created. Also quit to note is that
Etsy recommends to use all ten images as this gives you a greater chance for
your products to be seen. Here I've got a whole bunch of image templates
to help showcase. Digital planner. Lots of different template. It's about 17 templates here. Okay, So now the
witchy digital planner has been downloaded. So I'm just going to open up the zip file and then uploads. Just highlight everything
and drag it into the uploads area and
images being donated. Okay, so now I'm going
to show you how to create images for your
digital planner products. So what we're gonna do
is we're going to start off with the cover image, which is the image that the
customer will see fast. They search for witchy Canada, and then the search area, ETC. They will see this image. I'm going to use this image hair because we've only got
four planner pages. I'm going to get rid of one. Put these ones hair. So I'm going to
meet that one hair. Just me. I'm just maneuver
net because we've got images trying to see. Well, I like, okay, I think that Gucci, let me put up hair and
make this bigger like so. Alright, so I'm gonna
do is I'm just going to drag the photo into the iPad. Say, and going to change this to the
ultimate glitch. She did, she took Canada, I'm gonna get credit for you. Hey, you can just put a
couple of its features, say what size it is. So it's a US letter size. You don't have an A4
size. It's a hyperlink. Tana. Any other info that could
be special, unique. So I'm just going to write
which she, she design. Then I'm going to
change the color of the circle to black color. And then I'm just going
to change the text. And then I'm just going to
change the text to white. Like say, if you wanted to, you could add a graphics. So I search coffee or just searched like stars. Can add some stars. Maybe. Change the color to
match the photo colors. Just duplicate it,
pull it in hair, just add something to the image. Okay, so we've done
the cover page, and let's scroll down and see there's anything else
that we can add. So this is also
another cover page. If he was going to do
a landscape planner, this is something you
could potentially use. This one. You can just
showcase one page. Maybe it's just a cover
page of the planner. Again, just the cover page
of the landscape planner. So if you had loads
of planner pages, I would try and create images of each of the
planner pages if you can. This is what this image is. Hair ball. Yeah, but we don't really
have that many pages, so I'm not going to
use all of them. What I'm gonna do is I'm
going to just delete these and put this hair. Like say, okay, so now
I'm just going to drag and drop images into the iPad. Like so. And then I'm just going
to change tied to the old Smith which she
took planner pages. So head this is where I
would put a pan of pages. They all say if you've
got a section that's on. So in terms of the
witchy digital planner, if you got a section
that's on spells, you can just put take he can just put take
take a peek head, then just make that big peak. And then you can put some
important information here. Say hi, Something like that. So again, I don't
have any spell pages, but I've just put that as its own posts and
imagine that these were actually spell pages
in this section here. And if you have like
a spell page cover, you can add that there and then maybe add some
stuff around it. So like if there's a
spill page section, you can write organized. You spell knees that you can add up. And maybe at a box around it. Changed the color to
black and just change to find y. Oh good. I she spells with ease. This something like that. And then okay, So then we've
got some other pages hair. So this is where
you can showcase the actual planner pages. So just gonna change this to the ultimate
glitchy digital panel. We can put a daily
planner weekly. Hadn't. You can
just write right? Your daily schedule for the week ahead. And denies your eyes. Monthly. Monthly goals. So again, these are just ideas
that can help you with your Etsy photos for
your digital planner. And then again, so this is
just showcasing planner pages. Hair is where you can
highlight the key features. So high link. Let's just put what she she design through out. And then you can put
like how many pages. So we've got four pages. But let's just imagine
that you have like 100 pages, 100 planner pages. So let's put 50, the pan of pages. And then here we can
put her linked tabs. Hello. And we can put
another key feature. Like if we had an index page, maybe you can put index
page for easy trends. Session. Index page
for easy transition. If we had an index
page, the old Smith, which you should panda. And then again, this is just
incorporating key features. So if you have like a bonus, so we had a freebie, you could add it here. We have some stickers
that the customer get for free when they
put bio products, you can highlight your
digital stickers hair. Then this part is pretty
important because you're showcasing that you can use a digital planner
on any device. So let's just drag images. Which panel? On any device and then any important information like typical. You couldn't do that compatible
with any device. Right? Hand me. On a good night. And good types.
You can find PDF. Pdf file, download that. And then we can write
instant download. These are important features the customer would like to know. Instant download. And then you can
change the color. Change it to the
Scottish color hair. It's changing the size. So we've got that and
then here's hair. So if you are selling most poor, different sizes, then you can include it in this pot hair. A4 US letter A5 size. So make sure that the
customer knows that these sizes are included with your within your digital put up. And then hair. This is probably one of the
most important part as well. So I'm just going to drag, I'm going to track
the image hair. This is this part here. It explains to the customer on what they will get when
they download your product. Say, Hey, you can just
highlight that it's gonna be a digital downloads that
included is free PDF files. No physical products will
be sent out to them. That's important to highlight. So they are aware that
nothing will be sent out is it's all digital. And if you have any
freebies and you can include that in this
pot hair as well. And then this part is just mockup images
that you could use. So what I tend to do
sometimes is I grab the image and try and
fit it in to the iPad. So you pick will try as hard as we can to fit it in. Because I hands in a way
it's kind of annoying. All right. So that's the best I can do. Her hand is in the way, so probably not the
best mockup image. Here again, the
hand is in the way, but let's see if we can try. Yeah. I couldn't sees a
different image because these were not the best. It's on pause. So I'm just going to
type in iPad mockup. We just want one without
someone's hands in the way. Let's use this one. Can it sees a different
one? Maybe this one. Just trying to make
it nice and aligned. Try and get rid of the black. Maneuvering about to try to get as perfect as she possibly can. Good to be here all day. Just stick to that. Alright, so we've managed
to get it some more. Inserted into the iPad. Canvas does have a smart mockup. I'm not sure if it were a
hit and miss for me really. I don't think they
have an iPad as well, but I've just added a page. I copied our image. I'm just select Image and
then goes to Smartmockups. Let's seal. And I'm sure they
didn't have an iPad, but they've got iPhones
and they've got computer. What you do is you click on it. And then the image
will appear inside that computer or iPhone or
whatever image you decided. I think it's working. Yeah, it's working so I can
set all time. Let's go back. See you. Yeah, there you go. We've got our mockup image and not images
embedded into the laptop. If you want to. Canvas not the greatest in terms
of mock-up images. So you do have some and if
you have some free ones. But if you wanted to get really nice professional
ones and I would outsource on like Creative
Market or even at, say, to find one to
get your image really embedded into the mockup image. And mockup images are really
good for Etsy because it, because it helps showcase to
the customer the realism of your digital planner
on an iPad or a, a laptop or phone. It just helps to give them that visual aid
of your products. This page here is
the thank-you page and I'm going to put my
Etsy shop name there. If you have a freebie
or you will people to subscribe to your email list, then you could highlight
this on this page here. If we have a discount code, again, I would
highlight it here. This is the last page
where you can use this opportunity to upsell
additional products. Or two, get people to subscribe
to your email lesson, a call of action. Some care to get people
to do something. And I don't know why this
is changed into this. But sit down, what
I'm going to do. The case say we've got some
of our images for Etsy shop. So what I'm going to
do now is I'm just going to hit Share. Then hit Download. Let's PNG and select
download to download images. In the next part can be shiny. How to write an Etsy product
listing description. So I will catch you
in the next one.
17. How to Write an Etsy Listing Description : In this part of the course, I'll be guiding you
on how to write the perfect Etsy listing
description and title. Okay, So let's get creating
our Etsy listing title. So remember, when we created our keyword research table right here for the
witchy pan out. Well, what we're gonna be doing is we are going to
be using some of these key words to incorporate
in our Etsy listing title. So I'm just going to
pick some keywords. I think once I'm going to pick, so I'm going to start
off with Gothic, which she digital Hannah for. Good night. So I'm not going to
keyword stuff that much. I want to formulate a
sentence and not just coffee and not just
witchy digital planner. Let me show you. So not just doing
something like this, Richie, digital planner. Then the witchy
planners stickers me, show this is keyword stuffing. And as you can see it, it doesn't make any sense. And I've seen a lot of Etsy listings doing
or using this method. Which I mean it's us, it's us worked in its stem. But with Google, it flakes a clear title and
definition of your product. It doesn't like it doesn't like having lots of different keywords that
don't mean anything to you. Digital products. In that sense. If that makes sense,
I'll kind of show you the next thing
I'm going to write. So Gothic, which you could
use a pan off, goodnight. I'm gonna write perfect, cool. Night mode. Which Pana and Jan. No, Modern rich Pana
and journal live. With which she digital stickers. Okay, so I've made my type tool, so it's cuff Gothic, which he did to pan
off, goodnight. Modern, which
planner and journal with which he digital
planners stickers. So this is my title. Obviously, I don't have any digital stickers my
products, but I would, if I'm going to incorporate this last part,
digital stickers, I would definitely have digital stickers in my
products with my product. But it's just a quick and
simple title and I've incorporated some keywords
to this title as well. The next thing now is
we are going to create our Etsy listing description. And I have created and Etsy listing description
templates slash worksheet, which will be free for
you to download on Canva. And we're just going to
follow that template. The first thing that you need to include in the description is something to
draw the reader in. Stop if it's high, sing phrase, sentence
or question. So something like say, you're an every day, which looking to organize spells and mean rituals. Well, your hair is the perfect dish to help you organize
your every day. Which needs or something? Yeah. Every day which needs. Something like
this with the kid. If you are an FHA, which looking to organize your spouse and
mean rituals, well, you're in luck Harris, a perfect which he
digital patterns to help you organize your
everyday needs. This sentence, it draws the reader in
the kind of curious, okay, what is this
digital planner bow? I'm which I need a
digital planner to help me organize my,
my everyday needs. So we've checked that
off on this part. We want to explain what our
digital planner is all about. Use no more than
50 to 100 words to explain what your planner is and what it does and
how it can be used. So the alternate
which she did She to Hannah and we used in Good night. Good night. And no two theta t 0 or any of it. Hey, hey King. Used to digital, which she digital planner. Bailey. Let's incorporate
some keywords as well from our title.
So what have we got? We've got modern which
planner and journal. But where cheetahs
are pattern seekers, Full Moon Ritual, main rituals, me, magic, tariff journal. And I spit it a he's
a witchy digital. Daily. Denies your main rituals. Rituals. Tara. Customize your tissue to heal. Ritchie. Ritchie
digital, Hannah. And spoken as customize your witchy digital planner. Your ****** PDF. This PDF digital planner to what? He please. So what do we have? So we got the
ultimate coffee which she digital planner
can be used in good, Nice, nice ability or any of the Annotate
note-taking app. Use your which he does,
digital planner daily to organize new rituals
and terror cars. Customize your witchy PDF to just pallets of
whatever you please. I think we've got a good variety of keywords and we've
explained what it does. It's a which she did
panel. I'm Hannah. Why does and how it can be
used. Music, goodnight. Okay, So I think we've
done that section. The next section is what's included with the
discipline of products. Use bullet points. Here we can use some
points to say that. You've got, let's say the kinda kinda weekly. Gentle mean Mitchell. Digital, nights pages. And then hair is all about the
logistics of it is a panel includes the size measurements,
materials colored. Next includes your
freebie bundled package discount codes or
directly to your website, highlight your refund
and it changed policy licensing and how to contact you with any
queries or questions. So I've already previously
in these parts. So what I'm gonna do is I'm
just going to copy this one. I'm going to show you. So this is all description
template that I've created in. It includes, and it includes the other part here which
is about the logistics, the freebie, your policies and any questions and
queries, contact details. So what I'm gonna do is
I'm just going to copy the parts that we've
just done, that part. This part here. Then what I'm gonna
do is gonna write the thick rich she planner includes both increase US
letter and hyperlinks fall to PDF that can
be used for good. And if we've got two zip files, you can staple the
zip file and place. So does it fall in case t? He falls? Let's say all
together you've got 100 panna pages, 50 pages. So if you've got sizing, let's put here that we've got a free meal prep bonus bonus, which she issued. So panna is needed. That was put like times 20. So we can put that we
can add that part there. So if you do have a
freebie or bonus, I would highlight it
in your description. And then the next part
is around sizing. So I've just added
the size materials, say because the listing is a digital product with
instant download, just mentioned that and that
new physical products will be shipped or
delivered to customer. Colors. Part about depending on your monitor or
computed settings, a planet covered as
the planet colors can differ from their
listing advertise an Etsy, and you've got some digital
download instructions for our customer. You can also incorporate a YouTube link to how the
customer can download their digital planner
to GoodNotes or policy. So exchange a refund. Say because it's a
digital download, there are no refunds or exchanges and make that
clear to the customer. License. This planners
for personal use, but if your planner is
for commercial use, you can add it to the
license part and explain what it means to have
this panel. Personal use. Only. Personal use
means that you are not allowed to resell of
redistribute this planet. Then lastly, if the customer has any questions or
problems, so queries, let them know that they can
contact you, be approachable, make them aware that you're happy to
answer any questions. Then last but not least, thank you message
to your customer. And as a call of action, maybe you want them to
visit your website. Awesome to visit your website. And then they can download
a free products if they do. You can add there or if
you have any discounts. Mentioned it mentioned that
you're offering discounts to selected products or you're doing a buy
one, get one free. This is your discount code. Mentioned it in
your description. But you could also do in your Etsy description
as well that I haven't mentioned it
or haven't included it. Hair. But you could put like you can make it a bit personal so
you could add your journey, how you became, how you became a digital planner create or
digital products created. What is your journey?
What is your score? What is your story? People are genuinely
interested in the sellers. So adding a background
story of who you are, how you came to be a curator or digital planner
or digital product crater? That would be I think that's an added extra bonus
if you add that in, see listing description as well. And a k. So that will sit for this
section and hopefully you have some ideas and how to create an Etsy
listing description. And I will catch you
in the next video.
18. How to Create an Etsy Digital listing: Welcome back. Okay, we now have
a digital product, products images and
listen description. So now we can complete or Etsy shop setup
and add eliciting. Say this is the crater listing
page in front of the hair. And the first thing that
we need to do is we need to add our listing photos. So I downloaded listing pages that we created in Canva. So I'm going to do is I'm going to drag and drop hopefully. Yeah, hopefully it
works our photos into Etsy listing pods. And sometimes it
does take a while or it doesn't actually work for me. Has say some times, if that's the case and I'll
just do it individually, I'll just add the faces. But let's see what happens. Say the next thing
that we're gonna do is we're going to add our title. And we've already
created our titles. So what I'm gonna do is
just copy title Hair. Okay, Back to create, listing and paste
in. Has high tube. Okay, so the next thing
we need to taste. He made the product. Say I did. What is the product? Is a finished product. And when did you make it? We made it recently. A category, usually
for digital planners. I play into calendars and panas. And then it will
give us a drop-down. And it's just Lading. Okay, so we've put
it as a category as calendar and so he per category as
calendars and platters. You can add in a primary
color if you want to say. Primary color is black. Secondary. Goal. Setting renewal options depends on what you would
like to do. Personally. I like to keep it as automatic
so I didn't have to renew my digital products every
time it needs renewing. So Etsy, we just do
it automatically. But if you'd rather
do it manually, then you can select manual. And you would manually
have to renew your digital products or
planner when it's expired. So this high-risk important, which is to type say
the product type, we want to click digital. Next is the description. Save. Again, because we have created
off description already, I'm just going to copy and paste our description and
paste it there. Then we have our
description there. A k in the next part
is adding tags. So tags are really
important in Etsy because essentially these
are keywords that customers are searching
for in the search bar. Luckily, we have already created a mini keyword research
into our product. Therefore, we can use
some of these keywords. However, he does
only allowed 20, 0 up to 20 characters. And I go to our keywords. And as you can see, some of our keywords are more
than 20 characters. Usually, the long tail keywords are longer than 20 characters. We might have to
cut some words off. But this is when having
done an extensive keyword, research comes into play. So having a variety of keywords can really
help you identify which keywords will have a high possibility
of ranking high in Etsy or Google and under 20
characters for the tags. So what we're gonna do
is I'm going to add some keywords and I
recommend using all 13. Tags to get your
products out there. The feathers. I'm just going to write Richie. Mean, rip me off. Full name. Login. That's got some short. He says, No. Hi Jan. No. Night squid. Well fit panel. We can
even put digital planner. Fifth night, Hannah, KML, which she stickers. Stickers as well. Have you
guys we've added all 13 tags. So the next part is
inventory and pricing. So this is where we can set
off rise for our panel. Let's make it 10999. And quantity, because we are
sending a digital product. We don't need to
worry about stock, which is amazing. Believe me. Say for this reason,
I like to set the quantities the
highest amount, which is 999, as Etsy unfortunately doesn't
have an unlimited option. Okay, So the next part
that you need to do is upload your digital file. Save. I'm just going to
click this and go to my files and select my digital planner
and upload my file. So you can only upload up
to five digital files. If you have more than
five digital files, then I would combine
your files into one folder and then compress that folder
into one zip file. This is where you can also add a thank you page and your
licensing document, which I will show
you how to do later. Digital planner
has been upgraded. Let's just double-check
everything else. C bar pictures have been uploaded and yet
they are uploaded to see you cannot say drag the pitches to where
you want to place them. So I said, Let's just
double-check everything else. You could also add a
video if you want to. Just make sure that the
video is five to 15 s long. And as Etsy has stated, Hey, does actually drive more
cells. Your listing. So just double-checking
the title. An 0 of all details. Description. Okay, so
everything looks good. So the next step is to
click, Save and Continue. And there we go. We've added our first listing. So I'm going to click
the d this later. And I'm going to click
Save and Continue. And now I'm going to
click Open your shop. And a cadet, I'll shop
is open for business. So just to double-check
our listing, what I'm gonna do is
I'm going to click this tab here under
sales channels. And this will take me to
my Etsy shop and heavy go, we've got our first
listing hair. So I'm going to click onto that. Hair is all this thing. Images. Images that we've got a title and we've got our description haven't
right-hand side. So that was it for
this section and I'll catch you in the next video.
19. A Guide to Etsy Shop Manager: So in this section I
thought I'd give you a quick guide on
Etsy shop manager. The Etsy shop managers
where you manage all aspects of your shop
from your shops listing, team marketing, and to
responding customer messages. So let's start off
with the dashboard. Say this is the dashboard here. And essentially the
dashboard gives you a high level overview of what's been
happening in your shop. So things like stat and recent activities and cells. And maybe if someone's
favorite teacher shop, it will show here. But as you can see,
my shop is brand new, so I have new activities
at the moment. Okay, so the next
tab is listings. So this is where you get to add, edit and delete your listings. Save. I have no listenings, but I do happen in
active listening, which is the witchy digital
planner that I created. But I deactivated
it because it's only a prototype
for this course. But on the right-hand
side you've got different things
so you can switch the stats on and it will show you the statistics
for each listing. Also, you've got sections hair so you can organize
your listings. You can put categories
against each listings. You can also add your
own policy as well. In the next tab is massive. And this is where you get to interact
with your customers. Say maybe they want to ask you a question or there's something
wrong with the order, their messages will
come here and you'll be able to respond back to them. Next tab is orders
and deliveries. Because we're selling
digital products, we don't need to worry
about deliveries. On this page here
every time order is created or you make a cell, it will appear here with the customers
details and also you can check to see if they have downloaded
the digital file. So if they haven't, you could reach out to
the customer and ask them if they have any issues. Also, you will get to see your
regular customers as well. So at C will highlight which customers have bought multiple
products from your shop. So you can kinda
see that as well. Yep. The next part, the next
tab is star seller. And if you if you're able to meet the requirements
for the star seller, which is having message
respond rate of 95%. Having reviews, having
your average ratings. So your reviews 4.8, minimum orders five, and minimum mark sells
200 pounds dollars. This part here we
do is worry about because we are selling
digital products. But if you were to
meet the requirements, you would get a star setup
batch which looks like this. Which is quite cool because customers can see this
and we feel about your reliable and your
stores trustworthy. However, I wouldn't be too focused on this
just yet. At least. I think he just wanted
to kinda create as many high-quality
products as possible. And then you can come
back to this later. Okay, so the next part is that this part can it gives you a very high in
depth view of your analytics. You get to see where
people are coming from. Say how they found just shop will say can see the
amount of visits, orders, conversion rate, and revenue can change
the timeline as well. So you can see seven
days yesterday. Today, if you wanted to. The days. So yeah, so this part is actually very good as
well because like I said, you get to be. So xc kinda shows you the specifics of where
people are coming from, Etsy and other pages. To do with the app and other
pages the next season, clean entices picks the
homepage and favorites. So you can go, you can click
on this part and it gives you an in-depth overview. Then let's say this
is the xy search bar. Then see marketing and SEO. This is visits from
Google, Yahoo, Bing, and other search engines, direct or other traffic. This is, this is from
blogs, news sites, and other websites that
send traffic to your shop. Social media, instagram,
Pinterest, Facebook, Twitter, Tumblr, and Etsy add. So this shows you how many customers you bring
in with the ads. And that's the sad part. Say finances. Say it's probably get to manage your finances, say
payment account. Payment account. So as you can see, I need to pay 20 p, which is due on
the 15th of March. And this is because I
published a listing. And every time you
publish a new listing, you get charged when TP or
$0.20 wherever you're from. Hair, it will show you
available to posit that you have your net profit
and xy for the month. Then it will show you
yourselves made to mount cells. Marketing savvy run
ads or off-site adds. The fees, say the listing
fees, transaction fees, Processing fees, regulatory
operation, please. Vat and seller fees. I think this is too dependent on where your base or
your cell is a base. These velocity and
delivery fees, which we don't need
to worry about. Then here it just shows you the recent cells that
you've made or activities. So it showed me that I've listed my product and they
charged me 20 pads for it. Say the 0 parts of finances
is the monthly statement. And again, it's just same
thing that we saw before. You can see your net profit
and the cells and fees. And then I think this site, your Payments Settings,
I'm not gonna go into it, but this is where
you get to change your bank details and
your address details, and you can also change your
deposit schedule as well. And then the next
tab is marketing. So if you wanted to get
started with Etsy ads, you just go ahead
and get started. Oh gosh, given DNS, say sales and discounts, if you want to run a
cell on your Etsy shop, if you want to create a coupon
code, can do their hair. All said, I think this
is really, really good. Beef it will say set up automatic offer to
your customers, say when they bought a product, you can send them a thank you for giving them a discount code. Or they abandon your car. You can send them a
reminder to shoppers, but also give them a
discount code as well. They favorited your shop. You could send them an offer
as well to that customer. So you can set that up, which I think is
really, really good. It will say with
marketing, social media. So you can add social
media accounts. If Facebook, Pinterest, Twitter, instagram can add that to your Etsy shop or say
integrations as well. So you could add pinterest. The other stuff that you can integrate with your
shops at E rank. And just some other things here. Community and help
save if you need help, if you want to read the
policies or what this part here and settings lastly, so this is where you get to
change your shops appearance. You get to write up your
About section in your shops. You'll get to deal with your delivery settings and policies settings,
all of that stuff. Well, the setting
to do for shop. And yeah, so that was it really. I just kinda just gave you a brief little tour of
the C-sharp Manager. And I will catch you
in the next video.
20. How to Create an Etsy Shop Banner and Logo: In this part of the course, we will be looking at ways
to develop your Etsy shop. So first, we'll be
starting off with creating a shop banner and a logo for
your Etsy shop using Canva. Say, let's start off by
creating a shop banner. I've already created two
banners already in Canva. First one and then
the second one. But first, I'm going to
show you how to create a project in Canva and the
dimensions that I use. So this is the Canvas homepage. I'm going to click Create
a design Custom Size. And then I'm going to put in
thousand, 200 times 3300. And then select,
create a new design. And then come the brings
up my projects and my dimensions on this page hair. Okay, so I'm just
going to close this now and head back to the
banners that I've created. Different banners. This one's kind of
more modern and sleep, this one's a bit
more fun and funky. Let me just show you
how I created the base. So I'm just going to add a page. And what I'm gonna
do is go to Design. If you're struggling with
designing your BATNA, then I would hit template and
pick a template from Canva. And then just use that too. Create your own design. So I use, I can find it. So I use this template hair, which is a nice, fun
and colorful template. No, I did. Was I
changed the font. Mean time in pretty digital. She PP. And then change this to be less. Fan is when tuples. Yes. Oh, yeah. Just a little slow go. Make that. The next thing that I did is I just replaced the pictures. The template already
has to pay to photos. And then I just typed
in digital planner. But what I would do is
I would put pictures of the digital
planners that you've created already in
this part here. So it kinda showcases to your customers or
your digital planner, it's kinda like a mini
portfolio in a way, just to give an idea of your, that your potential customers
are your customers, what sort of planners you create or
printables you create. But for this video, I'm just
going to add some photos. I'm going to add at dysphagia. At this one. This one. And there we go. We've created our first lego. What I'm going to do next, and I'm just going to
duplicate this one. And then I'm going
to change that font. I also want to capitalize this, a heading, two Dots, hair. Press this. And it makes my, my texts into capital letters. And then instead
of using pictures, I've just used some graphics. So you can see, say, I'm gonna get rid of me. All I did is I went to elements
such as digital panna. And this one, this one, this one. We can just change the Katas. Said it's changes to this hand. I said I use change
colored neon blue color. Change to COVID. We go ahead and change this one to see. I've created two banners,
slightly different. I've just changed
the font for them, and I've added
graphics, this one, and this one has
pictures instead. So this is kinda like a modern, sleek Anna, and this one's kinda fun, funky, colorful banner. All right, the next thing I'm gonna do
is I'm going to show you how to create your logo. And again, I've just created two different logos
this seminar, but I've just changed
the font and added different graphics
as well to each. Like I say, the, as I mentioned, so I use
for this was 500 times 500. And again, all I did
is meant to design. And let's create the templates
that Canva has selected. The one that appeal
to me the most, which was this one. I'm going to change
the color background. Let me change the color of these parts from
brown to black. And I'm going to put fish until the changes. He Util. And again, I'm just going
to change the font. Meantime. Let's say in that, Let me go to elements
and then type in. And I'm just going to click
this graphic right here. And just paste it. Like say, navigate. We've created our first logo. Say now I'm just going
to duplicate this. And I'm going to change this. No sugar. Then again, freedom. I can hit this button here to make all of my
text in uppercase. Say, then I'm going
to delete this and paste this one. I'm just going to
change the colors. And also what's good about
Canva is that I could change all of my colors
to the color that I want, so I can go from my original color to the
color that I want it. We'll do it for that. So I click Change all. It will change this color as
well, which is really good. And semi guys. So these are pretty basic. Logo, needs to be
anything fancy. And also you can change a time. You don't need to
stick to this logo. Used to really worry about it. For now. I just have
something there. Then. Eventually you can change
it if you want to. Again with the Banner as well. You can change it
whenever you want. So what I'm gonna
do is I'm going to download one of these banners. I'm going to tell the age. So I'm going to download
ban on number four. So I'm going go to Share. Click download PNG. I'm going to select Current
Page four on dominate. And I am going to
download number four as well for the logo PNG. And that's current page for that is downloaded as well. Now I'm on the Etsy
shop dashboard or the Etsy shop manager. And I'm going to click on Etsy shop hair which is
underneath cells channels. What I'm gonna do is
I'm gonna go over to Edit and then say I want
to update a panel fast. I'm going to click
Banner and take a few options so you can have a big banner or the mini banner. Big banner is just fills the top of the shop with one big image. And the mini banner just adds a visual pop while keeping
the focus on your listings. You have other
options here as well, but this is, This
is for fc plus. So you have to upgrade to Etsy class and it
cost money to do say, and say, what we're
going to do is we are going to just
stick to the big banner. Big banner done. And then I'm just going to
drag and drop a banner. And there we go. A binary span and
that's pretty good. I'm just going to click Save, say to add our Lego, I'm just going to click this
camera icon, cheese file. And then click Save. And I'll let you go. You've added and we've
also added a logo. So that was it for this video. And I will catch you
in the next one.
21. How to Write Shop's Info and Story Pages: In this part, we will
be writing our shop in our story and our
messages to bias. So most often, forget about this part as they
think it's not essential. But let me tell
you, it really is. It makes so much of a
difference when customers, knowing you write up a story and a bio can
really help draw customers. And because they kind of noaa feel connected and
intrigued about you. What we're gonna do
is we're going to head over to settings. And we are going to go
to Info and parents. The first thing that we're
gonna do is we're going to put down our shop title. Say we already have a shop title is kind
of like our slogan. Slogan or shop
title is fabulous. Digital planners and printables. For you. Just some simple,
sweet and engaging. We have our Lego hair. You could also put
order receipt, but you could use your shop banner as the
the order receipt banner. If you want to say the
shop announcement, say, Hey, you could put stuff like if you
have cells going on, if you have discounts or little messages that you want to showcase to your customers, you can put it hair
with announcements. I do think it's really good
if you can do it regularly. Daily, at least so maybe
a few times a week. And say messages to bias. I think we want to focus
on messages or message. We want to focus on message
to buyers for digital items. I've already created
our message. And this is what he says. Thank you for your order and for supporting
my small business. I hope you enjoy your purchase. I want to ensure that all
my customers are happy. So if you are dissatisfied, please let me know. I'm always happy to help. Always remember to
leave a review. It really helps a business
much appreciated, best wishes. Olivia, from pretty to two GB. Hello, thanks for message
and you want them to review your shop as well. So always mentioned that to
get them to review your shop. But also if they are
unhappy with their patches, you want them to feel
comfortable enough to come and reach out to use it just
like a happy, nice, friendly message to
customers that they will get once they've bought
your digital item. We can add them. You're going to
save the changes. It will save, you
will need to change your name so you can just change and change it. Like say Settings again. And we're going to go to about your shop where you
can put your bio, you can add a photo of yourself. And in your bio you can tell the customers a little
bit about yourself. Maybe where your base, and that you can write
your digital planner, Crito, digital products creator, and tell them how long have you been doing it for maybe a bit about your background as well. So you go like a graphic
designer, something. But here you can add
a bit of personality as well to your, to your bio. So the next part is your story. And I, again, got a story hair. The story part is where
you can truly, I guess, express yourself and
get the chance to actually tell your
story to customers. So how are you got hair? Why you started creating
digital products? Again at personality and make
it a bit personal as well. Say the first line is bringing fabulous digital planners and printables, especially for you. So this is going to be all
tied to our story headline. And then I've just got a
little short little story when I started pretty easy to GP because I wanted to share fun and bright digital
planners with the world. I wanted people to know
that digital planning, organising don't
have to be boring. Then I create fun to planners
to help you stay motivated, organized and
productive with a beak, weather daily, weekly,
monthly or yearly. I'm sick. Let your hair spend time looking through my shop. If you have any questions, I'll be happy to answer them. Then I've got hair also, I have a blog where you can sign up for your
special freebie. So it's kinda cool. A contraction at
the end as well. I'm just going to
highlight this. Copy and paste. You could also add
a video as well, explaining your
story a bit further. And it gives you
the charts as well, or it gives customers the
chance to actually see and understand what you're all about further if they
see something visual. But you can also add a
phosphatase and write short captions so you can add photos of yourself
if you want to. You could add photos of
your digital planner or your digital plan of creation and just add a
little captions to it. Hey, you could add links. So Facebook, Twitter, Instagram, Pinterest,
blog, website. You can add your link care. In today's press Save. And that's saved. And we have created
our shop story. They've added short title, and we've added a
message to buyers. That was it for this section. And I guess I will catch
you in the next one.
22. How to Create an Etsy Licensing and Thank You PDF: Alright, so now we
are going to be creating a thank
you and licensing PDF document using
Canva in which she can upload to your listing
with your digital planner. Say by having a
licensing and thank you document is it's kind
of like a receipt, but it's just highlighting your licensing and
ensuring that you show gratitude in your customer's purchases
that they've made. Because you want them to buy again by giving them
kinda like this, this document or this thank you document ensures that you're really giving them a good
overall customer experience. Okay, So let's start
creating our document. Say at the moment, I'm on campus and I'm gonna
go to create a design. And I just want a
simple A4 document. So next what I'm gonna
do is I'm going to go to my uploads and I should have
uploaded my banner, my logo. So I'm just going to
place my banner like this at the top. And then what I've already
done is I've created a thank you and licensing
document template. What I'm going to do
is just copy this. And I'm just going to
paste it into Canva. Going to change the layout. And don't wanna change
the font changes. And I'm just going to
change the line spacing because that fit together. It's going to spread out that. Say, alright, see
you in the template. I've just got thank you for purchasing the witchy
digital planner. Your licenses are as follows. You can see the
personal use license of richie digital plotter,
what is allowed. So you can download and print as many copies of the
witchy digital planner. What is not allowed, you cannot share wish, resell,
redistribute, the ****** digital
planner. Just changed up. Then I feel it. If you have any questions, please contact me on Etsy. Once again, thank you.
You're purchasing the witchy digital planner. If you want your free digital
panel subscribe now and you're seeing weight so
you can add your blog, your website, hair and this part hair for them to subscribe
down on your piano. And then also, the next part is if you're
happy with your purchase, please leave a review. You want to get them
to leave a review. So just make it
obvious and clever. Obviously, make it
sound friendly. The greatly appreciate
it All the best, Olivia. So that's what I've picked out. It's just short,
friendly, sweet. It outlines the licenses of what they can and cannot do with it. You just want to make sure
that you're clear with it. If they all say if they
can use the your plan or your digital products for commercial use and make sure you pull it down that they can
use it for commercial use. Contacting me an SEC could
all say add your Etsy shop in this Betsy link for them to easily click on if
they have any questions. I'm just going to highlight
this bit because this is you want them to subscribe to your email list as well.
Just highlight the 3D. And yeah, wedge off
with a template. So I'm going to do next. I'm just going to add my logo. I'm going to make this
a bit smaller as well. I'm gonna change this part. I'm going to leave
actually down here. It reads better. I might even change there. The font that I used for
foreleg, for a banner. If I can remember the phone, I think it's sugar. Sugar. To me that part stand out a bit. And then I want, I'm going to tell you is
I'm just going to add the leg and place it down. And there we go. We've created a fake
key for purchasing at all licensing
template and it's super easy to do and really
effective as well if you want your customer to have that really good
customer experience, say I'm going to click
Share, click Download, download a PDF, print
the set downloads, and then wait for
it to download. And we can view it. See. Get to say, this is all template. Logo, banner. Thank you. Message licensing
and other Thank you. Of course. Action. And another thank you. And it was simple
today and I think it also shows
professionalism as well. We have something attached
to your digital planner. Again, just to express gratitude
and just fairly layout the licensing as well with the planner, oil
digital products. You can also include instructions on how to use
your, your digital products. If you're creating
a digital planner, you could give them
instructions and how they could upload that digital planner
to good nights, e.g. and how to use the hyperlink, how to add stickers
to digital panel, all of that stuff you
could also include. Just to give, like
I said before, the customer really good overall customer
service experience. That was it for this
part of the video. And I will catch you
in the next section.
23. How to Create Pinterest Pins: In this bonus part
of the course, I'll be showing you
ways on how to promote your products and your Etsy shop without using social media. So here're some
ways that you could use to promote your products
about social media. The first one is Pinterest, lead magnet, Etsy ads, and blog. So let's start with Pinterest. Say Pinterest is a very good way to promote your products
and it's also free as well. So there's many people that use Pinterest daily
looking to buy things, looking to find solutions, it can put inspiration. Pinterest is a
platform to be on. So what you can do
Pinterest is you could set up a Pinterest
account for free, and then you could create
an Etsy shop boards that's specifically dedicated
to your Etsy products. And then you can pin your
Pinterest pins to that board. Okay, so what I'm gonna do now is I am going to be creating a Pinterest pin that we could use to promote all of
which he digital planner. I have created a
pin essentially, and this is for the
witchy digital planner. So it's pretty easy to do. But first let me show you
the size that I used. So I use the size 4,000
px times 1,500 px. And then say I'm going
to recreate this pen. So I'm gonna do is I'm
going to just add a page. And to recreate this pen. All I did is I went
back to projects. And I went on to fail to Etsy
listing that we created. In Canva. You can see hair, but obviously it's format
is very different needs. So I'm just going to
add another page. And essentially I'm just
going to copy the background. I'm going to copy the heading. And then I'm just going to copy a digital planner
and paste that. So I'm just going to make this bigger bit thicker as well. And then this part
because I could probably fit in knowledge as well. And then I'm just
going to delete this, make this bigger and
paste this hair. I'm going to change
the font, Sans Bold. Just want to make this as well. So what I'm gonna do
is I'm going to add an effect to the text. So I'm going to go to effects. I'm going to select splice
and change the color. Go dish kind of color to
match car digital planner. I'm just going to
bring this up a bit. Just going to duplicate
this white rectangle box. And then I'm just going
to duplicate this text. And I'm going to put
the name of our shops. Pretty petite, Digital. Gb. Pizza matches. Get rid of the effects. Just keep it black. Like say. And then I'm
just going to duplicate the circle hair and
i'm, I'm going to add three. Because shaded,
as in a freebie as well. So we could add
the little stalls design as well.
Just feel summit. In fact, he said, I'm going to flip this. Clay. Yeah. Just send it. Quits. Says behind the cycle. And they've got, we've created our pen for a witchy
digital panel and that was very easy to do. We just used all x to see
those who listing and just recreated it to fit into
the Pinterest pin dementia, which is the vertical dimension. Just show you again.
So it's the 1,000 px times 15 or times 100, 500 px. The next thing that
I'm going to show you is how to upload
it onto Pinterest. So I am going to just download this picture
to a PNG file. I just want Page three. And I'm going to click Done. That's downloading now. Say now I'm on Pinterest. This is how you upload
your pen to Pinterest. You type in a name, say
just put the old Smith she digital planner. And I'm just going to frog
afraid on there like so. And then Harris, where you
want to describe your pen. And I would actually
use your Etsy listing description or
the vet just some of that because we know that they are actually lit
scene description. We've included some
keywords to app, which is really, really
essential with Pinterest. You need to add a
lot of keywords. But you could also say,
look on Pinterest as well. For keywords related
to your product. You can include it into
your header as well. So we can just, well, they could use our description. So I'm going to go back to Etsy. Okay, that's what Listing
I'm just going to take the first couple of
paragraphs about description. Say now you need to add
your destination link. So the link to your
digital planner or your digital products, you just put the link here. Okay, So now you use a pick
your Pinterest boards. Say, OK, I said you should
have a dedicated for two shop. And say we just select the
board that you want hair and you can publish it
immediately by hitting publish and making sure
that this is ticked off. Or if you want to
publish at a later date, just click that and
then change date. And you can change time. And then you can press Publish. And then to duplicate this pen, just go to the three dots
and click Duplicate. And then you can direct
it to another boards. And you can change the date
to another time and date. And then click this and select, Select All and Publish to publish all of your pins at the directed time and date. So I'm going to do the
reason why I like to duplicate my pins is
because I like to spread my pins
across most votes. That contains K again and
change the board, this one. And then change
time and date hair. And then I can duplicate
again and change the board This one day. But obviously you got to
make sure that the boards are relevant to
your pins as well. But this is a good method
to do because then it ensures that your pins are being circulated
for our Pinterest, which means that it will
gain more attention, more engagement, more
clicks to your products. Okay, so I am going
to stop here for now. And then I will catch
you in the next video.
24. How to Create a Free Lead Magnet: Okay, so next I'll be
showing you how to build an e-mail list without a blog
using a free lead magnet. So this is a great and probably
the most effective way to promote your products by
having bill an e-mail lists. The reason being is that you
don't need to have a lot of email subscribers to get some clicks,
engagement and cells. With digital, with a
digital products and Etsy, you just need enough
subscribers that are very interested in your shop
and your products. By using a free lead magnet entices your potential
subscribers to subscribe, dominates their free
digital products. Okay, so what I'm going to
say is I'm going to show you how to build an e-mail
list without a blog. And I'll be showing
you how you can do this with combat kit, which is an e-mail marketing
tool that allows you to create email newsletters,
landing pages, pop-ups for your
blog, your website, and just overall manage
your subscribers without having any coding or
technical experience. Combat care is
free to use for up to 1,000 subscribers as well, which is really good. So I'm just going to head
over to comeback here. And we are going to
create a landing page. So to do that, I'm going to click and select landing
pages and forms. Then I'm going to
select Create New. And then I'm going to
select landing page. And as you can see, they have a lots of
different templates, which again is free to use laser different
templates here. But I'm just going
to, one template is going to pick this one. Hey, I'm just going
to change the name to free need Mac. And so this is our landing page. And what you can do is you just can modify it
to fit your needs, so hence can put down night. You too. How to change the size. Then I'm just going to say nasty subscribe. Now down to your free will, see which she Lana. Feel free. But she does your planner. Now. Oh, she didn't have a title. Five pages. And I subscribe to that. Your which she she had a waiting list, something like that
to kind of gauge be your potential
subscriber to subscribe. Just going to change the font. Make it flat. I might make this bold. And then hey, you could also add another section
for the scribe. His name, me too, like so. And can change the
background cut of the the the subscribe button. Say that sounds like
a pinkish color. Like a bright pink. And we can even write and how me and yeah, so we could even
write count me in. Say, we have done this. Let's change of photos that
just go to general styles. And we can click on the photos so you can
upload your own photo. Or you could use one
of their faces that they have that kit. So that's just going to search digital planner and
just see what comes up. Alright, so I like
this photo here. And it's changed it you could
also change to the Kata, so we have the overlay as black, but you could
change it to Hello. I'm just gonna keep as blacks. Could also change the
font of your headings. So I can make it that I think I got to use laura. You can even change the body. Change it to marry whether you can change the
form background if you wanted to as well. How did they get the same
color as our button? You just get the
color of a button. Paste to co-locate there. And maybe we can change this to white se. But I think I actually
don't like the color. I'm going to keep it as white. Yeah, that's a that's an
option that you could do. You could change the color of this part and even the
background color as well. Page background. You can change it so
that I can advocate. I don't want to tear as well. Hey, so I'm gonna do
is I'm going to click Save just to make sure
that everything's saved. And then next I'm going
to head over to settings. And you can change
your success message. Say you can put
something like success. Now, check your e-mail to
confirm suspicion and digital. Seeing awaits. You can change the domain name. If you have a custom domain. Then if he could icon and incentive and go to
Edit e-mail contents. Contents, sorry. And then as you can see,
I've already got kinda like my my email template. But this is the e-mail that
your customer will get when they subscribe
to your embellish. Say can you just put
something like Hi, Hi there. Signing. It's great to have. You just put 0. And then you can just
put some things like the button, the light subscription. And you pan out the way to once again, thank you for subscribing. She appreciated the fast. Yeah. And he can change to
cut out the pattern as well. You will need to peatlands. And it can change the size. So if you want small busted, he wanted rounded corners. That's how you do
it. Hey, change the alignment of that as well. So what do you have
your, your email message just click Save. And then this is the part
where you need to add your digital planner or your
digital products to save, you just go to Download and
then click Choose File, and then pick your digital file wherever it is on your computer. And then click Save. And then just save it again. Now that it's saved, you can hit Publish. And then we can copy our link. I'm just going to
click Save again. Sometimes it does take
a while to refresh. Let's see if it works. So here's a landing
page that we created. And you could add this link to the PDF file that we created
in the previous video. You could add this link
to your Etsy shop. You could add a
solute to Pinterest to your social media account. And then when people
will click on the link, there'll be directed
to this page. They'll read this
type in their name, sign up to the email
address to it. And then let's count me in. And then it'll be k e-mail. And there'll be able to
download their digital. They're free digital products. And it was easy to do. And this is completely free, only up to 1,000 subscribers. So that was it for this video, and I will catch you
in the next one.
25. How to Use Etsy Ads: Okay. So the last point that I'll
be talking about in how to permit your Etsy shop and
products is Etsy ads. So I know that there's a bit of controversy with Etsy ads, like some people are absent
if it's really worth it of as a saying
that it's not great. While others have seen really
good results with FCS. For me personally, in the past, it has been a hit and miss. Before I would generate
cells and gain profits, or I would lose out on profits, it up and down. So I think that the key
with Etsy ads is being consistent and using the ads to promote sought
after products. They have high engagement
and products are in demand. You really need to delve into
your products and analyze which ones are the
most popular with high conversion
rates and clicks. If you're a new seller, I would recommend
starting off with Etsy ads with around
one to $5 a day. You don't want to go
overboard or spending and spending as well Amy, to what you can afford
to spend on Etsy. But if you use XES
and new seller, you'll begin to see
your engagement. Clicks. Cells rates increase, and your product will start
to build momentum and move. Well, it may move
to a higher rank. But ultimately you
should figure out wherever Etsy ads are best
for you and your business. So I'm gonna say this, I'm
just going to quickly show you how you can start
using Etsy ads. So once you're on Etsy, just head over to shop manager. And then what you need to
do is go down to marketing. Click in here, you can decide how much
you would like to spend. Say let's just put $1. And then he kept this part
here which will say start your campaign if you haven't started an Etsy ad campaign
before or the half, it will say restart
your campaign. If I click it. And that's it. It stops your EFC ad campaign. And here we go. So now it started and
my Etsy ad campaign, obviously I didn't
have any products in my shop at the moment. But if you do, you can go to manage your
advertised listings. And then here is where you can select which listings you
want to advertise on, which listens you do
not want to advertise. But like I said, I didn't
have any products hair. So it's blank. You can also manage
your budget so you can change the amount
if you choose to. The minimum amount is $1
and the maximum is $25. And this part here just
shows you that analytics. So it shows you how
many views you've got, clicks, orders, revenue spent. Okay, So this is
it for this video. Bye.
26. Course Completed!: That's it. Congratulations for
completing the course. That was a lot of
information to take in a big world onto you. Also, don't forget to
complete your class project, which you can do down below. Please send me screenshots
of your Etsy listings, your Etsy shop, your digital product or
your digital camera. I really cannot wait to
see what you guys come up with and say, forget, you can check
me out on my website, which is www dot
digital participation. So where I provide the
hints and tips and tutorials on how to create digital and how to
sell them on Etsy. And lastly, if you have any
questions whatsoever, name, matter how silly it may sound, please let me know and I'll
be happy to answer them. And once again, congratulations
on completing the course. Thank you for
taking the time out and joining and complete
in the course as well. Thank you.
 Olivia Davis, Digital Planner and Graphic Designer