Transcripts
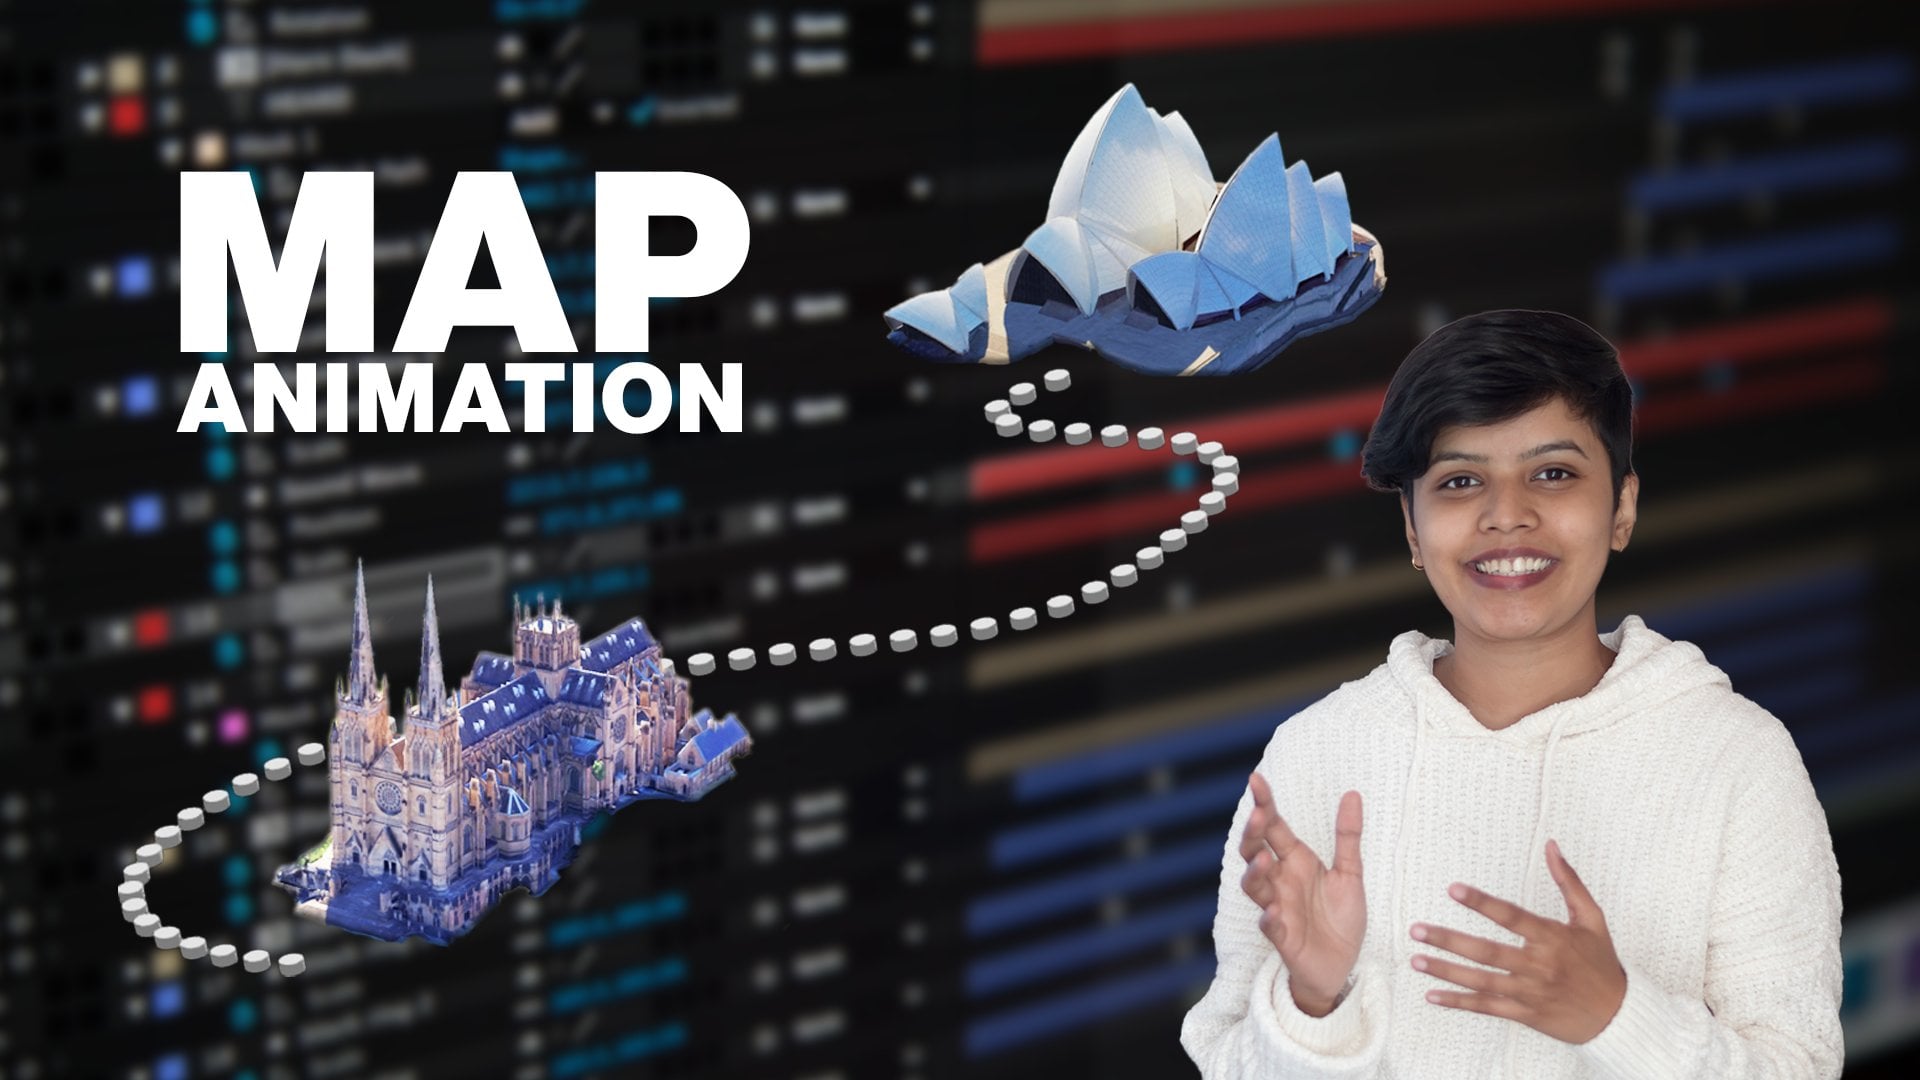
1. Welcome to Class: Everyone, my name
is Adi Purdila, and if you're making videos and want them to look
more professional, this class is for you. I'm going to show
you how to create animated slides like this one, that you can use
directly in your videos. We'll build this from
scratch in Lodi Lab, which is a very easy to use
browser-based animation tool. We'll start by learning how
the tool works and then build a fully animated lesson intro
slide with text animations, moving background shapes and proper timing across
all the elements. Once the slide is done, I'll also show you how to
export it and drop it into a real video editor
so you can see exactly how it would
fit into your workflow. We're just meeting,
my name is Adi. I'm a UIUX designer
and design educator. I've been creating video
tutorials and courses since 2010, and honestly, for a long time, I wanted to add more animation
to my own videos, but the tools always
felt way too complex. When I found Lottielab, that changed, and that's exactly why I wanted to make this class. Now, here are a few reasons why this class might be for you. First, you don't need any
animation experience. I'll walk you through
everything step by step, and if you've never touched an animation tool before,
that's completely fine. We start from zero. Second, what you learn here
goes beyond creating slides. Once you understand how animation timelines work and
how to think about motion, you can apply that to
any animation project, not just video slides. And third, by the
end of this class, you'll have a real
finished animated slide that you can actually use
in your videos right away. This class is for
content creators, educators, and anyone
who makes videos. No animation
experience is needed. However, I would recommend having some basic
Figma knowledge because we'll be
using it to bring the design into Lottielab. Alright, I'm excited for this. I hope you are, too,
so let's get into it. In the next lesson,
I'll give you some more details about
the class project.
2. The Class Project: In this lesson, I
want to talk about the class project and the
starter file I've put together. The class project is simple. You need to create your
own animated slide using Lottielab. It doesn't have to match
what we build in class, so feel free to change
the colors, texts, shapes, whatever you like. Make it yours. And of course, it's perfectly fine to create
the same thing as me. It's your choice. Now, to help you get started, I've prepared a Figma file with all the design elements
we'll be using in the class, and you can find the
download link in the projects and
resources section. File includes all the shapes, the text layers, and the overall layout
we'll be working with. Everything is already organized, so you can focus on the animation part rather than building the
design from scratch. Once you're done
with your animation, I'd love for you to post
it in the project section. You can upload a screenshot, a screen recording,
or even a link. Posting your project
is not mandatory, but I genuinely think
it's worth doing. It helps you track
your own progress. It gives you something
to look back on, and it also helps your fellow students see different approaches
and get inspired. So when you're done,
please share it. Alright, let's get
into the class.
3. Getting Started with Lottielab: In this lesson, we're getting
started with Lottielab. I'll show you where to sign up, walk you through the interface, and we'll finish by building a simple animation just to
see how everything works. But before we get into all that, let me answer a question that I think a lot of
you will be asking. Why should I use Lottielab over something
like Adobe After Effects, which is the industry
standard for motion design. Well, the reason is simple. Lottielab is browser-based. It's much easier to learn, and it's built for exactly
this kind of animation. And After Effects
is very capable, but it's also very complicated. It's more expensive and it needs a lot of computing
power to work smoothly. Now, let me start by giving you a few alternatives to Lottielab. Jitter is one of them, and this is actually what
I used before Lottielab. And then there is also Rive that does motion design
really, really well. Rive, as far as I know, it's a bit more complex
because you can create, like, a bunch of stuff
with it like games, really cool interfaces and
all sorts of animated assets. Well, Jitter is more
on the simple side, and it's a very easy way to create motion
design for the web. The reason why I don't
use Jitter anymore is because it got
very expensive. They had very
affordable services or prices at some point, but they changed their
pricing structure recently. So that prompted me
to look elsewhere. And I ended up going
for Lottielab. Now, Lottielab can be used
to create a lot of things. It's not just video
slides, right? Lottielab is great for all kinds of
lightweight animations, things like, you know, UI micro interactions,
logo animations, app onboarding screens,
even marketing banners, animated, social media
posts, you name it. You can create a lot of
stuff with Lottielab. So let me give you a
quick tour of the app. First of all, you can
go to ladilab.com, and there you can
create an account. You'd go to signup or login, and you can sign up with your Google account
or with an email. I'm going to use my
Google account for that. Once you're logged
in, you're taken to your dashboard where you'll
see your recent files. You'll also have access
to certain templates. And here's a quick
taste of the kind of animations that you
can create with Lottielab the animations here are not very smooth because I'm also recording this video, this screen, so my CPU is
a little bit overstressed. But yeah, you can create
all sorts of animations. These are pretty cool. You can go back to home
and you can organize your work into projects or you can just create
standalone files. So let's click on New File in the upper right corner here and create a new animation file. This is where we'll be creating
all of our animations. And there are four main
sections we need to talk about. We have this panel on the left, which offers access
to various tools, the layers, various
shapes and icons we can add the text tool and also
the ability to add images. Then in the middle, we have the canvas
where we add artboards. Artboards are like
pages in your project, and each animation is
contained within an artboard. On the right side, we
have a properties panel, and it's also the place
we can export files. And then at the very bottom, spanning the entire width
is our animation timeline, and I'll show you how this
works in just a little bit. At any point, you can control
the size of the artboard by changing its width and
its height from these boxes. And you can also
change the duration, the final duration of the animation by
changing this value. Also here, we can change the
background of our artboard. Let's just go with
white for now. Now, let's create a
very simple animation so you understand
how the tool works. Let's animate a text
element, right? And because in this class, we're doing an animated slide, that's the most common
use case for this tool. So I'm going to press T to
bring up the text tool, click, and then I'm
going to type my text. Getting started with Lottielab, and I'm just going
to position this in the very center of my artboard. Now, with the text selected, the properties panel lets
me change the font family, weight, size, line height, letter spacing,
alignment, color. So I can customize text and
other elements very easily. And up above, we have a button
that says add animation. When we click that, we have
access to certain presets. And when I hover on
a certain preset, I can see the animation in
real time in my artboard. Here's a fade,
here's show height. Here's a slide,
and a few others. We also have layer
transforms, right? These are animations or presets we can apply to any kind
of layer, not just text. And we have a few others here. I can hold your mouse cursor
over them to preview. Personally, I will choose blur
and slide. For this demo. So I'm going to click that, and I have some additional options. I can choose the direction
the text comes in. So if I click here, the letters will start animating from the
top left corner. But I'm just going to
stick with the default. I can change the duration of the animation and I
can change the easing. Let's go with smooth because I think that works a
little bit better. And if I scroll down, I can select to apply this animation on
a character basis, so animate each character, or I can animate the word, or I can animate the line
if I have a multiline text. Let's select word. And also, I'm going to
choose the smoothing here to smooth instead of
linear. Okay, cool. Now, once you apply an
animation to an element, the animation
timeline is changed. We now have an entry for the
text element that we used, and then the animation
that we applied to it. And if we click on this
element here, yeah, we can change the properties of the animation just like
I showed you previously. Now, if I select my artboard, I can change the duration of the entire animation that
happens inside that artboard. So for this demo, let's set that to 4 seconds. Now if we zoom out and we look
at the animation timeline, we can see the cursor
goes 0-4 seconds, which is exactly the animation duration
we set previously. And I can easily grab the cursor and move
it wherever I want. And I can also click on this
area to move the cursor. And if I want to
play the animation, I just press space bar, and it's going to play
in a loop. Like that. Now, so far, we animated
this text in, right? But what if we need
to animate it out? So that means we made
the text appear. Now we want to make it disappear after a certain period of time. We can do that by selecting the element and
adding another animation. Now, that animation
will be added to wherever the cursor is
currently positioned. Okay? So if I position it at the very beginning and
I select the element, and I add an animation, and let's say I want to add
the same animation, yeah, that's going to add the second blurrin slide
to the same element, starting again at
the zero position. But now I have two
animations that are competing with one another
on the same element. So if I hit play, I can see the
starting animation, but not the ending
animation, so to speak. So let's do a couple
of things here. First of all, let's select the second
animation that we added. And in the Properties panel, we're going to select out, and
we can see a preview here. The easing, I want
this to be smooth. And I also want to
animate per word. And also, I would like to have this animation
happen at a later time. So what I can do is
simply click and drag in the timeline in a
different position. Okay? So let's assume that this first animation will
go until 1.5 seconds, and I can easily
resize it like this. Then I can wait a second, and I can have the second
animation start at roughly 2.5 and run until the
four second mark, which is the total
duration of my animation. So now if I hit play, the text comes in and
the text goes out. Very, very easy. So we're essentially adding two animations to
the same element. One of them animates
the text in. In other words, it makes
it appear 0-1 0.5 seconds. Then we wait roughly a second, and then the second
animation starts, which makes the text disappear over roughly the same period
of time, 1.5 seconds. And if you want to be more
precise with these timings, you can simply select the parent element
here and you can set the duration to 1.5, and then you can set it to
the very end right there, and you can set this
to 1.5 as well. And now these two are
exactly the same. Cool. So, our animation
is now complete. Let's export it, and I want
to quickly go over this. For that, you would go to the upper right
corner, hit Export, and this will give
you a preview of your animation and allow
you to choose a file type. These are the file
types you can choose. For this lesson,
because we're making an animated slide for a video, we're going to choose
the video format. And then we can
choose the size of the video, right,
the resolution. How many times we
wanted to loop. We don't really care about this, and then we can choose
the frame rate from here 30 or 60 FPS. And then background, do we use the background
from the artboard, or do we make it transparent? And then you hit Export. This is going to take
you to another screen, where you can see a preview
with your settings, and then you would
select Download. And once that's downloaded, as you can see it
exported as an MP four and you can see
the result right here. Now, just a quick mention, if you're using the free
version of Lottielab, you'll find some of the options here will
be unaccessible to you. I have the pro version, so I'm able to export at any
resolution from this list. And if you're curious, the pro version is $12
a month if you pay yearly and it's $18 a
month if you pay monthly. But essentially, you
unlock everything. You can have as many
files as you want. You can export
without a watermark, and you can export in the
highest possible video quality. And you have some
additional perks, as well. All right, so this was
just a quick overview of the tool and how it works. So coming up next, let's start working on a much more complex
animated slide, right, something that
you would actually use in one of your
video projects. So I'll see you in
the next lesson.
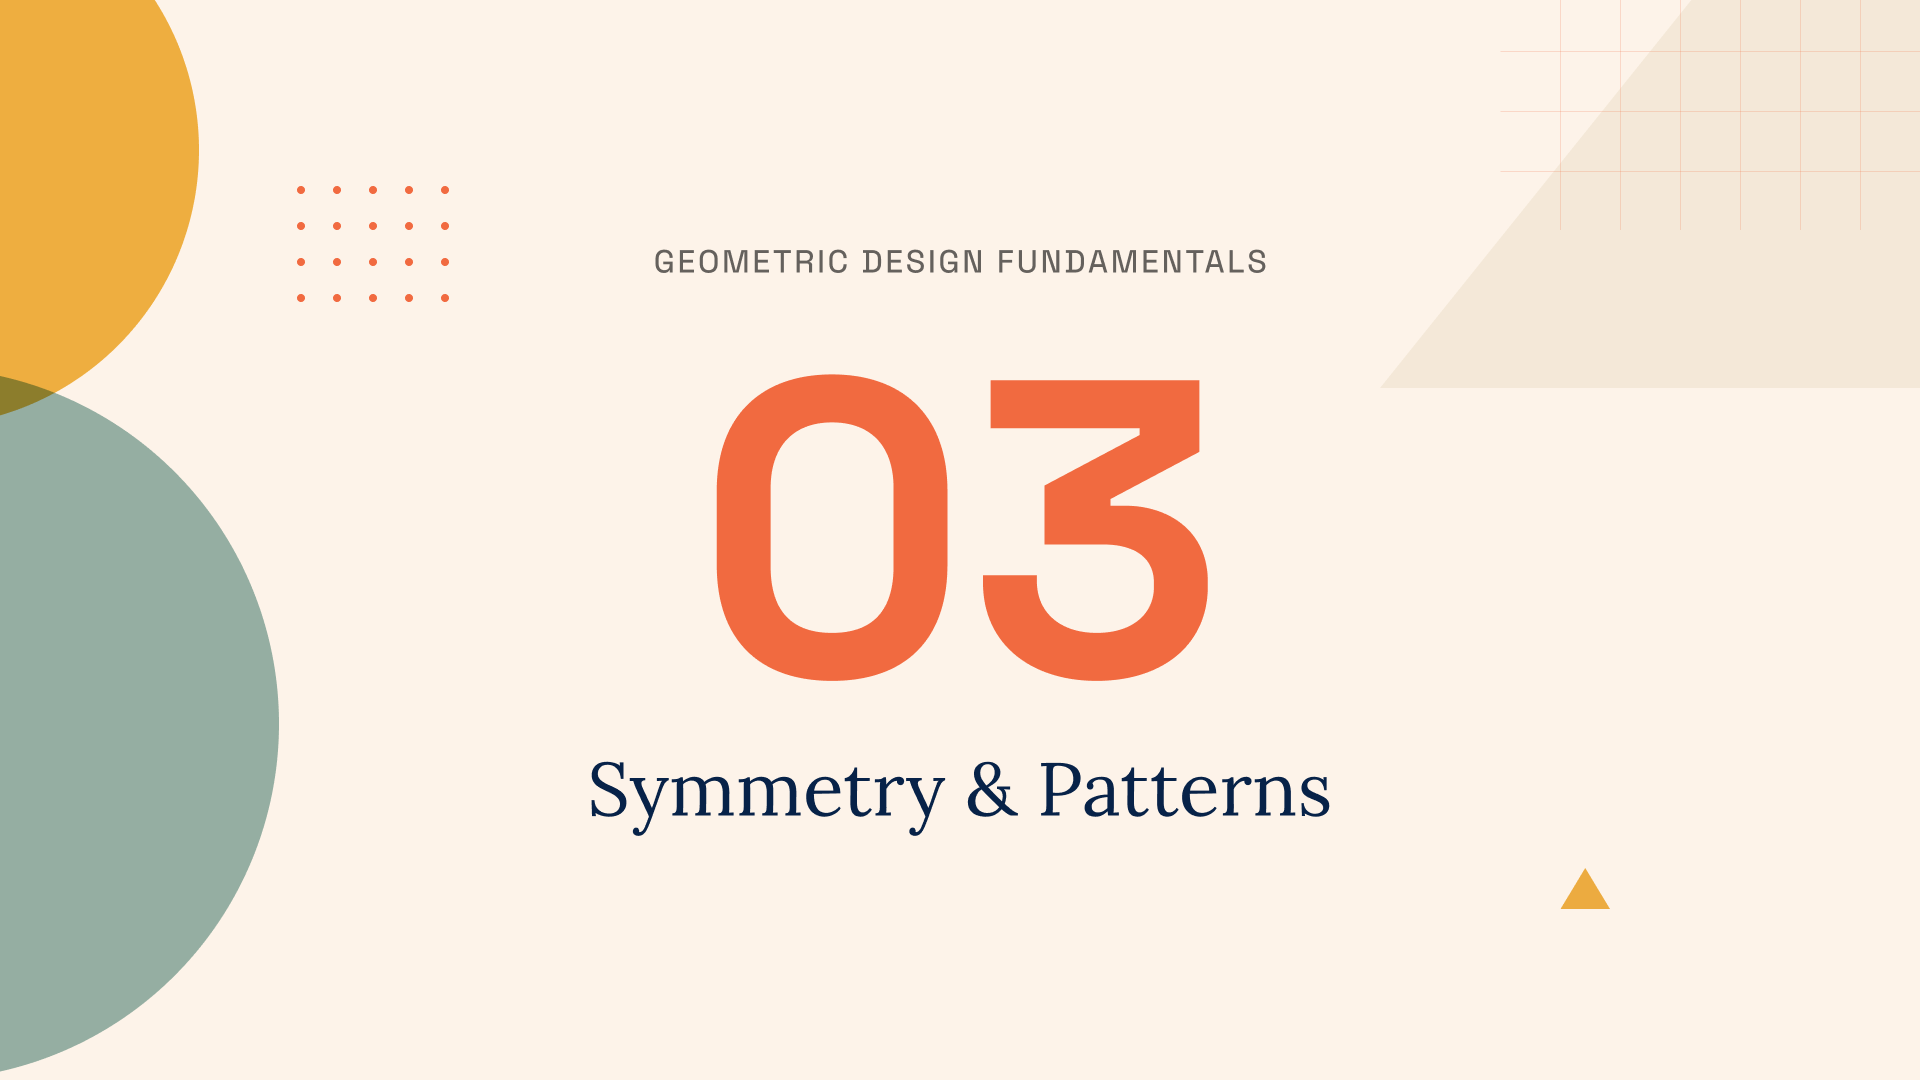
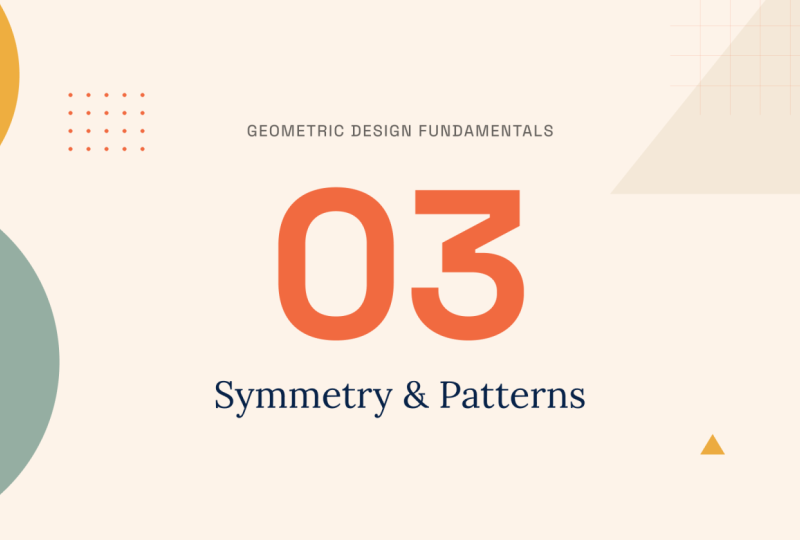
4. Let’s Animate: Prep Work: In this lesson, we're
starting to build the animated slide I showed you at the
beginning of the class. We'll set up on your file. We'll get the size
and colors right, and we'll bring in all the
slide elements from Figma. So let's get into it. This is the Figma file that
you can download for free by following the link in
the projects section. It's a very simple
design that can be used as a lesson intro slide for let's say Skillshare class or a YouTube course,
whatever it is. This text can be
the class title. This is the Lesson number, and this is the lesson title. Apart from these, we also
have some decorative elements that I would also like to
animate inside Lottielab. So the very first
thing we have to do is bring this file
into Lottielab. Now, we can recreate each
element individually, or we can use a plug
in that will simply copy everything and we can
paste it in Lottielab. But first things first,
we have to match the slide background and size. Okay? So as you can see, I have a four K slide here, 38 40 by 21 60 because I want to export this at four K. Also, since I'm here, I'm going
to copy this fill color. And I'll jump back
into Lottielab. In here, I have a new file, and let me just make this
a little bit bigger. Shift one for Zoom to fit. And for the artboard, I'm going to set its size
to the same four case size. So 38 40 by 21 60. We're going to set the duration. For now, let's just
set it to 10 seconds, although we can always change
that later and we'll set the background size to the
color we copied previously, FDF three E nine. So let's press Shift one, so we can see the
artboard once again, and I'll go back to Figma, and I'll press Control
or Command K if you're on a MAC to bring
up the quick menu. And I'm going to
search for Lodi Lab. Figma to lady animation. And let me just
zoom in so you can see it better. This is a plugin. You can click on it, and
then the plugin is going to tell you to select designs
to copy or export. So I'm going to click on one of the
elements inside Figma, and I'm going to
press Command A. That's going to
select everything. You can also see that in
the layers panel here. Now, the plug in shows me
all the selected layers. I can simply click on copy, and then I can go
back to Lottielab, select my artboard
and hit Control or Command V. That's going to
paste everything in place. Notice that this
action also brought all of the grouping and
layer names from Figma. Now, it didn't paste them exactly in the correct position, so we need to tinker with the
positioning a little bit. First of all, let's select these three element by
dragging a box through them. And I'm going to right click
and select group selection. Then with these selected, I'm going to go to the
upper right corner and I'm going to align
horizontally and vertically, just so I can position these exactly in the
middle of my page. And then I can right click
on this element once again on group to
remove that group. Next, let's manually move
these elements into place, and I'm going to
select or I'm going to start with these
circles here. And from what I can tell, the should be
something like this, maybe, and these
will overlap here. And these are actually using
a different blend mode. So when they intersect, they show a different color. I can also do that in Lottielab by going in the properties
panel and selecting multiply. That's the blend mode
that I chose in Figma. And as you can see now, when these elements
overlap, yeah, there will be the intersect basically will
be colored differently. What else? This element here. Yeah, we can move it a little bit up,
something like this. The triangle here, we can move
it to about this position. And then the bigger triangle here and the
checkered pattern, we'll move those to probably
something like this. Again, it doesn't have
to be absolutely pixel perfect because we can always
change this positioning. Alright, so now that all
of the elements are in, it's time to start animating, and we'll do that in the
next lesson where we'll tackle these decorative
elements. I'll see you there.
5. Let’s Animate: Create the Shape Animations: In this lesson, we
start animating. But before we do anything, I want you to think
like a movie director. You see, a good director knows the whole story before
filming starts. It's the same thing here. Before you animate anything, think about how each element should move and in what order. This makes everything
much easier. So let me show you how I would do this animation.
So here's the plan. I would like to animate
the two circles first, maybe, like, a grow
animation or a slide in. And then I would animate this checkered pattern
and the triangle. And then I would animate these dots and this
triangle, right? So this will be the intro
sequence of events. Only after that, I would
animate the actual text. So this is the plan. Let's see how it goes. Let's start with the
green circle, select it, and then add animation, and we'll select grow. We'll have it grow in. Initial opacity will keep it at zero because that's the
initial value, right? And initial scale is 0.5, which makes the animation
look like this. Right? So it scales from half its
size to its full size. But I want this initial factor to be a little bit smaller. So let's change the
initial scale to 0.8. So I want it to animate from 80% its size to 100% its size. I would like this animation
to be 1.2 seconds, and I'm going to change
the easing to smooth. So now, our animation
looks something like this. Let's do the same thing
for the other circle. So select it, hit, grow, grow in initial scale, change that to 0.8. And by the way, you
can hold down Shift and using the up and
down arrow keys. You can change that scale. Duration, change it to 1.2, easing, once again,
will go smooth. And also, I would like to move this second circle
animation at the beginning. So these two elements animate
at the same time like this. Next up, let's select the horizontal lines container and the vertical
lines container, and let's actually create
a group with those. So in the Layers panel, we can right click
group selection. I'm doing this because I want to apply this animation to both
elements at the same time. And I'm actually going
to rename this by double clicking to just lines. Oh. Now, for this, I'm going to use a
different animation. I'm going to choose a fade. So fade in over once
again, 1.2 seconds. And once again, I'm going to move the playhead
to the very start. So these elements are
animating at the same time. Next up, let's animate
this big triangle. For this, I'm going to
choose a slide animation. I want this to come in from
the bottom, right? So slide. I'm going to choose
the direction here. So from the bottom. And this is what it looks like. Slide B determines the
distance it travels, right? So it's currently set at 46 86, which is a very big number, and the animation looks something like this. Let
me actually zoom out. Right? I just travels
way too much. So instead, let's select the animation itself and change
its value to 200, right? So I just want a very
subtle animation. I wanted to move up just a tiny bit and have that smooth easing to
stop the animation. In terms of duration,
1.2 seconds, and I'm going to
change this to smooth. And once again, we're going to move this animation
to the very start. So all of these elements are now animating at the same time, and this is what we have so far. Okay, so that looks pretty good. Next, we have two other
elements we need to animate the dotted container
and this triangle. Let's do something different. Let's have them animate after the other
background elements. So in our case, the animation
would start right here, and let's have
this element slide in from the left to the right, and let's have the
triangle like maybe rotate in from the
right to the left. So when we look at
the big picture, these two elements
will basically do this. I don't know
if you saw that. They're going to basically
slide in from opposite sides. So with our cursor set
in the correct position, let's select the dots, let's add a slide. And let's set the properties in. The direction is correct, sliding from left to
right, and slide by, I'm going to use the
same value of 200 that I used here on the
triangle because I want to make this animation
be consistent. I'm going to have
the same 1.2 second duration and the
same smooth easing. Now, at the same time that
this animation starts, let's also bring in
the triangle, right? For this, let's
also use a slide. Slide in, but the direction
should be right to left. Same value of 200, 1.2 duration, same
easing of smooth. All right. So now let's
go back and let's see how the animation looks
like. Not bad. So we're animating these
initial elements first. And then once that
animation is complete, we start animating the dots
and the small triangle. And this is what we have so far. Cool. The next step is to
animate the text elements, and that's coming up
in the next lesson.
6. Let’s Animate: Create the Text Animations: In this lesson, we're
animating the text elements. These are the most important
parts of the slide, so we want to make
sure they look and feel just right. Let's do it. This is where we left off. And I want to start
my text animation by first having this central
element appear, okay? So let's select it. And let's use the same
blur and slide effect I showed you
previously because I think this would work just fine. Let's set the direction
to the bottom here. Let me actually zoom in. Slide by, I'm going to use
the same 200 pixel value. Duration is going to be 1.2, and I'm going to use the
same easing of smooth. Also, the animation will
apply to each character. So this is what we have
so far. So that's cool. But when exactly do we
trigger this animation? Is it after this finish? Like, would this animation work? I think if we do it like this, we have to wait a long time until the
actual text appears. So let's have the initial text, the 03, animate at the same time as the dots
in the small triangle. And for that, I can simply select the text element
from here and I can move it so it matches
the elements that I want it. So by doing this,
the text will start animating at the same time as the dots in the
small triangle. I like that. Now, what
about the rest of the text? Well, I would like this
to start animating after the big number
finishes its animation. And again, I'm going to take
advantage of the position of those text elements because the smaller text
is positioned on the top and the larger text
is positioned at the bottom, I would like these to slide in. The top text will slide in from the top and the bottom text will slide in from the bottom. Okay? And let's make it so this animation happens
at the same time. So we have this kind of slide
in effect simultaneously. Select the upper text element, and I'm going to
select a layer slide. Going to select the
top option here, slide by 200, duration
1.2 easing smooth. So that currently
looks like this. Okay, let's position
our playhead. At this mark right here, and we'll choose
the second text, and we'll also apply
a layer slide to it. This time, it's going to
come in from the bottom, slide by 200, 1.2 duration, and same easing of smooth. So now the animation looks
something like this. And let me actually make
this a little bit bigger. That's it. So this is the
sequence of events so far. In the first 1.2 seconds, we animate the circle, the triangle, the lines. In the next stretch, we animate the central text and the dots and
the small triangle. And finally, we animate the
other two text elements, one coming in from the bottom, from the top, and the other
coming in from the bottom. And so far, this animation
sits at around 3.7 seconds, and it's really up to you how long you want to make one
of these animated slides. Personally, I prefer to
make them a bit longer so I can trim them later
in editing, right? So for this example, let's make this entire sequence about 10 seconds long or
actually about 8 seconds long. So I'm going to select the
artboard and I'm going to change its duration to 8
seconds just like that. Okay. Now, what
exactly are we doing for the remainder of four
and something seconds? Well, this is where we can
add some slower animation, almost like residual animation. We can keep the background
elements moving at a slower rate just to keep that feeling of motion
of movement going. And we'll do that
in the next lesson.
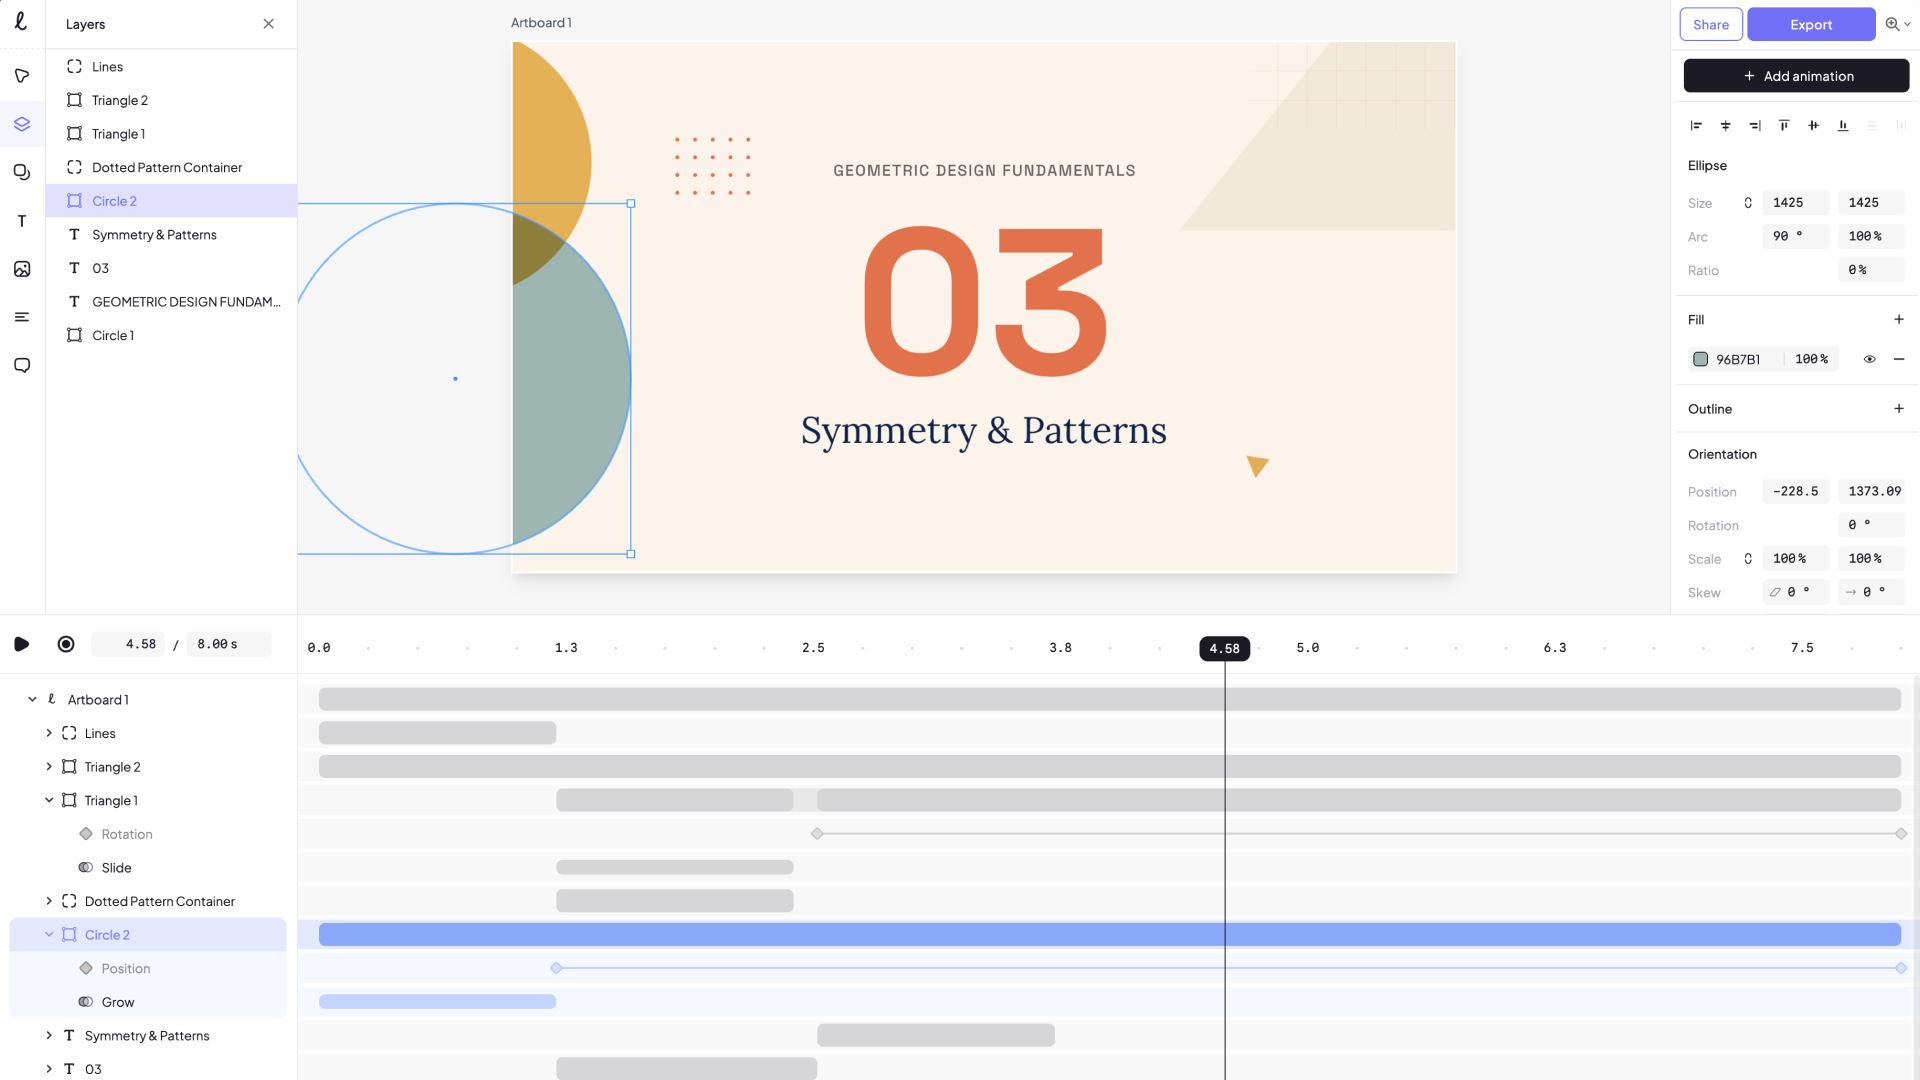
7. Let’s Animate: Create the Residual Animations: In this lesson, we're adding
some slower animations to the background shapes to keep things moving
until the very end. Then I'll export
the finished slide and show you how to use
it in the Vinci resolve, including how to transition from it into real video footage. Let's go. Now, let's
start with this circle. And I'm going to stop the
playhead right here at 1.2 when this circle
finishes its animation. Now, to create a
longer animation, we're going to use something
called custom keyframes. And when you select the element, you can enable this option
in the right panel. Now, with the elements selected, I can hover on the timeline
and notice I have plus signs. And when I click this plus sign, and let me actually
zoom in here. I can choose what kind
of keyframe I want. For this circle, I want to
change its position, right? I wanted to go
from here to here. So vertical position. So I'm going to choose position. Now, this creates a Rumbus
element right here, and that's the visual
indication of a keyframe. Then I'm going to
move my playhead to the very end at the
eight second mark, and I'm going to create
another keyframe here. But this time, the
position and I can change it from
this box here, I want it to be 200 pixels less, so I can say -200. And when I do that,
watch the circle, the circle is going to move up. So now, if I play
the animation from the very start, this
is what we have. Notice how the circle slowly moves up to the
position that I gave it. That's what a keyframe
animation does. It animates an element between keyframe one
and keyframe two. In my case, keyframe one was the position
the circle landed, so to speak, after it finished
its initial animation. And keyframe two was
the same position, but 200 pixels higher
on the Y axis. Now, since we moved
the circle up, let's create an
opposite effect and move the other circle down. So with that selected, I'm going to move my
playhead here once again and create a
keyframe for position. So I'm starting
at this position, but I wanted to end at a position at a Y position
that's 200 pixels lower. So I'm going to say plus 200. So now the animation looks
something like this. You see, now the two circles, are slowly moving on
the vertical axis. And that's exactly the
effect that I want. Now, the other two elements
I want to animate in the background are
the big triangle and the smaller triangle. For the big triangle, I
want to make it slide down, so I'm going to set my
playhead here at 1:20, select the triangle, and
then I'm going to click plus right here and
also select position. And then once again, I'm going to move
my playhead here. Make sure I follow the same row for my
position animation. Click, and then I'm going to add 200 pixels
to the position. So now the triangle
slowly moves down. And for the small triangle, let's see, the small triangle
ends the animation here. So I'm going to position
my playhead at 2.4, or I can place it at 2.5 just to be in
line with the others, and I can select the small
triangle. Click plus. And this time, let's
animate the rotation. Let's move the cursor
to the end once more, add another key frame, and this time, the rotation
value is going to be 180. And then if we play
from the beginning, it's going to look
something like this. And that's it.
That's how you can create an animated
slide in Lottielab. Now, let's go ahead
and export this, and then I'll show
you how to use it in a real video
editing software. We're going to click
on the Export button. Select video. This is a four K slide, and I want to use it
in a four K video, so I'm going to select four K. I'm going to select 60 FPS. And if you don't
know what the FPS stands for, that's
the frame rate. Essentially, the
higher the frame rate, the smoother the animation. Background, I'm going
to keep at normal, and then I'm going
to click Export. So this is going to take a few seconds while
the video will render. And it's recommended
that you keep this tab and focus for it
to render faster. Okay, it's done. We can see a preview of it here, and it just keeps
going on Auto loop. So let's download it. And let's watch it. This is an MP four file, and you can actually see it. It's an MP four file that's 4.3 megabytes. So
let's open that. And now it's playing
inside a video player. Let me actually make this
full screen and check it out. Very nice smooth animation, and this will play for 7 seconds or 8 seconds
the total duration. All right. Let's
exit out of this. And let's jump into the
Vinci resolve and show you how to use it as an
intro slide to video. Okay, so we're inside
the Venture resolve, where I loaded an MP four. Oops, that's a nice
thumbnail right there of, you know, a real live footage that I created for this lesson. And then we have the
four K animated slide. Now, I'm going to right click, create a new timeline. I'm going to hit Create, and then I'm going to
bring in the slide, and then I'm going to
bring in my actual video. So I'm just going to mute this audio track because we
don't really care about that. I'm only really interested in
how the end result will be. So let me actually just just
zoom in here a little bit. And let me scroll back
to the beginning, and I'll bring up the effects. I'll add a video
transition here, dip to color dissolve, and I'll add this
to the very start. And then maybe I'll trim this slide to about
I don't know, maybe 6 seconds,
something like this. Whatever fits my
current project. Let me delete that gap, and it's also add a
blur dissolve effect, and the result is going to
be something like this. It's a little bit
laggy because I'm also recording as
I'm doing this. And this video that's
playing back is four k 60, so it's quite
intensive on the CPU, but this is what it
looks like, essentially. So we go from
animated intro slide to a talking head
portion just like this. And that's how you can create an animated slide for
your videos in Lottielab. I'll see you in the
next lesson for the conclusion and next steps.
8. Conclusion & Next Steps: And that's a wrap. You made it to the
end of the class, and I just want
to say well done. You went from a blank file to a fully animated slide that you can actually use in your
videos. That's pretty cool. In this class, you
set up Lottielab, learned how the tool works, built all the shape animations, animated the text elements, and exported a finished
ready to use slide. I think that's a solid
set of skills you can now apply to any
animation project. Now, here are a few things I would encourage you to do next. First, take the slide we
built and make it yours. You have free access
to the Figma file, so change the colors, swap the fonts, and update
the text with your own. The template I provided
is just a starting point. The goal is for you to end up with something
that fits your style. And if my template
doesn't work for you, go ahead and create
your own from scratch. Second, if you want, go ahead and share your animations in the
class project section. It doesn't have to be perfect. You can send a screenshot, a screen recording or even the Lottielab link
to your animation. I think that sharing
your progress helps you, and it also helps other
students see what's possible. I would also love to
see what you created. And if you enjoy this class, it would mean a lot to me if you could leave a quick review. It can be just a sentence or
two about your experience. These reviews help other
students find the class, and they also help me understand what's working
and what I need to improve. So if this was useful to you, please consider
leaving a review. I read, and I highly
appreciate every single one. Now, on Skillshare, I
also teach about Figma, framer, and web design. So if you're interested
in those topics, head over to my profile and
check out my other classes. There's something
there for every level, whether you want to
get better at Figma, learn more about design
or explore other tools. I also run a YouTube channel where I post about
Figma, framer, and web design in general, but I usually post
shorter videos there. So if you're interested, you can find the
link on my profile. All right, that's
everything for me. Thank you so much for
taking this class. Now go make some animations
and use them in your videos, and I'll see you
in the next one. Bye for now.
 Adi Purdila, UI/UX Designer, Framer Developer, Educator