Transcripts
1. Introduction: Welcome to my class
Modern Texture rubbings. I'm Vanessa Seltofner.
I'm a printmaker, painter, and art educator with over 20 years
of experience. Texture rubbing is one of the oldest forms of printmaking. You take a soft cram
or soft pencil, rub it over a textured surface, and you create an accurate
print of that surface. A in this class, modern
texture rubbings, we'll create three projects, a five by seven
and eight by ten, and an 11 by 14, and we'll sign and
mat them so that you have three finished projects that you can hang in your home. I will take you through
all of the steps to create these three projects. We'll make our own
rubbing plates, or you can use
store bought ones. We'll practice with our
rubbing plates so that we have the textures we desire and
the colors that we desire. And then I'll take
you through the steps to make the five by seven, the eight by ten,
and the 11 by 14. We'll discuss different
color choices and different color layouts. And then when we're
done, we'll sign and mat these three artworks so that you have something to
hang in your home. If you enjoy this process, I created a bonus
project at the end so that you could have four artworks to
hang on your walls. Thank you for joining
me in this class, modern texture rubbings. I can't wait to create with you.
2. Supplies: I
3. Make Texture Plates: In this video, I'm going
to show you how to make four different rubbing plates
using simple supplies. To make our texture plates, we'll need base
pieces of card stock. I cut four of them. They're four by 4 " each. A size will do. Then you need another sheet
that you can cut up. You could also use a
manila file folder if you have one or maybe some
old greeting cards. Those would work too or
a piece of tagboard. The card stock I'm
using is 110 pound, but you could use 60 pound, 80 pound. It doesn't matter. I'll just give you a
different texture, different look to
it depending on how thick your card stock is. For this first one, I'm going to cut strips of card stock. I'm not worrying if
they're perfect. I'm not worrying if
they're straight. I'm just not making
them too fat. I want them on the skinny side. Then I'm going to glue them down onto my base piece
of card stock. Using just a regular glutick. Any glue will work, the glue
stick dries pretty quick, so you can use them right away. It might not last forever. But if you want it
to last forever, you could use a
regular white glue. I'm just going to speed
up the video now, but what I'm just doing
is gluing the strips of card stock to my background
piece of cardstock, making sure that I
leave a little space between each piece. So I'll speed that up so that you don't have to watch
me do the whole thing. It's pretty self explanatory. I'm just make sure
that everything gets glued down really well. Now that I have all
the stripes glued dot, I'm just going to flip it
over and trim the edges so that it stays a nice
square. It's not necessary. It's just to keep
everything neat and tidy. And then that texture plate
or rubbing plate is done, it'll give us a striped pattern. Now for the second texture
plate or rubbing plate, I'm going to cut circles. Again, I'm not going to
try to make them perfect. I am not going to try to
make them the same size. They can be wobbly. I'm just going to rough cut circles and they're going to get glued to my background
piece of card stock, and I'm just going to make sure that I leave a little
space between them. Right now we have our
second rubbing plate done and you can see that my circles are not perfect
and they look like rocks. So we'll move on to
the third one now. For the third rubbing plate, I'm going to use a
very simple shape. I'm going to use a triangle
and it's really easy to cut. I cut two wide strips and then I just cut
triangles out of them. Again, not making
sure they're perfect. And then I'm just going to
glue all of these triangles randomly on my background piece and making sure that I leave
a little space between them. The third rubbing plate is done. Again, I need to
trim the edges on this one because I went off
of the piece of card stock. That'll also help it so that the triangles don't
get caught on anything and get
ripped off if they're even with the edges
of the card stock. We have one more to make
and this one is going to be a combination of
stripes and triangles. The fourth texture
plate is done. Now you have four to use. They were very simple. They don't have to be difficult, they don't have to take you
a long time. Simple is good. Just make sure that all of
them have space in between. Otherwise, it's not going to
pick up the texture as well. Now keep these four
texture plates. We're going to move on. The next video is practicing with our
handmade texture plates.
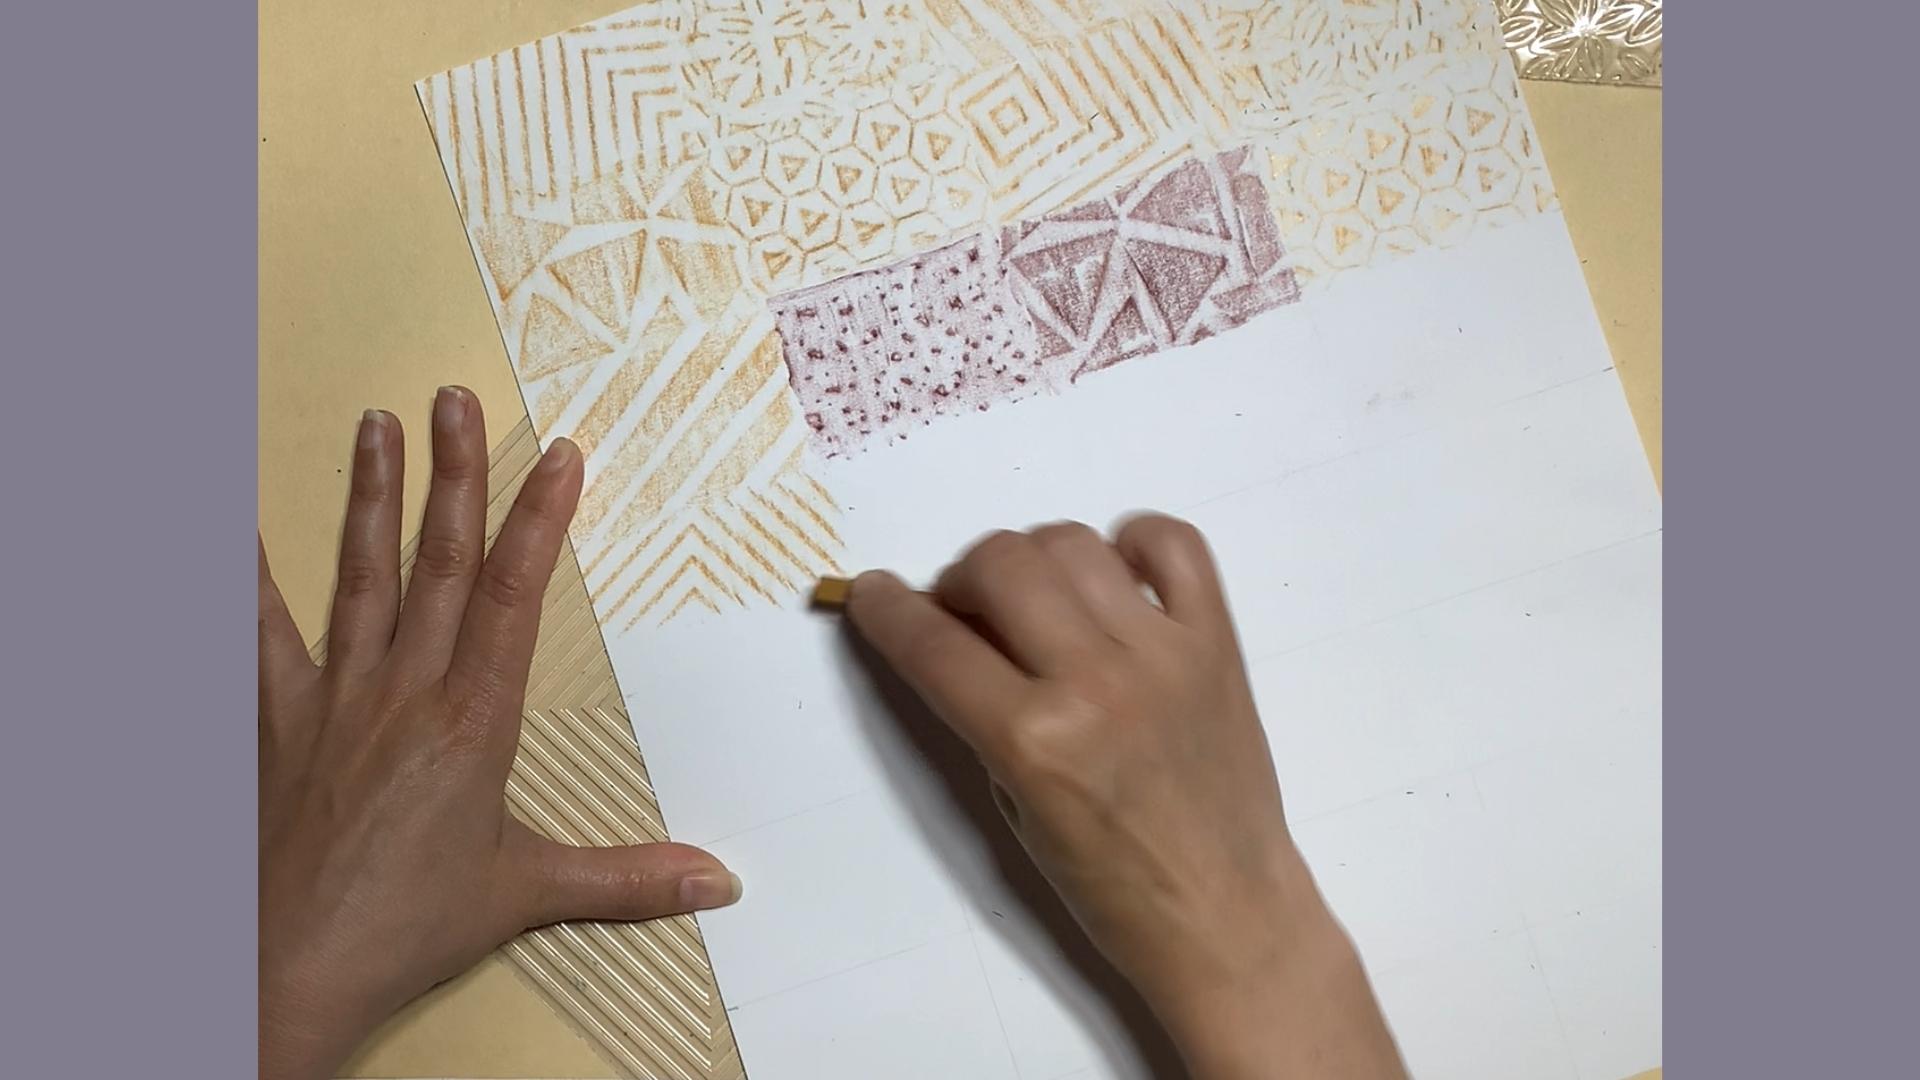
4. Practice Texture Plates: In this video,
we'll practice with our homemade texture plates or ones that you
purchase from the store. We'll practice with
different colors until we find the
ones that we like. All right. Now it's time to practice
with our rubbing plates. But first, we're going
to make a gritted piece of paper that we can practice on and put one texture in each box
so we can compare them. I'm going to take a
ruler and a pencil. I'm going to measure every 2 " on this piece of copy paper, and then I'll connect
them and make a grid pattern so that I have boxes to put
my textures in. So measuring every 2 " on
each side of the paper. And because this isn't a perfect square or
perfect measurements, you need to make sure that you measure the paper the same way. So you'll see that I measured on the top
of my copy paper, and then I measured
the same way on the bottom so that I start from the same side so
that they're equal. And now we take our rulers
and line up our marks and use the straight edge of
the ruler to make straight lines so that we end
up with a gridded pattern. Before we practice
our rubbing plates, I want to show you
one idea that I made. This is a sample page of all of the colors out of my colored
pencil stick package. I used the same
rubbing plate and I just did a test page
of all of my colors. So that's an option
that you could do too. Now it's time to choose which texture plates
you're going to use. You can use the handmade
ones that we made, or you can use
store bought ones. Either is spin. They work
a little bit differently. The handmade ones are a little softer than the store
bought plastic ones. And the store bought plastic
ones come in various looks. There's colored plastic,
there's clear plastic, all different kinds of
textures you can find. The texture plate goes under
the paper and you can choose from these colored pencil sticks or color pencils work too. I find that the
colored pencil sticks work a little bit easier, but they do give
a different look than the colored pencils. I'm going to show you
both of them so you can see the difference
between the two, but either kind works. If you don't have the
colored pencil sticks, go ahead and use your
regular colored pencils. So the color pencil stick, you just rub right
over the paper. It goes a little faster
than a colored pencil will, but it does give a different look than the colored pencil. I'll do that same
texture plate with a colored pencil and we'll
see what the difference is. And you want to use the side
of your colored pencil, not the very sharp tip. You kind of want to have
it tilted on the side, so you're using more of a
flat surface rather than a pointy tip because you can
break through your paper. It will also look more
scratchy if you use the tip. You can see the difference here. The colored pencil
stick didn't go into the grooves of the texture plate as much as the
colored pencil did. So with the colored pencil, you get more of a soft look to it rather
than any hard edges. So this is another of
the handmade ones, and I'll do the
same thing colored pencil stick versus
a colored pencil. And you'll see on this one, too, the same thing happens. The colored pencil stick doesn't get into the grooves as much. It leaves more white behind. And it also depends on the
thickness of your paper. Copy paper is going to look
different than thicker paper. So this pencil was
a little pointy, so I'm using some of it to get
more of a flat edge on it. And when you are practicing, you do need to go a little slower near the
edge of your paper. Sometimes your pencil gets
stuck on it and pulls it, so you do have to go a little
bit slower on the edge, and maybe you have to change the angle of your pencil
on the edge, too. So that's why we're practicing so that when we go
to the real project, we have all the kinks out. Now I'm going to practice
on a store bought one. Same thing I'm going to do with the pencil stick and then a color pencil so you
can see the difference. From here, I just want you
to continue practicing. You can fill the whole page
if you want to and continue on until you feel comfortable to start
your first project. Thank you for creating with me, and I can't wait to start
a project with you.
5. Preparing Paper: In this video, I'm going
to show you how to grid three different size
papers for our projects, a five by seven
and eight by ten, and an 11 by 14. We're going to first
start with the eight by ten because it's
the easiest one. We're just going to use
boxes that are 2 " by 2 ". You're going to make a
mark at the two, four, six for the top edge
and on the side edge, you're going to make
a mark at the two, four, six and eight. You're going to do that
for all four sides. And then we're going
to connect our marks. I'm going to draw my lines
dark so that you can see them, but you should draw yours
as light as you can, because when we get to
working on the projects, we will probably have
to do some erasing. So you're going to want it very lightly so that it erases away. Right now we have a
completed eight by ten, and we're going to
move on to the five by seven which uses
different dimensions. For the five by seven, we're going to use the measurements of one and a quarter inch by one
and three quarter inches. On the short edge,
we will measure every one and a quarter
inch and on the long edge, we will measure every one
and three quarters inch. This will give us some
rectangles to work with. It's good dimensions that work with the five by
seven sized paper. On the short edge,
we'll make a mark at the one and a quarter inch. The 2.5 inch and the three
and three quarters inch. On the long side, we'll make marks at the one
and three quarter inch, the 3.5 inch and the five and a quarter inch. And then you use light
lines to connect all of your marks just like we
did on the eight by ten. Now we have a completed five by seven and a completed
eight by ten, and we only have one more to do, which is the 11 by 14. For the 11 by 14, we'll be using the
measurements of two and three quarters by
one and three quarters inch. Each of our rectangles is two and three quarters inches by one and three quarter inch. On the short side, you will make a mark at the
two and three quarters inch, the 5.5 inch, and the
eight and a quarter inch. On the long side,
we'll be making marks at the one and
three quarter inch. The 3.5 inch, the five
and a quarter inch, the seven inch, the eight
and three quarters inch. And the 10.5 inch. And if you have a
long enough ruler, the next measurement is
12 and a quarter inch. And if you don't have
a long enough ruler, then you just measure one and three quarters inch from
the 10.5 inch mark. We're going to connect
our lines like we did on the other two pieces. And since this piece is
longer than my ruler, when I get to the
side that is long, I'm going to use another
piece of paper to use as a ruler since this one
doesn't go all the way across the 14
side of the paper. We now have three
completed papers, a five by seven
and eight by ten, and an 11 by 14, and we're ready to go
on to the next videos that will show different
color layouts, different texture plate
layouts for those three sizes, and we will create our
three finished projects.
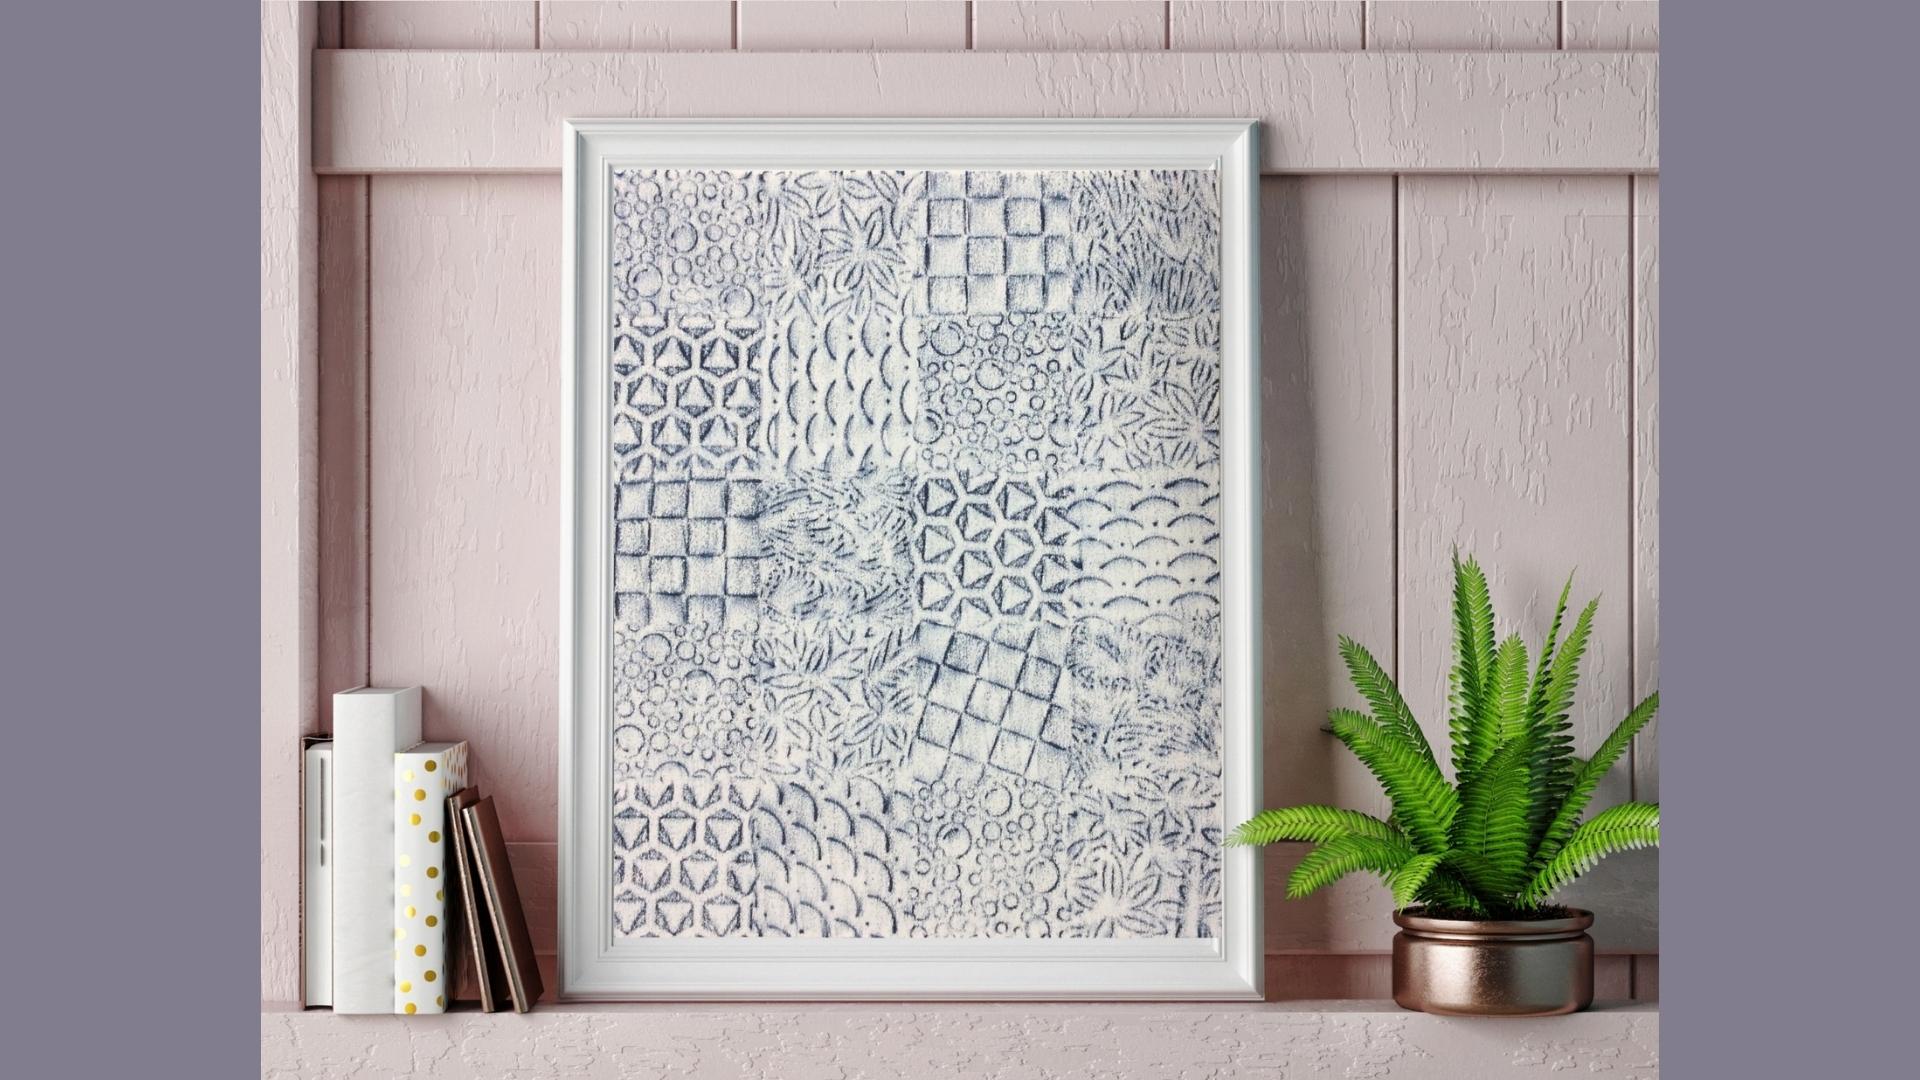
6. Let's Make an 8x10: In this video, we're going
to make an eight by ten. I have this one that I
did only using one color. But in the video,
I'm going to make this one where I
use three colors. I have my eight by
ten that I made in the preparing
your paper video, and then I made another
one with lighter lines so that they don't show up so much when I do the
actual artwork. On this one, I did previously
make a monochromatic piece, but I'm going to do another
monochromatic piece using only one color, but various tints and
shades of that color. I'm going to use three
different blues on this one. It's still monochromatic because it one color family of blue, but I'm going to use
a dark a medium, and a light on this one. I'm going to use my homemade
texture plate on this one, the one that I made
with the circles. So I have a dark blue, a medium blue, and a light
blue for this project. I'm going to start
with the dark blue in the upper corner staying inside my two inch square that I have on this
eight by ten paper. And then I'm gonna
do the medium blue next using the same
rubbing plate, the same texture plate. And then third, I'll
use the light blue. From looking at
my practice sheet that I made with all
my color layouts, I see that the light
blue really showed a pencil line between the
medium and light color. I'm going to erase that line so that it's
not going to be seen. If I erase it later, then I'm going to erase the
colored pencil. I erase it first just
remembering where it is and then I can use
the colored pencil. Anytime you have a
light color and you need to erase your lines, you just do it right before you use the texture plate and
you can just remember where the line was or erase it just enough so that you can just barely tell where it was. I'm just going to
repeat my pattern. So medium light, dark medium light is
going to be my pattern. And I'm just going to finish
up the whole page like that, erasing when I need to so that my pencil lines don't show
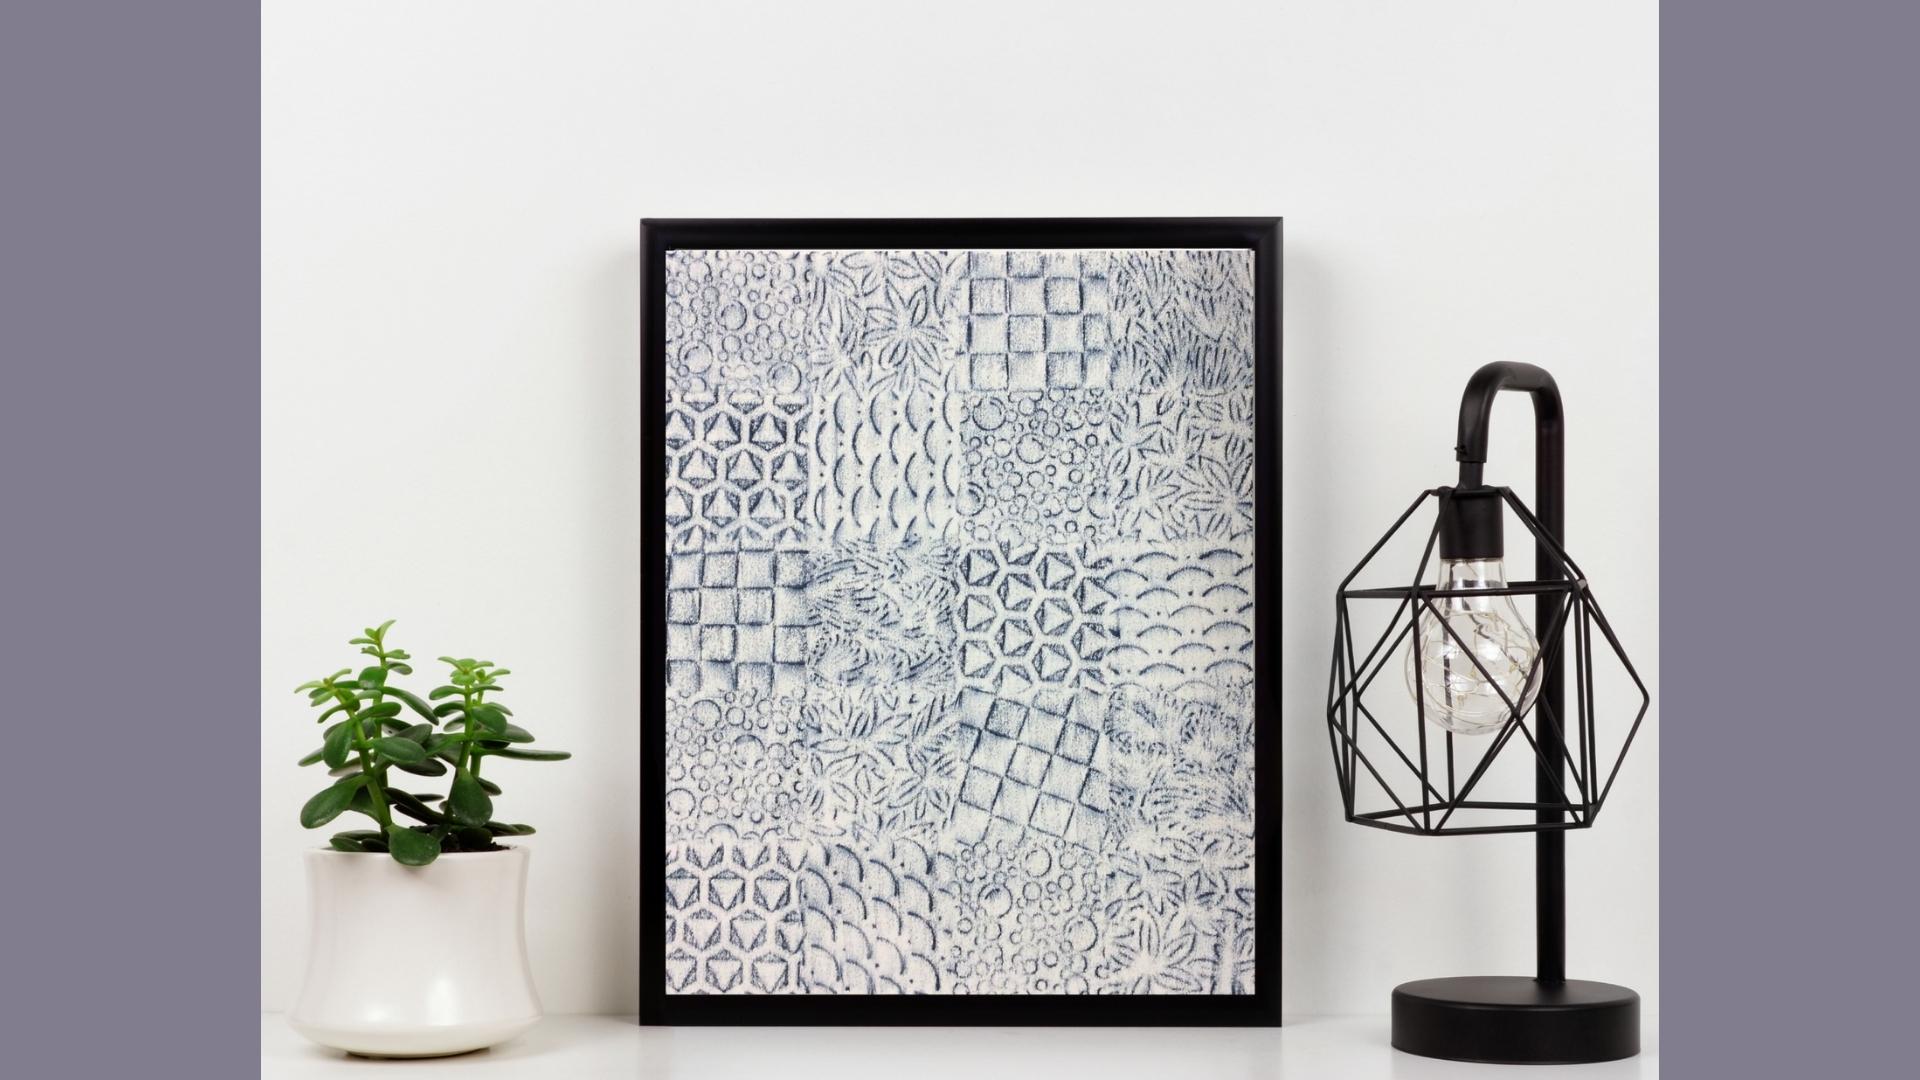
when my artwork is finished. We now have a finished eight by ten using a
monochromatic scheme, using three different tints
and shades of the same color. I hope you enjoyed making
this project with me and our next project is
going to be an 11 by 14. We'll have rectangles instead
of squares to fill in for that one and we'll be
using a two color scheme, focusing on the
center of our piece.
7. Let's Make a 5x7: In this video, we're going
to make a five by seven, the smallest of our projects. We're going to make this
a monochromatic scheme, and we're only going
to use one color. I have my five by seven paper that I made in the
previous video, and then I also made another
one with lighter lines. Here's a couple that I made before five by
seven and eight by ten and an 11 by 14 and these all use the monochromatic
scheme of one color. We're going to make
the five by 71 color. And we're going to use six
different texture plates and then repeat that pattern. You don't have to use six
different texture plates. You could use all of the same, or you could use two or three. We're going to use all of the same when we do
our eight by ten. So if you wanted to wait
to do that for that one, otherwise, whatever
texture plates you have, it will work for any number. While I'm using my
colored pencil, I'm making sure that I'm
going a little slower on the edges so that I
don't rip the paper. Now, I can still
see my pencil lines from making the gridded pattern on the paper that
I'm going to follow. If you're using a very
light colored pencil, the lines will show, so you might want to
erase them as you go. Um I'm using a dark color, so I don't need to erase them. It gets covered up with
the colored pencil. But if you're
seeing that you can still see those pencil lines, you can erase them as you go, before you do the box, you can erase them and get them out of the
way and then just line up where
you're going to put your rubbing plate texture. From here, I'm just
going to continue on using a pattern of
six texture plates, one through six and then repeat
until you get to the end. Now we have a finished
five by seven, and if you want to mat,
you're five by seven. I have a video on how
to do that later. Otherwise, you can move on
to making an eight by ten using a different
color scheme and a different layout with
the texture plates.
8. Let's Make an 11x14: In this video, we're going
to make an 11 by 14. I have one here
that I made before. And then the video, I made this one with two
colors instead. For this project,
I have my 11 by 14 paper that I prepared
in the previous video. Then I'm going to use
one that I made with lighter lines so that they don't show up on my finished piece. An 11 by 14, it's quite large. It ends up being rectangles
after we laid it out. I'm going to use two
colors on my next one. I'm going to use the same
color that I used on my monochromatic
one and I'm going to add in this
brownish red color that I think goes well with it and I'm going to make a piece that has a focus
point in the center. I'm going to use on this one, a few homemade texture
and rubbing plates, and then a few store
bought rubbing plates. I'm going to use six different
ones for this project. I'm also going to use one of the same texture plates that I used in my
monochromatic piece. That way they have
another similarity between them besides
the same color. That way, when I
display them together, they'll match even more without
being exactly the same. Like I said before, I'm going to use six different
rubbing plates. I'm going to repeat those
six rubbing plates. I'm going to do
two complete rows with the light brown color. Then when I get to the third row is where I need
to do something a little bit different
so that I have that focus point of the
second color in the center. I'm going to work on two rows of the light brown and
then I'll speed up the video and come back to the third row and let you know how I do
that one differently. For the third row, I'm still
going to continue with my six rubbing plates
in that same order. So I'm repeating
one through six, one through six for
the whole piece, except on the third row, I'm only going to
do one light brown, and then I'm going to do two of my darker reddish
brown color. So the reddish brown
color is going to be in the center of my piece. With the light brown surrounding the reddish brown
that's in the center. For the third row, I'm going to do light brown and then two reddish brown colors and then a light brown again. I'm going to continue that
same pattern of light, reddish brown, reddish
brown, light brown. It's going to be rows three, four, five and six. And then the last two rows will be the first two rows,
just the light brown. That way I'll end up with the reddish brown right
in the center. And Now we have a finished 11 by 14. The 11 by 14 takes quite a bit longer than the eight by
ten and the five by seven, but the results are beautiful. I've decided that it would be great to
make a set of three, doing a monochromatic piece on one edge and
then doing one with a focus point in
the center and then doing another monochromatic one and displaying them
as a set of three. That's an idea of something that you could take
further if you like this process
and this project. We have our three
projects done now our five by seven
are eight by ten, and are 11 by 14, and I have a bonus project. If you enjoyed doing this, it's a different layout
than we have done so far.
9. Bonus Project 5x7: In this bonus video, we're going to make a
five by seven again. But this time, we're going
to use a different layout. We're going to do some
different measuring. For this five by seven piece, we're going to still
have boxes to fill in, but they're all going
to be different sizes so we have a different
kind of layout. We have big spaces to fill
and small spaces to fill. On the short edge of our paper, we're going to make a mark at the two inch and the three inch. Then we're going to do the
same thing on the bottom, make a mark at the two
inch and the three inch. Then we're going to only connect the two inch marks for now. We're going to save the
three inch marks for later. And then turn your paper
for the long edge. For the long edge of our paper, we're going to make a
mark at the two inch, and then we're going to go down to that line that
we already drew and make a mark at the 3.5
inch and the five inch. Then at the bottom of the page, we're going to make a
mark at the two inch, the 3.5 inch, and the five inch. We're going to connect
the two inch marks from all the way to the bottom. Then we're going to
start at that line and connect our 3.5 inch marks and our
five inch marks. Using the three inch mark that we've already made
on our short edges, we're now going to
connect two spots. We're going to connect
from the top to the first line and then skip a space and connect the second
line to the third line. Now, I'm just going
to grab one that I did earlier with lighter lines. I did darker lines so that you could see
them in the video. But lighter lines
will work better in case I need to
do any erasing. And I'm only going to use one rubbing plate for
this entire piece, and I'm going to
use four colors, and each color gets used twice. So if you look at the one
that I already created, I have a light brown on the left hand side in
a big long rectangle. And then if you go
over two spaces, you'll see it again towards the bottom in a smaller space. And then the yellow I have
at the top and the bottom, and then a darker brown in the top right corner and
in the middle of the page, and then a reddish brown
the bottom left corner, and then up towards
the top of the page. So just follow along with me
as I create this new one, and you'll see where I put
the different blues and the black and how they
each get used twice. And now we have a finished
five by seven using a different layout for your bonus project.
I hope you enjoyed.
10. Signing and Matting Your Artwork: In this video, I'm going to
show you how and where to sign your artwork
and how to put it in a mat so that you can
present it in your home. When signing your artwork, you usually want to choose
one of the bottom corners, most likely the
right hand corner, but the left hand
corner works as well. However, you need to
make sure that you don't sign too close to
the edge because you have to leave room for the
mat because the mat will take about a quarter of an inch
off each edge of your paper. When you've decided where
to sign your artwork, you can choose to
use your initials, your whole name, you can
print, you can do cursive. You can do your first
initial and your last name. It's entirely up to you. However you do want to pick
one and stick with it. I've tried a couple of
different ones in the past and finally decided to use my first
initial and my last name, and I'm going to continue
to do that from now on. It just took me a bit
of time to decide. But if you can decide right away, it'll
work best for you. Matting your artwork is very simple if you made
your artwork a standard size or the size for the mat that
you're going to use. I have a five by seven mat to
fit my five by seven paper, and I'm going to tape it on the back and all you need
is one piece at the top. It's called a hinge
method of matting and that will keep the paper in
place and it does hang loose, but if you can get a
backing for your mat, you can put that
underneath and then it stays stabilized and
goes right into a frame. This mat fit a five
by seven paper, and the actual
outside dimensions of the mat are an eight by ten. So there, again,
it goes right into a standard sized
frame. Very simple. I hope you'll consider matting at least one of your artworks. Maybe you want to put
it in your own home, maybe you want to
give it as a gift, but putting a mat on it just elevates it to another level.
11. Final Thoughts: Thank you for
following along with my class modern
texture rubbings. I hope you enjoyed the time
that we created together, and I hope that you have
some finished artwork that you can now
display on your walls. I hope that you felt
that this was a simple, easy, enjoyable project.
 Vanessa Selthofner, Printmaker, Painter & Art Educator