Transcripts
1. Class Introduction & Affinity Photo: Hello, everyone, and welcome
back to my Skillshare page. I have a brand new Skillshare
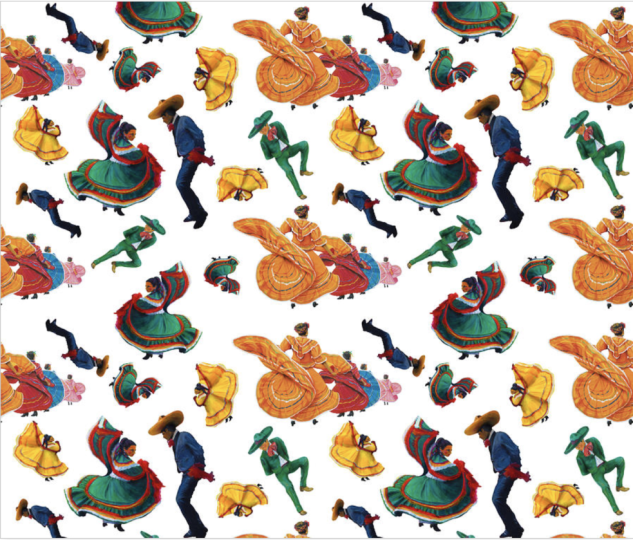
course for you guys, and this one is How to create a seamless pattern
in Affinity Photo. Now, this is going to work with any version of Affinity Photo. And if you haven't already
heard of this program, this is an alternative
to Photoshop, and it used to be a
one time purchase, but now it is completely free. Now, this is a type of
pattern that you are able to use with any
of your own artwork. If you happen to
have any drawings in P&G form and you wanted to make a complete seamless
pattern out of it, this is going to be
the class for you. And you can even size
it up or down and even apply this to many print
on demand websites. Before we get started, my name is Ivan Florentino Ramirez, and I am mostly a fine artist, but I do work with
digital, pencil art, gesture drawing,
acrylic, oil painting, and even watercolor as well. And some of the newest
ones include drawing with just ballpoint pens
and smaller sketchbooks. And they do vary in
length 15-20 minutes, half an hour, all the way
up to over 1 hour courses. And many of my
skill share classes revolve around the learning
through pop culture, but I've been integrating a lot of different mediums so
we can have a variety. So, are you ready to create your first seamless pattern in Affinity Photo? Let's begin.
2. How to Make A Seamless Pattern: Okay, let's create our pattern by opening up Affinity Photo. Now, the newest affinity photo
is colored here in green. The old one was with
this pink and purple, but both work exactly the same. You're gonna want to start
by opening a file new, making the page width
1,000 by 1,000 pixels. I like to keep it at DPI 300 just to make sure
everything is sharp and clear and the resolution is
pretty high. Let's create. You can import all of your images that you're going to need to
make the pattern. The easiest way
is to go to file, place, open your source folder. And for this pattern, I want
to have a clear background, so it's not a white background. I'm going to duplicate this, and we're going to
play around with it. So what I want to do
is make this a bit smaller and just have it
in this area right here. Okay, so what you want to do
is open the Transform panel. So go to view studio. Transform, and this
is going to open up the X and Y axis of any of
the images that you have. So when you click on it,
this one is on the X axis. And because we made our
entire page by 1,000 pixels, all we have to do is
do plus 1,000 Enter, and it'll move it to
the other side equally. So what I am going
to do is go ahead and copy and duplicate this. And as you can see, we can move this in any direction
that we want, and it'll be even when we
make this tile pattern. So now place them as you want
anywhere you would like. And here's a demonstration of putting something in the Yaxs. So we're going to duplicate
this green dancer right here. We want to duplicate it. You want to do -1,000 pixels, and it'll move it
straight to the top. Anytime you click on
one of your images, you can see it moving on the bottom where
it says transform. It may seem a bit confusing
at first, but you'll see it. As long as you put
the negative and the positive numbers exactly
where I have it here, your pattern your pattern
will come out seamless. And now it's just a matter of creating the pattern
that you want. Play around with different
sizes, rotate your images, make sure there's
a color balance with whatever objects
you're using, and as long as it's
varied and eye catching, you'll have an
interesting pattern. Okay. Once you decide that you like how your pattern looks, we're going to go
to File, Export. And I'm keeping this as a PNG to keep a clear,
transparent background. So let's export this. I'm just going to
title it tile pattern. Save. Gonna open the
file we just created. So open I'm going to go to new pattern
layer from selection, and now it creates
a special pattern. We're going to
create a new file, and specifically for Redbubble, I have it saved as a
template right here, and this is the sizes
that I know will fit all of the items in Redbubble.
So we're going to create. We go back to our tile pattern. You go to copy and
paste with Control V. We get at our move tool. And just like that, you created a seamless pattern
that can be rotated, upscaled, down scaled, and it's ready to be uploaded to any
print on demand website. Now, with these
types of patterns, as long as you know
your dimensions that you have to put in for whatever project or print on them and website that you
want to upload these two. Like, for example,
I already have some selected from Society six, things like Etsy, Red
bubble, fine art America. Those are just some
different types of places you can put them in. This pattern can be
scaled up and down. It's very versatile. So let me know what you
think of this course. Was it easy to follow? And if you do have any
patterns that you did create, put them in the
project section of this class. Share with everyone. Let's start a conversation about these types
of digital files, and I'll see you
in my next course. Thank you so much for watching. And I will see you in
the next one. Bye bye.
3. My Final Thoughts: Okay, everyone,
hopefully you enjoyed taking my class on how to
make repeating patterns. I just wanted to show
you guys that here on my fine art America page, this is where I've
done so many types of repeating patterns. They're varied. I
usually started with one PNG file or photo. For example, this one
with a red colored dress, which is actually going to be a future acrylic painting
course, so stay tuned for that. So, this one is a PNG
with no background. And what I decided to do was turn that into a repeating
pattern like this. And this one is one with varied
sizes to make it unique. I flipped some over. Some of them are reversed just to kind of make
it interesting. So yeah, with fine art America, any Print on Demand website, the method that I showed you
with repeating patterns, you can do anything you
like with your own artwork. So this is the one
that I used as an example when I was
using that course. So one of the things
that you have to keep in mind is keep things varied, make sure the pattern
looks interesting, play around with sizes, make sure there's not
too much empty space. And the repeating pattern will come together once you
play around with it. For example, with this one, this strawberry popsicle one, I wanted to make sure that
it wasn't just straight, so I kind of tilted some of
these, flipped the over, took some of these
strawberry bows that I had and hearts and
added them to it, as well. And these will fit neatly
in a lot of these types of print products and merges
that you're able to get. So I hope you guys had
fun with this class, and I can't wait to see how you guys do with your patterns. Will you be using it
for your own artwork? Will you be using these as a print pattern as a pattern for a phone
background for your laptop? You can have that as a
background for your tablet, iPad, computer, your phone. There's so much things
you can do with it. And obviously, all
you have to do is change the dimension size depending on where
you're going to put it. And they're easily scalable. Hopefully you enjoy the course. And if you do, make
sure you leave a review and upload your project in the project section
of the course. Thank you so much for watching, and I'll see you in
the next one. Bye bye.
 IVAN RAMIREZ, Artist, Painter & Youtuber