Transcripts
1. Introduction to the Class: You're planning on selling
something could be a product, a service, a course,
or a subscription. But you realize that
the first thing you need is a sales funnel. In this course, you're going to learn how to create
a sales funnel, which you can then send traffic to in order to generate sales. A typical sales funnel must have a sales page which you
can send traffic to. It includes the product
information, the videos, the images, and the copywriting which convinces the
lead to buy from you. Then it must also
have a checkout page, which is also sometimes
called the order form, where they enter their
payment information. But once you're on your way, you can then start
adding more steps and making a more
elaborate sales funnel, which could include upselling
and thank you pages. To get started building
a sales funnel, you need to use a platform, and there are many out there, but most good ones are paid. But if you're just starting out and you cannot
afford to pay, then I would recommend you use system dot IO with the
link I'm adding down below because it will give you
free access and you'll get other complimentary
services along with building a sales
funnel for free. In order to set the
expectations right, let's discuss the learning
objectives for this course. Firstly, you will learn which Dragon draw platform is easy to use quick and effective
in building a sales funnel. Then you will learn the various
stages of a sales funnel. Then you will learn how
to build web pages and link them in a funnel
with no coding involved. Then you will learn how to
connect a sales funnel with a product or a service or a
course, or a subscription. Lastly, you will also be introduced to the various
ways in which you can generate interest and traffic for your
product or service. One thing for sure is that there will be other
learning points along the way for you in every
video lesson. Let's begin.
2. The Drag & Drop Builder we'll use: Systeme.io: Hey, guys, this is the
first in a series of video lessons in which I'll be teaching you how to
set up a sales funnel. Effectively, I'll be using system dot IO as the platform
throughout this series. You should go ahead and sign
up and I'll drop the link down below in which you can
use system dot IO for free. That's a very good thing
because you're starting out probably right now and
you don't want to spend. As you scale, you'll be
able to upgrade your plan. But to start out with, you can set up a sales
funnel for free. You can set up a course
or product or sales page or link it to your
stripe account or PayPal account for free. And you can also do e
mail marketing for free. It's a very handy too and I'll drop the link out below,
make sure you use it. I want to start by
showing you around before we jump in and
build a sales funnel out. I want you to be familiar
with the platform. This is where we're
at the dashboard. Here are the contacts or leads, and you can add them
to a specific tag so that you can distinguish between certain types of
leads that you have, and here we'll be
building a fun. This is where we'll
go ultimately. Here you can set up
e mail automation. You can set up a newsletter, a campaign for e mail marketing, or you can view the
statistics and reports. Here you can set up a blog, you can create blog post, you can link the
blog to your domain, or you can use the
default domain that System IO gives you. Here are automations. You don't want to
use them right now. You can use them later
on when you're more experienced and you're
doing a lot of other stuff. But right now for the
sake of this video, this is not very important. This is very important products. Why? Because when you're
setting up a sales page, you usually link it to a product or a
service or a course. You can set up
physical products, you can set up
courses over here, or it could be access
to a community. You can be selling courses
to a specific community, and you can set up coupons specific coupon that
you want to give out, or you can see the orders that you're receiving
here as well. Here you can see the sales. Transactions, all things
monitory, subscriptions, if you're selling
subscription services, and affiliate, if
you're an affiliate, so you can see both
of them as well. Here is the help. We're going to jump in to
funnels right away.
3. Using the Page Editor to build a Sales Page: We took a break and
we're back now. I'm going to jump right
into funnels now. Here, I'm creating a Linkn
sales navigator funnel. I just named this. You can name it anything. I'm going to click
on this funnel and on the left,
you're seeing steps. These are very important why because usually there are
three steps in any funnel, apart from when you're
directing traffic. Let's say you're
directing traffic from Facebook or let's say if you're directing
traffic from Google, then you're sending traffic
to a specific sales page. All that traffic that you're
buying ads for or doing SEO f or doing marketing for all that traffic that
leads to your sales page. This is the sales page
that is the first step. It's the order. First
step is sales page. Second step is order form, and third step is
thank you page. But you can also
create more steps. You can upsell, you can create multiple
types of pages here. I'm going to click on
Add Step as you saw. I'm going to do it
again. Add step is usually how people start. I'm already building this out. I wanted to show
you how steps are. I pre built it and
I'm showing you now. But if you're adding when you're starting from scratching, you're adding the first
step So you're going to click on Add Step and you're
going to go into type, and you're going to
select specific type. I selected sales page and
then I selected order form, and then I selected
thank you page because that's what a
typical funnel looks like. But you can also select up sale or if you're selling a webinar, you can do multiple
types of pages here. But I'm going to
go into sales page to show you some templates, because you'll be getting templates that you
can start with. You can start editing
those templates. I'm going to give it a
name, test sales page. I'm clicking on safe and
now I'll see templates. Depends on what you're selling, because I don't want to go into something that shows
food in the template. Why? Because if I'm selling lead generation or if
I'm selling a course, or if I'm selling
a marketing plan, I don't want to go into these images that
I'm already seeing. I don't want to go
into these templates. What I'm going to do is I'm
going to let me move this. I'm going to click on
next. This is a good one. I'm going to click on preview because I'm seeing leads here. If I'm selling a lead
generation service or course or whatever it is, I'm going to go into
this, I'm going to see if this is what
I want to edit. This is the sample and I
think it's a good one. I'm going to go and select this. I'm going to click on cross
here, and I'll select this. What I have to do is I
have to now edit it out. I'm going to click on Edit Page. Here you can see that there are multiple types of
elements and blocks. What's the difference? What's
elements and what's blocks? Elements are individual elements that usually make up blocks. If you combine elements, a block is formed and it gives the combination
of elements, it gives a block
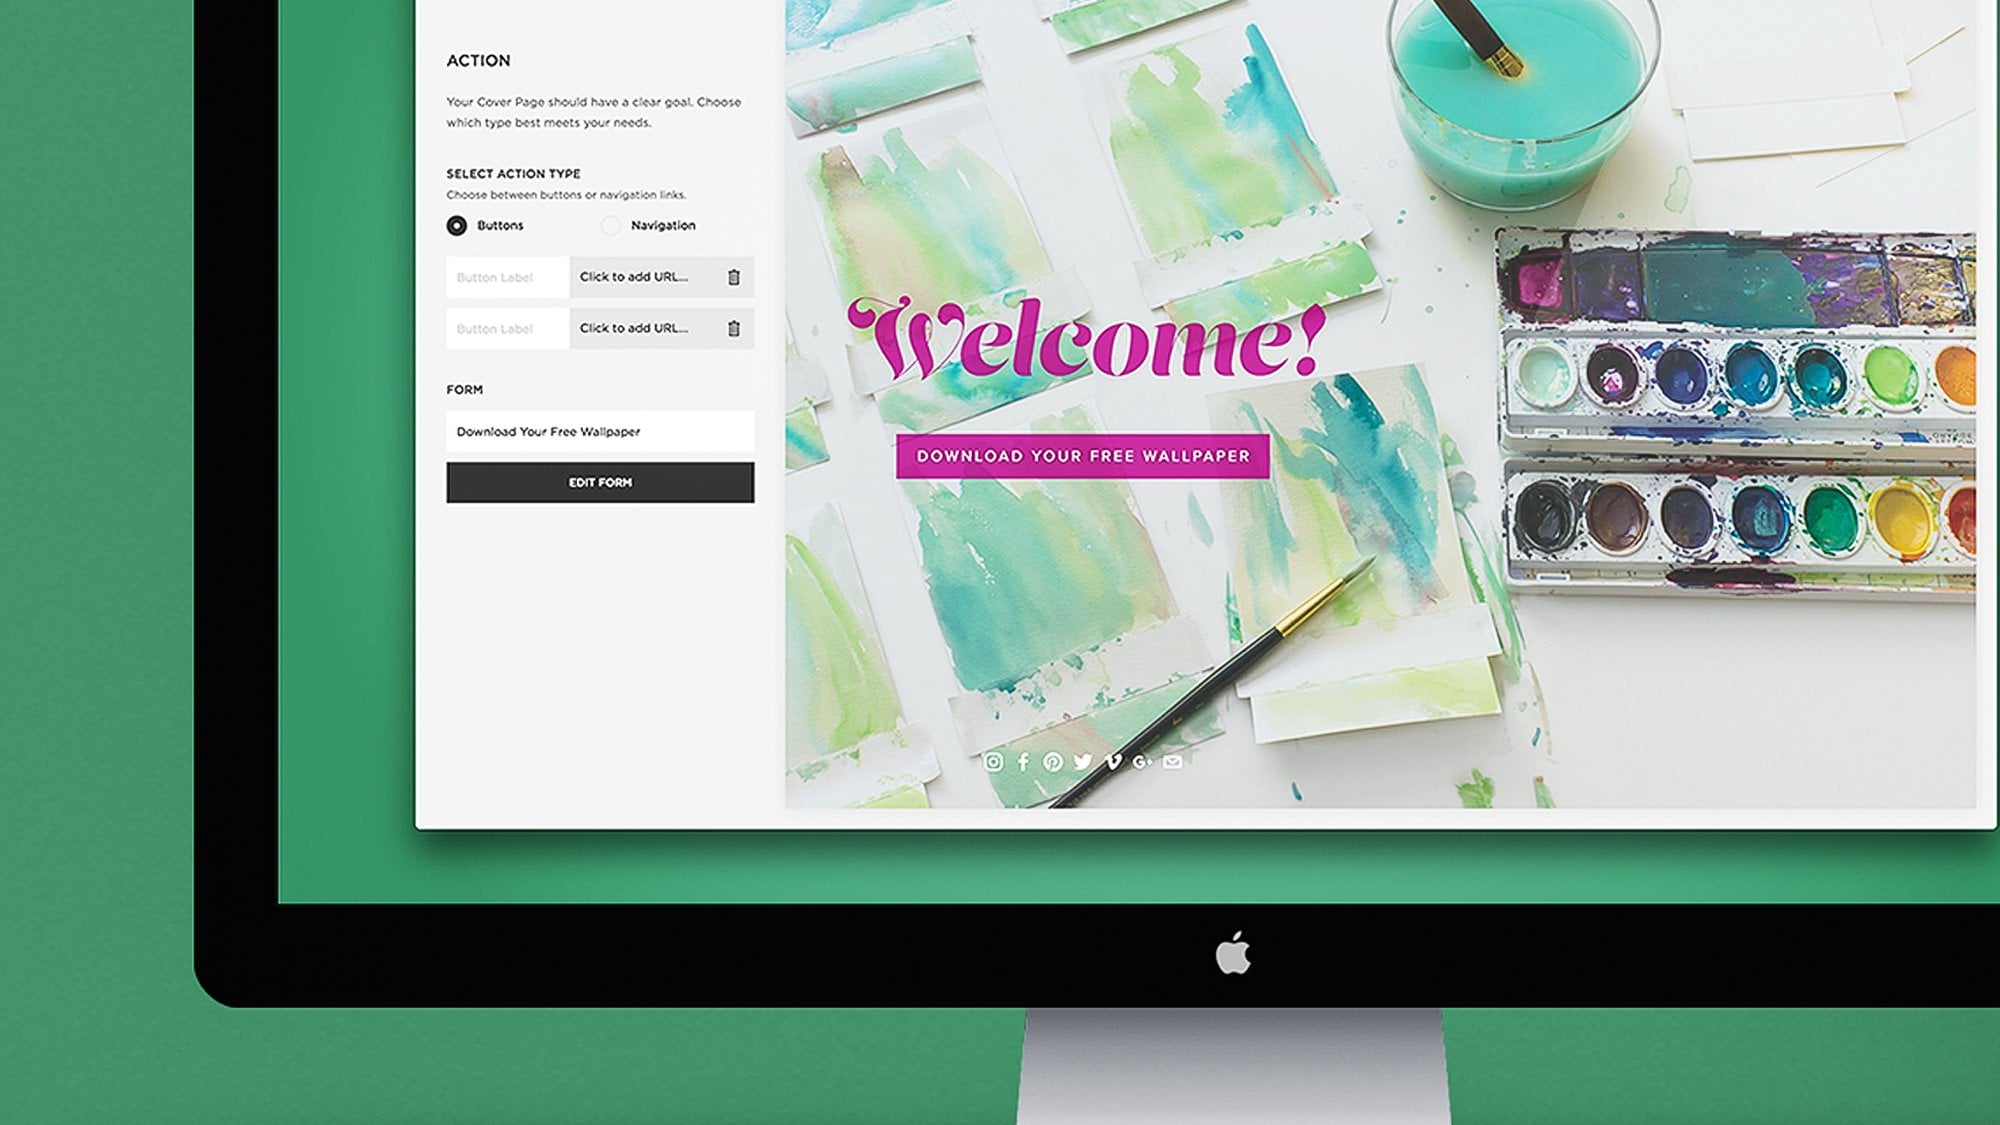
its functionality. It's page headers,
price plans, welcome, team presentation, but I
usually work with elements. I prefer that because
it's more customizable. I'm going to go and
I'm going to let's say drag it out here, text, or I can drag out heading, You don't see it right
now because the color, it's transparent, but
I'm going to go and select, let's say black. Let me select the texture. So black or yellow because the background
is black. White. Here's another one
that I have added. I'm going to change the
color for this as well. It's a heading. I'm just trying to show you
how customizable it is. You can add text, you
can add headline, you can add bulleted lists, you can add content box. There's a lot of things
that you can add. These are all
elements. These are columns that you
can add or rows. What are columns
in what are rows? Right now you're saying that all this text is occupying
the entire width of the page. But if I divide it into columns, then I can add here are columns, here are four columns
because I selected four. I can add a text in each column. I can add text here, I can
add headline text here, I can add bullets here, and I can add, let's
say text share again. So these are all columns. Let me change the color because the default background color
is black with this template. You get the idea. I'm just trying to show you
that all of this, you can customize,
you can add columns, and similarly, you can add rows. Then you can add images, text, any of it in rows. In each row, you can
add a text and image. Now I've divided my width of
the page into four columns. I can also do this with
rows or make sections. What are section? Sections
are sections of the page. If I want to create a
new section of the page, and section is a bigger element, probably the biggest
element of the page. Why? Because usually a page is divided into three
or four sections. There would be a
top of the page, call to action or video running. Anything that you feel needs a different section,
a section of its own. I can grab it out here, and I can add multiple elements. Here's a new section
that I've created. Now I can add stuff
in this section. I can add text, I
can add heading, I can add a call to action, a button here, I can change
the background color. If I click on the section, if I click on the
background, not the text. So I'm clicking on background here and
I'm going to select, let's say a specific
color that I want. I can change the
background here of this section specifically
and not the entire page. It gives you a lot of
customizable options. Here I can change the button. I've added a button
here and I can select that it should
show the next step. What's the next step, right? So here if I write
next step URL, then I don't need to add
a URL to this button. Why? Because if I organize my sales funnel into three
steps like I showed you. First is the sales page, second is the order form. Third is the T thank you page. If I organize it like that, and this is what I'm building right now, which
is the sales page, then next step here would
mean that automatically anybody who clicks
on this button is going to go into the order form, is going to go for the order
form and then check it out. Whatever they're buying,
they're going to check out. Here I can select alignment, I can give it margins, I can do left, right, bottom, so I can
align however I want. Then I can give it a font size. Here's the font size,
here's the line high. But you might be thinking,
how do I dit, the click here? It's a basic thing.
Here's bottom text. I should have
mentioned this before. I can just write by now, and if I want to
add a sub subtext, I can add here, subtext.
Don't miss out. Here's a lot of
customization that you do. It can be anything
that you want to add, I'm going to go and I'm
going to add an image. I want to show you that there's a lot of stuff you can add. Form input is also an option, but I'm going to go and
I'm going to add an image. Here you can upload the image. Image file, select file. Let's say I want
to add this image. This is the thumbnail
for my course. I've added the image insert, and now I've added the image. Similarly, I can change
the image alignment, image size, I can
give it a margin. I can blur it or not. There's a lot of stuff
that you can do? You can explore
on your own time. Of course, there's
a lot of things and if I start doing everything, then it's going to
be along video, but I just want to familiarize
you with everything that you can do work with
elements, firstly, work with elements, and try to go through each of them,
if not each of them, at least those that are
going to be relevant to you, which is image,
which is section, which is headline,
which is text. But I always recommend that you add a video to your sales page. Why? Because it converts better. Imagine somebody is engaged in your video instead of seeing a blank image instead of seeing text or
background or buttons, they want to see a
human talking to them. It converts better.
It just does. I would recommend
you add a video. How do you do that? You
can add a video here. You can add anywhere. But if I let's say add in this section. Now, do I add a video. I'm going to click on
this and I'm going to click on video type. I can add the link directly, which could be from YouTube
or any streaming platform, I can embed it, or I
can upload the file. What I'm going to
do is I'm going to upload the file because I've not uploaded it before to any other streaming
platform or YouTube. I'm going to just go and
browse and upload here and select a file and whichever file I select,
I'm going to upload. I'm not uploading right now because I don't have
the video ready. I'm working on it
right now as we speak. But it's very important that
you add video controls. Video controls are the play
button, the pause button, the sound volume up and down
button Don't autoplay it. Why? Because autoplay is
actually sometimes moying. When somebody moves
to your sales page, when you bring traffic
to your sales page and they're seeing the page
for the first time, they don't want a
video autoplay. They want to see the
video and they have to have an option to autoplay. But I just recommend this if you want to change it,
you can change it. T thumbnail. Thumbna
is very important. What do they see before
the video plays. Let's say I add So I've
added the thumbnail, it's going to show
up here in a bit. Then you can change the border, the border style could
be solid, dotted. There's a lot of stuff
that you can do. You can add margin, If you add margin, then
you're going to move it, you're going to align the
video in a certain way, right? And you can make sure that it's visible on desktop
as well as mobile. But if you don't want it
to be visible on mobile, then you can just select
desktop and deselect mobile. It's saying desktop only now. A lot of customizable
options that you can have. I'm going to exit the
sales page right now.
4. A Basic 3-Step Sales Funnel: Now I'm going to show you
what I've already built. I've used the same template and I've built a
page for myself. It's taken me a couple hours or at least an hour and a half, and I've built this page out. This is a sales
navigator course, and I'll show you the page
because what's there to hide. I've divided the
page into sections, I've edited that template, I've added feedback, I've
added buttons, call to action. One thing that's left for me to add is I told you I'm
working on a video. I'll add a video and then the
sales page will be ready. I'll probably add a video here. It right below the m. So this is the sales
pace that I've built. These are all relevant call to action and I've edited
the same template, the same template that I
showed you in the last video. I've edited that
and I've used it. All of these buttons, they direct the user
to the next step. What is the next
step? I'll show you. But all of these buttons, they direct the user
to the next step. I'll show you what
the next step is. The next step is the order form. Let's go to order form and I'm going to
go into edit page. Now, this is the order form that I've also taken
the time to build. This order form also was
a template that I edited. It has a lot of templates
that you can choose from, and I chose the one
that I would require the minimum editing for.
And this is the one. I've added an image here, I've added a title,
I've added the price. I've added a Actually this form was already here and I just tweaked it a little bit. Then I've added a video. This is a video that I've added. Then I've added
feedback here as well. One thing that's left for me to add is I would select
bulleted list, I would add an FQ section here. I'll add an FQ section
here in this list. But right now I'm not going to do that because
it's going to take me some time to brainstorm
questions and then come up with answers
for those questions. But I'm just telling you that this is the form
that I've built. It's the same way that you've
built out a sales page. Everything is the same.
The editor is the same, the elements are the same, the usage is the same. Only difference here is that there's a
contact information. This contact information comes with every template
that you select. In any template that you select, this contact information
will be there. You can select that you
don't want a specific input, but usually all of these
inputs are in every template. I'm going to go and delete this. In fact, I'll just go and
exit. No, I don't save. Then I want to show you
the thank you page. These are all actual
pages that I'm building. This is
the thank you page. It's very simple.
Right after this page, they get directed to the course. This is the page that
shows up right after payment and then they move
directly to the course. This is the page.
It's very simple. It has a thumbnail, it has a title, a heading, congrats prevailed, or you can change
it to your liking, and then there's this
single liner message, and then directly they
jump into the course. Hey.
5. Adding a Product & Linking it to the Funnel: Hey, guys, I showed you the
three steps in my funnel. But what use are they if
there's no no course, no subscription attached
to the sales funnel. Because at the end of the day, the sales funnel is
supposed to sell something. Here we're seeing products. We're going to go into products, and we're going
to add something. You can add a physical product, you can add a
community subscription or you can add a course. I'm going to go into courses. As you can see, I've
created a course or I'm in the process of creating a course, I'm going
to go into it. So these are the three
modules in my course. Now I'm in the process
of creating a course. You can add a module, and you can give it
a name, test mode. Here's the new module
that I've just added. You can arrange these modules. This will be the first
one, then introduction, then sales navigator
search uses, important overview and key tips. But introduction is supposed
to be the first one always. If you go and you see that how many lessons
are in this module, then you can add a or you can delete a lure that
you've already added. I can delete it, I can deactivate it for the time
being, I can view it. This would be the view
that the person would be getting once they're
subscribed to the course. This is my introduction. This is the introduction
page that I've created. It's the same as
creating a sales funnel. The editor is the same, everything's the same.
How do you create it? You're going to go into add lecture and you'll
give it a name. Let's say, introduction two, and you're going to
select a template. You can view the
templates, preview them, and once you decide on which template you
want to go with, Let me preview both of them. Once you decide which
template you want to go with, you can just select that one. L et's say I decided
to go with this one. I'm going to select
this template and then I'm going
to go into safe. Here, you can see that
it's a new lecture and now I'm going to go into this and I'm going to
edit the template. This is the template. I'm
going to edit the video, I'm going to edit all this text. This is the default
in this template. These bulleted points
are all to be edited. But now I know how to create a. If you don't want all this
text, you can just remove it. You can see it on the top right, there's this bin icon
in every element. These are all elements.
You can delete them. You can delete them in bulk. You can delete the entire
section if you want to. As you can see that here it's the entire section that I can delete. But I don't want that. I want to change the video. I'm going to change the video in the same fashion that I
did in the lecture before. I'm going to go
in to upload file and I'll upload my lecture file, or if I've already
uploaded to YouTube, I might want to embed it, or I can add the link URL here. Then I can add video controls. I told you ideal that
they stay on and then autoplay should be off because you don't
want to play right away. You want to have an option. Once you're on this page, as a user, you want to have
an option to play this video. Let's say I've added everything, then I'm just going to go into save changes and
then I'll go back. This is how you add modules and once you have added
modules, you add lectures. Here you add modules,
here you add lectures. You can see the number
of students here. If you have a specific student, you want to subscribe
to this course yourself manually, and
you can do it here. You can give their
e mail and you can decide what type of access
you want to give them. Full access partial
access, drip content. Drip content is basically
that they get access one by one of each
of each module. You can decide how much delay should be there before they get access to the next module.
That's drip access. You can see right now I
don't have any students. But if I did, they will
show up over here. This is basically how
you add a course. I'm going to go and delete this. I don't want this because it's just something that I wanted
to show you how to create. I'm going to delete the
test module as well. You see that there
are three modules and in the first one, there's just one lecture. In the second one, there
are five lectures, and in the third one,
there are two lectures. Altogether, right now
I've uploaded 123, six, seven, eight,
eight lectures, which are structured
in three modules. This is how you want to go
about creating a course. But if let's say you
want to add a product, You can add a product here. You can add a name, you
can add a description. If you want to add tax,
you can do that as well. You can add a price and you
can select the currency, and most importantly,
you can add media. You can add pictures
of the product. Once you're done, you
want to click Save. If you want to create
multiple variants, then you can just select this and you can create
multiple variants. Option name and
the option value. Option name could
be let's say color, and the option
value could be and then you add another
value, that could be glue. You can create variants of the same product
and then you can give each product
specific image, and a specific price as
well and SKU as well. This is pretty much how
you create a product, it's very simple.
It's very simple. Once you've done it,
you're going to go back and now comes
the best part. I'm going to show
you how to link a sales funnel to the
product or a course. Whatever you have
created thus far, you can add it in
your order form. Once you go into order form, this is the second
step, remember. Once you go into
order form, Here, you'll select what
type of a product, what type of an offer, you want to give in this auto form. This is a digital product
because I've created a course. But if you want to select
a physical product, you can do it as well and then select the physical
product here. But I'm going to go
into digital product. I'm going to go into resource
and I can select any of these communities subscription,
course bundle tags. Correspondle is
basically when you've bundled up a few courses
together and you want to sell them in bulk or sell them two at a
time, three at a time. For now, I'm going
to go into courses, and I'll select the course that I've already created and saved. True course access. Once they've signed up, once they've made the payment, they've checked out,
they'll get full access. Is there expiration date? Is there an access
on a specific date? No, I don't want them to have
access on a specific date, I want them to have
access right away, and no expiration date. I'm going to go and save.
Now that I've saved it, I want to select a price. Here you can see I've added
a price for this course. What is the price
that they'll be paying in the order form? It will show up
in the order form once I add it over here. Then a coupon. If I want to offer coupons and I
can create a coupon, I can create a coupon, and I can just select fixed amount discount
or percentage discount. Let's say I'm offering
percentage discount, then I can add a discount here. But if I haven't added anything because this is a coupon
that I've already created, it's showing up in
a drop down menu. But if I haven't added anything, then I can just go
and create a new one. I'm going to add a coupon name, a coupon code, it could be
anything, it could be master. Mastery, it could
be discount type, fixed amount,
percentage discount, and then discount amount. But if I add a percentage, so it would be 50%. Whatever the price
I've set over here, it would be 50% discount if
they use this coupon code. This would be the coupon code
and this would be a name. Name is basically for
you and coupon code is what you give Once you've
created this coupon, you can select expiration and you can select limit of use. Once you're done, you
click on Save and then you can give this
coupon to whoever you want. This is basically how you link a product to
the order form. You create a product over
here and then you create a funnel and then you
link the two of them. That was the goal
for this video. I'll see you in the next one.
6. Previewing the Sales Funnel & understanding configuration options: Hey, guys, this video, I want to show you what
we've built thus far. This is the sales funnel, and these are the three
steps, as you already know. We're going to see what
the user will see. We'll click on view funnel. Here is what we've
created thus far. This is the sales page. This is the landing page. All these call to
actions that you see, all these call to
actions lead to the next step in
the sales funnel, which is the order form. If I click on any of them, It will lead to the order form. Here you will see where
the user checks out, the contact information,
the payment method, and the total price
that they're getting. On the right, you will see that this is the course
description again, a short description this time, and the UDM course rating
because this course is also on and then a course video on the
order form page as well. Then there are
some testimonials. This was the order form
or the checkout page. I want to show you
what variations can be built around these pages. You can see these
are all the options. Right now, I haven't
gone into any of them. I'm going to go
into any page and all these options will
be there for every page. Let's say I go into automation
rules to start with. What are automation rules? If I'm going to add rule, you can see that if
there's a page visited, if there's a new sale, or if there's a sale canceled, let's say I want to re target those people who have
canceled a sale. I want to reach out
to them again via e mail because they've already filled out
the contact form. I'm going to add
the action here. I can add any of these actions. If I've created an e
mail campaign already, then I can subscribe
them to a campaign. Here's where you'll be
creating an e mail campaign. If you've created
an e mail campaign, then you can
subscribe them here. All those people that
have canceled a sale. Then there's AB test. AB test, of course, you already know what it is, you create two
variants and then you test them out to see which
is the best performing one. Two different pages. And then there's
stats. Stats show you everything you need
to know about sales, the average card value, if you have generated leads, then they will
show up over here. If you have generated
sales, they will show here. If you want to set a
deadline for the page. If you want the page to expire in a certain
number of days, then you can select a deadline. You can add a deadline here, let's say ten days
and the page will expire in ten days if you
click on the sa button. This is what I
wanted to show you all these different types of configurations for
the sales funnel. I hope you're following
everything and I'll see you in the next
video lesson. Goodbye.
7. Intro to getting Leads, Traffic, and Interest for your product/service: So you're ready to
sell something, could be a physical product, a digital product,
or even a service. But how do you start
generating interest around it? How do you actually
start selling it? How do you bring traffic
generate leads and actually get people interested about your product or service? If you're just
starting out, then this overview will
help you a lot. I'm going to show you
the various methods of generating leads. Since I don't know what
your business model is, you will need to see the
complete video to find out which ones are effective
in your selling strategy. Okay, so let's begin with
our legion overview. This video will be
very beneficial for you because this is exactly what any legion agency,
including ourselves, do. If you are doing lead
generation on your own, or if you're looking to find out other ways that you can possibly explore for generating leads and crust and graphic around
your product or service, then this video will
be very beneficial. On the left, you can see that
there are sources of lease, which can be classified into
coal leads and hot leads. So cold leads have not yet shown an interest
in your product. They probably don't
even know you exist. But they fit your ideal
customer profile. Whatever you're
targeting, whatever the audience is that
you're targeting. So they have straits,
the cold leads. The hot leads are
those people that have those straits as your
ideal customer profile, and they've shown an interest and they know that you exist and they are looking for something similar
that you're offering. They might be looking
for a similar service or a similar product. Let's explore the various ways
of generating coal leads. The first way will be Google
Business web scraping. You can find local businesses
via Google Search, and then you can scrape
that data off of Google. Next up, you can sign up
for Apolo IO or Snov IO and find people in your niche or industry and scrape
that data for you. Then there's LinkedIn
Sales Navigator, which itself is a
very important tool for b2b a generation. Then there's coal
leads that you can buy from an agency like ours. Let's talk about hot leads because hot leads
are actually more important at times and also more expensive if you're buying
them from an agency. The first thing,
of course, you can buy them off of an agency or let an agency handle that lead generation
process for you. Then you can only pay
for appointment set or the leads that are
coming in that have actually shown an interest
in your product or service. They know about you,
they know you exist, and they're interested in a similar product or service
that you're offering. Then you can create listings on portals such as
property websites, Craig's list, or Pink Trust. That could be an organic
way of generating leads. Then of course, you
have Facebook ads. You can direct traffic
to your sales page, or you can capture leads in the built in form on the
Facebook platform. Then of course there's
Google ads as well. Whenever you're
talking about ads, these are the two giants,
Facebook ads and Google Ads. Then there are
other sorts of adds that you can buy Twitter, Linked TI or CRA ads. It all depends on where
your ideal customer is. If you know where your
ideal customer is, then you can run adds on
that platform, right? Then there's organic
content that you can generate so that you'll
be getting organic leads. You can generate
social media content, build social media profiles
and maintain them. You can upload
content on YouTube, upload videos that are
relevant to your niche, or you can upload blogs on
your website and do SEO for them so that
they're optimized for certain keywords
that you're targeting. Then you can do LinkedN
B to B content. You can post content
on LinkedN that will generate crust
around your niche, that will be relevant to the people that you're connected to. That is a great way
if you're looking for generating organic
leads from LinkedIn. Then you can answer
queries on edit and Quota, which are relevant again to
your niche or your industry. Then you can join relevant
forums and Facebook groups, which would also help you a lot if you're active in
those communities. If you're generating leads, then you need to manage
them effectively. You've captured a
lead in step one. Now you need to nurture them. If they're co leads, you
need to nurture them. You need to develop and
maintain relationships. You need to sign them
up for a newsletter or an e mail marketing campaign for anything that can generate
interest for them. Then you need to qualify them. You need to make sure that those people are qualified
enough for your service. You're not just
targeting random people, you're not just
getting random leads. If you're getting random leads, then they would not qualify according to your ideal
customer profile. This is very important to
verify that those leads that you're getting fit your
ideal customer profile. Then there's regular follow ups. They might be looking to buy in the next quarter or they might be looking
to buy the next month, so you need to follow up and
stay in touch with them. If you've come this
far and you're confused about the type of lead generation strategy that would be effective
in your business. Then you can book a one
to one consultation with me to help
strategize and implement those lead generation
tactics in your business and find out which is the
best working one for you. Just a little overview for you about what our agency does. Right now we're not
taking in more clients, but maybe when you're
seeing this video, we might you might want to
reach out and find out. Our agency not only generates cold leads because that's
what any agency can do, we also generate hot leads which are already
people that are entrusted in buying a similar service
that you're offering. We do it using Facebook
and Google ads, and also using
content marketing. Content marketing is what
you're seeing right now. You're seeing a video, and I'm telling you about
my agency in that video. It is a form of content marking, but it could be anything, it could be text,
it could be videos, it could be animation,
it could be pictures. Just like we're doing
it for ourselves, we do it also for you. That is it for this
video. Goodbye.
 Daniyal Faheem, A Business Development Manager