Transcripts
1. Introduction: [MUSIC] An animated map
makes it easier to see how to get from
point A to point B. These maps are primarily used as a state of art tool for
geographic visualization. Viewers today expect stories
to have these dynamic maps. If you are interested in
adding some depth into your videos by creating
map animations, then this is the class for you. Hi, my name is Snehal Wagh. I'm a professional video editor and motion graphics designer. I have commonly
used map animations in client documentaries to have a wider view of surroundings, as well as to show the parts and destinations in my
travel vlogs on YouTube. This class will
cover the basics of Google Earth Studio and
Adobe After Effects. At the end of this course, you will be up and
running to create your own map animations. We will learn all about navigating and using
this editing software as we cover topics like keyframe animations,
controlling the camera, exporting the maps
from Earth Studio and importing it into an After
Effects composition, using track points for text
animation, and finally, exporting your map animation
to insert into your video or using it as stand-alone
animation for portfolio. Google Earth Studio
is a great tool to use in documentaries, news, travel vlogs, or for anyone who loves to use
maps in their video. Once you have
completed this class, you will be fully
equipped to create basic map animations with ease.
2. Class Orientation: Hey, welcome aboard. I'm so happy to see
you in the class. There are plenty of map
animation tools out there, but most of them are too
complicated or expensive. In this class, we are going
to use Google Earth Studio, which is a browser-based
animation tool. It's completely free. All it requires you to do
is request access to use, which gets approved within 24 hours It will give us a
lot of options for creating, customizing and
exporting map animation. Earth Studio is easy to
use if you don't have any animation experience
yet, it doesn't matter. We're also going to
use after effects to complement Earth
Studio animations. You will be learning the
absolute basics of it. So don't worry if you've never opened this
program before as well. So what do you need to be
able to complete this class? All you need is a decent internet connection,
Chrome browser, and After Effects along with Media Encoder installed
in your computer. Ideally, you should also
have the loose idea of the place you want to
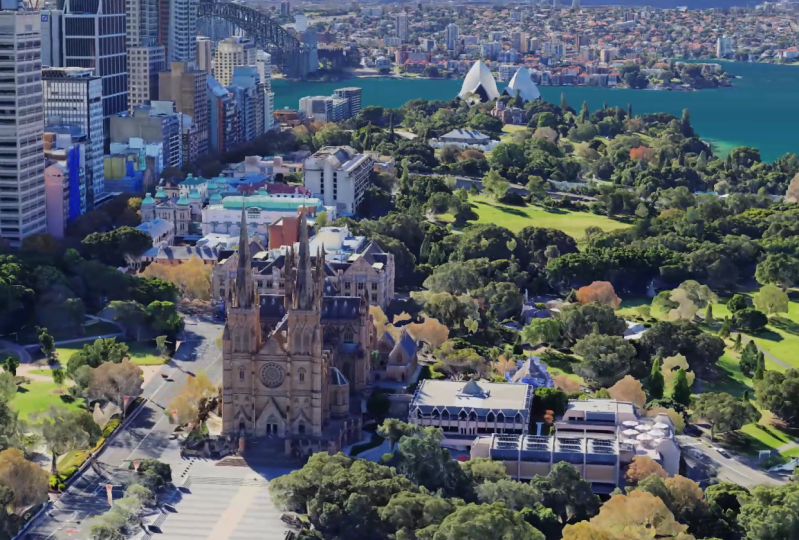
create the map animation. Since we are creating
point-to-point travel animation, I want my video to be
traveling around Sydney. So I chose St. Mary's Cathedral
to Sydney Opera house. We will create orbit around these two sites and path
that connects to two, basically a guide on how to go from the Cathedral
to the Opera house. You don't need to choose
the same points as me because along the
way we are going to learn a lot more about Google Earth Studio
and After Effects. So feel free to
experiment and create your own version
of map animation. So grab your laptop when
PC and let's get started.
3. Quick Starts in Google Earth Studio: [MUSIC] In this lesson you
will learn how to quickly create a map animation
in Google Earth Studio. Let's have a look
at the interface. Here on the main page I can open an old project or I can
create a new blank project. But if I click the
drop-down menu, we will see a quickstart button, and this will give us access to a few animation presets
which are quite easy to use. We have a couple of different
options here. We have Zoom. Which will zoom in on
a location from above. This will orbit
around the police. This one will show one
point to another point. This is good if you want
to show the distance. We have spiral and also Fly-To and orbit which is basically
zoom in plus orbit. I'm going to click
on "Orbit" here. This is going to
create a new project. Now it says where do you want to set your
point of interest? I'm going to select the
Sydney Opera House. I typed in the location
and now it has an overhead view that
looks like Google Maps. Let's click the
next button here. We are able to see
our timeline here and we can see our animation. We also have these
four different options to change for example if I want to change this animation in the opposite direction I
can have it go this way. I can also change
the radius so I have a little space for the text
animation and altitude. I'm going to leave the target
altitude where it's at. Let's click "Next" and
I would want it to be 15 seconds instead
of 50 and it's going to do an entire
orbit in 15 seconds and it will go all the way around and it will be looping as well. Once I click that it
will bring us into the actual application
interface which we are going to go into more
depth in the next lesson. But for now if we play
back this looks good. I also want to make
point-to-point animation. I'm going to go to File, New and click on "Point-to-point" It will prompt us to save our last project. Let's name this Opera House. That is saved. We can move on. I want to my first point to be St.Mary's Cathedral,
that's in Sydney. The second points will
be the Opera House. Now, I will click "Next" and it's showing the route from cathedral to the Opera House. We will play it back again. That looks good. That is one thing left to do here
which will make it easier for us to create path and
after effects later and that is to create a
flat frame of the map. To be able to do that
I'm going to select these keyframes and move
them a bit one-by-one. I can just hold and drag
and move them ahead. After this is done I'll
go to the start of the timeline and zoom out till
I see both of the places. Here's the Opera House. We can see the whole
path in the frame. I'm going to create a
keyframe here and here. We have one second of flat frame which we will use
as a guide later. What I want you to do right now is to create a
prompt for yourself. It could be anything somewhere
you have been to recently, a local attraction that you know of or a place that you
have never visited. All I want you to
do is get familiar with the quick start in
Google Earth Studio. [MUSIC]
4. Interface of Google Earth Studio: [MUSIC] In the previous lesson, we created a Quick
Start Animation. But in this lesson, we're going to start an
animation from scratch so that I can give you an
overview of the interface. I'm making a new project
by going to file, new and creating
a blank project. Let's see our last project, which will be cathedral to
opera house, that saved. Here I can name my project
and change the dimensions, the duration and frame rate. The dimensions here
can go up to 4K, but we'll just put 1920
by 1080, that is full HD. We can see the frame
rate goes from 24-60. I'm going to keep
it at 24 frames. I have kept the
time code as it is, that's 15 seconds, click "Start" and that's going
to bring up our interface. Google has based the
designer for art studio according to industry
standard animation tools, it has key-frames
on the timeline. This is our timeline. Over here to the left
we have our attributes. We have attributes for
camera positions such as longitude, latitude,
and altitude. There are attributes for camera rotations such
as pan and tilt. We're also able to add more attributes
like camera target, and the field of view, time of day which is very cool. We can make it
nighttime if we want. We can turn the clouds, ocean overlays, and 3D
buildings on and off. We can also edit
the camera roll. To make our animation
we will add key-frames, then move the playhead to
different spot in the timeline, change the same attribute
at another key-frame, and now we have an animation. If you've ever worked
in Google Earth, it's very much similar, you can grab the Earth
and drag it around, we can zoom in with
the mouse and scroll. On your right here, you can toggle different
view-port options. If you go to this toolbox, you can see we have this different way to
look at the interface which we can see in the camera moving as I change
the view here. Here's a pro tip. At the
top here if you go to view and turn on
available 3D areas, you will see these
yellow shapes. This way you'll be able to
animate those orbits to the 3D places which would not be possible to do with
flat 2D places. For example let's
go to Taj Mahal which is one of the seven
wonders of the world. Here's our search bar. We can type any location here and it will take
us exactly there. I don't know why, but as you can see this is not a 3D area. No matter how much we tried
to change the pan and tilt, it will always be flat. On the other hand, let's go
to the area which is 3D. We'll go to Eiffel Tower. Here we are able to
see the difference. This is possible because as
we can see this is a 3D area. Now, I want you to learn a few keyboard shortcuts
to make your life easier. The first one is Alt+C which will toggle
the 3D layers on and off. You can see it up here as well. Let's clean our timeline first. I'll hold and drag over all of our key-frames and I'm
going to hit "Delete". Now we have a clean timeline. Let's type in St.
Mary's Cathedral. Now we're straight over
the top of Cathedral. If we click and drag
just as we did before, we can move the Earth around. If I want to pan tilt
or orbit the camera, I'm going to hold the
Alt or Option key first, and we are going to
orbit the camera. Now this target comes up
exactly where my cursor was. My camera point of view is basically going to orbit
around that target. As I click and drag, we can see the 3D imagery. The next shortcut
is when you hold the Control or Command key. It controls the camera rotation. We can do tilt and pan moves. This is a tilt and
this is a pan. [MUSIC] These are the
two main shortcuts that I want you to keep
in mind because they are going to be huge
help in the next lesson when we are going to learn
how to control the camera, these two shortcuts are
Alt plus click to orbit around and Control plus click
to pan and tilt. [MUSIC]
5. Controlling the Camera: [MUSIC] In this
lesson, we will get into an advanced technique that will let you have more control
over how the camera moves. Animating the camera inside of the earth studio
looks a bit tough, so I'm going to break down step-by-step how
to do it smoothly. The first thing I'm doing here
is to right-click directly on the "St. Mary's Cathedral" and select "Set Camera Target". Don't worry if the target is
a little off because you can hold "Alt" and click on the
target to move it around. I'm going to put
it here precisely, and now my camera is going to auto-orient and stay
focused on the cathedral, and you can see down
here in attributes, it has locked my camera
rotation parameters. The pan and the
tilt are going to automatically adjust as I
move around and animate, so I'm going to close this. We can see it also added this attribute called
Camera Target. These are the same controls
as the camera position. However, there is an
influence here as well. It's a bit of an
advanced feature we are not going to use this
in this tutorial. The next thing we'll do
is set up the viewport, so if your interface is looking a little bit
different than mine, go to "View" and select
"Multi-view" to "Viewports", and then set your
viewport to the top. I can see my camera
target here as well. We have a top view here
and the knot is always up, so it's easy to
stay oriented here. I can control my
camera manually by grabbing it on this red shape, and now you can see that
as I move this around, it's actually quite
easy to now look at all of these different
angles of the cathedral. What I'm aiming to get in
this shot is that I should have this top-down
view of the cathedral then the camera orbits
around it halfway and ends up in
front of this shot, where I can also see the opera
house in the background. Let's key-frame the first shot. I'm going to zoom out
to where this will give me a little
bit of extra space. The shortcuts are going
to come in handy here. I'm using, "Alt" plus click for camera
rotation and "Control", plus click to pan and tilt
to get the shot I want. We can also adjust
the altitude here, so if you want to
make big adjustments, hold "Shift" and it's
going to move fast, and if you want to make fine-tune adjustment
hold "Control" and then it'll go slow. Or you can also manually type in the altitude that you want. One One thing that I do is
turn off the fall of camera. It lets me see the camera
target instead of my camera. To create the key
frames on the timeline, I'm going to take
the play head to the beginning with my camera
in its first position, and I'm going to add a key
frame to the camera position. Then I'm going to go to
the three-second mark, and I will bring the
camera over here to the front and add
another key frame, and let's take a look. I'm going to select all of my key frame and right-click to add auto ease that will make the camera movement smoother. Now, in my top view board, you can see the motion path and these two key frames points. This is our start position
and that's the end position, and you can see it's auto-orienting
to the camera target. You can also see
these little dots here that are your
speed reference. We can also create different
looks here for example, I don't want this to
be a straight line. I want the camera to half
orbits so that I can grab this point and hold
"Alt" or "Control", and then click and drag. It will give us these handles. Because of this, we
can curve the spot and this looks quite cinematic. [MUSIC] Go ahead and play
with the camera angles and you can do half orbits and half spirals and make your map animation
customized and cinematic. I'll see you in the next lesson where we will take
this animation imported into after
effects so that we can add paths and texts. [MUSIC]
6. Track Points in Google Earth Studio: [MUSIC] In this lesson,
we will learn how to use the map animations
that we made in the previous lessons and
compensate them into After Effects and add some
texts and elements like part. Since we're compositing motion graphic elements
inside After Effects, we need to add track
points inside of Google Ads Studio because if we render this as
it is right now, it will be a flat plane, so we will not be able to
use the 3D elements here. We can add a track point by right-clicking on the map here. It says to set a track point, you can do that but it will not be as precise as
using the viewport. I'm going to zoom in here and click on the Set Track Point. We can click here to rename it. I'm also going to click
this menu button and select Set as local origin. There are two different
ways that you can control the
coordinate system, where your anchor point and your positioning
defaults to global. The origin point of the Global is the
center of the Earth. When you move objects around
on the surface of the Earth, your positioning
parameters are high and it's hard to work with
motion graphic elements. So if you switch that to
local coordinate system, you can specify the origin
point to a track point. Now my origin point
is going to be at the top of my destination. When we move the elements
in after-effects, they are going to be scalable. One more thing I want you
to keep in mind before exporting is make sure your
map style is set to clean. You can do it by going to View map style and
clicking on Clean. The other two options will show parts and names like it
does on Google Maps. We won't need that
because we are going to create our own text
animation for this. Moment of truth, let's append these map animations
that we made. Click on the Render
button and I will rename it to Sydney Opera House. We have options
to render this as JPEG image sequence or a video. We need it in image sequence, so we can also change
the parameters here. Let's specify a destination and we need to give them permission to access
the local drive. Then down here in advance, this is where you specify
the coordinate space. Again, it defaults to global, which we will switch to local. If I didn't have
that track points set as the local origin, it wouldn't have Let me
choose the coordinate space. You also need to attribute Google ads since it's
a free software. What I usually do is
set these both to zero so that it doesn't come
in between my animation, but it still attributes
to Google Earth. Now it's rendering
it and there is a thing about this
way of rendering, is if you switch the tabs, it pauses that render using other graphic intensive
applications, or changing tabs in chrome while rendering can
cause faulty renders. It automatically pauses it so
you can click on Continue. We will render the remaining
maps in a similar way. To go to another project, I will click on the File, Open Recent, and
click on Cathedral. I felt the three-second
animation was too short so here I
clicked and dragged over all of the last
keyframes and made the animation longer
up to five seconds I will just do a little bit of tweaking here and set
tract points that has local origin and
that is ready to render. Since we don't have
a specific target for point-to-point animation, I'm going to choose the middle of the
path, that's the road, I'll set a Track point
and rename it to middle and render
this last project. [MUSIC] Now that
the Google Earth animation has been gendered, it's time to get into the
next part of this class, and that is to animate our maps. In the next lesson, we
will learn how to create text over our map animations. So open up your After Effects and let's get started. [MUSIC]
7. Text Animation in After Effects: [MUSIC] At start,
the After Effects looks a little intimidating because it does not look like the other video
editing software. Although it will get
easier once you get familiar with this program
and use it frequently, I'm only going to be scratching the surface
of this program because it goes way more
in depth with compositing. The next step is to import this maps into After
Effects, it's quite easy. All you need to do is
run the script file that is included
with the export. Let's go to find script, Run Script File, and then navigate to where
you exported the files, and you'll be able to
see a.jsx script file. Click on that. The script
did everything for us. You can see there
is this composition with all the assets. It imported the image
sequence as a clip and then it created this null
object from a tech point. It even added this text layer which is attached
to the null object. Now all we need to do
is reformat this text, because it's flat
on the surface. However, the camera is matching the movement of the
original animation. Now, if we create any
motion graphics and attach them to those track
points or the null objects, it's going to automatically
give you the illusion that we have a 3D
element in our map. Let's format our text layer. Click on our text and hit ''S'' on the
keyboard to see scale. We can see that
this is too large, so let's bring it down. We can see this 3D
widget over text, which we are going
to use to move it according to how we
want the text to look. If you replayed this, it's actually looking
like the text is a 3D object hovering
over the cathedral. I'm going to the
character properties in our sidebar here so that I can change the
color of our text. I'm also going to
change the text because this is just cathedral, but I want it to say St. Mary's Cathedral and I will also
make it all capital. I'm going to give it
some finishing touch. I'm also going to
do the same text standard deviation with
our Opera House map. This will create a new comp. I'm just going to fast-forward
the animation part. You can follow the same steps as we did with the cathedral. Although here I'm
adding one more thing as it's a complete spiral, I want the text to
rotate with the camera. So I will hit ''R'' on the
keyboard to set the rotation, create a keyframe at the start
and go to the last frame. Align the text where I want it. I will create one more
keyframe at the start, because I just realized I put the first keyframe
in the middle. Our text is rotating
with the camera. Now that we're done
with the start and the end of our animation, all we need to do is create
the path between that. Let's learn that in the
next lesson. [MUSIC]
8. Creating Path Animation: Before we move on to create
the point-to-point animation, I will make sure my
project is saved. To do that, let's go to File, Save and choose the drive. I will name this Map Project
and click on "Save". The keyboard shortcut
to save your file is Control S. To create
the path animation, let's export a point-to-point
Earth Studio file once again into after
effects by going to File, Scripts, Run Script File
and importing the.JSX file. Right here we don't
need any text layer, so I'm going to go ahead and
delete all the text layers. Now what I'm going to do is create a shape
layer for our path. I'm going to select a rectangle, change the fill color to blue, and drag to cover
the entire screen. Then I'm going to switch
it into a 3D by clicking this box in front of
the shape layer and selecting the middle
as a parent object. Let's also set the
position to 0, 0, 0 and orientation to 0, 0, 0 as well. Now that our rectangle
has become smaller, I'm going to drag it
over the whole frame. I'm also going to turn
our composition to fit the frame by clicking
here and selecting Fit. Let's hide the rectangle
and we're going to draw our path on
this same layer. We have got to make sure that this shape layer is selected. Click on the "Pen Tool", and then we're going to set
our Fill to transparent. Using this pen tool, we will draw a path from the Cathedral
to the Opera House. I'm going to follow
the road here and we can make
adjustments as we go. Just getting it relatively
close is important, but it doesn't have to be exact. You can fit the frame to 100% so you will be able to
see the road better. That is another shortcut
that is to hold space to move the timeline
with the help of cursor. Once we're done with this, open the properties for Shape 1, which is the path
we made just now, I'm setting the stroke
width to four Line Cap to Round Cap and lines
joined to Bevel Join. Since we have created
our text in white, I'm going to keep the color
of the path white as well. We will also unhide
the shape layer. We're now going to add
the trim paths so we will make sure the shape
layer is selected. Select, Add, and
then Trim Paths. This will allow us to reveal the path as the
animation progresses. We will go to our starting frame and open the Trim Path option. I'll click on the
stopwatch at the End and set that to 0 as
a starting point. I'm moving the playhead about a second and adjusting
the end values so that we can see the
path within the frame. That will set a
keyframe automatically. Then advance a
little bit further. We will do this through
the animation by advancing a few seconds at a time and making adjustment
to the end value. It will give us a little
bit of control over what is in the frame and what
we want to display. This is what it looks
like with the trim path. I don't want this to
be just one line. I would rather prefer if it
looked like how it looks on the Google map when you
search for a walking path, a leading line of dots, which is also moving. Yes, there is a way of doing
it in after-effects itself. In the properties of our shape, we can see there's this
option called Dashes. If I click on the
plus button here, we will get these two options. One is Dash and
another is Offset. If I click on the
plus one more time, I will also get the
option called Gap. You can play with this
however you like. This option will help
you get the right amount of Dashes and Gaps
that you want. As I told you, I want it to look like the Google
Maps walking paths. I'm going to try and make it
look as close as possible. Now, this is actually
looking a bit robotic. I'm going to go to
the first frame of our animation and
create a keyframe, and then go to the end of the animation and move
my offset a little bit. This is actually
looking like it's going backwards
instead of forward. I will set my first frame
to 100 and last frame to 0. This is looking so
much better already. Let's save that. There's a reason why I'm using the same object for all three of our map animations so that we could join them
together and export. To do that, I'm going to create a new composition by
going to Composition, New Composition,
which will open up this new window to
set up our Comp. I'm renaming it Final Cathedral
to Opera House Route, keeping resolution
at 1920 by 1080 HD, but changing the Frame Rate
to 24 frames per second, since we exported our
Earth Studio animations in 24 frames per
seconds as well. The duration will be 30 seconds. Click "Okay", and let's drag all of our map comps
into the final comp. Our first comp was Cathedral. I'll let this be, I'm going to trim the end
of this a little bit. I'm going to drag our
path animation comp ahead in the timeline right
after the cathedral one. Hold "Shift" to snap
it right after. I'm also going to clean
the starting part where we just use the flat plane so that we could create our path. Hold "Shift" to snap
it right after. The last one is Opera House. I'll do the same with this one. Hold "Shift" to snap. Let's watch it run
from the beginning. That looks pretty good. I'm just going to
do a little bit of tweaking to be able to share this on social media or watch it in the
normal player, we will need to export
it from After Effects. Let's do that. We'll
go to File, Export, and click on Add to
Media Encoder Queue. Once the media encoder opens, you will have more
settings like changing the preset and the
destination for tender. Here, I'm keeping the
format Match Source has bitrate but changing the
destination to Desktop, I should be able
to find this file later when I want to
share it with my friends. Now, I'll click on this blue
button on top right side, and this will take
a few minutes. This is how it looks at
the end there. [MUSIC]
9. That’s a Wrap!: [MUSIC] You are at
the end of the class, and if you have been following, and creating the
animation with me, you might already have
your own map animation. Do not forget to post
it in the project, I would love to see
what you've made, and it will be an inspiration to the people who are
enrolling in this class. I'm going to make more classes
like this in the future, so make sure you take out
my Skillshare profile, and follow me on
YouTube and Instagram for more behind the
scenes, and updates. It was a whirlwind of
a journey with you, we learned Google
Earth Studio from scratch from quick
starts to drag points. We then imported those
maps into After Effects and added elements to make
them more informative. In the end, we got
our final product, a beautiful cinematic
map animation. I have added PDF full
of keyboard shortcuts, After Effects elements, and RStudio document in
the resources section. Take this with you and make
more amazing map animation. All the best and I'll see
you in another class soon.
 Snehal Wagh, Filmmaker