Transcripts
1. Trailer.: using here gives to tell better stories of Rudy Brilliance Way off being more creative. If you want to start showing hear stories more creatively, start using cure chiefs and cinema. Gross. It's a really wonderful way of showing the mood, the moments, something that you can't show just on a single photos in here. A few examples. I will show you how I change completely the look of my stories just by using a few a few gifts or multiple sequences or photo animation each time. And I'm try to be very creative. I try to two new things, learn new things and apply them into my stories. That's why a lot of people like them. A lot of clients wants to create something more creative. And yeah, so you see, like just just one give and you can show so much things going on. You can just get attention and attract. People were like those kind of stories. They're just a single chief. But see, like I'm I'm changing them constantly with my stories. There's another example off more people sequences, I think is very interesting, like multiple sequences are great because you can show a lot of stuff just in a few seconds . And here's a notable example. I in this story are use, um, photo animation. So literally I I didn't use serious of photos. I just animate them. So you will see, um, in another few lessons how to do it. And it is very simple, actually. Very simple. Just two images and some animation and the good sense of putting them together. And what I really love about jeeps that they are really evoke emotions in the viewers and weaken more. Connect with your potential clients. Couples on you could be really creative. Yeah, that's why I really love it. You can get you can catch attention of people if he wants to. If you want them to stop a little bit on bond, focus on something that you really want to show. Jeeps are really brilliance, so I hope you like it. And I hope you're gonna enjoy this. A few few lessons and I hope you're gonna learn a lot. You will apply everything to work for. Thank you so much for watching this lesson and Syria in another one. If you are taking photos just with your hands stand still and be really study. Keep your camera close to your chest or your body. You can also put your camera on the floor are in your backpack, but make sure it's all safe. You don't want to damage your equipment. Niedere Harm anyone. Always repeat serious. Make sure you're capturing in good moments and movements. Use your live you. If possible, practice with different mouths off out of focus. It's better to switch to a manual mode and set up exposure by yourself. You will avoid several changes with your explosion in different photos and, most importantly, most important practice, practice and practice. Everything gets about practice, so don't be scared if you will fail once, twice or even 10 times, you have to find your own more flow, your own way of doing gifts. My my way is just trying to be very steady, almost like I'm I'm a human tripod, and that's the essential knowledge in this lesson. I will show you my workflow in light. So first of all, you have to, of course, select your photos for your gifts. My advice is to just select the good sequence of photos that he wasn't moving to march with your camera while taking the Serie try to be very stable. Try to keep your camera very close to your chest. Almost like you were human, Tripod and, um, and try to always repeat the serious of photos. So you just make sure that he captured Ah, the perfect movements. Let's say Okay, so let's go to this series of photos. I already added it. First image with I use my my own light from presets. They're called hero presets from Meridian Persons. If you if you like the toms the course again, you can go to the Meridian Presets website and it can purchase them off course if you like the towns, but it If you have your own presets, you can use wherever you like. We're color. See, they're perfectly So, uh, what do we have like first image? We have to just synchronize oldest Siri's, and you have to be sure that everything is checked. Check all and then synchronize Once everything is sympathized, you have to just export this Syria, Just click right. Click on the image. Make sure that every this older Siri's selected, then choose export juice. Your folder I always try to name the folder. Let's see Siris for Jeeps on. So I keep all the Siris for potential Jeeves in the one folder, and then I always try to keep recites a little bit. My advice is to keep your size for each image, let's say, from one tower from 500 pixels, maybe even uh to 600 sometimes because Chief said, they're quite heavy toe a lot of megabytes. And if you want to block your story using fugitives, he have just keep keep in mind that if you will leaves too much chiefs that they will, your website will be will slow down a lot. So but here we'll just export them with 1500 pixels. Let's just click export. I already did it, so I'm not gonna do it one more time. In the next lesson, I will show you my workflow in Photoshopped before we gonna go to photo show. I want to mention that I also use dip ligation called Adobe Breach. It makes my my work for more, much, much weaker than with just Photoshopped. I will show you just example off why I used So let's say I have already selected the series of the same of the photos that I just exported from light room and let's just load them into the ocean. So, first of all, you have to go to select the photos and go click tool stop in Adobe Bridge and then select for a shop and then load files into Photoshopped players so it will load photos into the photo shop. You see, once he's done, the older layers are together. You can also do it in a different way. Uh, let's just close it. But for me, uh, other be breaches smart, much easier, much faster. So you can also click the file top in photo shop and then go to script and load files into stock. And then just browse your folder with the images that you, um, you already edited and you see it's it's quite difficult to even search for for the city that you exported. So I prefer Adobe Bridge because everything is more visible. But let's say you don't want to use it. You can. You don't want to use that every breach so we can use this way off loading here photos into the photo shoot. Honestly, I don't um mark everything. Uh, I just put the fights here and click. OK, It's the same process. Honestly. So it will take just a few moments. Two seconds. That is that in the next licence, I will show you how to teach together how to teach photos. Gator photo shop to make a gym.
2. Gifs - Essential knowledge.: Hi. My name is Ruffle Boyer, and I'm really obsessed about stories. I waas always obsessed about stories. I remember when I started to block. I was just wondering, How can I show my stories in a little bit different way? How I how I can add some movement, Some moments, something that I couldn't show on my on my photos. And when I discovered Jeeps, I was completely blown away. It completely changed the style off my my stories the way I should. It helped me to be more creative, to be sometimes funny, to show the mood of the story. And that's why I really love gifts, because they can evoke emotions in the viewers and potential couples. And I really hope you're gonna enjoy this tutorial. And I really hope that they will help you to be more creative. Thank you so much.
3. Single Sequence.: in this lesson, I will show you how to make a single sequence single Jif. So, first of all, you have to choose older layers. So on my MacBook, I'm my computers. You have to just select first and then pressed shift button, scroll down and click on the last image. So everything is selected here and now we have to go. If you don't see timeline here, you can You can just click top window and then find a timeline, and then just you will have to. You will. You will have two options. Create video timeline or create frame and frame animations. So just choose, create frame animations, animation and then click this button here. And you see, the first image is loaded, so we have to Now go here. You see this? This little button on the right just click and it bill open automatically. And now we have to make you have to click that this option Make frames from from layers. Okay, so now we have all the layers loaded here on the timeline we can. If we will click the play button, you will see that everything is just like moving. So the sequence is just going and starting from the from the beginning, we can all also do something like it's going and bounce. So it's you don't see, like the cuts. Uh, like here Is he, like cuts from the beginning, cut from the beginning. So But before we will do, like the bounce effect way, have to align the layers. So let's select all the layers and then let's go and click the edit button at the Top Inferno Shop. And then there's an option here that is called out of our line layers. So just click this. Keep it. I always honestly keep the auto and then just click OK, out option. Okay, now everything is aligned. So let's just crop the transparency pick cells. We don't them. Okay, and now ever think is quite stable outside? Not that bad. So let's select all the layers on the timeline. And once again, let's just click this button here on the right, uh, corner and let's apps are, Let's just duplicate first. That's duplicate. Let's click here his bottom on the on the bottom off. The timeline. See, it's here so our older friends are duplicated, so we have to know choose. We have to know Reverse this duplicated layers. So just click this button on the right corner and then reverse frame this option Boom. Okay, so now the frames are reversed And to just avoid you, See if we want gonna delete one off those frames here on the on the middle, in the middle, it's like a first, and the last frames are the same. So we have to literally delayed first from the placated layers and the last one. And now you can see that the the gift is bounced. It's just going to the end and going to the beginning without this effort that would have this cut Africa. If we If you forget to delete those layers, you will see that it's gonna stop for one frame, you see? Stop. It stopped. So you have to always remember to delete the 1st 1 and the last one from duplicated Syria. Perfect. Now we have no we have Everything is the line. We have bounced effect. And now we have to decide what time we want to keep to for our chiefs. Like for each frame. And here. If you select everywhere every every single frame from the timeline. You have this option here in a click below each of the frame. See, you have the option. So no delay. 1.0 point one second, 0.2 seconds, etcetera, etcetera. 95% off each cases, each gift. I try to keep it 1.0 point one a second. So just select everything every every frame and then choose the option of time. Uh, like 10.1 2nd Everything will be centralized. When you will click, you'll see the difference. It's just a little bit slower. Okay? And now let's export those files, um, to the Internet export as a chief. So we have to choose the top file and then export safe for Web legacy. Of course, we're gonna, um, change the size because otherwise, 18 megabytes, it's way, way too much, especially when he wants the blood. Your story with few chiefs will just take too much time for people to lower your website. So most of the cases I use, let's say, 607 100 pixels on the longer edge. So it depends if you want to save your GIF asses. It's a horizontal malt or vertical so in, I would say like horizontal mode. I try to keep 600 on the longer edge. So 600 you will see that the size off the chief will change automatically to three megabytes on. I always try to keep my chief like it's 2 56 scholars. Mostly you can also check one point no. 120 28 teeth. There is not so much colors, uh, on this going on, but And just don't choose Transparency Restaurant Bar and see. You can also play a little bit with lossy and let's see how much we can about let's say, lossy. It's like it's trying to, uh, caught a little bit the the quality off the chief, but would say 5%. I think be would be good. So we have two megabytes. 45. Uh oh. I forgot to mention also before you have to also keep looping options to forever. Uh, if you will. If you will save it with this option once it will just load once and then nothing we're gonna happen on with James. We want to keep this this movements all the time. So forever. Remember to keep it for. And then let's just, uh, we'll just save it somewhere into the computer way will call it wind chiefs.
4. Gifs Photoshop Actions.: I wanted to show you also something amazing. They're just prepare for you for something extra, of course, but it's not expensive. I think you will help you a lot with your workflow. It will speed up your making, making those cheese. So let me explaining what I have. So I prefer actions for gifts, and I split them for food. Two different trips. Motion animated GIFs and motion less animated motion animated GIFs. It means that you you just want to have, like, a simple gift like it's here and motion less animated GIFs. It's especially for the gifts that have some selective movements, and you will explore later on. Um, exactly what it's what it's all about. But let me let me just explain you how to use those actions. So instead of just doing everything manually with those actions, you can just click and save your time, and you actually can just forget about like, what should you know? You have to just follow the steps. So first of all, we have to just aligned layers. So hit the 1st 1 great frame animations. The week late layers, reverse frames select first and the last one from the duplicated layers and then you crop it's and change the time. Change the resolution and it is done, guys. Just few Lil's clicks steps, and it's done. I will also show you the small video off how you can, uh, speed up reading your work folk with working. So I hope you you gotta enjoy it and they will help you a lot with your work.
5. Multiple Sequence.: in this lesson, I will show you how to make a multiple sequence. So let's go back to the for the shop. I prefer three different scenes, three different sequences that we will merge together and save it as a one. Jeff. So let's just add it the 1st 1 If you are curious, if you want to remind you how to do it properly like that, align the layers to make a group frame animations truck. Just go back to the first lessons that it is called from single sequence. I will be using Hugh my, ah, my actions because it will make our work folks much, much faster. So let's first align the layers. Let's make a first group might make a group. Let's create frame animation. Let's reverse the frames and let's maybe changed a little bit time. And of course we have to crop it to just delete this trance Burns excels effect great, and we'll have to. What happened would have to we're doing neck. What we have to do next is we have to convert to video timeline here on the left bottom. There is this small battle. Just click perfect. I already did the second and the 3rd 1 So let's just mark group first here. And let's just use the shortcut Common sea. Or you can find it also on the top at eight and copy so and let's just paste it here and let's go to the 3rd 1 Comment. See and common the great. So, as you can see, we have we have it. We have those three groups already, uh, here on the timeline. So now what? We have to dio ease. We have to just change their position. So there's the first group. That's the second group. And there's this 3rd 1 Let's put this in. The ants change little bits size and let's see, How does it look like? Oh, and we have to just see uh, see those that was blank. Um, pixels. I'm using the shortcut comment t on. Now. I can just move it and height those blank pixels. Let's see now if everything is fine, it was a little bit here. So common T Let's move it a little bit even more and no, it's perfect. So weaken, weaken, Save it. We can save it now. A zoo. See? It's so simple. You can even make multiple sequence and show few different stuff just in one give and which is great. Especially when you were blogging on. And you don't want to put, like, 200 of photos and make people boring really quickly. You can just show on one, give a few different actions. So thank you so much for watching this lesson and see you in another one. In this lesson, I will show you how to make an animated GIF. Uh, so what? I mean about what I mean about saying animated GIF. You can also blend two photos together and make some still photos, not chiefs, and make some kind of animation like it is here. So, you see, just there is a girl appearing here and she's just fading out. So let's go and let's see how to make it. And it's really easy, actually. So what I what I had I was just having to vertical photos that I together as that dip take . So let's just copy the 1st 1 controls. Comment A to just select the photo and can come and see to copy command the to paste it okay, and let's just resize it a little bit just and now we have to just make a dipped IQ. So I will es crop to to extend he here on to just move this photo a letter, but here to the left. So now you see, there's we have a really nice lip tick on here. We can just, um, group it. So now we have a proper dip. Take Let's just merch those files to get her those images together. And here I had a another shot of the girl that she was smiling. So I thought it would be really nice to ah to to put it there, to animate this this cheap. So come on a to select it. Come, come and see to copy. Coming w Come on, V to paste it. And now what we have to do is way. Have to decide where she's gonna meet but say let's plays her here. And now we have to create a mask, a liar layer mosque, and we have to, um, invert this musk. So if everything is hidden perfect. So what we have to do now is to try to blend her, Teoh, blend her here, Um, that it won't gonna look like it's something, you know that is that he said, like a different for So let's use, um, brush till Let's just keep our hardness as a minimum. So probably zero and maybe a paucity to from Nick around 30 and let just start, um, blending her. So we have to sell, like the white color. Of course. Oops, it's even too much. So maybe 20 capacity. You know, it's it's even to march. So maybe 10. Panel B Good, but see something like that. And of course, we have to also change their them landing mode. So I will be using here screen, which is, in my opinion, I think, the best, Ah, in this particular case. And now we can we can start moving her. Let's see, let's say she's gonna be here, and now we have to blend. It's even better. So I will be just using my brash toe planning a m'lee out. Perfect. In my opinion, these create So you also have to be, um, careful, for example, by choosing to images and leading them to get her, you have to play around and this I like you see, like this image was really cool because a lot off white and black pixels all around her. So it's easy to blend it using the screen blending mode. Okay, so now let's go to the timeline on and let's so I have to just unlock it and let's create a frame animation. Thompson. Sorry, let's create a creed. Video time like Okay, lets just click it. Perfect. Ah, so now what? We have to dio we have to be Make sure that this layer with this girl is on the top and we have to. There, we have to go to the timeline and click this bottom so and then we have to go to the capacity. And we have to make sure that this selector is at the beginning and what we have to do now is we have to click. Enable cave key frame animation. Just click this this little clock boom and let's change the opacity to zero zero and let's moved. I think blue selector to day, Let's say to the middle and let's just change a prostitute 100 and then let's go to the city, ends off the sequence and sleds. Just change it to zero game. Uh, That's 11 important thing. If when you gonna start playing with those animations, just make sure that, for example, if this key frame is, let's say 0 10 20% make sure that the last one is the same. Otherwise, if you will, if you will change it, let's say 10%. Your animation won't be as it should. I will show you the example of that. It's now it's wrong, said the beginning zero and Andy. And it's 10. You see. And now when I when I change, when I will change it to zero. Oops, No, just when I will change it to zero. It's just put it here. Everything. We will be smooth and I think it's too long. Maybe we should just maybe, let's say three. Second is good. Three seconds will be perfect mapping. Let's see. See, she's appearing and disappearing completely. We can also play like she's not disappearing completely. Let's say 10% maybe would be great. So if we are changing in the beginning, Trump's let's change are also at the ends. Perhaps not here. So did he do? Let's change. Let's change it here to 10% as well and that's she disappeared. Almost disappeared. Maybe even 100% is too much. Maybe we should We should keep it 90 or 85% maybe. And we can add another 1 85% So she will appear for for a little bit time and nothing good gonna happen. And then she will be just fading out. Let's see. Perfect. And now it's great. So you see, it's so simple again. Amazing effect with chiefs with two steel photos, actually, but we make we can make a chief from even two photos and can be really creative, especially showing our story. Thank you so much for watching this lesson and see you in another one. And now I will show you how to save it as a chief file. So we have to go to file, then export and then safe for weapon. And here you have to be just really careful about the colores etcetera. You see, like this, Chief is not that big. Actually, it's just but just see, because we used first of all the size is 600 pixels. It's, uh so it's not dead wide. And the the other thing is that we used image to just cover every every movement. So there's just a few little changes there and make sure that Transparency's is turned on. In this case, on colors are 2256. It's fine. 300 pixel. It's really low. I mean, it's not that it's really loud, um, for the chief and make sure that looping options are always forever perfect. Just, um, make sure it's he say with correctly, Let's say Gate one, save it and you can also save your Keefe as a video. So let's leads the way. With the 2nd 1 we've been under one. So let's goto file export this. And then we have to just click around their video and change your name. Change the name, Let's say, give one. So I like folder and you can decide about resolution. So I already change the resolution. Hear anything for 800 pixels or something. So I will also also change their resolution here. Or even you can decide you can have few options here, so 800 to 640 you can decide frame rates four months. In my opinion, this money is or a quick time is the best but I mostly to choosing this option here. And worker year old frames. Um, that's it render. But I think, Well, it's just I just find this in this file opening boom, and it's them and it saved as a video. Better quality for sure. Let's see how this thing look in with browser this, Chief, it's a really low resolution, so you can decide which resolution you like. Of course, there was just, like too much movements here, so I wasn't too to precise, but I just wanted to show the effect. So, for example, believe this bar doesn't work. Just make sure that you one gonna choose it may be something different. Maybe you planned it differently.
6. The End.: Thank you so much for watching this tutorial and for precious time. And I hope that you're gonna start doing here. Jeeps and cinema grabs. You gonna have fun with them, and you're gonna experience with your stories and you're gonna maybe change the way you should hear weddings and your stories and thank you so much. Ones more and see what?
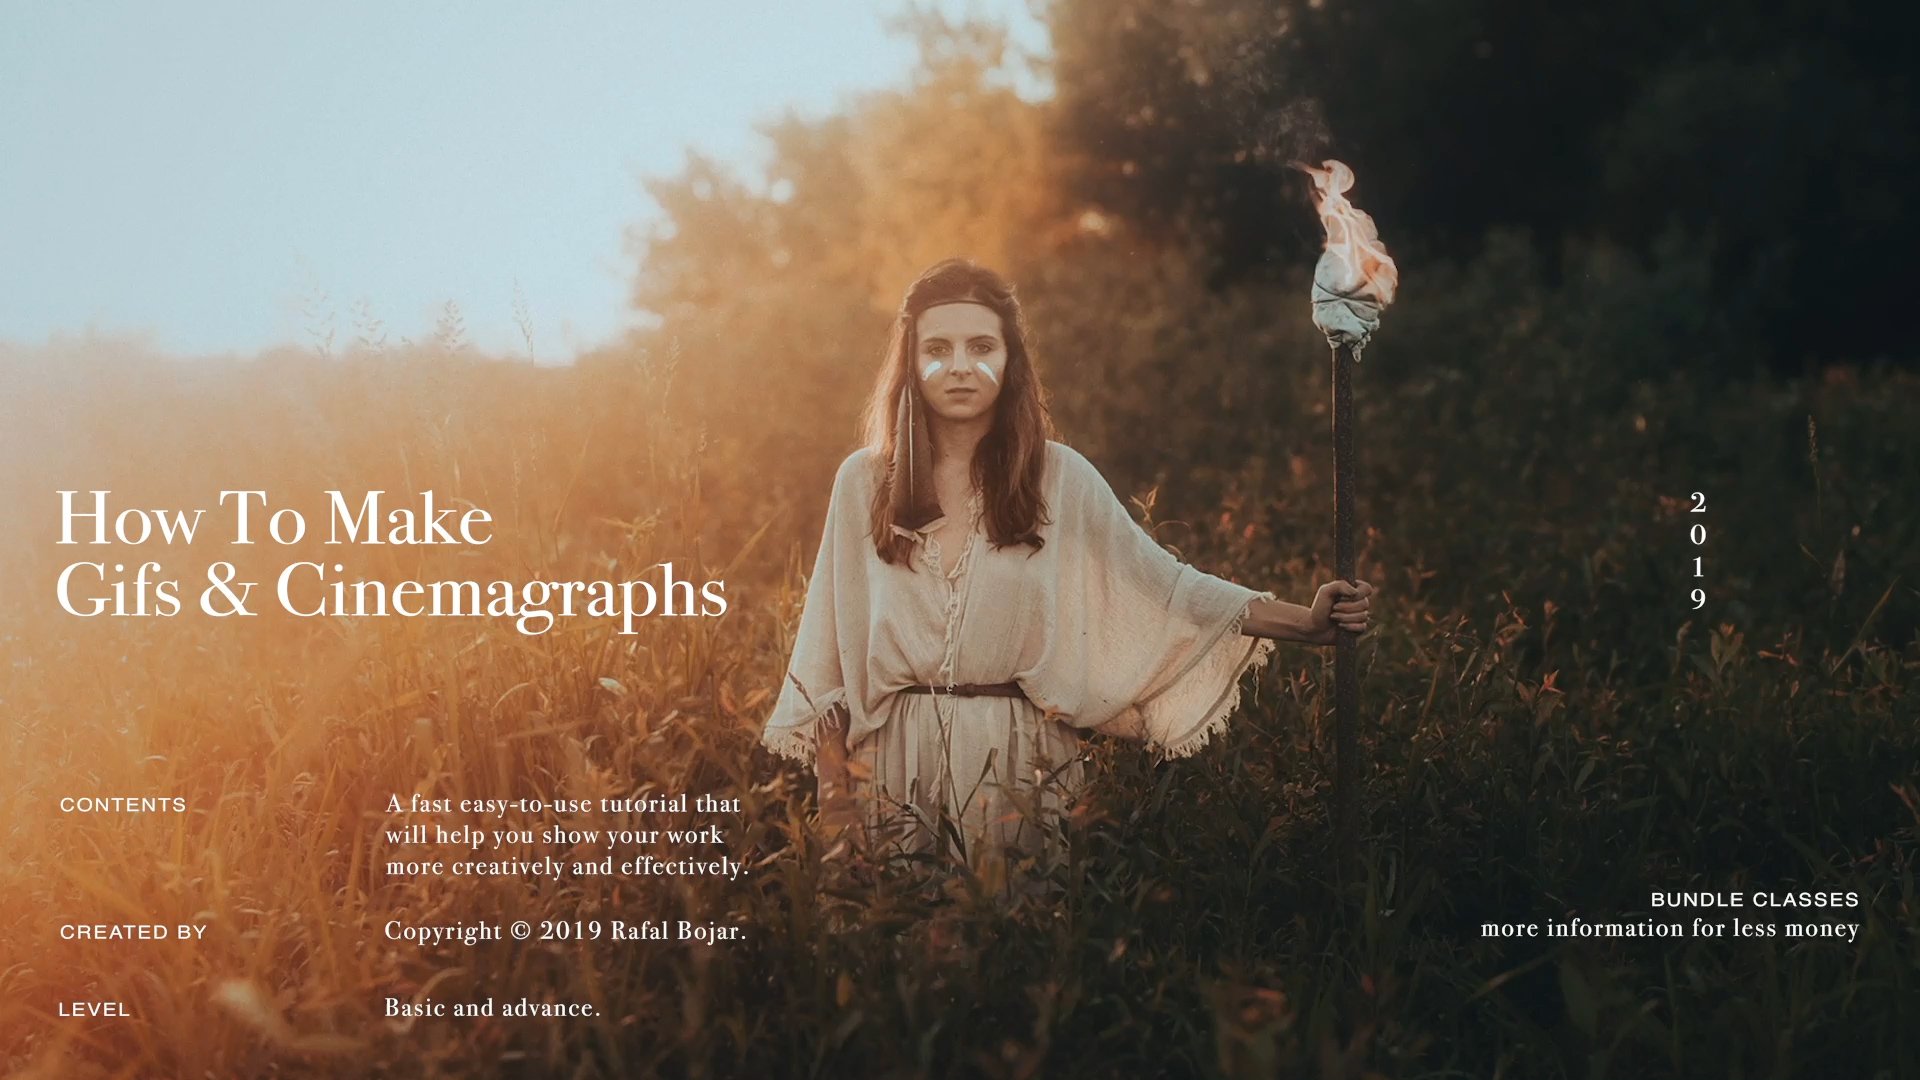
 Rafał Bojar, visual storyteller and teacher