Transcripts
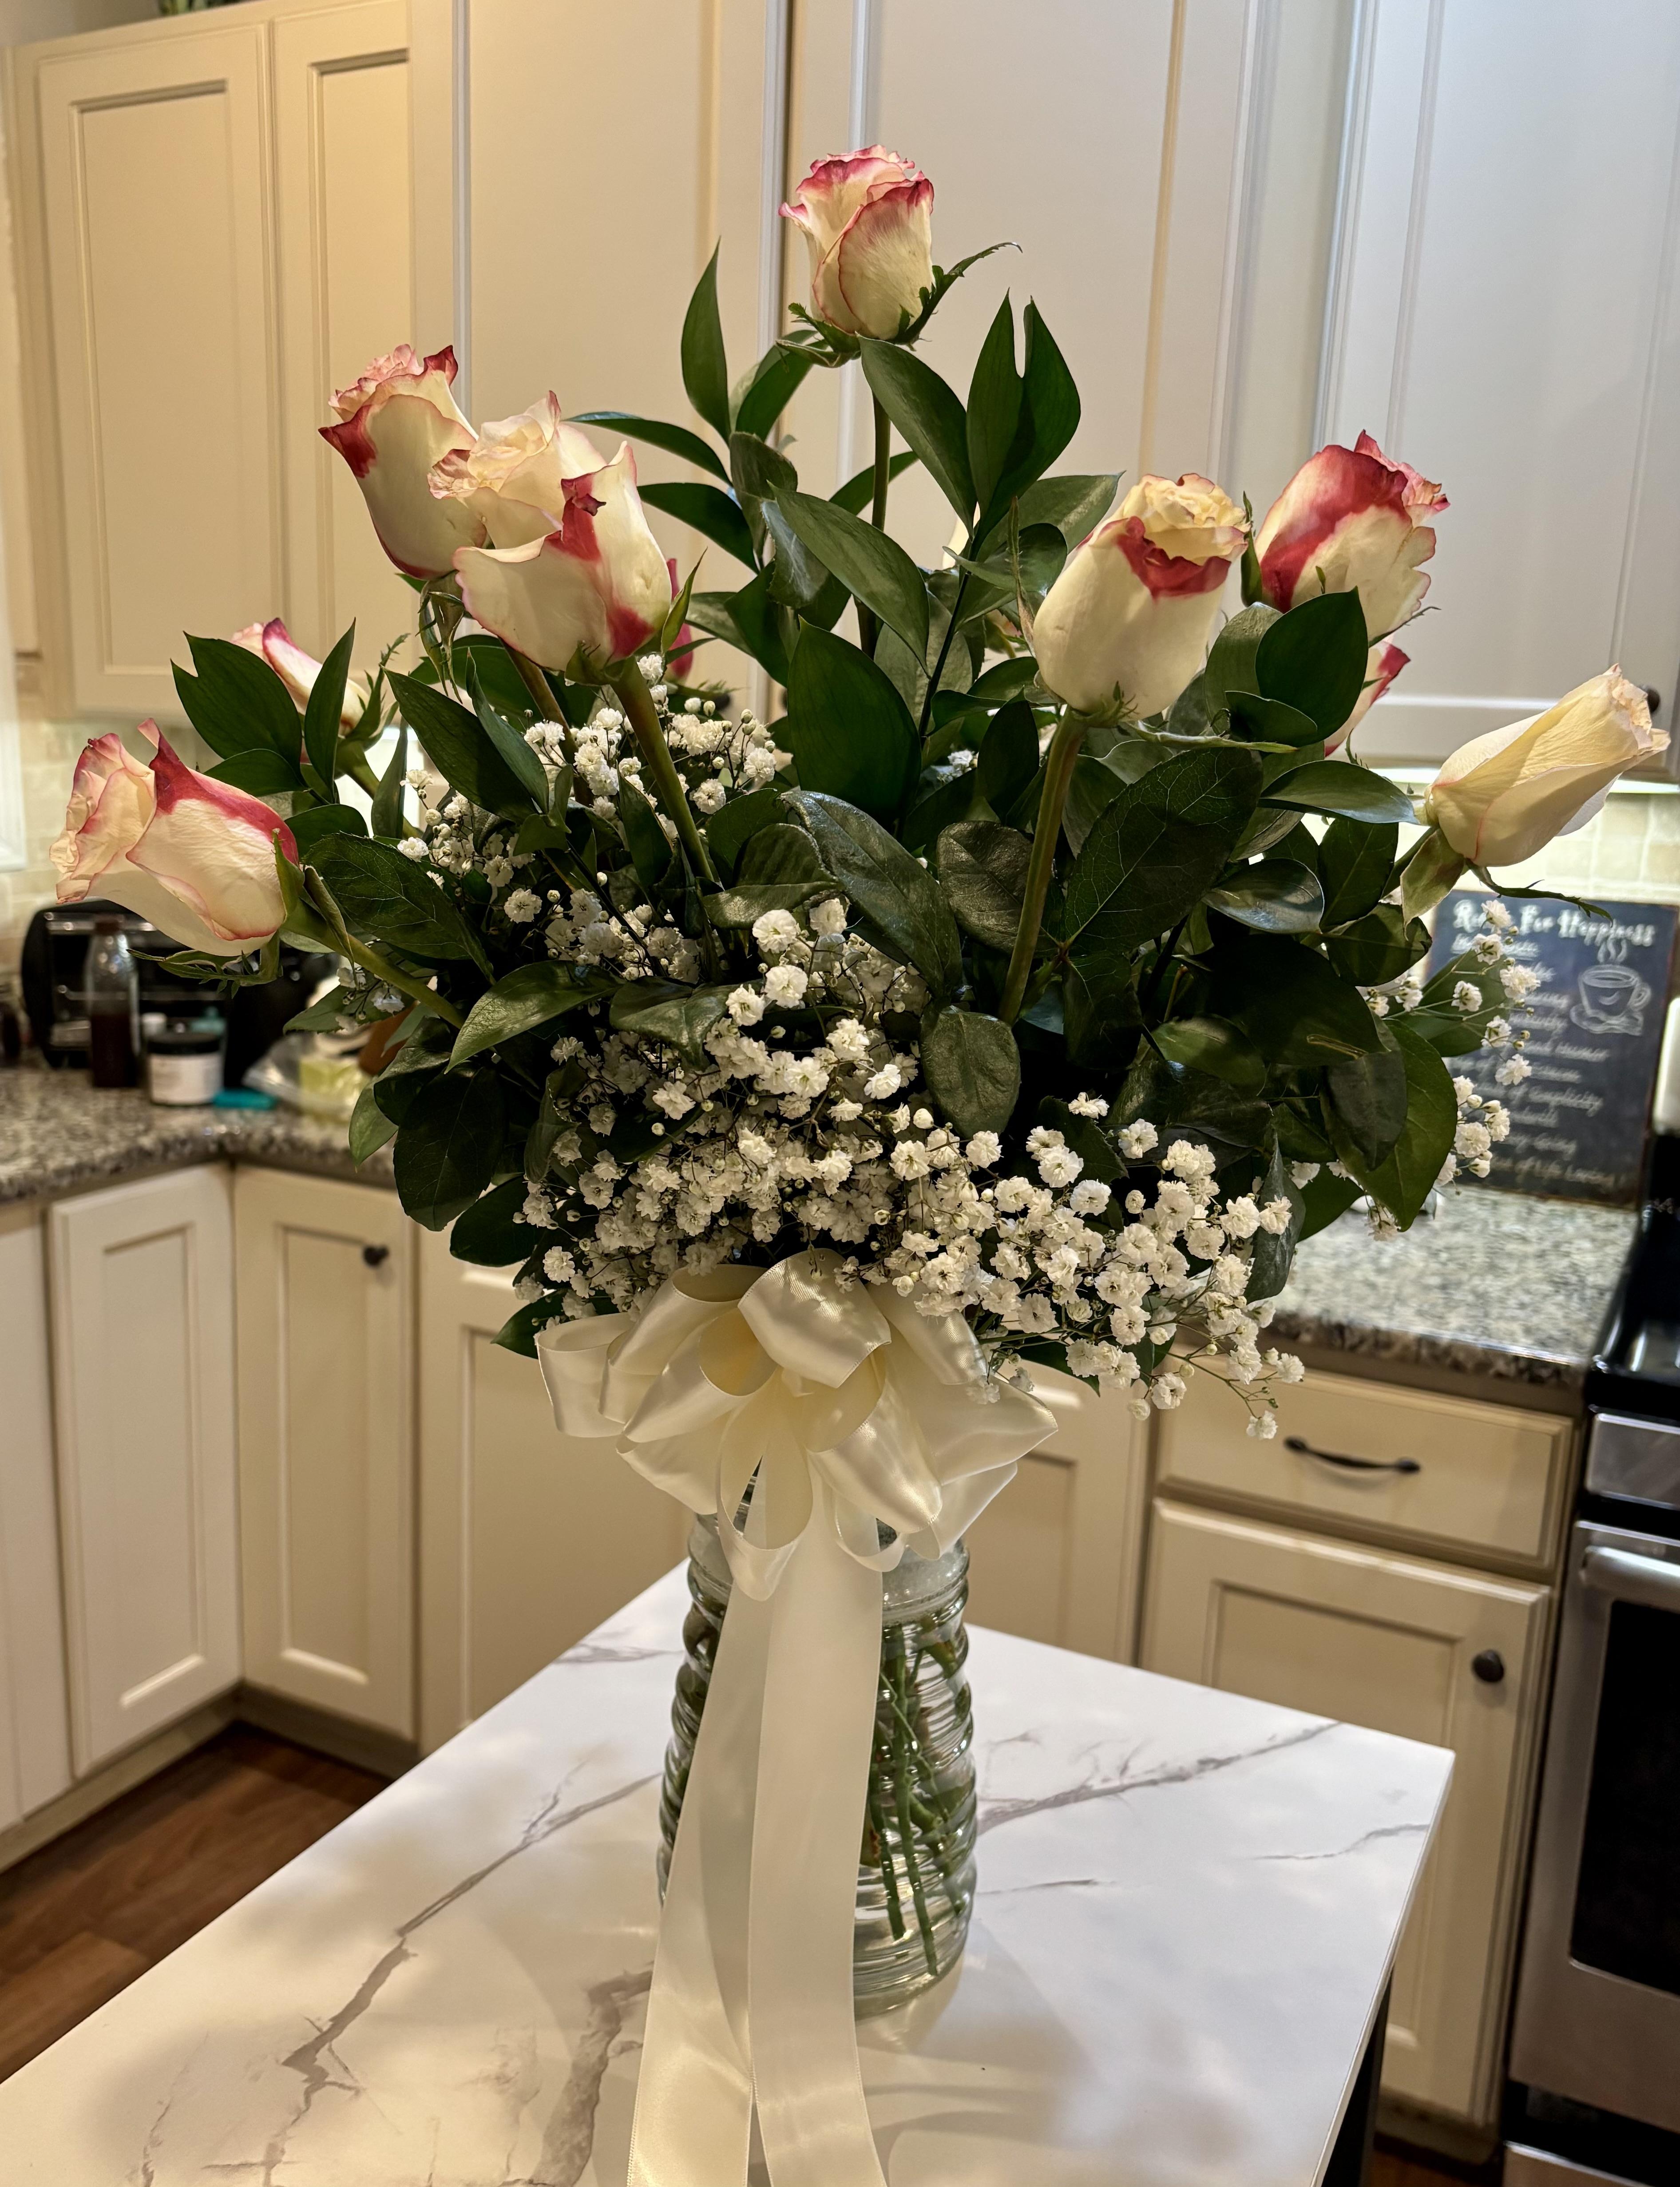
1. Introduction Supplies: So we're going to learn how
to design a dozen roses. A lot of people want
to know, you know, how do you get a
dozen roses that look like you got
from the florist? Well, I am a
professional designer, and I'm going to show
you how to do that. First of all, the
supplies you're gonna need is a rose vase. This is an eight inch rose vase. You can get any style
rose vase that you want. You can do a glass cylinder or whatever you may
have around the house, and just need something
large enough to hold a good dozen roses and some greenery and a
little bit of babies. So I picked up some roses today. These are called sweetness.
They're very pretty. It's like a white rose
with the pink edges. Kind of looks like lipstick
on the edges. Really nice. Maybe some ribbon
if we want to do a bow to tie around the vase. Supplies you're
going to need are clippers, rose clippers, scissors, and something to tie your ribbon with
if you do a bow. This is just a pipe
cleaner, Chanel stem.
2. Preparing the Roses: Go to open up the roses. Comes with rubber band on it. I just got to cut it open. Remove the paper. Because this is the week of Valentine's, they kind of put extra special
material around the roses. These you can get at
most grocery stores. I'm gonna save this. Maybe we'll tie it up
with that somehow. I move the rubber band here, and the best thing to do
is get your sines ready. Sometimes they come with
a lot of thorns on them. These look like they've already been stripped of their thorns. You want to make
sure that they are, and if any of them have
any thorns still on it, you can always use your
clippers to remove thorns just by clipping
them off like that. You want to remove any
damaged or broken foliage? And we only need
about three or four sprays of foliage at the top. Now, roses, some
of them come with a guard pedal that are a
little damaged and brown. So if they are, you
can put your finger inside here and
just pull it off. So that one's ready. So
we'll get these all ready. To go in the vase. It's just called prepping. A lot of times when we get
flowers in from the hossaler, we have to prep them and get
them ready to design with. And that just means removing
any foliage, any thorns. Anything that you don't want to be in your finished design. So we're going to
set these aside. Those are all ready. I like to work by a sink or
a trash can so I can keep my workspace clean.
3. Greens & Baby’s Breath: I like to separate
the baby's breath, kind of pull it apart,
air it out a little bit. It's really kind of
fragile, so be careful. 'cause it'll snag
onto each other. Just create a separate pile. Some of these have a few stems
attached on one long stem, so you can use them
separately in the design. You just cut them apart.
These are a little shorter, we'll save these for
the outside edges. And we'll set that aside. Now, you can use different
types of foliage. I like this. It's more floors gray. You can use leather leaf. This is the Israeli Ruscus. It lasts a really long time, and it's a nice sturdy base for your roses. We're
going to use that. Those prepackaged roses
come with flower food, and that just helps keep bacteria out of the water.
So we're gonna cut that. Put that in and then
get some water. It may create some suds. It looks like soap,
but it's not soap. It's just the formula
mixing up with the water. So we're going to start
with the greenery. Now, you don't want any foliage going down inside the water. So if there's any too low
on the stem, remove it. Cut all your stems on a
slant with your shears, and then let it lead
out to the side. Kind of measure and see
if it's going to be in the water, remove it if it is. And we're going to
create cross stems inside the vase to
help create a grid. So when we put in our
roses, they stay in place. I'm starting with basically
the four points one here. I want to here. See, it's kind of
all the way around. Now we'll fill in a little bit, a little lower to help
keep a secure base. You can measure to know, you know, the length to cut it, and then you go in between. So that's a little
shorter than these two. That's creating a nice grid. I always like to churn my base. Sometimes things move,
you can just hold them back. There we go. We'll do a few in the center. Near. And one over here. And we'll do one more. We
can always add more once we put our roses in if we
need it for stability. Now, some people sometimes
will start with the roses now, but I'm going to go ahead
and do the baby's breath, a filler because it
helps create even more of a secure grid for the
roses to hold in place. It's nice to keep a
towel on hand so you can keep your station clean. Now you get your baby's breath. As I said, you can cut them so that you
have two instead of one. Let's start down
low, tuck it in. Do one over here.
Kind spread it out. This one's nice and tall, so I'm going to do this
one up towards the top. Let it lean this way. Here I can make two again, separate for two stems. There we go. You just try and fill in the holes
wherever you see a gap. Keep it nice. Pretty
uniform around. As you can see, I recut everything before I
put it into the water. Nice, fresh cut, and they
can drink really well.
4. Arrange Roses in Vase: There. That's nice. All right. And you can start with most of these are
about the same height, but I like to see which
ones are taller to put and save the middle one
for the very top flower. That's nice and long. So you could start with
your center flower to know how high you want to go. But a lot of people
like to start with seven around the bottom, four, and then one at the top. So if you start at the top, you put the longest
one in first in the center and you want your rose to be at least double
the height of your vase. So That's a good height. Now we're going
to do four round. You measure, you cut, and you're going to put it
on a little bit of a slant, a little lower than
the one you just did. Do that again over here. Then two more at that height. Crossing the stems in the vase. And measuring. Now
you got your four. And now we'll do
the ones around. Just a little shorter. Sometimes you got
to wiggle them in, as the more you
get stuff in here. More stems you get, the more difficult it can
be to get them in, but I sometimes like to hold
the center one as I do that, so it doesn't move out of place. I love these roses.
They're so pretty. You can use any color
that you like for whatever the occasion
is or whatever color. Maybe a favorite color of yours. This has a few thorns on it, so we want to remove the
tips because if you don't, when you go to insert it in your design, it'll get snagged. I'm gonna do it down here. And one over here. It's really just
kind of following a pattern of what
you've already done. Turning. Yeah, one more. Don't be afraid to move
things around if you need to. They might just
adjust a little bit. And at the end, if you'd like to add a few more
greenery up at top. Sometimes I like to that
rose is up there by itself. Let's see if I can
see it in there. Let's. There we go. A little greenery on top. And that finishes the
roses. That's so pretty.
5. Make a Bow & Finish: A ribbon around here and
learn how to tie a bow, I can show you that next. This is a number nine ribbon, they call it in
the floral world. It's about 2.5 " I think in
width or 1.5 " in width. It's a double sided satin. It has satin on both sides, really flexible and shiny. You're going to need probably
about 3 yards or so. You pull out one, two, three, that should be enough, but I'm gonna leave
it attached to the roll as I show you
how to do the bow. I put the ribbon in front of me, and then I figure out how
long I want my tail to be on the roses when it's hanging down,
and they leave that. In the center, I create a center loop by
going over my thumb, twist, twist the other one, it ends up looking like this. And then make a
loop. Pull it up. Hold, twist. Make a loop down. Hold, twist. Each time you make a loop, you come up just a little bit
farther than the last one. Not much. Twist. So I got three. Three on that side, so you can see it's starting
to look like a bow. I would say five to seven loops on a side depending on how
big you want your bow. Bring it down, twist. I need a little bit more, maybe if you want to pre measure, you're probably going to
need about 4 yards or so. There you go. That
would be nice. Now you hold it up
and you measure cut one just a little
bit longer on a slant. Then the way to secure
the bow is you put the pipe cleaner in the
top of that center loop and you push it through your fingers on that
side so that you can grip it here and
here and pull tight, it looks like that
and then twist. Now you can let go of your bow. And to flaft just pull
the loops either down or up on both sides. Usually doing one up, one
down. I got a nice bow. What I like to do is I I save a stem from the
rose that I cut off, and then just twist,
twist, twist. Now you have a stem to
insert it inside the vase. So then you just put it
in. Now you have a bow. And it's ready as a gift.
Thanks for watching.
 Elisa Gabrielli, "Create easy to do Art & Floral Designs"