Transcripts
1. Introduction: Hi there and welcome to this beginner's class on how to 3D design a robot in Autodesk Fusion 360. This class is for anyone who wants to learn more about how to 3D design their own models and characters, and also how to upskill their beginner design status by creating more complex models. In this class, you will learn how to use a large variety of sketch and modeling tools within the software. This will also help you to understand how to break down the process when creating a more complicated model. I will be there each step of the way, giving you some tips and tricks to help you work more effectively and efficiently within the software. I'll also give you the opportunity to experiment with the different styles and materials until you find what works for you. Hi, my name is Hendrien Horn, and I'm a 3D Designer and Ceramic Artist from South Africa. I have always enjoyed illustrating and painting characters on my pottery. If you had told me a few years ago that I would be 3D designing characters and products using 3D software, well, I probably would have said that you are going absolutely mad and that my take in computer skills were pretty much nonexistent and that wouldn't really change in the future. But wow, did I prove myself wrong? Being a 3D designer opens the doors for absolutely anyone to become a product designer. For example, today we're creating a character, but maybe one day you would like to move into animation or products and prototyping. For example, making toys or inventions, the list goes on and on. 3D modeling, printing and prototyping is one of the fastest growing markets in the world right now. But because it is still new, people are quite scared to start because they think they might not necessarily have the skills or capabilities to do so. All that you will need for this class is a computer and a mouse with a scroll wheel and of course the software installed. Hi, my name is Hendrien and welcome to this class.
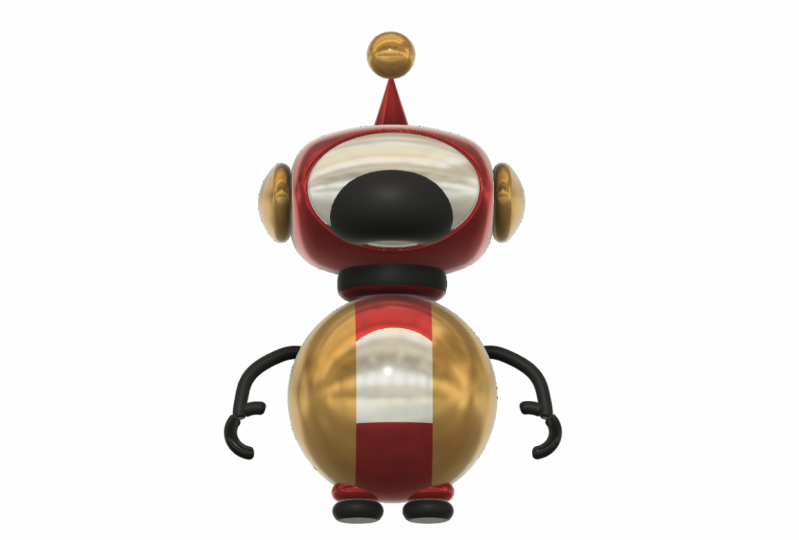
2. Project: Once we have gone over some of our settings and preferences, we'll be moving on to creating our 3D model. The 3D robot is a little bit more of a complicated model. This just means that we'll be able to explore a lot more of the tools and functions within the software. We will start by sketching the outline of the robot and once our sketch is cleaned up and we are ready, we will be moving on to the modeling of our 3D robot. We will be breaking up the model and modeling it in sections. By doing so, this will allow you to see how to get started with a complicated model and how to use the tools to help you streamline your design in an efficient way. Once you have finished your design, we will be moving on to changing the appearance of our robot, giving it some character. I would like to encourage you to explore all of the different styles, materials, and colors when it comes to the overall finalized look of your robot. Remember, yours does not have to look like mine. Finally, we will be saving and capturing an image of our model within the software. I would like to invite you to share your image with the rest of the class, please don't be shy. If you're ready, let's get to class.
3. Sketching Face: Let's start by going to Create, Create Sketch. Let's choose the front plane the z, x plain to work on. Now we need to do a line going straight through the model. We're going to Create, Line, click on the origin, release and drag up. Make sure it's 90 degrees on the way up and make it 230 millimeters, and Enter. Let's drag this dimension out. Let's start with the face up here. Let's go to Create, Ellipse. Anywhere on this line, I'd like you to click and release. Drag out. Save this at a 130 millimeters. Click, release, drag down, make this 80 millimeters and enter. We'll be doing another ellipse in the middle. A shortcut is to right-click, go to the top, repeat ellipse. Click on the center point here. Let's drag it out. Let's set this at 90 millimeters. Click, drag down. In the center, let's set this at 60 millimeters. I'm just going to drag all of these dimensions out because when you're doing a model and too many lines, it can just get over complicated. Next, let's do the antenna here at the top. I'm going to press "C" on my keyboard for center diameter circle. Click on the center point, drag out, let's set the diameter at 70 millimeters and enter. Next, I want a line going down here, so I'm going to press "L" on my keyboard for line. Click on the circle, drag the line down at an angle, and click on the top of the head. Press "Escape", and we can move this line around until we're happy with where it is. Now, let's merge so that we have the exact same dimension and angle on the side. Let's go to Create, Mirror. The object is this line. Mirror line is the center line that we drew, and it pops the line right there. Because we'll be revolving our model a little bit later, we just need to extend this line up so that the circle can revolve all the way around because it will be revolving around this line. How we do that, is we go to Modify, Extend. Hover over this line, a red line appears and you just click on it and the line pops into place. Next, let's do our eyes. We're going to do another center diameter circle. You can also click here on the top. Click the shortcut, click anywhere you like except on this line. If you click on this line, it constrains the center of the eye to this line, and I don't want that, so I'm going to click here at the bottom, release, drag out. Let's set this at 30 millimeters. I'm going to say C on my keyboard again, click at the top here, release drag out. Let's make this 40 millimeters and Enter. I'm just going to move them around and not put them on the line. If you do put them on the line, just go undo and make another circle. Now, I'd like to create a line here on the left-hand side, on this face. I'm going to press "L" on my keyboard for line. Click at the top of his face, drag down, make sure it's 90 degrees. Click on the bottom. We need to create a dimension between the center line and this line. I just want to bring it in a little, so I can press "Escape." D on my keyboard for dimension, click the center line, click this line, drag up. At the moment, it's on 54 millimeters. I'd like to make it 53. If you click on it, just change it to 53 and you can see it brings the line in. I just need to mirror it on this side. We go to Create, Mirror. The object is this line. The mirror line is the center line, and we say, "Okay", and the line is plopped in.
4. Sketching Body: Let's start with the neck. I'd like to create two arcs here so I'm going to "Create", "Arc", "3-Point Arc". At the bottom of the neck down go further than 10 millimeters. Click it around here, drag down, let's say that at seven millimeters, click and drag the arc out. Now, I don't want these lines to overlap over here, so I'm going to ensure that when I do my arc yeah, that looks about right. Just there perfect. Just to ensure that those lines aren't overlapping. I want to do another one, so I'm going to click on this point. The guides will help you with the lines that they put in this construction line. I'm going to say seven. Again, click and if I drag it out, you'll see it snapped into place because of the arc at the top. So I click. I'd like to create a line going to the right, so I'm going to press "L" on my keyboard for line, click on the point, and drag to the right. That is now an enclosed shape as well. Let's do the bottom part of the body. I'm going to press "C" on my keyboard for center diameter circle. Click on the line. Let's make this 95, "Enter". Now we need to ensure that this is an enclosed shape. We can see it's not enclosed because it's not blue. You can pull your circle up just a little bit and now it's blue. Just to ensure that these two lines overlap. Actually just going to pull it down just a little bit. There we go, perfect. I'm going to do another circle in the middle here. I'm going to "Right-click", repeat center diameter circle, click, drag out, and let's make it 60 millimeters, "Enter". I would like to trim part of this bottom circle, so I'm going to create a line going through here. I'm going to press "L" on my keyboard for line. Click on the one side and drag to the other, and press "Esc". Now I want to trim this bottom part away. You can go to "Modify", "Trim". You'll see the shortcut there is also "T". Let's hover over this line and trim that line and that line away. While we're in trim mode, I also want to trim this line here that overlaps because we want to have a clean model. Before we do our 3D model, we always clean up and make sure there are no extra lines. This is an extra line that we don't need, so I'm going to trim it away. I also want to create a line going down like we have on the face here. I want one here on the body. [inaudible] alpha line. Click at the top and drag down, make sure it's 90 degrees. The distance between these two lines, let's have a look I'm going to press "D" on my keyboard, center line, sideline, I'm going to make it 40. If you'd like to change it, if you want to bring the line in a little bit more, you can always double-click on the dimension and change it, for example, to 35 and it brings the line in. But I'm going to say "Control Z" twice and it pops it right back. Now just want to mirror the neck and this part of the body on the side. You go to "Create", "Mirror". We'll be selecting the two arcs, the line and this line. The mirror line is our center line and okay. There is our body.
5. Sketching Feet and Arms: Let's start with the left-hand side foot. I'd like to draw a line here, but don't get confused. This is not a line that we've done. This's actually the dimension we did earlier so I'm just going to drag it to the right. Let's press L on our keyboard for line. Click on the origin. Drag to the left to about there, and click the green tick box. Next, let's press C on our keyboard for center diameter circle, and on the left-hand side here, click release. Let's make this 35 millimeters and enter. I'm just going to move the circle around a little. I'd like a gap between the feet over here and I don't want it to overlap too much at the top. I'm just going to pull it down a little. Perfect. Because we've created this line here, I can now trim this bottom section away. Instead of going modify and trim, we can just press T on our keyboard, the shortcut and hover over it and trim it away. I'd also like to give a little bit of definition here on the foot so I'm going to draw another line over here. I'm going to press L for line, just make a line over here. I'm going to press D for dimension again and click the bottom line and the top line. Let's make it six millimeters and enter. This foot will also be revolving around, so we need a center line, I'm going to press L for line. Take it down, you'll see that line appears to help you. We'll click at the bottom, go through the center line, drag all the way up. We know it's the midpoint of the circle because at the top you can see the little triangle appears. Little click and there's our foot. Now, I'd like to mirror this to the other side. We can go here to the top to the shortcut. Let's just select everything. Don't forget this bottom line and the mirror line in the middle and okay. Now, let's clean up the model a little. We can say T for trim. Just trim that line. We see we've created an enclosed shape here but actually it shouldn't be enclosed so we'll trim that line away and that line and that line as well. Perfect. The feet are done. Once again, let's start here on the left-hand side. We will be using the fit point spline tool to make this. The shortcut is here at the top or we can go create, spline, fit point spline. I'm going to click here above this line and just make a few points. We don't want too many points, because we want a nice smooth curve and the more points you create, the harder it is to smooth the curve out. Going to press escape, and let's move these points around a little. You will see with these anchor points, if you click on them, you can actually drag these out and the sketch will change. But because we will be using the pipe tool later to make the arm, these sharp curves won't work with that function. I just want you to know that when you're doing the arms for now, don't make such sharp curves, rather stick to the smooth curve that we had. I'm just going to go control Z and that's perfect. Let's quickly make some fingers. I'm only going to give him two and I'm going to use the arc tool, creates, arc, three-point arc. Click on the point. Let's make this eight, and let's click over there. You guys can play around with it and see how you would like to do it. You don't have to do it exactly the way I do it. Click on this side, let's make it eight, and click over here and drag it out. Press escape and there's the one arm. I know it doesn't look like much now, but we will fix that a little bit later. Let's mirror it to the other side. Create, mirror. We're going to select the arm and the fingers. Center line.
6. Sketch Clean Up: Now there's quite a lot happening here, I just want to double-check my sketch and make sure everything is in order. I'm going to start from the top and work my way down. Everything's fine here. I already see problems here, for example, this line, I didn't mirror it to this side, but at some point I did press ''Control Z'' twice. It may have happened that I accidentally just deleted this line without realizing it. We're just going to do it again. I'm going to say mirror, click on this line and the center line and just put it back. There we go. That's why it's always good to double-check your sketch. Also, with the eyes, we will be revolving everything 360 degrees and there's no center line here, so I need to add that. I'm going to go L for line. That looks good. All the shapes are enclosed. Both lines are here. It has all its fingers. Everything is in order. All we need to do now is just save Finish Sketch.
7. 3D Model Face: Now we'll be using the revolve tool for the face. You go to Create, Revolve. Select everything on the left-hand side, even the neck. Also don't forget this part left-hand side of the line. The axis is the z-axis, the height, also the center line. It automatically revolves it all the way around. Make sure it's on new body and say, "Okay". You'll see our sketch has disappeared, but on the left-hand side, here is our body. Lets activate the sketch. Now I want to split the body here at the top using some of the sketch lines that I've created. How we do that, is we go to Modify, Split body. The body I want to split is the face. The splitting tools. If you're struggling to see the lines, put your bodies off here on the left-hand side. I would like this line, the right-hand side one and the sensory lobes. Make sure your extend spitting tools is unticked. Let's put our bodies back on. If you turn it to the side, you'll see it in red, meaning it's cutting the body. Say, "Okay". Next, I want to create our eyes. For now, I'd like to put all of my body's off to create the eyes. You're going to Create, Revolve. The profiles on the left-hand side, the axis, center-line. It's giving me a warning because my bodies are off so I can't see the center body. I'll put my bodies back on and then take all of these bodies and put them off so that I only have the one eye so that I know what I'm working with. Say "Okay". Let's do the other one. Right-click, repeat, Revolve. Let's choose the profile, everything on the left-hand side. New body, "Okay". Now, if we switch all of our bodies back on, we can't see our eyes because they're in the center, so we need to move them. How do we do that? Well, we know the bottom two are our eyes. If we hover over them, they light up. I'm going to click the one holding "Shift" and click the other one. It's right-click and to the left bottom here, say "Move and Copy". On our view cube at the top, let's click and have a look from the left-hand side. These areas have appeared and the square. Now don't use a square for now because if you move it, it's free movement, it could move them any way. To make sure that it just moves in straight lines, we're going to use the arrows and I'm going to take this bottom arrow and just move it to the right. Let's move both outwards. I want them to pop out a bit. Move them until you are happy. Say "Okay". There are our eyes. I just want to smooth this edge over here. I'm just going to put my sketch off for now. How do we smooth the edges? We do a fillet, and the shortcut for a fillet is, F. Click on the line, let's drag on the arrow. Let's make it 1.5. Perfect. Say, "Okay". I also want to fillet this line over here, because this looks quite sharp compared to that one. I'm going to say right-click, repeat, Fillet. Click on this line. Take it in a bit. Not too much. If it goes red it means you've gone too far. Let's make it three. Say "Okay".
8. 3D Model Body & Feet: Now, let's put our sketch back on and revolve the body. "Create", "Revolve", select everything left of the line. Don't forget these two at the bottom and we're not doing the feet yet, so you can leave those for now. Say "New Body" and "Okay". Like we did at the top, I'd like to split part of the body. We'll go to "Modify", "Split Body". I want to select these two lines. Say "Okay". Next, let's do the center part. I'm going to right-click, "Split Body". Make sure that this line and the bottom line is selected. Let's move on to the feet. We'll also be doing the revolve, so we'll go to "Create", "Revolve". Make sure it's on New Body and not Cut, say "Okay", and the other one. We'll be splitting these using the line we've created. We'll go to "Modify", "Split Body" and select that line, and the same for the other one. I'm going to put my sketches off for now. I'd like to smooth the edges of his feet a little, so I'm going to go F for Fillet. Let's choose these bottom circles. I'm going to make them 1.5. Right-click, "Repeat Fillet", 2.5 looks about right, and another one. If you see that you're clicking on your Fillets and they may be selecting these two first and then those two, it doesn't matter. Just follow along with the model. 1.5 looks good, and I say, "Okay". I think the bottom of his feet I wanted a little bit more of a curve here at the bottom. If we go here to the History timeline, if you hover over them, they'll show you the fillets that you were doing. It was the first one we did. We're going to hover over it, right-click, say "Edit Feature". It had a fillet of 1.5, maybe let's change it to 2.5. That's a bit better, yes. Great.
9. 3D Model Arms: Let's put our sketch back on, so we can finish the arms. Now, like I said before, we'll be using the pipe tool for our arm. We go to create all the way down to pipe. Let's select the line. If we add on a little, you see the line is extremely thin. It's like one millimeter at the moment, let's make it 10. How big is that? In proportion to his body. Let's make it seven. That looks a bit better. Now minus circular, you can change it to whatever you like. You can have it square, triangle, depending on what you want but for my overall look, I quite enjoy the circular look and it's on cut at the moment, so we need to say, new body, save okay. We look closely here, you'll see it's not intersecting properly with the body. That is when we make the spline, the spline didn't go into the body, we just did it on the side which means that the arm technically is not properly attached to the body. I quickly want to go and fix that. If we go here right to the front on our history timeline, right-click, edit sketch, and it takes us back to our original sketch. I'm going to go here to the arm and this one, if you click on it you'll see we've got a constraint. We can't move it. I'm going to double-click on this constraint, right-click, and say delete. Now I can move it in just a little bit. Just to make sure that the arm will be completely attached and say finish sketch. There we go, perfect. Next we're going to go to create and make another pipe. This time we'll be using this one side and seven millimeters, that is a bit much. Doesn't look right. I'm going to change it to five. Make the fingers little bit smaller, and say new body. I'm going to right-click, repeat file. Click on this one and do the same. Now the fingers just don't look right, so I'm going to edit a few things here. I'll go back to my first pipe on the history timeline. Just go and edit that. Let's make this five. Next, I want to fillet these edges so that it looks a lot better. 2.5, yes. Same for these two, F for fillet again. Like this one too. F for fillet again and let's select this one. Make that 1.5. It's like okay. But now I'd like to move these up because they look a bit funny. I'm going to go right-click, move or copy. What I'd like to move is this finger. Just going to move it up a little and to the left. Notice I'm not touching the square because this is free movement and we could move it on quite a few different axes at the same time and I don't want that. I want it to stay exactly where it is, in terms of going up and down. Say, Okay, right-click, move and copy, move this one up a bit. Even rotate it a little. Move him around until you're happy with it. Now looking at the sketch, the fingers don't look proportionate at all. They look really small. This is going to happen a lot when you're 3D modeling, so you have to go back and change things. I'm going to go right back to the front and edit my sketch again. I've put eight millimeters, I'm going to double-click on it and change it to 10. Move up quite a bit more. This one, it didn't have a dimension on it, so that's fine. Let's make it 12. Say finished sketch. That looks a lot better. Now I can make the arms bigger as well. I'm going to go to each pipe and edit it and make it seven. Let's quickly merge to the other side. Let's go to create mirror. Some on faces at the moment, so make sure it's on body. The mirror line is the z-axis, the blue one. We can close all our bodies here. Special per sketch and it's looking pretty good.
10. Adding Appearance: Let's go to Modify, Appearance. Now you are welcome to choose whichever type of material you would like to use. I'm going to be sticking to the paint folder and the glossy colors. But there are so many options to choose from here. Please don't feel that you have to use the paint colors. Let me show you how to work with some of the colors. For example, I want this to be blue, so I'm going to go to the blue, click on it, drag, and drop. This blue, it's quite dark. I don't like it. I would like it a little bit lighter. I'm going to right-click on the color here on the right-hand side. Say Edit. I can move the color up and down according to what color I would like. You can also change the roughness here. All the reflectiveness. That looks nice. Say Done. Now if I take this white, for example, and I drag and drop it in, this white will not have the same settings as this blue that we've put in here. You need to bear that in mind. If you would like the colors to all have the same settings. Then what you do is here at the top right-hand side, we're going to right-click and say Unassign and Delete for the white one because these are the settings that the software has at the moment. Then on the blue, we're going to go right-click "Duplicate". The one on the right-hand side is the new color that's popped up. It has exactly the same settings as the color on the left. We're going to right-click on it and say Edit. I'm going to take it all the way to the white and say Done. You can see there's the white. Now I can click, drag and drop. One thing I'd also like you to note is that because this is all one body, it's changed the color of the neck to be white, but the neck doesn't have to be white. If you'd like to change the color, you don't have to hold ''Shift'' and just click the separate parts. I'm going here to your colors. Drag and drop. There you go, it's changed it to black. Have some fun with your model. I'll see you on the other side. Don't be afraid to experiment. Once you're happy with the overall look of your model. We can go down here to display settings, click "Visual Style" and say Shaded. All the lines are gone.
11. Save your 3D Model: Next, let's save him quickly. We'll go up here to File, "Save", name him whatever you would like. I'm just going to say Robot, and your location, I'm going to put it in my Skillshare folder. If you don't have a folder for Skillshare, you can just create a new folder here, but there's my folder. I'm going to say "Save", and we know it's saved because at the top here it says "Robot."
12. Capture Image: Now let's quickly capture an image of our robots. Now we don't necessarily have to have a view from the front, you can hover him around and take a photo from whichever angle you would like. I'm going to do a little bit of an angle right there. That's perfect. I'll go here to "File," "Capture image". Now you can choose what size you would like your image to be up here. I'm going to stick to 640 by 680, and I'm not going to give it a transparent background, otherwise, if you upload your photo the background might be black, and then we'll lose all the color definition we've put on him. I'm going to untick that and say, "Okay." It's going to ask me where I want to save it. I'm going to save it to my computer, and you're welcome to click here and save it to another location on your computer. I'm just going to say "Save". If so, if I go to my downloads folder, I'll be able to find it there.
13. Finishing Up: While you're all done, thank you so much for joining me. Please remember to share your image with the rest of the class. You can drop it in the discussion section. I know sharing your work as a creative can be a scary experience in the beginning. But please don't be shy. I look forward to seeing all of your designs. If you would like to post your image on Instagram, you're welcome to tag me. My handle is hendrienhorn. If you find yourself in a little bit of a bind, or if you would like to give some feedback on this class, you're also welcome to drop that in the discussion section. Other than that, thank you so much for joining me. My name is Hendrien and I'll see you next time. Bye.
 Hendrien Horn, 3D Potter