Transcripts
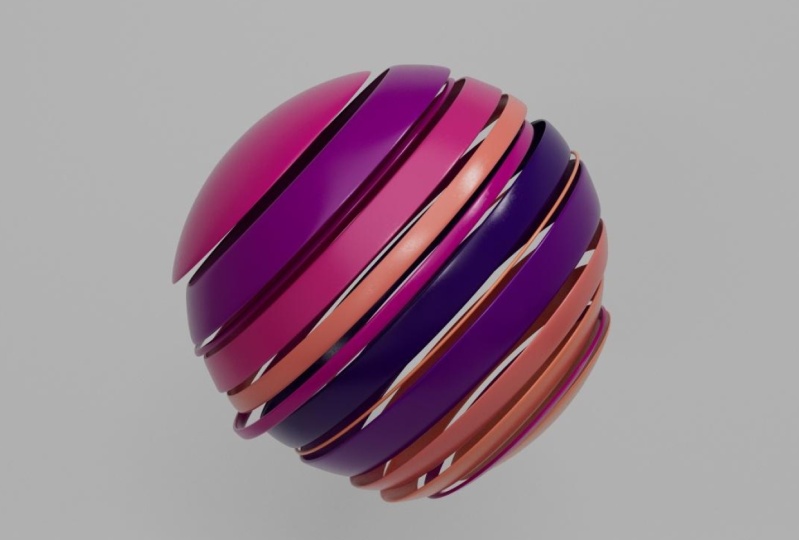
1. Introduction: Hello, welcome to another
Houdini beginner challenge. With practice. A lot of practice
comes perfection. This challenge you
will make what used to be a boring sphere
look rather cool. We will cover
procedural modeling, layouts, lighting, and
shading in Redshift. Alright, let's do it.
2. 1. MODELING: First we create the project
file, new projects. Then I save it File. I make some space. Rearrange this, bringing a
new vein for the parameters. This is going to be my network
that's making a sphere. And then we have a
radius of half a meter, which means the diameter of 1 m. I want to cut this,
but first let me just change the rows and the columns. And now I can cut it.
How do I do that? Well, I'd like to
use a grid actually to act as a cutter that's
bringing in a grid. Migrated by default is huge
compared to the sphere. Let's make it just 0.1
bigger than the sphere. Sphere plus 0.1, just a
little bit to cover it. And I don't need that much subdivision
on this, on the grid. Two-by-two to give
me just one polygon. And this will come through this. And we cut it. Simple Boolean. I connect one to one of these slots
and then the audacity of it doesn't matter
which one is which, as long as you know
how to treat each one. Sphere is a solid. Grid is not a solid,
it's a surface. So when I come and check here, I'll find that it's
been treated properly. But if I go back to solid, it is not because
grid is not a solid. So the operation
that you choose, which is subtract by
default, which is a minus B. By default, you can change it. You get this. But the most important is how
you treat things. What are they? Is it a solid
or is it just a surface? For right now? I have this additional edge. What you see here. Right now, I just want
to see a clearer, I can bring in an exploded view. This experience, any
connected geometry. Alright, so this is the
idea, this is the principle. I have one grid. Now we're not going to
do this grid by grid. It needs to be done in a
rather procedural way. So how do I do that? Simple, Let's remove this. And let's bring in points
because I want to have points along the
height of the sphere. And then I will
copy this grid on these points at several
locations. And randomly. They should not have, these points should not
have equal distance to each other. So
how do I do that? How do I get points
from here to here? Well, I can start with a line. This sphere is, what's
the height of the sphere? The height of the sphere is 1 m because the radius
is half a meter. So the line by default
also happens to be one. So if I click here, I'm template the sphere. I see that one of them starts
at the origin and is half. And the origin of above
the origin and half below the line is starting
from zero and going up. So I need them to be aligned. How do I do that simple, either I bring in the line
to the origin at half, or I bring the sphere up. Now normally I would
bring this one down. I would do something
like this in normal circumstances and then proceed with working
with my points. I have two points here. Let me show you. Just make them a
little bit bigger. This is your points market size, I plus D, plus D, you get the display
options, right? So this is what I would do. But to show you how to
sort out any issues, problems that you would
encounter if you are forced to model
outside of the origin, not at the origin, I will move
it outside of the origin. Okay? So I will do this. This one needs to just
state the way it was. Then the sphere will move up. And because it is a radius
is already half the sphere. Radius is half the sphere. So I'm moving it up by
half, which is the radius, which you would not do for box, because the box you
would divide by two. Here we have a sphere,
because we have the radius. It's already half. Alright? Let's now add some points
because I only have to do that. I resample. And when I do that I
have the option to, It's by segment length
or by segment number. I remove this and get
Segment number, segments. So that is 123. Until then. Good. So how many points are there? Where it's the segment
plus one? There is. Because one segment has
two and all the others. You can count one. This
is now for me 11 points. Now if I want to have 14 points, 13, 14 Points are right. Now. The problem is we
have equal distance. We said we don't want a
boring equal distance. So let's bring in some
randomization with eight points. Jitter. Jitter does just that. It will move them all over the place. However, what I want, I want is just the y-axis, not
the x and the z. Simple. We'll just put
zero and x zero in the z. And then we have the
randomization happening, the jitter happening
only on the y axis. This however, I mix it, go below and above the sphere. We don't want that. We want it, whatever
it does to stay within the sphere and the
aligned at all times. We could do that
with a match size. So this should match
the size of the sphere. I connect this here, this here, and by default, it just moves it because
it's just translated. But when you check scale
to fit uniform scale, it makes sure that
it's always lighter. Good. Now we have moved with this. Let's move to the next
bit which is copying. But wait, you will
benefit a lot by having the habit of cleaning
your geometry as you go. Always keep your geometry clean. What do we have and
what do we need? I have a sphere, I have points. I have a line. I need
the sphere on the line. And the points. Do
I need the line? No. Okay. So we tell the line,
thank you very much. Goodbye. This way you always
keep your geometrically. Now I've added an Add Node. That's how I removed because the ad does a little
bit more than adding. It also removes, if
you delete geometry, but keep the points here, you end up with just the points. We're ready now to
copy two points. These are the points. Where is my grid? Here is my grid. There you go. This is now copied. Two points. Simple. Let's do the same thing
as we've done before. And because we had
this one in B, just not to confuse
you, I'll keep it as B. The greatest be the sphere
is going to be as pain. You go by default again, again, treat as what was that? What was the B the
grid as a service. So we need to treat
as a service. And now we can split it sliced. We have more edges. You want to see it clear
that you know how to do it. Alright, here we go. Now we have two things
we have to deal with. Number one, the boolean has created, just
contemplate this. That's created this
inside geometry. I do not want that. I want to create my
own border here. I want to have a thin edge here so that when
the camera sees, when you look from the camera, you're able to see
the inside adhere. This should be gone. This or this, that's number one. Number two is, well, does this look like a sphere? No. Alright, well maybe we have exaggerated the exploded view. If I just do 0.2,
That's what I want. Actually about 0.2 separation
between each one of these. However, the sphere shape
is also gone with 0.2 is, no matter how much
you put in here is, if it's not zero to the oval. So how do we deal with that? I just need to make sure
that the x and z have the same addition as this. But first, let's deal with. The inside inches. And then we'll come back to
the shape of the sphere. When we did the Boolean. We had this geometric created by this Boolean gives us
a lot of information. We are able to create
groups of geometry. These are the groups
that we haven't. This is one of these groups. Now if you don't know which one, simple, just go ahead and
click on all of these. Then bring in a blast
or a state or a delete. Let's just use the
split for a change. Maybe here, and then
select one of those. Now, these are now visible
under groups here. I'll select any
one of these now, I know it's being inside a, so I'll just click on
that and see it's you. I want to delete you.
So how do I do that? This is the name of the group. Now that I know you remove
the split was just invited to for difference of
bringing the blast. I say just this one. Then it is removed, gone. Good. That's one. Another thing is I want
to fully extract this. What I could do,
what I could do. Let's, let's do it already now. Let's clean our
geometry already now. So have I, yes or no? Yes or no. Finished
with these groups? I've done the work of
targeted district. I've removed it. Thank you. Goodbye. So all these groups
have to be removed. Group delete, always
keeping it clean. Because I don't need
any one of them. I just say star. And gone. The less information, the
lighter your geometry. Next is going to be
the poly Extrude. And just a tiny, tiny, tiny bit. You may have noticed the asthma. If the little bit back,
It's moving outwards. You must move it upwards. You want to move it
inwards with -0.1. But because we want to keep
the normals not messed up, I could reverse it later, but it's better to start like this. And then output bag, this will close the
inside as well. Good. We're done with the edge. This part is done. Alright, now, do I have
to clean something? We're good. Just be nice. Position. Wellness. Let's now start
dealing with the shape. This exploded view has moved
by. Let me bring it back. That 1.7 was just to see what we're doing with the group that needed
to be deleted. This is oval, it
shouldn't be the case. Let's transform scale on the
x and the z by how much? I'm not going to type here. The number, the IV here. This 0.2. I can say this one plus
whatever happened here. So whatever you have here, copy it and add it to here, one plus base
relative reference. Let's see, It has been and distorted
because it's only the x. What you need to do
that for the z as well. And I want always to copy z from x naught from somewhere else. This way I'm sure
it is spherical. It's a bit bigger.
If you think. No. I insist I wanted to go back to the initial scale
that we started with. Well, good, we can do this. This sphere we started with. All right, so we match, we ask this changed
sphere, sliced sphere, bigger sphere to match the
size in both the translate, where it is and the size. And now we have exactly
the same sphere size we had before. But it is now sliced. Alright, let's move to the
next bit I wanted to add. Now might UVs, because the further processing that will happen later is not
going to miss up with UVs. I want to add them already now. So I can do UV unwrap or there's a lot of tools
that you can use. I'll go with even rub. What I could do is deal with
each one of them separately. So what I can do is for
each connected piece, I want you to do the UV unwrap for each one of them separately. When I click, I get each
one of them separately. But but but because they have
been dealt with separately, they did not take into
account each other's density. Some are smaller than
others and bigger. So I can use a UV layout to say scale islands too
much their surface area. This is now uniform, right? Good. The next bit is going to
be to move them around G, third them when I'm using the
exact same word as in here, these are pointed, remember this point jitter bit
that we've started with? Let me just go back.
This is what we had. Yeah, this is what I need. I need that geometry
to move, but wait, this is called jitter
and what do I have? Let me go back. Put it back to what it wasn't me,
go back to my geometry. What do I have here? I've got geometry, yes, there are lots of points, but This is our standalone
geometry pieces. How do I move them as points? Well, I can convert each
one of them is a point. You can do that
pack when you park. Houdini treats that
geometry as point. Now if I do it right away, what's going to
happen is everything becomes only one
point. Just one point. Now I don't want that. I want each one of
them to be a points. Well, you guessed
it. We've just used it for each connected
piece again. Alright? So we can do, for each of these. We already have this, this connectivity
attribute primitive. This creates just an attribute
that the for-each loop uses for each one so that it
identifies each one of them. I don't need it again
because it's already there. I already have class primitive attribute
from the first one. I don't need to create it again. So let me delete this
and just keep the loop. And now I say, buck each
one of those buckets. How do I know they're packed? Well, there are merged points. 13, packed geometry
13 and merge 13. I have 13 of them. Okay. Good. Because if you remember, this resemble these are
the segments that scene. Okay? Okay, so now
that we have this, we can start jittering them because they
are not just points. Jitter on by default, it's all over the place. What do I need to do is I don't want them
to move in the y, just in the x and z.
So that's number one. And then here,
very, very subtle. Tiny numbers would
do for this purpose. Perhaps a bit more. Something like this. Good, What have you done? We have backed the geometry
for the purposes of turning them into points because point jitter only axial
points are we done yet? We're done. Good. What do we need to do? Clean? What does green mean? In this case? It's unpack. You're done. So you need packed
geometry. Now I'm packets. We need to restore back
our UVs and everything. There you go. Now Up Your be UV gloss and
we've got some leftover here. Where did that come from?
Where it came from? This UV layout, it
creates these attributes. Now what we could
have done is to say attribute delete already
before reaching this point. Now, I don't want you
to feel that it's required to clean things
right there and then, but that habit is really useful. You could add the very end, have an attribute
delete, group, delete, or clean node before exporting. But I prefer to just remove the unnecessary information
as soon as I'm done with it. So that's the detail
attribute coverage. And this one, it came from
the uvula layout, right? So what do I have left now? Might be UV and gloss. Do I need gloss? I don't need it any
more at this stage. So what I'll do is I'll just remove ID, attribute, delete. This is a primitive
attribute class. We're not going to
do anything anymore. They're connected piece
so that one is not needed anymore as a primitive. I'm repeating it as a primitive because
we're going to need another one class as a
point, not as a primitive. Good, We're done. Now. What I can do is transform
because I want to rotate it. The node transform not needed. You could have both
done in one transform, but I need to show
you something. I want to scale here. Okay? Let's transform. You. Press
Enter and groups that rotate. Is, the private is here. So what's happening? That's because remember, I told you that
normally I would move the line to match the sphere
when it was at the origin. And it's better to
model everything at the origin, then export it, and then you move it where you want as part of your layout. If you however feel like now, that's how it was done outside
of the not at the origin. What do I need to do?
Simple, we just need to move the pivot to the
centroid of the sphere, or the waiter that
five or transform. And I come here and say, dollar Cx, EY dorsi, is it? Now any movement I make now, the rotation is
happening in relation to the centroid of the
geometry. Done. So same story is
going to happen here, but in this case, I want
it actually to move down. I don't want it to be scaled
in relation to the centroid. I want it to be
closer to the ground, just because now artistically
happens to be what I want. If I wanted it to be
risky, scaled down, stay where it was, then I will do the same thing. Those EX EY dossiers,
it, alright, good. Now we have reached about the, almost, almost the end. We have p, we have UV. We can add some normals. We want to do now is export, but, but, but, but
there is a bot. I'm going to write
out slice sphere. However, I need here to
other step for later. See, this is one geometry. If I apply a material to it now, or let's say I apply
a color just for the sake of demonstration. Let's give this a color
and I want it to be read. Everything is turning red, whether it's
primitive or points, whatever, everything
is done in red. Now, I can have a uniform color, in which case, this
is all I need. I can export it from here
with a rope geometry output. I can write here the
name will do it later. And I'm done if I
only need one color. But if I want to have each
one of them to have a color, we're going to have to
think how to do that. Because remember,
remember the story here. Every time we needed to do something for
each one of them, we had to bring in
this for each loop. But for shading, when I want to use a material
with different colors, I need the input of
the for-each loop, which is the attribute gloss. So if I now say on this color, give me random from
attribute class, I will get nothing
or simply one color because there is
no such attribute. And I don't need one
that is a primitive. I need one that is IQ points. So I'm just to connect DVT. I don't need the loop,
not the whole thing, just a lot of connectivity. And choose point. By default, it's
point now, class. Now that I have this, I come to the color because
now it is primitive. I'm turned to zero point and you have the different
colors that are random. Now from here onwards, you can change either
to a ramp from attribute on adding the
colors or whatever he wants. But you need the attribute
to be able to do that, sorry, random for much of yet. Okay, this was just to
demonstrate the need for this. Let me put it in red or whatever color that makes
sense for you guys. The most important thing for coloring individual
geometry pieces. So here's what I'll do. I'll just delete this color. I don't need it. I just need points attribute. Alright, now I can do
a Save the geometry because always have the habit of getting your geometry out and then bring it back again to
avoid recomputing the S. Now, this is very small
geometry, very light geometry. This isn't much, but things will start adding up and
you'd be working on bigger projects and you will need to get
that habit ordinal. So let's change this now
to job because I want it. To always point to
the job and the job. And this is smallest sphere. Bgo dot MSC is the extension
of the format that is the most efficient
for Houdini if you want to
save it as an OBJ, right dot OBJ render
the current frame is just one frame and
save to geometry. Now we can Bring it back again as a file and
proceed from there. We get out of here and
rename this one as sphere or a sliced
sphere modelling. Right? I will get the font to this
one and create a new file, either geometry and
then open a file or I could even do it from here, file based the pump. So this is going to
be, well, slowest. Sphere render. I disabled the display
flack for this one. Okay, Good. Well, why, why did I do that? Well, just separating
these two phases to make it abundantly clear that you do not work with the output
of the network. You do not want it to
recompute every time. You want to have a
baked final geometry. So this is my slice sphere. Now, what I want to do is make sure I have a
background as well. Let's make a background. So to arrow back ground. For the background, I'll
just bring in a crit. Let me actually
hide the orbital. I could keep it goes
to see where okay, I'll keep it goes to print
out just to see where it is. This is too big. I will keep it two-by-two
because remember, our sphere was one, a diameter of one. This is two by two. I do not need that many. Normally I would go with
something like this. Two rows, two columns, and then proceed from here. But, but, but because I
know I'm going to want to have a curve here. It's like the
background is curvy. I will add some more rows. Because this edge is going to
protect when I poly bevel, this edge will protect the polygon from
moving up. Alright? You will understand when I
moved to that for the yeah. Actually, I need two by
12 by one because I don't need the rest by one. And then what I'll do is simply poly Extrude transform
extra phone global. So what I want is here, select this one and press Enter. So we have 11 and
then this is two. Okay? I want this one to
be the same as this. This has three edges, which means four
divisions, four segments. I would like also to
have here four segments. So poly Extrude
gives you divisions. I want to have four divisions
because this is going to help keep the three
divisions as they are. When I select this one
for poly bevel in, the curve is only going to
happen between these two. These edges help protect the rest from being poly
beveled for being curvy. Okay. Good. Simple. Now, what I want to do before
proceeding any further, I would like to give them u
v is because from now on, I want to my u v
to be inhibited. Sometimes it's better
to start with the vase. So a simple UV unwrap
would do that, takes care of both. Then I'll probably fall. When you live in water can
simply select this edge. Or actually what we could do is, why don't we just saved? Because now they're
all selected. If I say poly bevel, all the edges are selected. I want to ignore
this, this exclusion. Ignore flat edges. What this does
need to be polyval that it's not doing anything. So if I click Ignore, I can play with this angle if it's not selected
automatically, because this one is
really perfectly flat. I end up with just this
one being in green, which means it's has been
targeted now for play beveling if I want to put it now so I can do is just
increase the the definition. 0.20 point. Yeah, what to do? And obviously we want to have more divisions because
this is not having enough. Five divisions
perhaps that work. Yeah, I think this
is about enough. We don't need high-quality
background is just there to make sure
there's something behind. That's all that's all we need. And yes, we can have e.g. a. Uv layout. Because when you look at this, I want to make sure that
they have mostly surface. Okay, then when I look at this, I have P and UV. I don't need these two
that came with UV layout. I'll just add an
attribute delete, which you wouldn't
have needed if you haven't used the UV
layout because all I need is now to remove the
evening out has left behind. Alright, so now know
our back ground. It has UVs, It has everything. That's all we need
to add some normals. Now, I can do what exactly, exactly nothing is taken from a node network
is the habit. You want to have geometry rope output and you send it in as simple
as background. That's it. It's not a complicated geometry, but we don't care. We just want to keep repeating clean pipeline saved to disk. Now this is
background modelling. On disable this copy. Was this doesn't matter. I prefer to have myself as
dollar job all the time. It has saved to the
right place anyway. So I'll copy this. And this is now a new jail. We don't have to we could
have brought it here, but just keeping it a
bit separate simply. But ground should we call
it render file paste. And there it is. Good. This is my background. Now I have both. What do I need to do next? Next is going to be the layout.
3. 2. SHADING: I will move this sphere of it up and create a camera. Locates a bit closer. Something like this. Alright, so that's number one. Number two is I need
to have lights, but before moving to the lights, the camera, we need to make
sure that the focus is right. Right-click on this cube
and choose focus handle. You will notice that
my focus is off. This is the focus range
and this is my object. So I need to move
this all the way here and make sure that my folk, my object is indeed in focus. So this is what I want. This range is the focus range, the flux that I put it here is an artistic choice that
I did not include. I could have had bigger that I did not include
the background. But it needs, you need to have your object in focus.
So that's one. Return it back to the
orientation handle. Because when we look
through the camera, it will be handy here
to move using this. Alright. This is for the camera. Done. We need some lights. For the lights. I want to bring in the redshift lights if
you don't have the time, you go for the redshift, It's down here you can see, but that's how you begin to tab. And I create a dome noise. And if, if you think
this is annoying, like it's standing in your way, this gizmo for the light. You can come here
and disable lights. I'm going to need it
for the second lights. So for now, I'll
just keep it on. So this is dome light and
then I need another one. And for that, what
I will do, first, I choose the position where
I want my life to be. And then Control
click on the light. It will create the light from my position and lock it so I can move it like
this, then unlock. And it's a huge light. Let me quickly change
the size of this. I'm going to call it softbox. I want to have soft lighting. This is, this term is
going to be called Studio. Right? Let's go back
to the softbox. This is too much. Perhaps 0.50, 0.5
could be enough. Okay, That's good. Now, these lights
are not ready yet. We need to bring in
some textures for them. Column, okay, Now,
for the studio, I'll be using an HDRI
from HDRI Haven, and that's going to be the
indoor, is DRIs indoor. You can see it here in
doors and then you click the new find Studio
endorsed video. And you'll get plenty
of Studio HD arise. I suggest you go with something
that has neutralizing, not something that
is full of colors. Just neutral item. Perhaps you go with
something like this. Definitely something
like this is great. I will use another one
which I had already. You see, where is it? This one which I had already cleaned
from the lights and I have already neutralized the colors. Nothing is there. So that's the one I'll be using, but you can just take the one, this one as is or any other
neutral studio lights. That's for the studio. And for the softbox. Simple, you just go to HDR
labs and grab this softbox. A. Okay. Well first, the studio. I will draw the data is now
for the part light texture. This is now my I've just turned on the
visibility of the lights. This is how you turn it
off. So this is how I see my studio lighting. Hdr. That's one. And then I have my softbox. And for that, you never want to use a
flat color like this. You want to use a texture
with neutral colors. Use texture that
creates a tab here. And then I will
describe for texture. Now, it's important to make sure that we set the
color space right? This is snake czar. I have already
converted it to a CCG. You don't need to.
If it's just an XR, you got it from HDR labs. You choose utility. Utility linear sRGB. You get it from HGRI
is your labs as E XR. You haven't converted it. Then you just say it's
an utility linear sRGB. In my case, I have
already converted that. Just say SEC. Alrighty. So Redshift does
not need to convert it. Studio. Same story here. But this one, yeah, luminance is a CG. I will do the same. You will do the same rights. So this is softbox
comes actually the default lighting
intensity is humongous, obligate down to one. And I will work with
exposure because this is something that exists
in real life in cameras. Intensity is just a
multiplier materials for each for each one of them. What I'll do, I'll just
have a material node. This one is for assigning. And then I'm not net, which is for creating. I keep them next to each
other just as a convenience. Right? This is for my sphere
and I also call it porous material build-up
and sliced sphere. I'll call this uniform. You need form color. And then when I want to have a different one for
multiple colors, I'll just copy, paste this one and add whatever I
need to activate. The color I want to
go with is going to be 15 all the way to 15. And I prefer to keep the
roughness as is for now, but we'll change it. I don't want to use numbers
like this, roughness maps. This is for the sphere. The background is not
going to be any different. We want it to have material. Obviously, we need
to assign them. I haven't assigned the
one for the sphere yet. Let me finish this first. On this background, which is
going to be just a flat 75. You don't want to go
beyond 0.14 divides. This white does not exist. This block does not exist. You want to stay
less than 0.8 or 0.8 and never reach your zero in black because
it does not exist. That breaks realism. You count, want to composite
if you're black, your CG blacks are too black for the real
bugs in real life. So for the whites, I'll keep it as 75 for now. This is my background and we have not assigned
the material yet. This is for creating,
this is for sign-in. Let's assign background. Magnetic. Assigned should
do the same for the sphere. Sphere uniform color for now. Alright, this is now done. I'll save my file. Let's go now to the
Redshift RenderView, which you can open from here. Render. Now, this is what I get
with the default settings, and this doesn't work for me
because you see this is now. We have a harsh
edges and this comes from the geometry here. It's not subdivided. We want that subdivision of hundred time. How do we do that? Simple, we come to
redshifts OBJ tab on the geometry node, the solution and displacement
enabled installation. Defaults are going
to work just fine. Let's make a snapshot perhaps of this and
then re-render again. Now you see it is Smith. This snapshot, and
this is Smith. Alright, subdivided.
We have solved this. This is a CG Luke. We don't want this. We want to introduce
some roughness to this, some level of realism. Let me turn off this
and the material side. Basically what I want to do
is work with the roughness. This is roughness zero. If I increase it, it will
give me rougher surface. But this isn't what I want. What I want is to drive the roughness
using roughness map. Now roughness maps, what you can do is just go and search
for roughness maps, surface imperfections, or simply use the mega
scans imperfections. And the one I have in mind is, this one is, has quite a
subtle, subtle roughness. So let's move this
out of the way. Let me bring in a texture. This is going to be detection, which is this one. By default, it's an XOR. So I have to tell redshifts. This is no, Initially
it was a color. If it was a color, we would have gone for
utility linear sRGB, but this is going to be
used as a roughness. So we need to go for row. And then I can plug this in. The reflection roughness. Let's render. Okay, you see that it is rough, so we don't see a lot. There seems to be some detail. Number one, to be able
to see it closer. Why don't we get another
camera that is close up? So let me back to the cynthia
and create a new camera. Look. That create new camera. Here. Come on. This is going to be close up. This is a close up on
this is going to be to render the close up. I get a bit closer here just
to see why roughness better. Then I come back here. I don't see it. Let's
close and reopen again. Has the render and close up. Now, if I launch this, I'm able to see it closer. To work on this. This isn't good for me, this doesn't cut it. So what we need is to tweak these values
because the values, the way it comes as this doesn't work for us,
so we have to change it. You can either use a ramp and in this case a
scholar on one channel, or which is also very valid, simply work on the
Gamma and the contrast. Another option, right? So when you work
with the ramp and that's like more customized, like you can customize
it the way you want. You can tweak this and
then bring this one just until you find this
probability just, we're introducing a
bit of contrast here. You can see there's
something going on, but this is going to take quite some time for me to tweak. You can do it fine. What I can do, there's a quick and dirty
way of doing things, which is just get the
gamma down to 0.5. Bring it in a little lower. We introduce a bit of contrast, but if you leave it as is, because this is just
6% or 7% rendering, you can't see a lot. You see there's
something happening. So if you leave it
to render to finish, we will see that there are some details and there's
the lighting again. So if I go back to my
lighting, unlock this. The light. Is it close enough? Is it bright enough? I can now start to weaken the lighting because
during the layout we only had the block in the soft. Now, an exposure of fun. Probably this is enough. Let me see. Yeah, this should be enough. This should be enough. What I had done is reduced intensity to 0.5
for the overall. Looping it back to one. And we render again. It's probably better to keep
it as a multiplier is 0.5. Alright, well, I can
do is simply give it a full render.
Okay, there we go. So you've got some
details have been here. Now, you can tweak
this to your liking. I will leave it as is for now, but again, you can use the ramp to customize
that further. Now this is what I
would like to do. Let me have a snapshot and get the full render. This is the full render. You can see there's some
subtle roughness in here. I'll take a snapshot and let's now move to the
part where we get the color for each one
of them to be different. Here's what I want to do. Remember, we have this
gloss point attribute. So why don't we
make use of that? If I add a color. Now and say, this is going
to take from random, from attributes and use
this attribute called loss. Then I'll get different colors every time I can even
change the seed. So that's number one. If I want to get these colors, Let's get some barriers
or something like this. E.g. if I want to get these colors to show
up in my render, I need to tell redshifts
in the material. Inside here. I want to use my color, the color that came
in with the geometry. Because now let's go
back. What I have. I also have C, D. I have the color. That's an
attribute, that's this color. So how do I bring
into color simple, user RS, color, userData. I connect this to my base color. And go back here. Let's render and see. There you go. You
have the color that came around the
geometry back in, inside your material
in the render. So this is for random. The thing is, this is
okay, this is good. I'm just quickly stop this. I don't need to render
the whole thing. So let me take a snapshot and show you how you can
control these colors. And this is something
we're going to do a geometry levels. So here, this is
random from attribute. I don't get to
choose these colors. Yes, I get different
variations if I want to. But what if I want
to choose them? Well, simple, we can use
ramp from attribute. In the ramp, I can
choose the colors here. E.g. by changing this
increase in the range, you get, cover more colors. This is how you bring
in more colors. Take your time to get
complimentary colors. So what I will do is I will
copy paste and show you an example of how to make
sure that you are covering. This is exactly the same node, but selected red, green, and blue to make sure
I cover all of them. So if I now do I
have a snapshot? Yes. I'm just reminder again. Obviously with the material. There you go, and you
can choose your colors. Now, aesthetically,
it's better to get complimentary colors
from the color wheel then to get RGB. So if you want to spend
some time on that, then you might end up
with something like this. And I'm just now
based in some ramps, some color ramps that I've
just gone ahead and added, different shades of
brown and dark blue. If I connect this,
now connect this. I get a different look. So this is an artistic choice. Can go ahead and
add as many colors, preferably complimentary
colors as you like, making sure that you increase the range to cover more colors. Let me take a snapshot, but I think there's something
with the background. Let me go back to
the background. Yes, the display flag
is not on the material. We go back now and it's again
just a matter of iteration, bringing in more color
variations and spending your time to tweak it based on complimentary colors
in the color wheel at me. Let me show you a few
other variations. This one here. Connect
that will give us this. Let's take a quick snapshot,
has a finished rendering, but it's just to show you
what the options are. But it's always good to iterate on your vendors
with multiple variations. And another variation. This is how you get as many
versions as you'd like. These are a few of the renders, variations in colors and n, the number of segments. Now, how can you change that? Simple? You remember,
let's go back to geometry. Let's stop this one.
Thicker snapshot. Go back to the scene view. We have inside the
rendering paths. Sorry, the modeling part. We have this free sample. We have made a decision here, segments, we've decided
number of segments. Let me turn this
one into greens. Remember we have made a decision here that we
can change our mind. 13 so we can iterate on
the number of segments. We can iterate on the scale of the point jitter
that we can do as well. There is another one
that drives the look, which is how thick the
1D border edges to be. So that is another decision. Let's go all the way
through, all the way down. And then there's
another one which is a point jitter, which is here. How far are they
from each other? So these two, these, you can change these
1234 decisions. You can change these, and then you end up
with different looks. This is the glossy one. This is with the roughness. So just so you know, and you can see clearly
the difference between a pure CGI render and then something that looks
much closer to reality. Here our renders.
 Film VFX