Transcripts
1. Introduction Ghost Animation: Welcome. In this course,
you will learn how to make a ghost animation. If you're new to Houdini, I will take you step-by-step. And if you already know Houdini, then you know how powerful
and easy Houdini is. You will learn cloth
simulation using vellum drape, how to use textures in
your shaders in Redshift. Same approach applies
to other renderers. How to work in Acis, in texture based materials. Seem layout. Using LinkedIn to
tell your story, volumetric lighting in
redshifts, and how to render.
2. CLOTH SIMULATION: We will start with references. And you always want to
start with references, even if it's just concept art. And obviously the
references will be for inspiration only. We will not reproduce
them as is. By the way, to organize
your references, you can make use of this wonderful free
software called pure ref. Okay, I'll go back
to my selection. I have selected two
from my references, only two that will drive
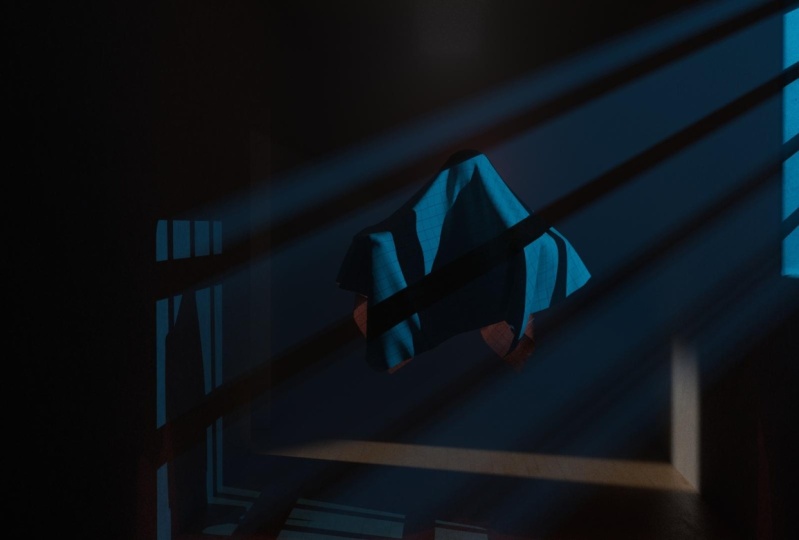
the look of the scene. The first is Blade Runner, and the second is invisible map. From Blade Runner. I like the atmosphere. It's dark, the volumetric
lighting, proximity to danger. And I like the idea that the only escape visible
is behind dendrites. So we need to get past your
first from the Invisible Man. I like the idea of
the narrow corridor, but I want it to be
closed now escapes. I'd rather have nighttime. I want to have a claustrophobic
feeling and bring the ghost closer and have
no contact with the ground. The clotting to be floating in the air and to bring the lights. I need a window. So July glucose
and little window, but that window could be
perceived as and an escape. That should not be the case. So how do we convey
the message that the window is not an escape
by adding metallic bars. And I do not want
those metallic bars to be even visible themselves. I want to convey
that, the delight. So a bit like this. But then even without
seeing the whole window, just see the form of those metallic bars reflected in the
volumetric lighting. So the window will
serve three purposes. Number one. Number two is convey
the message that I am not an escape with
the metallic bars. And number three is called this wonderful volumetric
lighting with lunch and ofs, we need a character for our cloth simulation
for that outcome to Mixamo and I come to
the character stamp here, you can find plenty of
characters that you can use. But for the cloth simulation and it's something that
is lightweight. So an efficient geometry as simply one because the character is not going to be visible. So I'll just go straight
to the page number 3 where I'll find my Export. Export is right here. When I click on it, it'll
find it here in a T-pose. This is not what we want. What I want is a post
from an animation, so I'll go to an animation from the admissions tab
and select something here. I'll go to search for
float obviously can check. You can choose which other
animation works for you. You can grab a frame
from the animation and then similarly diclofenac
and search for floods. And I do not go to
treading water. And this is the one
that I have chosen now this is not the women animation. We're not interested in
that I emission itself. What I'm interested
in is the boss. If you do like this, I want the clock to be carried
not just by the shoulders, the arms and hands to
give it a little bit. Okay. Good. So this is the one I've chosen. I made up my mind yet as to
which a frame, to be honest, I think I'll go with frame
number 1 and frustrating, but I'll just download the whole animation
and decide later. Okay, click on Download. And in here you need to
make sure that we get with the skin because that's
the character that we need. Okay, click on
download and save. It's in the mixable folder under the Projects
folder in Houdini, we first create a
new project file. New project. What is this? This is not your Houdini font, so if you're new to redeem it, this is just the
project structure, the folder structure,
and your hard disk. It offers by default
some folders. We need to add to
it, our references. And its parents have
all the references, not just the ones that you have selected and also mix them up. Okay? Should you need more,
you can add more, okay? And if you want to
disable some of these, you can go ahead and do it, but I'll just leave it as is. And I will choose the path for my projects and our
cool the project ghost. Okay, good. Now if I click on Accept, what is going to happen? Nothing in terms of file is
just a folder structure. Click accept. You still see that
it's untitled dot hip. Now this is the file
that I can say. Once I click on Save and I will, I'm sure i'm, I'm
clicking on dollar job. This takes me to the
folder structure. I have here, my
next HMO and href. So this is exactly the folder
structure for the project. I can save. Here, say goes, and this now
is the Houdini file, okay? Except let's bring
in the effects animation file, imports, FBX. Okay. Click on equity job Mixamo. This is where I have saved. The maximum animation. And except I can leave the
defaults as they are imports. Now first we don't
see much because the scale is of
100 times bigger. If you press Space, gene, P will see the character with the skeleton
and the animation. Here's animation. Okay, Good. So because it's meant
for scale of this, 100 times bigger than Houdini
will need to rescale this. Let me just move this one
a little bit like this. And we will take care
of the scale later. First, let's dive, dive
inside this effects node. Most of the stuff we don't need because this
is skeleton, okay? What we do need is
this part over here, the joints and the surface. So if I remove, I'm left with the skirt and that's
what I did not need. Okay, which means that these
are the two modes we want. Fluorides and by joints. Because this is such
a simple geometry and that's exactly what we want, something that's
sufficient for simulation. These are just spheres, the joints, just spheres. And these are the main
parts of the body. Okay. Good. Now, I'm going to get inside just for
visibility purposes. I'm going to drop
a note and call it out surface and come back to
join Sandy, the same thing. More. Outer joins. And I'll get bounds on the FBX completely even turn off
the visibility and say, thank you, I'm going to
create a new geo node. But you're not on call. It goes on and get inside. And here is where I'm going to bring those two components
of the character. And the way it's been,
object knowledge and oppressed p to get the
parameters I need to, this is giving me just one. So I'll just click
on plus to have to. Now go to my vector
points out joints except I'll go to my metal surface on
service and accept. Okay. Good. This is the character. And if we scroll
through the timeline, we're going to notice that our nation is there, Okay, Good. By default, the timeline and Houdini starts from one to 240. The animation stops
somewhere here. We are not interested
in animation. We're interested in A-frame. To simplify things. I'm stake into frame number one. Okay, good. What do I need from this? Well, before we start
talking about what we need, this was 100 times bigger. So let's deal with
that first transform and 0.01 plus space G. And I'm now with
the right scale. And I want a cloth simulation that is going to interact
with the upper part. So for efficiency, I don't
need this bottom part, so I'm going to delete it. Alright, come here
and click on Select. But if I start selecting, I don't want to select
individual primitives like this and then
starts looking for, yeah, be careful with this because I want to select
3D connected geometry. So I'll come here and click
on this one that says select groups or
connected geometry. Click on it and select
3D connected geometry. Here. If I select
anything that's selected, any phase that's selected, all the other connected
geometry with it. And that's more easier. Alright? And then press, Delete. This is the only part I want to keep this sphere
because if I don't, this edge can cause issues, we're not going to see the
real part of the cloth. Okay. But I would draw the habit
dealt with already know. Okay. This is all I need in
terms of geometry. It is frozen. No, it is not frozen. We're going to take her later. Okay. So first is what frame
have we decided? We are going with frame
number one, okay. If I'm number one, then
I'm going to freeze it. Time shifts. Time shifts. I can do a lot of
things including clumping to both clumping the
star trained and untrained. Now because this
is an expression, I'm going to delete
it first to be able to write the leak channels. Now I can write, but I'll say it starts at one
and it ends at one. Okay, good. Now if I scroll
through the timeline, nothing happens because we are always in frame number one, that one is done. Now we have finished with
our collision geometry. This is condition two. Metric. Get done. Next is going to be unclothed. So how do we bring
in the graphic news, a grid if you want, but there's a much more
appropriate input. That's the planner patch. Because it comes in triangles. I mean, zoom back. And triangles are much
better for CT simulation. Okay? So this is some kind
of patch you can choose. If it is a circle or rectangle. I'm going to go circle. And later we're going to
choose the resolutions. If I go 0.05, you will notice that we
have much more polygons. Now, we start with 0.1 for the purposes of
explaining things. And then when we
simulate the real thing, will go in much
higher resolution, which means much
lower edge length. Right? From here. I will go to the cloth part of that
before going any further. And I'm going to position
it and give it to you. This. Okay. Let me, let me position first. It needs to be in the
right exit plane. Okay? An opposition that's
on top because it needs to be draped on the character
and the drape. This. Now if I position it like this, just pushing it up, Just making sure yeah, it's it's about it's about Very good. Now we're no good. It was a simulation. Just like we want to be very efficient with the
geometry we bring it in. We want to be efficient
with the distance. There is no point Simulating. Let me look at the front view. This whole space, like it simulates and then
it's going to be simulating an empty less, It's frames and RAM being
used and everything. And we haven't even started. Now, we want to be very, very, very efficient and that means
getting dangerously close. So the geometry collision, so close that let
me just make it also sold the rights to
be closer to the center. Okay. How close? Well, when it
starts talking about 0.10, some fiber, that should be okay. Yeah. Do you think zero-point
000 001 is okay? Yeah, I think it's okay. This is a lot better, is it not? We don't waste any
simulation resources. Good. Alright, upscale. Now, it's a matter
of look, obviously. I will keep it in the
wrong position now because you see
it's not centered, tiny to explain something, there's an important
parameter need to explain. And for that, I need it in the wrong place or
Gibson wrong place. But one thing I want
really is the size. So the wanted square
or do you want it? The length and the
width are different. It's up to you on
going with square. We're going to be 1.5 sides. Okay? Good. An occupant like this for now. And we're going to move ahead, go ahead with the
other steps and simulate it and comeback
to position it right. Because I needed, as I said, to explain an
important parameter. First before going any further to the cloth simulation
will develop nodes. I need to give this
planet patch UVs. So either UV texture like this and I'll be
able to see my UVs. Why? Because somewhere down the road, if we add UV's later, we might have issues, would rather sort
them out now so that what's going to
happen later takes account, takes into account. But as you please, you notice they are not
really oriented, right? So I need to do is just come
to the y and scale minus1. This way we get it
oriented rights. Okay, Good. I'll template and collision
geometry for now and bring in now the parts where
we tell this grid. Please start behaving like a cloth because you are
no longer geometry. We don't want it to
be just the geometry. Wants you to be a clock. Good. How do we do that? It comes with a
vellum constraint. This is unaccompanied. Velum constraint is
not only for cloth, it is for a lot of stuff, a lot of great stuff. But to be able to
tell this grid, we want you specifically for
the cloth we need to come. And it's co-investment visibility
to the constraint type. Same cloth. Once we do that,
now before I do it, notice how long or short
the parameters are. Stretched, attributes,
geometry, okay. Click on growth,
you get much more. So every type is got its
own set of parameters. And for Cloud, we have
mostly two constraints, stretch and bend because
some more parameters. But we want to worry mostly
about special event. Let me show you. I will just copy,
paste something to explain, be pasted here. And this is only to explain
to you what's happening here. Now that shouldn't
be the geometry, should the constraints. Now I have two constraints. What did we say was
a stretch and bend. Now, all constraints,
if I click on this, we see all of them white lines. What our constraints,
what the points are holding each other's hands. We say now we are close, we need to hold
each other's hands. Obviously. When you come here,
you will find right. When you come here, you
will find stiffness. So this is going to define how hard they are holding each
other's hands, how tight. Okay. Now, I had I have here
a split using group, but I didn't tell the velum
constraint to create a group. And that group is only
for demonstration, but you could also use
it for further work. Under stretch. You can say output group. That's why we called stretch
or whatever you wanna call it upper group and band. When I do that electron here, even notice that I have now my bend and stretch
primitive groups. I only need them
to demonstrate to you what the band looks like. It's quite a complex structure. I don't want this stretch.
Geometry constraints looks like this is constraint, straight
stretch constraints. And this is the band constraint. When you add them together, we get, well, both of them. That will help give us that
simulation cloth look. Okay. But that was just
for explanation purposes. I'm going to delete
it and come back to our villain constraint. Good. There are parameters to work
with, mostly stiffness. Okay? We're going to notice
that if we keep it stiff, this is the opposite of this. It's like how stretchy
they wanted to be. This is resistant
that stretch in S, which means I'm going
to make it stiff to resist being very strategic. And I'm going to make it
stiff to make it resists being banned and to
make those forms. But we want to have those folks. So this is why we're going to reduce this stiffness later. I keep it to one to 10
because if I click on beds, not respond to happen. I'm going to need to bring
in another film load that will drape. And indeed, the node
is called vellum. Drink. Okay? All the velum notes. While you're still working
with three inputs and outputs, whatever these are,
the first one, as MS connects the first. To do it easier. Instead of connection
one by one, you just get closer and
you see those lines. I said Click, going to
take care of itself. It's equitable of time,
but it has connected. Okay, Nice. So what are these? This is the geometry. So what, what, what
should become a cloth? You have a grid, you
want me to change into cloth, okay, put it here. And then it says of constraints. Do you have any constraints? Put them here. Well, I counseled on you. I rely on you to make
constraints. Okay? I'm gonna do that. So if
you have any constraints, you can bring them in
otherwise or make mode. So this is because you
can layer constraints, another constraint and then you connect this one
to the other one. Otherwise, we'll take our back. This is the collision geometry. Well, haven't we just
made collision geometry? Yes, we have. Let's
make this one. But it's meant this
and actually too, because that'll be
working a lot with this. I'm not changeable
layout a little bit crispy on splits and
this one left and right. And go here, select
parameters plus this one. This way we always have
the parameters open, always the viewport
anomalies network. That's much easier.
Okay, Now this was the collision geometry that we already have
collision geometry. Well that's to good. Nice. Now that we have film
driven connection, which is a simulation that I will be able to press play and then I'll
see something happening. Now. I'm, I'm going to press play, but there's a lot more to handle in here are
displayed to you. So you see the
simulation happening and I wanted it to go wrong
and it is going to go wrong. Hopefully. Yes, it's coming along. Okay. Number one, the triangles
or topic number 2. It is fall in. Well, I haven't left it. Good, good. As it's moving too fast. That's an opportunity to talk
about the real-time toggle. So if I click on this one here, this is your real time taco
for what is real-time, you define it yourself
here and the timeline, 24 frames per second. Now, by default, as I said, the Houdini trauma comes between 1240 frames and this is not
going to cut it for us. We know that I know, I know from
experience with this, we just press Control and then click on this one to
remove the simulation. I know I'm going to need a lot more for the cloth at
the full resolution. To settle down. I'm going to need 500 friends. But because I want to have
a slow-mo effect on it, I'm going to need double that. So I'll go to 100 on passengers. Okay, so now let's
keep everything as is and click on simulate. And it's going to form. Number one. Look at this, I mean Control B. And once you see
this in four, right? Let's look at this. Does this look like, cough. It is fairly low geometry. Low-res geometry. The triangles are so big. It has only 123 folds and one ashamed fold here. It is it is not going to
work for us because of the resolution and because
of a few other parameters. And plus this thing
is going to fall. Well, I've positioned wrong, but even if you do
positioning right, you might at some point
in time have it slide. Let's deal with
that slide infest. Absolute most important
thing to handle in this very specific
case, control B again. And I'll go back to my film, Drake volume drip is a simulation
note that go to solver and forces and friction,
the static threshold. Let me change this one
to something that is drastic is just for
demonstration purposes. Don't do it please. Because if you do, you might
end up with artifacts. And we are going to end
up with some artifacts. I'm going to keep some of them, might give some artifacts, a little bit of them to
show some of these for you. But let's increase
it and how to ten. Okay? And I click simulate again. Now though, although
as you can see, that the real part is much bigger and should actually
with the force of gravity in form and
did not because now it sticks to the surface of
the collision geometry. Good. Now this is just static
Jetson Nano of board with then 0.5 was the default will. And we will move it to
one on a little bit more. But I think I might
even keep it as European fashion
for this purposes. Should your clock slide, you know how to fix it and where to fix
this, That's number one. Number two is going to be simulation cached memory.
Look at your RAM. This is five gigabytes by default, I'm going
to go with 35. I don't need to go that high, but I can also go higher, but that depends on your RAM. But I will give you a
method of work that even if you have low run,
you can still work. Okay, so by caching it, we compute something
and you cache it, you read it from this codon, be different from ramp. You enter the room for
further processing. We will do that. I think it's much better
for you. Otherwise, if we go just the RAM root and you may not have
in front of them. Okay, and our
planner patch here, it should be positioned, right? And we need to talk
about the resolution because enough about
the friction will need to bring it a little
bit more resolution that is enough for blocking. We're gonna do a blocking
of the simulation. Then the simulation number 1. Let's put this one right. So I'm going to go
to my butt too few and position this one
somewhere in the center. Something like this. Alright. That's to make sure
it's positioned rights. Okay, that's good. And then let's talk about the resolution. 0.05 is what we're going to use. So now we have much
more, more polygons. We're going to use
this for demonstrating again and had been a
blocking of the look, the relook economic acid with the real with much
higher resolution. So let me do it again. Let me play again and
select the velum train. On an necropolis. What is this? It's behave in much more. It's much closer, but
not really enough. Okay. Much closer to do this is
to you feel it's hard, although it is a
very thin sheet. You will notice that there
aren't that many folds. And we want to have folds. This is 1, 2, 3, 4, 5, 6 ish, this is 90. This is not enough, but
it is getting there. Now the resolution is
going to solve this, but also the velum constraints. We've talked about. The stiffness for the
band, for the folds. It's the students for the band. So you can treat it here or you can use
the multiple together. I'll just go half on
this graph on this, and then this one. I don't want it to be bad stuff. So I wanted to stretch. Okay. No. Well, let's run this as yes, Because stretching as a
completely different story and I want you to
see what not to do. Let's run this with
abandoned first to have some more folds, okay? Okay, okay, we get immortal
see, getting much more. All right. This is more forms. It's folded more. Now, what this is telling me, just a blocking is that once
it goes full resolution, it will have enough false. Good. So the blocking for the
false for the band is done. Let's now talk about the stiffness or the
stretch, sorry, the stretch. If I reduce this to 0.1, is going to happen. Something terrible. Zero-point on is
not bad. Sorry, I didn't actually
have exaggerated. Now, 0.010101. And
then let's commit. It is going to
stretch a lot more. Let's go to loft board. Now what else we can 0. Let's make it 0. This is stretching. Okay. Now, do you wanted
to stretch or do you want it to be stiffer? So what I'll do is
the default was one, I'll just stick to 0.9. Why? Because I wanted to
have a little bit of stretch in S, but not a lot. Okay, good. This is now the full
blocking of our gloves. Of course, there are a
lot more permissions, but these are the ones
that matters most for us. Okay, Now this is
now the blocking. What I'll do, I'll just move
now to the full resolution, which is going to be 0 from 01. And I click on this
kinetic lit, while. This is a much denser
geometry, Good. Now that we're ready, are
we going to stimulate? You could do that, but I prefer
to save it as in cash it. You could do that
with a vellum by 0. I'm going to catch this
as forgot to bring it closer or SMS collect
them on by one Vimeo. And this is what I'm, what I will do is I am
going to cash 500 frames. We check is this yeah, it has channels and
delete channels. I'll say 500 frames. I want to give it
enough time to settle. And I'll just put it in
a folder called trade. And once an African
saved to disk, and once it's done, I
click Load from disk. Okay, it has
finished simulating. I have learned from this
and this is the simulation. Now, you notice the block M
was given us very few faults. Now you have them smaller
and more of them. Okay. Good. All right. And you have 500 trains and these are the frames
I am interested in, where it reaches the bottom. And from here. From here, I want to start
is envies friends here. Without the movement, the
animation of the character. I get this lovely movement here. That is a bit too fast, so we're going to take
care of that later. But for now, let's look
at the clot itself. Okay. This is simulated at the
resolution that I want, however, to get out of vellum. And this, this is fantastic
for velum, the triangles. But once it comes to look there, you don't want to have
these pointy edges. So there's some
post-processing to be done. On top folder velum post.
And we get the Olympus. What do I use this one for? Well, this is, this
is going to help us blur the position. Okay, So blur 0.5 for example, you notice has blurred. So let me disable,
label, label, label. Much smoother. Okay? Alright, and I can
subdivide this and change it into quotes, but at the same time,
have more resolution. Cut Mark Clark, and you
have now more polygons. That will help also. The smoothness of the
clock for the deaf. Okay, Good. Let me check the way
have unfortunately I do not have the artifacts. I'm begging to get them. Maybe I will see them
better with light. Was hoping to get
some of these here. Okay, to show you that actually, when you look at the
constraints, let me go back. The, sorry, develop drape. We said that for the
forces stiff friction, static threshold, if
you go off board, you might start seeing
some artifacts. So if you have artifacts, you know, who's the suspect? Okay. Let me go back. And now, for the
post-process, is this enough? I'm often by blurring, I've done my subdivision, the Y1 to thicken the cloth what initially got all of the
cloud has thickness. You can it depends
on your thing. Okay. For our scene, it's
going to be dark. We're going to be,
we will not be, will not be able to see much
and I want to simulate that, Sorry, want to render it fast. So what I'll do is I'll
not have thickness, but should you want
to have thickness? And this is, most of the time we will be doing that is click on Extrude
by thickness. This is going to give the cloud thickness
is extraordinary, but it's too much. Okay. This is not a blank space to be. For us just the sheets or
0.02 could work for us. Okay. Or you decide thickness based on real life
thickness of the cloth. In our case, it's dark, no one's going to see anything. So we're going to
keep it lightweight. Okay, good. So this is for the post-process. Now, I can catch this
or I can move on with the retirement and
time-shifting. What do I mean by that? Well, these are 500 friends. If I go here, there's nothing. And I was interested not in this first part where
it's still falling, just the last part. And we said it was a little
bit too fast for my taste. So how about number one? We retirements slow-mo okay. Retype I wanted to
go much slower. And you'll notice we no longer
have those three points. Geometry constraints,
collision with vellum process. You're getting out
some developed world. Now you're back in
normal geometry. So I've got my free time. And I wanted to just
be twice slower. So speed 0.5 and the input
frame range was 500. So I'll go input
from one to 500, and the output family
H is one-to-one. Now, if I look at this, I will still see There is stopping here
because I have just extended it a doubled the animation because
of slowed the speed. Good, this is retiring, so it's going to
play much slower. Now I need to choose
where do I want to start? I want to start where it reaches the bottom where these
points register protein. So it's going to be somewhere,
somewhere around 240. Okay? So we go to a 140. Good, and I want my animation
to be around 10 seconds. So another 24 times 10,
it's going to be 480. What do I do to
simplify? Thanks. Crop the whole thing
with peak time shifts. Time shift we used
earlier here to freeze. Now we're going to crop. Okay, so I'm going to say same story clumped to
both party starts. And let's check, do we have,
we have an expression, delete channels or to
start with John and 40 onto an ad for a 180. And to make my life easy heard the timeline should also
follow this on over two hundred and forty and
four hundred and eighty. Now, I have only the section
that I'm interested in. Okay. Now we can catch this to disk. Let's do that. File cache. And because it's quite
some process and post-process is not a similar
issues, it's processing. But the question computation and your RAM could
get a little bit. You could have issues with gram. So if you want, you can cache it now because this is the final
output from here, we move into other
stuff to look there. So you would rather not recompute stuff when
you are rendering. You want it to be cached. Could cash and what
the frame range is. Let me just do we have we
have expressions or delete channels and the frame
range is between two hundred and forty and
four hundred and eighty. I want it to be saved to
this come to this folder. So just festival was draped. This is going to be draped
underscore post, right? And I can click on Save
desk and then later rabbits with a load from disk or
write it as finished caching. Now with load from this, I will play this at real-time. But what does
real-time toggle mean? Real-time means at maximum two
extant going to go faster. What I will have is if the reading speed of
reading from disk is slower than that's the maximum as your speed
of reading from the desk. And yes, as part of the
post-processing stop, I think we have now our lovely artifacts that
I wanted to show you here. Because once it got subdivided, we have those artifacts. Okay. What is oh, by the way, I'm keeping these here
for one simple reason is that the light is coming from the right and all of this stuff is going
to be dark anyway. But I wanted to show you
the what's driving this. Okay, good. So this is our final product. Again, if it's Sunday seen in
only one to have thickness, you can always do that in
post-process with them. Now we're going to
move to the layout.
3. LAYOUT: Let's move to the
layout's not that we have our final cost here. Let's create some floor, walls and ceiling,
and window and door. Now, what is it going to be? Something as simple as a grid? So this is a grid cell floor. Keep very simple
geometry inside. I'm going to make
it 20 in length. And I want to have
a narrow corridor. So I'll go with five. And you think, well, five meters is not narrowness quite wide. It is very wide. I'm just going to use a half
of it's I'll explain later. Okay. And I do not want to see any of those phases here since
we just talked about, you know, ten by ten. Good. All right, this is
simple geometry. How many polygons? Well, one primitive. Wonderful. Good. Then I
need to give it some UVs. Uv, and not when it
comes to the UVs. You can use whichever
method works for you. You could do the UV
portion that you could do the side effects
labs, quick UV stuff. You could draw
plenty of urinals. So just drop something
that works for you. Have some EVs because the
greatest not committed to this. And I have a no and call it out. Floor. Good. Now what are we going to do
with the ceiling? It's going to be achieved. So J0 itself creating a grid. I'm going to say geo, seen in an all I'm gonna do is bringing the floor
and flip it around. Objects, luggage,
bring up the floor. All of this is just the FBX, silicon floor, floor, up floor. We have the floor with
UVs, with everything. All I need to do is flip it
and say, three meters high. Transform on turning this fellow a 180 degrees on the z-axis. Uncertainty of not rotate. So 0, 3 meters, three meters is
what I believe is a reasonable height for a floor. Good. You could make it more
claustrophobic by translate into two meters and a little bit to
country or something. But I'm leaving 23 to let some light bounce
and stuff or not. Okay? This is going to be
a problem for me. This width of 50, five meters is needed
for the floor, but definitely not feel
comfortable seeing why he's a ghost. I want the lights
to be pointing like this, not like this. 90 degrees perpendicular,
know, like this. And an obviously I
wanted to becoming from the top and you see the ghost. Now, that's my point. This thing needs to be thinner, not enter, sorry, smaller. So I'm going to resize this in the back actually to
almost it was five meters. Then the corridor is 2.5. Add a little bit of the
width of the walls. So let's make it 0.6. So a half plus a little bit. Then I have my cylinder, right? What is this?
Another one polygon. Okay. Just keep in three lines. Geometry is it doesn't. Yes, it is strong Sumo. And out. Should we need
it for referencing? Good. Do we have yes, we have
them from the floor. I'm going to create a wall. And JO we go with box just
to show how simple it is. It's just a box,
nothing else, right? This is going to be
called Brides wall. Right? And get inside. We can push this manually or we can make it
a 100 percent procedural. When do you work a 100
percent procedure? When you have something
that is repetitive, are we going to repeat
this scene now? So we're going to work mostly. I said mostly manually, but not 100% manually, because yeah, we need to use some Houdini procedural
goodness as well. Number 1, how high is it? It's three meters high. If I decide later on during
enlightened or disinterest, think the silliness too high. When I bring it down, I
want everything has to follow that It's not about
how many sins you make. That's about your own decisions. So about this distance, I'll go to the floor, not the
foresight to the ceiling. And the ceiling is
dreaming, says, hi, copy this parameter. And I've come to my
box here and I'll say your size and the why you read it from
where that guy is. Silliness face
relative references. That's it, past the size. Okay, now, and there's
obviously the usual. I'm moving it on,
placing it on the floor. So that's the copy parameter. I'm going to put
it in the center. Thanks Roxanne for France. And because it must
buy the whole, why? I need to divide it
by two. That's it. And it's always going
to stay on the ground. Good. Is it in the right place? Now what does maybe it's a
little bit like this and have how thick is the
world going to be? I need to cheat in this one. I know that we need to look at the real reference
from walls. And not every, not
all the walls have the same thickness and
some old buildings really thick,
horizontal does not. In this case, I'm going
to have to go with almost half a meter. Why? Because of actions of
having the window bars, metallic bonds in the window, visible in the lights, but not visible in the camera. So I need to push them a
little bit further and we will not be able to see
how thick the wall is anyway, 0.4 and that's what I need. Okay. Are we okay here? Yes, we are. Okay, good. So how are we going to
take care of the length? Same story because it's 20 meters and I decided
that somewhere, somewhere here. Length,
copy parameter. Let me go to my right wall. And how long are you? You are? Demeter's. You are as long
as the grid, we don't care. Based routing reference,
phaco, this is your wall. Now if you notice, I'm not
placing it on the edge here. Why? Well, because it's
first for narrow, but why do I need this edge? If I ever happened
to move the door? There is going to be a door. Remember that reference
where there's a light coming behind the VM, the ghost. That light is
coming from a door. That door could be visible. Some of it could be that
visible if I ever see inside, I don't want to have mTLS. I need to be able to see
a bit of the ground. That's why it is five meters. Okay, so now I have my books on these UVs that
there's lot more to be done. But let's first give it,
you is paying UV layout. You've noticed I'm not
changing the parameters of UV. Unwrapping the UV layout. I'm just going to
simple way, right? Let's move this down here. And we need a window. If we just use words like these, it's going to be dark. Very dark. So I need to introduce
what is a window? It's another box.
Okay? Another box that we just Boolean,
simple books, volume and offering
and one here, one here, and you've
been in the two, you will have a gap. If you get to live your box, you will see the cup like this. If we go. All right, Let's move it up closer and you have
it from the green. I've used another keyboard. Right? Good. Okay. So this is our window. The window nice to
have reasonable size now just to be square as a box. So I'll go with
somewhere like 1.5. I'm sorry. This must be
working on different access. 1.5. Now, this is too narrow to wide. One is ugly and height
height is 1.5 ish? Yeah, Something like this. 1.3 maybe. Okay. This is something it
gets from your wealth. Real-life references. If you're replicating,
sampling from a castle, then we're not going to
be a little different. So this is where we get
our information from. Nice, good size x was useless. Actually not because I might go skip it to actually
even nice. Okay. Now that we have this,
do we have a window? No, this is completely
not acceptable. What you see here is
as sharp as a knife. Now for realism, you own waste, want to bevel your edges. In real life. Look around you. Nothing sharp. Just the knife and
other related things. Okay? So we want to
develop this stuff. I could select these
edges procedurally, okay? But because you only have
one window now we can go ahead and just come here and click on the edge. Turn off the
visibility thing here. And click on one of those edges. Shift and double-click. And you will select the whole loop shift and double-click, select the homo and shift, and click on the utmost. Now, this is not the
proper Houdini way of doing things because
I will draw the do if I'm taking care of
a much bigger seen as have a bounding
box that would cover with upper padding and lower padding on all axis so that I can group
these points. And when I group the points, I promote that grouped edges. And then during the Poly bevel, I exclude this fellow and I end up
with procedural injustice. What do we need to do that now? Now, I just covered this. I press tab and say poly bevel. And here I get my distance
of 0 points from 0 to maybe, maybe that's enough, maybe 0.3, depending on how big
your building is. Obviously this is
going to be terrible. It looks awful. This primitive head is
polygon Harris thinking, always invited to the party
and I don't know what you do, which would
essentially look it's looking at the wrong way because one simple reason,
not wrong way. It looks wrong. This is not babbling this
when one face sign off. You need quite a few divisions. Five. So now we have some
bivalent that looks decent. Evelyn, right? Good. Are we done? Yes, we're done. How many polygons we go? Let me just check,
connect this one here. Quite a few. Quite a few. But enough or not. Our rights. And onDraw the first row, I should quit this and
other nerves as well. Good. This is my range
for what I could do is object merge this one into the left warm can
create a lift wall. But because I prefer it's going to be a door,
not have been there. I tried to tweak it quite fast, so all I do is just copy paste. It actually is obviously wrong with no mysteries with jail. Left. I'll just take a briefing. I could've copy paste the
dates, but all right. And then here onto
something that is lazy. I don't want to adopt,
we don't even want to bother moving it. I'm too lazy to move the wall. So I'm just going to mirror it. Okay. But my order something
it does keep originals. We need to tell it. Please don't keep original. Y. Well, it works great for you. And you would keep this
one and you would add this mirror inside
the right wall, knocking and left wall. If you have exact play to win those opposite of each other
and you would just simply duplicate like this,
you might buy. In our case, I'm going
to have to remove the original and tell this box, now you are not a window, you are a door. And it gets out of here. Let me see what we
are going to have to hide or the objects and
gets inside the platform. Yes. I have my books here. That's because I've
just mirrored it. I don't mind. We'll
just move it like this because I wanted the door to be behind the biggest because
I want the lights to It's time to train. Okay. I want the light
to come from here, pointing towards the coast to coast needs to
move a bit behind. And I want the door, the light to come
from here, like this. So not 90 percent and 90
degrees perpendicular. But like this. So I need to move it
a little further. So let's move this
box a little further. Something like this.
It should work. Okay. Are we done almost just turning this thing
into a door under it properly because the
edges could have been this, the height years would
be more like three. Something like this works. We need of course, to make sure that
the highest matches real-life height
of the door mice. And maybe a bit 1.31.25.2 on the wetter. Okay, look at your references. They will tell you exactly
what the measures are. Good. Are we done? Yes, we are. No, no, we're not done. The Berlin could have
been messed up because this may not work for us. So what I will do is make sure I have my Berlin
don't properly. Let's go back to
the volume in here. I'm going to select, and
sorry, not this one. So I have my edges. Control this. If I double-click now, it will get 10 minutes,
double-click color shifts. You will get the whole stuff. And I don't want these to be beveled inwards depending on where you're standing
and worse, artwork. I don't want it to be
beveled towards the outside. Although to be
performed word insight. But I'm not gonna do that
because I could have done if I had a box that behave
like the whole corridor, not separate box and ceiling is a great insurance
could start doing is simply not double-click
the Shift and just select these individually. Again, I could have
very easily used the procedural way of selecting the points and promoting
the edges group. And then it will
grab only this one. And now I can just have
another polyp form. Let me make this one too. And you notice, Have
you noticed a change? Let me go back to 0. Look at the viewport.
And it just to point to the normals are
going to be messed up. Long as got messed
up into fixed up. With five divisions,
it's less visible, but we don't want to have any
issues during the render. We add normalise, believable, can mess up your
normals and make sure your displacement is now properly on how publisher
here. With the normals. That looks much
better if you move weighting method by
face area. Okay? But this area, every phase
takes care of itself. So now it's clean. The display here. And we have our window door and we're missing just
wanted or fellow, which is the background wall. So that's going to be a box. That's the background model. And we're going to place it
just goes on objects, places. I could have placed it
procedurally. Front. No. Right side. Yeah. Sorry. I could have placed it
procedurally by telling it to read from the maximum of the said. Sorry. I'm the head of the
ulna and I wanna change this one right on the floor. So what I'll do now is go to the floor and the
floor to ceiling. Ceiling. The height is three
meters of the parameter, The box, the background wall. The height is going to
be exactly the same. Pace. Translate reference. This by dividing by two. Good. Now we have it covered. Let's go back to the
perspective view. And we now have me
to have some width for this stuff and just give it hold shifts and
make it thicker. Nice. As this worked for me.
Yes, it does work. Good to have NEA
and he comes in. Well, you know, just
give me a nice Okay. We're good. We are good. We need to have some UVs. And unknown. Shouldn't we ever
needed background? And my output? I know I need to add
enough materials well, just to be on the safe side. Okay. Oops, that's the wrong
thing or not in packing and erase this and put. The environment is now finished
acceptable the window. Now how are we going
to tinker with the bars for the metallic
bonds for the window? How are we going to
take care of that? Now this part here, let me
fast enough for the layouts, clips inside the womb. And then we have the ghost
behind like this of it. You look from the
window, the light is going to be somewhere here. Somewhere like this. So near discussed to
be somewhere here. So the sunlight is
going to be looking. I want you to be further
behind good window. And the window boss. Let me create a grid because that's
how I'm going to tell it. Really fast and easy. Wins. And let's hide everything else. Right? Good. What do I want? Well, on the right size, so the size we can read it
directly from the window, ended up procedurally and OK to place it procedurally
on the wind up. But I know that
to be able to get that there is light shafts and sculpting the
volumetric lighting. I need to position
the window bars, metallic bars if an
outside of the corridor. So I need to keep it not linked. So there's no procedural
goodness, Happy. Now, the size is going
to be 1.5 by 1.5. Now, this is just guesswork because it's own creative work. There's no reference
or anything. It's light driven, right? So I need to control that might spark, right? I'm going to turn this
into what peers to be in the lights as metallic bars and polypeptides
are plenty of ways. Fats do not like
two or three ways are having but fully parties, one of them only does
it grabs the lines. The lines of a primitive stages at turns them into permitting tsunami can fully expand them. What dx is going to expand
to the point expand, which is another form of
extraordinary things. Nothing happens. And you think what,
what's happening here? What, what's, what's wrong? The output offset curves this to turn into off the surfaces. And when you do
that, you get, well, some ten that appears
to be willing to work, but interesting to
change the offset. So how much we need the
0.02 or something smaller, depending on how thick
your metallic bonds are. Then you get something
that works for you cut. All right, let's now move
this fellow outside. And in this case I'm just going to move it from the
object context. Turn it around, not
give it any thickness, doesn't need any UVs. For one simple reason. This and just Control be
to look at everything. And let's move this. I, I know maybe it was
too big for the window. That's not win. This is just a light blocker. At the very end. I know it will be
somewhere here. Somewhere here, because
the light is here. I just don't connect this. So just the effect. Okay? So let's start with something
like this and we now have our layout done shopping at the camera. We
will add a camera. So Welcome, new color. Lockett's flick on the lock. And then you can
move and position your camera and obviously changed the resolution
and everything. But for now let's position. It's something like if I go any further and be able to see
outside, I don't want that. We have agreed. We just wanted to have the
effects of the metallic bonds. And we will then
come back and change the focal than to something
that looks like this. You choose what works
for you. Girl with 90.
4. LIGHTING & LOOKDEV: First, let's create some
lights and just unlock the camera and move. Come here. The first slides is going to
be coming from the window. This is our main light,
something like this. Once position I come to redshifts
or actually any lights. So for instance, I'm going
to use re-sequence Control. Click. It gives me
exactly where I am looking at art and then
it locks the light. Should I want to change it? And yes, I do want to
change it a little bit. It's going to be like this. Now you can lock it. Let's look at the lights. This is an area
lights by default come to the parameters here on the left and then change it. And I am going to change it because this is a bit too soft. It is going to be two
software to software. It is because AC to get that
those volumetric lighting, light shafts, I'm going to need something
stronger, stronger, not in terms of intensity
because it does come with a strong
intensity here. That's not a thing. I
don't want to play with intensity on a play
with exposure. I want the form to change. So from Area Lights, I'm going to move
it to a spotlight. And this is going to
make a difference. Now, obviously, the
intensity is too large in here and draw the work
with the exposure. Okay. Let's now from the camera here, okay, I'm starting to get something that will work for us. But let's now move a camera and the camera bit closer,
something like this. Okay, I don't wanna see
the edge of the cone, which by the way, we can change, can come here to lights. And because this
is the spotlights, we will be able under spot
to change the cone angle. I think I have done 75
in the corner angle because that gave me
more a wider angle. Twilio covenant. Let me just check. What we'll say is that I
had used for the company or the original thing on the
cone angle was indeed 75. Okay, Good. I just wanted to be
consistent with the earlier and this is going to
be called, right? Right. Like you just move everything here and
organize them as well. Good fats my right. Let me unlock the camera
and move and bring another lights looking like this because I want
the light to you. I'm not perpendicular to the
walls, but be like this. And click on arms,
control and slides. And position is
somewhat like this. Where do you think the
light bulb would be? Somewhere like this. Okay. Let's keep it like that. Alright, this is going
to be the door light. Good, and let's unlock this. This is not enough. I could have changed this
one into a point light, but I want to show
you something. So let's keep it as an area, as an area you will find. But let's first
sort out this mess. I want to work with
intensity, sorry, but exposure, not the intensity. Sustainable one. Maybe behind the brigade
a bit closer and bigger, obviously, because the door
is about to perish simpler. I'll make this tube because the smart positioning,
maybe wider. X another two. Okay, good. Now I need to look
at what I'm doing. So for that purpose, I want to go to the output, the output text, and add
an RS render node, RS. Remember, that's going
to give me an IPR. Okay? So if I know come here, it tells me rather
come on, Okay. Then I will split this view. I'm talking about them. And one of them is going
to be the render view and the other is going
to be my viewport. So Brent of you and viewport, camera on and Redshift. We're good. So let me just see what I already
have my position. This. What am I doing now? I'm doing the blocking
of the lights. The final tweaking is
going to happen later. First we blocked the light, then we bring in the materials. Then which week the lights. And obviously with the
volume metrics as well. Let's click on Render
and see what we get. Okay. This looks a bit
too bright already. We have not assigned
any materials, but I just wanted to see
what the thing looks like. The overall feeling, the
intensity is too much. But in terms of blocking, I'm kind of wish to
start with this too. This is too much. Of course all the values
are going to change. Everything has got to change. All I'm doing is blocking. Okay? I'm good with this as a starting point for block and I'm going to
need another lights, which is going to cheat. So the scene is
going to be dark. But I want you to have the
option to change the darkness, make it brighter or darker. To do so, I'm going
to bring in lights inside the corridor
with the grid, the coordinates to be
dark, claustrophobic. So what I will do is that light is not going to have any impact on any
volume metrics. It's just going to be there
cheating with the walls and the floor and the floor. I will show you it actually. Let me let me create a
first stop the render now, and then I'll create the lights. So I just control-click
on the lights, then turn it off. So I want to have lights inside. Let me control B this
and turn around. See very stable,
unstable wireframe. Wireframe. Much better. All right, so I'm going
to position it here. I don't want to
light and the clock. I want to live the
whole corridor. Turn it down to the
point where we're unable to tweak the brightness
control V again. And let's close
this one for now. The size is given
to be 20 meters. What's this? Master my axis. The y axis, 20 meters,
about two millimeters. So covering the whole corridor. Okay? Then other ones
have any mess in terms of rotation 0, 0, and 1. And the middle habits
a little bit narrow. So sizing the excess circled
5, That's about enough. But how high is it? I know the wall is
three meters high, so I wanted to be fairly close. Shall we go at
0.9897? Yes. Do them. All right. So it's just to have the option
and before I do anything, I have to change from
the top to change the intensity back
to one and then work with the exposure. Let me go back and see what
this stuff looks like. You can take snapshots
if you want. But we're not there yet. I just showed you. Good. This is too bright obviously. And I need to change murders confirm from
the walls to under, have that reflection
on the wall here. The first towns there. This is good to start with us. A minus two. Fantastic. It's a place
holder light, something. Later, I can brighten
or darken the scene. We're good. Okay. There's another thing which is, I may want to add already
some creative lights. I'm just part of the
block and I may add, this is now all creative stuff that you don't even
need to worry about, that It's whatever you
feel like you want to do. I want to have a light inside the cloth and the
lies behind the head. That's just my choice. So let's click on
control our slides. And that's gonna
give me an area, change it to a point lights. And I would still move
something like this. Slot, easier to move in
wireframe and get inside growth. Here we go. I am now inside club and I want to turn
this fellow into red color. Obviously aid intensity is a bit too much was my intensity. One. Let's make the exposure
0. There was fine. Okay. I then create another lights which is going to be disabled. This one, unlucky mean. And then click on slides. It's gonna give me another
one, changed in spotlights. And because it's
still locked on, press on ALT and move
behind the head. Okay. Something like this. So this is not just
number one was inside. Inside and distance behind head is just blocking in the
creative blood scattered. Intensity for this one
is too much again, maybe I'll go with
minus one here. Shall we look at what this
stuff looks like? Okay. I'll just block in
the stuff over more. Good. All right. I don't see my 21 that's
behind it because it's two on amendments
and smooth this one. It didn't change the spotlights at the points, sorry,
point-to-point, point. It's a point like point
lights also read. And minus 1. So much minus 3 is about enough. Tiny 2020 debit. Again, we're just
blocking takes. Good. Do I have all the
lights I need? Yes. Finds them one of the rights, one on the left
for the door. No. One at the top for cheating. And to create it once. Well, that's just
the block in London, anything yet, in terms of volumetric lighting
or materials, good. So the next step
is going to be on materials and grab
your materials from fixture have done from textures.com,
from mega scans. There are plenty of resources. We're going to go to infectious. But if you come here
and those structures, you will find a few precious that you can use for the floor, for the wall, and
for the fabric. So the public can
be using this one. You can use any one of these. Most of these are just leather. One is the pattern
until arginine. So we can use one of these two. I'm going to take this 1 second, click on that and then
come to download. There are options, HK
sometimes 16, Kate. Obvious resist the
temptation to go with 16. Hey, because unless you
are filming a NSURL, have a scene of a
an and or a bug on backlog that maybe that level of detail is
going to be an overkill. Okay, so I'm gonna
go with for k. You could go with UK
for the first renders, for blocky, look dev, and for the final render
with HK, Sorry with four. Okay, good. And please do go
with EX Rs when you get the choice because
I think now it has become maybe the default
download is the XOR. But if you get it
from somewhere else, to keep your
consistent format ESR, and it's the industry
standard anyway, it holds more value, it's heavier, but it's
going to help you as well when it comes to
creating the materials. Okay, so let's now W the
input in your texture folder, and let's now move to
creating those materials. Where do you create materials? Now, if we go to
the mat on fixture, but I prefer number of
one individual asset actually has to do
with insight in here of this one doesn't
have a northern output. As the national me out. Ghost, not organic search. Just keep that in mind. Quite good. If it's just one asset
that can be copied over. Rather have a material
network, material network. Network, network right here, you click on that and you create and they coincide at your work. If you want to copy, when you copy this with the
material network in it. Okay? Now, because this is
just a onetime use, what is go outside
air because the more, the deeper you go into
each one of them, the more clicks to get there. Okay. What I'll do is just keep it outside here and say my network. I don't want to go
to the mat contexts, but this is about the
same thing twice. So now we're going to create some RS material builder. Okay? When you do that, you
are going to find here some sort of an output
and the material itself. Let's talk about this. This is just as standard as any other principle
based style material. They're all the same. The layout a little
bit different. They may have some
different order, different naming
sometimes, but it's about the same concept
as the principal shader. Okay, good. Now, this
possible chamber now will need to be texture based. So we're just bringing textures. So if I go into infectious and feed them into this
about where you can, you can expand this and see where we're
going to feed them. And occupants are like this
to keep it nice and tidy up, wanting to do is
create texture maps. Third section, maps are going
to be used for this course. But what I want to do is
give you the template that you can use with any
material that is texture paste. Shall we do that? Let's
start with infection. Okay, So this is regardless
of the texture maps that you have in this cloth textured, I go from fixture
haven't regardless, if they have three textures. I'm going to give
you the usual fix, the usual suspects, but
you need to worry about. So there is colored base
color, space color. There is ambient occlusion. I am just Alt and drag. Ambient occlusion. There is your roughness. These are three. Number three. There's a bump and
there's the normal, and then there is
a displacement. Good. These are the six, the usual suspects. Okay? Now, these to deal with color. This as an important concept to keep in mind later
for the color space. So I will come, to, come here and I'll
just call it color. We think I think it's obvious. Is it not obvious? It's
already called base color. Bear with me. As I explained
once we get there. This is not color. So it's something else. It's data. For now. I'm not gonna say data
already going to use row, data, row, signal,
row, information. Row is the key word for later. Okay, good. So this is what we have. We're going to start
connecting these. The base color. I'll just go to, oh, by the way, the most important
parameters to worry about here are obviously the filename, whereas infection, but
the color space changes are somewhere down the line. Your render is going
to look messed up and it's the color space. It's now clarify this. You want you always want. Work in a says you
may be thinking, I'm just working on my own. I don't need a stylus. It's better to get used to ASS. It provides you with
a wider range of colors and it just looks
a lot more realistic. Okay, good. So that's for the column
space and there's the scale of cells and protect. All right, what do we need? We need our detection artery, so go grab it from
jobs. Factual. Should images. I'll go with color
number 1 except OK. Now you'll notice when I did, when I added a color
space has been assigned. That's because I have aces. Uninstall install the
Windows environment level, not at the Houdini
environmental level. So although I referenced
insignia as well, I have it at the Windows level, which basically means
whichever application R1, it will pick up pieces. Okay? So you look here on
you decide, okay, what what do I need to do now? Is this correct? Well, this is why
I said color is color and row is row and ESR. When I said, better keep
Tectonics, ours mosaics, ours not have a maximum of JPEGs and PNGs and Exxon Mobil. Because when it come, when it comes to
the color space, redshifts does the
conversion for you, but you need to tell redshift, what would you bring
in to the party? Is it any XR, then it needs
to be dealt with differently. If it's a JPEG, it's
completely different. Okay? All right, so ESR, linear JPEG, texture,
sRGB direction. Okay? You come here and all
you need to do is go to utility, linear, sRGB, XR. If you already know this stuff, does bear with me as I
explained to those who do not. Okay. Utility linear sRGB does
for you your czars. If it was a JPEG and you will
go to utility is RGB, okay? Or there are some schools of thought that say output SRGB, which would be
somewhere down here, I guess, was my output. You're going to notice
that this is one of the most annoying things, is calling up and down. And there's a trick to
avoid changing output sRGB. You could do this one for JPEG, either this one or
linear utility, linear sRGB, sorry, utility
is such protection. Jpeg, this one. But we'll go with, it's hard. It is linear. Now if you change, if you click again and go for the second one in
texture haven't, for example, this color space is going to
be reset the game. And I'm going to have
to go and scroll again. And what is that? That's a waste of time. So what you may
consider doing is gets out of here and come
here and say, you know what? I'm going to edit
this parameter pink. We don't want to
have any headaches. I'm going to bring in a string, my string for them. They're either hide
these ones or keep them. And then we call this
color color color. And you say except. And this is then color string. And I think what is this? This is the bound,
this home phone. You can then copy. When you want to use a
texture, you can use it here. Why are we doing this? Because
we want to avoid selecting from that annoyingly long
list utility linear sRGB for the hospice, six of them every time we change the texture because we want
to have a different texture. So it will exactly
the same thing. Color, PEO, Roughness, Bump, normal and displacement,
you change it here. Redshift does know
that it has changed. It just computes this. So this color space
doesn't change. That's the trick to
avoid wasting time. But for now, I know I'm
going with that one. I will not need to do that. I'll just come here and delete that parameter that
I've just added. Good. Let's come back here and show me starts
connection this. I connect the base to
the diffuse color. Good, Let's go get an occlusion. We will worry about
the scale of self. As we finish out
this music lesion. Is there one? There
is one we accept. And we say, let's
connect it to the, to the ambience of collusion. Whereas the average
collision there is now going to collusions,
what do I do? Okay? There are two things here. Initially. And in general, your
amplification needs to be multiplied by the base color. That's one. Number 2. In redshifts. There is an
advice in reference that, well, do you want to
use a texture itself or do you want redshift to compute the ambient
occlusion for you? Okay? In this case, I have
chosen to use a texture. So what I'll do is just composites are
esco color composites. Click there. Connectors bringing the blend color as it's done. No, hasn't done anything
whatsoever because it's still composite mode base color. So what I'll do is
change to multiply. Now we have this, which is still set to the wrong color space
multiplied with the color. So what was it again? Linear, utility. Linear because it's sRGB, ESR. Okay, So this is done for now. And then we do our rashness,
gone, the roughness. There's our roughness. Accept. What does it have to be? Is this color that's color linear or associate
bit extra for Japan, linear for an exam, such metrics for 4000. This is just data, so it needs to be row. Let's look at a
roughness and just scroll all the way down or wherever you find this
under your conflict, is conflict and rope Done. Same story here. Bump, is there a bump? There is no bump. Let's say normal is a
normal, reasonable. The GL and dx GAL4 VFX, dx programs, generally speaking. And displacement, we have
a displacement node. There is no displacement, okay? I'll keep it there anyway. Because this is meant
to be a template, works with everything, all textures that you have, because you might
have displacement, okay, and we're going to
connect up it improperly. Alright? Roughness or the
softness go, well, roughness goes to your
reflection, roughness. If I click here, reflection,
roughness, this one. Okay, that's your roughness
connected directly to the bump under normal are two fellows that
are faking it. Okay? This guy is doing it for real. These are faking it. This brings the detail and
two different methods. This method is different
than this method. And if you have both of them, you might think I'm
going to bring both. And to be honest, the bump is always has always
smaller level of detail. Doesn't have a look at it. Higher level of details, one, smaller displacements, not
displacement, smaller details. Okay? So sometimes you want to
blend, to mix these two. So how do I do that? Let me first, you know,
because we're not using the parameters and we're not using panels. We're going
to go to Control V. I look at this and
for much better. Okay? The bump as a
texture needs to be rho. We know that it's
Row, Row, Row, Row. If you have a bump, bump, bump map, you connect
it to the fixture. And you keep it by default, height field because
it's just a one. For the normal. We already have a normal set
of probabilities for all. And we're going to
go, you have normal, I'm doing something wrong, but bear with me as I explained, are as dogma, click on that
and really think, yeah, good, as connects 0, y 0. What's happening with this normal map
thinking is superseded. It is already marked by the
time you're watching this has already gone from the selection. Maybe they just completed
therefore legacy projects. So we don't use this
from normal map. The bump map is used for the normal map if it is told
to behave like a normal map. If you bring in a
second one and you say input Mach top,
tangent space normal, then this is your normal map is behavioral economics
collected input could arise. Where do they go? Let's look at
displacement first. Displacement. Displacement. And you connect your
texture, texture map. Now we're good.
Okay? The color ones goes straight into the color. The data once the bunk
normal displacement, not roughness of must
also go straight there. You could mix roughness type, multiple breakfast
or texture maps and, but that's a creative
decision. You could blend. These need a little bit more
certain in these nodes here, one for the bump,
want for the normal, one for the displacements. So where did they go? Depends on how many
materials are you using. Is it just one? Then you could plug them here. Displacement goes
to displacement and bump, coastal, bump. A normal goes to normal. There's no there's no normal o or we left again with
numbers always crazy issues. No. The normal gets
blended with the bump. So we need to have
a bump blender. And you have honestly a one, and that's your base layer. Okay, good. And we move it connected
to the bump map. Now we have it all connected. You can adjust the
scale of the bump here, the scale of the normal hair, and the mix between the two
with the blend weights. Because by default,
inverse of m, 0.5 if we start getting into
open five after layer 0. And then there is this useful and dangerous at the
same time, additive. Note, if you put it at one. And then our digital mode is
going to bring everything has and it might look ugly. So if you think you're been
displaced, no displacement. If you think your bumper
normal stuff are behaving weird and you think
of this is to march, check this lovely additive mode. It is the usual suspect in
this case because do you have, if you don't have
the technology, you could bring the whole
power of the novel, we thus addition, right? So, or you could just bring a little bit of it, half of it. This is all created land, and it just creates it. It also depends on the
texture map itself, how much detail is in there. When it was created? It was that too much contrast
or very little contrast. So that that plays
a role as well. Okay, so that's about
your overall tablet. You know what we are going to do before we finish this template, I'm going to go back and give
us a little render, Okay? And I'll show you that
we need something else to avoid wasting time. Control B. And I will assign, name this one properly. Coastal or redshift
curves or whatever. And it comes to graphs
and render and assign it. As my math. What matters here? Cost, okay, good. It is assigned. Nice. Let me go all the way back. Now. Notice that the camera view and I want to
disable everything else. I'm working exclusively
on the cloth. So I'll just select everything and don't see
anyone of these, just a girls. And for the lights, I'm going to keep
all the lights. I'm going to keep
all of them for now and then see how it goes. It's assigned. Let's click on Render. Okay, Good. I don't necessarily want
maybe a little down. Okay, Much better. The scale is completely off. And this is one of the
mistakes that we don't get. Realism has like
the scale is off. Whether it's the
texture or environment. The tree is bigger
than the house. The chair is off the scale is the one
thing they need to nail. So what I'll do is number one, get rid of those lights, creative ones because I
just want to see what. Looks like and yeah, the scale is off because
this is how it was scammed the Soviet God. Now we need to start tiny nets. So I need to go back to
my material network. And in the material network, I will adjust the scale. Sometimes want to
adjust the offset and you may even want
to rotate it because there is a pattern
that appears to be too repetitive and it wants
to rotate stuff. Weights. Are we going to do that
for each one of these, every time we bring
in a new texture. And if I change my mind is
going to be a different scale, different offset,
different everything. No, we're not going to do that. We can't do that to ourselves. So you either come here
and creates a node and call it texture scale controls on textual picture controls. And you create your stuff. Here. We come into the interface
and Agile stuff here. So I'm going to be a string. Remember this? And you add your vector
to vector 2 and float. Or to make your life easier, you may want to work. Once you've settled, everyone wants to work at this level. Then you say, well, if I know this thing is based on
an issue only have, by the way, if you
only have one texture. And maybe, sorry, one material, material that's driven
by the texture, because here we have only one. You may be adding more
stuff and thanks. Shaders can get
quite complicated. So it's up to you where you want to place those controllers. Okay? I place it here for now. We'll say permitted
interface, where we'll start. Yeah, I'm going to bring
in a float vector to, vector to it because
I've got x and y. And I'm going to use the
float for the rotation. Let's call it
quickly fixed poses. First one is Kim scale. Fixtures scale. I really don't mind
if I mistyped. Well, I do my fake. None. The next one of the
scale defaults. No mess up. It's
defaults one-by-one. Unless you always use, like usually use makers count actions that they
tend to be two-by-two. So you start by default
with the two-by-two and then change it
if it happens to be eight by four or four-by-two. Jan I'll go with them. Infection of cells. That is not my place. Okay. Messing up to our fixture. Upset. Right? No. No set as default. And then there is
your profit yeah. Fixture date. Sure. You do it once and you
have less headache later. Copy parameter. You select all of these at once. Come to your scale on
based relative reference. Again, offset, copy per meter. Same story, select all of them. Of the face phantom
reference, back again. 48 copy parameter. And it's based on offense. Because I'm still sticking. Everything went okay. Good. We're good to go. Now we're going to
change it to moles, the scale that I had used
in my original scene, just a little bit,
not scale walls. Four by four. So let's go with, for my
fortune we do now for my four, if it's square, always square, it even be lazy and copied
this parameter here. But sometimes you have them as h by 44 by two or whatever. Could click on that
amplicon vendor. Well, this looks little bit
more realistic, does it not? Nice. So this is about the infection. Alright, now that
we're done with the look they have
for the cloth, I'm gonna go back
and work on the rest of the lighting of the scene and bringing
some volumetric lighting. And then later we'll bring
in the other materials. Okay, So let me reactivate. We display all of the stuff. Camera. And let's give it a random smooth this one up. Let's look at this. Okay, now, if I render this with all the Lloyd's metronomes
lights again, this one's good. Okay. So this is a sunlight. But I needed to have volumetric. Volumetric. So you
will find under Redshift Rob in the OS context. And about as under
Redshift advanced. And then volume scattering. Then your two most, sorry, or three most
important parameters obviously can tweak
the other ones, but you have scattering,
attenuation and face. Okay. So scattering, it's
how strong effect is, how strong is the
volumetric lighting. Attenuation is more like, controls the strength of the
foam and the amount by which the light gets
attenuated as it travels through that atmospheric on
that volumetric lighting. The phase is how much
of the light gets, gets bounced in the atmosphere. So much of tweaking these parameters until you get something that
works for you. I'm going to go with
0.3 for the scattering. Well, enable, obviously enable for Scotland and scattering
ZOPA three attenuation, whatever works for
you of bond 45 and then this one minus six. Now, you don't have to
put this a bunch of experiments with other values
to get different effects. All right, and I'll go
back to my bright lights and give it a color
and blue color. And from here, it's formed
matter of tweaking. Let's keep it more, something like
this and then make the arrest little bit darker. The door has too much. Okay. There's something we
already know is that this light here does
not look realistic. If it's a light bulb in a
room and it's coming out, it does not have these
very soft edges. So how do we deal with that? Either? Use the point lights for because I wanted to
show you this part. We're going to go to the Shape
and it's under the spread. That's under the spread here. This is this spread. If you make it bigger, you get very soft channels. And if it gets smaller, we get a very hard shadows. Let me quickly check
the exact one. I did not make it 0. It was quite close to 0. So for my rights, more on the door, door, 0.035, something close to 0. If you make it 0 is
going to be nice. Sharp, very sharp. Okay? So if I do this now, you'll notice by changing them that the edges have
become sharper. Not very sharp, but just
about enough to say that this is a room like
this is not an area, lights will just make it. Okay. Good. All right. So from here onwards, it's just a matter of tweaking, but obviously we need to
bring in the other materials. And it's exactly
the same process as for the cloth material
to weaken the lights, applying the materials
to the wall, the seed in the ground in exactly the same way as we've
done it to the Cloud. Here. The final results, but this
is the original scene. This is not a single work in
offices. My original sin. And as you can see from the volume scattering is
exactly the same parameters, or 0.25 minus 0.6. Now you can go ahead and render wireframe and then asked to
document that the full frame. And you can start
with constraint, and then we can go ahead and
render your ten seconds for whatever frame and
you have the outputs. You choose the right camera. And for the output you
choose where it needs to go. Please go ahead with the XOR. If you want to use a use Easy can go ahead
and create them here, or you can create
your own UV list, which you then reference here. It's handy if you
want to copy paste it to other projects. If you have a set
list of the UVs. But Redshift here at the
advanced volumetric Scotland, we keep it as this sampling that's going to define the
quality of your render. More quality, more
waiting, simple. Okay? So I have left everything
to us as a default. So here you can increase
your samples or you can decrease your noise. So the lower the value, the less than noise, but the more samples
the model waiting, but the higher college. Okay, good. Global illumination
is an important one. But for our scene,
Let's be honest, the, the, the defaults
work very well. The defaults start with the secondary engine as
irradiance point clamp. This one is the
cheapest for computing, so it's the fastest once
you get your results out. If you are still in the phase where your
experimental and say, okay, is it what I want? You can go ahead. Irradiance. If it's a dark scene like
the one we have in now, you can keep irradiance
if you say no, I'd like to have
something much more realistic with brute force. Fine. You can move the secondary
as well to brute force. You might be interested
in increasing this, but not as interested as
waiting too long, I guess. So. Be careful with those
three steps because they, they will take longer to
render and Brute Force as notoriously expensive, right? Good. So that's about it. You can go ahead and
render your scene.
5. FINAL SCENE RENDER: All right, this is now the
render will open this infusion and you have
exported it as a CG. So if you look at
your render and a new infusion and
After Effects, and it looks dark, not like what you have seen in your render view in Houdini. Then it's because
of the color space. And you think, Well, what
should we do about that? Simple, You come here and you just change the
view poll just to, from ACG to output. What output do you have? Generally it's flexible.
Output, sorry. Is finite out. Put Rec 709 for your monitor. If it's Rec 709, if it's
an ordinary monitor, go with 70 nine. If you have a proper
color correction monitored and you go
with output sRGB, your monitor is going to
define what the output is. An exponent or sRGB. Okay? When you click on that,
then this is what you view. But wait, this is just a viewer. I want the output like
the final thing to be in the color fringy thing
to look at my doc. All all it has done in the view of this monitor here is just change the view
has changed the file. To do that, you need to go
with this one here from space and color
corresponds to add. And I'm going to change
exactly what I've done. But now I'm
villainous, less than work at the file level place. Not just to monitor level. So output, whereas my
outputs somewhere. Okay. So now it's a matter
of where is it going? Is it going to be viewed
in Rec 709? Most likely. I'm going to go, it
is four GB anyway, but effect should go
to x of 9 because it's the final destination in
terms of the audience. What is the audience for the watch on monitors if our exponent, and
you better do that. Okay, I'll keep track record
of non-African, okay. And then a control
space saver on Render. And you're under
the full frames. And this is the final result.
 Film VFX