Transcripts
1. Welcome to the class: Hi, everyone. I
hope you're doing well and welcome
to this class on how to sketch a
contrasting scene using marker pens
and fine liners. The goal of this class
is to show you how to create high contrasting
sketches using only a few drawing tools
while making the most of ink saturation to bring
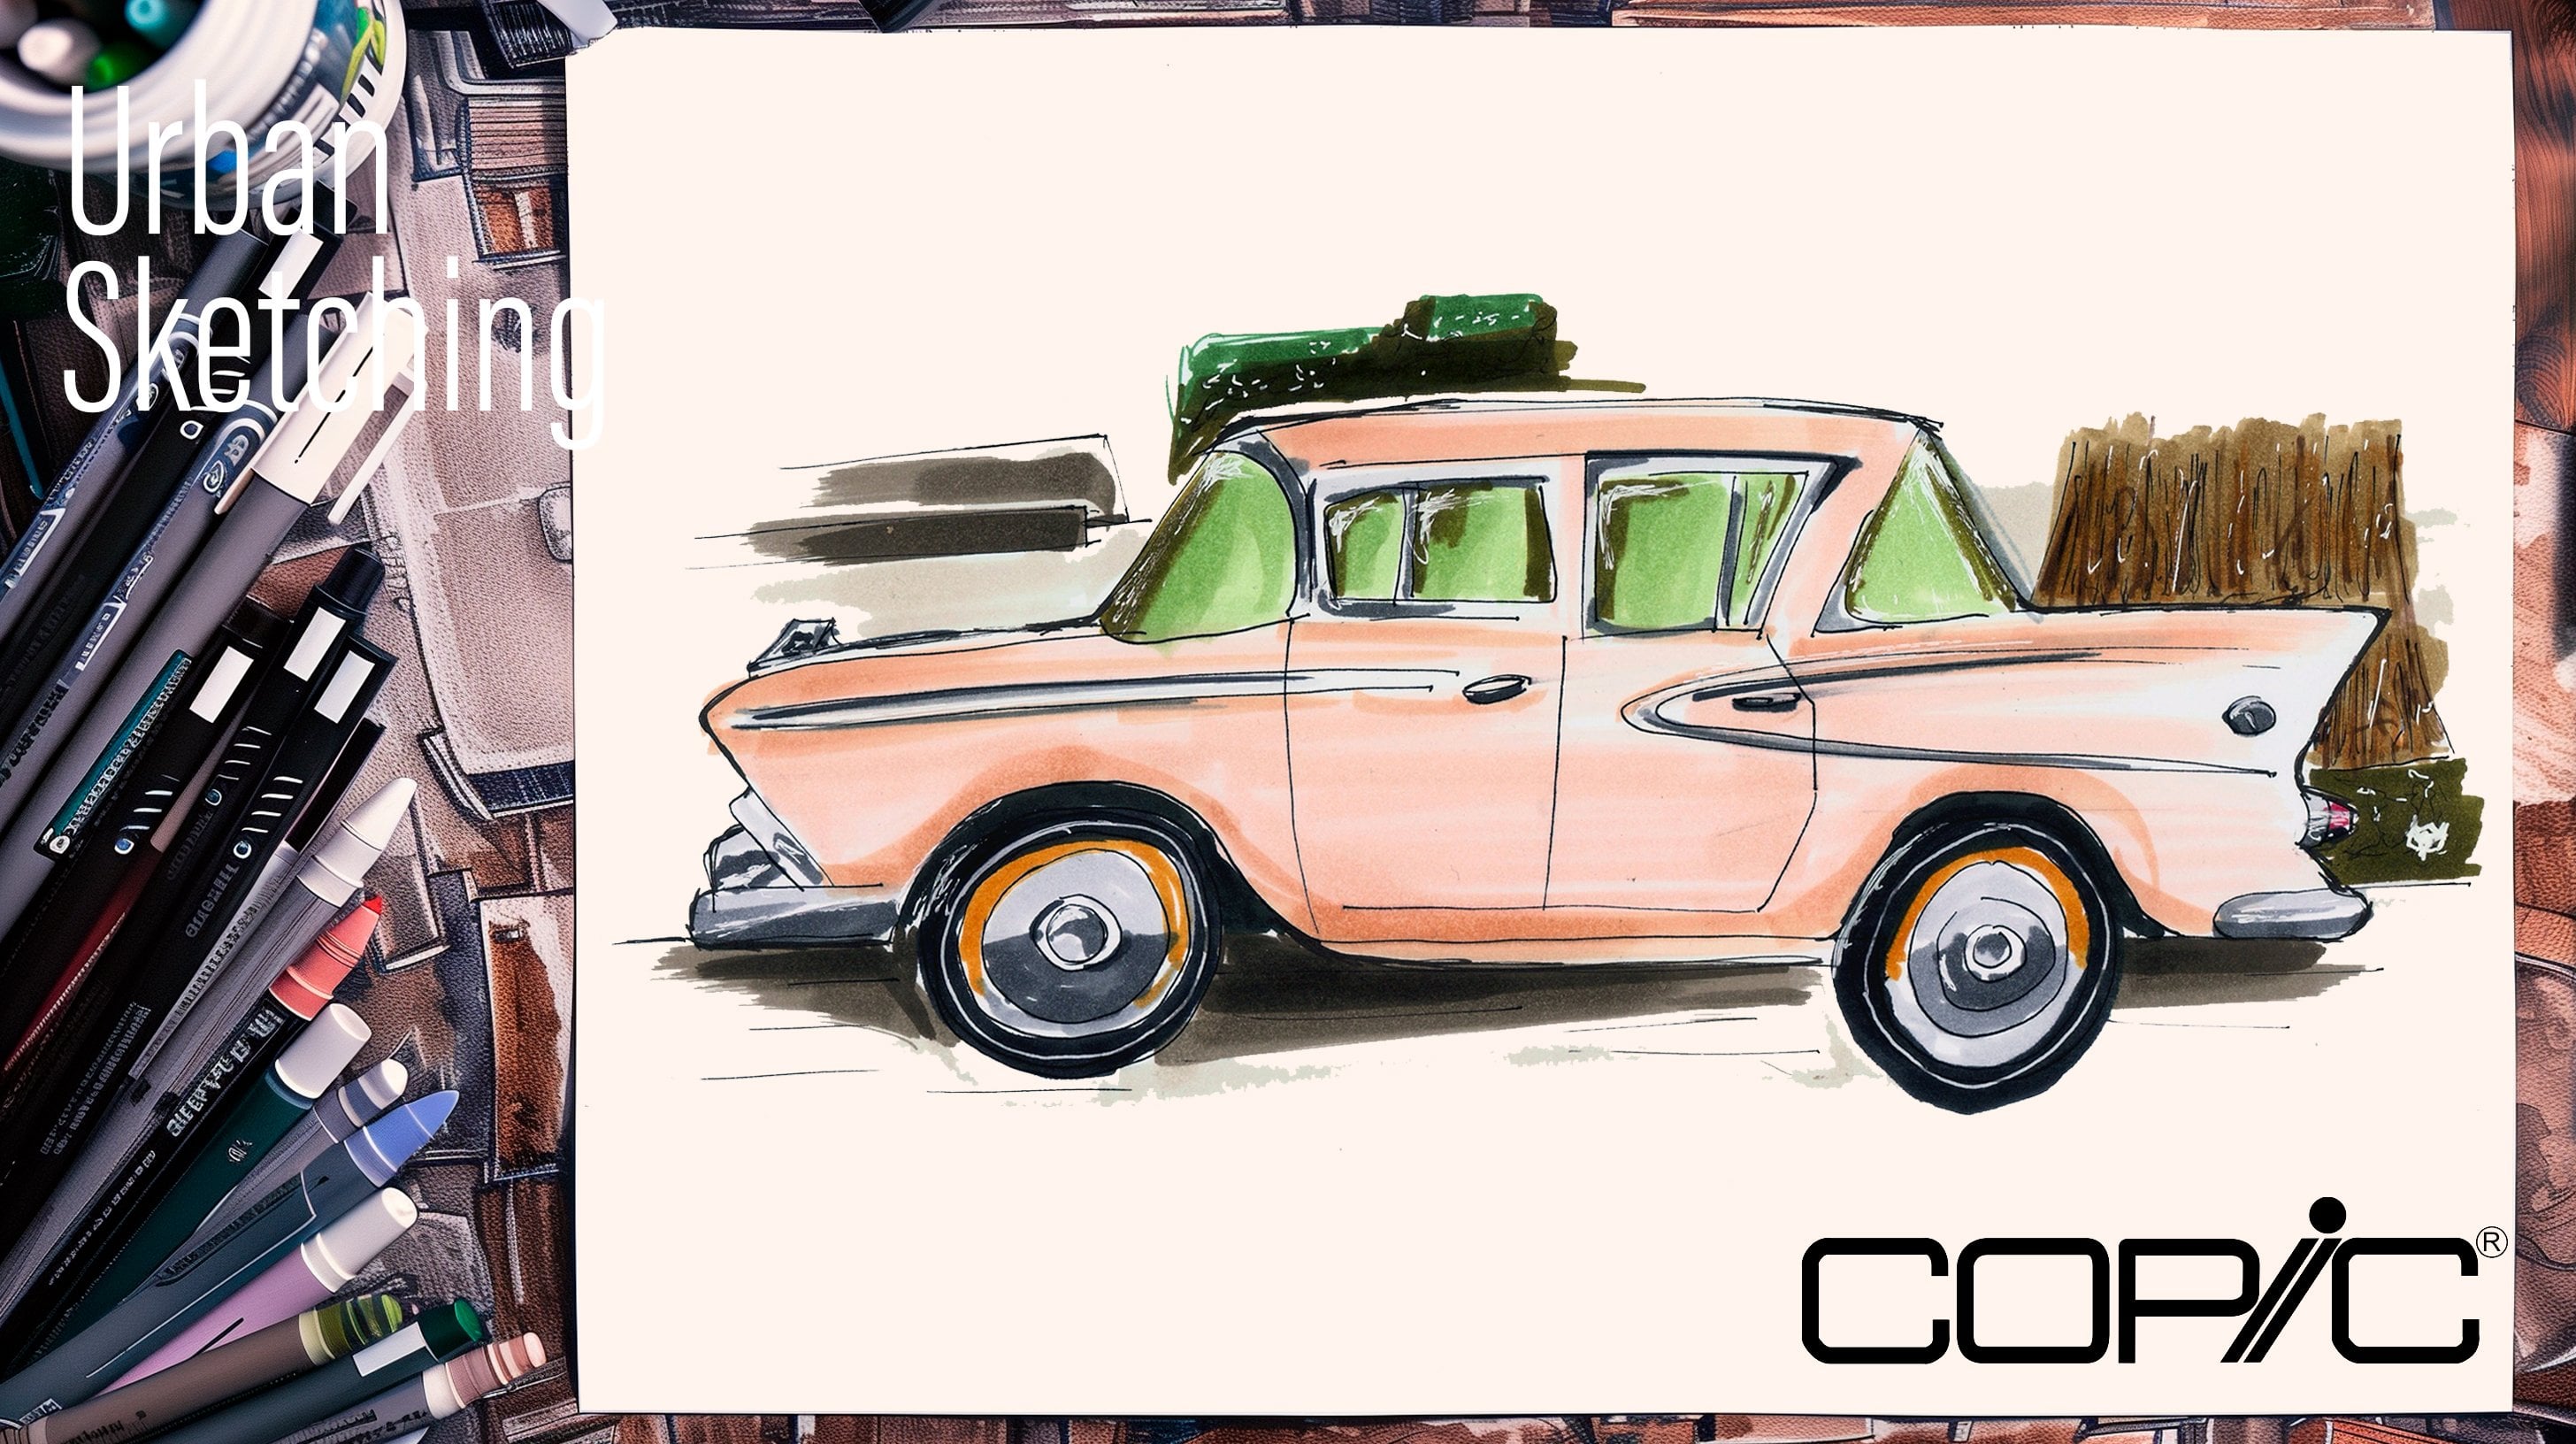
your scenes to life. In this project,
we'll be sketching a vintage van in front of
a house with a large tree. To follow along,
you'll only need a few marker pens in your
preferred colored tones, several fine liners,
marker paper, blue painters tape,
and if you have one, a fountain pen can
be quite useful too. I'm really excited that you've decided to join this class, so let's get started with our
project in the next lesson.
2. Laying the groundwork with a rough sketch: Welcome to the first lesson
of first sketching project. Before working on our definitive
drawing, in this lesson, we'll prepare our paper with
some blue tape and create a quick pencil sketch
that will help guide us as we move
forward with a project. To start, place your
paper on a flat, even surface and
secure the edges with blue tape to prevent it
from moving while drawing. Next, draw some quick reference
guides with your pencil. While these lines may be faint and hard to
see in the video, they will be very useful later
as we refine our sketch. For this sketch, I decided
to frame it as a square by placing tape along the full length and
width of the paper. Framing the drawing gives it a more visual weight
within a defined space. Feel free to explore your
preferred orientation. Square like mine,
horizontal or vertical, and use blue tape
to help guide it. Once the tape is in place, we can complete our
initial sketch. In the next lesson, we'll add line weight to all the
elements of the drawing.
3. Adding line weight to the elements: Welcome back. Let's begin working on our
definitive sketch. Once we're happy with the
initial pencil sketch, we can start adding language
to the entire scene. In my case, I'm using a fountain pen filled
with black ink, as it is my preferred
sketching tool. Other alternatives
include fine liners, calligraphy pens,
and rollerball pens. I don't recommend using ballpoint pens for
this type of project, as their ink tends to be
thick and you need to apply considerable pressure to get consistent lines which
can damage the paper. Suggestion is to use either a phantom pen or
these possible fine liners, which we'll also be using
later in the class. To start, I like to work
on the central elements, which in this case, is the van. Begin by drawing the
entire silhouette, then move on to the
windows and details, finishing with the rims
and tires as shown in the video. Oh. Next, we can draw the
elements closest to the van, such as the fence, sidewalk,
and street details. Now it's time to work on the
house in the background. In this lesson, we'll focus
on the broad elements first, such as the wooden panels
and that make up the walls, the windows, and the roofs. I'll also include
smaller details like a chimney and some
bushes around the house. To add more drama to the scene, I'll sketch a large tree on
the right side of the house. I won't add all the foliage yet, just a few irregular strokes
to define the area of the tree before moving on to
additional house elements. Once we're happy
with the sketch, we can move on to color in the van in the next
lesson. See you there.
4. Applying color to the van: Now that we finish adding all the line weight
to our scene, we can start adding
color to the van. For this step, we'll use only a few marker
pens to maintain a strong contrast between the color subject and the
black and white background. For this project, I'll be using a few orange tones and
gray scale markers, but you can experiment with
any color palette you prefer. To begin, color the
lighter sections of the van using
your latest marker. In my case, I want the van
to have a bright section at the center with sub reflections on the front and rear areas. Then you say slightly
darker tone, such as a deep orange to shade the darker
parts of the band. Next, colour the rims and tires using gray and black
markers respectively. After that, add shadows and
a few additional details on the upper section
of the van using graton markers to enhance depth. If you notice that some
line weight details have faded during the
coloring process, you can always reinforce
them with your front and n. In the next lesson, we'll
fill in the background with rich details using
our fine letters. A
5. Filling the street and fence with black ink: Welcome back. With our
van fully colored, we can now move on
to the background of the scene and begin
saturating it with black ink. I recommend starting
with the areas closest to the colored element. This approach allows
you to better gauge how much saturation feels
right for your project. In my case, I'll begin with
the elements on the left, alternating between thin and thick fine liners along the way. For heavier line
weight sections, I'll use 0.5 millimeters
fine liners, while shadows and sold
details will be drawn using 0.1 and 0.05 millimeter
fine liners. I'll also use my fountain pen to reinforce thicker elements, which helps conserve ink
from the fine liners. In the next lesson,
we'll continue building osaturation and
details on the house.
6. Filling the house with black ink: In this lesson, we're
going to saturate the entire house using
our fine liners. Since we've already added thicker strokes for the main line weight and key elements, most of the lines
we'll be working on this lesson will be done
with a thinner fine liner. I like using a 0.05 millimeter one as it
allows me to draw more freely without worrying
about or saturating tight areas such as the
wooden sections of the walls. Alongside the fine liners, I'll continue using my fountain
pen to add shadows and reinforce any line weight that may have faded
during the process. I'll also use it for areas
that are completely black, like the main door to save
ink from the fine liners. Oh Before continuing
with the house, I'll finish adding details
of the street and sidewalk. In the next lesson, we'll focus on saturating the tree
in the background.
7. Filling the tree with black ink: Now it's time to
saturate a large tree. For this step, I won't be
using fine liners as they tend to run out of ink quickly
when covering large areas. Instead, I'll use
my fountain pen, which is refillable
with a converter, making it easy to top up
the ink whenever needed. I recommend doing
the same if you have any large sections that
need to be filled with ink. To begin, make loose wavy strokes throughout
the tree area, starting from the center and
gradually moving outward. Continue adding ink until the tree feels
visually balanced, dark enough to stand out, but with enough
white spaces left to suggest light filtering
through the leaves. Once finished, I'll go back and reinforce any areas
that may have lost line weight and add
a few soft shadows using a light green
marker for extra depth.
8. Removing the tape from the artwork: Welcome back. In this lesson, we're going to remove the
tape from our sketch. It's important to do this
slowly and carefully. Even though we've been using blue painter's tape designed
to be safe or paper, there's always a small risk of tearing the surface
when removing it. So take your time and
gently peel off the tape, making sure not to
pull too quickly. Once all the tape
has been removed, your project is complete. In the next and final
lesson of this class, we'll go over the
final project. H.
9. Final project: Welcome to the final
lesson of this class. Now that you've
learned how to sketch contrasting scenes using
fine liners and marker pens, it's time to work on
your final project. For this project,
choose a picture you'd like to sketch
and transform it into a high contrast scene
using just a few colors and plenty of black ink just as you practice
throughout this class. Once you're done, don't
forget to post a photo of your work in the project section so other students
can see it as well. Thank you so much for
taking this class, and I hope to see you
in another one soon. Have a great day and good
luck with your final project.
 David Gonzalez, Industrial Designer