Transcripts
1. Introduction: As a guitar teacher, I've come across many students that are grappling with the connection between chords and
key signatures. It's a common puzzle that often leaves guitars
scratching their heads, requiring some knowledge of music theory and confidence
in fretboard navigation. I'm Lance Houston, a
musician and producer, and I'm here to demystify this crucial aspect
of guitar playing. Mastering the ability
to navigate within a key is a pivotal milestone
for any guitarist, especially those
who are stuck in the beginner to
intermediate phase. By unlocking this skill, you'll gain invaluable tools to exploring the
entire frame board, transforming you into a more versatile and
proficient musician. In this class, you'll explore the most
common key signatures, mapping out each chord and its relationship within the key. Through this
approach, you'll gain a new found understanding
of the guitar neck. Along the way, we'll dive into some basic music
theory concepts, including the circle
of fifths and its role in navigating
through key signatures. This class is
designed to meet you at your skill level
and take you further. By the end of it,
you'll have gained a valuable skill that will change the way that
you see the guitar. So grab your guitar,
and let's get started.
2. Class Orientation: Today, you're going to
learn how to play chords within the most common key
signatures on the guitar. By the end of this class, you'll have a fresh
perspective on how to use chords that will serve as a
foundation to your playing. In my project, I'll be demonstrating how
to play every chord within several keys in
ascending and descending order. All you need is a
guitar to get started. Here's what I'll be looking
for in your class project. Playing through the chords
within a key seamlessly, using a metronome to keep time and incorporating
different rhythms. You can submit your
project by recording yourself on your phone or
another recording device. Next, we'll look at the
basics of key signatures, the circle of fifths, and the theory behind them.
3. Foundation What are Key Signatures: Before we get into how to play through key
signatures on the guitar. Let's build a foundation of understanding by covering
some basics of music theory. So what are key signatures? A key signature in
its simplest sense is a way of grouping different
sets of notes together. From these groups of notes, you can build scales and chords. In order to best
understand this concept, I think it'll be helpful to
move over to the keyboard. First, some basics. There are 12 different notes. This is known as a
chromatic scale. Here, we're looking at all
the notes from C to C, going from a low C to a high C. This is called an octave. The nodes in between consist of both black and white keys. The white keys of the
piano are A, B, C, D, E, F, and G. The black keys
are the notes in between. You might know them
as sharps or flats. When a note is sharp, the pitch moves up or to
the right by one key. The black key to the right
of C becomes C sharp. When a note is flat, the pitch moves down into the
left by one key. C sharp could also be
looked at as D flat. One way you can
refer to moving from note to note is in
terms of steps. When moving through
the chromatic scale, we're moving in what's
called a half step. For example, C to C
sharp is a half step. Now, let's say we
moved from C to D. This would be
called a whole step. It's also important to
note that there are no sharps or flats
between the nodes E and F and B and C. Now, I want to look at
the major scale. Let's see how a major scale
is built in terms of steps. Major scales follow
this pattern. Hole, whole half, whole
whole whole half. Starting at C, let's
follow this pattern and take a whole
step to D. Next, another whole step to E.
Then a half step to F, a whole step to G, another whole step to A, another whole step to B. Finally, a half step to reach an octave above
where we started. C. By using this pattern
and outlining the scale. What you've done is identify the notes that are
within the key of C. The key of C is unique because it has no
sharps or flats. By knowing that this key does
not have sharps or flats, you can quickly build cords off of each
node of the scale. There's a lot more that can be discussed about how each of these cords are built and
their function within a key. But for now, I want to keep it simple and just look
at it visually. I'm going to demonstrate by playing each of the
cords within the key of C and notice how I'm only
playing the white keys. By learning the patterns that
we see within the key of C, we can take this knowledge and
apply it to any other key. To explain further, let's
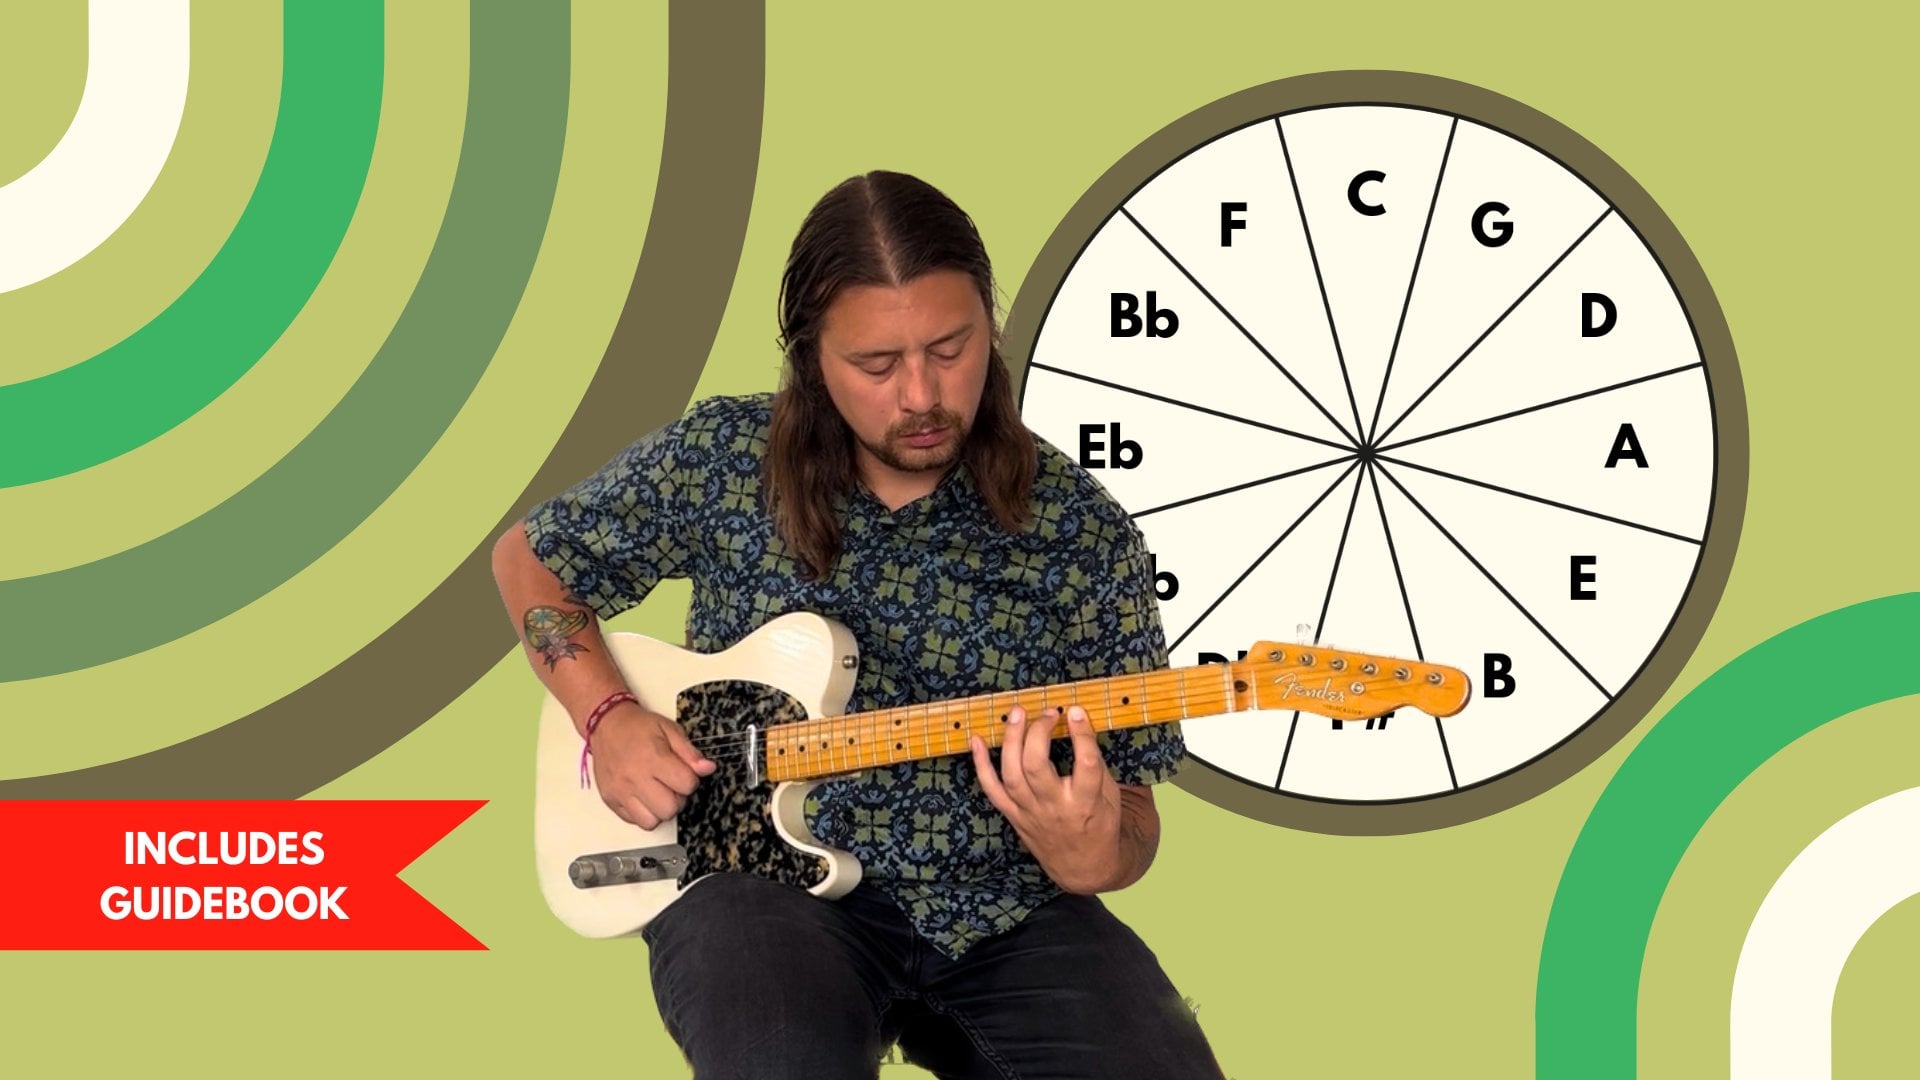
discuss the circle of fifths. We'll start by
looking at C again. Here, C is representing the
key of C. Or in other words, the groups of notes
that build the C scale. The key of C is our
starting point because it does not have any
sharps or flats. Now, let's fill in the rest of the circle by traveling
an interval of a fifth. We're going to start by going clockwise and fill in the
next part of the circle, going from C and moving
up a fifth to G. Every time that we move a fifth and arrive at a different
section of the circle, we're going to add one
sharp to that key. In the case of the key of G, that key only has one sharp, which is the no F sharp. Now, I'm going to explain
why that is the case. Looking at the key
of g, let's follow the whole whole half whole
whole whole half pattern. Again, this time, we're going to start on the node
G. Starting from G, let's go a whole step to A. Next, another whole step to B, a half step to C, a whole step to D, a whole step to E, another
whole step to F sharp, and finally a half step to G, and octave above
where we started. In the key of G, you've now established that every
time you play the Noe F, it is played as F sharp. Let's see how that's
going to change how the cords within
the key of G are built. You'll notice that every time a chord
contains the node F, it'll be played as an F sharp. When playing through these
chords in succession, you're not only following
the scale pattern, but you're following a
pattern of chord tonality. Let's take a look at what
that pattern looks like. The pattern is that the
one major, the two minor. The three chord is
minor, four is major, five is major, six is minor, and the seven is a
diminished chord. Let's take a quick look at these chords in the key
of g on the keyboard. Starting with the one chord, we have G major, the
two chord is a minor. The three chord is B minor. The four is C major. The five is D major. The six chord is E minor, and the seven chord is
F sharp diminished. As discussed before, both
the scale pattern and the chord tonality can be applied to any key in
the circle of fifths. Let's go back to the
circle of fifths and start filling in
the rest of the circle. The pattern continues by jumping an interval of a fifth
to the key of d, which has two sharps. So the F sharp from the
key of g will carry over, but then we're going to
add another sharp here, which is C sharp. Jumping another fifth
to the key of A, which has three sharps. Next, we'll move
to the key of E, which has four sharps, move another fifth, and you'll
arrive at the key of B, which contains five sharps. Now we've reached the
bottom of the circle, which will be F sharp. The key of F sharp
has six sharp notes. Let's stop there for now and take a look at what happens when we travel counterclockwise
through the circle of fifths. When traveling in reverse, the circle of fifths moves
in intervals of a arth. We'll start back at C and move counterclockwise
by a quarter. Moving from C to F,
G in this direction, we will add a flat to the key. The key of B flat has two flats. E flat has three
flats, et cetera. At the bottom of the circle, the flat keys meet the
sharp keys at F sharp, or G flat, depending on how
you want to look at it. Now that you have an
understanding of what key signatures are and how to travel through the
circle of fifths, let's explore how this
all translates to guitar, starting with a key of C.
4. Key of C: In this lesson, you're
going to learn how to play through each chord of the
key of C on the guitar. For this key, I'm going to
use primarily open cords. To start off, let's revisit how these cords are laid
out on the keyboard. Remember, the key of C
has no sharps or flats. Now, let's translate
this to guitar. Starting with the
one chord, C major. In this case, I'm going to use the open chord version of C. The two chord is D minor. Here is D minor played
as an open chord. Moving on to the three E minor. Once again played
as an open chord. The four chord is F major. Here, I'm breaking away
from the open chord shapes and playing F as a bar
chord on the first fret. The five is G. And I'll be switching back
to the open chord shape. A. Next is the six
chord, A minor. Play it as an open chord. The seven chord is B diminished. If you want to stick
with triads or three note cords that fall
neatly within the key, then you'd play this
chord like this. But I do want to show you some other options for the
diminished chord, and you'll see a
couple variations of it throughout this class. Here, I'll play this chord
as a four note chord, using a shape that's
a bit easier to play. B half diminished. We'll complete this pattern
by returning back to C with the cord shape
that we started with. Now that you've taken a look
at each cord individually, let's take a look at how to
each of the cords within the key of C in both ascending
and descending order. M. M. M. M. M M. Once you get comfortable
with all these transitions, trying some different rhythms. Congrats on gettingthroug
the key of C. Next, we're going to take
the same set of ors, but approach them in a
different way by looking at the relative minor
of the key of C, A g.
5. Key of A minor: Uh In this lesson, we're going to explore
the relative minor of the key of C. The
relative minor of any major key can be found by looking at the sixth
note of the major scale. Counting up to the sixth degree of C major, you'll land on A. Here we can build
the chords again, but starting with the six chord, which is now our one chord
from a minor perspective. The one chord will
now become A minor. The two chord is B
diminished, then C major, then D minor, E minor, then F major, after
that is G major. H Remember, all these chords are
the same exact chords of the key of C. We're just playing them in
a different order to emphasize the minor tonality. Now, let's take a look at how to play these chords on the guitar. But this time we're
going to take a different approach and move these chord
shapes up the neck. I like looking at a minor with this perspective
traveling up the neck because
it's a lot easier to see what's happening with
each chord transition, which isn't always the
case on the guitar. Here we'll start with an open
chord version of A minor. Next is the B diminished chord. Like I did in the last lesson, I'm going to play this using the half diminished chord shape. After, we'll move to C Major. Here played as a bar chord. Next is D minor. You'll change the bar cord shape and move up the neck to frets. After is E minor played with the same
minor bar cord shape, but up two frets. Next is F major. Here we're only going to move up one fret and change back
to the major baror shape. After that is G major, where you'll keep the
major bar chord shape and move up two frets. Finally, you'll finish
an octave above with a minor bard
at the 12th fret. Try playing these chords
in both ascending and descending order and experimenting with
different rhythms. M. M. M. Oh. Grass, I'm getting
through a minor. This is going to be
the only minor key that I'm going to
cover in this class. But remember, the method
that I used to find the relative minor can be
applied to any major key. Next, we're going to
start going around the circle of fifths and
through the key of G. O
6. Key of G: The key of G is the first sharp key that
will cover in this class. This key has one sharp, which is the no F sharp. Now, I'm going to play through each quarter the key
of G on the keyboard. Now, let's take this
knowledge and take a look at the key
of G on the guitar. The one chord is G major. Here, I'm going to
play this as an open. The two chord is A minor. Once again, I'm going to use the open version of this chord. The three chord is B minor. Here play a bar chord
shape at the second fret. The four chord is C major. Here, I'm going to return back to using an open chord shape. The five chord is D major. Here I'm playing this as
an open chord as well. The six or the relative
minor of G is E minor. Here again, I'm
using an open chord. The seven chord is
F sharp diminished. For this chord, I'll play it as a triad barred at
the second fret. You'll finish up by returning
to our G major chord, exactly where we started using
the same open chord shape. Experiment with
playing these chords in ascending and
descending order, as well as integrating different rhythms
and staying in time. Congrats on getting through
the key of G. Next, we're going to take a look
at the key of D major.
7. Key of D: The key of D is the
second sharp key that you'll cover in this class. The key of D has two sharps, F sharp and C sharp. Now, I'm going to play
through each chord of the key of D on the keyboard. Let's take a look at how
this translates to guitar. The one chord is D major. I'm going to start this key
by playing a bar chord on the fifth with the root
played on the A string. The two chord is E minor. Let's move up the neck two frets and play this bard
at the seventh fret. The three or is F sharp minor. Here you'll keep the same shape, but bar this or at
the ninth fret. The four chord is G major. I'm going to play this
bard at the tenth front. The five or is a major. Here, I'm moving back to the fifth position and
playing a bar chord. But this time the root will
be on the low E string. The six chord is B minor. Let's move up the neck and play this bar chord at
the seventh fret. The seven is C sharp diminished. P on the ninth. You'll finish up with
the D major chord. But this time, we're
playing this at the tenth fret with the
root on the low E string. Explore playing these
chords both ascending and descending and try incorporating different rhythms
while staying in time. Mm. Great job on getting through D Major. Next, we'll continue through the circle of fifths
to the key of A.
8. Key of A: The key of A is the
third sharp key that you'll learn in this class. This key has three sharps, F sharp, C sharp, and G sharp. Now, I'm going to play through each quarter of the key
of A on the keyboard. H Now let's take a look at
this key on the guitar. Here, I'm going to play
the key of a major in a similar way that I
did the key of A minor, but be on the lookout for
some important differences. The one chord is a major. We'll start with this
played in an open position. The two chord is B minor. Here, I'll play this as a bar
chord on the second fret. The three chord
is C sharp minor. You'll move up two frets and play this bard at
the fourth fret. The chord is D major. You'll move up one bard
at the fifth position. The five chord is E major. Here you'll move up
another two threats and play this bard at
the seventh threat. The six or is F sharp minor. I'll play this as a bar
chord on the ninth fret. The seven chord is
G sharp diminished. Here, I'm going to play
a half diminished chord with the root of the chord
played on the 11th threat. Finish up with the A major chord up and octave from where we
started at the 12th fret. Now, try playing
through the key of A in both ascending and
descending order. Nice work on getting
through the key of A. Next is the last sharp key I'll be covering in this class, the key of E. O
9. Key of E: The key of E is the fourth sharp key that
you'll cover in this class. This key contains four
sharp notes F sharp, C sharp, G sharp, and D sharp. Now I'm going to play through each chord of the key
of E on the keyboard. Oh. Uh Now, let's move over
to the guitar and see how the key of E translates. The one chord is E major. Here, I'm going to play
this as an open chord. The two chord is F s. I'm going to move this up to the second and play this
as a bar chord. The three chord
is G sharp minor, which I'll play at the fourth threat using
a bar chord shape. The four or is A, which I'll play as an open or. The five chord is B major. Here I'm playing B as a bar
chord on the second fret. The six chord is C sharp minor. I'll play this as a bar
chord on the fourth ft. The seven chord is
D sharp diminished. For this, I'm going to play
a fully diminished chord. You'll finish up with
an E major chord. But this time, I'll play it as a bar chord on the seventh. Try playing through the key of and ascending and
descending order. Congrats on getting
through the key of V and all the sharp keys that I'll be covering
in this class. Next, you'll play through the only flat key that I'll be touching
upon in this class, the key of F major. O
10. Key of F: The key of F is
the only flat key that I'll be covering
in in this class. This is because guitar music
typically favors sharp keys. There is an exception, and
that is with jazz music. The key of F has only
one flat note, B flat. Now, I'm going to play through each chord of the key
of F on the keyboard. Now, let's translate
this on guitar. The one chord is F major. Here, I'm playing F as a
bar chord on the first. The two chord is G minor. I'm going to play
this as a bar chord. Moved up to the third fret. The three chord is A minor. Here, I'll play
this as an open or. The four chord is B flat major. Here, I'm playing this as a
bar chord on the first front. The five chord is C major. I'm keeping the same
bar chord shape, but moving it up
to the third fret. The six or is D minor. I'll play this using a
bar cord at the fifth. The seven chord is E diminished. I'm going to play a
fully diminished chord with the root on
the seventh fret. And finally, we're up in
octave at the F major. This time, I'll play it as a bar chord on the eighth fret. Once again, try
playing these chords in ascending and
descending order. M. M. Great job on getting
through F Major and the final key that I'll
be covering in this class. Next, I'll play through all the key signatures
you've covered in this class in my class project.
11. Class Project: Now you've reached the point
where I will demonstrate playing guitar through the
keys covered in this class. I'll play through part
of the circle of fifths, starting with the key of f, then moving to the
key of C, then G, then D, A and finishing
with the key of E. O M O. O Oh.
12. Conclusion: Congratulations on making it
to the end of this class. I hope you're coming away
with a deeper understanding of how to navigate through
key signatures on the guitar. Post your final project
in the project gallery and any questions you might have in the discussion section. Remember, practice
makes perfect, so keep honing in those skills, and I hope to see you in some of my classes in the future.
I'll see you next time.
 Lancelot Hueston, Musician - Producer