Transcripts
1. Welcome: [MUSIC] Today, we're going
to take a look at something that is stepping outside of my own comfort zone. Sometimes when you're in your art room and
you're creating things, you get into a rut
and you're like, okay, what can I do to get
out of this rut or be more creative or go in a
different direction or discover some new things? For me that is trying things
that I normally wouldn't do. They're a little bit
outside my wheelhouse. Maybe there's something I'm
not naturally drawn to. But I feel like stepping
outside your comfort zone helps you grow and learn
and pick up new skills, and hopefully, surprise you with something that you weren't even expecting. I'm Denise Love
and I'm an artist and photographer out
of Atlanta, Georgia. Today's class is
all about grunge. I don't do a lot of grunge and I don't usually like ugly art. A lot of times when you go to art school and you see things
that people are creating, [LAUGHTER] ugly seems to be what gets famous and what people buy and what people
look forward. It's like the uglier it can get, the more outrageous and the more shocking than the better
that piece of art is. But I've never really
bought into that. [LAUGHTER] I like my
art to be pretty. I like the things
that are hanging in my walls in my
house to be pretty. Let me say too, that
what you were meant to create may not be the same
thing as what you collect. That was like an aha moment when I heard somebody say that, because the things that
I collect and the things that end up making
it in my art room don't look all the same, and I'm like, why
can I not create these beautiful things
I'm trying to collect? [LAUGHTER] But whatever
is inside you, the movement of that day just
may not be that direction. But today I'm trying to step
outside my comfort zone and do something that I just
might not normally do because I feel like in that you'll
learn some new skills. You go a direction that
you didn't even expect. You may end up surprised and go, oh, I really loved this
and I didn't even know it. We're going to create some
grunge collage today. I've got several different
projects and things lined up for you that
hopefully you're going to love and you're going
to be like, oh, okay. Once we do this and you
get these, you're like, I'm pleasantly surprised
and I love them too. [LAUGHTER] I've got lots
of fun stuff in store. Hope you're really
going to enjoy stepping outside
your comfort zone, and if this is your comfort
zone and fantastic, this is the class for you. [LAUGHTER] I can't wait to
see what you're creating, so definitely come back
and share those with me. I'm super excited to have you. Let's get started. [MUSIC]
2. Class Project: [MUSIC] Your class project today is to come back and show me one of your grunge projects, whether it be one
that you've cut up and mounted on other
pieces of paper, or something that you've framed, or something that you have
done on cradle board, or a piece of Canvas. Whatever it is that you
decided to do grungy today, I want to see what you've done, so definitely come back
and share those with us, and I will see you in class. [MUSIC]
3. Supplies & Collage Elements: In this video, let's
take a look at different supply options that we can consider
with our collages. I thought it would
be really fun in this one to use some
of my stencils. I've gone through
must stencil stash, don't ask me where
all these came from, I have had them for
years and years. But go out looking for
stencils or go through your stencil stash and pull
out some that you find fun. One of my favorite stencils though isn't really a stencil. This is called punchinella and it's the stuff that they punch sequence out of and you can
get punchinella online. A lot of different places
but I think I might have got this off Amazon and it was a pack of a bunch
of punchinella, but it's my favorite. This is a fantastic thing to use a stencil and it makes
a little dot pattern on your piece and I
think that would be particularly good in
a grunge project, definitely going to be used
in some punchinella today. Then I just randomly pulled out different
stencils that I have collected over the years that I thought would
be particularly fun, like look at this one
with the numbers on it. Numbers and letters remind
me of like a graffiti look and how good would that be in some type of grunge piece. I'm definitely wanting
to use the numbers. I'm going to set that over
there with my punchinella. If you're wanting to do like pretty graffiti
grunge kind of stuff, you might throw in
some pretty shapes. Most of my art is
all about talking about pretty things, letters. But for the grunge project, I'm thinking more like graffiti on the side
of a train car. That's the feel that I'm
thinking for our grunge project. Take a look at this wonderful
little different squares. I'm thinking that's
definitely going to go in my yes pile. This one looks like different
spills, got some numbers. This little clock part
one's, super fun. I've just collected over
the years random stencils. Some of these go all the
way back to like, oh, this one's fun, I'm
going to put that in my yes pile, just
random circles. Some of these go all the way
back to scrap-booking stuff, but look around and just find, look at that one, that one's a good one, kind
of grungy looking. Alright, so I've gone
through my stencils, I have said, these are my favorite ones and I'm just going to go for it. I have no idea where
these came from. So look around at some grungy looking stencils that you think you might enjoy. I've also through the years collected tissue paper and this would be more along
the pretty grunge look, but it was in the color
ways that I'm thinking, because when I'm thinking
graffiti and grunge, I'm feeling like it's going
to be more monotones in my pieces and we're going to do some fun big black swashes, maybe some raw umber and
white and I'm not thinking tons of color like I am with the pretty collage
pieces that I do. But you might look around
at the craft store or online for decorative pretty
tissue papers because that could be an element that we
pull in if it's got something very interesting that
we like and then we could have a little bit
of pretty grunge in there. I think I got these
at Hobby Lobby, which is a craft store near me. But these are some Tim Holtz
idea-ology collage papers. You can probably find
some good ones online. I've had these for
several years. I don't know if they'll
still be available. This one I've actually
never even opened. Sometimes I buy stuff with good intentions
and then I never get to it. But let's just take a look. We pull this out. What this actually looks like, where is this connected to? It must be stuck, wait there. This has a little
bit of color in it and apparently we're just going to tear the
bottom, here we go. It has a little bit of color, but it also has some very
interesting old paper look. If you don't have old papers, but you can find something like this collage paper that
has old writing in it. You could make something like that work like you could take
that whole section right there and that would be a particularly pretty
collage element that these music things would be something really
good in there. The tissue papers are fantastic. You can use tissue paper
in your collages if you have random tissue
paper that you like. This is another
one that came from Tim Holtz that I
have in my stash. It's a little bit bigger
tissue paper piece, but it's the right
colors and it looks like great big old paper. Look around for some of these
items or something similar, I'm sure that this Tim
Holtz idea-ology stuff comes out with new
things every year, so they may have something
newer and greater and better. than one I got. Some of these items, I just went around
looking in my stash. I'm trying to give you some ideas of things
that you might look for at the store if you don't
have a stash of old papers, and I'm actually personally
going to use old papers, but these are just
some ideas for you. This is that same Tim
Holtz thing and it's got pretty scrapbook papers in it that look particularly
pretty and grungy, so another option, if you
don't want to tear up an old book or someone's
scrapbook papers. I am going to be
using old papers and old books and pages
that I've painted on, so we may take a
few old book pages and just create ourselves
some collage paper. I pulled a couple
of old cyanotypes out because it was
neutrally in color, but I don't think I'll use them. I've also, in the past found at the antique store some people that put
together collage packs, and I've seen these on
Etsy and stuff too. So you might look on Etsy near you for a pack of old
collage papers that people have pulled together
a collage fodder because a lot of people will pull together random fun papers that
they've gathered. Old newspaper. This just looks like
it's tea stained, but I like all of the grunge on it and so you might just look around at something like
that where somebody has pulled together a
paper pack for you. That's fun because
then you look in and it's like a happy surprise. I really like saving book. I got old book pages,
old books torn up. I like saving the front
and the backs of books they are particularly
wonderful to collage on. So we could collage on, that could be our
surface of collage. So if you get an old book at the thrift store and
you take the front, back off and then you use all the book pages
in your collage, save the front and back. Those could be collage surfaces. I just have lots of old, old papers and old letters
and some of these, if they're really
beautiful and nice, I will save those as photography
props if I've gotten, because I've got a lot of
old fancy French letters that are a couple
of 100 years old. If I've got something like that, I'm really hesitant
to tear it up, so I will actually scan it into my computer
and maybe print it out on a piece of paper and
that way I can still use it, but I'm not tearing
up the original. Then I'll use the original
in my photography setups. Here's another really
pretty piece of tissue paper that I
don't have a lot of, but it is really pretty. Look for stuff like this. That would be a wonderful piece in a collage. I'm loving that. This is what I'm
going to be using in class today collagewise. I want old paper. We're going to take some
of these old papers and make some of our
own collage stuff with some of our stencils maybe and see what
we can come up with. We want to look around and find old papers and then paint-wise, I'm going to stick to
using some acrylic paints. You can use heavy-bodied,
medium-bodied. I've got the high flow here. These are the fluid
and the high flow. I thought when I'm
thinking Grunge I'm thinking the sides of trains
and things like that. Some of those are very colorful, but I'm thinking black, white, and some type of
maybe neutrally color like the raw umber so I've
pulled out black raw umber. Then sometimes you think of maybe there's a crazy
color thrown in there, just a little touch
of it here and there as some graffiti. I've got a couple of
wild colors out here, like green-gold,
and bright orange. You might even
consider a neon pink. I have a neon pink over here, that could be one
that I consider. That can be super fun. I've also got really
bright turquoise, so that could be a fun element. But what I'm going
to be doing is maybe the most of my collage, will be in the black or the brown and then these would
just be a little hint, a little surprise pop of color. I'm going to set these back here behind us and keep
those in mind. Can pick whatever
color, grabs you. But I'm thinking for the
majority of our pieces I want them to be in these
black-brown color tones. I've also collage on lots
of different surfaces. I have a couple of
different surfaces here that I'll be
collaging on possibly today and most of those
start on a paper. You can use mixed media paper, watercolor paper anything really that you want to collage on. You could collage on
the back of books, you could collage on
old piece of art, really the options
are endless here, but I'm going to be using watercolor paper because
it's what I've got. You could also collage on
cradled board or wood panels. I like the cradle board
because they easily could paint the sides and
they're basically ready to hang up
as a piece of art. I generally like the ones
that have really deep edges. Instead of just the
three-quarter inch, the inch and a half,
or the two-inch, I really loved the deep edges. I don't have any
in my art closet to use in class currently. But here's one that I have hanging on the wall behind
us just to show you how beautiful the
very deep edges are on a real two-inch one. If you're going to really
be doing collages that you want to hang up and you
can get the deeper side, I think they look so rich and I would encourage
you to get those. Then you could also
collage on Canvas. We can collage on any surface that you
could imagine basically, but these are the
most common ones. Anything you've got in
your little art closet or if you're just
wanting to experiment, start with the paper. I love doing things on paper and then cutting
it out and putting my piece on a board so
I'm not constrained to the box that this is. I find that working within these constraints
are frustrating. If you get your pieces set
wrong and then you're like, Oh, I got to throw this away, it's not right, I don't love it. Whereas if I do a bare piece and cut out the
part of that piece, that's perfect, I love that. I cut my art up a lot. That really gives me a lot of joy and it's
the way that I create. I encourage you if
you find working within the constraints of
whatever your surface is, work on a bigger surface and then cut the part
of that out that you like to glue down
to a finished surface. Just some little random
thoughts there on that. Our glues today, I personally am going to be using the Yes Paste. It's my very favorite,
it's acid-free. It's nice and thick. I don't know what it
really feels like, but it's wonderful stuff and it really has
some good grip. For these heavier papers, especially they're
going to get glued down and be easy to work with. But I will say when
you're working on something lighter
like a tissue paper, the Yes Paste is almost
too heavy and you might consider some
lighter weight glues for the super-thin papers. For those, I use gel medium. You could use Mod Podge. If you use the Mod Podge, I would get the matte Mod Podge, not the glossy Mod Podge. I like this because it's a
nice medium thickness glue, like an Elmer's glue, maybe a little thicker. This gel medium is the
thicker gel medium, not the really thin gel medium. You could use on tissue papers, the really thin gel
medium and I do have some here in my art room somewhere. Might be right here. Oh yeah, here we
go. The Liquitex, the ones that are in the
bottle that you could squeeze out and they're
really liquidy, that I only like for
the really thin papers. I'm going to keep
that on my table. You could also use photo glue sticks or
archival glue sticks. That's another option
for glue and stuff down. Look around at any glues that
you might already have in your art room and we will get going with
our collage pieces. I'll see you back in class. I also usually have a couple
of palette knives available, and especially on
something like this, I'll be using palette knives. We'll also be using some random
paint applicating things. Have a few paint brushes
available and some sponges may be to sponge
my paint through my stencils so definitely
gather those also. I like to have some
baby wipes handy because things get messy and we can clean up
really easily with that. I also usually have some shop
towels here in my art room so you can have any towel that
you might find necessary. I'm also going to have some
various mark-making tools. I might be making marks
with neo color to crayons or maybe a
piece of graphite, a neo tolerant color too are some of my favorite
and I will probably stick in those neutral colors
if I use some of these. Gather anything maybe that you like for mark-making
that you might possibly use in your
grunge projects. I want you to think grunge. If you need to look online at graffiti and things
like that to get an idea of the feel
you might want to go for and then definitely
check some of those out. I'm just in my mind was thinking most of the stuff I
create is really beautiful, so I thought, let's do
some grungy stuff today. Most of the suppliers also have a little roller over here
I can roll some stuff. Just get lots of stuff
ready to start playing. Now I'll see you back in class.
4. Making Some Collage Papers: I thought it would be
fun if we made some of our own collage papers and then we'll just have these
available to use. If you're one of those
people where you like to infuse a little
bit of meaning into your collages and what is written on these
pages matter, then be very selective about the books or the papers that you come across that you buy, that you put in your art room. I am not as picky but
maybe I should be. If I'm thinking, oh, I want a piece of music in there and I find this book page with this pretty
music and I know I'm only using a part of it. It doesn't matter to
me what that song was, but some people like to be more specific than me and
that really matters. Dictionary page is
particularly beautiful to me, old papers that are just
all out but old looking. I just like things
that look old. If I have French papers, I think most of
the French papers are legal documents for land
sales and stuff like that. But some people would
want the French papers to be a love letter saying some
kind of poetry or something. It just really depends on what your preferences are there as to what you're ultimately
going to want to use. Because for some stuff
like this right here is just black marks
that I have put on old book page and brown
marks and you're going to cover up most of the page when you do something like this. With this collage today, I almost want to do a lot of painting with a little
bit of collage. You can collage
the whole surface and paint and stuff
on top of that, there's several different new
approaches that you can do. Collage level surface
paint on top of that, end up with your
beautiful piece. Mark Mike, do a little collage, do some paint on top and
that could be your approach. I'm maybe going to
do a little bit of both those today possibly. I really liked this music. It's got Jesus in it so this actually must have come
out of an old hymnal, because it's really pretty. Something like this we could easily collage on
top of with say, a little bit of black paint. Maybe I've got a little stencil. Maybe I've got a little sponge that I'm going to collage with. I'm going to actually dip that sponge in a
little bit of water, I've got a little thing of
water sitting over here, so we might just dip that
in some water to get it a little bit softer
and ready to go. Then think I'm going to
make sure it's all out. This is just disposable
palette paper here. But I'm just going to go ahead
and the sponge is too wet. That's very interesting, but I didn't want to use
the sponge dry. When you're sponge is too wet, that's what happens
so we'll keep on. But that's grungy. We're just going to
see what are we going to get with some of these. I could do this
with a paintbrush. I think I have a stencil
brush somewhere. We might do some
stenciling on our papers. We also could do some
mark-making and scribbling. We might could just use
the paper just like it is. We don't have to do that. But I just think it's fun. I like the flat end of this, so we can come back. It's like the perfect
stamp, look at that, it's almost like us doing
the graphite on that. Let me put a little
more paint out. On the page like this, this is a fairly large page
and it looks like it's out of a big religious book and
I did not tear the book up. This probably came in a little collage
pack of paper that I bought because
sometimes other people just find that randomly
the prettiest stuff. I'm going to treat this
like four pieces of paper almost and just see. That's pretty. Because I'm going to be tearing pieces of
paper out of these things, it doesn't have to. That's good. I want you to
play with your collage bits. I want you to do
some with stencils, we could come back with one
of our paint brushes and we could make color
on our paintbrush. Let me just do this while
I'm thinking about it. We could come back and do
marks on our book pages. Your goal when you're done, it's just to have a
whole stack of grungy, well even could say
ugly collage papers. Because when I'm
thinking grunge, I'm not thinking the pretty ones that I am usually
trying to create. I'm not thinking pretty
colors, pretty shapes. I'm thinking graffiti
and ugly and grungy and maybe I'm at the
old car graveyard and I'm taking pictures of
all the rust on the cars. I got that ugly art in my mind. I like that right there. We could also do that with a big black pen if you've
got a big black pen. Let me get one here in
one of my pin boxes, which I have lots of. I don't know what
this is. This is a Higgins India ink brush pen. Oh, yeah, there we go.
These were interesting. This is a India ink brush pen. But use a sharpie, use whatever big black marker
that you happen to have. I'm just thinking words, your scribble or
something really tall that you don't quite know what I said but maybe I had like this was a pulling or
maybe this is a scripture. Maybe it just is random scribble and you
can't make out what it said but I think that looks
really pretty as collage. I'm not really writing anything, this is more of just
my scribbled writing, but this is a great
look, I love that. Let's get another one. We could also do shapes. You might look at
these now and think [NOISE] but when you're
doing collage and you're looking for
something with little extra movement and dynamic to it and maybe extra
color or whatever on it, then you're going
to pull these and think this one's
going to be perfect. I like having these with all marks on them.
Let's do that. Then maybe on this one, we'll do some line marks. This reminds me of book poetry. I don't know if
you've ever seen it, where you take a page in a book and you go through
and you mark out. You go through and find words in there that
could make a poem. We're looking at this, we could say
prisoner, destroyed, murdered, had judged,
disdainful favor. This is the history of France. But that would be the
words that I would want to preserve
and then I would go through and just blackout all the other words and it
would be a book page poem. Austin Kleon, one of
my favorite authors does a lot of those and some
of his are so wonderful. I desperately want
a few of them, but he doesn't really
sell prints of all those. Some of them are in books
and things like that. His are just wonderful
and that's what that reminded me of,
crossing words out. Project here on collage pages
to make some of your own. I want you to go through, gather your old book
pages and I want you to start marking
them up using some stencils and
getting some stuff ready for when we start
making our projects. I didn't even use
my punchella but we can use that on when
we're painting. Definitely create collage
papers in preparation for what we're going
to have going forward and you might just
paint on some pages, stencil on some pages, do some lines and
mark-making and get some stuff ready
for your collaging. I'll see you in the next video.
5. Laying Down Collage Elements: I thought it would be fun on this first
one to do a really big sheet. This is just a
great big sheet of watercolor paper
and I'm using an 11 by 15 sheet random watercolor
paper in my closet. This is just a £140 cold
press Strathmore pad that I happen to have. But I'm using it instead
of the [inaudible] because I got it and it's bigger. I would like a couple of bigger
pieces out of this piece. I want to create
minimalist collage with some grunge and just see
what we can end up with. I'm going to glue down a
couple of collage bits, then I'm going to
paint on top of that, and then we'll see
what we can get. To start with, it's
a white page and I might want a little bit of
scribble at the bottom. We could be using neo
color crayon or a piece of graphite or a
pencil or anything. But I'm thinking, what's
nice about the neo color. You could do this with charcoal. Is I just want to lay some
scribble here on my paper. I'm not being strategic. This is why I like
to create this way because I'm being strategic
and I'm thinking too hard. I get frustrated at my art table because
then I don't know, it's almost like
white page paralysis. I want to create
something amazing. But how do I do that? This is the graphite. You just get stuck
because you're like, I don't know what I want to create and what if
it ends up terrible. This stops some of that
thought process in your brain. I want some of this tissue
paper on this piece maybe, because I like the bits that look
like old writing. I'm not going to cut these. I want them to look a
little more organic. I'm going to tear them. I've got old papers which I could scan through
my scanner and print them out and you can use
those if you want to also. What I like about the old papers versus the tissue paper is old papers are thicker so you're less likely
to see through it. But at the same time, I love that you can see through the
tissue paper because now you'll see some of the marks that we've
done underneath. I love that. I'm going to
consider this more like strategic collage rather than full-on cover the whole
page with collage. Because that's basically
what we're doing here. We're strategically
going to lay pieces in. Then when we're done,
hopefully we love what we got. If we don't, you can just
throw it out and try again. But it's that wild like the
cut-out stuff. Really, no matter how I do it, I always end up with
something I love. Let's go ahead and I'm
going to use one of these more liquidy ones because
I'm using tissue paper. I'm going to go ahead and use
my Liquitex matte medium. I like the matte medium. I do not want this
to be all glossy. I try to have specific paint brushes for glue because even
though I think, I'm going to use this
later for something else, I never can get
all the glue out. I have specific
brushes that I like to keep to the side for
glue and stuff down. You'll see with matte medium, how perfect that is for
something this thin. Whereas if I had gone
with the yes paste, It's just way too thick. You'll notice because I used a neo crayon underneath this, that this activates it. But I don't care
it's not a big deal. If you like to be very specific about where you're
laying collaged pieces, you might do a
little preliminary, lay the piece down get everything decided where
you're going to put it and then take some pictures before you pick the pieces
up to start to glue them. Because then you'll
remember where they were instead of going,
where do I have this? Matte medium dries clear so
I didn't really matter to me if I'm getting any of this
on the rest of the paper. But once we glue this before we move on to
painting and stuff, we'll need to let some of
this matte medium dry. You want to resist using too much heat like
a heat gun on glue, because sometimes you'll
bubble that glue up and create weird burned spots rather than what
you were thinking. Do we like the collage
elements that we have? Or do we want to come in and throw a few more collage
elements in that we created. We can certainly do that. I'm going to hang with the map. Well, I'm going to
switch over actually, because now I'm
using thicker paper. We'll set that Russian water. Problem with a thicker paper in the matte medium
it just seems to peel back up for me
and I'm sure it's me. It's probably not the matte medium,
it's probably me. But I want everything to stick
where I stick it out. Don't want to wait on it
to fold its way back up. I'm just going to use the
yes paste on the thicker. Look at that. That's pretty fun. If I use an element, I want to use it more than once. Sometimes I'm even thinking
an odd numbers and maybe I want to use
it three times. Even though I'm not really specifically thinking of a specific composition
at this point because I'm going to cut this up and a little bit thinking about what would
I want to have in a pair of pieces or whatever
it is I cut out here. I'd want to have a repeating element in the pieces so that
they all tie together, even if in the end they're
all slightly different. I would just go through
and if I did one item, I would maybe do the item
three times or maybe an odd. You could do odd. I like odd numbers,
but you could do four times if you're like, I have this spot over here and this would be great or whatever. You just play that by here. Let me just get a towel because I like to get the glue off of my utensils pretty quickly because I
love using these over and over and I do tend to use the plastic
ones with the glue, but I still want to gut
the glue off of me. I have several that I've
managed to let do its thing and they basically got glue all
over it now I can't really use them for even gluing stuff. Let's get that down. Now we have some front marks a little bit of collage element. I'm going for a little
more minimalist on this particular piece. We can go a little more
maximized on the next piece. Let me just scoot a glue
or two out of the way. Now we're going to have to let
the glue dry for a moment. I'll be right back. It's not completely dry, but it's definitely
dry enough for us to start applying and I really
want there to be some black. I want them to be some
of an umber color. Shake that up. Get rid of the liquid. I've got a brush and I've got this palette
knife and we might even play and see if I put some of this on with
the palette knife. Look at that. Yeah. That's exactly what I was hoping it would be
feeling I like. I like that. I'm doing these fast. I'm not thinking super hard about what's
here, what's there. I like creating that way. I like creating in a way that I don't have to think
super hard about it. Let's go with some umber here. I like creating in a way that it's more like
play and when we're done, you're like, look
what we got here. That's fun. I just got up to pick
up one of these. This is a random size. I think this is a six
by six random piece that I happen to have. Yeah, that's six inches. Already cut just so that
I can look now and judge, what do I have going and
do I have anything that I'm feeling might work
here as we're going. Is there an area that I love? I'm thinking maybe that might need a little something else. If I love that right there, does that need some stenciling? Does it need a poper color? What does it need to really
finish it off for me? I am feeling like this
in here is pretty cool. I like that big
swipe of that brown. I'm loving some of
these quite a bit. Some of these I'm like, maybe I would love that if XYZ. Whatever it is that
that might require. I'm feeling like
maybe we could do some stenciling or
punchinella or something. Maybe a wild pop of color. I don't know. Maybe
this green gold, do we want to see that
pop out of there? This might be too thin, but we'll pull it out there. I might do that with
a dry brush and see if I get a better result. I just got a random brush here. I'm going to be real dry here. That's perfect. Yes. Just a tiny bit. Punchinella is my favorite. I love me some punchinella. Look at there, see a little tiny. Don't that look like
some super grunge. We're going to call these
ugly grunges because they're dark and very Graffiti
like and I love that. We could even come
back in here if you wanted to be more
Graffiti-like and you could draw and write on
this with a bigger brush. Maybe in black or brown.
Let's see what we got. I'm just going to
pick up another brush because those are all wet now. Let's just see if we were like. A little bit of huge writing
that when we cut this up, you're not going to actually
know what that said. It said I love art. But when we come back in here, it's going to be
just random marks that you're not
sure what that is. Like in this right here. We could even at this point, if you're thinking I went
too far with the black, we can come back
with some white. I generally like to
do the white with white gesso because I can skim on top of everything and it would look like
maybe some plaster. I'm going to do that
with a palette knife. So let's get the one
back out that we did in black and we can come
back over and if you think, I just overdid all the dark
we can bring the light back. We get really interesting
texture when we do that too. I really love this texture
in here. Super cool. That texture that I
just created right there, really cool. Once we cut these up then
we'll look at them and decide, did we get enough or do we need to add a touch of detail to the finished
piece that we cut out. Let's do that there and then we can decide
though that my water. We're going to let this dry. Then we can come back
out and cut it up a little bit and see, did we end up with our
beautiful grunge collage piece? Is it finished or do we need to collage more on top of it? There's nothing saying
that we can't come back up and throw pieces
on top of there. But let's let this dry
and we'll be back.
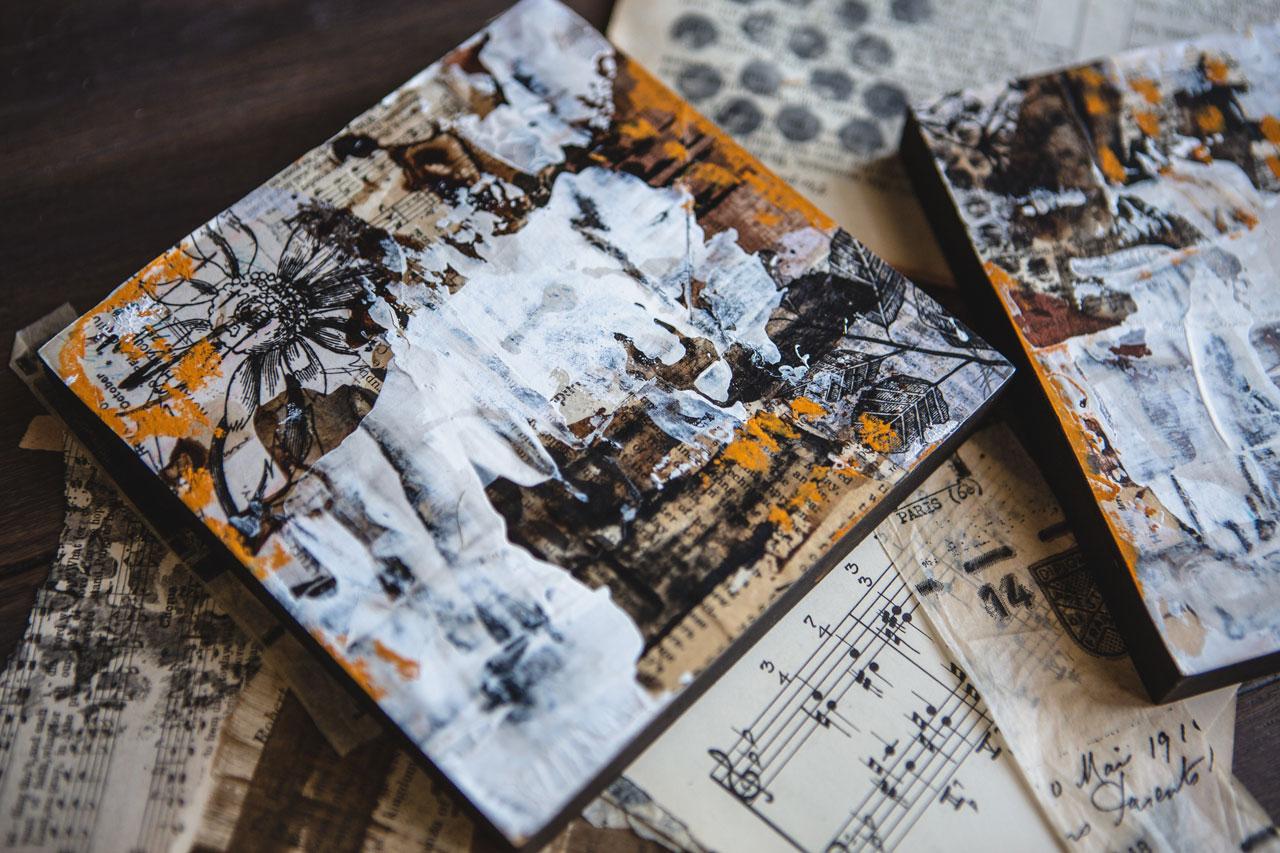
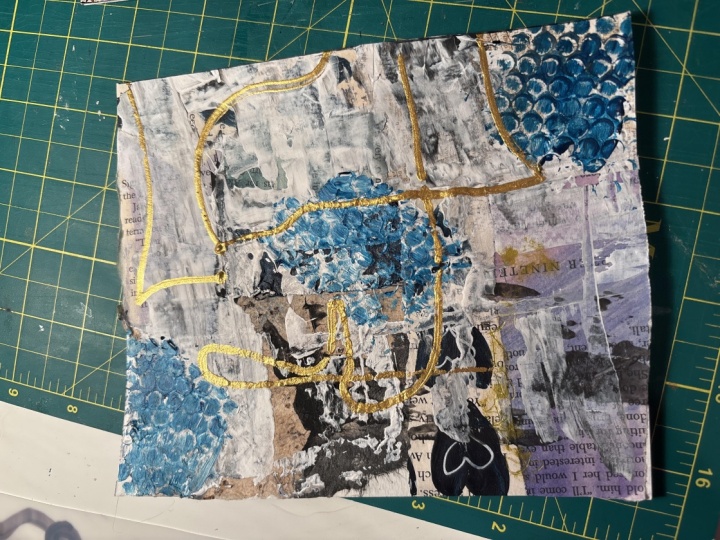
6. Cutting Our Piece & Finishing Up: [MUSIC] This is pretty much dry and this is
a six by six piece, but I almost want a
four by six layout, not a square layout. I think what I'm going to do is just this just piece
of watercolor paper. I made a square in and cut it. But what we could do is
we could cut two sides of this or we could come back. There we go. We can
come back in now. We can make it four by six. Now I can make it
some other size, and I actually have some
tape here if I think four by six is the size I
want to go for today, you can make it different sizes. Like maybe I like this long. Yeah, maybe I like that. Let's see what that even is. This is 3.5. I'm thinking four,
I want four by six. If I do four inches down here, I could take this temporarily
to the size I want it. Like this. Longer shape. It doesn't have to be exact, but if you get it close, then you can have it
ready for framing in a four by six frame
even possibly. Let's go ahead and get
this one closer to four. There we go. Now
we can look at it. I liked this taller shape. I want at least two
pieces out of this. We need to decide what's our favorite piece
and I'm going to mark these and cut them. I'm loving that right there. At this point, this is
almost how I can pose, like when I'm taking
a photograph, I can pose the great
big picture and then come in with my camera
and our frame stuff out, and then this could even be almost considered like
you took the picture and you've got on your
computer and now you are cropping in Photoshop. [LAUGHTER] That could be that. I like this with
the little touch of green shining through
that, I really love. I'm going to take a pencil, which I've got somewhere. I'm going to mark this out. We'll just use the big
piece of graphite. I'm not sure where
I hid my pencil. I need a pencil. [NOISE] Here we go. I like the mechanical
pencil for this. Now I can just draw
this four by six piece. I can cut that out very easily. I might cut that out and then decide what
else I want to cut. Or you might think, I might change my mind. But basically we're
just going to cut this on those lines. See how we did. [NOISE] I'm not thinking of composition and placement
of items until the end. I prefer that because,
let's come back this way, having to work that
hard at the beginning, [LAUGHTER] it's so
discouraging almost. You want to be able to
enjoy the art process, the play. Look at that. I'm in love with that, you can decide what way, I like it that way too. That's a really good piece.
We're liking that one. Now let's go ahead
and take our piece. Much more exciting
when you played. Then you're like, okay,
what do we create, because I'm almost
loving this over here. I've got a little white. If I go with this, I've got white down
here and over here. I'm liking that.
Got a little bit of green peaking through. We've still made it part
of the same series. I don't know how
you would not know that this was the
same series though with the paint and
Grand Dragon going on. [LAUGHTER] [NOISE] Look at that, I'm in love with this
big heavy line up here. It's your birthday. Let's see if we got
one more in here. [LAUGHTER] Say this is a great
piece for more collaging. This might be another piece that we use for something else, or we might have some micro collaged pieces in
here that work out for us. I'm actually feeling
like this might be nice. Possibly that like we could just cut that right
out of there. I don't really have enough
left over on this side. For that big piece, let's just go ahead and cut
this piece out as a maybe. It'll look better cut. Let
me get that third side, I want to go ahead
and have it just finished out as a four by six. I'm getting that third side cut. There we go. At
least they'll match. [NOISE] There we are. Now we can look at it and say, do we need anything else? Are we happy with the three
that we've got cut out? This is the time to look
at those and decide that. Now let's say you look
at it and you think, these are amazing. Which I think these two
are amazing and this one is my question. That's okay. What I also like is
these leftover pieces, so we might revisit that as a
little micro collage piece. But what I might do on these
because they're so amazing, is mail these on their
own piece of paper with some torn edges so I could make them a
finished piece. The other option is we can
now mount that to, say, a four by six cradle board, which this is not four by six. But just to give you an example, if I'd cut this out, I could've glue this on the board and then I
could've painted the sides like a black and
that would've been a finished piece ready
to hang, I love it. But those are not four by six. I think I'm going to mount
these on their own piece of white watercolor paper. You could use a handmade paper, you could use all
kinds of stuff. But let's just grab some paper and show you
what I'm thinking here. Thinking, if we mount
this in its own sheet, but maybe the edges were torn
that might be pretty or it might just be pretty mounted so that it's got a
white frame around it, like we taped it
off or something. Let's just try this
and see what it does. I want to show you this
because I want to show you my dual edge ripper. [LAUGHTER] This come
from dualedgereaper.com. But I particularly
love edge reapers because this is a
honking big ruler, trying to squeeze back and
not lose my microphone here. But basically what you do is
you get enough to grab on, put your ruler down, and then tear the paper
[NOISE] up towards that rip. If you do it slow enough, you shouldn't end up with leftover paper like
I've got here, but we'll just go back
and tear it. There we go. Then I'm going to flip it over. I'm going to judge where
I might want that. We'll say about right there. Again, bringing this
paper up the edge of my, yeah, that was perfect. What I love about
that is I like using the other side because
if you use this side, you have this little
line that we can see, but if we use the other side, it looks really natural. Now I'm going to
actually tear the top, and tier the bottom. I'm trying to get pretty
tight on the top here. I'm just eyeballing
the straightness, just doing the
best we can there. They don't have to be perfect. That's what ripped
edges are so pretty, they don't have to be perfect. But they do look natural. Let's do the fourth
side, judge as well. I liked that these rulers
are clear because I can say, okay, that's about
the right place. You could be more exact and
measure it if you want. I'm more of an eyeball girl. [LAUGHTER] Let's
come back in here. I'm going to flip that over and then conclude that right there for
a finished piece. I'm liking it because I think
the torn edges are pretty. I'm liking it because it
goes in with scruffy, grungy a little bit. I'm feeling like I'm going
to mount those like that. I'm going to go ahead and tear the other two and glue these
down with my yes paste. Let me go tear the other
two and I'll be right back. I've glued those two
now and I'm working on the last piece here because
I've got thicker paper, I'm using thicker paste. I just glue that down. I'm just eyeballing it where
it's about in the center. I don't want to smash
this down with my hands. I don't want to be
smashing on this with my hands because depending on what art supplies
you have decided to use as on top of here, if you use pastels or
anything that would smear, you don't want to smear
that off onto your nice, pretty clean white paper because at this point you want
your hands to be clean, you want the paper
to be cleaned, you want your
surface to be clean. There we go. Look at that. [LAUGHTER] There's not a 100 percent straight imperfect
like there's this size, a teeny bit bigger. If that were something that
we're going to bother you, then you can just recap
that piece of paper. It does not bother me
because it's grunge. I'm loving that the pieces
are all slightly different. If my math is off by a smidge, I'm okay with that
on some pieces. What do you think? This is [LAUGHTER] our
completed set for me, minimalist collage and grunge. We'll definitely do way more collage with some grunge to see what you
think about that. We might come back and
use our leftover bits for like a micro collage
piece or a bookmark. These would be
good for bookmarks and we'll see what
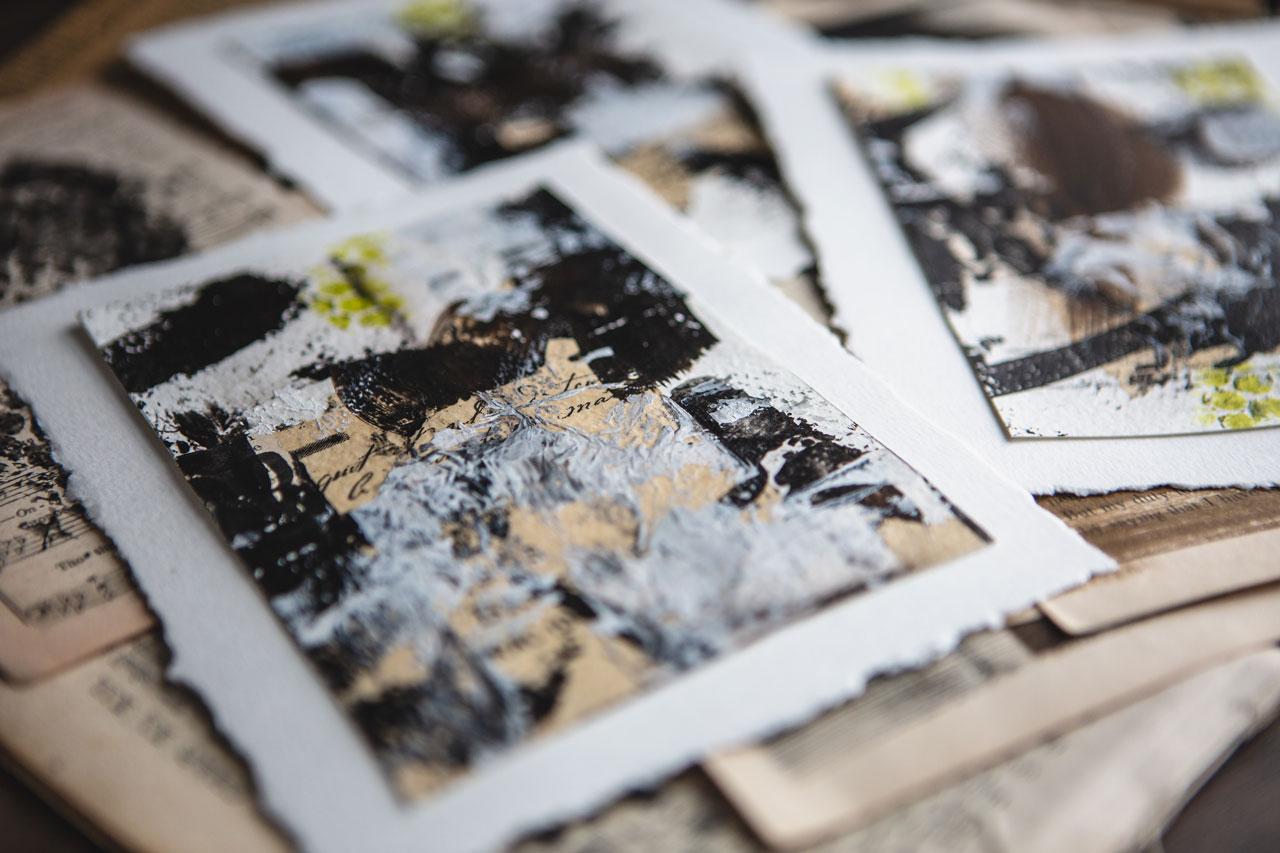
we can come up with. Check it out. Three grungy, we'll call them
ugly but beautiful [LAUGHTER] collage
pieces of art. I can't wait to see
your first project. I want you to do
the bigger paper and use cutouts if you need to, if that's easier
and you end up with pieces that you love
because to be honest, that's the best thing for me. I'll create amazing things. Now these are ready to frame
and like a float frame. As a set are
absolutely beautiful. I'll see you back in class. [MUSIC]
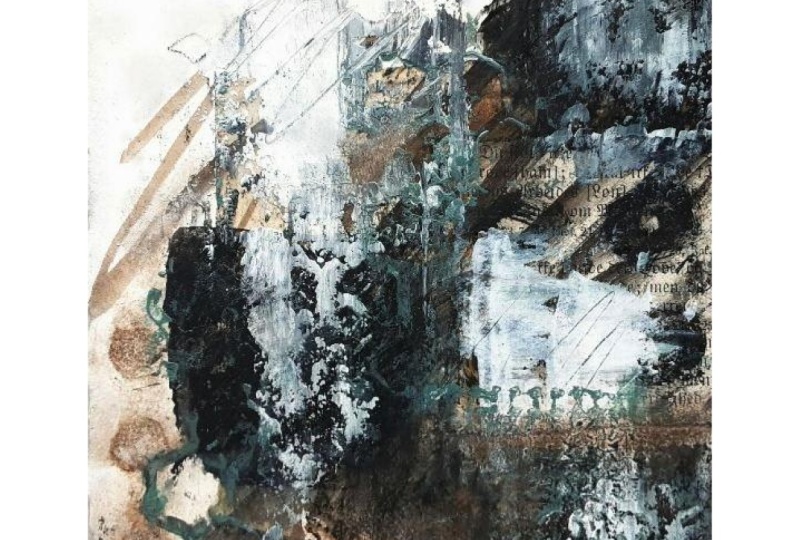
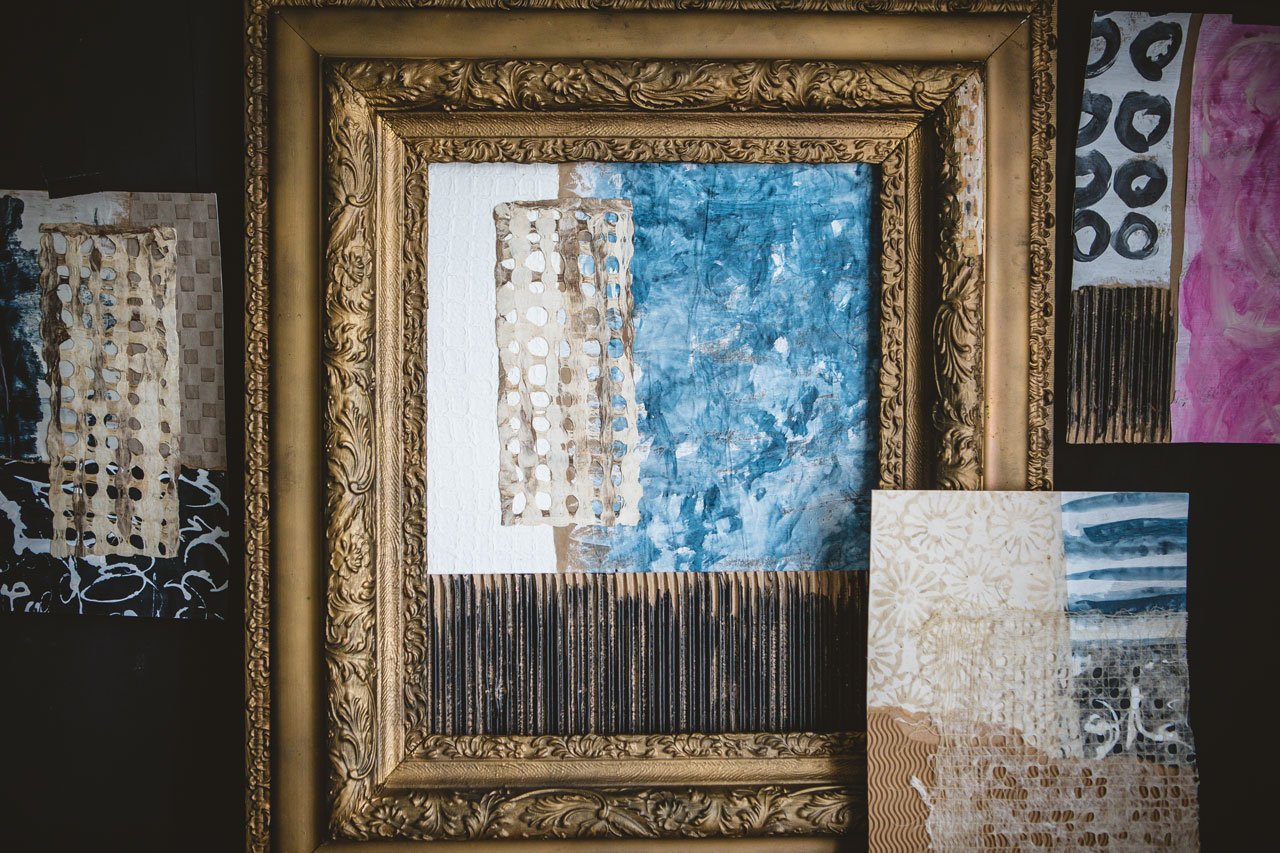
7. Collaging On Cradled Board: In this project, I thought we'd go
ahead and work on some cradle board just to show you that
sometimes I do do that. We're going to work straight on the board and I
thought it'd be fun if we collage the whole
thing and then come back and I was really thinking
about this tissue paper, that I've never used. I thought wouldn't that be fun to maybe incorporate
something out of this tissue paper
in our collage so that we get a tiny bit of pretty in the grunge and then maybe
paint on top of that, so let's just see
where we end up. I've got all of these
little book pages and collage scraps that we
made earlier in class where we drew on them with ink and
paint and I already painted the sides because I don't
want to do that afterwards. It's a pain and I can just touch up easily afterwards
because I've painted the sides afterwards in past things that I've done and I end up painting on my artwork. I do prefer the
sides to be painted first and I've already
put clear gesso on the top because this is a
wood surface and it's very porous and if you don't
seal it to begin with, it soaks up things and maybe in the end doesn't hold things
as well as you might like. I am going to go ahead and start just placing
and looking at, I've been tearing paper just so that I have little
pieces to play with. I'm going to start gluing
these down and at this point, I'm not thinking about
composition nearly as much because and
I'm going to let these overlap the wood because once they're all
glued down and dried, I can flip the wood over and
I can trim the paper off. I don't have to worry about all the edges are getting right up on there and it
being straight. I can clip that later. I was just playing with the little pieces of
paper and thinking, what can go where? I don't have a final
placement for everything. I've just been cutting
up some pieces so that I can think
about it and then you'll notice here on
this one I actually had a little bit of red
torn on that paper, but I was thinking
in our paint stuff that maybe we could
use some walnut ink which is coffee color basically and you can do this
with coffee and I didn't mention this
in the supply video. I don't think because it's randomly one of those
things that I'm like, look around your
art room and see what you've got
that you can play with and you can do
this with coffee. You don't have have
the walnut ink, but I thought it
might be fun to maybe try to use the bottom
of one of these to make some circle stains
or something because in my stencils that I showed
you a little earlier, I remember having and I
may have already moved it, but I remember having one that
looked like drink stains, so I thought wouldn't that
be pretty maybe to have a drink stain and
some paint on top. Maybe some of these, I've cut some of these
out of my paper. I don't have a specific spot in mind for them, but I thought, let me just cut a few of
these out and they maybe part of a collage on top
of something somewhere. We'll see. It's
going to be random. I do have a little color there, I got to think do I want
that color to show? Do I not want it to show? Don't want more to show? I'm using different tones of book pages here and
now that I look at it, nothing's in the center, like I haven't got it lined up, so you've got a
center eyeball line. I've got everything
offset one-third and two-thirds of the board
side. I might like that. Then we might come
in here offset maybe with those flowers, possibly maybe just one flower. I'm really loving
that one and so I was just trying to tear
some of the same pieces and then wouldn't have to
do all the tearing at once. But let's just see if we get it eyeball
to how we want it. Then we can glue it
down and I can trim it. Does it matter if I get every single inch of
the wood covered? I could come back in with
some paint and disguise any blank spots so that's
not super-duper important. I just got to decide
like how much of these black elements really
need to be standing out. How much are we going to cover? Maybe I'd rather
have that flipped over and have that down here and just see. Let's go ahead and glue
some of this down. I don't have an exact formula there on what's going where, if you do all this pre-layout, guessing and you
think, I love that. Then definitely feel free to glue it down when you see it, when you see the magic happen. This is the fluid matte medium. It is the more
runny matte medium. Let me get my glue
brush and I'm going to just paint the whole
board and then stick stuff down and paint on
top because this can be a top coat to your
stuff and I know I'm gluing things down anyway. I'm going to go ahead and
try to coat this top, so I can glue a little faster. You can glue each piece. If I was doing the paste, I would be gluing each piece, that was a whole lot of glue. Maybe I'll put this
extra glue over here on my disposable paint palette
because we're going to be using this extra glue or I could have put it on this other palette,
but that's okay. We'll put it over here for
now and if you get it down the sides and you want to
get that out real quick, you can go ahead and do
that because I actually did have that run down the side. It's not going to be
a big deal as far as what it looks
like on the side, like it's a finishing coat, the matte medium is
but why not be neat? As neat as we can
as we're going. Let's just go ahead, start placing and I am placing these off the board
and I've got plenty of glue now to let me go ahead
and run this glue for the next piece and then
I'm just using that on the top and the bottom,
like we're decoupaging. Like you used to do
with the mod podge. That's what mod podge was for. It was to decoupage pretty
pieces of furniture, so we're just going
to go ahead and get to attaching and then. I will let this dry
before I trim it down. Look at that, I'm already
liking it glued down. I like it when the book
page end is off our piece, but that's okay.
We'll just do that. Look at that. Okay, I'm filling that. Because what if we
put this flower here? Let's just do it.
Picking up some of this glue over here off of my paint palette
where I put the extra. We're going to go ahead. Here's where the end is. I want it to be on the end. Let's just go ahead and
put that where we can, look at how pretty that is. We'll trim that up when
we trim the edge off. Do we like this
coming in up here? Let's just commit to it. This is why I like
doing a big piece. Let's go ahead and do this one. I like doing a big
piece and then finding the composition
that I like because are you going to
love these? I don't know. But if you did a
big piece of paper, it's not such a commitment. It's just not as nerve-wracking because
you're having fun and your gluing stuff down
and this way you're like, I want to make sure I get it all in the right place and
I'm committing to something. Whereas when I'm
doing paper stuff, I feel like I'm not really
committing at the time. I have time to plan and I could cut stuff out and let's put that
up on the corner. I don't like it. I don't have to glue it to my expensive cradled
board because I get it. Art supplies are not cheap. I find that if I'm doing it in such a
way that if I don't love it, I didn't use my most
expensive supply doing it like vintage papers. That's why a lot of times
you're just scared to use real vintage book pages
or papers or things like that, me too. That's an investment,
that's a piece of history. We're never getting
that back again. It's hard to commit to
real vintage pieces. When you're just starting
out and getting going, if you don't want to commit to a real vintage, let's
put that there, to a real vintage piece and you're thinking, I
don't want to ruin it, make a copy of it so
you can cut that copy up and then do it on
a big piece and cut out the six inches that
you liked and glue that six inches down and have a
perfect piece every time. But for the sake of learning, I thought let's go ahead and do it the hard way. I really want this
flower here, I think. I want it on the edge there. I could have that flower coming down like we turn this around now and now the
flowers coming down. Maybe we like that better
because this flower is going up. What do
you think of that? We could have some leaves coming
in from the side. Why not do the
other side of that? Because this is, for all
intents and purposes, a matching set. It's a pair. Let me put that glued
down in some water. In a pair, we want
them to mostly match. We're going to have to let
these dry before we can paint or do anything
else on top or trim the edges
because at this point I would trim the
edges before I added anything else to it or we could paint on top and then
trim the edges at the end. It's a little bit of surprise of what we get. Let's do that. Let's trim it at the end. Let's just paint it and
trim it at the end. So I'm going to let this
dry and I'll be right back. You've got them drier. I think I liked
it that way maybe but maybe I liked it
the way I had it. Maybe I like it that way. That's fun when I do, I think I definitely
liked this one this way. I'm looking in the
camera so I can get a little fore view of these. Collage works better sometimes
when you can do some. Stand way back,
take a look at it, and then decide what
else does it need? I almost feel like maybe
we need a dark contrasty something and maybe some just other marks and general things. At this point, we
can just go hog wild with anything that we
want to put on top of this. I'm almost feeling like the [inaudible] is fun
but it isn't enough. Let me pull my disposable
palette paper over here. Let me just see if we can just do a little bit of
this on this palette paper. Then I just run it
in the clean water to clean it up. I love having that dropper. My thought was on some of
this is to get something that you don't mind getting the bottom of
it with some paint, like say, this paint thing. Maybe we'll do a few
little circles on here. This, you can do it
with a coffee mug if this is not big enough for you and you really want
it to be bigger stains. You can do it with a bigger
cup or a coffee mug. We could do it with the bottom
of a got a jar over here with some random leftover
water from when I mixed it. We could do a
bigger one in here. Look at that,
that's a good size. Pick a jar. It can be
like pick a jar, cup. I just want some
of these in here. Something that can give
you some fun shape. Then maybe even some sputter, like this sputter because
I do like that dark. Look at that. Do some of that. If you do that and
you think, "Oh, I need to flatten that
out," this could be something where we
use our roller, but I'm actually
wanting that to do its thing or maybe not. Let's go ahead. We're moving it around some. Look at that.
That's pretty cool. Getting some, yeah. This is almost like
aging the paper, the look that this gives. Let's make it dirty
there. I like that. Let's roll that off of there. Now I'm actually going
to have to let this dry as I think what
else do we need to do. We also might take some pastels
or some neo-color crayon. We could take black paint. Let's go ahead and
add some black paint actually, let's go ahead. I've got the half
[inaudible] paint out there. We can put paint
on with something that we don't
normally paint with. Maybe one of these
rubbery paintbrushes instead of a regular paintbrush. I've got some with
some little teeth cut out that will be fun. That might be with my
acoustic supplies. I've got a couple of the fun little catalysts
blades. Let's use this one. Let's go and just commit. I'm looking for dark,
I'm looking for light, I'm looking for contrast, I'm looking for grunge. Maybe we'll come back
in with this and do some nice dark marks and maybe smear some in here.
That's different. Then once this dries, we might come in with a
little bit of white on top and see kind of fill, have that dark, light contrast, we'll get that flow on
a little better too. Because I like to
have really light, I like to have really dark, I like to have it not
centered. Let's see. Let's let that do its thing and dry a little
bit and I'll be right back.
8. Adding Finishing Touches: [MUSIC] Another thing I was thinking as I was looking
around as maybe I want some punchella before I start tapping this
with maybe some white. Maybe we want some of this
punchella in this brown. Just because I
have it out on my, that's pretty. Look at that. I put it over there where I had those strikes, that
was interesting. I do love punchella. If you just want to give
me a whole bunch of dots and circles and
things like that, I love it. [LAUGHTER] Like that. I'm just being not super overly concerned
where I'm putting it. But if I put it over here, I want to put a
little over there. I'm feeling that. Let's do
that for the punchella, throw that in some water. I'm feeling white, maybe with a palette knife to pull some brightness
back out of this. Then we'll trim it and
see if we like it. [LAUGHTER] I'll tell you at this point 100
percent of the time, I'm just going to use gesso. Gesso is basically
white acrylic paint with some grid in it and it just works great
for something like this. But I will tell you right now, I doubt every piece that I do. [LAUGHTER] Look at that, till I get to the end. Then I'm like, that actually ended up much
better than I thought. Sometimes I got to wait till
the next day and be like, I didn't like it yesterday, but maybe now I like it. [LAUGHTER] I liked that
little tiny bit right there. I don't want to lose
that little tiny bit. Again, I'm just spreading
this on just where it goes. I'm not overthinking it. I'm not trying to do
something specific, and if you're a little more specific and exact
thing than I am, you certainly might be doing something way more
specific than me. But part of the joy
of art for me is, what do we get when
we're doing this, the serendipitously part of it. I'm not trying to get something specific
when I'm doing collage. Then you can sit back and
look at it and think, what else does it need? Do I like it? Do I not
like it? What else? Do we want another layer on top? Do we want to get some
other collage papers and then collage on top of that. Do we want to color
in there like we randomly threw a color here? Do we want to color in there? Do we want something three
dimensional on top of there? A piece of fabric or a piece
of textured handmade paper. All fun, three
dimensional things. Maybe you have an antique set of metal things that go on
doors that you could glue on. There is lots of
different things that you could do with collage. We could come back on
here with some pastels. I've got all pastels over here. If I wanted to come back and maybe do something strategic, I've got some little pastels
over here and I could be grabbing some color
and just giving it a pop. Do we need a pop
out of here now? Do we want a pop of color? Maybe if we pull some of this orangey tone out
of here that we're not going to get too far off of our fun neutrally palette, but look at that. Fill in the little
bit of orange. At this point we can
do some mark-making. We could do some smearing. Pretty collage to
me is all about the layers and it's
not just the layers of the paper but the
layers of things like this that you come back after the fact and maybe you're like, here's a little hopper, a little jump off of
something exciting. Maybe we weren't expecting. That's super fun now with
that orange pop on there, that's still says to me graffiti
ish, what do you think? I'm feeling that's good. Cut three little spots there. [LAUGHTER] That totally
made me much happier. I like the things that
can shine under and now we're not seeing the
complete picture yet. Let me grab my cutting
mat, Gamma cutting mat. I hit it with a
heat gun a little bit to make sure it was dry. I'm going to flip it over and because it's not
super thick paper, I don't have to be super
strong about this. I do want the cutting blade on the mat and not
up here on the wood. [LAUGHTER] I'm just going to trim the paper off each side. This is a little bit like cutting our big piece and getting little
pieces when we're done. Here's what it's more
like. It's more like when you take the piece and then you peel a tape and it reveals the amazing
piece that's left. This what this feels like to me. We're revealing our piece
because we're cutting off any overhang. There we go. I'll see what we got, see now, it looks finished. We have it completely trimmed at the edges and it looks
like a finished piece. Here's a piece
where I don't know, there we go. Look at that. Now I'm feeling better about it. You've got to get to the
point where we're cutting stuff that I start to feel good. [LAUGHTER] Got to be cutting
things up then I like it. This one has some white
paint steel that was wet. That's okay. [NOISE] Let's see what we got, we got that. Which way do we really
liked that flower go? That one's neat because I
got the leaves here and it almost goes up to the
flowers, that's pretty cool. [LAUGHTER] This one, the
flowers are growing up, so I'm actually dig in this. I really love the pop
of color that we added there at the end that
made me super happy. I still feel like we are very grungy and we're getting in there with our little
graffiti look. I'm very happy with the way
that this has turned out. Now is the time to decide. Do you have enough done? Do I have enough white on this? Do I need to add some more? Do I like how it's
doing its thing? What I really love is the movement of the
white on this one. This one, I don't know
if I love it or not. I might take a little
more white and just see, because now we can do
our finishing touches, our last little designs here. I do like that better now that
I've got that right there. This one I think I'm happy with. [NOISE] I think I'm
going to go with that. Now if you're using
pastel like I am, and then you smear
up into the pastel, you can see your pastel
is going to move around. Let me show you how
I would finish this. Because I used pastel on this, I would go ahead
and hit this with the Sennelier pastel
soft pastel fixative. For any pastel fixative, there's a couple of
brands out there. This is my favorite
because it doesn't tend to change the color of the
pastels like the other brands. I'm sure I have the
other one over there. That's my favorite and
then I would finish it with a varnish. If you're wanting to put a
finished coat on your piece, but at the minimum, I would fix the pastel. These are pretty exciting, very grungy, little bit of collage piece is
strolling through. We could still continue to layer on top of that
if we wanted to. But usually the paint
layers are my top layers. I'm going to call
this one finished. I hope you have fun
with this project. I want you to at least to do a pair and see how you
can get them different, but at the same time
compliment each other, it's like a little series. We'll see where
we go from there. This was six by six with a little three-quarter
inch side that I had. This would've looked
much richer if I'd had the one and a-half
inch or two inch sides. I'm going to have to order
some of those to keep as a stash here in my room for when I want to pull one
out for a project. Because then it looks rich. It's nice and deep. You hang them on the wall, they're ready to
hang and it just looks like a rich piece of art. I hope you have fun on this project and I can't
wait to see yours. I'll see you back in class. [MUSIC]
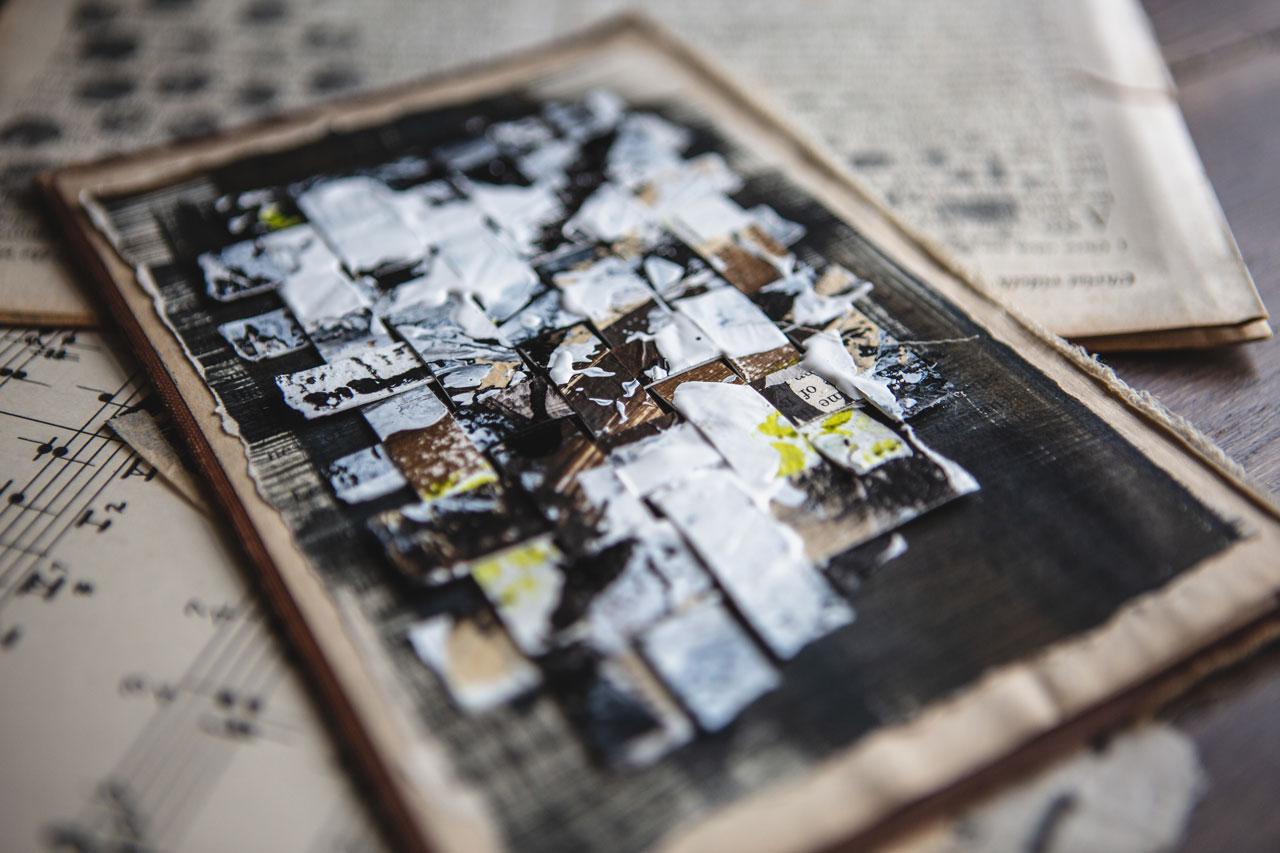
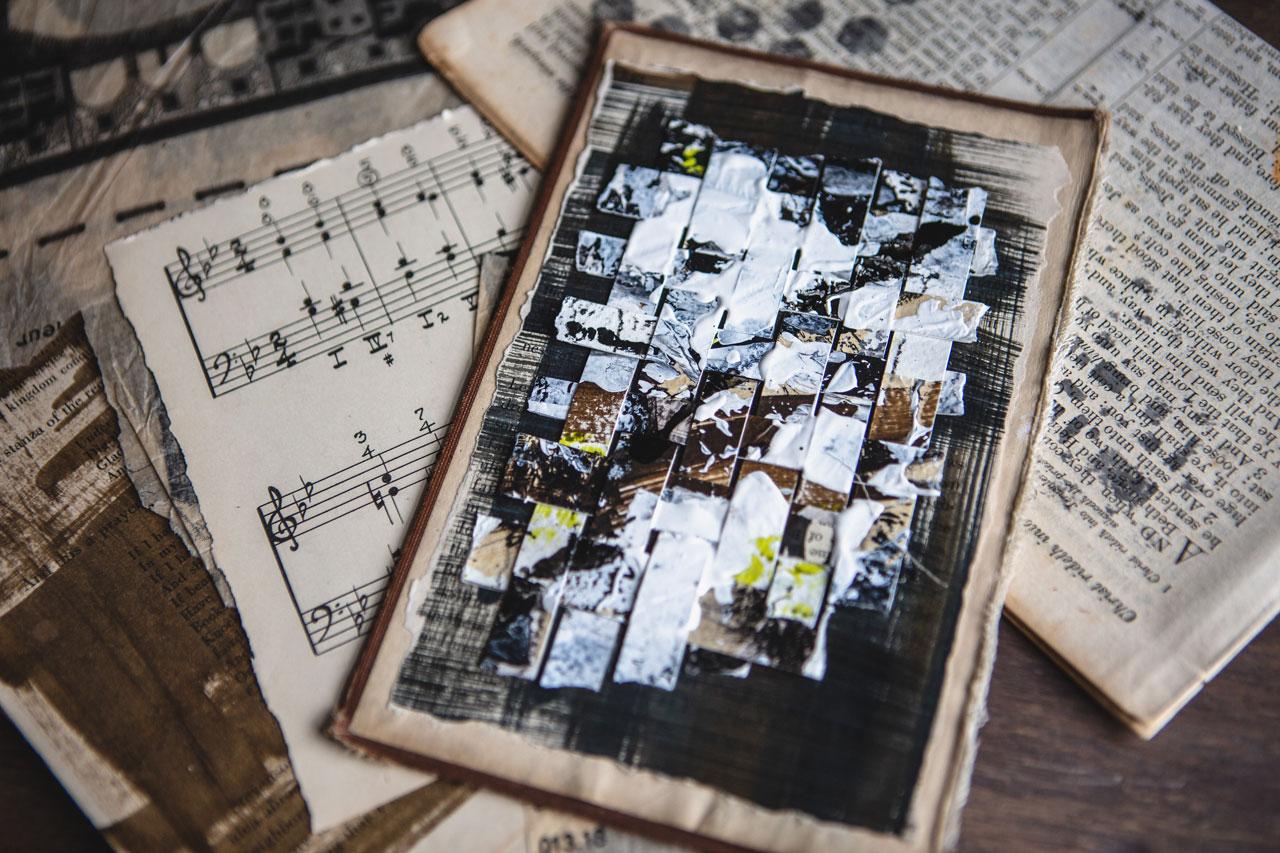
9. Paper Weaving: I thought in this project, we might do something
a little different. I don't know if you've
ever seen people do paper weaving or doing
weaving pieces of art. But let's make a paper
weaved piece of art with our leftover piece that we used to make our
earlier project. Because I thought how
fun will this be. Sitting here thinking what would I want to do
for paper weaving? I want it to be dynamic, I want it to be interesting. I want to step outside the box of what I've
normally been doing, and I had this piece of
an old book page that I just painted some
black Indian ink on. I thought we could stick
this down and then paper weave a piece on
top of there with this and we're right
there in our colors. I've got a couple of old books. We could even do it on this
one with the brown outside. That might be even better because I could trim this paper, just tear it and put it in there and then the outside
of the book is brown. I think I like that better. I want to use a book
cover for something What I like about this is, this is already
got collage on it. We're collaging this piece onto here and we are gluing it down, so I've got a glue stick. I think that'll be
easier for this. I'm wondering, maybe I'll
just use my rip ruler to give me a pretty edge
right around the black here, because I need this piece of
paper to be inside of that. Maybe we can tear the edges, which is really easy. I could just tear the edge, but I love this ruler
and it makes it so easy. Look how easy that is. It doesn't have to be perfect, but it gives it a
nice torn edge look. Then if I get up here and I
don't like any leftover bits, I can just tear it, I like that. How far? I want that to give me an edge? I want it to be inside that
book. We're going to do. Here we go. Yes, see that's perfect. Let's go ahead and
tear up the top. Don't throw out any pieces yet, you you decide you need a scrap, but let's go ahead and put
that in there. Love it. I'm going to glue it down
with a glue stick just for ease because this will make it a lot easier just to get that in. This is acid free glue stick, so if you go grab
some glue sticks, get the ones that say acid free. That way they don't come
through your paper on edge, like glues that
have acids in them. This is a photo stick
acid free glue stick I'm using so that that
doesn't seep through. Is that's where we want
it? Yeah I'm liking that. I'm just going to press
that down for a moment and then thinking, we want this weave in
the middle of this. I think I've got plenty
of paper to weave. This side will be longer and
this side will be shorter. When you see we've got what
looks like plenty of paper. I want the edges
to be like torn, so it's not all even. What I think I'm going
to cut the actual strip. But I want to get them about the right length before
I cut some strips. I could have used the
ruler to do that, but let's just be organic
and see what we can get. I'm thinking on strip size. We're paper weaving so we're
going to be doing this where we have paper weaved
in and out like that, like a piece of fabric weaving, where we weave each piece
in and out and we end up with really what
looks like a mess. But the reason I love it, is because every time I see
a piece of weaved paper art, I think in my mind that
looks very grungy. I'm thinking, perfect
for our grunge project. Let me get this edge straight, I do want the weaved
edges to be straight. Well, doesn't look very straight out
since I've clipped that edge up there off,
but it'll be straight. I'm thinking that
maybe we don't want them to be really any bigger than say that
size right there, which is about a half an inch. I was looking for our ruler had any
millimeters on it, so there we go, so
like one centimeter. But you can decide yourself. I think I'm going to do
a half an inch or so. I'm just going to use the
paper trimmer to trim these. I need to do it this way so I can see that half an
inch, there we go. You can cut these with scissors, you don't have to cut these on a cutter if you don't want. Now that I have torn
the edges and made it harder to be straight
might be easier, but oh look at that, that's fun. These are going to look
so beautiful and grungy. They don't have to be perfect, just get your strips similar. In size and I like the
torn edges personally because that way it'll
look very organic. It won't look like it's
real sharp and started, it'll look more organic. This just look so
grungy and good. Once we get our paper
weave on there, we can then add more paint or other decorations
if we wanted to. But I think we're going to love how interesting these turnout. How wide do we got enough
wide? I think we do. Now I think that see that
width is a good width, but I do want the edges torn. But maybe this time I want to say I do want
the edges torn, so. That was pretty easy. We can adjust these as we go. You know what? I think that
might be enough because I actually think it's fun if they start off nice and even but get chopping
on near the end. Let's start with that
see if we've got enough. If we don't, we've got
other things over here. You don't have to
just use art like you could have done
one layer of art, one layer of book pages, you could've done layer of art, layer of handmade paper. You could do art paper, art paper, art paper. You could get real creative on the way you decide
to weave a piece. But what we need to do first is get our top pieces
started and settled. We actually need to glue the top pieces as
our starting point, and let those dry, so that we're not fighting
with this the whole time. I've got my Yes paste
and I'm going to get started and I'm going
to glue one of these. I want them to overlap
like this so that it doesn't look as uniform. I want some overhang
on each side, I don't want it to be
perfectly straight, but I'm going to just
glue one underneath, and then the next one, I'm going to glue it on top, and then the next one, I'm going to glue it underneath, and the next one, I'm going to glue it on top. Underneath on top, underneath
on top, underneath on top. That's the way I'm gluing and then we'll see where that ends up. I'm going to take
my Yes paste and start gluing those and
then we'll have to let those dry before we can do
the rest of our weaving. The rest of our weaving actually
gets quite a bit easier. I'm going to glue this here on this palette paper because I'm going to just make
it easier to see. I've got my little knife over here and I'm just going to put a dab of glue about
where I want to start. I wanted them to do like that. Dab a glue and then
glue that down. Then we will want
that to firm up, so I don't want to
immediately start weaving. The next piece I'm
going to glue on top. Dab a glue, and just be careful as you're
going that you're not moving these all
around and look at that. See how yummy and grungy, next dab of blue goes on top. See how yummy and grungy
these look for like our grunge theme they're
just saw so yummy. That was under over under, next piece is over. I don't want big gaps, but I don't want
them so tight that I can't weave anything
else in either, so just eyeballing it. I can still move
them for a bit until they're dry just to get
them like I want it. That one was over, so
the next one is under. This does get easier
after this little bit. Because after this we're just weaving
pieces of paper in. Now this one's on top. I'm just eyeballing
about the same amount coming off the top here
for these to do that. We got another, do
we won't that one? Is that enough? Is
that not enough? We'll see where we're
at. How wide is that? Do I need the next one? Yeah, I need the next one. That one was over, this next one is underneath. You can line up your
little strips to see where are the
colors falling. Do you like where
you have everything? Do you need to get some arranging done before
you get into the gluing? We're going to go for this. I want it to mostly be straight. I'm going to let this
dry and then we will get into weaving onto our book. I will be back.
10. Finishing Weave & Final Touches: Our piece, it's not
completely dry, but it's dry enough for me to be able to start weaving
paper in, I believe. Then we're paper weaving. This one under, over, under, over, under, over, under. This, we want to do
the exact opposite. We want this to go
over, under, over. We have to weave the different strips in the exact opposite of how
we weaved it to begin with. I can do this by picking up the ones that went
under before and just scooting my paper in so
that we have completely created a little weave
that we can now push up. These might not push as far as if we were say, do in fabric, but they'll push far enough for our art piece to
look super cool, and then we're going to
do just the opposite here with this piece here. We're going to go under on the ones that
went over before, and over on the ones
that went under before. We're just pushing that in the exact opposite of what the
strip right before it did. It gets a little awkward. If you have to
pick the piece up, that's why I haven't glued
it to the paper yet so that I can move things
around a little bit, but just the opposite. We're making a little
basket weave thing. I'm not gluing these yet because I feel like once we
get all the weaves in there, we can glue the whole thing
and we didn't have to glue each piece like we did
to get it started. Just going to weave it
exact opposite of what we did and now I need
to also decide, at some point, are we going
to tear some of these so that we don't end up
with a great big square? Maybe I wanted to
start as a square, but taper off as we
get to this end. What do we want to do there? How do we want to get
creative with this? Let's weave and think about
that as we're weaving, and then we can decide as
we're getting further down, if we want to strategically
tear the edges off and make the shape
a little different. Look at that. I don't
want a great big square. I actually feel like
in strategic places, let's just start
tearing these edges and see how we can make this
look a little grungier, a little less conformative here and see what we can get. We might even start at higher
than I just started it. Something like this could be a really super cool
statement piece that you add in with a
whole collection, like we've just made a
grungy collection of stuff. Something like this could be
like the surprise element, just something
fun. Look at that. That's really cool thing. I'll just play in here to see, did I do enough? Do we want some more? Did I bring it out too far? I almost think I might have brought it out
too far for our piece. Do we want to go the other way? That's interesting to
think about that also. We didn't have to
go all the way. I almost feel like this
extra piece was extra extra. I don't want to come back in because it's not
100 percent dry. I still have a little
bit of time to rip that back off and I might just take a little piece
of paper towel, [LAUGHTER] and pull the
glue off of the back of that sum so that I'll have a big mess that I'm
still working around. Yeah, let's do that. Now, I can actually tear these a
little more strategically. They can even be different. They don't all have
to even be straight. Yeah. I fill on
that a lot better. Now, that's still
goes off of our page. Let's tear these
down even tighter. This is why I don't want
to glue them all to my substrate quite yet. I want to have the
freedom to still tear stuff if I need to and really get
into, I like that. I like that the two
sides are not the same. Like I've got a longer edge over here and a shorter
edge over here, which I could come back
in and trim these. I don't have to leave
them as long as I've got them and I can even trim
them a little unevenly here. Now, I'm feeling that
right there. Look at that. We are going to go ahead
and glue it down once you get the weave that you like. Then we glue that down, and then we could
come and paint on top of this a little
more if we need to. We don't have to stop where
we're at. Let me see. That one was coming
down a little bit. We can then embellish
on top of our piece. We don't have to call that yet. Let me tear these so they
do like a little like that. I'm really happy with. I'm going to glue this down right about where it's centered, say like glue about there, and then we can come in
like paint on top of this. If we wanted to add more to it, we could do some
gesso on top of it to make it seem like
there's another layer on top of the layers
that we already have. Look how pretty that
we've is on the back. What I like about doing on
that is then we've added yet another layer to our collage that pulls all
the elements together. We haven't just stopped
at the weave and said, okay, I don't know
what else to do. It didn't go any further. Now we've said, okay, we've done this amazing weave, and then we've
painted on top of it, so that's what I'm going to do. [LAUGHTER] Don't do
that. Don't pull out. Now that I'm gluing,
I don't want to lose my spacing and stuff. We don't have to get glue
on every single one, but I need this thing to
be there for good now. Let's get that placed
where we want it. Look how cool that is. Then what I'm going to do is perhaps set something on top of this for just
a little while. I need these edges
to also stay glued. I might go ahead and say I want that right there
specifically, and that one. I might just need
to set something on top of this for a bit and let it do its little
thing for a bit and dry. [NOISE] Maybe I'll just
sit here and hold it. [LAUGHTER] I need
these two that I cut. I need them to stay. It just take a second to stay. I'm going to let this
dry and then I will be right back for maybe a little
tiny embellishment on top, so maybe some paint
smeared across the top to give it that
little final element. I will be right back. We've got this pretty dry. I think I'm going to add
an extra little swash of white on top so that
it actually crosses over the weaved pieces with
just a palette knife and some just acrylic paint
with some grid in it. I thought it would
be fun to just make this element pull the elements underneath it together
because now it's on top. It's not like we've got the separate elements
and that's all. Now, we've got
elements where it's got some yummy
detail on top of it. Then at this point too, I'm ready to say yummy
weaved piece of paper, but at this, is at this point
too that you can decide, do you need to
embellish this more? I like it like it is because I have put this on a book cover, so it's already started off with an interesting cover and what's really neat is now we can
look at this and say, well, do we like
it this way better because it is really
interesting this way? We could do black on top of here if we wanted to come back and maybe
with some India ink, do some black drops. We can continue adding to
our piece if we wanted. Then we have to let this dry. I like when some of the
elements on top cross through multiple pieces
because when they weave, you break up that
continuity a little bit, but if we do this, they go together because we went through
something like that. I'm going to let that dry. I'm going to go ahead and say, yummy, yummy, this
piece is done. You can call your piece done at this stage if you've used something interesting behind it, or you can continue building
up the layers if you want to add some pieces on
top of that, you could. It just depends on what yummy fun stuff
you have in your stash. Look how pretty that is. It's very grungy, but it's interesting because
now you want to get up close and see what's going on with the piece that's
in the middle and look, it's weaved and it's got layers and it's just
so interesting. I want you to try a
piece of paper weaving. These are very pretty
too if they're mounted just on
their own piece of white background or a piece
of colored mat board. The piece itself is
just very interesting. I want you to play with some paper weaving and see
what you can come up with. I definitely want to see
your finished pieces of this and I'll see
you back in class. [MUSIC].
11. Final Thoughts: [MUSIC] I hope you had fun with
me today in class. It has been a blast. I have loved having you in
another one of my classes. I can't wait to see what your projects end
up looking like. If you're like me
and you're like, I want all my art to be pretty. [LAUGHTER] Then
this is definitely the best way that I know of to step outside your comfort zone and to try something different. Something completely
opposite of what you normally think you would enjoy, and just try to create some ugly art and just
see what you end up with. Because I got to tell you even
though I call it ugly art, when you're done look
how pretty this is. It's not like pretty with
the pretty colors and stuff, but to me it's still
end up really pretty. [LAUGHTER] I had a
lot of fun making it. I feel like stepping outside
my comfort zone and maybe creating art in a way that
I don't normally create it. Expands your knowledge, and it gets through some problem solving and you'll
learn new things. I want you to start
to get uncomfortable when you come up
to your art room and you start to create things. Use colors that you
wouldn't normally use. Go with an idea
that you wouldn't normally think of like grunge, grunge abstract, grunge
collage, anything. If you're into the
very pretty abstract, pretty colors, pretty paintings, whatever it is, think
opposite of that and say, let's step outside
our comfort zone and see what we can create. I've really loved having
you in class today. I hope you enjoy the
projects that we do and I can't wait to
see some of yours, so definitely come back
and share those with me. I'll see you in the next class. [MUSIC]
 DENISE LOVE, Artist & Creative Educator