Transcripts
1. Introduction: [MUSIC] Are you like me and
you create a lot of art, but maybe a lot of
that art is not stuff that you really want
to hang on your walls? I create a lot of
art and some of it, I love it, a lot of it I
just stick in a drawer. I was thinking, what
can I do with that? I don't want to just leave
it in a drawer forever. I don't want to throw it away. It's something I created
and I spent time on. But what can I create
that I can really love? I'm Denise Love, and I'm an artist
and photographer based out of Atlanta, Georgia. Today I'm going to show you a really fun project
that I came up with to do with these yummy
little scraps of art that maybe I just
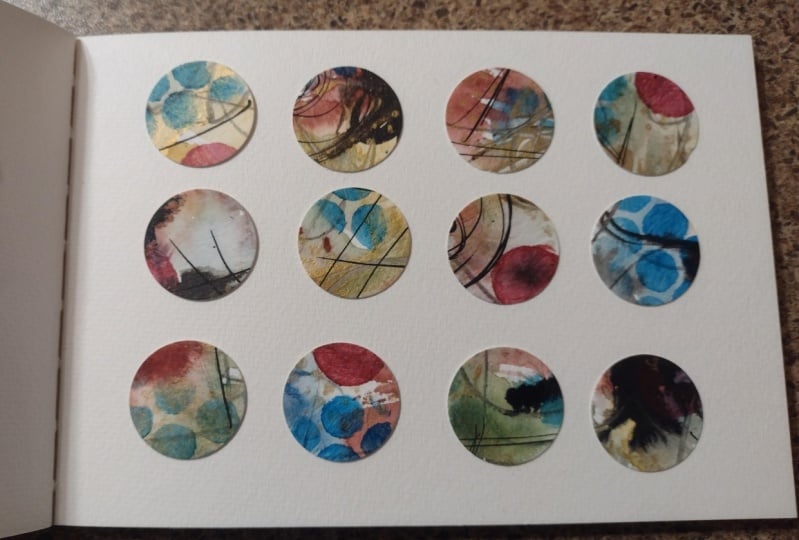
don't love initially. But once I've created
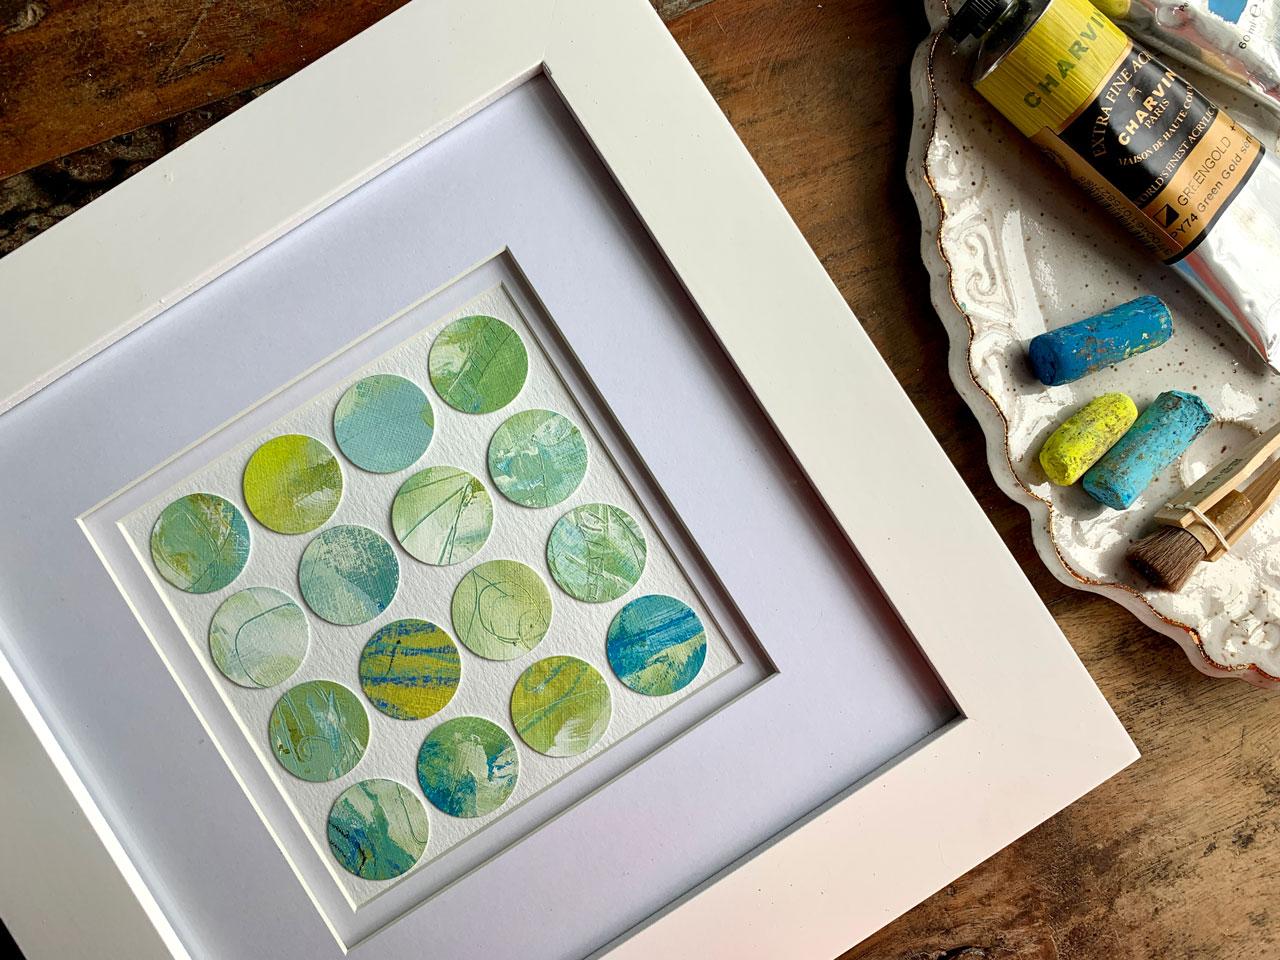
this yummy dynamic, a little piece of dot art, all of a sudden it became
so much more exciting to the point that I've actually created several and framed them. Today, I'm going to
show you how I create these and I hope you get inspired to create
a few of your own. There's lots of things
that you can do. You can do smaller
pieces like this. You can do gigantic pieces and they're just so beautiful
and interesting. Now when you get in, you get excited to
look at the details. I know you're going to
love experimenting with this and I can't wait
to see what you create. Let's get started. [MUSIC]
2. Class Project: [MUSIC] Your class
project today is easy. I want to see you create a
piece of dot art of your own, whether you choose to use pieces of your own art
that you've cut up, old book pages, vintage
papers, handmade papers. You can get really creative
with this and you can make small pieces of
art like I've done. You can frame a piece or two, you could do large pieces, you can make greeting cards, you can make bookmarks. There's a lot that you
could do with this. Now you have the art that maybe you weren't
very excited about, or this graphs that you had leftover turn into
something more exciting. I can't wait to see what
you create in class, come back and share
that with us. Your assignment
is to create one. But I've definitely take
any that you want to share with us if you want
to share more than one, and I can't wait to see
what you do. [MUSIC]
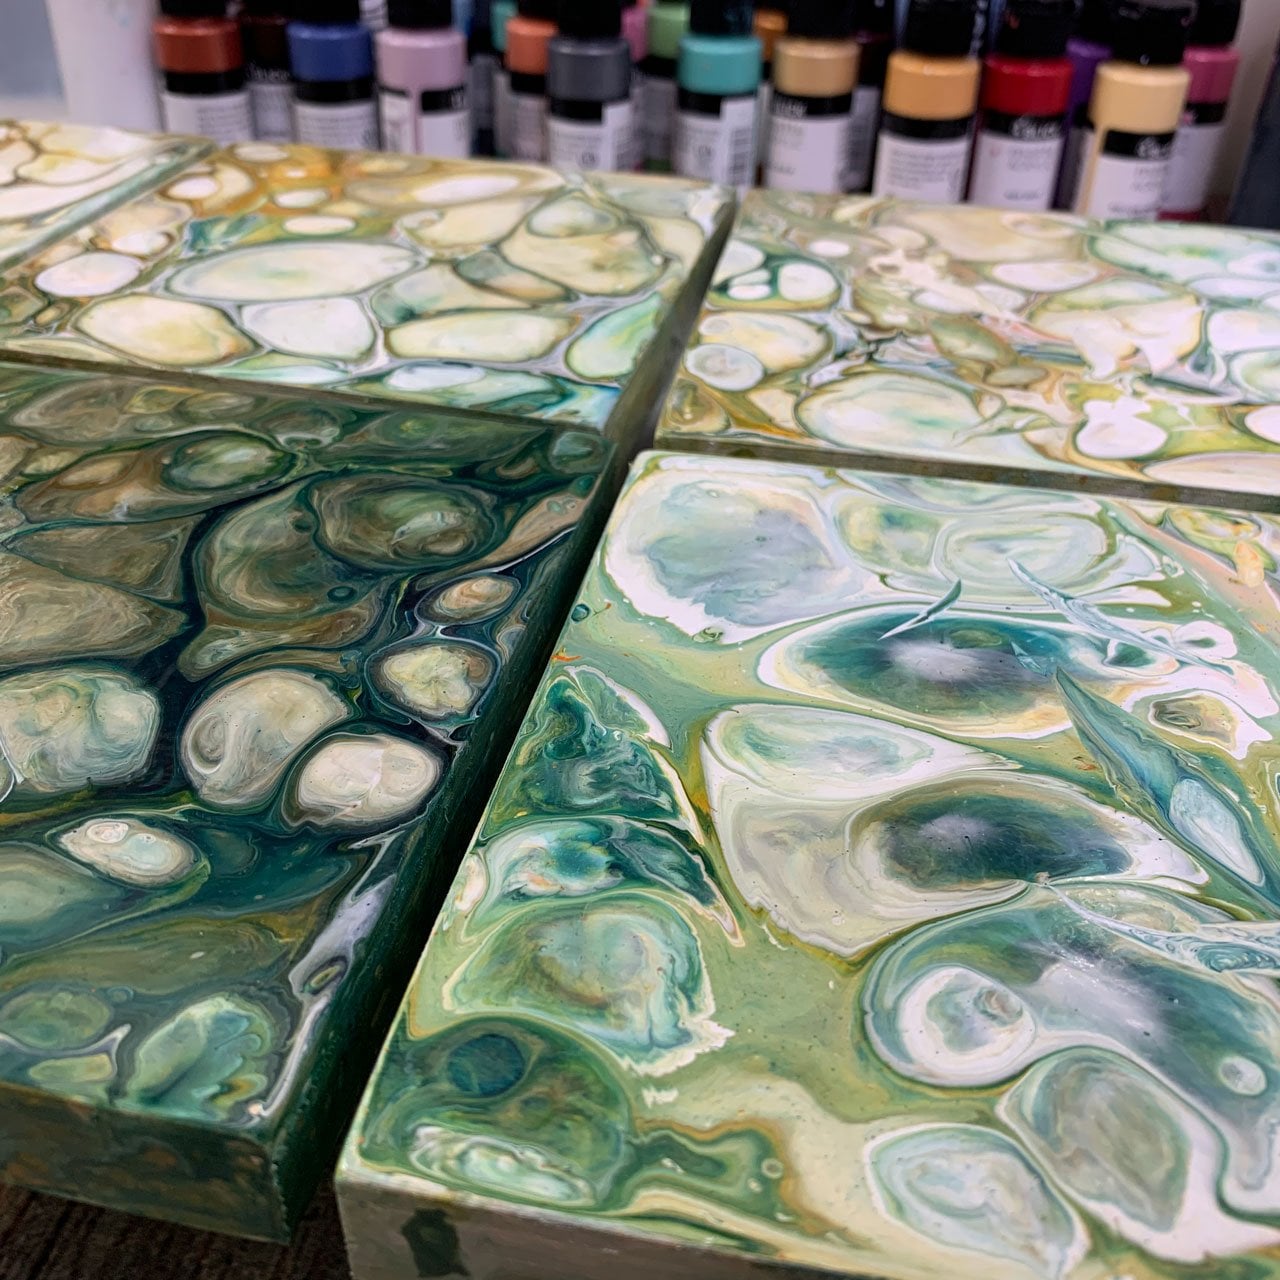
3. Supplies: [MUSIC] Let's take a look
at our supplies today. For this project, I've created several
already and I want to create a few of these for
class so that you can see exactly how fun and easy
these are to create. I framed one up. I have
two more of these frames. I want to frame up a set of three different
colorways so that I can just have some interesting bits to
look at as I come close. I have used pieces
of my own artwork, so we'll look at in a moment at different things
that we can use. I've done different
size circles. I've done larger circles
and the smaller circle. What I would
recommend if you plan on framing these like I do, because let me tell
you these look good from the very get-go. As soon as you cut
these circles out and start placing
them in your grid, you're going to be like, "Wow, I would reframe that
and hanging it up because it really
does look so good." [LAUGHTER] By your frame first, so you'll know what size
you're working with. I've done a five-by-five
piece of artwork, and this is an
eight-by-eight frame, and I've done it
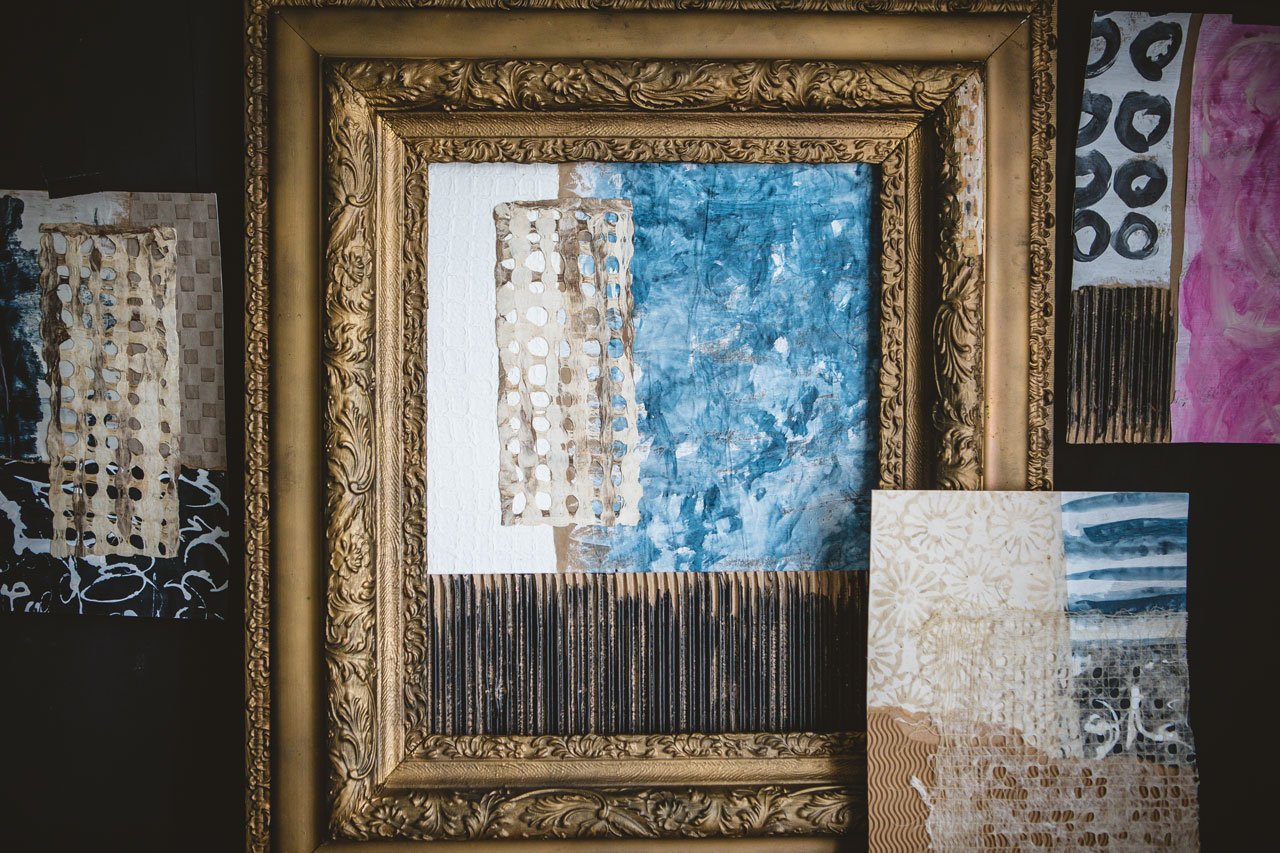
with the white mat. But you can certainly do
more interesting things. You could do the black
frame with the white mat. You can take it to
the custom framer and let them do some
colored matting for you in a very interesting frame like this right here
would be really cool with one of these colors picked out and maybe a
yummy gold frame. If you've got some vintage
frames that you collect, like I collect vintage frames, this might be
something fun to have, something very modern put
into a vintage frame. Lots of yummy stuff that
we can do with this. I've got a couple of different circles here that I've cut. The reason why I recommend you go ahead and buy
some frames first, if you plan on framing these with an inexpensive
pre-made frame, I got this at I
think the Michaels, you can get it
anywhere that sells framing that was ready
for you to frame up. I like Michaels, because
they have lots of different sizes and stuff
in ready to go things. See, this is packaged up, ready for me to open it and
just put my piece of art in. I love that. I have a set
that I'm going to make. I made this one first, and then I decided who
those really do look good. Let me go ahead and get my frame out and put that in my frame. I figured out immediately
that my circles, if I put it up under that mat, were up under the mat. That's why I say by the
frame first, because then, you can use the mat
to then see where can I put these circles so they
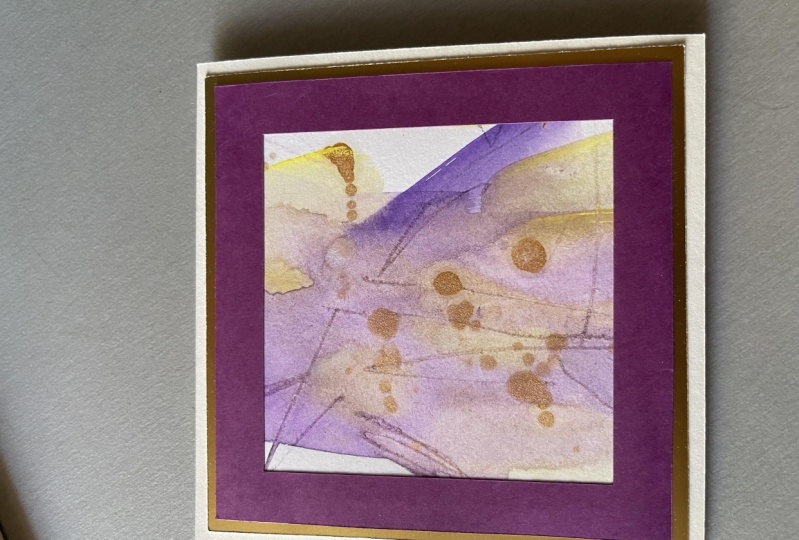
all fit in the matting? This one I'll just
have to either get a single mat because this is a yummy double mat so that
it'll fit in one like this, or take it up to the custom framework
and let her just frame one for me because I really like these colors
and I think that this purple and this red
and this yellow, I've got some yummy stuff
to work with there. Maybe matted in this
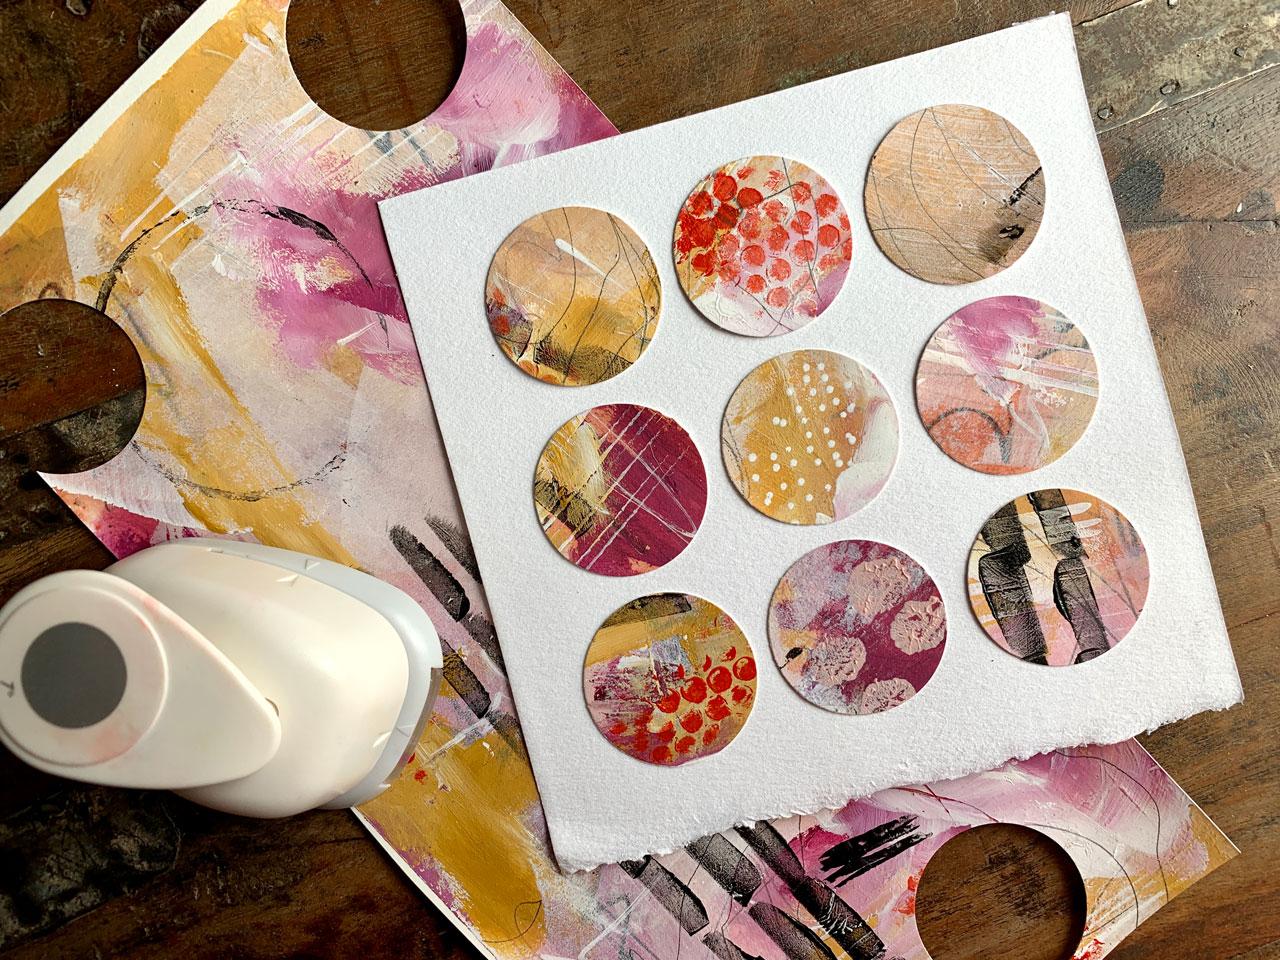
mustard and gold frame. This may be a gold frame option. [LAUGHTER] But anyway. So I cut the circles, and I'm using pieces of my
own artwork to do this, and I'll show you in a moment some other options
that you can do. But to cut the circles, if you want to go the easy way, then get some of these
circle paper cutters. You slip the paper right in, and it cuts the circle for you. They're all the same size, they're all uniform, and
you have a couple choices. I've got the one
inch circle cutter and the one-and-a half
inch circle cutter. I got these at the
craft store over where the paper goods and the
craft supplies are. These are fun. I actually
now wish there was a 1.25 cutter on instead of a one and a half inch
cutter because that's a gigantic difference
between those two sizes, and I want the one
in-between it [LAUGHTER]. For the smaller pieces, I recommend doing circles appropriate to the size
you're planning on making. If you're going to
make smaller pieces, this one inch size is perfect. If you're going to do
larger pieces and we can do much larger pieces than
these, like 8 by 10, 9 by 12. We can do some fun stuff there. Then I would do probably
the larger dot. If you only want one
dot between the two, I do think the smaller one
is the one that I purchased. But again, I'd really want one in between
these two sizes. I'll make a looking
around or look online and see if there's a
third little paper cutter. Now, if you don't want
to do that and you want to stay something easy, maybe inexpensive, which
these aren't too expensive. I got them 40 percent off, so I only paid five
bucks for them. But you can do, if you've got one of these
already at home, you could do a circle template. You can draw your circles. You could take your
pair of scissors and cut each circle out. I didn't buy this
for this purpose. I've had this since I
was in college because I have a degree in
Interior Design, and we did drafting
of the interiors and this is when drafting was
still hand done [LAUGHTER]. I won't say how many
years ago that was, but this is my actual
draft template from when I was in college. We did it all by hand, and so I still had my
whole little packet of draft things that I just
have stuffed in the closet. Now what I do like
about this is it's got the circle in between the two circles I
said I wanted, so, I've got the one inch, I've got one and an eighth, got one and a quarter, I've got one and three eighths, I've got one and a half. Look at all of these
other options, that I have all on one template. The reason why you might want to do this
is if you really, really love doing the
circle art and you know, you can make these
and sell them in a gallery just as well
as sell them online, sell them through your art site, frame them for your friends, these make good Christmas gifts. This gives you all the
options on one template. It is certainly a nice way to go if you don't have access, or you don't want to buy these little paper cutters
all the different sizes. Two options there for
cutting our circles. I also have a pair of scissors handy because we're
going to need them even if we don't
cut the circles out, if we've got a little
whitespace on our page, we don't want to cut the
white strip out of the page, and I'll show you what I'm
talking about [NOISE]. If we have our own little piece of art that we're cutting, and you've got a white edge, we'll need to cut that white
edge off because we don't want that to be
part of our circle. You can use any paper that
you want to mount these, I'm using some paper that I
got from choosing keeping, which is the art
store in London, because I liked the
raw edge on one side. But for this project, we're not using that edge unless I frame this free-floating. That's another option
with these two. If you don't want to mount
them under a mat and you want a free float them
on top of the mat, so say we wanted to free
float it on a goal, on a yellow ocher mat, frame it in gold, week float that piece and that piece
of paper is really pretty. You can make your
own torn-edge pages before you create your circles with some watercolor paper. I like the hundred 40 pound
cold press watercolor paper. If I were going to
make my own and tear the edges before I start
glue and my dots down, I'd just go for my standard watercolor paper to do that on. Cut it out the size I need it, tear the edges, and I'm ready to do my art and I could float frame
and if I wanted to. But I'm using these
because they're the right size for this
piece of art and it's convenient that I
already had it and I don't have to cut the
paper out [LAUGHTER]. Any paper that you want
to use to mount these on. We are going to glue these
pieces of art that we cut out. We're going to glue
these onto our paper. I like Yes paste. I'm going to be using Yes paste. You can put a dab on the
back and you can still move all your dots around so
they're perfectly straight, which I did a couple of times on this before I was satisfied that there wasn't one leaning in the wrong direction and
the line was straight. I also did this one
with a glue stick. If you have an acid-free
glue stick [NOISE], those are fine too. But I do want you to get the acid-free because if
you're going to mount this and sell it as a piece of art
or something that you want to be beautiful for a long time, you don't want the glue to eventually yellow
or bleed the paper or anything like
that so that you can later see it or bleed
through the top. You want something
acid free and I have a bunch of these because
I got a whole pack of them. But you could use a
glue stick if you want. I like the Yes paste, Which is like glue stick stuff, but I'm going to get it
out with a palette knife. That's our glue options. What can we use to
make these pieces? I'm going to be using [NOISE]
some of my leftover pieces of art from when I did the
abstract adventurers classes, if you took any of those where
we created a big piece of art and then we cut out
little pieces that we liked. I save all those little
leftover pieces of paper, and I've had several
people ask me, what can I do with
this leftover art? Or let's say you have a
piece and you're like, I don't really love
it as a piece of art. I'm just going to
throw it in this box and think about it for later. You can cut these
up too they don't have to live just
like you had them. This is one of the things
that I love to do with these leftover scrap bits or the pieces that I cut out and I just ended up not
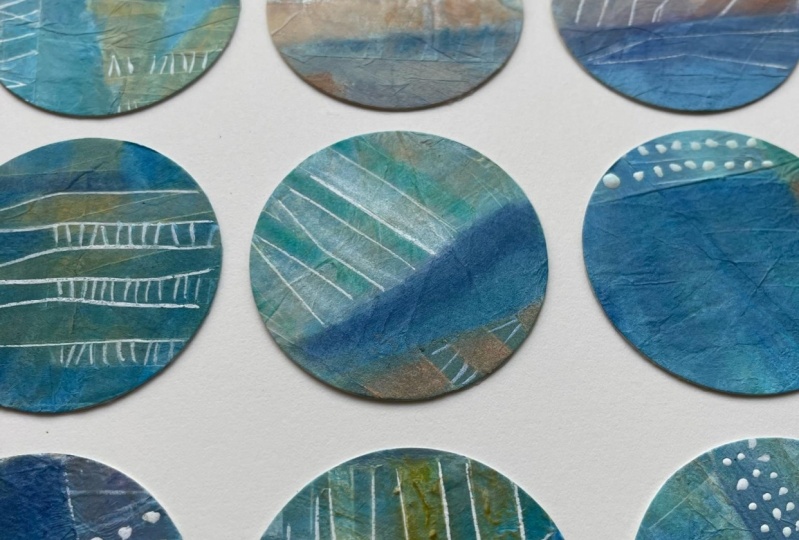
doing anything with it. Look at all the
interesting stuff going on in that
piece. I love that. That's one thing that
we could use these for, is our leftover pieces from
playing with abstracts. I also did at some point,
some eco-printing. I have some eco-printing here. I could do a piece out of eco-printed pages and look
how pretty those are. This is something
fun that I could do. [NOISE] With that I
could cut pieces out of the eco book that I made
and have lots of variation. Another thing is that you could
use these old book pages, so you don't even have
to use a piece of art, or you can paint
some scribbles on here and then cut those
out and that would be fun. You could use different old
book pages, old papers. Here's some old page
out of music thing. You can use old book
pages and papers. Another thing that you could
use is some handmade paper. [NOISE] I collect a
lot of handmade papers for some art projects to
use these collage papers, but this right here would be the perfect thing
to do with those. You can pick, say two papers
and alternate your dots. Look how beautiful this
right here would be. Now that I've looked at those, I'm thinking, It might be a
piece that I come up with. Handmade papers or
another fun option. Pick two or three
depending on how big the piece you're creating, pick a couple that has some pretty contrast and
then do alternating dots. [NOISE] I hope you enjoy all the different options that you could use because
that's basically what we need. We need a piece of paper, we need something to
cut our circle out, whether that be the paper cuts or a circle template that you can then cut
all the circles. You need some glue. [NOISE]
You need some glue, and I liked the Yes paste
for today's project. Then you need whatever
you're going to cut up to make these. If you're going to frame it, go ahead and buy your
frame first so you can use the mat as the right
sizing for the dots. So let's get started. [MUSIC]
4. Creating Art From Left Over Scraps: [MUSIC] Great, so I've already
opened up one of my frames. I had three of these
and one of them already framed and two of
them I didn't yet. I've got a piece of paper here. Open that frame up so that I
can use this to judge size. I'm going to set that to the side for a moment
and then pick out, what's the piece I'm
going to create today. The piece that I
already created, I made one of these
in that bigger piece. I made one of these in
that smaller piece. When you're working with lots
of your old pieces of art, you want to be careful
because if you've used things like pastels like
I've used, I mean, you might want to
fix those before you start touching them
and cutting them because I ended up with pastel everywhere and had to be real careful not to smear pastel
on my bass paper here. I want that bass paper
to be very clean. Even digging through
these pieces, I know that I have
not sealed them [LAUGHTER] and I need
to decide and be careful when I'm
cutting and using that. I'm not getting them all over
myself and my paper here. I'm trying to find
one that maybe has big enough pieces that I know I can get
enough dots out of. That's so thick it felt
like a couple of pieces. I want to go same colorway. I really like this colorway. That might be this one. You could even,
if you wanted to, go back to that first abstract
adventures class where I'm showing you how to
create abstract art without all the stress
we put on ourselves, go back to that class and create some pieces of art to
cut up specifically. Look at this one. This
one speaks to me. I could actually maybe even
throw it in with that, create some of these
specifically for this project. If you don't have
any leftover art, you want this to
be your own art, go create some art, and then come back
and say, "okay, I think I'm going
to use this and see if I get enough
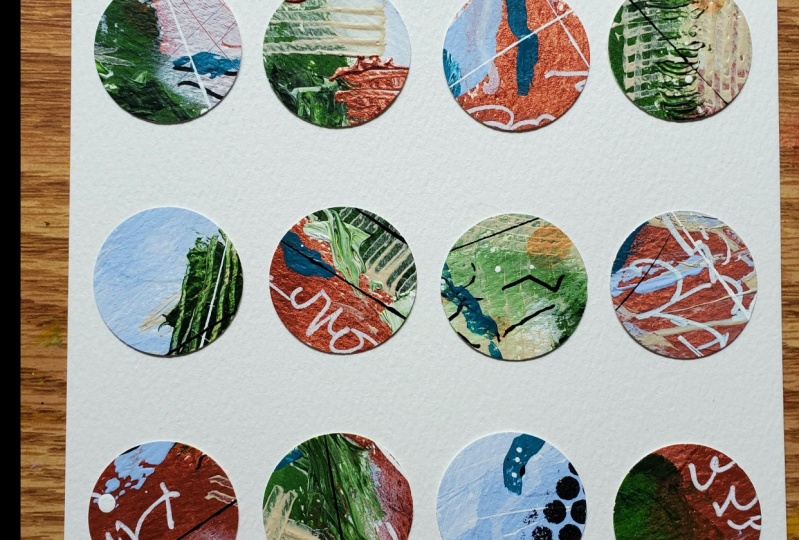
pieces out of there". That blue-green and
that pink, yellow, orange color family
always is so exciting. I may or may not have enough pieces that I can get
out of this, so we'll see. If I don't, and I have these
pieces of art somewhere, I might pull them
out and cut them up too because I don't have
to frame all these, but I need 16 pieces because in our original piece,
that I'm duplicating. I opened up that one
to do the next piece. But if you'll notice, if we're
doing the one-inch circle, I've got 16 pieces that
I can see that fits in the specific frame
that I have purchased. That is what we're going for. You can see this other one, the larger circles it did nine, but I don't have a frame
yet to put this in, so I don't know if I've
spaced them correctly or not. I may have to have it custom framed if I end up loving it, but I'm going to go
ahead and cut these out, and I don't want to
cut any white edges. If you've got white
edges and you know, you're going to bring your
little cutter in here, cut the white edge off because you don't want the
white edge on your circle. I want at least 16 of
these little dots. Let's just get rid
of this because I do like these little cross hatches. You can be strategic
about it if you've got big enough pieces of paper and you want to get real
super strategic about the exact
part that you want. You can do that. It's almost easier if you flip it over and you can make
sure it's in there. I'm going be random
about it here and let serendipity decide for
us what we end up with. That's four and
this will be eight, so I definitely have
enough to get these out. You see why I like these
little colored cutters. If you try to draw
circles and cut them out, you can see how much
slower that would go. I like this little
corner right here. I love that right there. I definitely want that. Make sure I've got
everything in there. I don't want to cut part of
it off that I didn't intend. Let's look at what
we've got already. You could cut extra dots too, because there may be a dot when you get them all out
there that you're like, oh, I love this one or I don't
love this one or whatever. If you have enough
dots to pick from, then you can have some choices. I like it when there's
something going on right in the
middle of the dot, like look at these dots here. You may end up
using more petals. You look all of those dots. I want that extra. I love this section right here, but I don't see how I can get to it unless I cut
some of this off. Let's just cut that and then
we can come right in here. I want some of these to have
all that yumminess on it. Look at that. One, two, three, that's nine. [NOISE] We want four more. Just looking at which ones of these has some color difference. I really like this right here
with that orange in there. I'm going to cut into that also, so I can get right in here. You'll see now
I've got pastel on my fingers and coming
off on my little cutter, I can tell that this wasn't sealed and I use pastels on it. When I go to make
my final piece, I'm going to be very careful. I have some baby wipes here
to wash my fingers off before I get my piece of paper out and start
gluing stuff. That's what I'm
going to do next. I've got those cut out. We're going get our piece of paper and we're going
to get our Yes paste. I want to call it yest, but it's yes. Why yes? [LAUGHTER]. I'm going to
get out my little piece of paper from the
little pad that I have. It's already sized
out correctly for this project or just cut a piece of paper from
your watercolor pad. That is perfectly fine. Now, we can decide before
we start gluing these down, how do we want these. Do we want to move any around? Do I have too many of the same
whatever in the same spot? I want some variation? Do I like all the pieces or do I think one doesn't belong? I actually think that that one right there with the white, I don't know, it's
not grabbing me. I want there to be
something more. Maybe I'll cut out
an extra option. Let's see. I like
this. Let's see. Do we like that better? That's about the same. [LAUGHTER] Maybe I will come in over here where I can
get this orange line. Yeah, I like that one better. Eyeball it before
you start putting it on your paper
and gluing it down. Now, I'm going to go ahead and very carefully
grab my Matte. If you want, if you're for sure that you're going to use
this and frame it in this, we could even go ahead
and tape this down. I'm trying my best not to get any dirt on the front
of my white Matte, so maybe I'll set
something under here. If we go ahead and tape it down because we're going to shift it a little bit as we're gluing
until we get it perfect, if we tape it down
and we don't have to worry about trying to
tape it down later. If you want to use
some archival tape to go ahead and
attach that paper, do it whatever you
feel comfortable with. I'm doing these for me. Just going to tape them down with the painter's
tape that I have, but if I were doing this for a gallery or something to sell, I would probably use
an archival tape to tape this down like I would if I were framing something
for a gallery, I'd just go ahead and do
all that right up front, and then when I was done, I could slip my
Matte into my piece. Here we go. Then I like
where everything is there. I'm going to open
up my Yes paste. Now, one drawback to doing
it this way, I just thought, is now we can't put
something flat on our piece of paper to make
sure that it's all flat. I'm going to undo everything
I just did because, remember, when I
did that first one, I actually flattened it under a book to make sure all
my pieces were flat, so let's scrap that. [LAUGHTER] Now we're
going to glue these down and I'm just putting
a slab of it under here, because this yes paste, I can still position
things for a bit. It doesn't dry super fast, so I can get them
all positioned and I can take my finger and still move them
around a little bit. If you're doing the paste stick, you can still do this
for a little bit. Then at some point they're going to just be dry and they're going to be stuck. I love this little bit
of orange out here. You can get real specific. You can have these
in a certain order, you can have, like I'm doing one all from
one piece of art, but what if you wanted to
do different pieces of art and have a colorway going, a color wave or something going, you can definitely get as
picky or specific, oh, don't get on there, as you want. I like mine a
little more random, but you can definitely
be a lot less random with these if
that's your style. It's why I love this
type a little project. Now I feel like I've not
wasted any little bit, even if I didn't love
it when I made it. I feel like I had wasted it, because these just sit in a box. Now you can pull these out of the box and create
something amazing. [LAUGHTER] You're framing with this
Matte like this does for me, it does when I'm
peeling the tape off of a finished piece of
art that I just created, that peeling that tape
just finishes it and makes it seem like an amazing
complete piece of art. Putting these in a
frame like this, makes these dots look like
an amazing complete piece of art when before it just looked like a little scraps of
paper sitting around. Now I've got everything with a little bit
of paste on it, we'll just close that up, and now we will very carefully
shift these until we're, okay, that's exactly
where I want everything. Do we like that? I think we do. It's hard to see when I'm
looking down on the camera. But now I think I've got
everything where I wanted. I can set my piece
of watercolor pad on top of that and really flatten it down and let it
sit for a moment. You can let that sit
for a very long moment, but I just wanted to make
sure I got it mostly flat. Then I can still come back and adjust because the paste
is not 100 percent dry, which is what I like about
using the yes paste; I can have a few
minutes to adjust. I actually have some of that linen mounting
tape I could have got out, but I'm just going to tape that. If you do some type of tape and you want it to be archive, I'll do it with some
acid free tape. Look how beautiful that is. Now because I did
this like that, I can now go ahead and put
our piece in my frame. What I like about these little pre-made frames that you can get is now I'm done and I
can close these up. I do get a lot of things
framed at the frame or two if these are
ones that you really, really love and you
want to have them professionally framed. But look how amazing that is. Oh my goodness, we just
did a whole project, start to finish using
some of our existing art. Check it out, check it out. I love that. These
are going to be really beautiful
hanging together. I need to do a third
one and then I will have a beautiful set
to hang in my house. Now if you stick them in
your frame as fast as I did, sit them like this so that nothing falls off until
it's completely dry. Otherwise, you'll
need to maybe set something heavy on
there and let it dry before you frame it up. But I hope you enjoy giving
this little project a try, because these are super fun and they're beautiful
when they're framed and they're really lovely when you use
your own pieces of art. Either go create a few
of these pieces that you can then cut up
or use some stuff that you've already used
and maybe put in a box like I have and put those
scraps to use. I'll see you next time. [MUSIC]
5. Final Thoughts: I just want to take
a moment to thank you for taking this
short class with me. I hope you got inspired
to make some pieces with the leftover arts scraps that maybe you've got sitting
around like I do. I'm really excited to see what you end up creating
after this class. Definitely take
some pictures and come back and share
them with me. I love some of the pieces that I've created and I'll
probably spend the rest of my weekend just making
other fun stuff because I still have more pages
that I can cut up. I would like to say
as a final thought, I have been working in
class with circles, but you can work with any shape and do fun stuff like this. When I was at the art store, they had all kinds
of those cutters. I have the circle cutters, but they had squares. They had hearts, they had
stars, they had leaves. I think the leaf
one is fun because you can make the leaves
go up and down the page. They're very fun. Get
creative and just look around and see what can you create and what shapes
might you like. The squares and
rectangles would be completely different in look
and feel than the circles. I hope you get excited
about playing with the scraps and I can't wait
to see what you create. Definitely come back and
share some of that with me. I'll see you next time. [MUSIC]
 DENISE LOVE, Artist & Creative Educator