Transcripts
1. Introduction: [MUSIC] If you're like me, you make a lot of
bad art in between, hopefully, some good
art that you love. What do you do with
all that bad art? Do you stick it in
a drawer thinking, maybe I'll like it
some other day, or maybe this will be the base
of some other piece of art, or do you throw it out? I'm Denise Love
and I'm an artist and photographer out
of Atlanta, Georgia. Today, I've got
some ideas for you on what we can do with
all that bad art. It's not even bad art, I would just say it's not the
art that I wanted to create because to somebody, the
pieces I'm cutting up, that could be something
that they're like, "That's amazing,
don't cut that up," and I'm looking at it, thinking, should I just throw this away? Because, about two
or three weeks ago, I went into my guest bedroom
where I store all the art from the different
workshops that I do, I'm like, "I have no more space
and I have lots more ideas and I'm going to be
creating artworks for as long as I can." What am I going to
do with all this? I've run out of
space and you know, I live in a little townhouse, so it's not like I
have a shed out back where I could start
storing stuff or I don't have an attic
where I can [LAUGHTER] stuff the stuff I no
longer want to look at. My space is at a premium. So what do I do with all
this art that I'm like, this is just terrible stuff
here. I don't love it, I'm not going to do
anything with it, it's trash basically. Should I just throw it out even though I've
saved it for so long? The stuff still sitting
there in my bedroom, and last night I was
like, 'Wait a minute, what if we go back to
my favorite technique and cut stuff up [LAUGHTER] because I love to cut up art and see what we can
create and collage and re-imagine these pieces
that we just don't like." That's what I did today. I didn't practice these
pieces before class. I wanted to create and
get the initial feel and get that little art high
if stuff was working out because if stuff
wasn't working out, I was just going to
scrap this workshop. [LAUGHTER] But stuff worked out. We're going to create
several different projects, little micro mini
collages, stripes, that let me tell you, I got on a little art
high making these stripes with these little mini triptychs
that we're going to do, they turned out so good. I know that once you
make a few of these, you're going to be like, "I'm never throwing away
a piece of art again." You can create and
then know in your mind if you don't love it, put
it in the recreate box, and then recreate
something like this because then it's amazing. I'm thrilled. I got so
excited at the piece that I was like, "I
don't like this" and it ended up like
that and I'm like, "Oh my God, I love this." Totally made my day. I want you to have
that same feeling. I want you to cut up
some of these duds. Don't throw them away. We're going to re-imagine some things at you
can do with this. Then once you start
making some of these, I want you to come up with
some of your own ideas for how you could re-imagine
the different pieces. Use them as the
base of collages, use that piece that you cut up and create like we did today. None of your art needs to
be thrown in the trash if it's just paper
that you're like, "It's taking up space." Once you see some of these, you're going to be
like, "I need that, let me find a Rubbermaid tub that I can just pitch things in until I'm ready to use them
for a project like this." So I hope you enjoy doing
the different projects today with some art that
you're not happy with and turn it into something that just brings
you a ton of joy. Because I'm telling you,
these are super fun, and those stripes, if you do nothing
else but the stripes, the stripes are the most fun. [LAUGHTER] I can't wait
to see what you create. So definitely come back and share those with
me in the projects, and I will see you
in class. [MUSIC]
2. Class Project: [MUSIC] Your class
project is to come back and share one or
more of the projects that you tried in today's class. I really loved the stripe one. If you don't try any
of the other ones, at least try the stripe one because that is
my very favorite. I had a little art high
going after I made those. I want you to experience
putting that together and then thinking, "Oh, look
how amazing that turned out." I can't wait to
see your projects. Come back and then share at
least one of them with me. I'll see you in class. [MUSIC]
3. Supplies: [MUSIC] Let's take a
look at the supplies that we'll be using in class. I have pulled together
a stack of just old art that I know all of us have. If you're making art
and you're thinking, "Oh, this looks terrible,"
and you're throwing it away, stop throwing it
away and throw it in like a little rubber
band and just keep it. That's what I did. I've been keeping these in
a dresser in my other room. The dresser was so
full that I'm like, "Okay, we need to
weed through this and pick out the art from all of the art classes that I
truly love and keep those." The rest of it, what
do we do with that? I've pulled out some of that and I've got plenty of duds
when I make a workshop. [LAUGHTER] I'll have plenty
of samples where I'm like, "No, that's not working. I
don't like how this is." Some days nothing works out and everything that I try to
create just looks terrible. [LAUGHTER] Then some days, I sit at my table
and magic happens, and the pieces that are
just magical, I keep those. The rest of this, I'm just
like you and I'm like, "What do I do with this? Do
I just throw this away?" I have an idea today
of what we could do with some of this art
that we're just thinking, we're going to create some
abstract art with our trash. I'm calling it trash because I could have thrown
this in the trash. [LAUGHTER] We're going to
make some abstract art with our trash pieces of art. I want you to go
through and just gather all of the pieces that
you're just not loving and see if we can create
something new that we will love. One of my favorite things
to do is to cut up art. [LAUGHTER] If you've been
around in any of my classes, you know how much I
love to cut up art. This is a perfect project for those of us that love
to cut things up. I'm going to be cutting
my art into strips and different sizes
and different pieces that I can then glue onto
a new piece of paper. We'll call this almost like creating some abstract collage. But rather than it being
like a true collage, I really want it to
look like abstract art. We're just come up with some different ideas
as we're going on what we can cut these
up and create them into. I'm going to be using
possibly my paper cutter. Somebody asked me in one of
the classes what this was, and this is a 12 inch
Fiskars paper cutter. This is a very old one,
but they don't wear out and you can just replace
these little blades. At some point, I actually
got a newer Fiskars cutter and this is what the
new ones look like. I do like that they're clear. It's still the same
size, 12 inch, and has the ruler that
comes out on the side, just like my old one does. But it's not been used really. My old one still works great. I'm probably just going
to use the old one, but just know that
is what it is. Maybe I'm saving the new one for a special occasion,
I don't know. [LAUGHTER] I'm used to it
so that's what I'm using, but that's what it is. It's a 12 inch
Fiskars paper cutter. You can get them at
any craft store. They're not expensive. Man, I love having
a paper cutter. I also like those old
timey paper choppers. I don't know if you're
old enough to remember the big wood block
with basically the guillotine chopper
that comes down. [LAUGHTER] Don't think
those are safe anymore. I'm sure that they're
not in classrooms like they were when I was a kid, but you can put a whole stack
of paper there and chop it. It's amazing. How cool would that be
to have one of those? [LAUGHTER] If you don't
have paper chopper, you could just have
something to cut on. This is one of those mat
cutters that you can cut on, a big ruler and an X-Acto knife. We may be using this
method on some pieces too. I have that available
here to be cutting. If I want a bigger piece or I want to see when I'm cutting, or it's too thick to go
into my little paper cutter or my paper cutter gets dull and I don't have a
replacement blade, here is an option for us. Ruler, mat to cut on, and
a nice sharp X-Acto knife. You want to keep some extra
blades for your knife so you can swap those
out when they get dull, they start ripping the paper. Some way to cut your paper and that could also just
include a pair scissors. Have that too, whatever your favorite
paper cutting method is. You also need some type of glue. We're going to be
gluing these down and because they are thicker papers. In my case, these are nice
thick watercolor papers, in most cases, 140 pound. That's a little bit too
heavy to be gluing down with just regular matte medium. I'm going for the
heavy-duty YES paste. It's my very favorite glue. This stuff is amazing. That's what I'm going
to be gluing with. You could use glue sticks, but that's again for a lightweight material and these are going to be much
heavier weight, so I don't think they're going
to hold very well for you. Then heavy matte medium
could be a possibility if you've got the
real heavy stuff, not the light liquidy stuff, that could be a possibility. You just decide
what glue you have, your gluing probably
heavier pieces of papers, so you want that
heavier glue option. I'm going to be
using the YES paste with a plastic palette knife. Then I'm going to be
creating probably just on some pretty
watercolor paper. This is my Canson XL pad, it's perfectly suitable
for gluing things on and creating a
different piece of art. What I most likely will
do is create my art, cut it again so that
if I have any overlap or if I want to trim it
down to a certain thing which is where that
thicker board and, not board, but this
thicker mat with the X-Acto knife would
really come in handy is when we have several layers and we want to cut that
into say, a new shape. Because sometimes with
the watercolor papers, especially if I'm cutting
up old pieces of art, these have pastels
all over them. I'm getting that on my fingers and maybe I'm going
to be getting that on my watercolor paper and I don't want to
have that influence the pieces that I choose. I want to create,
maybe cut it out, we could seal it if
we needed to seal it with some finishing spray and then maybe mount that cutout to a new clean piece
of watercolor paper. I might tear the edges
of the new sheet with my ruler and make
it some deck old edges, but I could center it in
the piece of the paper and have clean paper around it. I'm probably going
to do that for mine. We could also work
in our sketch book if you want to do some
minis in your sketchbook, that's a fantastic idea. Then you can always have
those bound up in your book. We're going to have
some type of paper, I do like this Canson XL
because it's under 40 pound. It's inexpensive and you can get great big pads of it
but not very much. Then I want you to
gather all the old art that you can find
that you thought, "Oh, this is trash or didn't
turn out or this is *** ***" [LAUGHTER] and just see. Actually this was a colorway
that I didn't fully love, now I do love it. Some of the trash pieces when you go back
and look at them, you might change
your mind and say, "Oh, wait a minute, I do
actually really love that," and set that to the side
and not tear it up. But some of these others, I'm like, "Yeah,
that was a dud." [LAUGHTER] I have plenty
of duds just like you do. I really wanted this
teal and red to work. These are actually
really pretty, so maybe I pulled some
into the dud pile that necessarily weren't duds. But would this make a bigger, pretty collage piece
in my bigger abstract? So we just have to
think about that. Which ones of these
could we combine? What could I combine that with on some of these other
things that I'm cutting up to make an interesting
abstract composition? I don't know. We'll just see. I've pulled them out and not using them for
anything else. I even pulled some of
these fun ink ones that I never actually painted after I was doing
all my ink samples. That might be fun
for some pieces that are just
contrast-y and neutral that we put in with some pieces
that have a lot of color. Even if you have ones
that you've drawn on with just ink and paper
or mark made or whatever, pull some of that too. That might be a fun
contrasting element. That is most of the supplies I think I'll be springing
on you in class. Let's get started. [MUSIC]
4. Neutral Collage: For this first piece,
you know what, let's do something
that just really takes the hard work out of this. Let's be a little bit mindless. Really quickly go
through your art, pull together things that are in a similar
colorway possibly, or a completely
opposite colorway. You just pick what
you want to do there. Maybe some different materials, maybe some black and
white mark-making, maybe something that was an idea that really wasn't
coming together for you. Thinking that we
can just glue these down haphazardly and cut these into micro mini composition. These have pastels on them
so they are getting all over my fingers and I'm not
even worried about it. Because these have white edges, I'm going to use my paper cutter and just chop some of these off. At this point too, because we were not thinking
too hard about this, we're not trying to
create our masterpiece. We are just seeing what
can we come up with. What I want you to do is cut off any white edges and then
just start cutting these into strips or squares, or interesting shapes that we can then use as collaged pieces. Look at that right there, that right there,
that is amazing. This is why I like to cut apart. You saw the big piece, it looked [inaudible]
. Look at this one. I love how this little
bit comes into here. Man, see, now that right
there my favorite piece, I already want to use that. This was just an
idea that I had. I might cut these into strips
and just see what we get. I don't want to make
this harder than it is, so I just want to create myself a pile of
stuff to pick from. We are just cutting
going fairly fast. If you feel like, "I don't
know if I can do that." Set yourself a
timer and go fast. I don't want you to spend any more than about 20
seconds on each piece of paper so you can't
overthink what you're doing. Your different sizes
not a big deal. This was when I was playing with all those alcohol inks
that let me tell you, I'm still insane for those, not alcohol inks,
the acrylic inks. Still insane for those. But I got on a little kickier with these watercolor graphites. Look at that right there and
I'll see that pretty cool. I was just about to
cut that in half, but it did grab me.
It's like this. Now that's a very
interesting piece. Cool. We may just need
to pull the whole pile, cut the whole pile up like this. Not really thinking about it. Not really working, overworking our mind here and just see what are we going to end up with
these pieces we cut up, because just getting
those two pieces right there that I loved,
made me really super glad that I did not
throw all of these out. See, that's real
pretty right there. Let's keep that one. It's
going to be a bigger piece. Because I get just
as discouraged as you do, I'm making stuff. I'm like, this ain't working. I'm not an artist. I'm just mad at my art table. Why do I even try? Trust me, it all goes
through all our heads. We're right there with you. Look at that, see super fun. Should we cut that in half? Let's save that and
think about it. Now that has chalk all over it. I do have my very
favorite this microfiber cleaning clothes. Best way to just get your fingers clean enough to
move on to some more art. Now I just want to sit here
cutting up art all day. This truly is my favorite
part of the process. Just seeing what
can we cut out of this and without even
thinking about it, get something super amazing. Look at this piece right here, I'm feeling that, look at that. We now have some movement
on the diagonal. The super cool blue next
to that yummy green. See this piece is much
more interesting. Don't want to cut it anyway. I don't know. We might save
that as a bigger piece. I have a whole
bunch more art down here that I could cut up. But you know what, let's
just get started on our first project and
see what we could get. I've got the cutter here, I can continue to cut things up. I might just look
at these and say, what could I put where? Then when we're done, I
may cut these up again. Let's just see. What if we
did some striking things? Just filling my way here. Might have to cut these down some if we see
something that we like, but we still need to cut on it. I may need to get some
more pieces and cut those. If this is not going to give me some of the stuff
I was wanting. See, now I'm already
feeling maybe I do need to cut some
more pieces up. But let's just not think about
it too hard. Let's go in. I do like these mark-making
ink pieces. Those are fun. I do want to have enough
of those in there maybe. Then solid colors
would be nice too. If I had some solids,
that would be fun. This is Y2. I'm not
worried about the sizes. If we go in a weird
direction here, we can cut it out to
something that's cool. So that's pretty
cool right there. It's completely different. Now, I can come back in
and cut this into some micro pieces and maybe end up with
something interesting. Let's just do that. Let's just go ahead and start
gluing some stuff down. This is a cool
piece in here too, let's just start gluing these down and then we
can evaluate them. I don't want you to think too hard
about these at this point. It would be really good too
if you see a layout you like, take your camera,
take a picture of it, and then you can come back
and start gluing stuff down and you won't lose what you did because you had
a picture of it. I'm just using the yes pace. I like it because it spreads
a bit like a frosting. It's nice and thick. Soon as I stick that paper down, I know it's going to stay. Again on this piece, I'm not working terribly hard
to do anything specific. I'm still trying to
keep it mentally light and just go with the flow. Hopefully, I don't
have too much stuff on my fingers that are
coming off on the paper. But if we do that still okay. It's not a big deal because these first pieces are
like getting our feet wet. Now, if you want to be more careful and create
your masterpiece, then definitely keep something handy to be able to
wipe art supplies off your fingers because I'm
definitely getting it on my fingers, the pastels. Because this is a very
heavy pastel set of stuff. I actually liked this one
right about there, didn't I? As we're gluing you might see
interesting things emerge, like I just saw when she moved some of these
other pieces out of the way. Look at what just emerges here and I'm really loving that. If you start gluing stuff down, and you see something
emerge that you're like, "Oh, okay, I'm loving this." Don't be afraid to go with it. I'm really loving this. What did we still have in here? Do I want to combine
that in there or I could let
that be the focal. Add some more random
marks on top. I love it when you're making something and you just changed direction like
I just did on you. It's okay. Let's see. Kind of want it, yeah. Why not right there? I like it. I like how it continues
that right there. Weirdly enough, I'm digging that right there and
I'm almost thinking, let's cut this up, so totally changed
directions on us. I'm going to use these on
something else I think. But even if you need to make yourself some of these
black and white line ones, you should totally do it
because look how cool this is? If you do some of
those acrylic ink, watch them all run together. Abstracts, look how
amazing that looks cut up. That's pretty amazing. Now we need to let this dry a
little bit and then we will cut this into a piece, and
we'll call this piece done, let me try to cut
it while it's wet. I think, because I would
like to continue moving on. This was going to
be my micro project and I've changed my mind. I think what I'm going
to do, and I like this ruler because it's got lines and it's clear and I can
work at and straighten it. Make sure that what I'm
doing is lined up really good and what we could do also, is make our self a viewfinder. But I'm thinking I'm
going to go ahead and cut this just like
that, along these edges. I just want to make sure
it's lined up straight. I'm going to go
ahead because it's several layers and
the glue is still possibly wet and use my knife. I'm not trying to cut through all the layers on
the first pass. Go ahead and just
make several passes and you can feel
when it lets go, so just make several passes. Look at that. Let's go ahead
and cut this bottom piece. Look at that. I love this because you're
never going to get anything that you expected. Now we can mount
this on a piece of clean paper and have an edge around it and we can
call that one good to go. Because I do actually
love that quite a bit or we can leave it just like
that and we can frame it. I do like setting it
on a piece of paper, having a frame around it
but we could do it just like that and that could
be our first collage. I love this because now my main focal piece is not
completely in the center. It's a little bit
more to the right. I'm trying to think
of things like composition when I'm doing
something like this. I could even have cut
this further over, not had this piece on here
and then that could have been my focal piece on
the rule of thirds, 1/3 over, which we
could still do. Do we like this piece here or is it distracting
and we need to cut it off and have just our
piece of art there? I'm going to leave
it but you vote. Tell me what you thought. Let's clean our fingers off. I don't want to get my
nice clean piece of watercolor paper
completely dirty. If we wanted to, we
could just measure this. So that's about six-and-a-half and our whole page is nine. That gives me about one and
one and a quarter. If I wanted to do one and
one and a quarter on this side to get an even all
the way around the edge. But about right there, about one and a quarter here. It doesn't have to be exact. This is our play pieces but I'm trying to get close and we should
just cut that off. We could fair the edges
to decal the edges or I got it dirty. There we go or just take our yes pace
and mount it and just have a finished
mounted piece of art. You decide how you might
want to finish that. But that was pretty cool
for our first experiment. Jumping in and just
seeing what can we create if we just start
gluing these pieces down? I love that. I'd frame this. I have some mat boards
around that I might just look at what it might look like framed in with a
piece of mat board. How cool is that framed? Say a black man with a black
frame, that'd be cool. I hope you enjoy this first. Just get your feet
wet, pull out pieces, maybe come up with some black and white
stuff that you're just hiding or you could even create for this project
if you wanted to. But create and then have an element as your
standout piece. Super cool. I will see
you back in class.
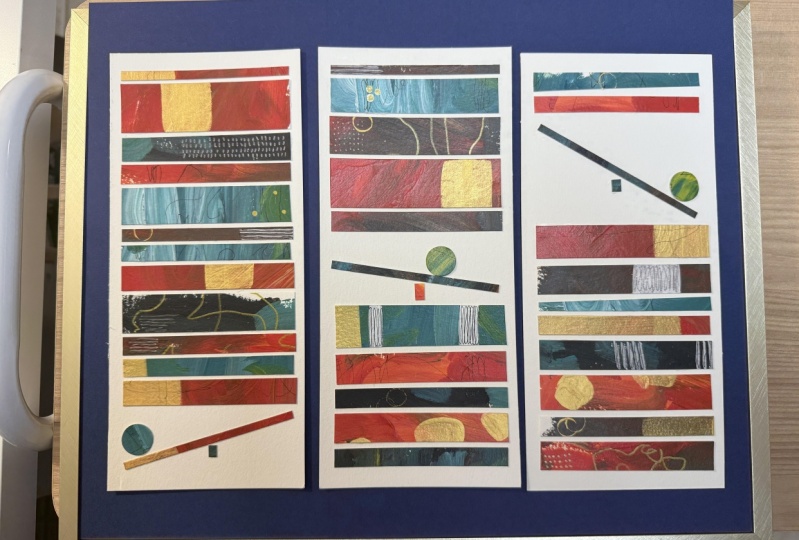
5. Stripe Triptych: [MUSIC] I got a new
project idea for us. What if we make some
long stripey pieces? I had this piece leftover
from when I glued this one onto a piece of white paper, which I think that's cool. I had this leftover, so what if we do some of these
along but stripy pieces; we take these together and just rearrange
and stripe them out. I had this great big piece
of oil and cold wax. This one I've had
a couple of years. It's just been living
in the drawer in there. I thought, what if we
cut this into strips and then use those strips
to make our stripes? I'm going to do
straight stripes, but you could do wonky stripes. It just depends. I did not like the
overall piece, but about when I cut it up, I'm going to love parts of it. I should have just cut this up. [LAUGHTER] What I like
about this piece, we can do skinny stripes
and we can do wide stripes. [NOISE] Let's just
start cutting. What do I want to do? That's a really long stripe, but do I want to cut these
in the right width first? Yes. Let's see about this. If we're going with
say this width, I want these to probably
be about this wide. We can do that with scissors, but I like doing it
with the cutter. If I do these about this wide, that would be great
going all the way up. I might just cut
several strips of this with my hands clean so I don't
have pastels all over it. Then we will cut the strip
the right size to begin with, and then cut these into strips. I'm already getting excited. What I really love is the
variety of color in here. If we switch these up
with some other things, how fun would that be? I could actually take
more than one piece. We could do a couple of pieces and just see what
those look like if we stripe them
in with each other. But there were so
many colors in this that I think we can still
get a really cool effect. There is that one. I mean, they look cool just
like that, don't they? Then what size is this? Is this magically
the right size? Well, it's like a hair
over, like just a hair. [LAUGHTER] I want
them all the same, so let's go ahead and
cut that tiny bit off. It's basically
just a millimeter. There we go. Probably should have
cut it off that side, it has a piece
that's not painted. Look how pretty that stripe is. [LAUGHTER] Pretty stripes. Now, let's just cut these
all different widths. It doesn't matter. You don't have to do
them with the same. We can just cut them some wide, some narrow, I want
some different size. A little strips to move back
and forth and mix and match. Just go through like a little
stripe assembly line here. I want a piece of clean
paper about this size. Let's see if I can cut this and not get the
pastel all over it. [LAUGHTER] We wanted
about this size, which is about pure going. What size is that? [LAUGHTER] This is
about four inches and the pieces of
paper that I just cut are about three inches. We end up with about
half an inch overlap. If I want to cut this in
four inch increments, I could just go ahead. See? Something on that
already, dang it. I just go ahead and measure
out four inches [NOISE] and cut that. Then just use that as my
guide to cut another one. Third one's going to
be not the same size. Are these 12 inch pieces
of paper? Maybe they are. Yeah, they are 12
inch pieces of paper, so it's very close. We have three. What I want to do, I make sure I don't have art
stuff all over my table. I just want to create some
little stripe pieces, and because this is
oil and cold wax, I shouldn't be
smearing stuff on it that I didn't intend to
because they're dry. But I just want to
start layering these in and get a look at
what we can get. We don't have to glue
them down straight. We can glue them down wonky. They don't have to be
perfectly straight. I did want them all to
be about the same size, but they don't have to be
glued on perfectly straight. Now I just want to just start arranging and
seeing what can we get, I want some different
colors beside each other, I want some contrast, I want to put it together
in a way that's different than the way it originally was. Look at these, they're
looking super cool already. I mean, I'm getting
excited right now just looking at
these. [LAUGHTER] Look how cool they're looking. This is the excitement. I want you to feel this
excitement with me. I want you to get excited
when you cut your art up, and you're like, now, I love it. Look at that piece
there. Let's see. Then before we start
gluing anything down, I just want you to get a feel where are you going with this? What do you want the
end piece to be? I love that piece there. What I really love
about this project is we're not getting
wet with new paint. We have a day of not getting
messy with our paint. [LAUGHTER] I'll take it back. I do love to get
messy with paint. [LAUGHTER] See, like
this one right here, look how wonky that one is, but it's still cool. We don't have to glue
these down straight. It looks like we'll
definitely have enough for another one. That's super cool. [LAUGHTER] Look at these. These are gorgeous. Can't even tell you how
pretty these are in-person. I wish you were sitting
right here next to me. I feel like you're
sitting here next to me. I want to get these
about the same size so that we have a little
triptych of stripes. Look at that. When we're gluing these down, I do want to have the same
amount of space at the bottom. They don't have to be perfect
when you glue them down, we can get a little wonky,
makes it interesting. But I do want them in the
end be similar sizing. I need a contrast-y
piece up top there. I don't know, maybe I
want more contrast. Yeah, like that right there. [LAUGHTER] Those
are pretty cool. This is what some of these
tiny pieces are good for too. If you've got a little tiny
space and you're like, "Oh, I just need a little one." We can fill that in
with a little one. I do like these ones that have so much color though. Look at that. We've
got all the color. That one is almost
too big in it. I got all these colors, now we rearranged them in
something more interesting. Even though I didn't love the overall piece
of the original, it doesn't matter because look what I made
out of that. [LAUGHTER] Yeah, I like that one there. I'm feeling I got
enough stripes here, so let's start
gluing these down. This is not hard at all, but that is beautiful
and ready to frame, as I just blew all
those off of there. What the heck? [LAUGHTER] What
was I thinking blowing it? I had a piece of something
on here, art or something, so go wash your hands
before you start this. Make sure you have nothing
on your paper that is going to make you mad
because it has a mark. These kneading erasers, these artists erasers, I love having these handy,
especially if it's pastel when I'm getting on my page
where I didn't intend, because this stuff will erase any little soft pastel specs, so always have one
of these handy. I'm going to go
wash my hands and then we will come back and
start gluing these down because I don't want
any of this on my hands to get on my clean paper, so I'll be right back. Let's just get started. I've got my paste, I got
my fun little knife, and I'm just going to
glue down our stripes, starting at a point that I'm
going to try to start with on every single piece. Glue stick would be
great for this project because you can see, we
got little pieces here, we could just put a
little bit of glue on the bottom would be fine. So if you've got a glue
stick, that'd be fine. You don't have to
be perfect here, we've got some space to
make them a little wonky. I am trying to keep them in some resemblance of
straight going up too, I don't want them going
to far or one direction. Just my personal
preference there. Then do we have a tiny
one that we can put? Hold on, is that enough? I don't know, that's
enough, isn't it? Look at that, oh my Gosh, that is insanely beautiful. Now I'm going to take just an extra piece
of watercolor paper, I could've used some deli paper which is on the other
side of the room, so since this is
what I've got handy, just going to take it
and flatten it out. I want to do that like this rather than each piece smearing just in case you had anything
that was going to smear. But I want to make
sure everything is definitely stuck down. But look how gorgeous that is. That right there, totally made, making that piece of art
and not liking it worth it. So let's glue down the other two and then we'll have
a little triptych, which is now super cool rather
than super disappointing. Check it out. I want this to
start in a similar place, even though they're wonky
and slightly different, I am, for the most part, trying
to keep them consistent. Because even though they are not exactly
the same piece of art, like they basically are the
same piece of art though, but even though we're using it with different stripes
and cutouts there, I want them to be a cohesive set because of the consistency
in the border. [MUSIC] Look how these turned out. Oh my goodness. [LAUGHTER] I got to tell you, sometimes when I
create a project and I got to make it
9 times out of 10, it might not work out
and then one time it works out exactly
as I'd hoped, amazingly right at
the very first try and I am just like, "Oh my gosh, might be the best thing I
ever made right there." Look at that, it looks
freaking amazing, and now that piece of
art that I did not love turned out to be the
absolute coolest triptych I ever could have
made, look at that. Now what I want you to
do is the same thing. I want you to take all
your pieces of art and cut it up into strips
and make some of these. [LAUGHTER] This you
could do any size. We could do a little
triptych like I did, we could do a 4 by 6, a 5 by 8, we could do the 9 by 12, you could totally strip up
the art and do a big piece, just like these little pieces. This could scale up to many
different sizes and uses. But check out the
little triptych. I want you to make one
of these striped pieces and see in the end, did you love the piece of
art that you ended up with versus the piece of art that maybe you didn't love
that you started with? Because this right here, I had the idea in my mind but I hadn't actually
cut up a piece of art and put the strips down to see if I was even
going to like it. In this case, the idea that
I had immediately worked out even better than I hoped. These are gorgeous. I hope you have fun cutting
up some stuff into strips and creating a piece
of this strip art because these are gorgeous. I can't wait to see these, and I'll see you back in class. [MUSIC]
6. Larger Stripe Diptych: I got to admit to you right now, I'm on a little
bit of an art high after those striped pieces so much so that I want to do
some larger striped pieces. Part of this particular class, I want you to pick one of the projects and then go larger, and so insanely loved that little set of stripes
that I think we should do. I think I'm going to do
a larger striped set. This is a 9 by 12 piece
of paper that I have just cut two inches off of because I want it
to be an odd shape, I don't want it to be perfect. What I'm going to do
now these are 7 by 1, I'm going to create a somewhat
long something in here. I've gone and dug through the oil and cold wax
pieces that I consider to be failures
because they're not exciting but the colors
are interesting. I picked three
pieces to definitely cut up but to possibly
use for our striping. I'm going to need to just cut these out a bit
and I'm going to cut them a little smaller than
what this piece actually is. But I want them to
be cut all the same. I'm going to line
these up together. I'm not thinking super hard
about making them exact, but I do want to
get pretty close to exact so that our
stripes line up down the edge and I don't know that these
all look good together but we're going to try it
because that other one I'm telling you I'm on this
little high with that. Almost like, can I do anything better this year is so amazing. I love that feeling.
Well, art high. I'm not going to throw these out because those are actually some good edges there but I am going to go ahead and see how wide do
I want these to end up. I might just go ahead and trim a little off that edge
and then I'll have, they'll be even on my
final piece there. Let's just do about the same
thing that we just did. Might've been a little
extra, but that's okay. As long as we get to all of this same width,
doesn't really matter. It would just be that much
extra framing around it. I'm feeling pretty good
about these colors. I like blue and orange, it's complementary colors
on the color wheel. That's what drew me
to this little set. I wanted to just see what can
we get if we stripe these. Now, I'm just going to
cut the end off and then cut various size stripes. Some bigger, some smaller, and in the end, I'm
thinking two pieces, but if you've got enough
to make three go for it but I want to get for sure two of these
pieces out of this. But this is three pieces of art. Technically maybe we
would have enough for three pieces of striping. If you do all the
same size stripe, that's not very interesting. Try to vary up the stripe
sizes and if you get stuck in one color with
all the same size stripe, you can always cut
these in half again. It's not a big deal or if you have a second
one that's very similar, you could come back and
make sure that you're varying up those sizes, maybe they're smaller, maybe
they're a tiny stripes. I'm trying to make
different sizes here. You see what happened
a little paper cutter makes this process almost fun and less labor intensive
than it possibly could be. Paper cutter, people you need this
paper cutter. That's fun. I like that these are a
little different color than that first one
and then I love this orange and maybe I should
just do an orange piece. I know I've got more
over there that are definitely not finished. They're failures, I'm
calling them art failures, but really is any piece
of art a failure? It can be beautiful. That could be the piece
that you're like, "Oh, my gosh, that's
the one I love." I'm thinking, "Oh, my gosh, that's the one I'd
throw away", it's all in the eye of the beholder. Don't forget that. It's all in the eye
of the beholder. I've definitely seen
some stuff recently in our local art gallery
that made me think, I've been trying too hard with some crayons
gribble basically. They were selling in it
at $200 and $300 a pop. I was like, all in the eye
of the beholder people. Let's see what we got here. I've got two pieces of paper
here that I want to create. A double a little dip tick with. They can be a little wonky. Don't have to be perfect again, just like our first piece
that I want them to be exact, but I do want the
framing to be similar. Then let's just start placing our pieces and
seeing what we get. If we go blue-orange on one, maybe we go blue-blue or
blue-blue orange weightless, definitely completely buried up in the pieces that we pick. There we go. See
that right there. Yes, I like that. I'm already thinking
this is going to turn out even better
than I expected. That's the projects I like. I like it when they end up
being something that I'm like, I didn't expect that. I know you've heard
me say that on one or two projects in class and some other
classes and I'm like, those are nice surprise. But that's what I love. I like it when things actually work out
better than I hoped. Let me tell you, these
piecing together of the cut-up arts
definitely fall in that category because these are definitely even better
than I was expecting, and look at this, that one right there already looking amazing. Then try to vary up wide skinny. Don't make them all
the same width. Don't make them all
the same pattern. I want to see that
variation in there. All these orange ones
are the same size. Let's cut one of
these in half again. Me, I thought I was a
little better on this one, but I guess I was not. Let's go ahead. Get
some tight or stripes here with this orange. I really like this
particular piece because it's got all these
yummy colors in there. What I really like about the oil and coal wax
is all this texture. There we go. Because it's a
very textural paint process. Give me a wide blue. Yeah. There we go. Oh, see, now I'm
filling that one right there, what do
you think of that? Does that one feel like
we want it to feel? Let's see what we got here. If we can in that
off with something different than when
we started it, that would be super fun. Then evaluate, do you
need to move any around? Are they all about
where you want them? Do you have enough in there once you straighten and
tighten it up, do you need to leave
some more spaces and make it a little wonkier? Just think about these things. Look how beautiful this
is turning out though. Do you want to offset
your stripes so they're zigzagging down the page or
do you want clean edges? I want you to be
thinking of some of these things as you're creating. Definitely loving this one. This one, I feel like we need another
one in here somewhere. Let's see here. No, I did not like that. Oh, yeah, I like that
darker, little bit darker. Tiny blue in there. What about that? Sat longer than the other one? It may be. I might need to take
this up bottom. Are we about the same size? Let's start gluing these down. I do like how this
one ends in orange, this one starts with orange. We could flip it over when
we're done to see does it look better the other
way? I don't know. Let's just start,
let's just jump in. I'm already though. I'm already loving this. Look how good that looks. Let's go ahead and glue
this other one down. I can see that my border
is not 100 percent exact. But almost don't care. You do have a little tiny bit of edge time here with
the yes paste, we can move it a little bit. But that's basically
what we're going to end up with. But
I'm happy with that. I could trim a tiny
bit off here if it really bugged me
about the spacing because I have a little less on the top and the bottom so I can make those even if I wanted to, but I don't even care. I think it looks so good. I'm going to be on
an art half rest of the day after making these. These have just turned
these pieces that I honestly had pulled out and I thought there's
so much junk here. I should go ahead and
throw some of this out and it has sat on the bed, in my guest bedroom now
for about two weeks. Well, I haven't got the
heart to throw them out yet. So then I was sitting
there last night and I was playing on the computer
while I was watching TV, and I was thinking
because I was like, "Oh, I want to make another art
class, I'm feeling creative." I was like, what if I used some of that old art and do the stripes
just like this? I mean, the stripes is
exactly the project I had thought in my mind
that what if we did that? Because you already did a yummy collage class on
using leftover bits of art. So already like
to cut up and use pieces that I don't love in other pieces that then
hopefully I will love. When I thought of
the stripe one, I'm like, "Yeah, that's
going to be a good one." Then I was brainstorming other
things to do with it that we could piece together
with the other projects. But this right here is
what got me excited and when I made those little
triptychs telling you, I am still on a little
high for making those. I think it's the colors that
worked out really well. I did love those colors. But I mean, this is easily something that we
could frame these up because now I think
look how amazing this is. We've turned a so-so
piece of something into something I got
really excited about. So don't throw away
the leftover art. Save it until that
day that you're like, "Oh, what about this? What if I did this with that?" Save it for a day where you're seeing this project
and you're thinking, "Oh, those are cool, " or this might not be
your thing, your choice. But just like the yummy little heart project
where you're putting all the little hearts
on the page that you cut out of a piece of art, this reminds me of that project. You're going to
get just something cool every time you do it. The heart project,
I get something I love every time I
make those hearts. I know hearts are
[inaudible] and cutesy, but my last name is love. That's okay, if you think
I'm a nut, I'll take it. I want you to come to
your art table and make stuff like this and get
on your own little art. Hi, this is my little
art high talking. I want you to get excited about
some of these projects and then when you have a project
that doesn't work out, I want you to get
excited about making something else
with that project. It doesn't have to be
thrown away it's not trash. It is a future piece of art, it is a future masterpiece. We'll think of it that
way it's not trash. Don't be disappointed. Think of it as a
future masterpiece because these are future
masterpieces for me, look how amazing these are, and I can't even tell you
how many years I have kept these pieces of paper
in the dresser before I cleaned them out of
the dresser the other day because I run out of
space and was finally like, "Should I throw those out?" Then I thought at this idea. Let me tell you,
find space for him. I don't care where that
space is find space for them and keep them. One day you're going to
think of an idea like this and it's going
to be so amazing. If you sell your art, perfect thing that
put these together, frame them and sell them. Because these look
amazing. There we go. Are we the same size
at the top? Let's see. Now I got glue all
over my fingers. I'm trying to be real careful, but I need to look at these. Are they the same? Oh, yeah, definitely very clear. It's like I'll get those
look. Oh, my goodness. Look how good they look.
That totally just made me really excited
as the little ones. I love the details. I love that they're the
same but different. I love just what we got out of three different pieces
of art that I actually considered throwing
away last week and I want you to get
this excited too. I want you to definitely try the different stripes with
say, two pieces of art or a big piece of art with
a lot of colors in it. See what we can create
because these are amazing. I will see you back in class.
7. Micro Collage: For this project, I'm going to go back
to my thought of doing some micro collages basically. I have some old watercolor test and samples that
I was trying out. These were just trying out the different salt stuff
but I got some cool colors here and I thought
what if I cut up some of these to make
some small collages? I like these, so I just
pulled out several. I do like the blue green
but almost now that I'm looking at it really feeling, I don't know, I like that too. But I'm feeling these
bright blue and orange and maybe this
little bit of orange here. I could always pull
more out if I need. What if we created these, glued them all down to a
piece of paper and then cut that up and just
see what we got? That was my idea here. Very similar to
that first project that we were creating
where we were like, let's just change it up on ourselves and create this
other thing instead. Let's go back to that
first idea that I had. I try to be flexible enough at my art table that I'm creating
with say one idea in mind. But what if we start creating and we're
like, wait a minute, this is turning out
even better than I was thinking if I do it
this other way instead. I'm thinking micro collage. But when we're done, who knows what
we'll end up with. I'm just cutting these out of their, little sample pieces. These were just
watercolors that I threw down and was testing out
different kinds of salt. This was an idea that you've
not seen in the class because I just could not
get all my ducks in a row. Sometimes my class
ideas workout great. Sometimes I'm like nothing
is working out here, let's move on to the next idea. The stripes for this class, that's one of the
things where you're like, this is magic. This is an idea that I'm like, nothing is working out for me, so scrap it and try again. I saw an artist that had
the most beautiful salt look on their pieces and where the salt
soaked up the paint, it was really pretty
crispy white. It made a cool pattern. I tried like 15
different kinds of salt and could not get the
look I was trying to get. I've got some pieces of paper that I've
just cut in half. This is nine by 12,
just cut in half. We've got a couple
over here in case I get so inspired, I
want to make a bunch. But we're at least
going to make one. I'm thinking that then
we can cut this up. I almost want to
cut these up and separate some of
these colors and just see what can we get mixing these up a little bit like our
stripe pieces but different? Similar but different. The same but not the same. How many ways can I say that? There's another one. Let's cut this one up too and
I'm not being real exact. If you have a real
clear vision in your mind of how you think
you want your pieces to go, be more exact than I'm being. We're really like the
splatter right there. I like that piece of splatter. Right there. I really like this, whatever is going
on right there. For sure that piece, these are pieces that
are maybe, maybe not. The goal here is to glue these down and then we'll just see what we can
get out of there. I'm liking that. If we cut a piece out of there maybe or maybe I
don't like it at all. Maybe I want to combine
some other pieces in or do we just want this
to be the one set of colors? This is where I
need a vote button. I need you to vote, I need you to go ahead and
tell me what you think. I need you to go ahead and
give me an opinion here. This could be a piece that
doesn't work out for us but let's just go ahead. Let's just jump in. My goal here is to just cut something out of
this that I like. It's not like it's
got to be perfect. Let's just glue these pieces down and then we'll see what
we want to cut out of it. Really we could go all
the way to the edge. Let's just do it. Just commit. Let's just commit. That's the hardest
time sometimes it's just committing to something. Rather than overthink it
on these first pieces, don't overthink it and just see. Let's glue them down
and see what we get. Then when you find whichever particular
project that you love more than
anything else, then you can get really creative with how
you're creating it. Then you can get
more deliberate. You can make choices that
fill in a need for you. That's when you
can really decide, what do I actually want? That's fun there. It doesn't matter if
these overlap or not. This could be the piece
out of all the pieces that does not work out for
me, so let's just see. That's what art is all about. Experimenting, just
trying stuff out. Let's just see if we can make
it work, see what we get. I didn't really understand
that years ago. I've done art since I was a kid but I still would sit
at my art table and get frustrated as an adult
because I did not understand that art is
about experimenting. It's okay if I did not create a masterpiece
every time I sat down. I did not at all
enjoy the process because I wanted every bit of effort that I
did to be amazing. Failure is not
something I enjoy. But with art you're
definitely going to have a bunch of failures. But lucky here,
now we could turn the failure into some
other piece art. Is it really a failure or did
you just give up too soon? That's the way I feel now. On some of these I definitely
gave up way too soon. I put them in a drawer. I left them for years. Now it's like, "Oh, wait, what can we do with this? How can we make this
into something amazing?" Then if we've got
leftover pieces that we can maybe
put on top of this, why not do that? Let's just see. Maybe we could break
it up a little bit because I don't want it to be too uniform like I just
put together my little legos. I want to break it
up some and have some depth maybe, some height. Don't have to be a lot though. Let's do that right right. Let's see what we can get. I've got some pieces
of paper here that we can just turn into
like a little viewfinder. Let's just mark these off. I've got some
viewfinders that I made, but they're hiding
from me at the moment. I don't know where
I've put them. But let's just use this. Let's make a little
viewfinder in the size of a finished piece
of art that we're hoping to get and just come up with some little pieces out
of here that maybe we like. We could approach this in a
couple of different ways. We could do the viewfinder. Let me glue these down
a little bit better. Take this and smash it down. We could just cut it up into equal parts and just
see what we get. That would be easiest. We could take the viewfinder and find some little pieces of
art within our piece of art. That's always fun. Let's see if I can get my
little viewfinders over here. I say they're hiding from me, but really they live over
here in a drawer. Here we go. Perfect. This is just
a little square. How big is this square? Where did I put that ruler? I'm always losing
stuff. Here we go. This is three-by-three. That's a nice
micro-sized piece art. This is just cut out of a
piece of watercolor paper. What I like about this
is now I can say, I love that right there. I can come over here and
do the same and see, is there another
piece over here? I wish now that I did that, that there was another
three-dimensional piece right here. But at the same time, look at that one right there. That's pretty cool right there. What we can do is
draw with a pencil. We've got a little mechanical
pencil we can draw out, I like this right here. I'm looking at composition
now and color and pattern. I'm making sure that nothing is where I don't want it
in a bad composition way. I like how on this
one-third here, we've got some differences. On this two-thirds here, we've got this large spans,
these larger pieces. Model it. There we go. I'm like, I'm [inaudible]
on this pencil really. Draw our square and that's the square I want
to cut out right there. Look at that. This one. Look at that right there. That might be my favorite. Looking at composition. I'm looking at where
stuff's falling. I love the three-dimensional
aspect of this one so much. Now this is where I want a
paper chopper. Look at that. I could put this on
the mat and chop it, or I could just cut
it with my scissors. Now mine is not perfectly. I'm going to cutout mat. I noticed one time it's
not perfectly straight. These will be as straight
as I can get them. That's why it's almost
better just to put it on the mat and cut it with
the exact dough knife. But that's okay. We'll
just go, we'll go for it. It's still a tiny bit wet, so these are going to move just a tiny bit, but that's okay. I don't want you to
wait until your glue is dry to do it right. Do as I say, not as I do. Don't you love when
people do that? Not perfectly straight to see. There we go. Very close,
but look at that. I wasn't super cool. Little micro piece. I'm loving that one right there. Let's cut this other one out. Because I just got way
more excited about this project now that
I can see one cut out. I'm like, "Oh, is
working out", when I was like, "Is this
going to work out?" Now if you end up
with pencil on here, let's just look at this. If I end up with pencil
where I didn't want it, let's just take our
little artistry eraser. I don't want you
to get hung up on the pencil because look at how easy that was to erase
a little bit of pencil. Don't get hung up on a
tiny bit of pencil mark. We can erase it,
which is why I like doing this in
pencil and not pen. If you like using your pins, this is not the place
to use the pins. Look at that one. I love it. If you have
any glues scrape out, just take your nail and
you can get that right off. There we go. Super cool. Look at those
two pieces of micro art. Before you give up on any of the other ones,
just double-check. This one's pretty cool right
here. I like that one. Just double-check your
other pieces and see, is there something here
that we could go with? If we cut this right
there, look at that. That's pretty cool
too. Super fun. What I would do
on the micro art, I like this one
too. Look at that. What I would do on
the micro art pieces like this that aren't
a particular size, I'd use those as gift tags or little original pieces
of art that you could put in a card that you're
sending to somebody. I love those, don't
throw those out. For these, I like to mount these in the center
of a piece of paper. Let's go ahead and cut these. These are, what
do I end up with? Threeish. We get there three-by-three. Really I want them
to be five-by-five. Let's just go ahead and
cut these to five-by-five. Now I'm glad I had
these little pieces of paper ready over here
just for a random, whatever idea I had. This is why I like those Canson papers
because it's a nice paper that's inexpensive and I
don't mind if I cut it all up for whatever project
I'm working on. Look at that. Those
are pretty cool. This one I feel
like it's curved. Actually driving me
a tiny bit insane. I like that better.
I felt like I had like a curve on the bottom. There we go. I like that better. Might not improved it, but mentally in my mind
it improved it. Let's get the glue back out. Let's go ahead and attach these to our presentation paper. Basically, this is the piece that's
going to give it a little bit of a
frame around it. You could decal the
edges of this paper, but I really feel like this is a more contemporary field
to the piece of art. Those deck old edges are
not contemporary to me. They're not the clean edge
of a contemporary piece. That is why I have not
decaled the edges. I do like torn edges. Then I will take just my
random piece of paper here. Let's squish these down. Then look at our
finished pieces. These are amazing. These turned out even better than I hoped. Also, super fun project. I'm glad I went back
to the micro art. Now I have a few little gift
tags also that I can use for something and then
see what we can get. I can't wait to see
your micro art. These were pretty fun. They were very easy. They ended up better
than I hoped. We just went for it and came back and looked for
some compositions, which is a favorite way that
I like to create any way. These filled that need for me. I hope you love this project and I'll see you back in class.
8. Large Stripe Collage: I'm back to do another project. I actually thought I
was done filming class, but I so love the stripes
and stuff that I did. I was like, "What if we just
went a little bigger and had some big junks of stripes, and we could do big
stripes over here, nice chunky something
and we could come by the other
direction with this." We could do that. I just thought, let's
just play a little more. This is just a piece of the
nine by 12 paper cut in half. I have a couple here that are randomly already cut so we'll use them. Really what I love about this
project is we don't have to get paint
and everything out. You can just go grab some art. I think you'll agree with
me on some of these. They're just there. But look at these together, maybe cut up into pieces, maybe those could be some
elements that blend. I've got some cold
wax pieces here. But I had better
obvious failures But look at the color ways now that
we've got them like that, this purple got that
color in this one here. I thought, you know what? I'm going to do a
couple of more, just different collaged
pieces because I like them. I actually love the
colors in this one so much that I want it to
be similar to that. This was closest. I don't remember because I
did these several years ago. I don't remember if I was painting a pair of
them and then at some point I just gave up
because sometimes I do that. I get little shiny
object syndrome and I'm thinking,
I'm tired of this. Let's move on to the next
fun exciting thing or maybe some fun art supplies came in the mail
and then I'm like, "Oh, let's go play with this",
and I put everything away and I just never pulled
it back out again. Totally possible. I am definitely
shiny syndrome object. I have that issue. Just looking at this, thinking,
if this is the size of my paper and I could've
done a whole big sheet, we could have done that,
but I want to keep it to about this size. I think. What if I'm thinking
on this side? How might I want to cut
some of this paper up? I could just cover the
whole thing and then trim it down to the
size of this paper. That's always a good idea. Then we can mount it
on another piece of paper we want it framed out. Try just not to get too bogged down into making this hard. I don't want to make it hard. I love this whole
element over here. Let's just go ahead.
Let's just commit. Because I also love this
whole element right in here. Let's just cut some of that out My little blades
are getting dull. Then this whole element. I don't know, I like this
piece right in here. I might do something with that. I really like nothing on this one. But I do
like that it has the brown and the blue I'm not sure what I
was trying to do here, but apparently I gave up. With the color wax they're
never really trashed. It could always be more
and more layers on top. You just keep layering these and layering these and
just seeing what you get. But at some point, I just
grow weary thinking, I don't like this. Look
at that like some blue. See now I like that
as a strip like that. While I was doing a great big
one, gorgeous strip there. Let's just do couple of
different sizes here. I'm just getting some hopefully contrast the
elements to go with this other piece that we've
got bigger pieces cut down. Let's just see what we can do. Maybe we'll cut a couple
of these in a small or let's just see Now see now as a strip
that's got a lot of interesting elements and
detail and texture to it. I did just all of a sudden
like that a whole lot more. This is why you
shouldn't throw away your trash pieces
because you can see these were
obviously failures. But look at how interesting
some of these elements are. Now that this has cut
down to this side, I actually like what's
going on in here. Let's keep this as a
bigger piece over here. I don't think there's
anything too like here but stripping it or maybe if we cut it
we would like that. Now that could be an
interesting something if we go ahead and just,
let's just do it. Now see that's pretty is an
interesting, solid piece. Now this can become an amazing
abstract just like it is. If you're cutting up your
stuff just like I am, and you get to that you might
have to keep just that. Now that I actually really, truly love. That's beautiful. We go back to
cutting up our art. See now I don't like this one nearly so much, but
I do love that one. If we go back to one of my favorite things which
we're already doing cutting up art you may come out with a few pieces that
are just amazing. Maybe you should keep that. We will consider that
off to the side. I do actually like
this element on here, but I don't want to
cut that up here. Let's just see. Let's
see what we got here. We can start just
planning a little bit. Maybe I want some
great big stripes. That's possible. We could
do that for one of these. Let's just see what
we're getting. If we just lay some of these in here and think about
it for a moment. Look at that one right
there, that look cool. Oh, my goodness, I
like that stripe We can flip them around. Don't be afraid to
change things up there. See now that probably
would've been cool if I used that
as an element. But look there, it's short. While now right here if
we consider there being a border around there and
this being the element, fill in this now. Oh, my goodness. Sometimes
you just got to say what if? What? Look at that stripe. That's a gorgeous stripe. This is a plan coming
together my friends. Look at that. We're
going to save this one. I like that. This just got so much more interesting. Now I'm going to use
this as my guide. We're just going to
cut these same-sh size in the spot that I
want. Look at that. Oh, my goodness, this just
turned into something amazing. Now I want to sing for you. Another little art
high coming off today. I can't tell you. Sometimes I'll do these and
I will just be ecstatic for the rest of the day
and I love that. What part of this
one do we want? Do we want a little more blue? I feel it coming together,
a little more blue. How about a little
more? Let's do it. I really like this
section right here. How about right there? It's your birthday. Let's do this one. Now, so glad that I didn't say,
"All right, we're done." I actually said, "I'm done." This class is done. I'm ready to edit videos. I'm ready to go
ahead and just put this one out there in the world. Then I was just playing around last night doing
stuff and I thought, "Wait a minute, am
I really done?" Now look here. I actually wish I had a
tiny bit more paper now. We'll do that right
there. Which part of this one do we love? Do we love that
part right there. Do we love this little
blue stripe in there? The little blue stripe is fun thinking I like the little
blue stripe in there, or do we like it up here? It's completely
contrasted? Yeah, I think I like that
better. Let's do that. Let's just try and get
these as close as I can. I love this piece. When I hated that
piece I was like, "Why have I kept this?" Let's make sure I don't have anything
on my paper. Let's get this setup. Glue this puppy down. I don't have to leave
any space but I was feeling a little tiny
bit of spaces in there. But if we leave less space
I've got a better border. Look at that. That
is super cool. That is a gorgeous piece of art. I'm telling you now I'm going
to be up here for weeks. Just cutting everything
up. I can cut up. Oh, my goodness. Now I want to go take
it. Visit the framer. There's so much pattern to this. It's almost like you
don't even have to like go different directions because the art itself is
going all kinds of directions. Oh, my goodness. Sometimes it's that piece that you come back
after you think you're all done that ends up being the most incredible and this one
I think is that peace. I already did my welcome video and this piece is not in it. Now I'm like hold on. I should re-film that
but I'm not going to, that's a lot of work. This is a little surprise piece, a little bonus,
one that I'm like, I just want to go
cut more art up. Sometimes doing stuff like
this leads me to my next idea. I love staying creative, not getting too far away from my art table for days
and days, because once you take a little break it's hard to get
started back up. You get into a rut or you get down and you're like, I
don't want to go up there. Then all of a sudden you turn around and it's been six months before you've even been up to your art table making any art. Just too hard to get started. Well, the same thing. Making little workshops
and stuff in classes. If I take a long
break I'm just like, I dread all that work because
it is a lot of work to think up a fun project
and do all the filming, get everything together and edit the videos, and upload everything, and build
it on the website. That's a lot of work. If I get on a roll and I'm like, "Okay, every day I'm up here
and doing something else. I'm rolling, rolling." But then if I take a break or
my dad comes to visit and I have to have a forced
little stoppage, man, it is so hard to get motivated to come back
up here and start back up. Oh, my goodness, look
how beautiful this is. Projects like this are the perfect way to gently
step back in to making art. You didn't have to get everything
out and get all messy. Just tweaking it a
little bit here. Make sure I got all the
pieces where I want them. This is a gentle way to
step back into art-making because you don't have to get all your paints
and everything out. You're just cutting up stuff. Look what I ended up
with when you're done, let's just watch this down. Let's all admire how gorgeous
that just turned out. Oh, my goodness, totally made worth coming back up here and
making another piece. I've got another one over here. I might just do one
more for myself. But I was just playing in these colors and
these don't match but look at the color ways
maybe they could match or maybe I could end up
with something really cool. I want you to try big
stripe piece in addition to the little stripe piece and just see if you don't get
as excited about that. Now I think that might
have been a pair and now it's a pair that belong in the
same collection because they end up so cool. I want you to try a piece like this where all the
stripes are not the same size and just see what you can end up with because now this could be
my favorite piece. Hope you enjoyed this last project and I'll
see you back in class.
9. Final Thoughts: [MUSIC] What did you think
of today's projects? How much fun is it
to cut your art up into creating some
other pieces of art? That's one of my own
favorite ways to create. I create plenty of art
that I feel is a dud, or I'm very disappointed in, or maybe an idea that
didn't work out, or maybe I was
scribbling on something, and I had them all in a dresser and then my dresser got full. Now I'm like, oh-oh, I'm
still making more art where am I going to put the good pieces of art
that I want to save versus the duds that I'm like, that's
just terrible, but I'm keeping it anyway. What do I do with those? I actually cleaned out
my dresser last week and kept everything that I
thought, this is amazing, maybe I'd one day frame it
or sell it or give it away. A lot of times, I keep the art a little bit longer
than most people because they're done in classes and sometimes I want to
keep them for marketing and maybe I want to rephotograph
them at a later time. A lot of people will go ahead
and create a collection and then take it to the
gallery or put it out for sale or whatever it is that
they're doing with their art and I tend to keep art for
years with the classes because I might need them again. I went through the
cabinet and I'm like, "Look at all these duds,
what do I do with it?" Maybe it's time to
just throw these away. But this has been
sitting on the bed in the guest bedroom now
for a couple of weeks, maybe a week or two, because
I did this just recently. Then last night, I'm
like, "What if," and then I'm like,
"Today, I need to sit and grab some of that art
and just cut up and create and see what I can end up with." I'm so glad I did that because these stripy ones are so amazing that I can see myself
putting the stripe ones in as a thing that I do on a
consistent regular basis as I'm creating more bad
art in between my good art. Don't throw away the bad art, I want you to keep all the duds because when you chop those up, the colors turn
into something else and when you stripe
them or collage them or put them together
in different ways, you end up with
something amazing, even if your first
initial piece was "Eh", which a lot of pieces are, I come through a lot of
duds before I'm like, "Okay, this is my
masterpiece [LAUGHTER]." I want you to start
keeping all the duds, if you've got a pile
of duds already, I want you to get those out and create some of these
projects with me today and then tell me
when you come back how much fun making
some of this was because I'm telling you, I got
on a little art high today after re-imagining the
pieces that were terrible. Now I'm like, "Oh, I'm so glad
I didn't throw that away." It's a little Trip Tik of
little ones that we created. My very favorite, I cannot wait to actually do
something with those, and I got so giddy
about it that I'm like, "Okay, let's make
some bigger stripes because I'm on this
little stripe kick." I hope you get just as excited after you create a few
of these pieces and how they turned into
something wonderful when before you just might
have thrown them away. I want you to use
all of the art. Just re-imagine the art
that you don't think came out the way
you needed it to. I know you're going
to love some of the new pieces that
you create with it. I want you to have fun
with this technique, I want you to use
these going forward, I want you to come back and share some pieces with me and tell me if you didn't
get that same little high when you made your little
Trip Tik of stripes, because those are super fun, and I can't wait to see
you next time. [MUSIC]
 DENISE LOVE, Artist & Creative Educator