Transcripts
1. Introduction: [MUSIC] I love watercolor and watercolor mixtures and
different types of paint. I love making my own paints
because I think it really ups your game and your
art-making when you can say I made the paint
and I made the art, and so that's where this
class has come from. I'm Denise Love and
I'm an artist and photographer based out
of Atlanta, Georgia, and I get a monthly art box with new art supplies every
month because I feel like you can never have
too many art supplies. [LAUGHTER] One month, I got this wonderful new Kuretake
Gansai Tambi graphite pans, and basically, they're
watercolor with graphite in the watercolor. They're so beautiful,
I'm telling you I think these are my new
favorite art supply, at least for now, [LAUGHTER] until I get something
else I love. I thought I need some more than just the five or six colors
that they make these in, so I need to make some. I've got graphite powder, I've got pigment powder, and I'm going to
show you how you can make your own
graphite paints. If this is not something that you can
easily get a hold of, the ones that are
professionally made, then you can make some
of your own to test out. As you play with the ratio
of graphite to paint, it may be a little
brighter, a little smokier. The really fun
thing about having the graphite in your
paint is it adds a little metallic element
to your pieces so they're really thick parts
of the paint will almost have a metallic
pencil sheen to it and you can buffer
those a little bit with the back of a spoon and make that really pop out so you have that sheen of
graphite in with your piece. How fun is that? [LAUGHTER] So in this class, I'm going to show
you how we make the graphite watercolors
and then we'll test them out to see
what they look like, and then you can play with
your formulas if you want them brighter or smokier
or more metallic, and you can create some of your own art supplies
to then paint with. I hope you enjoy learning how easy it is to make
some of these, this is a very easy technique
to make watercolor, and then how fun it is to create with some paint
that you made yourself. I'm excited to have
you in class today, so let's get started. [MUSIC]
2. Class Project: [MUSIC] Your class
project today is to come back and share some of the watercolors that you created in class
with the graphite. I cannot wait to see
what colors that you created and the samples that you painted
to test them out. Come back and share some of
those with me and I'm pretty excited to see what
you come up with. I'll see you in class. [MUSIC]
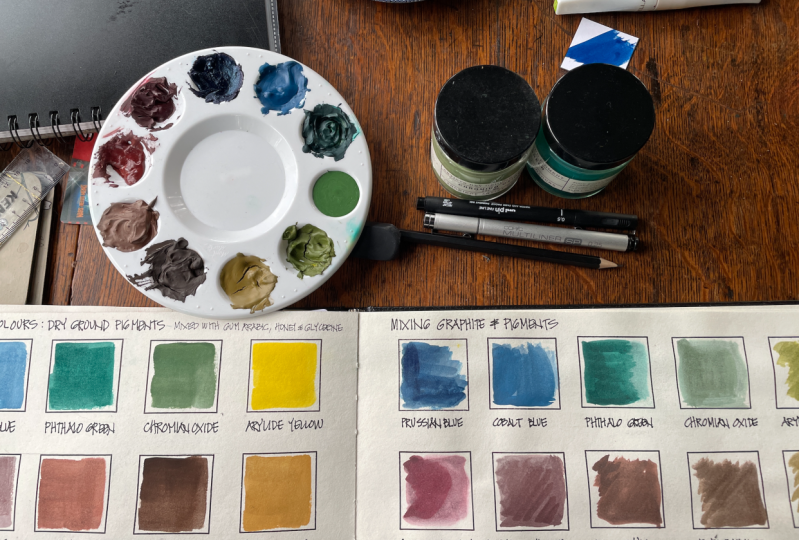
3. Supplies: Let's take a look at the
supplies I'll be using in class. Because I want make
graphite watercolors, which I've really
become obsessed with these five graphite
colors that I have that I got in my art box. That's a new product and
that super-duper cool. What I like about the graphite is it makes these tone
down muted colors, and you can actually once
you paint those on there, you can take a spoon and
burnish those colors, and you'll get this really
cool metallic sheen of the pencil. Like if you were drawing with a pencil and then
you burnished it, you get that look in
these watercolors. You get that little bit of a graphite sheen when
you're using those. I've just become obsessed
with these because they're beautiful and they make the
most wonderful abstracts. I want to show you how
easy it was to make these. If you don't have access to these that are for sale
or they're sold out, or you want some other colors because it is a new product. It's very limited in the colors and they
look really dark, but once they paint on there, you can go from thinned to real heavy in the consistency
and get beautiful stuff. We'll make a few colors and
then we'll test them out. That was my inspiration
for creating these. I already have a class on
making your own watercolor. We're basically making
more watercolor just with the additive
of this graphite. I did try it to these are some that I made yesterday
with charcoal, so I did charcoal
powder, and pigment, and I got really pretty colors that it's a little different
than the graphite though, because the charcoal
doesn't have that metallic sheen
like the graphite does. It is like adding black
powder in with your color, so it gives you
these muted colors that are really pretty. But it's not quite the same feel that I love with the
graphite additive. We're going to make some
graphite colors today, and then we'll see
what we can get. Basically what you need
is some graphite powder. We're going be adding
the graphite powder and some colored pigment powder and make our watercolor with
the two blended together. You need a thing of this
graphite powder and I have the Cretacolor,
C-R-E-T-A-C-O-L-O-R, Cretacolor graphite powder. That's what I'll be using. Then I have pigment, so
you need a color also because you're going to
mix the graphite powder and the pigment powders. You can get any pigment powder from the art store that
you want to work with, you can get some
natural pigments from online or you can forage
and create them yourself. I'm going be a pigment snob, and I'm going to use
my pigments that I had gotten from Choosing Keeping, which is an art store in London, and these are Japanese pigments. I particularly love them
because of the way the color looks and the way they
granulate and the way they balloon out and do
different effects, and I love the colors. I have pulled out just a
selection of colors that I want to make and
we'll see what we get. I'm going to use those. You can use pigments from
wherever you want to get them. You need a pigment, you need the graphite powder, and then we are ready
to start creating. Let me set these to the side. The other thing that we
need to make watercolors is we need some gum Arabic. In the other, create your own watercolor
class that I have, I've created my gum Arabic
from scratch with powder and water and stirred it up until
it created this liquid. This time I'm going
to be lazy and use pre-made gum Arabic because
it works just as well. It goes quite a long way. I made the concoction, I'm going to tell you
about in just a moment. I made these six colors and I still have more than
half of this left. I think that will easily make the seven colors that I want
to make here in just a bit. If you've got 15 or 20 colors, four tablespoons is
about half of that, then make about double that. You can easily make, I would say like 40
pounds of color, like these little half pounds. I'm just guessing there, maybe off a little bit, but that's quite a little
bit of color that you can get off of one thing
of gum Arabic. I'm just going to use
Winsor & Newton's pre-made gum Arabic. You need the gum Arabic, you need some glycerin. I just got this at
the grocery store and I'll be using a little bit of glycerin and you
need some honey, and I got this at
the grocery store. I've been using this
orange blossoms, so it doesn't seem to matter
what flavor your honey is, if you want to get plain
or a flavored and keep on using this to eat with, you can. I'm going be using that and I got it from
the grocery store. This one is actually
starting to crystalline. I've had this for awhile
because honey doesn't go bad. If you've got honey
that's crystal lining, you can heat this up a little
bit like in some hot water, I believe, and that'll get those crystals
back out of there. But I used it with the crystals
in it for this concoction and it blended right into my medium and didn't
seem to matter. I didn't have tons of
crystals go in there though. Try to use fresh honey than
have the crystals in it. But I've had this
for awhile using it for my different
old projects. Here's the three things
that I will be using to make the watercolor, pigment and graphite powder. I also have a little pans
to put my watercolor in, so I had to order
these little pans. But you could get these in stock maybe at your
local art store. I also because I liked how
big these full pans were, I couldn't get these
at the art store, but I liked how big
and flat they were, and I saw this, which is a little
plastic palette thing, and I thought that
might be fun to fill these little wells and let it dry and let this be
my graphite palette. I'm going be using this, but you can get
little half pans and full pans at the art store
or online if you want. That'll be what we
put our color in, and then that'll be what the
color lives in as we use it. I also have a spoon. I have a little scoop tool set, which I didn't
have these before, but I found these at the
craft store by recollections, scoop tool set, and
it's got a couple of different sizes of these
little scoopy things. This thing has been fantastic. This is the perfect scoop
for making our colors. I'm going be using a scoop. Also, I have a glass muller
and a piece of glass. You can order these online and you may be
able to find this, search your art store. This is how we grind and
mix our colors together. You'll need a glass muller
and a nice glass surface, and then that is
all the supplies in addition to the
measuring spoons. That's measuring spoons. Then we will be able to
start making our watercolor. All right, so another
supply that I forgot to mention that I just want to
tack on here on the end, you need a palette knife, and I like one of these rubber catalyst brushes because it makes it really easy, the silicone brush does to scoop all the pigment into
a pile on your glass, and so this is one of my favorite tools to
use when making paints, and I can't believe I
forgot to mention that. You also need at
least a palette knife and you'll see how easy this catalyst rubber spatula makes it to gather up our paint. I do like having the
rubber spatula also. All right, I'll see
you back in class.
4. Making Watercolor Gum Arabic Solution: Let's take a closer look at making our watercolor solution. This is a gum arabic solution. In gum arabic is basically
a tree sap, I believe. I'm using the pre-made
gum arabic in this class because I liked
the amount of shrinkage compared to my
homemade concoction of the gum arabic because you can get this as a powder and mix it in hot water and you can make your own gum arabic. You can get it
from the online at the Natural Pigment Paint
website is where I got mine. But these shrink a lot less
than my homemade solution. I liked the amount
of shrinkage that I didn't have versus
my homemade stuff. I feel like I'm cheating, but I'm using the
pre-made gum arabic for my solution that
we're doing today. It's like a tree sap. It's very hard, and it dries very brittle. You don't want to use just that in your
watercolor because you don't want to have any
issue with your paint drying and being extra brittle, so that's why there is a mixture
that they use, recommend. I'm going to add to
the mixture I already have here and then I can
make a lot more paint. But we only used about a quarter of the
mixture that I made today, so I think making this stuff, you could easily make
probably 40 pans of paint. I'm going to use the
last of that one, and I've got a new one. Basically what this is four
tablespoons of gum arabic. Again, since the gum
arabic is so brittle, and this little thing
will make, I don't know, I would say that's at least six or eight
tablespoons in one thing, and you can get
almost all the colors that you want in one thing. I think one is a
lot of paint that we can make. I've got that. Let me just wipe this off
so I can go wash it out, and then because that is
so brittle when it dries, and when it dries, then you wouldn't be able to re-wet your pan because
it's so brittle, it's not going to
activate back for you. That's why we use a teaspoon
of glycerin and a teaspoon of honey because that will allow you then once
that paint is dry, it will allow the paint to be re-wet and used like a
watercolor in a pan. One teaspoon of the glycerin, one teaspoon of the honey. My honey is a little
crystallized, but a little crystallized, and it still seems to blend
in and work just fine [LAUGHTER] But the less
crystallized probably the better. I'm going to get a tissue and
I'll set this on a tissue. I'll go wash those, and I do have a set of measuring spoons just
for my art supplies. That's not a set that
I use in the kitchen, but they are porcelain, so I'm sure I could wash
them and not have a problem. Then you just want
to stir this up until it's completely
mixed and smooth, so a couple of minutes,
maybe two minutes. Put yourself a
timer so you're not tempted to stop stirring early because you're trying
to get that honey and that glycerin really mixed in
good with that gum arabic. Then if you have an issue
where you think it might mold, most paint recipes recommend
a drop or two of clove oil, and that'll let this mixture stay good a little bit longer. You can refrigerate
this mixture too if you want to make your
watercolor in batches. It would stay longer
if you refrigerate it. But you're not going to be
able to use this forever. You need to be able to mix up the quantity
that you want to mix up and use it
as fast as you can. Go ahead and mix
all the colors you want to mix when you
make this mixture. I have made bigger
mixtures before just because I was
making a whole bunch of watercolors at the same time, but this is a lot. That four tablespoons, I easily made all of the paint that
I made today in class. These charcoal colors
that I made the other day when I was
playing with charcoal, and I still had more than
half of my liquid left over. I could easily make double
or triple this amount of paint with the amount of
solution that we created. Then once you've got that
mixed up really good, you've just been
stirring and stirring. You're okay, I'm feeling
good about that, you're now ready to
make some paint. That's what we're
using as our mixture. You can't just use the gum arabic because it's too brittle. Adding in that glycerin
and that honey will keep that less brittle and allow you to reactivate it
with water when it's dry. That is our watercolor solution that we'll be using in class. Let's get started. [MUSIC]
5. Safety: [MUSIC] Let's talk about safety when you're working
with these pigments. If you're working with
powdered pigments, especially like the
graphite, the charcoal, or any colored pigments, you want to make
sure that you under no circumstances
breathe that pigment. You need to have a mask. If you have that N95 mask, that is fantastic for not breathing in all
those particles. I also use these little
three-layer disposable masks. Sometimes that's really good for catching most of the things that you might be breathing in. Also not whipping the
powder up in the air so that there's less chance I'm sitting there breathing it. Then depending on what
pigments that you get, some of the pigments, like the cobalts
and the cadmiums, those pigments they're toxic, so you don't want to be touching them with
your bare hands. I do recommend you
wear some gloves when you're working
with your pigments, unless you know for sure
that they're not toxic. Just better safe than sorry. You don't want to
be touching them or breathing them if
you can avoid it. I just thought I'd
be remiss if I didn't mention that in case
you didn't think of that. [LAUGHTER] Alright, I'll see
you back in class. [MUSIC]
6. Making Watercolor: So to make our basic mixture, and I still have quite a
bit of this mixture left, so I'm just going to
tell you how I made it. I took four tablespoons of gum Arabic and
put them in my jar, and this is just a pickle jar. So if you've got an empty jar, this is the perfect thing to keep this in because
this will stay good for a little bit while you're trying to make color
over several days, it's probably not going to be good a couple of
months from now, but it'll be good for a bit. I've got four tablespoons of
this pre-made gum Arabic. I've got one teaspoon of honey and one
teaspoon of glycerin. That's what I've got in here, stirred up together to make my watercolor compound, and that may be a tiny bit different than some recipes that I've used in my make your
watercolor class just because I keep trying different recipes and sometimes I'll see another recipe on an art site and I think, let me try that. These came out great. This has been drying
for two days. These are the charcoal
colors and it seems to be a lot less shrinkage than my homemade
gum Arabic solution where I had to take
the gum Arabic powder. It's got a lot less
shrinkage going on here, so I really like using the pre-made to make it because I like
that it shrink less. So this is our solution and
all we're going to have to do, so easy to make this
after you do that. So I want the graphite
and my colored powder, so I'm going to put some
colored powder out. Let's just start with
my favorite green. I love this green. It's a mossy colored. I'm going for about a 50-50 mix. I want about 50 percent color
to 50 percent graphite. This is definitely one of
those things where you need to experiment and decide, did you like how much
graphite you used in one or did you need more graphite or did
you need less graphite? It's not an exact science as
far as making your stuff, so I'm going to take that. This crumbles down to about
two scoops of graphite. I think that's what
I'm going to use. I'm looking at about
maybe like that, I don't want it so dark
that it just turns black. Then I'm just going to take
my muller and squish those in together because my pigment grinds down really
fine pretty easily. Then once we've got
that in there together, one other thing that
we need that I didn't mention is a palette knife. I'm just going to get that
go and pull that back in, see what the color is and think, do I like that? Was it too much? Was it too little? We're just going to go for it. So I'm going to pull that
together in like just a pile. You can make like a little dip in the pile if you're
wanting to keep your gum Arabic
solution contained. But I'm going to start off
with just a little bit of gum Arabic solution and
then see how that mixes. I want it to be liquid-y, I don't want it to
be super thick, but I don't want to add too
much gum Arabic solution right up front. I definitely need a
little more than that. It's going to dry in the end, so if it's a little bit
liquid-y or it's fine, so let's do a tiny bit more. Try to put the lid on there
and just let it move around, mix up, do its thing, then I'm going to
take this muller. That's about what
I want to make. It makes like that little pans worth or so that makes
about like that much. Then you're going to take
your little muller and this is how we really get those pigments in with
that liquid mixture, the gum Arabic solution. You want to just mull it around. It may be a muller
rather than a muller. So you just want
to just mull that around until it looks
nice and smooth and you don't have
granulation or pigment showing as granules,
really, it looks like a smooth color, basically. I just spin my muller like this and just go
around in a circle. Now I don't want to
do this for an hour, I just want to do it
for a minute or so. Then that's looking
pretty smooth right there. Look at that. Look how pretty
that color is too. I don't know if I got
enough graphite in it, but it's definitely
a pretty color. It'll darken whatever color you add the graphite in with, but it's not doing quite the
same as the charcoal did. I'm just going to get
that off the muller and then I'm going to
pull all this color in, and I think at one time
I even used my spatula. I have a spatula over here
because then I can pull the color in without scratching the glass with my metal thing. Look at that. It really
pulls it in nicely, the spatula, and I
can just set that in water and now we're
ready to just go ahead and put this
color in whichever container we're going
to let this stuff live. Because I picked
this larger pan, I'm just going to scoop all
this color into this pan, and then that's where
it's going to live. I'm going to be real
careful not to set stuff on this or drop stuff in it and maybe just spread that
out to my little pan. Then we're going
to let that dry. I'm going to do my other colors, and I got to go wash all
this off and start fresh, and then I'll do another color. I'm going to go ahead and get this cleaned up
and I'll be back. I'm getting super excited now, I'm on my last color. I went ahead and made these other colors and I'm
freaking out a little bit how pretty some of these are. The funny thing here
with this light pink, I can actually see the graphite
swirling around in it. It's so pretty, I can't
wait to try them. Some on the last color, so I thought I'd mix
one more with you just get that going. Then draw a little bit
of graphite powder. There's no exact amount unless you try this a
couple times and you think, I really do want half and half. Then you can definitely
get more exact. I'm planning a little bit more by the seed of my
pants with that. With these pigments, I found it's easier if
I just go ahead and very quietly squish
them with my muller. You want them finally
ground to begin with. These particular
Japanese pigments melt really easily into liquid so I don't
have to really grind them with my pedestal and my, that thing that grinds pigment. This thing here where you put the pigment in it and you really grind it down really good. I love that, that's
an antique one. The newer ones have more of
a bowl and this thing that sits in it and you
grind it like what pharmacists use when they
grind pills and stuff. But this pigment really is so finely grounded when it
gets mixed in there, it just melts into
it really nicely. I don't feel like
I have to grind it as thoroughly with
my mortar and pestle. Just seeing the thickness, adding in my gum
Arabic solution. I'm doing it visually. If you're more exact like a
chemist and you want to say exactly half of this
pigment to this half of this pigment to one
teaspoon of whatever, definitely go for it. I'm judging it based
on how thick this is, the consistency,
more of that feel. It works just fine for me. Just don't worry about it. Then once I've got that liquid-y
consistency that I like, then I go ahead. I want to get all this pigment
off my little knife too. Then I go ahead and
start to mold it. Then this little
muller just gets all that stuff
mixed in so nicely. It's not like you want to just stir it up
and you're done. You really do want to
grind those pigments into that gum Arabic solution. You want to do it
until it's smooth. You want to make
sure you've squished any pigment chunk areas. You want to just definitely
get those ground in together. Then I do it as a
swirling it like this because it pulls the
pigment back on itself. Don't know if I mentioned that the first
time I did that first color. You just want to do this
for a minute or two until you've got those colors
really grounded in. You're not seeing
any chunky areas. You're not seeing any
big clumps of pigment that's not nice and mixed. Just nice smooth colors, what we're going for. Some colors will take
more mixing than others. I had some watercolors that I was making with some
indigo pigment. Then I just about didn't
get that pigment mixed in. It's not the best watercolor
that I've made either. I don't think I worked
it hard enough. But these with these
yummy pre-mixed pigments and the pigments that you
could get from the art store, they're so nice
and finely ground for you that they
work beautifully. It's when you're getting
into those natural pigments or you're foraging
pigments on your own. Did you get them
ground-up enough? That's hard to grind
those because if you get a rock out of
nature and you beat it with a hammer to
the point that it's a little bitty rocks
and then you get it in your mortar and
pestle and you really grind it until you
get fine powder, how fine of a powder
did you really get? You just got to work those
natural pigments a little harder than some of
these pre-made pigments. I really love these
Japanese pigments because the colors are
insanely beautiful. That just tends to
be my favorite. Look at this. This might be my favorite color. Let's fill up our palette. I know making paint might seem. I just put some of
that in my green. I didn't mean to do that. Just not going to worry
too hard about that, but try not to do it again. I know making paint might seem like a
little bit of a pain, but it's not like you're making
your own paint every day. We're making this container of paint and I might use this
for the next five years. It's not like you're doing this tediously every single time you're trying to paint
something or maybe you are, but I'm usually not. I'm usually making
paint and then you see me pull from it
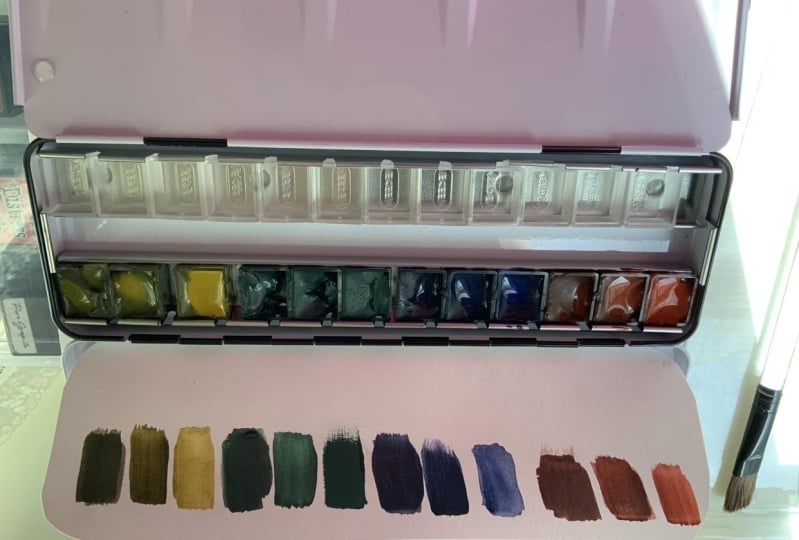
for a very long time. Now we've got all of the seven colors that I pulled out to fill out
this little paint palette. We're going to let
these dry overnight. But before that, I'm
going to test out the colors so you can
see what they look like. Then when they dry,
they're going to shrink. Don't get upset
with any shrinkage. These are some of the
charcoal colors that I made. They definitely shrink. If you're making watercolor
and you want a full tub, I've seen people put all of
this color in a syringe. They make a whole bunch, may put it in a syringe. They fill this
container up and then they cap off the
syringe with some tape. Then the next day
after they've let this really settle in good
or maybe even two days, come back and put more of that color in because it's
still in your syringe. So fill it up some more. It may take two
or three fillings of doing that to get a full pan. That's how they're doing that. But for my own
watercolor adventures, I'm just fine with
the shrinkage that I get on the one go
and using them. Your preference there. I thought that was very interesting though on how they get full pans because I thought,
well, how much does shrink? How are they getting full pans? Then I saw an artist
do it with them in the syringe and
I'm like, genius. I'm going to go wash
off all my stuff here and get some paper and test out our colors
and see what we got. So I will see you back in class.
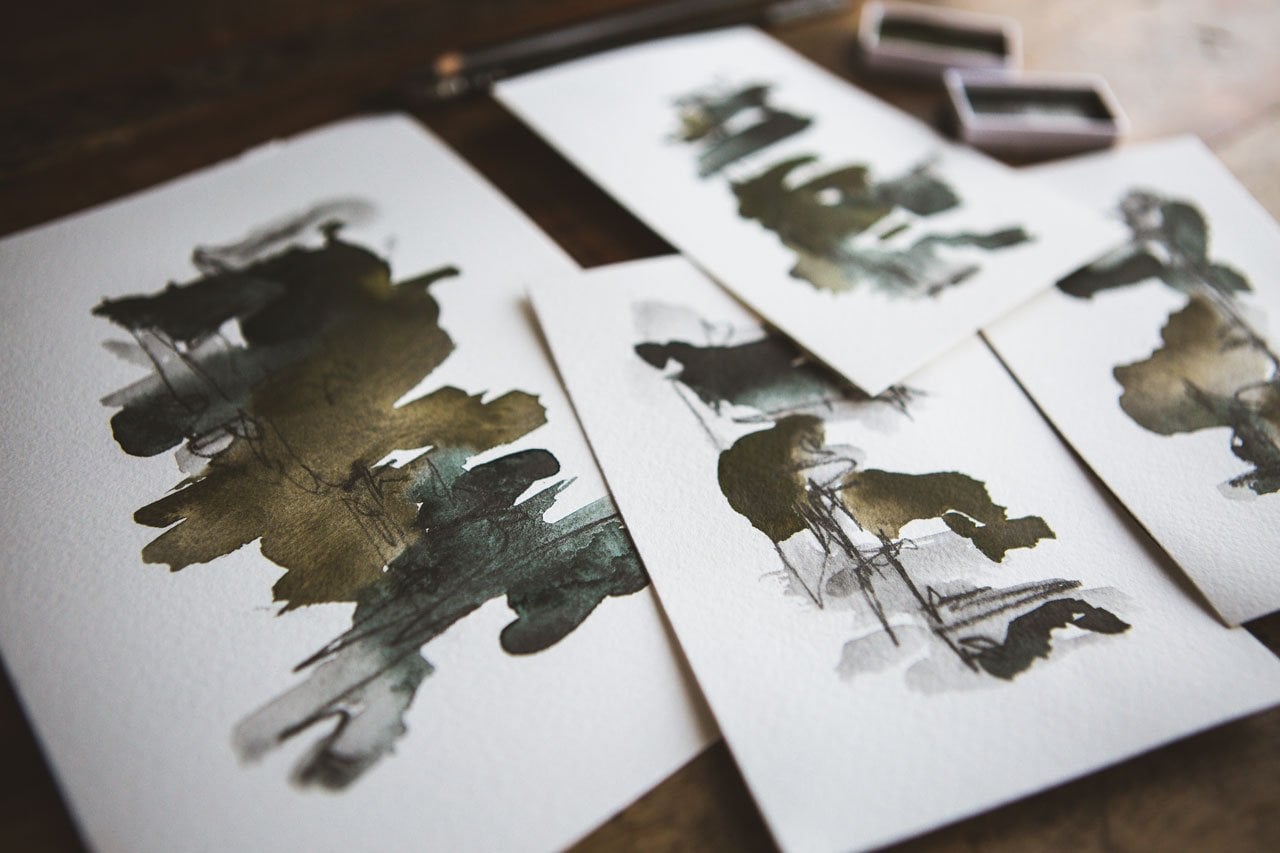
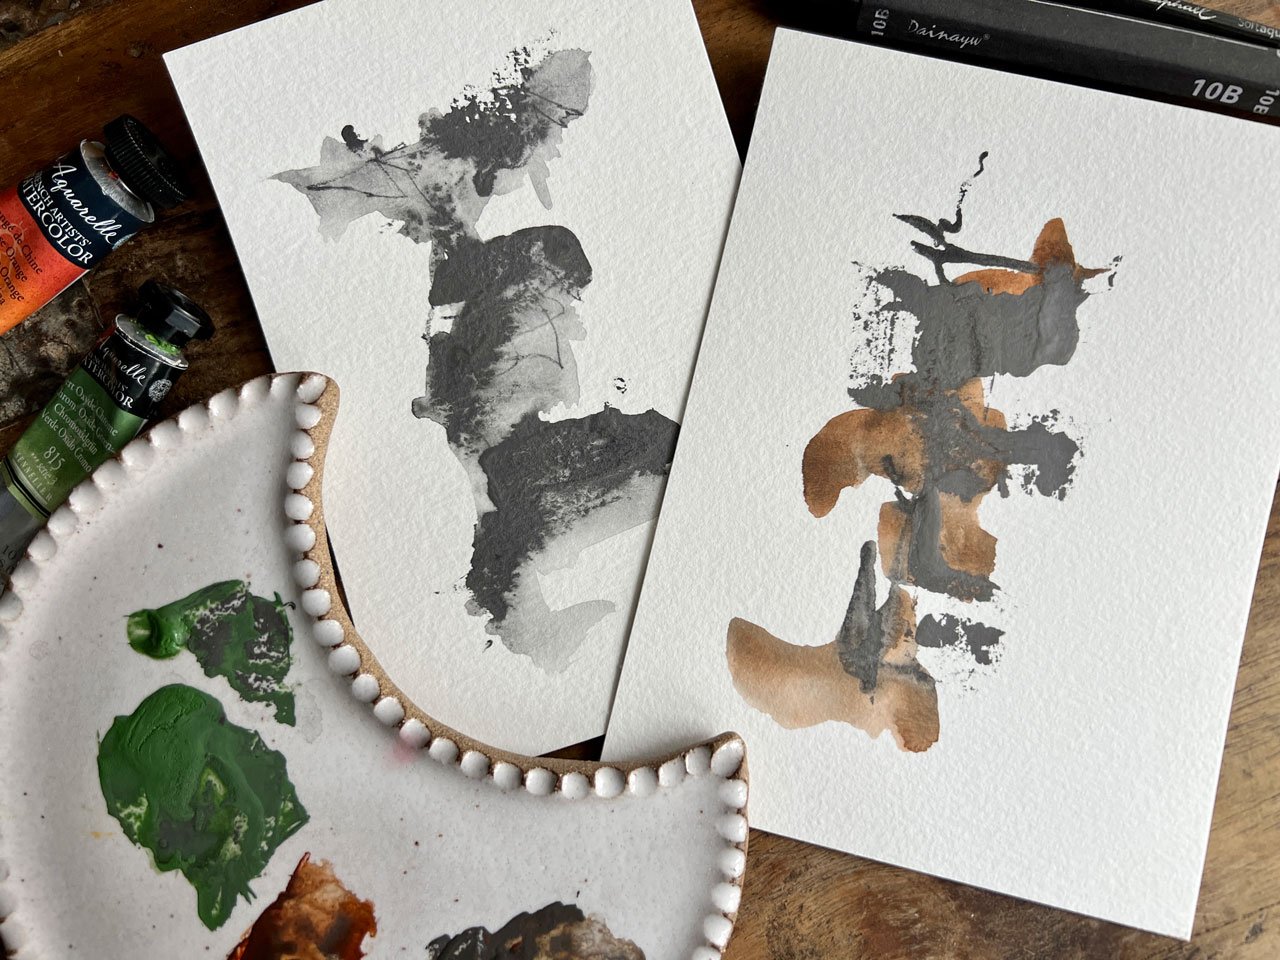
7. Testing Your Paints: [MUSIC] Let's test
out our watercolor. I'm going to just wet a
watercolor brush here. These are still wet. I will let these dry. They very easily just wet
back up with some water. But I want to see
what we've created. I'm just going to go
ahead and dip my brush into each color and
see what I got. I like that the graphite changes the color
quite a bit less. It darkened it but
it changed it less than the charcoal did
that I tried out. There's our seven colors. I want to let these
dry and see but I can already see a little bit of a metallic sheen
in some of these, especially this pink one, the way that it's separated out. I'm going to let these
dry and I'll be back. Let's take a look at the colors I made and the
colors that inspired me. I can tell now that I'm
looking at the colors that inspired me and we
could have done a paint test a lot earlier
than this obviously. I can tell now that
there's more graphite in the Kuretake Gansai
Tambi graphite pans. These are Kuretake Gansai
Tambi graphite pans. I can tell, and you can
even tell by the color of the mixtures that these are darker than the
ones I created. That was a really
interesting experiment playing with these
because just to get, this is a green and
this was a yellow. You can tell that the yellow is darker and that the green
one is even darker. I'm thinking that in their
mixture it's more of say like 60 percent graphite or 70 percent graphite to 30
or so percent pigment. But in the very thick areas
of the ones I created, we can still burnish
those and get that pencil graphite
metallic look in that color. Let's see if you can see
that a little bit of metallic shine in
there, which I love. I just liked that it was way different than a
regular watercolor. If I made these again, I might add even a
little more graphite. You might make one color. Take your paintbrush and test the color and dry it and see if it's what you want before
you make like a whole pan. But I'm still loving this pan
that I made, so I'm good. Let's actually paint something and see just
like what these might look like and I like that I now have the ones that were already
made and the ones that I made because now I have
like a whole selection of fun graphite watercolors
to pick from because they only come in a few colors when you order them because
they're so new. This is the other thing I
like to use with these. This is a 6B water-soluble
graphite pencil. This is art graph but there's a couple of
brands out there. I love this 6B
because it's so dark, when you add water to it, you can get some yummy
gray coming off of it and still keeping the
yummy dark lines. As far as, playing
with abstracts, that's like my mark-making. Then I can just
spread that around and just see what else
can we do with it? Then, I love adding our graphite colors
that we just created. You can see now, I could very easily mix the
pre-made and the ones I made. Just to see, what do they look like
in a painting together? Are they so
drastically different? I know theirs has more graphite in it than mine does
but that's okay. I like just playing
and testing things out and just seeing
like what did we get. Let's do that one and
we'll let that dry. Then I'm dying to try out
this crazy yummy color. Look at that. It's
insanely beautiful. We could mix that
with one of these. Here's the graphite
red from the Tambi. You can see it's
tiny bit darker but still will complement
my piece really nicely. Let's try this pink
one and down here at the bottom. Look at that. I could come back
in, you had to see. You can tell how these work
exactly like watercolor. We can drop in some
color and just see what would that look
like when it dries. I'm just experimenting
and playing here now. Then seeing what our pieces
look like when they're done. This might be a favorite color
way for me, so super fun. Very interesting to observe. How much more graphite
there might be in the professionally made
set versus the set I made? If you want them to really be this darker graphite coloring, then maybe do like
70 percent graphite to 30 percent pigment
instead of my 50, 50 mixture and just play
and see what you get. I could go back and do a whole another set, exact same colors, much heavier on the graphite, and then have a
light and dark set. That's the fun stuff about
making your own paint. You could keep on tweaking
that until you get the colors that you
want and you love. Now, our pieces are
almost completely dry. Look how pretty this one is. This is so beautiful, mixed in with the Gansai pans and my homemade green. I love the green.
It's beautiful. This one is almost dry too and I just dipped other colors, so I stayed a little bit
lighter and less heavy handed here making these than
I did some earlier pieces. But just to show you from
the workshop where I made the abstract
graphite pieces, that's what inspired me to
maybe want a few more colors. These were so beautiful
and some of these I was like super heavy handed with the amount of paint
that I was putting on these and I was playing
and practicing. But there's a couple in here that are my
absolute favorite. This one here. I
really loved it. This one I loved it. I could go either way
but I liked that way. Then this is super
beautiful. I love it. Once it's completely,
completely dry, I could burnish these
heavy areas to really get that metallic
graphite to pop out. Basically all you're doing
is taking a spoon and carefully rubbing over any of the heavier parts
of the paint and that will make that
graphite shine. Really you could see it right
here in this heavier bit. If I see right there that
graphite shine in there. The heavier it is, the more you can get that
graphite to really pop out. If you want it really
heavy like these, then use more graphite in your solution like maybe
70 percent graphite, 30 percent pigment but you
could play around with that. But that's what inspired
making some more colors. This is only available
in five or six colors. I love them so much that
maybe I want more colors. Fun playing in these today. I hope you have fun with these and I'll see you
next time. [MUSIC]
8. Std Watercolors & A Graphite Pan: [MUSIC] In this video,
I'm going to show you a little hack
somebody recommended in the little discussion page. Hey, what if we just
did a pan of graphite and not mix it with any pigment? I thought, "Oh, great idea." I didn't even think of that because then you could
take that graphite and mix it with
other watercolors. I actually spent
yesterday making myself a whole bunch of
new graphite colors because I'm obsessed. Look how pretty all
these shades are. I've got a little variety
there to play with. I did make a pan
of just graphite. It really is the very
prettiest silver pan. I thought, what if I used
some of my Daniel Smith, just some favorite colors, I've got Serpentine Genuine
and Kyanite Genuine. It's blue-green because
I like blue and green. I thought it'd be interesting
just to see how those mix up with the graphite and
just solid and say, this is the green solid and this is the green
mixed with some graphite. All I did was wet my brush, get a little of this
graphite in here, and just mix it with
the Daniel Smith color to see what I would get. Now I do see some
differences here from the colors that
are completely mixed because this is one
I was playing with last night with my new colors. I can see that mixing the
graphite in with the pigment really does slightly different than just mixing the
premix together. I'm getting a similar smokiness, but I don't feel
like I'm getting quite the same exact feel. I could be wrong, could just be [LAUGHTER] my
own interpretation there. But I thought it'd be
fun to maybe paint one and see if we get that same
repulsion that we were getting with our water-soluble
graphite stuff, which is in one of the
classes that I have. I just thought we would
paint one and see how pretty it turns out and if using just
the graphite pan is easier than mixing
all your colors. But I do love all
my colors there, so I just thought I
would maybe create one. [NOISE] I actually want
a different brush. I'm going to use this brush
just a little bit larger. I want to smush
some stuff around. Really see if I can
get a look similar to what I've gotten
on these pieces. Just a little this
green out here. I'm just mixing it with a color just to see does this give us more choices than
we already had? Could we just save time and mix us a yummy graphite pan and not worry about all
the different colors because now you can use any
of your favorite colors? I mean, it's definitely an
interesting experiment. Now we just need to let this dry and see if it's as pretty
as our other pieces. I'll be right back. Now, this piece is dried
and I was just comparing it to the other piece I
created last night when I was playing
with my new colors. While it does give you the beautiful smokiness
to the color, and I would use it if there was a particular super
favorite color that you happen to have
in your watercolors, what it doesn't give me is
he depth than I'm getting when they're mixed all
together and used. Another experiment that
you'll see in one of the graphite classes
is the one I'm using the water-soluble
graphite pencil with the mixed-up colors
where they're all mixed up. It repels the graphite pencil
in a way that's amazing. You'll see that experiment
in one of the classes. This was the one where the
color was mixed already. This is the one where I mixed
it with a Daniel Smith. On this one, it
was a hit or miss as to where it
repelled the color. That was a very
interesting experiment. Wherever there was more
graphite is what's repelling and then where it's
more of the regular just watercolor paint
color I was using, it didn't repel, and I like when it's all mixed and it repels all
over the place. That was an
interesting experiment with the water-soluble
graphite pencil too. If you watch the other
graphite classes, you'll see that experiment
in one of those classes. I just thought it'd be
interesting to talk about it. Does it repel the
same? Not quite. A little bit, just
in certain areas, but it's very interesting. You can see now that this
is really getting dry, they're very similar. If you've got a limitation
in what you want to create or you've got a very favorite
color that you're like, "Gosh, I want that to
be a graphite color," then mix just a pan of graphite. That was just the graphite and our watercolor gum Arabic
solution that I was using there. I thought that was
very interesting and I thought I would share it since I was doing
some experimenting. Having a graphite pan is
actually very useful. [LAUGHTER] I'll see you
back in class. [MUSIC]
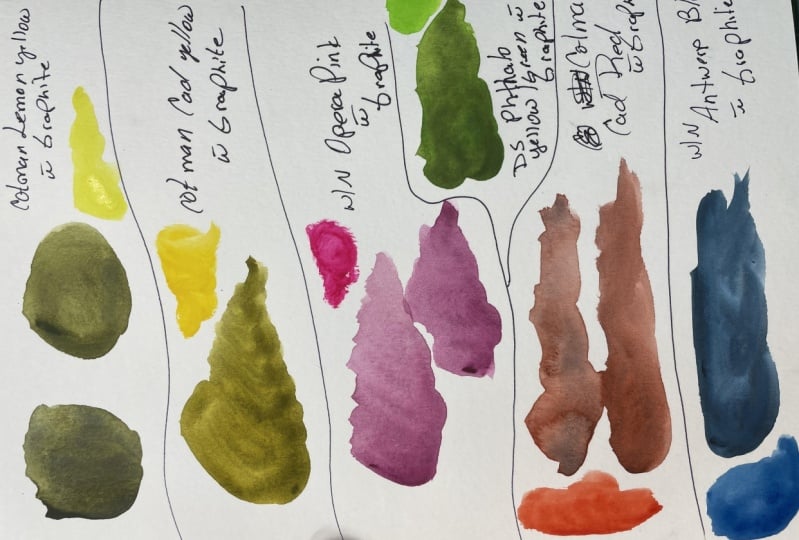
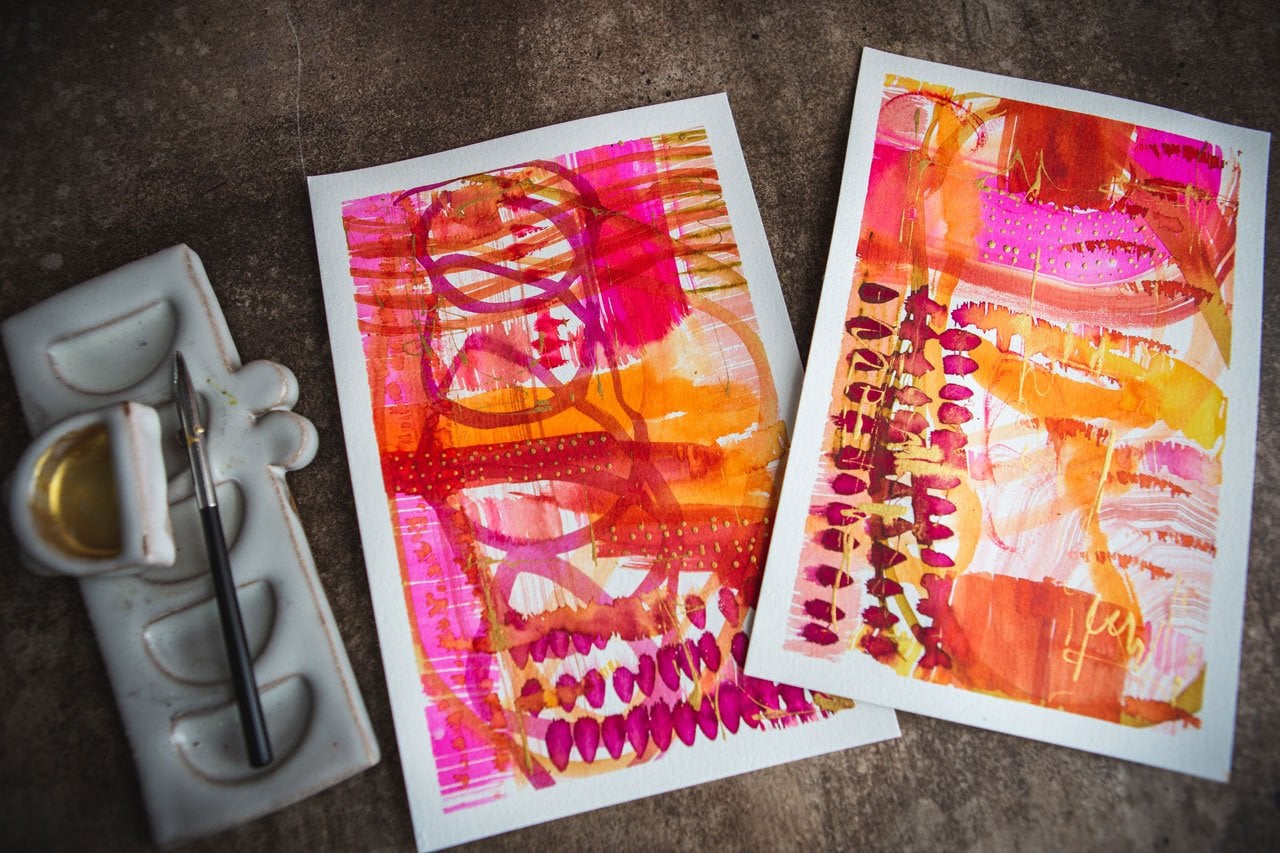
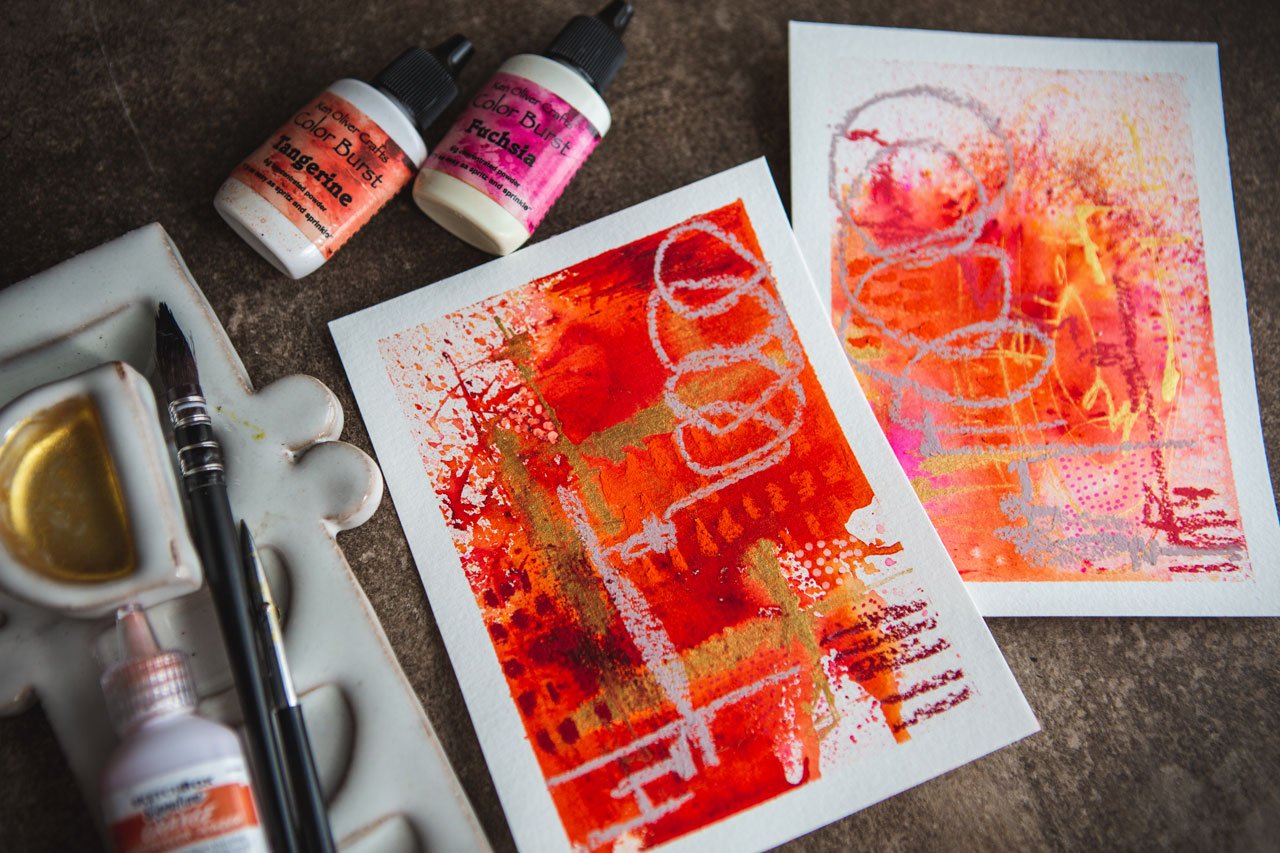
9. Using Premixed Watercolors: I had another student put a genius idea
in our discussions. So I'm going to record
us another video. She was going to try adding graphite powder to her
pre-made mixed watercolors. I'm like, "Oh, that's
freaking genius. I don't know why I didn't
think that either." Sometimes, I'm too close to forest
to see the trees. Not with such a great
idea that I'm like, "Oh, yeah, we're going
to try this out too." I already made one with the
Chinese orange by Sennelier. Just to give you an example, look how gorgeous that is. I think I get stuck on the end, so obsessed with my beautiful pigments that I want to use
them every chance I get. But check this out. We can just go ahead and
make ourselves a tub of our colors with any of
our premixed watercolors. Look how easy this is. I'm actually just doing this
on disposable palette paper because I'm not trying to
grind pigment and everything. The graphite powder is actually a really
nice fine powder. I'm not really trying
to grind it up and I am just eyeballing the
amount of pigment. Basically, I'm just going to mix this graphite powder right into my watercolor and it's already a really fine high-grade mixed-up watercolor
that I'm using there. I don't feel like I need to use my molder around the glass. I'm just going to
mix the powder in here to a point that I'm like, "Oh, yeah, that looks
great and smoky and yummy. That's still a bit bright. It's just going to be up to your own personal
preferences here. The original
graphite watercolors are yummy and very deep, and really is more
graphite than pigment. The ones that I made are
a little more pigment, but they're just as gorgeous. Then I made a whole bunch
more after filming these because I wanted a whole bunch
more colors to play with. But now I'm thinking this was so genius with the premixed colors
that if you have any favorite colors here or
you don't want to bother with mixing everything from scratch this would
work great too. I'm actually thinking I
could do even a little more. Now, it is getting
a little drier. There is a little thicker than the other concoctions
that I was mixing by myself. But it really didn't matter
because once these dry, we're going to be the same either way you add water
to it to reactivate it. That's nice and thick. Do I have it mixed in
as dark as I want it? You can keep on mixing these
so that they're really dark. My main goal is to
mostly get it so that when I'm using
it on the paper, I'm getting this really
bright smoky color rather than the
really bright color. Because if I were to take this watercolor just like it is, and I'm just going to use this, even though this is
really gorgeous. Just going to use this
as an example piece. But use that color just
right out of the tube. Look at the difference. You can immediately see
what I'm going for. I'm going for this
yummy, deep, smoky, really multi-layered
color rather than the very bright,
vibrant, original color. That's a big difference there. Just going to guess, is this dark enough?
Do I like it? I also write on the bottom
of my pens the colors. This is Venetian red and
then plus the graphite. I don't forget what that is. Then I'm ready to
put that in a pen. I have decided that I because I went ahead and
ordered some new pens. I like these bigger
full pen size than those little half pen size because I had plenty
of little half pens. But actually, when I'm painting, I like getting the paint
out of this bigger size. From now on I'm going to use the full-size pen to
make paints it's easier. I get more in it,
everything fits. Then let's take our
little sample sheet here and test out our new color. You can actually just get this off of this right
here if I wanted. But let's test this out
and see what we got. Maybe a little more water. Oh, yeah, look at that versus let's see if
I pull this right out of the container, the difference
that we get there. This is going to be trial and figure out how much
dark did we want that. Did I get it dark enough? Don't want to add
more graphite to it? How dark do I want to go? Before we put it into
our little half pen, we can test the colors
out, and then if I think, "Oh, I need a darker, I
can add more graphite." If I think, I need it lighter, I can add more pigment
and try to cut that down. Just another idea to give you on how you can make some graphite
watercolors if you don't want to make them from
scratch and you've got a color that you
particularly love definitely get some of
those and make a pen or two add the graphite
powder in it. This Chinese orange, crazy, beautiful, that is the
most beautiful rust color with the graphite in it. I recommend that color. I hope that gave you
another great idea. I can't wait to see
what you're creating. I'll see you back in class.
10. Final Thoughts: How fun is it to make
our own watercolors? I love the graphite watercolors
so much that I was like, I need some more colors, I need to figure this out. Let's just make some. My watercolors are a little
bit lighter on the graphite, than I think their
professional colors that I got that I
love so much are, so I could go back
and make another set with about 70 percent
graphite, 30 percent color, might even be even
more graphite. You can play with that
formula a little bit. But that's the fun of making
some of your own paints. You can test out
some of these ratios and you can be like,
this is what I like and make a whole set of things just in the ratio that you love. How cool is that then
you can be like I made my paint in addition
to I made this art, elevated your art to be even
a little more prestigious because let me tell you people are impressed when you say, I made my own paint to
create this for you. I hope you enjoyed
making your own paint or seeing at least
how it was done and getting inspired to make some of your own
paint today in class. I can't wait to see what
you end up creating, the colors that you
gravitate towards, the sample pieces that you might have created
to test them out. I want to see some of those, please come back and share. I'll see you next time.
 DENISE LOVE, Artist & Creative Educator