Transcripts
1. Introduction: It's no secret that I love new art supplies and I get
an art box every month. This month's art box
really inspired me to make a little art class with you to experiment with
these new products. I'm Denise Love and
I'm an artist and photographer out of
Atlanta, Georgia. This month we're going to
play with graphite pens and water-soluble graphite
pencils. These are super cool. The graphite pencils are
very soft, and bold. The six B pencil is now my new favorite
mark-making pencil because when you add water to that it gets really
dark and yummy, but spreads out to
a beautiful gray if you switch that
around a little bit. They are so beautiful. Then the graphite
pens, super cool. They operate and work a
little bit like watercolor. We're going to add water and we're going to push
those around like we would a typical watercolor
that we're playing in. But the difference that
you get when it dries, it's a little more matte and the thicker
bits of paint have that little bit of
a shininess that the graphite has.
It's super cool. In class today, we're going to experiment with these
graphite pens and the water-soluble
graphite pencils and just see what we can create. We're going to make
some little abstracts which end up really beautiful. I can't wait to put a few of these up because
they're gorgeous. I can't wait to see how you enjoy playing
with the graphite too. Because I know
once you see this, you're just going to want
to get some for yourself. [LAUGHTER] I'm really glad
to have you in class today. I hope you love playing
in this new supply. Let's get started. [MUSIC]
2. Class Project: [MUSIC] Your class project today is to come
back and show me some of the graphite
abstracts that you created. This is a really fun art supply, art medium that I've not played with before because some
of this is brand new. Super fun to bring you a new product and to play
with it in class with you. Hopefully inspire
you to want to grab some of this yourself
and see how cool it is. If you play with this one, I definitely want to see some of your pieces that you create. Come back and share
those with me. I'll see you in class. [MUSIC]
3. Supplies: [MUSIC] Let's take a
look at the supplies that we'll be using
in this class. It's no surprise that I
love art supplies and I truly enjoy getting
the sketch box each month because
they introduced me to some new things that
maybe it's brand new or maybe it's just something that I've
just never heard of. It keeps me
interested each month in what cool thing
can they send me? This past month, I was super
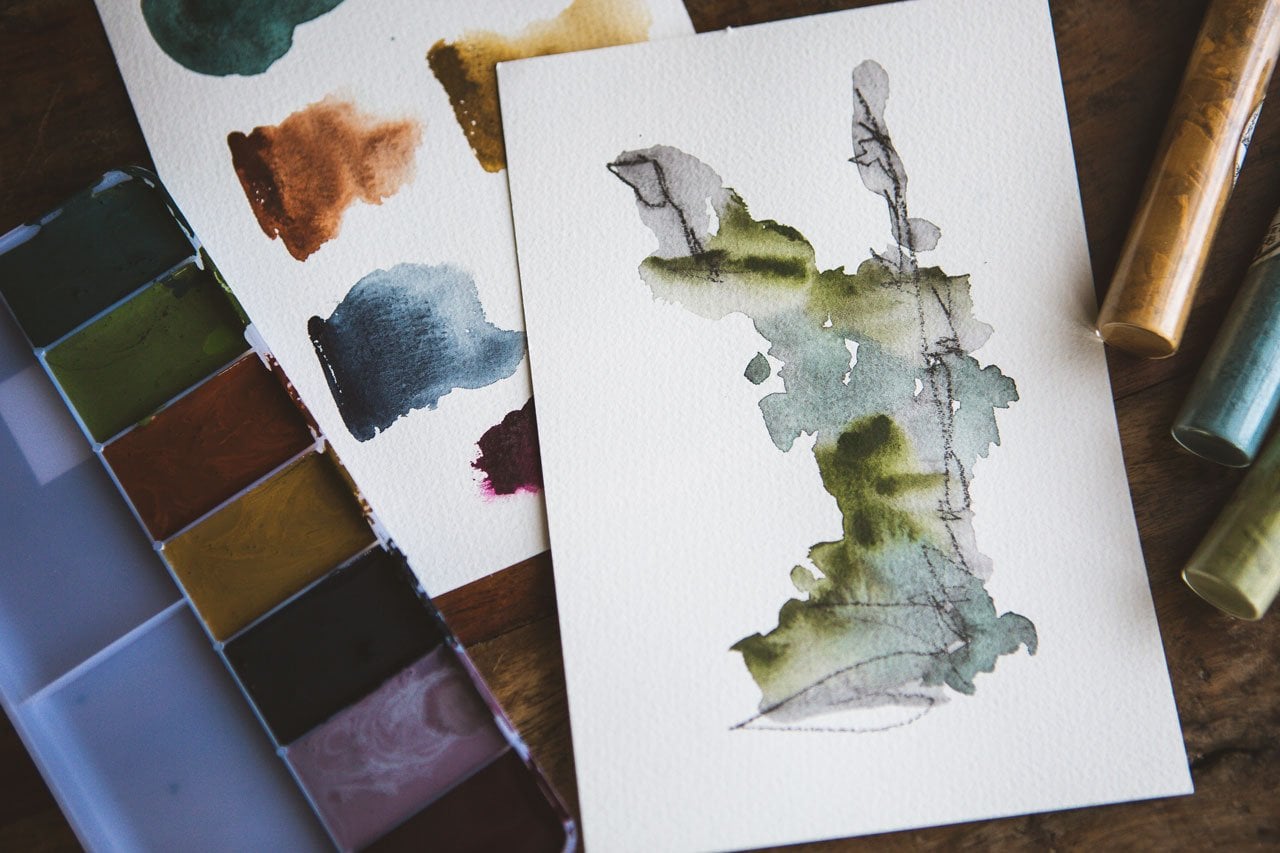
inspired because they sent these lovely graphite pans. These are the Kuretake
Gansai Tambi graphite pans. It's brand new at the time
that I'm filming this. But it is available at several online art stores
because I looked it up. These are super cool. The colors that I've
got are graphite red, graphite violet,
graphite yellow, graphite brown, and
graphite green. But to me, this
yellow looks a little more like a pine green and this green looks a
little more like a really deep, yummy,
bluish-green. The violet does look like
a violet or a maroon. The brown, it's okay. It's like a brown. It's pretty. Then what's this
last color again? The red. The red
is really pretty. It's like a maroon,
like a dark red too. It's actually a really
exceptional set of colors that we've
got to play with. I'm going to be using
another product that also got to do these. These are art graft,
water-soluble graphite pencils. This is the 2B and the 6B. I'm really in love with
the 6B, out of these. If you just want one
one you can find a 6B art graft, water-soluble
graphite pencil. I love this one. What's really cool
about these is we can draw on paper and then we can add water to that and mush it around a little and we
can still see the marks. But then we also have this really pretty grayish
color that we have. [NOISE] Those are fun. I'm going to be using in class 100 percent cotton paper because I liked playing
on the cotton paper. You can use any 140
pound watercolor paper to play with this technique. I'm using the Moulin du
Roy because somebody recommended it and
told me that was their favorite
watercolor papers. I ordered some of that
to experiment with. That's what I'm using
for my paper in class and this is
the smaller tablet. This is about, I'd say a five by eight give or
take a little bit. It's in centimeters. It's 14.8 centimeters
by 21 centimeters. It's almost six inches by a little over eight
inches, there we go. [NOISE]. I'm using this and
I've cut these in half. Here is that little stack
of paper I've cut in half. I've got my five
graphite pencils. I've got my art graphite, and then I'm also just using my favorite
watercolor brush. This is a Raphael soft
aqua brush size 0. It's just holds a
lot of water and it's going to smoosh
everything around for me, really beautiful on
this size paper. Then I've got water. I've tried to keep the
supplies pretty simple. I want to play and create
some beautiful abstracts, and I've already
been playing some. Just to give you a sneak peek
of what we will be making. Look how beautiful those are. I'm super excited to play in
these yummy graphites today. I'm really excited to introduce them to you if you've
not seen them before. Because what's really cool
about these is they work like a watercolor but they dry
with a much different look. It's a little bit grainier, it's got of that
graphite pencil look. When you get thicker,
it's actually got that little bit of
a graphite sheen. It's really cool in the
way that this looks. You can see how
I've pushed around that dark art graph pencil around to make the
under gray color there, look how beautiful those are. I think I have a
new favorite supply to play in for awhile. I'm really going to enjoy these. I'm going to show you
how I made these. It's super easy. This will be a nice short
technique and you can see if you want to try
and experiment with the super fun supply. Or you can, of course, substitute watercolor
and graphite pencils and give it a try
with what you've got on hand. I just think it's fun to
introduce you to something new. Let's get started. [MUSIC]
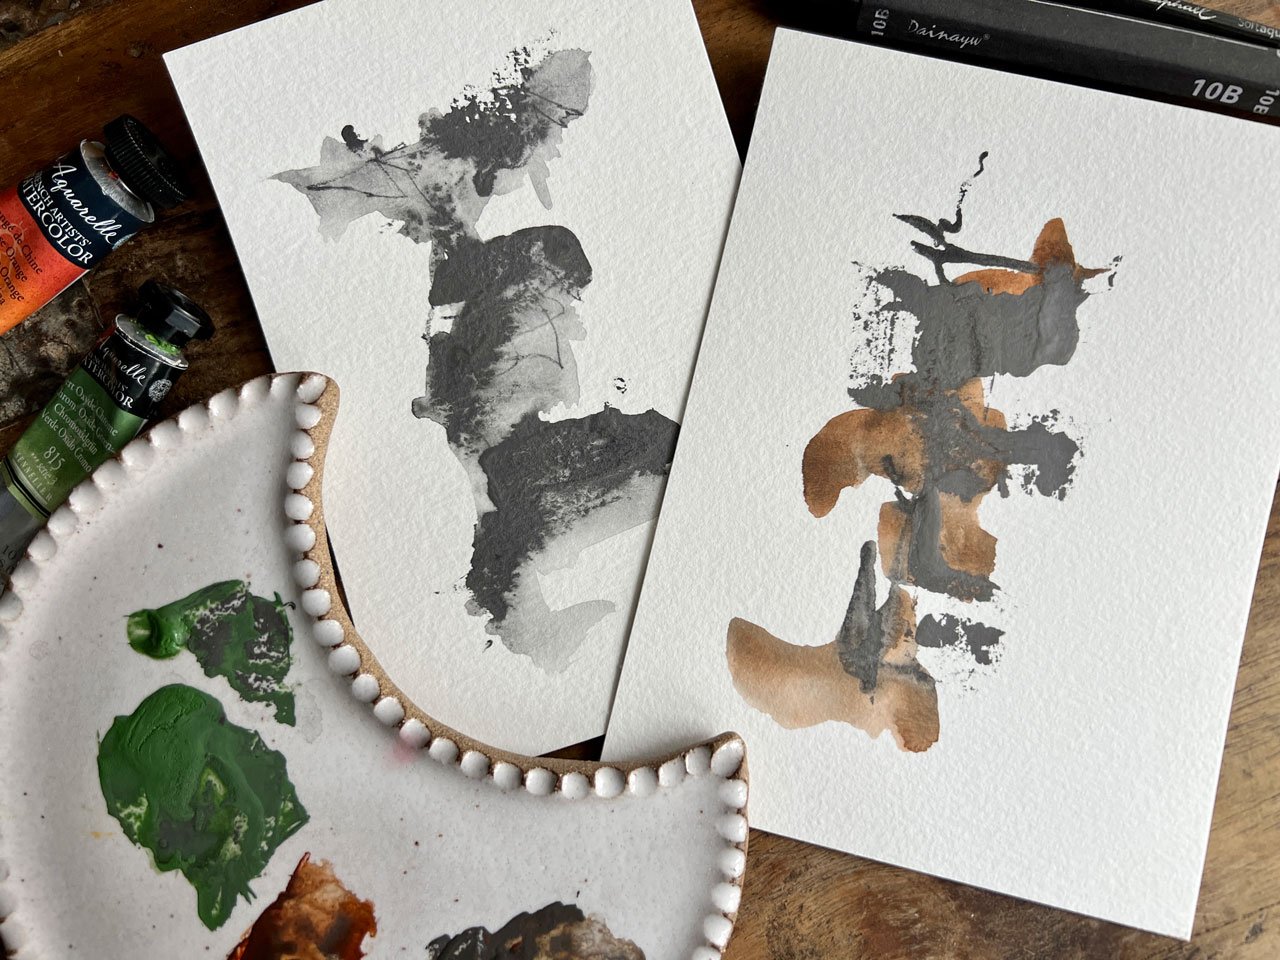
4. Sampling Colors: Before we actually start painting on our yummy abstracts, let's do some color testing and see exactly what these do. This is the 2B art graph pencil, and I just want to see
what I can get out of it. This is the 6B, which I really like
how soft these are. Let's just see the difference
in the two pencils. I've just got a
little bit of water. Let's just switch
these around a little. I think this is going
to be where you see the big difference there
on the 2B and the 6B. Look how dark and
yummy that line is. [LAUGHTER] The softer
that graphite is the darker and yummy our mark is
under there. I love that. I've already sprayed
these with some water, so let's just take a
look at the five colors. We've got red. Maybe I'll spray a
little more water on these because I was
playing in them first. Really seeing how I was
going to like them. We got red, then this one is the violet. Look how beautiful that is. Yummy. This is the yellow. See how it's more like a pine
green or an olive green. This is the brown. The brown and the red
looks very similar to me. Then this is the green. This is the most gorgeous color. It looks more like a blue-green. Look how beautiful that is. Then a fun thing that
I tried on one of them was I took my pencil and I ran the pencil
through the graphite a little bit just to
see if these were wet, what it would do and it actually wherever I
ran the pencil through it repelled the wet graphite
that I had painted on here. You can really see
it on this green. Did you see how that
repelled that color? It just pushed it away. That's a really
cool thing to know. I wanted to show you
that because that may be something that you
want to experiment with in your pieces. Now that's all our supplies, we've played with
our little samples. Let's create a few
abstracts. [MUSIC]
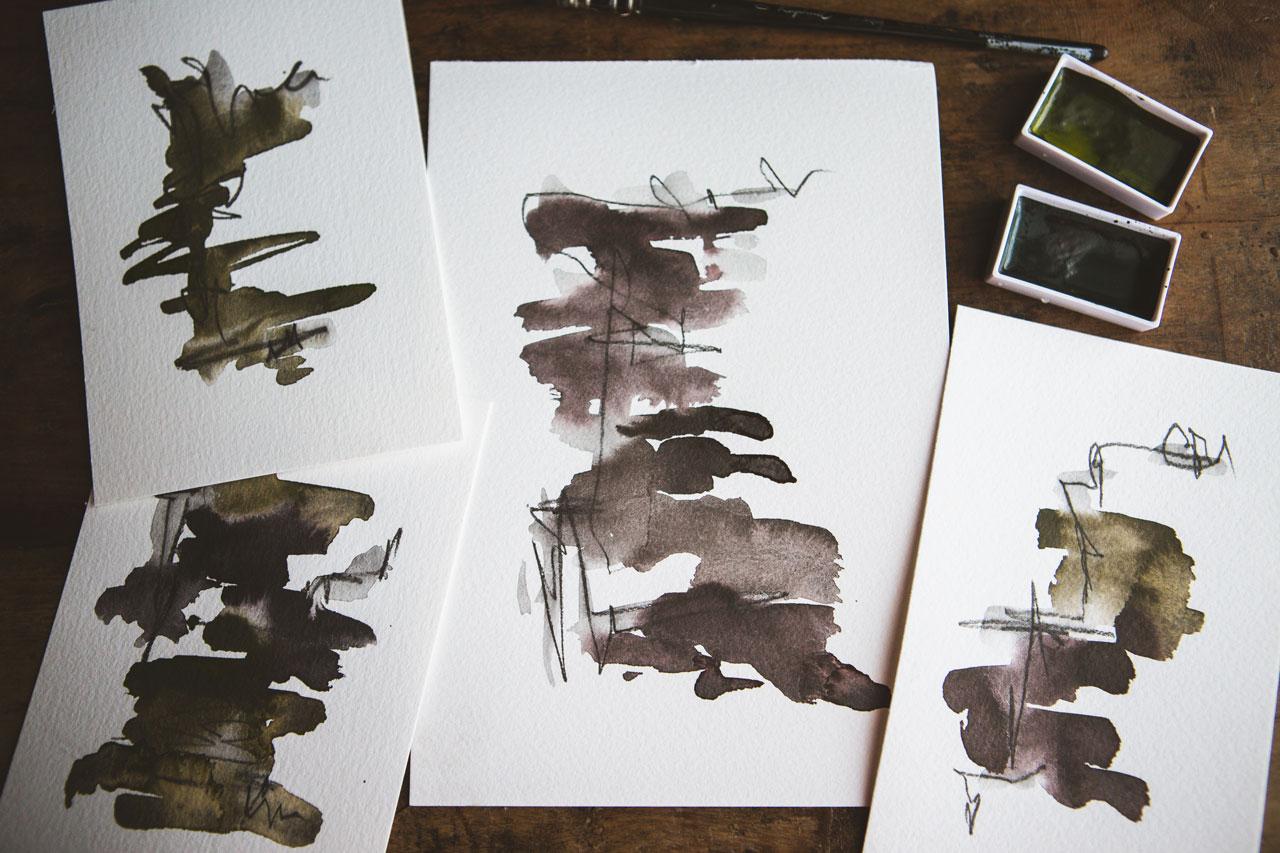
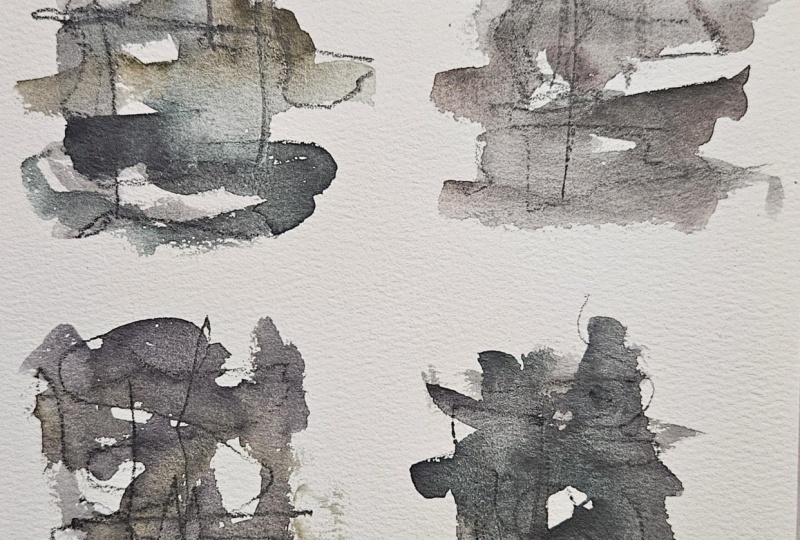
5. Graphite Abstracts: [MUSIC] Let's create
some abstracts. I've taken my color sample that I'm going to sit
over here and be able to look at and I've
written down what each color is and which
pencil I was using, so that way there won't be any confusion later
when I think, what did I use there? I'll have myself a little
card I can refer back to and I can write
down what this is. This is the [inaudible] graphite. Now I know what I used. It's not half dry, so I'll sit this to
the side and I'll be able to look at this
as we're creating. I've decided that I particularly love the dark east pencil, so I'm going to be using the 6B. I've used it quite a bit, so the point is dull. You might keep a
little sharpener around and sharpen
that if you want. Then I'm going to just play
with the different colors. I'm just going to start off
doing some mark-making. I'm pressing nice and hard. I'm just going up the
page with some scribbles. We might just create a few of these at the same time
because it's really fun when you get
the brush-wet stage to have some ready to go. These are so beautiful
when they're finished. I really do feel like this could be one of my very
favorite new items to play in. I already like
watercolory stuff. I like water-soluble graphite, water-soluble charcoal,
I have some of that. I might need to do a class with that one with the charcoal. This is getting our pencil dull. I might go ahead
with a sharpener. I have one of these 1970s electric pencil sharpeners
over here on my desk [LAUGHTER] that I had seen in another class long
time ago and gotten. That thing is insane. Look at the point it
puts on this pencil. That's a Panasonic auto stop electric pencil
sharpener and it's very old. I had to get it off eBay. But man, talk about an
edge on that pencil, that will hurt you. [LAUGHTER] But it got
a nice sharp edge and you see we'll
get a different feel if we have a dull edge
versus a sharp edge. I want you to be aware
of how different that will let us create
depending on how this edge is. I'm just doing random marks because I don't want to
be too precious about it. I don't want to talk. I don't want to think too hard about it. That's why I'm doing this
as I'm still talking because I don't want to
stop and think super hard. I want to just mark-make, I want to enjoy just
seeing what I get. Let's just go from there. Now we've got a little
stack of parties. We can see which
way you want to go. Let's just give this a go. I'm going to move the gray pencil around and just see what we
get and activate it. I don't want to erase my marks. I'm leaving the yummy
darkness on the marks. Now I'm just going to experiment with some
different colors here. This is that green. Look how pretty that color is. [LAUGHTER] This is the yellow and I've got
it already activated. I'm getting a whole lot of
color here on my brush. You can thin that out some. But really these are so gorgeous with that
super thick color. But you can definitely
make these a lot lighter. Let's put a little of
that green down there. Let's call that one good. These dry pretty fast
too. Let's experiment. That was a super dark. Let's do this not so dark. Maybe not so much
loaded onto our brush. Let's do water first. I want to activate our
yummy darkness here. Let's real quick too
while we do that, look at what if I run
through some of these, let's go ahead and
experiment too. Let's see if that will repel the color or if I've got enough paint
on there, not really. We'll just let that dry
and see what it does. Experiment with some of that, put some marks on first, put some color on. Let's see what it does. If it's wet and you
go back over it, you'll really smear that
color and even more. Let's go really light
with the color, not so dark as I just
did and see what that difference might
give us because I did go super-duper dark
on that first one. Look at that. We could come
back and add a little more. Now we can really
get some variations on how dark and light
we get that color. Look how pretty that is. I love this. [LAUGHTER] Then we can experiment here and see. Can I get any of the color to repel or are we going
to be good like it is? Now another thing I didn't
mention because these are water-soluble and I did use all my cut-up
pieces of paper. Let's just pull out another
yummy piece of paper. Because this is water-soluble, I didn't have to add
the water on top. I could have dipped my pencil
in water and had water on it and then drew on our
paper. How cool is that? That's another thing
to test out too. You could have that water
activating it as it goes, which is fun here. Let's do a bigger piece anyway. I like scaling
things up as we go. It's fun to go ahead
with a bigger sheet. I'll set that to the side. Super fun though. You could put the graphite in the water and let that
be doing its thing. Let's go ahead and
paint some more. We don't have to activate all this graphite
if we don't want. I like the graphite active. If we got the real
light purple and I can add some more and get
some dark places. These colors are just stunning. With the purple, maybe
let's try some of this yellow because it feels
like it's a greenish color. Maybe a little more water. That's pretty maybe
some of this color up top and I'm just working in
a little movement there. I'm not worried about placement so much because it's a design that we've centered
on our sheet of paper. But I do want there to
be movement in there so that your eye works
its way around. Look at this first
one that we did and you can see how
we've now working our way around visually at the interest that's
going on there. These are so pretty. We might try the brown. I don't know that
I'm a brown person, but it's certainly
interesting to at least give every color a try. I think the brown is
the only one I didn't try because I got, well, maybe the red so
let's do the red, so brown and red. But I really feel
they're very similar. If we do the red real thin, you might can actually then see a difference in the
brown and the red, but they're still very
similar and close and then I just might come and
touch a few more in there. Super pretty brown and red. Maybe come back with
a little more brown. See if I can get some
just heavier interest when that dries, so that's really pretty, pretty. I'm really in love
with the blue-green. Let's just do a few more
because we have them [LAUGHTER] I want you to really get excited and feel
comfortable playing in these. Now I can run that gray a
little further out if I'm wanting to offset
some of that color, don't you love what that does? Then we can fill some of
that back in and just go back and forth with the color and
switching up your colors. One of my favorite techniques, because we really introduce
a lot of movement, a lot of interest. Set this over here. Let's go back with this yummy yellow and we can even do these as a one
color maybe I'd think, I love that color, and
let's just do that. Then we have the one
color and the graphite, a level of movement going
on in that so let's go ahead and let this one dry. Maybe we can do
it one one color. Well, do this. I will play in the blue here and just wine this
around and just see. I could come back with
my graphite and see if I can get it to repel
any color again. Some of these are really
obvious when it dries, but it's just cool to
experiment so that's fun. Maybe we'll come back in with a little green
because I don't like it being back there on
its own, look at that. I like that better
[LAUGHTER] Let this one dry. We've got a couple more
of these are so fun when they're done wait until you to our finished pieces
when they dry. They dry pretty
fast so as you're painting a whole bunch of these, you'll be able to
come back to them in a relatively short amount of
time and just experiment, you can do some other
mark-making if you want. My goal on these is not to
do a whole bunch of extra mark-making but
some of these don't have enough marks on it when you're done
and you might think, what would it look like if I did some dots or some lines or just came back in with
some extra whatever. If you dip that
pencil in the white, and the water can really
get some good marks. That one might not
be my favorite, but I was just demonstrating. Extra dip it in the water and
then get some other marks, go on to do all
kinds of fun stuff. We've got one last little one and then we've
got that big one. Let's just go ahead and see
what we can get on these. On the brush when I'm
really activating these I'm just moving my brush in lots
of different directions, I'm not trying to hold
one direction on these. That might not be
what you want to do, you might have a different
goal so just follow the moment like what are you inspired in the
moment to create? That's pretty let's
go a little bigger [LAUGHTER] Look how
pretty this one is. These are turning out so pretty once they dry,
they're beautiful. Let those dry. Then let's go a little bigger. I've got this bigger one that
we experimented on here. Remember, I did this when it was wet so I've already got
some in here that's activated but I really
like the gray that I get as I mush it around so I'm going to just go ahead
and do that some more. Then as you go bigger, usually you want bigger tools, or bigger marks, or
bigger whatever. I'm going to do bigger
swishes of color, not necessarily changing
my brush out for this one because it's not so big that
this brush is too small. I might do several of
these because I like them. Look how pretty that is
[LAUGHTER] Gorgeous. I'm going to let these dry and then I'll come back and
take a look at them. I might personally just paint some more big ones because I got a couple of more
sheets of paper here. Well, I got one more
sheet of paper here, so I might just play and
make another big one with some of these other colors depending on what
my favorite was, like, look how pretty the
brown and the violet was. That turned out even
prettier than I expected. So I'm going to do one more. We'll let these dry and we'll come back and
take a look at them. [MUSIC]
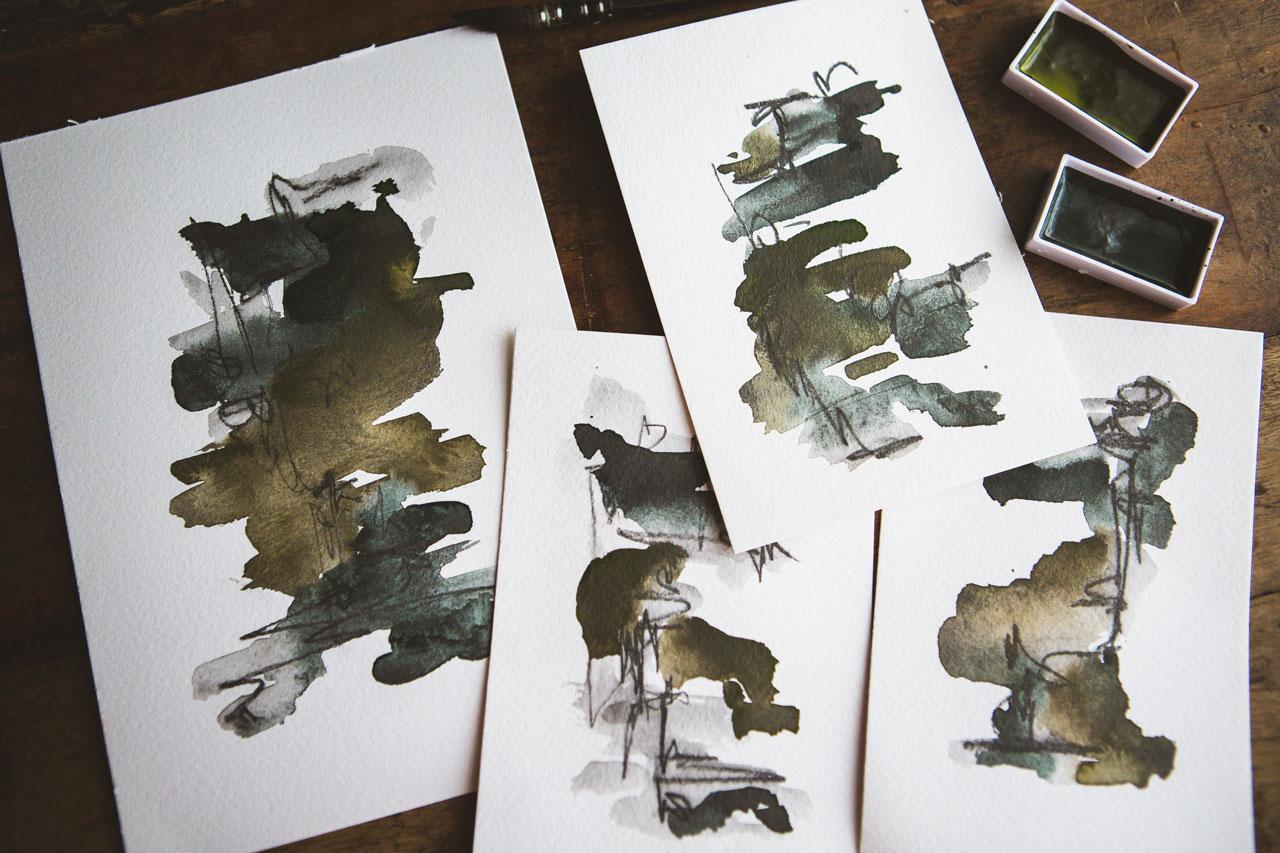
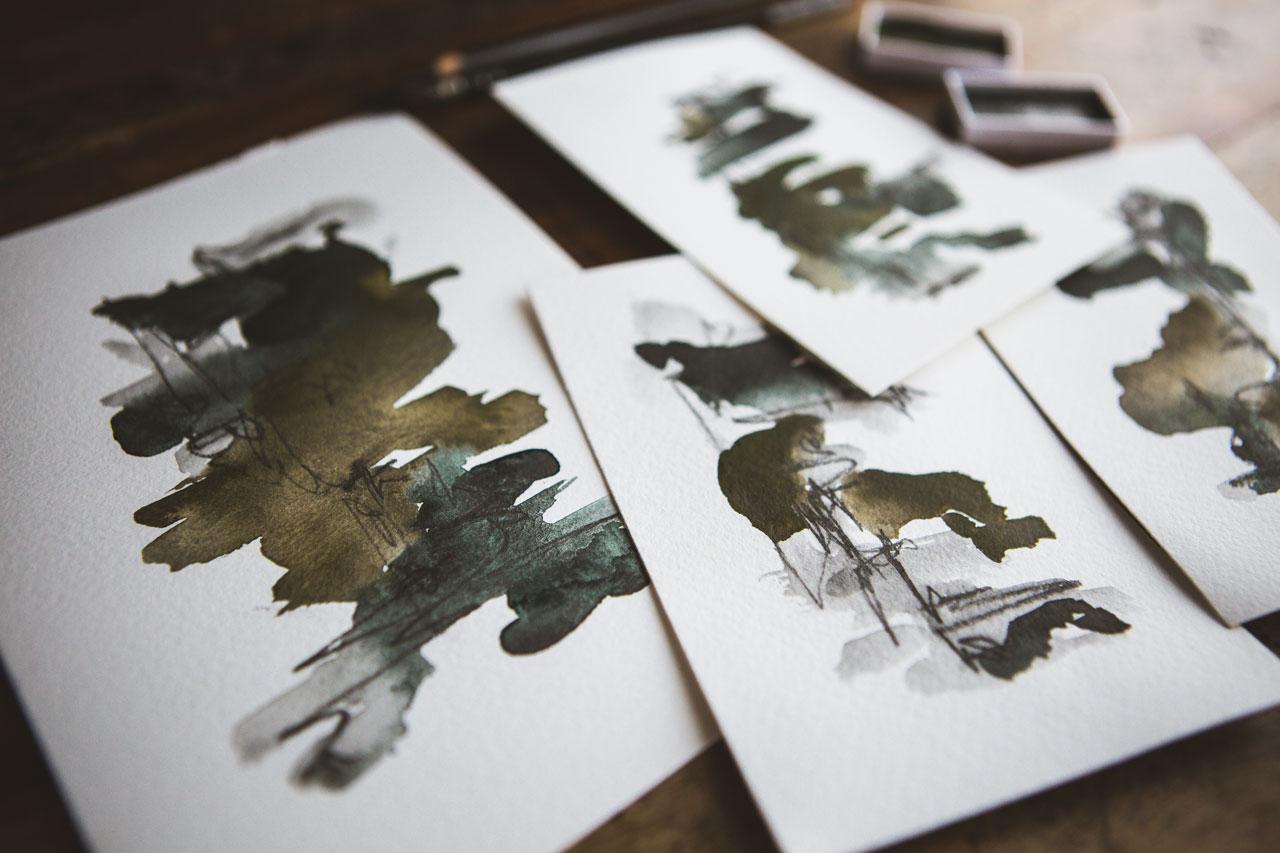
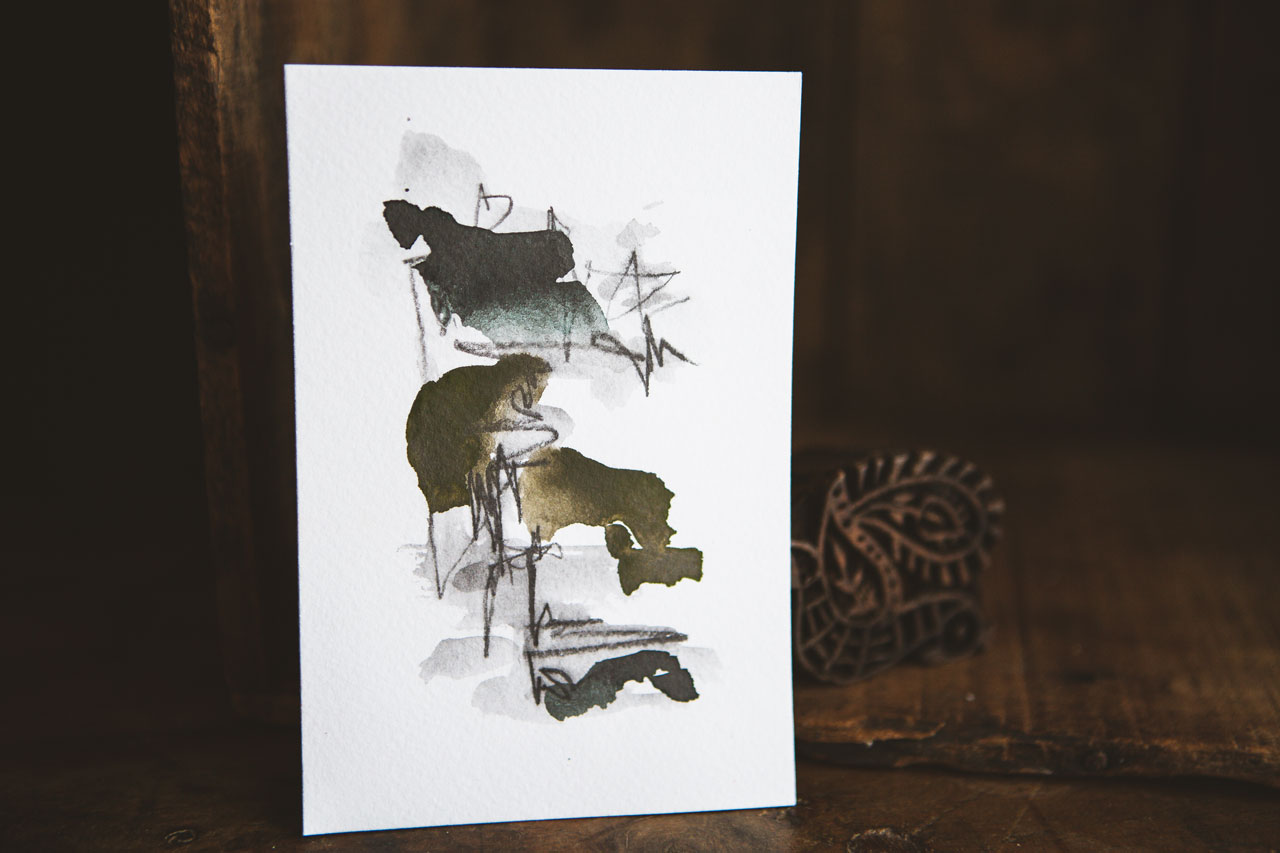
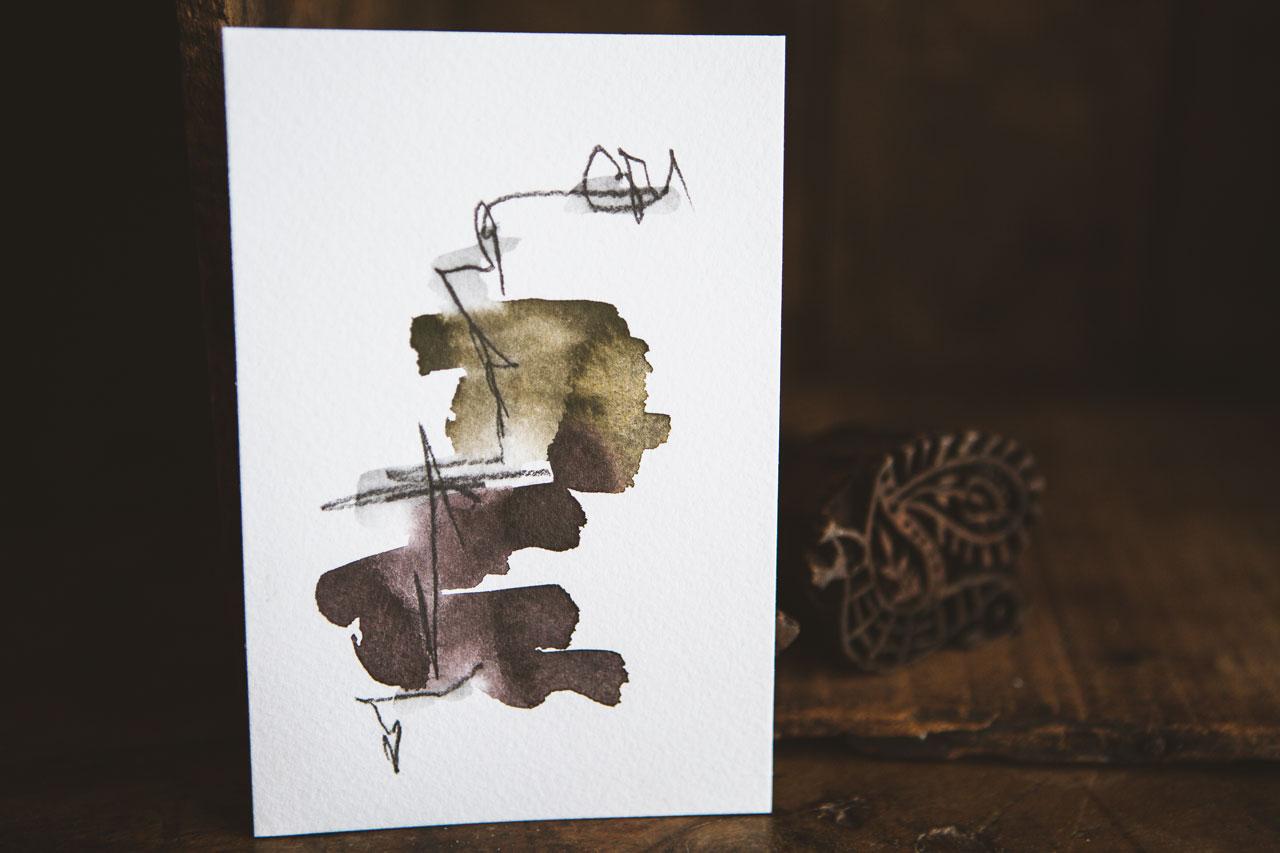
6. Finished Graphite Abstracts: Let's take a look at these now that they have dried. So super cool. These are super fun. Let me remove all the graphites out of the way here and we'll just take a look at the different littles
that I created today. This one I particularly love. I can also see where I dripped a little
extra water in it. I got some little bit of almost a watercolor
bloom that occurred, which I really love. I like it when the watercolor
bloom's on the abstracts. I know it's not a
desirable effect on serious watercolor paintings, but these are fun
and the bloom adds to the different interest
points for the piece. I can see, as I'm
looking in the light, you may not be able
to tell on camera, the thicker the paint, the little more of a
graphite look you get, which is really beautiful. I like that with the variations
from the light to dark. Look at that, that looks
like an avenging angel or something with the
wings flying out, so that's pretty fun. The violet and the
brown, super beautiful. I do love those. The green and the yellow
are my very favorite. This could be one of my
favorite right here. I love the lights and the darks, and the way that they
work together there. I'm going to try and
experiment here on one of these others but I
also love this one, the simplicity of the one color, so don't discount how strong
a single color can be. This was the green and the
yellow, look how gorgeous. This was the green
and the yellow a little bit heavier
on the paint, so very interesting to
see the difference. I do like it. A little lighter
handed where I see a lot of light spots in there. This didn't have
any of the light. Just something to play with. This is one that I let the
marks go outside the color. Look how beautiful that is. Again, I did that here too. I had a lot of marks, very sparse with the
color, beautiful. Here I played with
three different colors : the green, the
yellow, and the violet, and again, I let the
marks go outside. Look how pretty
these turned out. Here I went with a lighter hand. Very interesting
to see what that did and I love this one too, and that's that green and
that yellow again, gorgeous. Then look at these. Look at that big one. Look how gorgeous that is. I love that you can really
see some of the way that the graphite granulates
a little bit, and I like the thickness in the heavier parts, I like that. Then the brown and the
red, really pretty. But this is the one that's
really speaking to me. I thought wouldn't it be fun
to just see what happens if we take one and we
see if it reactivates. We've already put that
on, we've activated. What if I add more water into something or
something's too dark, or I want to go back
around and just push these colors around? Check that out. We can push that
around and change these a little bit so
these do reactivate. If you get them wet again, we're going to be able
to push that around and we can just see what we get, so keep that in mind. Then I was wanting these
to dry really fast because I was filming
and I wanted to be able to come back pretty quickly
and finish filming, but this is one of those
watercolor projects where you really do want
it to dry on its own and let it do its thing. I encourage you to
paint a bunch of these because you're not going
to like all of them. Some of them are
going to be duds. I think this is a dud, and I did this before our class just playing with the stuff. This is a dud to me, but I was just experimenting. But you're not going
to like all of them, and you're certainly
probably not going to like the first one that you do. I want you to do a dozen of
them and then you can say, I don't love this one, but I love this one. As long as you end up with a few that you're
super happy with, you're ecstatic when you
leave your art table. Look at all of these. I love all of these. That one's kind of like,
I really love this. Out of these, I don't know
if that's my favorite. Maybe the angel is not
and I like these two. Out of that, I would say, I consider five, we'll
even say these two. Seven duds, but I also got
2, 3, 4, 5, 6, 7, 8, 9. Nine that we're great came
out of the two big ones. This one's nice, but
I love this one, so I'm glad I did more than one so that I didn't stop and
say, that's not for me, I don't love it because
now I have one I love and I'm like, look at that. I hope you enjoyed
experimenting with a new art supply with
me and I hope that these make you interested in
trying it out for yourself. I definitely want
you to check out the Gansai Tambi graphite pens, which work like watercolor
and the art graph pencils. The 6B was my own
personal favorite, but if you want a lighter touch, the 2B is great also. I hope you love
playing in these, and I'll see you back in class.
7. Final Thoughts: [MUSIC] How cool was it
experimenting with the graphite pans and the water soluble or
graphite pencils? Super fun. I am truly
going to be playing with that 6B pencil going
forward in a lot of my art so you might see that pop
up over and over again. The graphite pans, anytime that there is an
instance where I can use watercolor or mark-making or mixed media or something
in there or I need some other colors
and other techniques and like other mediums that
look a little different, I'm going to grab one of
those graphite pans because I love that they're a little
more matte than watercolor, but also love how in the
very heavy, thick areas, it's got a little bit
of a graphite sheen to it and it just looks
completely different. I love that about those. I hope you enjoyed learning
about a new product. If you've not tried it before, definitely give those a try out because this was super fun. I'll see you next time. [MUSIC]
 DENISE LOVE, Artist & Creative Educator