Transcripts
1. Introduction: If you've been around my channel for any length of time, you've probably gathered that I love graphite
and I love gold. Today I want to combine
graphite and gold into some yummy abstracts
and see what we can create. I'm Denise Love and I'm an
artist and photographer. Today I have several
small abstract projects for you to give a go. You can substitute the
gold ink for gold paste and watercolor gold or
acrylic gold paint. There's lots of different
options with the graphite. You've got the fluid graphite, and the water-soluble graphite, and regular graphite pencils. So many choices. Who knew graphite came in
all these different forms? We can get all the
different shades of gray depending on how we mix
those and add water to them. I'm really excited
today to introduce you to some fun projects that
we can just use two items with graphite and gold and
see what we can create. They're dynamic and yet
they're simplistic. They go beautifully
together in abstract and you're not stuck on
the age-old question of what colors am I going
to use in my project because there's
just gray and gold. I mean, how cool is that? I'm really excited today
to have you in class. I can't wait to see
what you create with these two yummy art supplies. I've got a variety of those
art supplies to show you. It's more than you would think
that you have for options. I can't wait to see
what you're creating. Come back and share
those with me today and I'll see you in class.
2. Class Project: [MUSIC] Your class project is to come back
and show me one of the abstracts that you
created from class today. I love the gold and
the graphite together. I think they're beautiful. I think they're more
minimalistic because you don't have all the different colors
fighting with each other. The marks and the
interests that you can create with just these
two colors is amazing. I'm looking forward to
seeing what you create. Come back and share
your projects with me and let's get
started. [MUSIC]
3. Supplies: Let's talk about the supplies that we'll be using
in class today. I want to make some really
beautiful abstracts. I want to be able
to hang these up or give them as gifts
so I want to go ahead and spend a little
extra time on them and have them be really
beautiful finished pieces. I'm going to work on a little
bit better quality paper, which is going to be today, my Canson Heritage paper. I've got a bigger size pad here that I'm going
to cut into fours. I'm going to cut it in half, and cut it in half again, and end up with some pieces that are about this size that
I could create on today, and then I can make bigger
pieces as I'm so inspired because I love
going bigger after I've do some things
that I like and seeing, what can I get if
I make it larger, and what are the different
complications that I run into? I love playing in that. I will be using 100
percent cotton paper because I like it, it is a nice paper, and it's going to give
us a pretty finish. You can use any
watercolor paper, cold press 140 pound paper
that you're comfortable with or that you have on hand
that you like working with. It's not a big deal
on type of paper, just one that you
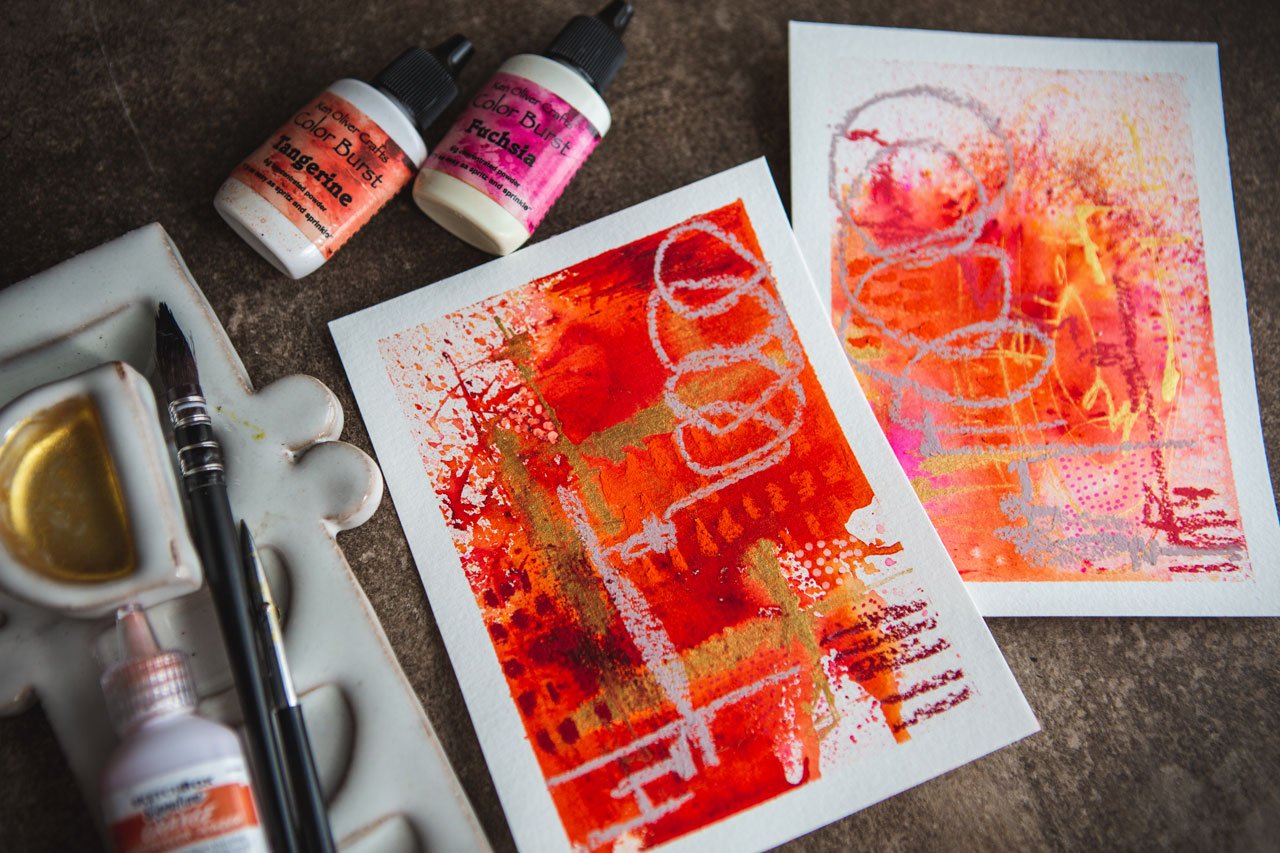
want to play on. The other thing that we need is some graphite and some gold. With the gold and the graphite, I have lots of options, and it's pretty cool to
have different options. Let's talk about the gold. You can go with a
gold acrylic paint, that would be perfectly fine. You could go with some
gilding paint if you've been to the craft store and found a little thing
of gilding paint. You could use Gold Mica ink, my favorite is the Kuretake ink. It's very beautiful
when it's dry, very vibrant and shiny.
It's my favorite. I also have the
Kuretake Mica paste, which is my favorite
paint thing. But I only had like one
gold, I don't know. It's a toss up between the ink and the paste now that
I have both of them, because they both have a purpose and a place in the stuff I do. Two favorite things right there. Most favorite art supply. But you could do
gold acrylic paint. You could do gold watercolor and then you could
do gold Posca Pens. For mark-making and drawing on, I like the smaller tip and the larger tip so
they both got a place, so I've got some gold. Those are my gold
options that I have. Then I have a dip
pen for my ink, and I'm using my
Kakimori Dip Pen because it holds a lot of ink, but a regular
inexpensive dip pen is just fine too for your inks, or you can use a
brush with your ink, you could get
creative with that. That's my gold options. Just trying to show you
that you could pick whatever options work
best for you there. It's not a hard and fast rule, it's got to be one or the other. Same thing with the graphite. We've got choices. I've got some graphite
that I just mixed up as a watercolor in
my watercolor class. It's just graphite and gum
Arabic and some honey making my own graphite pen with
the graphite powder. I also have, which I
actually like best, this high viscosity
material, fluid graphite. This stuff I love, it's like a real thick
watercolor that never dried. It's super cool, and I'm going to be using this in class because I love it. But just know you have options also like water-soluble
graphites. If you have a water-soluble
stick or pen, you could draw
sections with these and then wet them with
water and smear that around and get a different look there then I'm going to get
with the fluid graphite. I also have just some pencils and I also have several
different types of drawing pencils handy. Just have some pencils handy. Maybe some
water-soluble graphite. I love the graphite sticks. Fluid graphite I'm definitely
going to be using, and I've kept it
simple in class. I want to use graphite, and I want to use gold. I've got a little bit of every
type graphite that I have, and every type gold that I have, and then I can just see
what I can create today, with some fun abstracts. All right, I'll
see you in class.
4. Gold & Graphite Options: In this video, let's take a look at different graphite
and gold options that we could consider when
making our abstracts. I actually have lots of
graphite and lots of gold because that's
particularly some of my favorite things
to use personally. I've got some gold
watercolor paint. I've got some gold Micah ink, so gold inks would be good. I've got my gold Micah paste. Both of these are by
the kirataki brand. This is a fine-tech
gold watercolor. I've also got some
gold acrylic paints. Then I've got some
gold marking pens, these are my posca pens, which are my favorite. This is a uni-ball pen, which is the posca
with the smaller tip. Then this one is the one
with the larger tips. I've got some options there. Then I also have several
graphite options. I've got some graphite
watercolor that I made in our watercolor class. I've got some fluid graphite, which I really love. It's like a graphite watercolor, but it never got hard. Really fun. I also have lots of
different graphite pencils, water-soluble
graphite options with the pencils and the sticks and so I have all kinds of
fun options to create with. I thought it might
be fun just to take a look at what
each one of these does. I want you to experiment with your drawing materials that you have and just see if I use this, what is it going to do? I've got three graphites
here that I drew with and I just want to see, can I push any
around with water? If they're water-soluble,
obviously, I can and that's one option
for creating in class. Then my fluid
graphite, super fun. I'm actually considering putting
some water down and then dropping some of the graphite in that water just
to see what it does. I want to do that with the
watercolor also just to see, does it move as easily? Am I getting the same effect? I'll tell you just on
my little samples here, it does not move as easily
as that fluid graphite. The fluid really goes and fills up everywhere I put water and the watercolor one did
not, so super interesting. I'm going to go
ahead and activate my gold watercolors so I can
get a look at how gold is it and is it the same
or different than my gold Micah ink
that I love so much. You could combine all of these. You could use some
of my oh, look, it's like the same color
actually, check that out. We'll call this gold
Micah watercolor. I love it. I wonder
if it's going to be a shiny when it dries. You could combine your
different golds and your different
graphites in this, which is my intent. They just get a
little piece of paper here and I'll get this
acrylic paint out. Just shake it up. Even though we're being
very conservative and more neutral palette-d here
with this fun project, I still like to see my options. Are they going to be shiny? What can I do with these? The paste, one of
my favorite things. Now, the paste I
like to use with a palette knife because
it's so thick and yummy. But I could do it with
a paintbrush also. See I could, I could just
really do fun stuff with that. Then what do our
posca pens look like. The Posca pen could
be for making marks, lines, dots, different mark-making
things that maybe we want to fill in our abstract with. Play in practice with
some of your mark-making and this nice skinny line
is a really good size. As I put my finger on our
metallics, don't do that. The bigger one is a
much thicker line. Still gives me a fine dot, but could give me a bigger dot. Definitely way
larger in the line, so the super fun there. The ink is one of my very
favorite tools to use, and I use that with my
cocker Maury dip pen. Any dip pen is fine
with an ink or a brush. You could do that with a brush. A regular dip pen
would work just fine with any of these
inks too if you've got an inexpensive
regular dip pen for calligraphy or
something like that. What I like about this
particular dip pen is the way the head is made. It just holds a lot
of ink and I can use it on its side and
I can use it on its tip and I can get different
sizes and I can draw for a whole lot longer than I
can with a regular dip pen. I do tend to use
this quite a lot and I can get different lines
and marks out of it and you just want to clean the dip pen heads immediately when
you use them so that you don't get any ink dried up in
your pins and there we go. Now we have lots of options
here and surprisingly enough, all of these golds look really beautiful and are
nice and shiny, so I could definitely get
away with using any of these. Even this pale gold
matte acrylic paint by blick is really pretty
and has a nice shine. Now they're not completely
dry and I can tell that maybe it's not
the most shiny paint, this one's a little shinier
and this one's the shiniest. But it is nice to
have options and to see that you could
do this with a variety. You could just have a
gold watercolor paint, maybe a posca pen,
perhaps some pencils, and this fluid graphite and that would be like my
favorite options along with, I like this golden here, but lots of choices
here that we can make to do our graphite
and gold pieces. Gather up your supplies
and see what you've got to play with and
we'll get started.
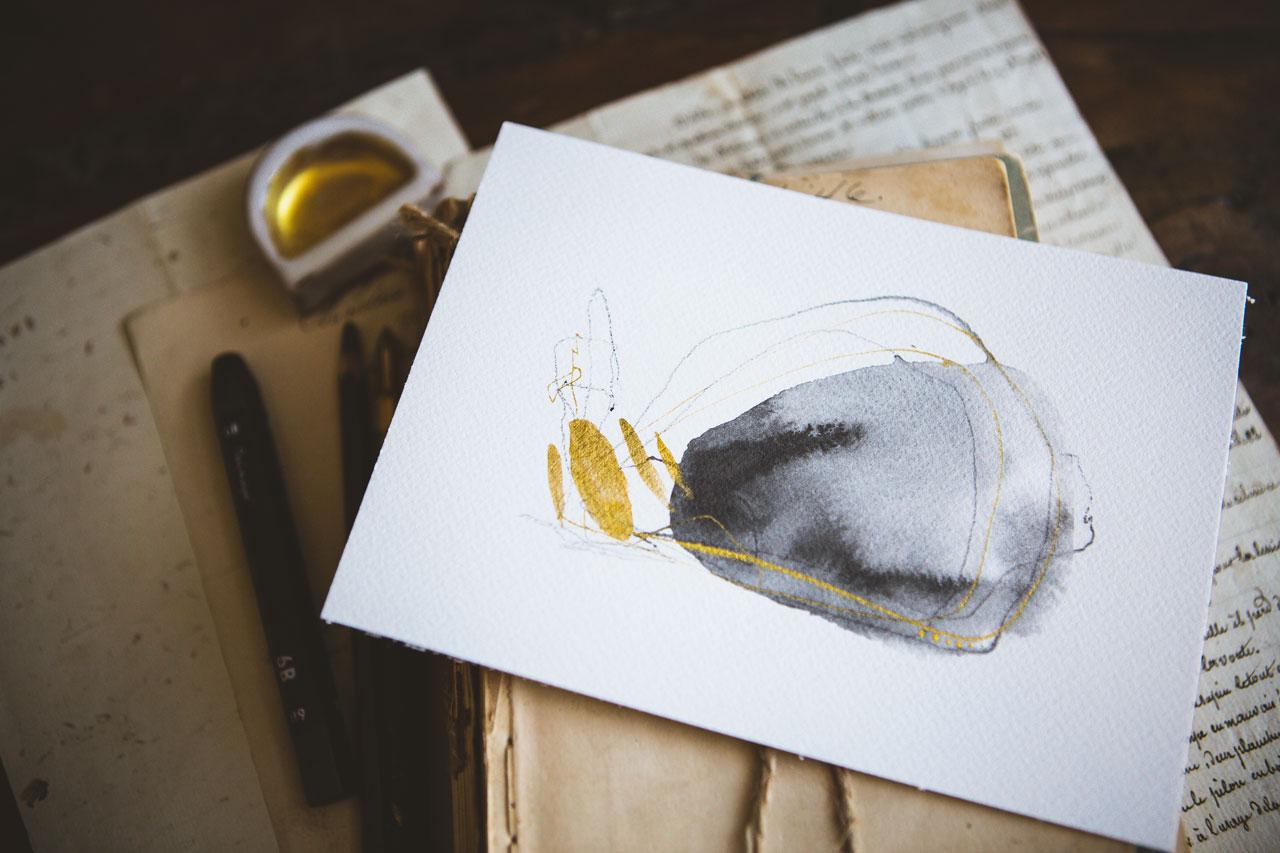
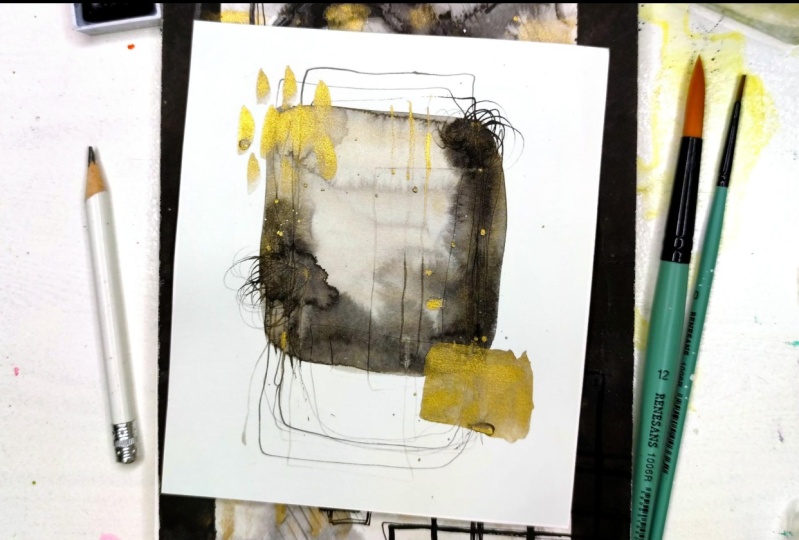
5. Abstracts: In this project, I want
to do some abstracts with the graphite and some gold. I want to have a big
area of graphite, little areas of gold,
and some mark-making. I have some things in mind that I just
thought I would try. I'm going to start off with just some water.
Let me go ahead. I'm going to use
the fluid graphite, and I'm going to use
the gold Mica ink. I might use my gold Mica paste. You can substitute any of
your graphites and golds and everything that you have pulled together for this, go for it. You've got lots
of choices there. But I'm thinking I want one
blob of graphite on each of these and just see
how can I create a little bit different
abstract on each of these? My water is not clean, which is nice because
then I can actually see where this water
is going a little bit, and then I can just
pick up a little bit of this graphite and drop it in. If you're having so much fun
doing something like this, you could always
do several layers, like we could do
real thin layers on top of each other and just see like what can we
create with this. I'm just wanting this to
move and do its own thing. I could come and clean
the edges up if I'm not feeling like the edges
are clean enough. The way it spreads out, we can clean that up a tiny bit. I do want it to be clean and let it spread
and do its thing here. I'm going to let that
one dry for a bit. On this one, I'm going to come and do a big rock
or something here. My water is nice and dirty now I can see exactly
where it's going. See this is exactly how
we could do some layers. Look how pretty that is
just in that dirty water. Again, I'm going to
take it and spread this and let it do its
thing also on top of here, because I think
that's beautiful. Maybe a little more
water on my brush just to help it around. I don't want there to be
real weird obvious spots, I want it to spread out some. Then as that's doing
its thing now, I like it, I'm going to go
ahead and wash out my brush. Now I'm going to take maybe my water-soluble stick
and do some marks. I could do it with a pencil, I could do it with a
water-soluble pencil, I could do it with
a regular pencil, I could do it with my stick. Actually let's start with a
regular pencil because it's not water-soluble and
it's not really going to move around in the water. Look at that. Just
a couple of lines, not too much, and then this will actually activate some in the water and be really dark
and different. Look how much more vivid that
line is, oh, my goodness. Look at that. I like that
already. Oh my goodness. The extra darkness of that water-soluble six B
stick, that is gorgeous. Let's do something similar. I think I got graphite
there, that's okay. Just doing some lines
and mark-making. Actually, I like that being so pretty and fine,
really super light. We could do something
like that too. See, I like that
really super fine. Now, I'm thinking, let's do some gold stuff here, as we're still letting
this dry some. Could do this with
your Posca pen, which if you do with Posca pen, you can't do that on
this wetness here, but with my dips
pen and the gold, I can go ahead and
do that on the wet. Now keep in mind
anything that's wet already is going to let
this ink spread out. It's not going to
be a fine line in here unless you had let
that completely dry. But that's okay. I
understand this. That is so beautiful,
just right there. What if we just did
a couple of fun? Maybe thin lines
on this one too. Do some little drawing in there. Look how pretty that is. I could also let this dry some, but I could also
come in here and do some dots because I love dots. But we could start adding
some very interesting minimal mark-making just
for some interest and some extra yummy stuff. I like that. I'll stop
there real quick. I did want some
dots on here too. Just real little fine. That's still wet
so they're not as neatly defined, but that's okay. That's fine. My goal here is
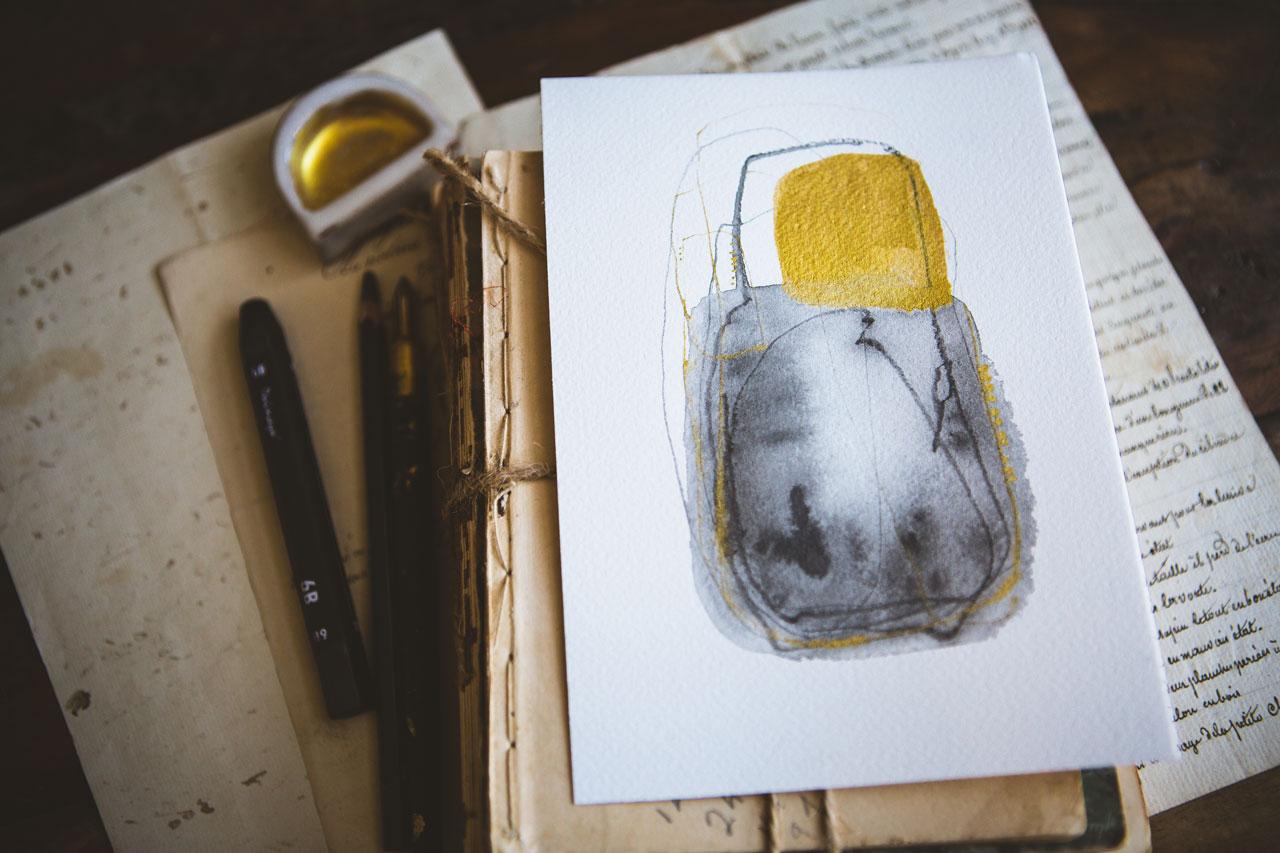
not overdoing it with that, but I did want some in there. Now I'm thinking, what if we have maybe a square
of gold up here? I'm needing this to
dry a little more. Let me dry this, I just
have a hairdryer here. That was dried on cool air and I only consider drawing it a little bit with
the watercolor after it's already mostly
done its thing, because I don't want
to dry it before watercolor has a chance
to work its magic. It is magic the way that it runs and creates
edges and dries, and so the more
organically we can let this finish out
drawing, the better. But I'm thinking for this, I'm wanting some block
of something up here. I could even follow this
line that I did right there, but I could come over
more to the side of it. I'm just trying to sketch this out basically
without putting my hand on my piece of
watercolor that's wet here, and then maybe fill this in. I don't mind that you can see lines underneath
this gold either, that's part of the
interest in my eyes. Look at that. I love it. Oh, my goodness. I love that, it's just very bold
and neutral and look here we could go a
different direction if we wanted to see how this
looked in other directions, I like it like this though. I love it. This one I'm
thinking a little bit less, maybe a few lines. Look at that. I could even do a third
one up here if I wanted. See, I like that. I like that it's super shiny, it's soft, it's just doing
its little thing there. Do I want anywhere
else or do I want that just to be its thing? I'm liking that just
like it is actually. The goal here, simplicity, and just doing the
graphite and the gold, big blob of graphite, a little touches
of gold and just see what you can create
and come up with. This is pretty fantastic. I'm loving how these came out and I can't wait to actually do a few more of those and see
it once it's slightly dry. Once it's slightly
dry, well, slightly, once it's really dry, the graphite is super cool. You could take a spoon, or your finger, but you'll get stuff all over your finger, and you can lightly burnish these really heavy areas of the graphite and
they will shine. That's what's really cool about the graphite, it's shiny, like a pencil, like you can see that little bit of
a shimmer in there. Once these are dry, just buff a little bit of the
thicker areas of the graphite and you'll have a cool little silver
shine in there too. I can't wait to see what yummy simplistic
abstracts that you create. I'll see you back in class.
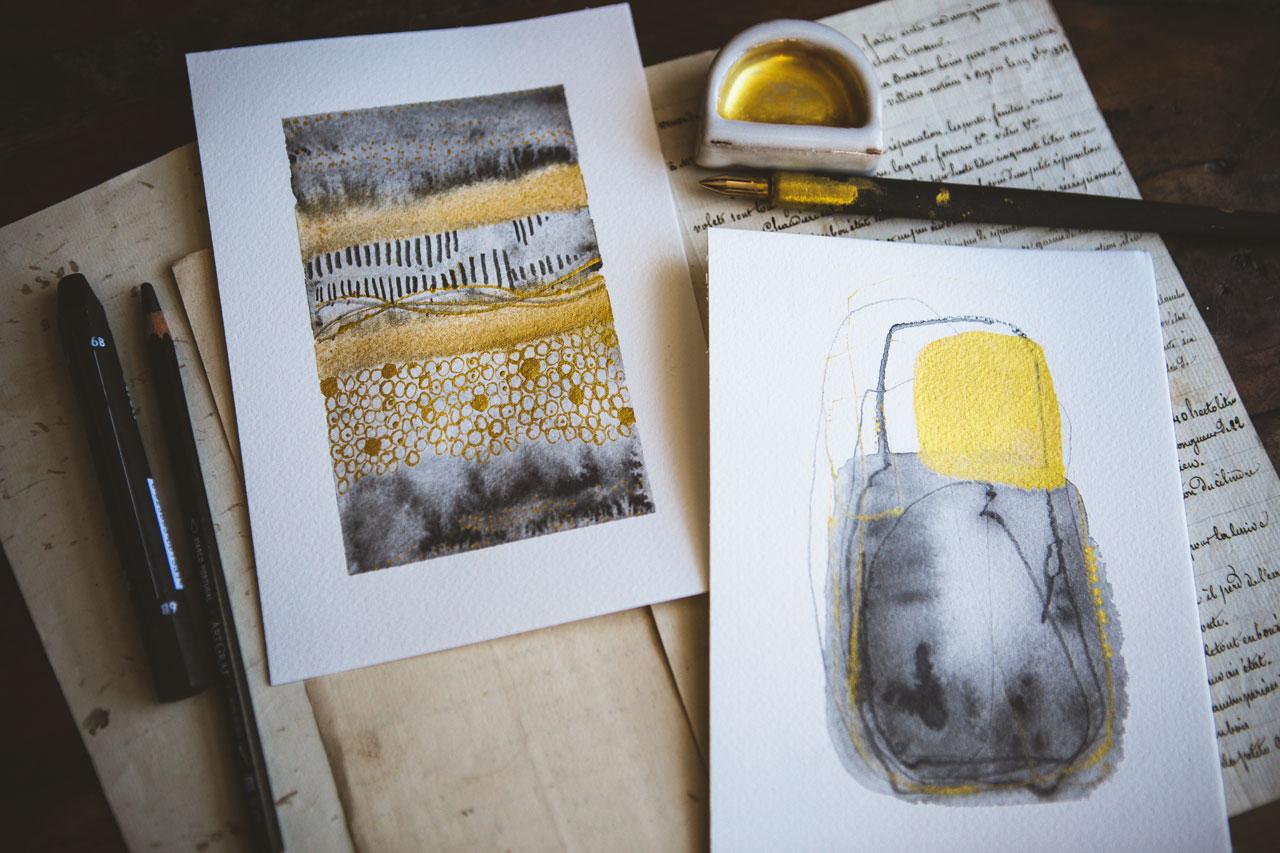
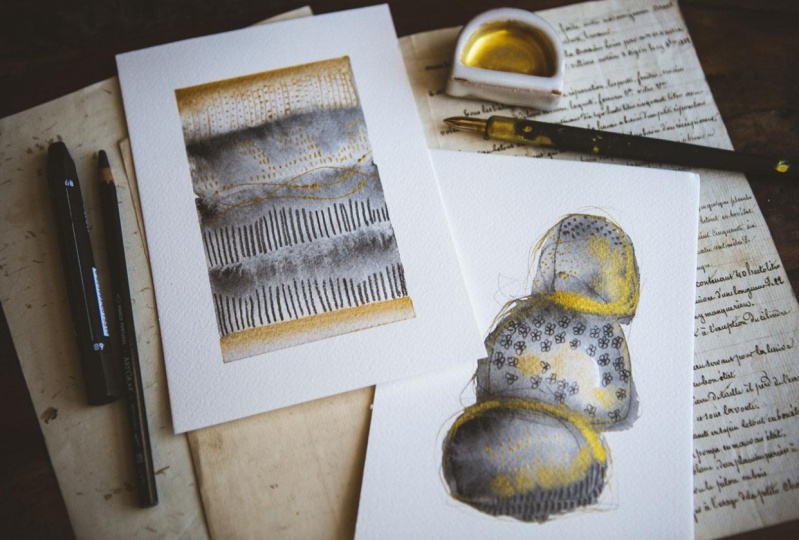
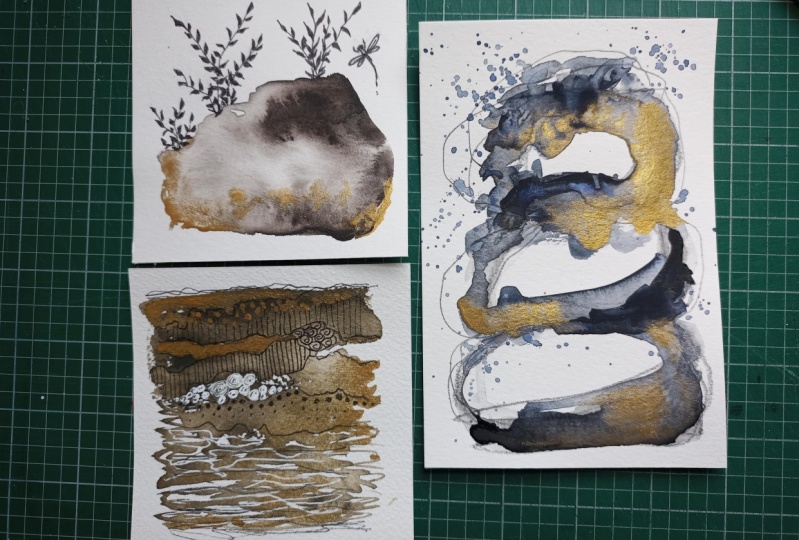
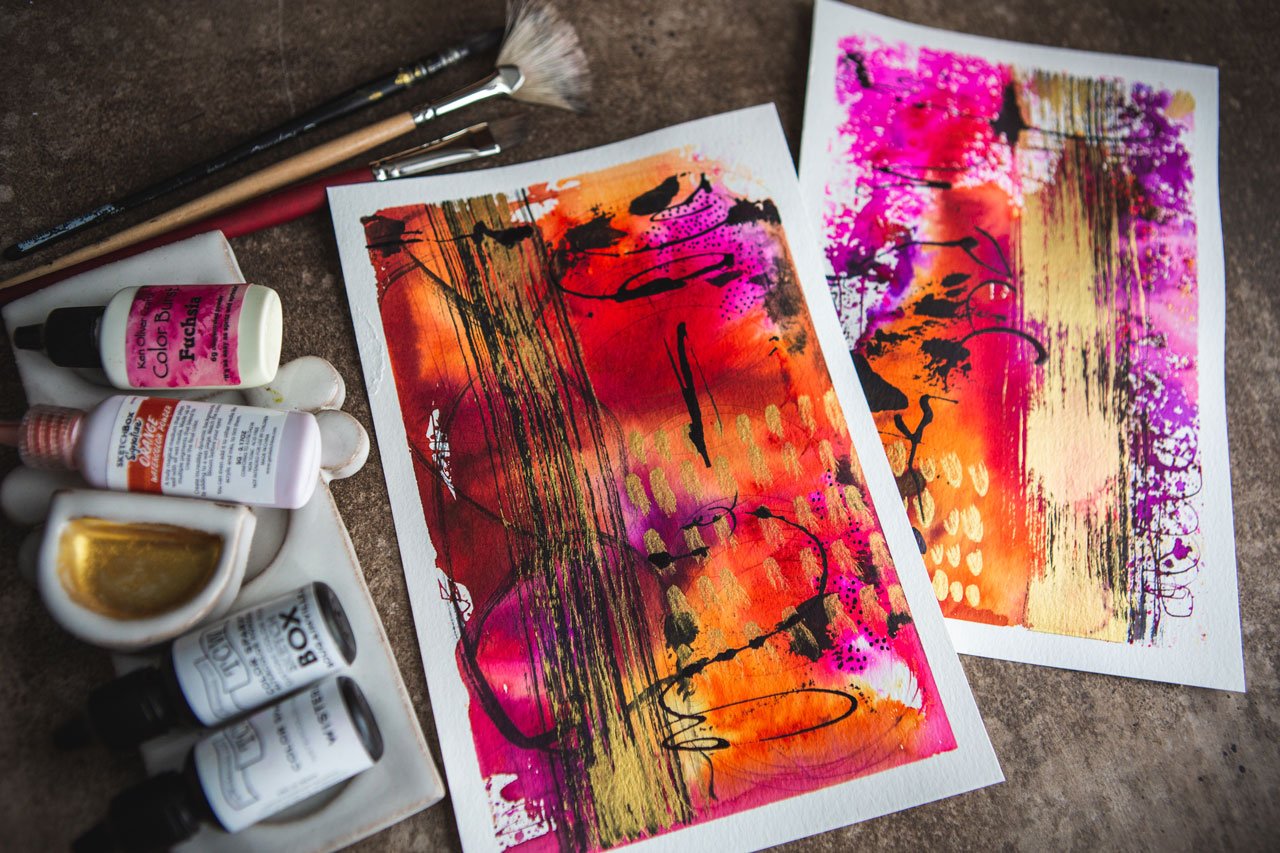
6. Stripe Samplers: In this project, I'm going to do a yummy stripe. I love doing the
stripe samplers. I think they're beautiful. I think with the
graphite and the gold, we could get something
really cool. I've got my Mica ink
and my fluid graphite, which are my favorite graphites. I've got a graphite
water-soluble stick. I've got my pencils over here. I've got my gold
paste if I need it. I've got my Posca
pens just in case. What I'm going to do is work
on two pieces because then you could go back and forth if something were not
completely dry. But I thought how
cool would it be? My water is really wet. I mean really wet. Hello. Water is wet. My water is really dirty, but we're going
to use it anyway. I'm going to just basically
stripe these out. I went ahead and taped my paper off because
I have a tendency to not be very uniform with my stripes
when I stripe them out, and I want them to
be more uniform. You might do a layer
with some graphite, a layer with some water. We could do a layer
with some more water if it's still super thick. I could do a layer with the ink, the gold ink or the
gold watercolor, whatever goal you have. Then we could stripe that out again with a little
bit of graphite. We come back up here and take some of that water off and get a different stripe
variation to work with. I can also come back
and dip some water and let that now reactivate and give me some variations where that water is
moved that around, which I like those variations and the dried splotches because then I have some very
interesting spots to put gold. Then that's going to need to dry for a bit. Let's go ahead and just do two. I'm going to put on this one, I'm going to make
them different. That way, we have a pair,
but they're different. Let's put a little gold at
the top and the bottom of this one. I like it. We could dip into the graphite. Am I even getting? There we go. Get us a nice layer
with some graphite. We can vary up, putting the
lines in like I'm doing now. Little different so that
when we come back and put water next to that, it bleeds. Very interesting and different than the first one that we did. Look at that. This is cool. This one's super cool. Now I can come back and
drop some more graphite in and start making some
interesting patterns that we'll see when
the paper is dry. Pretty cool. Now, we just need
to let that paper dry and then we can come back and do some interesting marks on top, so I'll be right back. These
pieces are 99 percent dry. So I'm going to start back
here with my first one. Now you can do mark making with the graphite or you can do
mark-making with the gold. Definitely get creative there
in what you're marking and doing because I could do graphite on graphite
and make lines, and dots, and shapes. I could do gold on the graphite. I could do graphite on the gold. Lots of options here
on the mark-making. I'm going to start off with some gold and just start going, what do I want to
see going on here? I might come down here. I really like this
little stripe here. I might just go ahead and put some dots in
this little spot. Usually, when I'm creating like this, I'm following the line of whatever tonality I
picked to do that with. If I picked the lighter one, filling in in that stripe
all the lighter areas. We could even have that separated a bit by some of the darker
areas and then fill in. There's a little
divide in there, but there's still the dots in, say, the lighter area. That's just one thing
that I like to do. I also like lines, stripes. Stripes would be fun. Especially if I did some
type with the graphite, I could do some type
of line coming through here that criss-crosses itself. Then come back and put some
yummy little dots on there. Reminds me of a piece of
jewelry when we do that. My paper is still
a tiny bit wet. I can feel as I was doing that, but I still like that in there. I could do that with the gold. I liked that so much
actually that I do want to do that on this
one with the gold. The paper is still
a tiny bit wet, but we're going to go for it. Because when this shines, that's going to be so pretty because you're going
to see that shimmer. As we do that, it's very subtle, but real pretty in the shimmer. Then we'll come back and do some little gold dots in there. That's pretty. I like it. Thinking right here, we could do a fun stripe and that stripe can end
up here in this gold. Maybe in-between those stripes, we could add some dots. Then just be really
careful not to be running your hand on top of anything
that you're drawing. You don't know how
many times I've done that and then messed
up what I was working on so definitely maybe switch your paper back
and forth if you need to. If you need some
ideas on what some of these things you're
filling in could be, Zentangle books are really
fun and interesting for doing that and getting some ideas and I actually
like that gold lines so much. I think I'm going
to come back on top of my graphite line. Like it's shadowing it. I'm not even trying
to like cover it up. I just want to shadow it and do some gold dots on there
because I do like the gold. Maybe if we've got
a bigger area, I might do a fun
pattern in there. I'm doing ovals or circles and then in between
those ovals or circles, I might come back and put a dot, or I might just leave them as the circles so if you've
got a bigger area, you might look at
that and say, okay, what pattern can I put in there to fill
that larger space? Could be squares,
could be triangles, could be little flowers. You could do like I'm
doing and do circles. Then if you've got some
areas where you're like, oh, I made a mistake there
like there's a couple of really thick circles
when I picked up fresh ink, my trick for making
that look more normal like it wasn't a mistake, is to come in and
add some more of that mistake so that it's now on purpose, and so now you
can't look at it and say, oh, we dipped the pen there. Now, it's like a random
pattern I've worked in, so that's my little thing
there on filling things in. I don't like that
filled the whole circle so now I might just
come through and fill all these little circles and now it definitely looks
like it's on purpose. Oh, see? Now, that
looks good like that. I might come back in
here and just dot now in between some of these circles and just add to
the pattern there. Just whatever makes it
interesting for you. It's not a big deal either way, but I don't know, it's
more details to look at as I get closer,
so I like that. I really like the dark graphite, so I've got my 6B
water-soluble pencil. But I like it
because it's really dark and I could come back now and do some type
of dark mark-making. You don't just have to
mark making one color. We can mark make in really
heavy graphite colors too. Look how cool that looks. Again, I just picked a
little area of light or dark to do that. But man, that came out super cool. Totally made my day there. Look how cool that is. Oh
yeah, I'm loving that one. I don't want to do any more
dark graphite. Let's see. I want to do one
on this one. Let's see what can we do over here. I do like the graphite lines, might want to do those
right down here. Super cool. That's coolness, I like that. Now, I feel like [inaudible] , they won't
let that dry in there. Let's keep that pen nib clean. Feel like I need something
else in this one. I am loving this one
just like it is, but I might come back with some little dots now
that I'm looking at it, I might want some
dots just down here. Just cause and
it'll shine pretty. I like what this
one is doing, so I almost don't want to
touch that at all. This one up here needs
a little something so I could come back with
some dots, some circles. I could do circles
like I did over here, that might be interesting. I could do little hatches. I could do just small lines. Again, just following
those light areas just to see what that
might look like. Look how cool that is. Oh yes, I'm loving that. I'm loving this. I do feel like I'm loving these like they
are so I want to take a look at them with the tape
off of it and see if I'm done or if I want to do any
additional mark-making, but look how cool these are. I like that they're
just that gray pencil mark and that pretty gold and I taped them off so I'll have some
pretty clean edges. Look at this as I'm
peeling that tape off. Make sure you don't
have anything on your fingers, man, look at that. It looks so good. Revealing it, just
taping anything off, turns it into a piece of art. Pretty, pretty, pretty. Oh, my gosh. Graphite and gold. You should try this on
things that you like to draw, Zentangles, real drawings. If you'd like to
do real drawings, just combine graphite and
gold and see what you get. Check it out and look how
good these look finished. We could just sign this at the bottom and it's
completely finished. Pretty piece of art.
So I want you to definitely try the
stripes and fill in with the different
mark-making just with the graphite things and the gold and see what
you can come up with. These, I love so much. They're beautiful. I can't wait to see yours. I'll see you back in class.
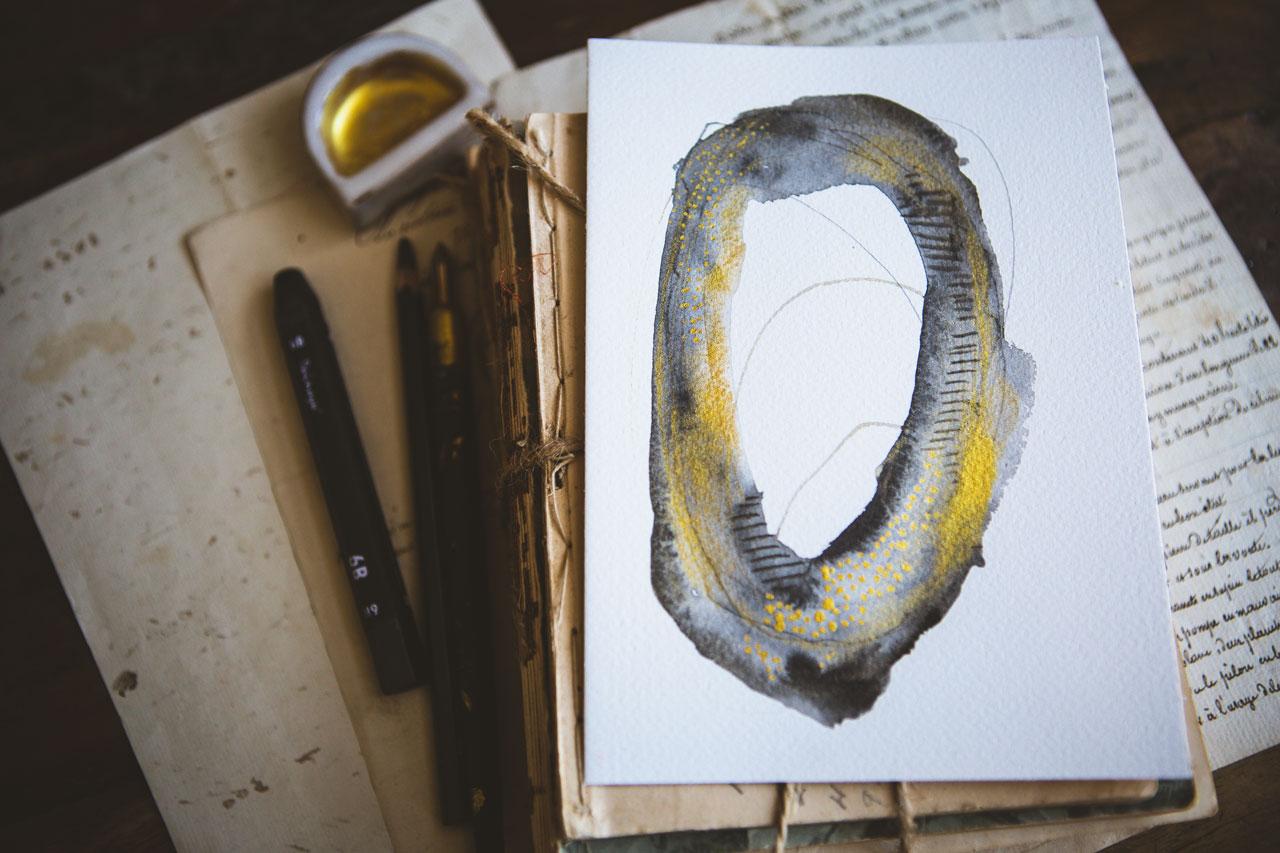
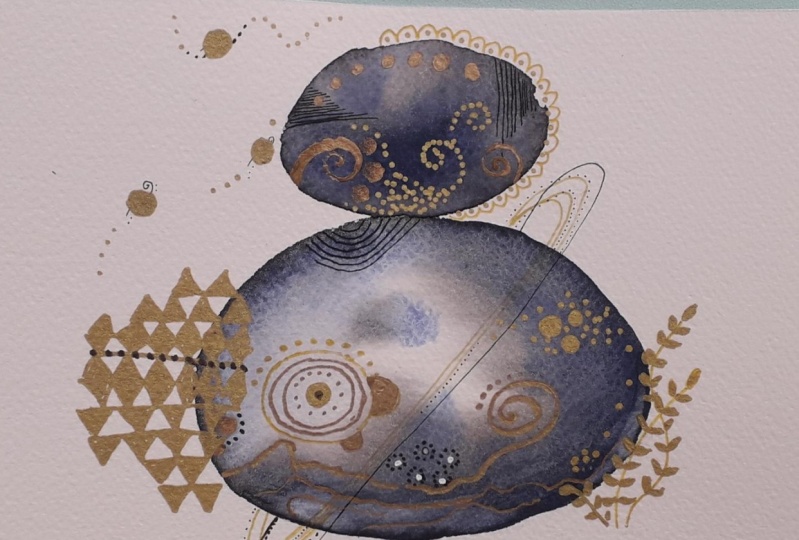
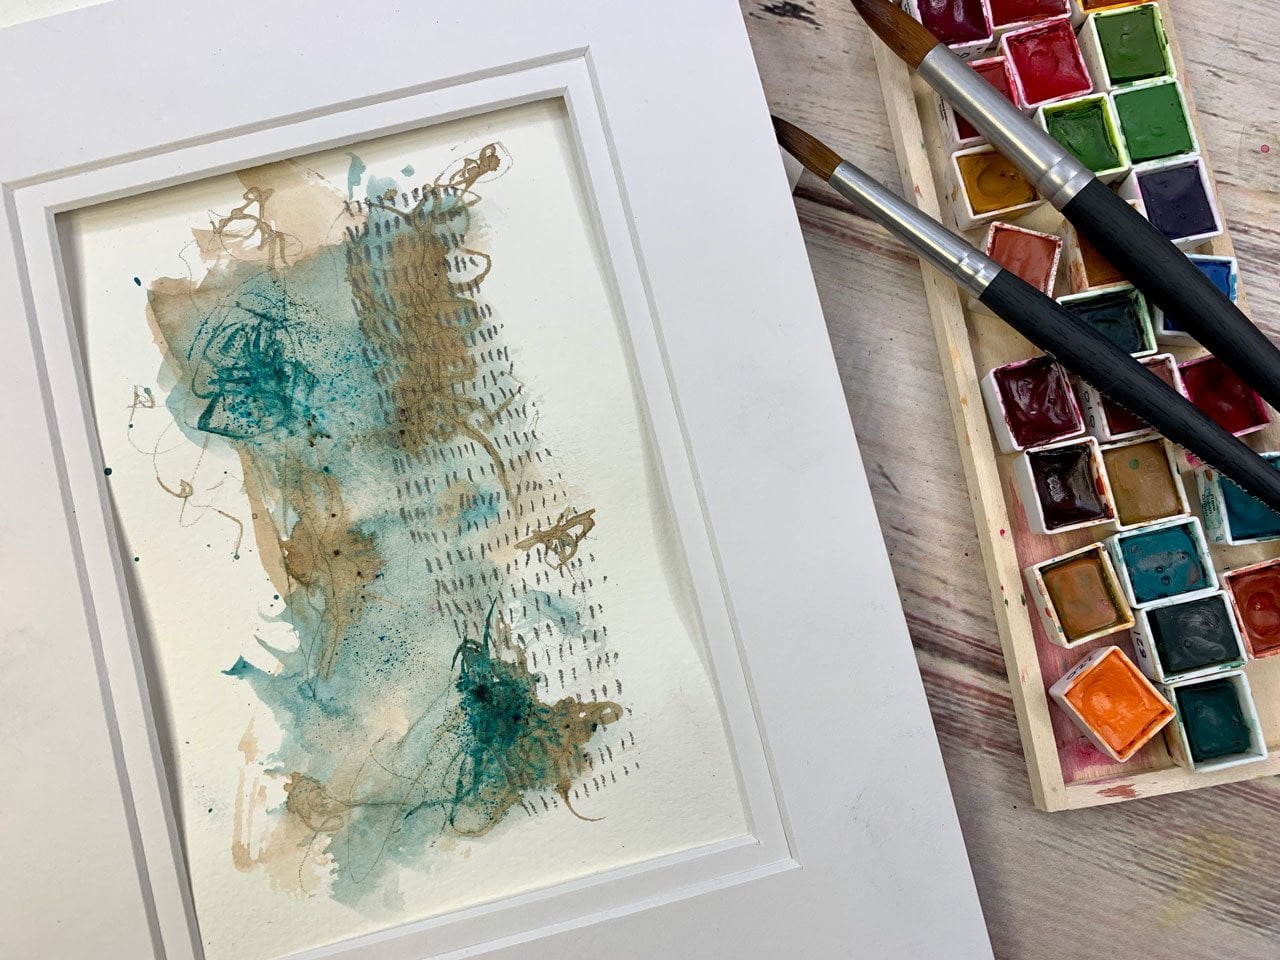
7. Circle Abstracts: In this project, I want to do something
with circles. I'm thinking a big circle and maybe little circles or stones
or something that just, I don't know, it's
different and we can visually get started
with some mark-making. Like if I wanted to just give
myself a direction to go, I could just start
here with some marks. This is a water-soluble
graphite pencil in the 6B, so it will activate when
I put some water on here. But I just thought
might be fun to do some of this and see
what we can get. I'm feeling like on this I started with
the graphite pencil, going to put a circle of water, dip in some fluid graphite and let it do its
little thing and move around and then come back maybe with some gold and some gold mark-making, maybe. Let's just see what
we can create. I could add some more water
in here if I need to. Just let that move around and do its thing a little bit there. Then we can do that
over here too and just see if I have some
circles or water, I can come back in here
with little graphite. Come back in here, move these a little bit
with some more marks. I like the water soluble
because that gives me a nice dark mark
where it's reacted a little bit, super fun. Then I might let these go
ahead and dry a little bit and come back with
some gold or like on this case on this side I could actually come back and just dip that gold in that
water and let it move around and see what
it's going to do and then add some
more gold on top. That might be fun. It is still wet enough that it's
moving around some for me. Then we'll just let that
do its little thing. We'll let these dry. I Could add some gold over
here if I wanted. See if those will
just blend a bit. I could go head. I was going to let
him dry, but I could go ahead and do some fine mark-making with those
stripes, the lines. That's pretty cool. I like a mark quite a bit. Let's let this dry a little bit and then we
can come back and mark make on top of these and
just see what can we get. I almost want to make this
one a little more irregular. What if we just come back
in and let's say some more of the dark graphite and see if we can just really make that a little
more abstract and irregular. I like that. Now I'm
ready to mark make. I can mark make with graphite, I can mark make with gold. I'm already feeling
on this one here. I'm already feeling pretty dots. I'm going to dot some
areas on this one. I love the way
it's got the dark, it's got some gold
streaks already, it's got some light, and it's got plenty
of space for me to add something like a
dot to add interest. Whatever your favorite mark-making
thing is, go for that. Mine happens to be the dot. I'm just picking the lightest area there to do
those dots because why not? You might pick the
darkest areas. Look at that and
the way it shines. That one's gorgeous.
On this one, I'm also feeling like
we've got some light. We might want to do some dots. I might want to do a little
flower on one of these. Make it look like a little
daisy or something. Maybe some little flowers in here just for a
difference of pattern. I'm just doing that
as little daisies. [MUSIC] That's fun
and different and not completely even, which
is what I wanted. I don't want it to be even, I want it to be a
little different. Maybe I'll come back in
here with some lines. This is a 6B pencil too. For some reason I just
like it a little better. This one is the art graph. This was the Faber Castell, but for some reason this
one is the one I like. The best. I like that
at the bottom of that. It almost makes me want to do
some graphite markup here. Yeah, I like that. I could even come back light pencil marks
with just a regular pencil, add any extra, just little random marks
that make what we we want. Yeah, I'm loving that. This one, just have
to look and think, I'm I done with that? Don't want to come back and add any lines or marks on this. Maybe I want some lines. Yeah, like that. There we go. Look at that. Super fun. I'm going
to call these good. I'm loving both of those. Some type of rounds, circles, stones, something round
you could do some bigger. Just like a round, full filled in circle with some pattern
drawn in like an egg. You could do stacked
stones like I've done with different
sizes or shapes. Some irregular circle
like this super fun. I just like seeing what can I come up with
in an abstract way with some golden
graphite marks in both light and
dark and just see. I hope you enjoy these projects and I'll see you back in class.
8. Final Thoughts: How fun are graphite
and gold paint, I mean, give me a break. They make the most amazing
abstracts, am I right? I hope you had fun
today in class. I really enjoyed
working on projects that didn't have
very much color. We have a lot going on, but we didn't have
to worry about what is my color palette
today that I'm working with because the choice is
gold and gray basically, and how cool did they turn
out when we were done. You can get so many
shades of gray, and that gold is a vibrant
pop on that piece. It's amazing. I hope you have fun creating in this very minimalist
color palette. I can't wait to see
what you made in class. Come back and share those with me and I'll see you next time.
 DENISE LOVE, Artist & Creative Educator