Transcripts
1. Introduction: Have you ever imagined an
octopus running on a treadmill? On a skeleton playing violin with a Marmad
sitting beside it. That was amazing. Beautiful. The world of creative
possibilities had just become limitless. And it's right at
your fingertips. Hi, I'm current. I'm
passionate about exploring new frontiers
in creativity. I have spent years owning my skills in digital
design and videoty. And now I'm excited to share how AI Imagination is transforming
the world of creativity. In this class, we will
dive into Google Wix, an AI incadl tool which can turn your wild ideas into
sterning visual. This course is for anyone who want to bring their
vision into life, whether you are total beginner, a graphic designer or
a YouTube creator. By the end of this class, you will be able to create your own personal AI Aptar for social media or
your online brand. Design eye catching
YouTube thumbnails that get more clicks, Master the art of text prompt to generate anything your
mind can dream up. By using Google Wix and a beginner guide to
Google Nano Banana, which is Google's latest
image generation model, which you can use for free. Within Google Gemini. For our class project, you will generate your
very own masterpiece and share it with the
community in our project, Kal. The potential of this
tool is endless. So are you ready to
unlock your imagination? Let's dive in. See
you in that class. Are you ready to learn?
2. Overview of Google Whisk Google Gemini Flow and Nano Banana: Now we are getting into the
new era of image generation, not just CUI, not just
flux, not just context. We are talking about Google
Wix from Google labs. Right now, it's free to use. There might be some limitation of using this tool
like everything. You not actually get
it on fee basis, but you get it on trial basis. You can play it out,
you can learn it, you can understand it
how this thing work, and you can also understand
where we are going into the image generation and image editing and basically
image composition. Right now, Google
has four tools in its library in its
Google lab that is flow, Image effects,
music effects, Ds, music effects, Whisk, you can
create a image composition. As far as I can understand this, it's not just image
generation tool. You can do it by
using Nano Banana, by using Google AI. You can generate images in
Google Banana in 2.5 flash, that is fast all round of help. Like example, you can
create an image here, like create an image using Nano Banana right code,
Canvas, no tanks. And right now, let's try
Princess in Kasser in red dress. Now let's wait for some time, and it will generate
a image for us. Here is the image that it
just generated for us, right? But in the Google
labs in the Whisk, we are actually using
all these images and create a new composition
out of all images. In the flow, we are creating
our videos like you have already know about Google
Veo two, Google Veo three. All these are we
are going to use. But in the WIX, we also get to animate the images
that we have created. We are going to take
every step one by one. In the image generation process, we are taking all
the step one by one. In these lectures,
we are going to learn about Whisk.
Let's launch it. And the link is very simple, left dot Google slash FX. I will share it in the project section or in the description, you can find this link right
now, click Launch Whisk. Once you click it, it
will redirect you into a new page that is really awesome to see and
once you scroll down, it will just line
up, as you can see. All these are amazing images
that has been created. I don't really see it as image. I see it as composition. Like the layers we are
using in our Photoshop, we are actually
working like that. Let's click it and start by using this composition,
make your own. Once you click it,
it will redirect you to a new window that is the interface of the Whisk where we can play
around with our images. But first, I will let
you know that I have also created a YouTube
thumbnail in my Library, once you go to my Library, I have generated a YouTube
thumbnail as an example. Let's check it out.
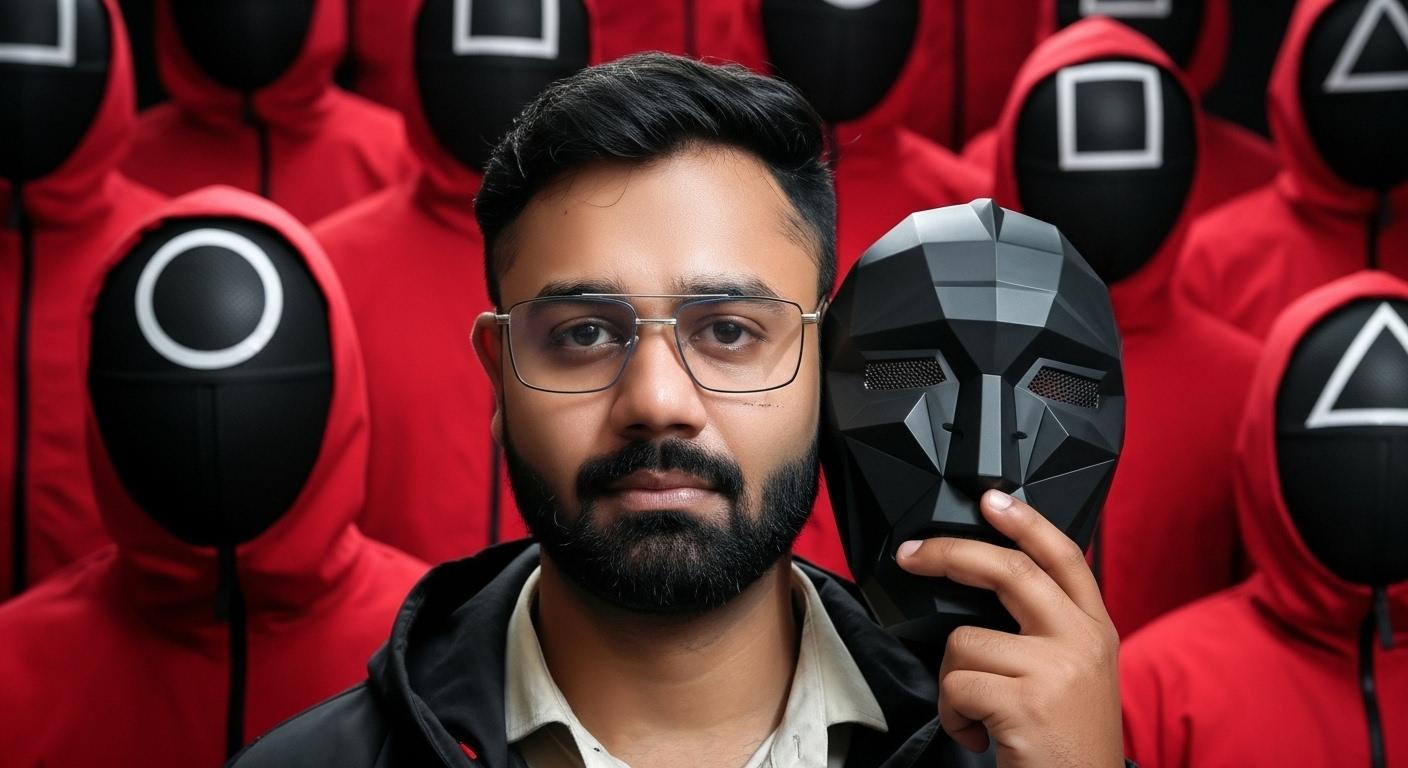
As you can see, this is the thumbnail
that I have created and it
looks really nice. How I have generated it, I
will show you in some time. In the upcoming lecture, I will share it with you
because it's getting advanced here and I love the
thumbnail idea, and this is the thumbnail
that I got the idea from Mr. Beast, which is very
famous YouTube. As you can see, this is the
thumbnail that I got from Mr. Beast and I have created
my own with my own image. I have used this image. After that, I have composed
this image as you can see, as you can see the
mouth totally same. One more thing, this
is my profile image, and this is the image
that I have used. As you can see, it's totally blurry and it's
not clear at all. Here, it's really
clear. I loved it. It's not just about the
image editing parts, it's about the composition. We are creating and editing
an image into a new level. This is what Google Wix does. This is what it
make it different from other image editing
image generation tool. I feel like this is the tool that can replace
Photoshop easily. You can actually replace Photoshop easily
using this tool. This is just an example. We are exploring all
the tools one by one and I will explain you
everything one by one. This is just an overview
for the tool so you can un
3. Create Octopus running on treadmill using Veo 3: This is our interface
of Google WIX. In my library, you have
already seen this out. This code, you can
connect with dis code. Help about Whisk. We want Whisk explain to be
safe, fun, and educational. Therefore, we
prohibit users from knowingly generation certain
category of content. Yes, there might be
some restrictions like you can't use famous
celebrities in the images. Yes, you can't use. Wix feature precautions
to protect minus, certain queries
that could lead to output of children
will not be generated. Additionally, certain queries
that could lead to output of prominent people will
also not be generated. Yes, we have discussed just
now and health center. Let's cut it out.
This is my file. Right now, I have
a pro plan and you can use it using your
Google ID, your Gmail ID, and it is totally free right
now this is the credit that I have right now and my
library, my account. Once you click on this arrow, it will minimize and maximize
your experience here. Right now, once you click here, it's a image generation tool. It's the video generation
tool, no videos here, and it's the tool that you
tell it is your favorite. Just like that, you simply
have to click it and it will come up here,
your favorite thing. It's very simple to use
and here is a prompt, you can type any prompt
and simply enter it. The image will generate here. Describe idea or
roll the die from prompt ideas once
you click here. This is the prompt
detail photograph. It is automatic a prompt. You can use it to experiment. There are many, many, so many. You just simply have to click and it will generate a
simple prompt to you. It will just help you to
getting a study. That's all. After that, here
is another window. You can check according
to the size that you need for portrait for
square landscape, mobile portrait,
mobile landscape, check for any aspect ratio. Once you get to
the settings here, you can change the
seeds number here. You can log the seed here or you can precise
the reference. Once we start into the
image generation part, we will get to know all
these tool one by one. After that, there is a
subject scene and style. Once you click on 3 bars, you will see load template, download image, new project, and all the information
and help desk here. Let's start by generating one simple image using
their own loaded preset. Example, right now, we
have used like click it, make your own now this is the image that we
want to generate and it automatically add an octopus for us into the scene as
our main subject. This is our subject, and there is no scene here. We simply have added
a prompt here. It is automatically added. Octopus is made of pearl. Let's change it not into
the pearl because we get the same result or we can say, let's make of glass, dimer. Let's change it to diamond and the seed and
precise reference. Let's not precise reference. I will explain you
in just a minute. Once you create it,
this is the image that we got made of diamond. It's not really look good. Yes, it's understand the
prompt and give us the result, but not really good. This is the image that we got, and it's actually
looking really shiny. Let's make it into precise mode. Let's make it precise reference. Once you click on precise mode, let's generate again, see, this is the image that we
got in the precise mode. It's not really arted our
image at all, I think. It just changes the
dimension of our image. So you understand what
precise mode had done. In the precise mode, it won't change the
subject at all. It might change
the scene for you, I might change the
style for you, but it won't change
the subject at all. It will give a touch
to it like texture, creating a smooth skin like we have discussed
about my own image, but it won't change the
pose of the subject. It won't change
anything in subject. Let's now add image here. Once you click it, you can
see it just give a demo here. So let's not use it. Let's click it
here in the scene. This is the object. This is the subject here, and this is the scene,
and this is the style. Now, let's remove the style right now and start
working with scene. Run the prompt and this is the scene that it
automatically generated. Now what you can do, you can change the
scene to anything. Once you click it,
you can see there are so many scene
automatically added. You can delete it one by one, delete, delete seen
this is the scene. This is the scene.
This is the scene. Now let's use this scene
here. Let's click it. Now I have checked
this scene and now let's again click here. If we not get the result here, we are going to use the
precise mode differently. Wow. As you can see, the scene has been changed. This is the result that we
got using the same change. You can see the scene and this is the octopus in the diamond. Now we are going
to use style here. You can use your own, you can enter text, whatever you like, you
can have the style here. Right now, let's
start by using this. I like this one. It is just a thread work on cloth
and now let's click it. Right now, we have
subject octopus. This is the scene, and
this is the style. The style has been
changed, as you can see, I look like something textured happened
like clothe texture, as you can see, thread work. Let's change the style
to different let's use this one because it will give us a totally different
image like anime style, I guess. This is the style. As you can see, the flower
has been changed to anime style and textured, it's cover up in diamond and
look totally alien to me. Wow. Now, let's
click this image. And if you want to change the image or did
the details here, you can do so if you want to create a video out
of it, you can do so. You can refine it.
You can add details here like the character is eating ice cream
or anything you want, you can add it further. Let's try it. The character
is having Jim on Treadmill. Let's try this. Now we have treadmill here and
the character is with two legs on treadmill and its speed is five
kilometre per hour. Now let's use this image here and animate
this image directly. Once you click on Anim it
will give you a result. So right now we
have 38 generation. Why? Because I have a pro plan. I have already subscribed
into Google Gemini Pro. If you want to use Gemini
Pro and if you want to use Google features
up to the next level, you can buy this. And if you don't want, you still have some
generation in your pocket. There might be seven
or eight generation you might be in pocket. Try a prompt that character
is running on treadmill. Now let's run it. It will take some time and once it's done, you
will see a video. Your video is cooking exit
to create more magic. Let's wait for some time and
it's working really fast. Right now, what they are using, they are using the
latest model that is Veo three of Google
image generation model that is Google Veo three. Video is cooking exit
to create more magic. Let's wait for some time and
it's working really fast. Right now, what they are using, they are using the latest
model that is Veo three. Now our video is ready. Let's play I love it. I loved it. They just the sound the video is really
amazing, right? This is the video that we
have generated right now. Right now, there is
minus one generation in my total generation and
once you cross it out. You can see all the images
that we have generated. You new video will appear
here once you click here. This is my video. As you can see, the
image generation credit has been lost. There is 20 credit
from my account. Before I have about 760
credit AI credit right now, I have 740 credit
left in my account. If you want to get
more, you can have it and this is my library. This is what Google
Wix does for you. This is just a basic idea how
we can use the Google Wix. This is just to give you an
overview how Google Wix. Work. Now we are getting into the amazing part that is image generation
according to our need. We are going to experiment
it with different scene, different subject,
different style, and we will going to explore where it will work
and where it will not work. At some places it might break the rule that it won't able to generate the
images that we want it, or it will give the
totally different result that we don't really want it. We are going to discuss
everything one by one. So in the next lecture,
thank you for watching. See you.
4. Google Whisk Guide to understand Prompt and Refine Images: So once you get into Google Wix, there is a Google Wix guide. Basically, what does it tell? It tells that learn
how to create unique generative
images by combining subject, scenes and style. By starting the subject, we can say character consistency because there might
be some issue with the character consistency
in other tools, but right now, with
the Google Wix, we don't have really
problem by using that. We simply have to click
on the precise mode and it will give us the
result. What is Google Wix? Wix is an experimental AI tool released by Google
in December 2024. That's revolutionized
image generation, unlike traditional
text to Image AI tool, Wix introduce a unique
approach by letting user generate image
through visual prompt. I don't know why this is from December 2024 and
it's about one year, almost one year
and we don't know about this tool.
This is so easy. This is free and
this really give us a totally different result
that actually we wanted and we want to create amazing images using
all these scenes, subject, and style. We want to play more, but we
don't know about this tool. I don't know why they are so underrated tools in the market. Now, let's key components subject the main focus
of your generated image from character and object to complex combination example
including vintage phone, furniture, pieces or
fantasy character. This is our subje is the main focus of our
generated image and the scene, the environment or context
where your subject appears. This could be anything from fashion runways
to holiday cards, allowing for creative character placement
and interaction. After that, we have style that is defined the
aesthetic direction, materials or technique
for your creation, enhance your vision by specifying style preference
in the main prompt box. Now, this is the guide, drag and drop an image. You simply have to drag
and drop your image, or you can select like
we have discussed, upload it from the folder. You can also create
a simple reference from a text prompt. You can create your own image once you click on New Project. You can create our image here, Enter text and write dress cute baby panda. Let's generate it. It will automatically
generate image for you like they have diced
us in the blog. Let's wait for some time and
it will give you a result in about ten or 15 seconds.
This is the image. As you can see, cute panda in red dress.
It looks amazing. You can change
anything you want. All the images that you are creating in this specific area, it will appear here and
you can select them. Now let's move it into further. Now let's move
into further part. Also create simple
apn from a text from or you see a couple
ideas by selecting inspire me or using the
roll the die feature. So this feature,
this is the role, the dice feature, this is
the role the dice feature. As you can see, it will
automatically give you a unique prom and it
will give you an idea. After that, the
system will bring those others into
creative remix. As you can see, this is the image that they
have generated, Dragon drop interface for
uploading reference images. See what is come up
with and keep riffing. You can also throw in some
light guidance to play around with details and keep
your imagination going. The robot is running, make the character
eat ice cream. Dinosaur and Akata Hi fi, make sure the NML pin is round, adjust the color scheme to
follow a pastel palette. These are some idea. You can use it and
just test it out. If the generate image looks a bit different from what
you have imagined, you can click the define button to enter refine mode and make small and medium adjustment to get it close to what
you originally wanted. Like example, once you click it, you are into the
refined mode right now. And this is also a refined mode. You can click it and simply have to change the
character here. You can define it anytime. After that, here's the image. This is the image
that it had created like this and like this image, they have selected this
image and refine it further, and they have changed it with
the prom that is the robot should be happy and
here is the result. At anytime you can
click the image to see the under the hood
prom, as you can see, once you upload any image here, as you can see, once you upload an image here,
let's remove this. Now let's use this image, I simply drag this image here, drag it and see, it's automatically analyzing my image and it will give you a prom. Now, let's click here and
you can see a head shot of the adult male with the dark brown beard
and dark brown hair, 2030 is my body at
the viewer blah, blah, blah, and all these
features has been updated here. Now, this is the
image that it had already analyzed my image and now this is the
image that it's already analyzed in just seconds
and it's give me. Ah prompt according to
my image appearance. As you can see the
heads of an adult male, dark brown beard,
dark brown hair, appearing to taus
broadly at the viewer, and all the skin
ton medium brown, this is the details that
has been appear here. If you want to change
anything particularly, you can do so like skin tone is medium and head shot adult male. You can check it to female. Now let's run this prompt, and it will generate
a image for you. It just created here for me, and it looks funny.
5. Google Whisk Guide for Character Consistency and Prompt: Once you click here as you
can see, this is the image. I can select any of the image. Once you click here
and cut it out, it will automatically
select here. Now move forward.
Anything you might click, see under the hood prompts, as you can see, not
seeing what you expected, you can change it here
and generate here again. Now, how it works. In order to Wix element from
different image together, Wix first need to develop an understanding of each
image you reference. This is where Gemini multimodal
understanding comes in. When you upload an image, Wix uses Gemini to
visually understand those images and generate text description or caption
about them or in other words, translate the image
to text I to T. These description are meant to capture the essence
of your reference, not to replicate the original to facilitate remixing ideas. These caption are then used to write detail prom to generate an image based on
your guidance using WIX latest and most powerful
image generation model, image and three or
in other words, translating text back to image. This process, that is TTI, this process above help WIX better understand
represent the ideas you are forming and ittate
while conversing with you. Now, character
consistency with extract only a few key
characteristics from the image you provide
to guide the model. The goal is not to
create an exact replica, but rather to capture the
essence of the subject. Therefore, the generative image
may differ in appearance. For example, the
generative subject might be of a different height, weight, or have a different
hairstyle or skin tone. These features may be crucial to unique identity for
your character. To achieve a result
closer to your vision, you can provide
more detail prompt and refine your instruction. This is what we got
into Google Whisk, AImaeGeneration
Tool Guide and two.
6. Create Professional YouTube Thumbnail Image composition process : Now let's come
into amazing part. That is thumbnail
creation for YouTube. How we are going to do that? First, let's upload our image. This is the image
that I have already uploaded and go to YouTube, check for the thumbnail,
anything you want, or any YouTube you follow or thumbnail you follow,
you can have it. You simply have
to go to YouTube. I'm going to use this one, how we can download this image. You simply have to search for a YouTube thumbnail
and right click. Copy link address,
and after that, you have to find a new link
that is on Google search for YouTube video
thumbnail download. That's all you have to do. After that, with the first
link, you have to click here, past the link and get thumbnail
image. This is the image. Now, let's save this
image, save image. After that, save this
image into the folder and drag this image in your Google Whisk in the
scene or in the style. So let's make it in
the scene because I want this image to be because I want my subject to
be in my scene. Not user style right
now at prompt, make subject appear
in the scene. Let's see what it will give us. Kp. It's totally
unreliable. Knob. Now let's see the precision. That is precise reference. Let's enable it. Now, as you can see the medium short
holding the mask. Now let's use make
subject holding the mask in the
black plain hood, like you can see,
hood looking into the camera with
serious X pression. Let's see what we will
get because right now we have tried
precise reference. It will not change our reference or subject or character anymore. Let's change it and
this is the dimension. Right now, what it had changed, we have a face, but I think make
the subject holding the mask in the black plain hood looking into the camera
with serious expression. It looked like a little
bit of me, but not me. Now let's check for the image here and let's change
the characters the mask. Now let's refine it further. Camera with expression, subject, keep the subject appearance. Let's move it further. Let's see what we will get. Whoa. Now, this is the result. As you can see, we
have specifically tell that make subject holding the mask in the black plain hood looking into the camera
with serious expression. Keep the subject
appearance, same. Now, as you can see,
yes, now it's better. This is the result that actually I was thinking in my
mind, I loved it. I really loved it.
I love the result. I have created my own very
thumbnail into Google Wix. Now let's try another
one with a new example. If we want to create a thumbnail or if we want
to create a text here, you can use Janva for it. If you want to download it, you can download it, download. Yes, let's download it. Now our thumbnail is ready. Right now, I loved it so
much that I'm going to use.
7. Understand Subject Scene and Style in Google Whisk: Now I'm going to use
another thumbnail for my image and I'm going
to use it as a style. Let's put it here. Now again, wait for a second. It's analyzing the image. After that, just drag it. Now our prompt is working, the magic is happening here. Let's wait for the style. Okay. So it has simply changed the style of the
image. That's all it has done. Now, let's remove the style and try another style
here. Let's make it. Again, it's changing the
image. It's breaking. Let's not use this style
and try to use this style. I'm trying this style right now. Let's wait Now,
again, it's good. So at some point it break
the result with the style. You can experiment it
out with the style. You can experiment it
out with the scene, or you can experiment it
with subject and style. Let's again, prompt it. Now it's running the prompt and what we will get.
So this is what we get. Nope. Not a good result. Let's not add anything
and try again. Whoa. In the scene, it look like
a trophy and animate. This is a result that we got it. It look like as you can see, it looks like an arrowhae
anime style appearance, and this is a YouTube
thumbnail, more views. This is how it look.
That's all it starts. This is how it's
understand and give us the result that we want it
and that we don't want it. It's just give us the result. So let's understand
with another image, and I recommend you to
please use the image with a clear portrait so it can create a better result
for you with your image. Otherwise, it will break it down at some point
and your face not actually clear out or there might be some issue
with your face appearance. I highly recommend you to
use a perfect portrait.
8. Create your own avatar for Social Media : Now let's generate another
image here that is, let's remove this image
use by entering text. Gallatin is playing
violin in the C with the Mermaid sitting beside it clapping. AUT, full mermaid playing
violin in the sea, but it's not skedon in the suit playing violin in the sea with the beautiful Mermaid
sitting beside it crapping. Now, let's generate the image. Let's see. Yes, I'll loved it. But let's change the
scene into the water. Let's see if we can
find the water here, Knob Yes, we can find
underwater world. Let's generate here, natax create under water, B E a beautiful world. Let's generate it. Underwater beautiful
world, yes, generate. The subject, the scene, yes. Now let's enter the style here. Let's see what type
of style we wanted. I don't like all these styles. Let's keep it a real one. Let's not use any style here and without adding details,
let's play around. I want to be amaze. I hope it's not
looks real to me, but I think it might break with multiple subject in the image. Let's change the prompt
skeleton suit it playing violin in the sea, in the underwater sea world. Let's taste it and
run the prompt. Yes. Yes. Now let's use this one. And into the scene that is
underwater, beautiful world. But, Mermaid is there. Basically, I just want
it to be a mermaid here. Let's check it out
if we can find it. It look awkward, but BEAT
Mermaid on right side. Let's see what it will give us. I just want it to
be appear here. Let's use this one and try
to add a mermaid here, use without prom right
now what we will get. Nope, I don't like this looking
into the camera pot trait and mermaid under in the looking into the
camera portrait. Let's use it. Let me
tell you one thing. As far as I understand this, you simply have to
remove the background, use the subject with a white background or the
plain background, so it's understand
the subject better. Let's not use it and use Google Gemini
for image generation. Let's use Google Gemini. Let me explain you one thing. As per my view of creating something or
understanding something, you simply have to experiment
it with a different tool. In the AI world, it's not
actually perfect right now. You have to take the
advantage of all the tool, understand the tools,
make it work for you. One single tool, you can't really get the
result that you want it. You have to go to another
and another and another. Because right now we are in the era where AI is developing. It's not fully developed,
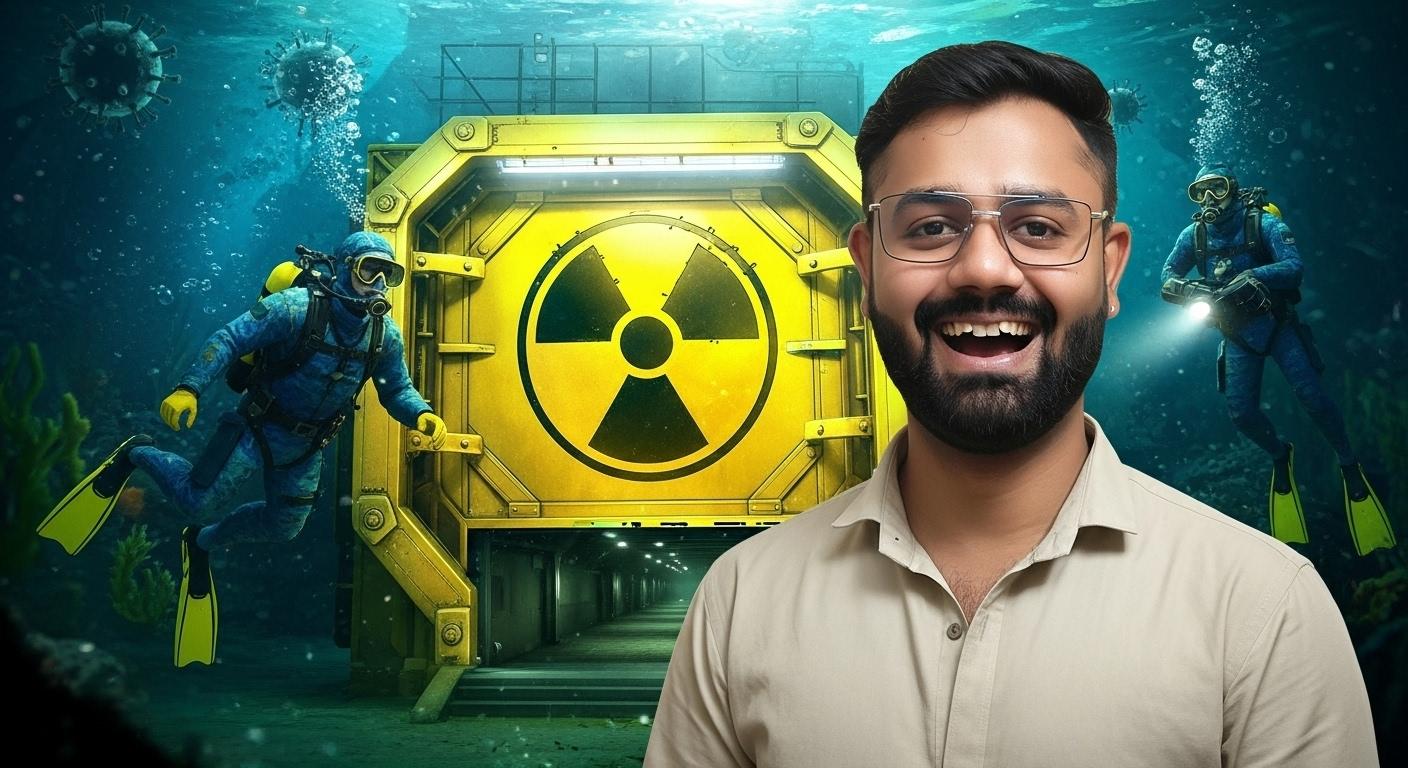
it's developing. Right now, let's use our prom
that we have used in Wix. Let's check it Scala suit, playing the violin in the
sea underwater, sea world, looking in the camera portrait. Of Skeladon in the
suit playing violin. That's all I want it right now, generate image using Nano
Banana not now right now. It's generating image for us. Yes, it's look good. Let's download this one, drag this into our scene here. Let's drag this.
Now generate again, VEAful Mermaid in the under water sea world. Looking with what we will get. No. We don't want it. Real Mermaid in the sea in the underwater world. Let's play it around.
It's not real. Let's use this no no. Let's remove this one, beautiful mermaid
enter VEAUT Mermaid in the sea sitting on the
lost ship, big old ship. Yes, it looks nice. Now combine this style
with the real world. This is the real world
that it generated. Now let's combine this image. Without any prompt, let's
see what we will get. Now let's not use this as a
precise reference and yes, this is what I was
expecting underwater world. Let's generate it again. Subject. Now I am adding a prompt here, subject sitting on the chair in the scene playing
violin for Mermaid. The Mermaid is looking at at subject,
clapping and happy. Let's use this prompt and
see what we will get. And I think I have to use
precise mode if I'm not, Wow. This is good? Yes. Now, this one
is actually amazing. This is the result
that I wanted. How this thing work, let's
understand it better. First, I'm using
the subject here. This is the subject
that I have rapper, and this is the scene
that I have rapper. Yes, and this is the style that I have
wrapped in the underwater. Now, let's on the chair in the scene playing
violin for Mermaid, the Mrmad is looking at subject, clapping and happy in the
underwater auditorium, full of fish and full of fish. Let's run it again.
Yes, it's look nice. This one is looking like
it's in the underwater, but let's make it precise
mode and make it play again. With the precise mode, you can see it's using just the moment here
with this precise mode, it's not looking
like it's actually using it's not actually using
the scene and the subject. It's taking the appearance like they have told
in the block section. Now I want that this is
skeleton to be animate. Skeleton is playing violin Mermaid is clapping
and cheering for it. Don't mind my English. Skeleton is playing violin, Mermaid is clapping
and cheering for it. Mermaid is happy
and all the fish are running all the fish
are moving in the sea. Let's run this. This is our generation and our video is
ready. Now let's play. That was amazing.
Play beautifully. This is what we get here.
Clapping applauds to me. So so Let's make it five. As you can see this is
how we can generate our images within the Google
Wix. Let's cross it out. I really appreciate that
you have come this far, understand this tool with me and I really appreciate if
you give a feedback that how you love this
journey so far with me in understanding the new
tool that is Google Wix. Please share your
review and also please share your project that you
have created using this tool. We will talk about project
details in our next lecture.
9. Create Scene composite and Create Video using Google Veo 3: Now let's generate another
image here that is, let's remove this image
use by entering text. Gallatin is playing
violin in the C with the Mermaid sitting beside it clapping. AUT, full mermaid playing
violin in the sea, but it's not skedon in the suit playing violin in the sea with the beautiful Mermaid
sitting beside it crapping. Now, let's generate the image. Let's see. Yes, I'll loved it. But let's change the
scene into the water. Let's see if we can
find the water here, Knob Yes, we can find
underwater world. Let's generate here, natax create under water, B E a beautiful world. Let's generate it. Underwater beautiful
world, yes, generate. The subject, the scene, yes. Now let's enter the style here. Let's see what type
of style we wanted. I don't like all these styles. Let's keep it a real one. Let's not use any style here and without adding details,
let's play around. I want to be amaze. I hope it's not
looks real to me, but I think it might break with multiple subject in the image. Let's change the prompt
skeleton suit it playing violin in the sea, in the underwater sea world. Let's taste it and
run the prompt. Yes. Yes. Now let's use this one. And into the scene that is
underwater, beautiful world. But, Mermaid is there. Basically, I just want
it to be a mermaid here. Let's check it out
if we can find it. It look awkward, but BEAT
Mermaid on right side. Let's see what it will give us. I just want it to
be appear here. Let's use this one and try
to add a mermaid here, use without prom right
now what we will get. Nope, I don't like this looking
into the camera pot trait and mermaid under in the looking into the
camera portrait. Let's use it. Let me
tell you one thing. As far as I understand this, you simply have to
remove the background, use the subject with a white background or the
plain background, so it's understand
the subject better. Let's not use it and use Google Gemini
for image generation. Let's use Google Gemini. Let me explain you one thing. As per my view of creating something or
understanding something, you simply have to experiment
it with a different tool. In the AI world, it's not
actually perfect right now. You have to take the
advantage of all the tool, understand the tools,
make it work for you. One single tool, you can't really get the
result that you want it. You have to go to another
and another and another. Because right now we are in the era where AI is developing. It's not fully developed,
it's developing. Right now, let's use our prom
that we have used in Wix. Let's check it Scala suit, playing the violin in the
sea underwater, sea world, looking in the camera portrait. Of Skeladon in the
suit playing violin. That's all I want it right now, generate image using Nano
Banana not now right now. It's generating image for us. Yes, it's look good. Let's download this one, drag this into our scene here. Let's drag this.
Now generate again, VEAful Mermaid in the under water sea world. Looking with what we will get. No. We don't want it. Real Mermaid in the sea in the underwater world. Let's play it around.
It's not real. Let's use this no no. Let's remove this one, beautiful mermaid
enter VEAUT Mermaid in the sea sitting on the
lost ship, big old ship. Yes, it looks nice. Now combine this style
with the real world. This is the real world
that it generated. Now let's combine this image. Without any prompt, let's
see what we will get. Now let's not use this as a
precise reference and yes, this is what I was
expecting underwater world. Let's generate it again. Subject. Now I am adding a prompt here, subject sitting on the chair in the scene playing
violin for Mermaid. The Mermaid is looking at at subject,
clapping and happy. Let's use this prompt and
see what we will get. And I think I have to use
precise mode if I'm not, Wow. This is good? Yes. Now, this one
is actually amazing. This is the result
that I wanted. How this thing work, let's
understand it better. First, I'm using
the subject here. This is the subject
that I have rapper, and this is the scene
that I have rapper. Yes, and this is the style that I have
wrapped in the underwater. Now, let's on the chair in the scene playing
violin for Mermaid, the Mrmad is looking at subject, clapping and happy in the
underwater auditorium, full of fish and full of fish. Let's run it again.
Yes, it's look nice. This one is looking like
it's in the underwater, but let's make it precise
mode and make it play again. With the precise mode, you can see it's using just the moment here
with this precise mode, it's not looking
like it's actually using it's not actually using
the scene and the subject. It's taking the appearance like they have told
in the block section. Now I want that this is
skeleton to be animate. Skeleton is playing violin Mermaid is clapping
and cheering for it. Don't mind my English. Skeleton is playing violin, Mermaid is clapping
and cheering for it. Mermaid is happy
and all the fish are running all the fish
are moving in the sea. Let's run this. This is our generation and our video is
ready. Now let's play. That was amazing.
Play beautifully. This is what we get here.
Clapping applauds to me. So so Let's make it five. As you can see this is
how we can generate our images within the Google
Wix. Let's cross it out. I really appreciate that
you have come this far, understand this tool with me and I really appreciate if
you give a feedback that how you love this
journey so far with me in understanding the new
tool that is Google Wix. Please share your
review and also please share your project that you
have created using this tool. We will talk about project
details in our next lecture.
10. Project Details: You have learned to create a professional YouTube
thumbnail, a personal Avatar, and even something as wild as
an octopus on a treadmill, a skeleton playing a violin. Google Wix really are limitless. Now it's time for
your final project. Just share one of the images you created with what you have
learned in this class. It could be a new Avatar,
YouTube thumbnail, or maybe your own
creative masterpiece, whatever you are most proud of. You simply have to
follow the steps that have shown in the lectures. Be sure to post your project in the project gallery
below so everyone can what you have created.
I can't wait to see your work and give
you some feedback. Thank you so much for
taking this course with me. I will see you in the next one.
 Karan Rathore, Creative Technologist: Video Editing, AI, and 3D