Transcripts
1. Trailer: Hello, everyone. So
welcome to all of you in my full Master series
on Google AI Studio. So in this particular
lecture series, I will teach you
that how can you generate your own app
with the help of AI? Suppose if you have to create a clone of midjourney
or Leonado, you can easily do it. Okay. So I will teach
you Google nano banana. With the help of
Google nano banana, you can easily create
stunning image. That will blow everyone's mind. Also, I will teach
you how can you generate voice with the
help of Google AI Studio. So I have many
things to teach you. This course is designed in a very systematic manner so that everyone can understand
this very easily. If you are a creative
person, influencer, content creator, YouTuber,
or business owner, then this course
is best for you. If you want to upscale yourself, then you should definitely
check out this lecture series. I will see you in the
lecture. Okay, bye bye.
2. How to Create app like midjourney ?: Hell, hello, everyone. So welcome to all of you
in my full master series. In this particular lecture, I will teach you that
how can you generate your own midjourney
or Leonardo app. So without wasting any time, let's start our lecture. Okay. So in order to create app like Mid Journey
or Leonardo AI, you must think about the prompt. Okay? You have to
mention everything that kind of feature
your apps would have. Google AI Studio will create app on the basis of
your prompt. Okay? That means Google AI Studio doesn't know what you want,
what you exactly want. That's why you have to
create more focused prompt. Okay, that will
fulfill your need. So create app like
midjourney in which you can create image with text. Okay. So if you are creating
de clone of midjourney or LeonadoEI then we have to mention each
feature one by one. For an example, we have to
mention that feature to produce image in
different art form like anime, cyber punk, Okay. Also, it should have
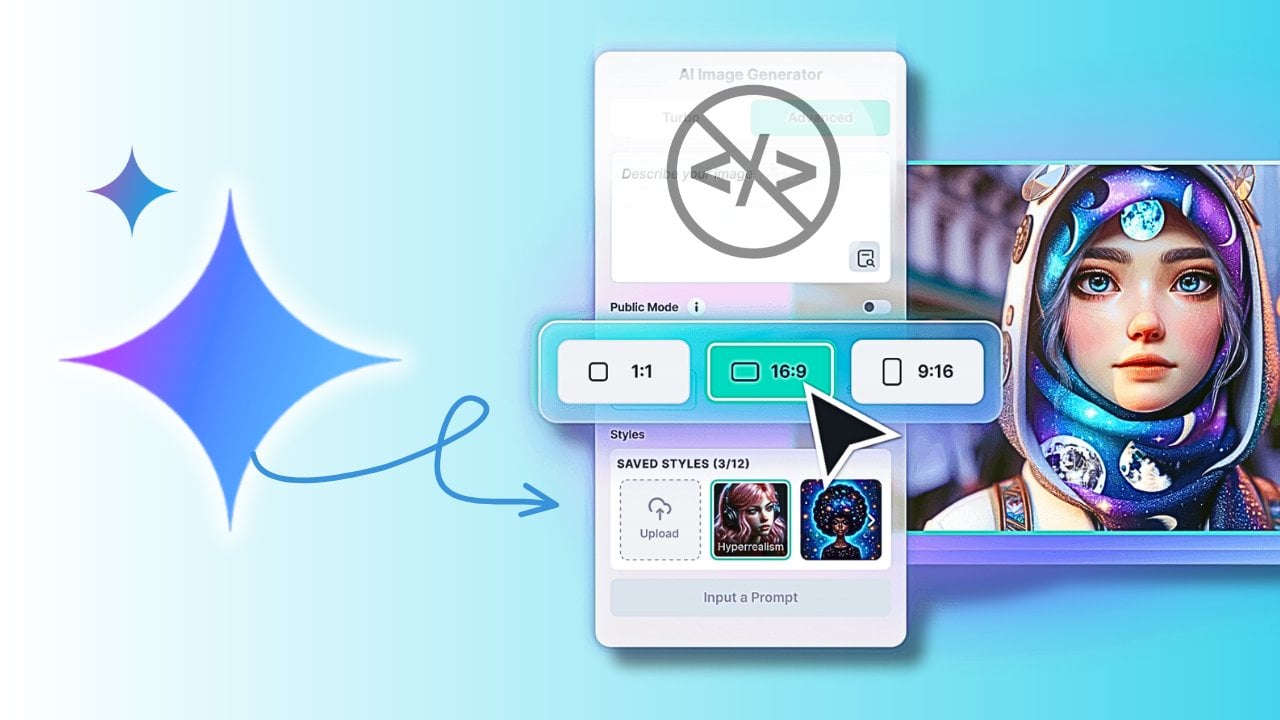
capability to create image in any aspect ratio. Okay, like 14 to three, 16 ratio, nine, nine to 16. Okay. And also, you should have feature to
download your image. Obviously, if you will not type, please create download button, then it will not create
download button for you. So you have to mention
each thing very carefully. So now you can read my prompt. Okay, so let's zoom it. Okay. Create app
like midjourney, Oeonado in which you can
create image with text. Okay, obviously. Provide
ten different image style, changing aspect C of feature. Provide download
button for each image. So I have mentioned everything that feature our app so have. Okay. So let's hit
the Enter button. Now let's see what will happen. So first of all, it
will think about your thought, and after that, it will create wireframe
and UI of your app, and after that, it
will generate code. Then it will deliver
you final product. This is a approach
of Google AI Studio. So if you want to read code, then you have a code. You can copy and paste
it in your own notebook. Okay, for your study purpose. Otherwise, if you
are not a coder, then you can simply
create any app. Okay. But this Google AI Studio is very useful for coders. So finally, our app have
been created successfully. Okay, so now let's
look at the design. Okay? And also, if you want to change
the name of your app, you can do it very easily. Okay. And here you have
to type your prompt, and here we have
different styles. Okay, in which we can
create our own image. So we have ten
different art form, as we have mentioned before. Okay. And here we have a
changing aspect ratio option, square rectangle, portrat,
again, rectangle. Okay, four ratio three. It is a 16 resonant, right? Okay. Okay. And this
is a three ratio four. Okay. So we have a different art style and different aspect ratio in
which we can create our image. Okay. And this is a
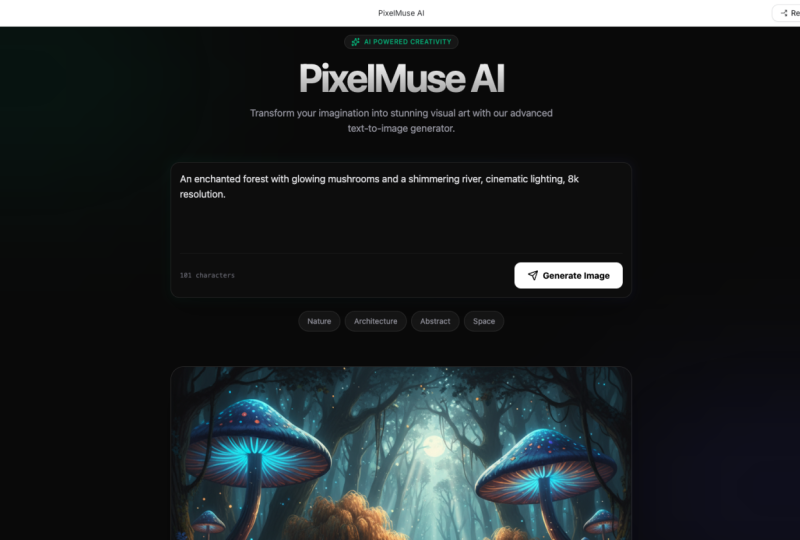
output preview portion. So now let's type anything. Let's type Lord Krishna is looking towards the war. Okay. Now, let's
select the art form. Art forms should be
photo realistic. Okay. And let's
select 16 ratio nine, and the best thing is when I will switch to
the aspect ratio, it will preview on right side. You can see this
is the best thing. Okay. So let's click on
rectangle. Click on GR. Okay. And if you want to preview
your app in fully screen, then we have a fully
screen option right here. Okay? So if you will click here, your app will transform
into full screen. So this is a full screen. Okay. So now from here, we can download our image. So Image have been downloaded
successfully. Okay? So let's close this preview. Oh OMG, this is a power
of Google AI Studio. Okay. This is a power
of Google AI Studio. You can see the detail, you can see the quality of
image produced by our app. Okay. Now let's skip the prompt same and
change the style. Let's click on Anime. Okay, and click on generate. You can see the quality. I don't have to say
anything about this. This is a very,
very, very awesome. Let's click on cyberpunk
and click on Janet. Oh, MG, you can see
the quality of image. I mean, look at the detail. Also, here we have
Sudasan Chakra, the most powerful
weapon of Lord Krishna. Let's click on Pixel Art. Click on Generate.
And the best part is, since you have
created your own app, that's why you don't need to purchase any kind
of subscription. Okay. And you don't need to spend too much amount of
money in buying credits. Okay. So you can
generate a number of images without losing
or buying any credit. Okay? So this is the best part. This is so amazing. Let's click on Comic Book
and again, click on GenRt. You can see the output. From now, you don't need to purchase any kind
of subscription. You can create your own app. You can use it a number of time. Look at the quality.
Let's type here, JaganathPuri, Temple. So let's see it can
create temple or not. Okay? So let's click on photorealistic and
click on GenRate. Okay. So actually, it has created the temple
of Jagan ath Puri. You can search on Google.
You can see same image. Let's create Lord Hanuman Muscular body. Lord Anman Muscular body. Let's create on anime style, okay? Click on Genret. So finally, image have been
generated successfully, and you can see the quality. Now let's create Kratos
from God of War four. Click on Generate, and here I
have selected Nimage style. Our image have been
generated successfully, and with the help of simethod, you can even create
your thumbnail. Okay. From now, you
don't need to hire any kind of graphics designer to create thumbnail for you. You can just simply type prompt. Okay. And with the help of that, you can create your
own thumbnail. Okay. So if you
like this lecture, then don't forget to give me good positive
rating and comment. So here we have created
Cretas from God of War four. But what if God of War one? Okay? So now craters from
God of one first part. So this is a young Kratos
from God of War One. Okay. And also, you can
see the background. Background is exactly same
as in God of War One. Now keep the prompt same
and make it a fantasy art. So let's click on Generate. This is how you can
generate wallpaper for your computer or mobile phone. And there is no limit
for image creation. You can create any number of image with your own art form. Also, you can add your
custom art form in your app. Okay. Suppose if you have to
add Gibl art, you can edit. Okay. Suppose if you have to add Simpson art, you can edit. Okay. So according to your need, you can modify your app. I will show you in
the next lecture. Now, if you are a gamer, then you already know you should already
know about CJ Okay. CJ from GT. So if you don't know about CJ, then you are not a gamer. Okay, so CJ is a main protagonist
from GTS Andreas game. Okay? So let's see it
will create CJ or not. Hmm. This is not a CJ. Was from far cry three. So this is a main
villain of Farcry three. So let's create image. No, it is not looking like vs.
Let's change the art form. Click on Cyberpunk,
click on Generate. So this is a final output, and this is how you can
generate your own app. In the next video, I will show you how can you modify your app? How can you create
more user appealing? Okay. How can you
make UI better? User experience, user interface. I'm talking about user
interface and user experience. How can you create good design? How can you add extra feature
that your apps would have? I will show you in
the next lecture. For now, bye bye.
3. Create app for Thumbnail Creation: Hello, everyone. So welcome to all of you in another video. In this particular lecture, we will learn interesting thing. You will not believe what
I have recently created. I have created AI
thumbnail generator. Okay, so where you have
to upload your pick. Okay. And on the basis
of following keyword, you can easily generate
your own thumbnail. Amazing. And you can see
the quality of image. And since this is a AI tool, that's why whenever I will click on Generate Thumbnail, always, it will create random result, which will different
from the previous one. As you can see, it is
creating awesome image, and again, click on Generate Thumbnail without
changing any prompt. Let's click on
Generate Thumbnil. And using the same character, it will create
different thumbnail. So if you're not satisfied
with your output, you can again click on
Generate Thumbnail. Let's click on
Generate Thumbnail. Let's select gaming Video, click on Generate Thumbnail. So now let's understand
how can you create such amazing app and
for better practice, what you can do, you can
copy and paste my prompt. Okay. Create a website in which we will upload our photo and we can create
thumbnail for anything. After uploading a photo, user can select or type which
kind of thumbnail he want. Using the photo website
will create thumbnail. Okay. And if you want
all of this prompt, then I will attach
resource file. You'll get desired file
from the description, okay? So on the basis of prompt
here we have final result. Okay? So let's test this app. Okay. So first of all, you have to upload your pick. Okay. So this is a very basic version of
your app where you have to select upload image,
let's upload. Let's upload any image and make sure that your image
should be clean. Your image should not contain
any kind of other element. Okay? Your image
should be very clean. Now, here we have a two option. Either we can
select any keyword, like if I will click
on Travel log, it will auto type prompt for me. If I will click on
Fitness challenge, then it will autotypePmpt
for fitness challenge video. Okay, I I will
click on DI graph, it will auto write, prompt for my thumbnail. Okay, so instead of that, instead of clicking on each
keyword, we can type here. Make thumbnail for
video editing course. Click on Generate Thumbnail. And you can see
the final quality. And this is another result. Let's type YouTube thumbnail
for a DI Craft project, and here what we get. From the now you can
easily automate your work. Now let's click on Travel blog. So this is our prompt
YouTube thumbnail for Travel blog video. Click on Generate thumbnail. And this is a final result. I have downloaded it too. You can see the quality. In the next video,
I will teach you how can you add extra thing in your website and how can you
modify its user interface. If you like this lecture, then don't forget to give me good positive rating and
comment. Okay, bye bye.
4. How to Create Stunning image with nano banana ai: Hey Hello, everyone. So welcome to all of you
in my full master series. In this particular
lecture series, I will teach you
that how can you create amazing
image with the help of nano banana from
the Google AI Studio. So without wasting any time, let's start our lecture series. First of all, you have to
open your search engine and you have to look
for Google AI Studio. You can search on Google, Google AI Studio and
you have to visit its official website and
you will see this window. On the left hand side, you
will see chat section. If you will click on Chat, then here you will
get try nano banana. UI can be changed in
future too. Okay. Now let's click on
Try nano banana. You can generate
any kind of image. Okay. Like generate an image
of banana wearing a costume, this is by default prompt. Let's see its output. This is a very basic lecture. We will learn advanced
thing step by step. Now you can see the quality of a image. It is looking awesome. Now let's type for dragon, ball, Z, wallpaper four K Okay. Aspect ratios would
be 16 ratio nine. Okay, hit the Enter button. And from here, you can
download your image. You can download your
image from here, download. Click on Download. Image have been
downloaded successfully, and you can see the
quality of image. Load Krishna ultra
realistic photo, he's facing towards War zone. He's facing towards Warzone. You can see the quality. And if you look at
here from here, you can upload any file. You can insert any
kind of image, video, folder, file, or audio. So let's upload.
Let's upload a photo. Upload file. And let's
select any of this image. Let's select this image. Suppose if I have to change
the color of my shirt, then I can simply type, change the color of my shirt from white to black. Okay. Run. Finally, color of the shirt have been changed
from white to black. Also, if you will notice that
everything is consistent. Face expression, and background,
everything is consistent. Now let's change the paint. Replace paint with blue
sorry, light blue jeans. Light blue jeans. Replace paint with
light blue jeans. Let's see what will happen. So this is a final
look from now, you don't need to purchase any extra dresses
or extra outfit. You can easily replace your shirt or paint with the
help of Google AI Studio. It is so amazing.
Now from the Google, I am copying this
image for reference. Actually, I want to see how
it will look like in my body. Let's copy this image and go
on nano banana and paste it. Now I will type replace my black shirt with this outfit. Okay. Simple. Hit
the enter button. So finally, output have
been produced successfully, and you can see the
quality of image. This is how you can get a
rough idea how any outfit look in your body structure. Now let's type. Now using this man, make thermal
off video editing codes. And finally, we got this image. It is looking awesome, right. I will teach you advanced
thing from the next lecture. Here I am exploring
what it can do. Now let's change the art style. Here I will type, make this image like Simpson art. As you know Simpson is a
cartoon which has own art form. Like other cartoon, let's convert this image
into the Simpson art. Our image had been
generated successfully. So now let's
download this image. It is looking so attractive. This was a basic
lecture in nano banana. I will teach you
advanced thing from the next lecture. Okay, bye bye.
5. Generate Voice from Google ai Studio: Hello, everyone. So welcome to all of you
in my full Master series. In this particular lecture, I will teach you
that how can you generate voice with
the help of text, and I'm not talking
about 11 lab. You can easily create
voice with the help of text with the help
of Google AI Studio. Without wasting any time,
let's start our video. First of all, you have
to go on Google and type Google AI Studio and you have
to hit the Enter button. You have to visit its
official website. Now this is a current
interface of Google AI Studio. In Google AI Studio, you have a different kind of option you can create
high quality image. You can fetch information from weblink Native e
speech generation, live audio to audio dialog. Okay. So according to your need, you have to pick a tool. So here we have to
generate voice. Okay, that's why
here we will click on Native speech generation. So now I would like to
introduce its structure. First of all, let's look
at towards the right side. Okay. Here, you have
two different mode, single speaker audio mode or
multi speaker audio mode. If you want single voice
in your whole audio, then you have to select
single speaker audio. But if you want that,
two different voice should be in your
voice like in podcast. Okay. Suppose if you are
creating content like podcast, then you have to select
multi speaker audio. Because in podcast we have
more than two different voice. Okay. So that's why if
we talk about podcast, we need to select
multi speaker audio. Okay, so let's select multi speaker audio and
let's explore this. Obviously, if we
have two speaker, then we need to select
two different voice. Okay, so this is a speaker one
and this is a speaker two. Okay, so you can name the first speaker k. This is
the name of first speaker, and this is the name of
second speaker, okay? And you can select
voice from here. Ready to build something
awesome today? Ready to build something
You can preview your voice. Got a project in mind? What
do you want to explore? So let's select this voice, and for John, let's select
What sparks your interest? What sparks your interest? Okay. So this is how
you can select voice. Now let's look it
towards the prompt. So this is a ray structure
by which you can get a rough idea how
to write prompt. Okay. So suppose if we have two speaker, two
different speaker, then we need to type
like this Speaker one. Hello, we are excited to show you our native
speech capability. Then Speaker two. Where you can direct voice, create, realistic dialogue,
and so much more. Edit this placeholder
to get started. So this is a rough idea. So if you have two
different narrator, so you have to type
script respectively. I Speaker one,
Speaker two, right? Okay. So I think
we don't need it. So I will click on
single Speaker audio. Obviously, if you will click
on single Speaker audio, you have to select
only one voice. Got a project in mind. So let's select this voice. And here you have
to paste your text. For a script, I
will use had GPT. Or instead of that, you
can type it manually. Okay. So here I have
created a script for Wonder share
filmora class trailer. Okay, so this is a script.
So let's copy this. And also you can pause this
video and you can read this. Welcome to the
undersaFlmora, Master Class. Okay, you can pause this
video and you can read this. So let's copy and paste it here. Okay. Now let's click on Run. So now, our voice have been
generated successfully. So now let's play this. Welcome to the Filmora
14 Master Class. Where I'll take you from
absolute beginner to advanced video
editor step by step. In this course, we'll start by installing filmora and
understanding its interface, the media library, timeline, preview window, and editing. So our ma sorry. Our voice have been
generated successfully. Now we need to download this. So let's click onthredt and simply you can
download it for free. So voice have been downloaded successfully, and
you can see this. Welcome to the Filmora 14 Main Titles and Animate background
music with Effects. On the advanced side,
I'll show you how to use green screen or Chromaky
masking, blend. Okay, guys, this is how you can generate any voice
with the help of text. And obviously, this was
an alternative of 11 Lab. So this was a capability
of Google AI Studio. And if you are
watching this video from the 11 Lab Master Class, then you must know that
I have created stand alone Google AI
Studio Master Class.
 Ankit Shrivastava