Transcripts
1. Antigravity trailer: Hell, Hello, everyone. So welcome to all of you in my full Master series
on Google Anti gravity. So in this particular
lecture series, I will teach you that
how can you transform your idea into the live app? Okay, you have to think what you want and you
have to transform your idea into the prompt
and on the basis of prompt, it will automatically
create app. Also, antigravity has planning
tool by which you can discuss with AI agent
about your app. And AI agent is very interesting because it
will help you a lot. So before creating a final app, you can easily refine it. You can simply add, remove or modify anything from the app with the help of agent. Also, I will teach you
to use AI agent manager. I have designed my lecture
in a very systematic manner. So no matter what you comes with coding
background or not, this master series is for you, even if you don't write any
code in your whole life, then also you will be able
to create your first app. Sometimes, if you have to perform a small task
in your daily life, then you are fully depending
on the external website. Like if you have to convert
the JPG to the PDF, then you are fully dependent
on external website. Suppose if you have to
upscale your image, then also you are fully
dependent to external website. If you have to create AI images
with the help of prompt, then also you are
dependent to many tools. But with the help of
Google antigravity, you can create any kind of
tool in a single environment. So from the N, you don't need to depend on any other
external website. You can create any
app for yourself. So first of all, I will pick a demo project for
demonstration purpose. With the help of that project, I will introduce each tool
inside the antigravity. And after the demonstration
of all the tools, we will create
different kind of app. We will do some experiment. So I have designed
my lecture series in a very systematic manner so you don't have
to eskipe anything, and it would be better
if you will follow my H tap while
watching my video. So you have to do practice
while watching my videos. And if you stuck at some point, then you can leave a comment, I will reply as
soon as possible. Also you can rewatch
the full videos. From the now, you don't need to make your app in a
traditional way. This is an era of prompt
engineering where you can easily create any kind of
app with the help of prompt. Guys, I will see you in the lecture series.
Okay, bye bye.
2. How to download & Setup Antigravity ?: Hello, everyone. So welcome to all of you in my full Master series
on Google Anti gravity. So in this particular
lecture series, I will teach you that, how can you build your own app or website with the
help of prompt? Just you have to type anything and it will create your app. In this particular lecture,
I will teach you that, how can you download
it in your computer. Also, I will discuss about
some of its features and why you should use Google anti
gravity to build your own app. So without wasting any time, let's start our video. In order to download,
Google antigravity, just you have to go
on Google and type Google antigravity and you
will get this website. And from here, you can
download it for Windows, Mac and Linux also. So you can download it for three different
operating system. Okay. And the best part is here you will
get agent Manager. If you don't know
about agent Manager, then let me simplify you. With the help of agent manager, you can create multiple agents which will work behalf of you. You can create many agents
at the same time and you can assign different
kind of work to each agent. Suppose you have created three different
agent, agent A, B, and C. Then maybe you can assign UIUX designing
task to agent A. You can assign market
research task to agent B. For prototyping work, you
can assign agent, sorry, C. So you could
have many agents, and they will perform different kind of tasks
at the same time. So at the same time,
many agents are working. One agent is doing
market research and another is
doing UIUX design. Another one is doing coding. Another agent is testing
your app in real world. So you can perform front end and full stack development
at a single environment. At a single environment, you would have coding area where you can write
your code manually. You can see all the
codes, you can edit it. Also, you have a prompt box by which you can enter
your prompt from here, you can create any kind of app, you have to give a prompt. Suppose if you have to
create image generator app, then simply type create
image generator. App, like Mid
journey or anything. And it will use
Google Gemini Pro. Okay. Also, it has
different model like Cloud, sont 4.4 GPT, so you
can choose any model. Whenever you will
enter any prompt, it will create implementation
plan for your project. Implementation Plan
is nothing but a full roadmap of
your app development. So on the basis of our prompt, it has created implementation
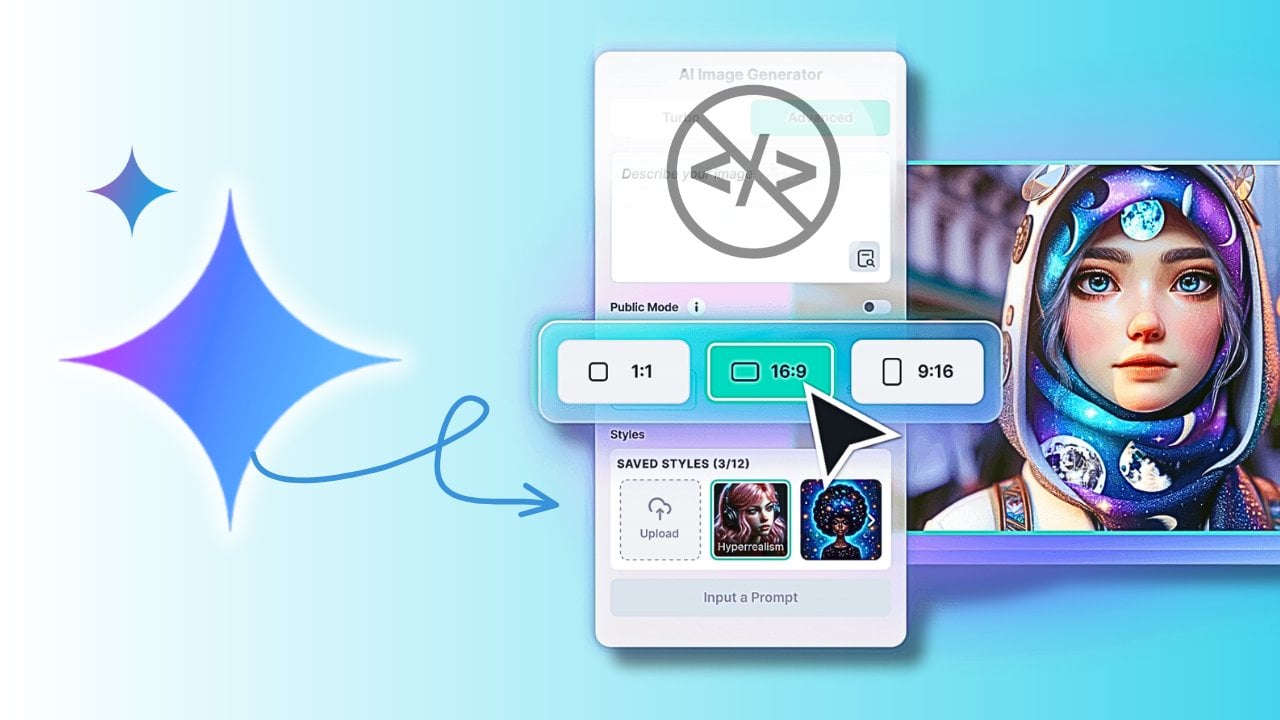
plan, AI image generator. So create a major app AI
image generator website. The first phase is
select UI design. Or you can do full planning of your app before
publishing it. Suppose if you have to create
a AI image generator app, then you will
discuss with agent. Basically, you will talk to the AI agents before
creating your full app. So whenever you will say, I have to create AI
image generator app, it will introduce you
implementation plan. You have to read it. Also, if you are not satisfied
with something, then you can menton like this. You can add a command, change gradient background
to the normal color. Okay. So you can leave a
command for a specific part. Okay. So suppose I have to change something instead
of gradient background, it should have neon background. Then with the help of comment, I can easily change it. Okay? So this is a
very basic lecture where I introduced you
Google antigravity. In the next video, I will
introduce its interface. This was a quick review
of Google antigravity. So with the help of
Google antigravity, I have created my own
AIImageGenerator app, and let's type Wonder
Woman in Egypt, and let's click on Generate. So with the help of
my Image generator, I have created this one, and it is looking amazing. You can see the
quality of output. And you can create any
kind of app or website. There is no limitation. You can create anything. Just you have to
think about your app. You have to convert your
thinking into the prompt. You have to discuss
with AI agents, just add or remove
any feature in your app and simply
implement your plan. So you have a
endless possibility. So, guys, if you
enjoyed this lecture, then don't forget to give me good positive rating in comment so that I
can motivate myself. So okay. Bye bye.
3. Basic Interface & features of antigravity: So finally, we have installed Google antigravity in our
computer. Now we will run it. In this particular lecture, I will introduce its interface. So when you will open
Google antigravity, you will see this window. Okay. So with the help of
open folder, what you can do, you can select the directory
where your file will save. Here you have a open
agent manager option. With the help of agent manager, you can assign different
work to different agents. So suppose you have to perform multiple tasks
at the same time, then you should definitely
use Open agent manager. So if you will click
on Open folder, if you will click
on Open folder, then you can create new folder. Antigravity Project two. Okay. So you can
create folder, select. Okay. And whenever you
will create anything, it will store in
particular folder. At the right hand side, you will see prompt box. With the help of
this prompt box, you can type anything
and you can transform your idea into the
web or application. Okay, so with the
help of prompt, you can create anything. And here you have a two option. One is planning mode and
another one is fast mode. So in the next video, I will cover it in
very detailed manner. But let's quickly
discuss about it. So whenever you will
use planning mode, you can discuss
with your EI agent. You can discuss about
its feature interface, and you can manipulate
its features. So basically, this is a proper discussion format where you will discuss about your product
before creating product. And whenever you will
use planning mode, it will provide you
implementation plan where you can see full
roadmap of a building. And if you are not
satisfied with something, you can still edit it. But if you have
better clarity or if you already created
your own prompt, then you can use fast mode
when you use fast mode, agent will execute
task directly. You can assign simple task. So your task will
perform by agent. You can see agent. Okay. And from the
here from this icon, you can see past conversations
with your agent. Okay. And here you
will see three dot. So if you will click
on additional option, then you will get customization. So if you will click on
customization, so from here, you can create Global
rule for your agent. Okay. So suppose if
you have something in your mind that agent
should follow, then you can assign some rule, and your agent will follow every time whenever it
will create any project. So if you will click on Global, then here you can type
your prompt easily. You can specify. This is a rule. You have to follow properly. And from the top panel, you can open agent manager. And I have already discussed
about what is agent manager. So with the help of agent
manager, what you can do, you can create many agents
which will work behalf of you, and it can perform multiple
tasks at the same time. Okay. Here you have
in built browser. Okay, so if you will
click on Browser, it will open Chrome.
It will open Chrome. Suppose if you have to add reference image
for your project, then you can easily
use reference image. And from here, you can choose model Gemini
three pro high, Gemini, three pro lo, Cloud So Cloud Sont
4.5 thinking, GPT. So you can choose any model at the time of
recording this lecture, we will use Gemini
three P because currently it is free at the
time of video recording. Now, this was a very
basic interface of Google antigravity. Okay. Now suppose if
you have to change the theme of Google antigravity, then what do you have to do? You have to go on top panel, click on your profile, and here you will
see theme option. So go on color theme. Here you can change the
theme of file icon, product icon theme. Okay. So let's click on Color Theme. And here you have a
lighter or darker version, both kind of version, like this. Okay. So it is actually
looking amazing. Again, go on theme color theme, and night tomorrow night blue. So you can use this theme also. It is looking like coder. Okay. Let's use another theme. Go on color and red. Okay, so this is how you
can change the theme of your Google antigravity. Okay. So I personally
prefer Lights. Okay, light, high contrast. So it is looking like this. So you can use any of them. And if you have to download new theme, then what
do you have to do? Uh, so you can choose
any theme from the here. But if you have to
download new theme, then what you can
do, you can go on theme section and drop down. And here you will see Install
additional color theme. So if you will click on this, then it will open new browser, and here you have a
different kind of theme. So you can download
anyone which you want. Okay. So let's use anyone. So let's install
Dracula theme official. Let's install this and click on Trust and
publish and install. So it is looking like this. It is looking amazing. Let's use cyberpunk
theme. This is a theme. So let's click on. Let's
click on Cyberpunk theme. Install. Okay. Let's click on
Trust, publish and install. And finally, we have
a cyberpunk theme. So now we can cut it. Okay. Okay, now we can
start our project. Okay. Fine. So this was the basic
things of Google antigravity. And in the next video, we will discuss about planning and fast mode in a
very detailed manner. So, okay, guys, if you
like this lecture, then don't forget to give me good positive rating and
comment. Okay, guys, bye bye.
4. Google Antigravity 2.0: Interface & How to get Old Antigravity Interface ?: Hello, everyone.
Welcome to all of you in my full Master series
on Google Antigravity. Finally, we have
a new version of Antigravity called
Antigravity 2.0, and this is a new
interface of Antigravity. If you like this interface, then it is okay. But suppose if you want to get back your
previous interface, then what should you do? In such case, you have to go on Google
Antigravity website, you have to click on
Download button and you don't have to download
Antigravity from here. If you will download Google
Antigravity from here, you will download
latest version, which means you will
download this interface. Okay. But if you want to
get previous interface, then you have to scroll down. And here you will see Antigravity
IDE, Antigravity IDE. If you will install
Antigravity IDE, it will give you
previous interface of Google Antigravity from
which you are familiar. Okay, and suppose if
you are a mac OS user, then you can download
it from here. Okay, similar for Linux, but I am a Windows user, so I will click on Download 64. Okay. And after that, you can simply install
your Antigravity IDE, and it will provide you
previous interface. Okay. And if you don't want to go back into
the previous version, then you can also
use new version. This is a very clean interface. This is a 2.0 verson. Okay, it is similar
to the Cloud. Okay, you can see the detail. Okay. This is a very
clean interface, and here we have a
project section. Okay. And also, we have a
history of each conversation. Okay. So it has categorized everything in
a very systematic manner. One may recorder,
this is one project, 11 may recorder, this
is another project. Okay. And also, I can see all the chats inside
my specific projects. Okay. From here, you can
start new conversation. From here, you can see
history of your chat. Okay. And here you
can schedule task. Okay. So new interface
is very clean, okay? So I think you should
use Antigravity 2.0. Okay? But if you are not
familiar with this interface, then you can download Google Antigravity IDE to recover your previous interface. Okay? If you enjoyed
this lecture, then don't forget to give
me good positive rating and comments so that I can
motivate myself. Okay, bye.
5. Planning vs Fast mode Explained: Hell, hello, everyone. So welcome to all of you in my full Master series
on Google antigravity. So in this particular lecture, finally, we will start
building our app. But before that, I want
to introduce you to mode, which is planning
mode and fast mode. So first of all, let's
discuss about what is planning mode and
what is fast mode. So, if we talk about
planning mode, agent can plan before
executing a task. Okay. So basically, it is
a discussion format where you agent will discuss
about your product. Okay. And you will discuss
everything related to its design interface, features. Okay. After that, you will
finalize your product. If we talk about fast mode, so agent will execute
task directly use for simple task that
we completed faster. With the help of fast mode, you will get your
app very quickly. Fast mode will directly develop your app on the basis
of your prompt. It will not discuss with you. Agent will directly develop your app without any discussion.
This is a fast mode. But my recommendation is
to use planning mode. Because whenever you
will use planning mode, you will proceed step by step. So before creating final, maybe you can ask for, Hey, create UIUX design
for my product first. Also, you can ask for
two different design. You can ask for, Hey, provide three different sample of UI design for this
particular product. Okay, so it will also
provide after that, you will choose one of them, and it will proceed with that. And after UI design, you can talk about its feature. You can add or remove anything. You can leave a comment
on a specific plan. So whenever you create anything, it will firstly provide
you implementation plan in which you will see full
roadmap of your building. Okay, so suppose if you
are not satisfied with something like color or logo, you can specify that, Hey, you have to change this. Okay, so it will
automatically change. And maybe sometime you will get any kind of unknown error. Okay. So it will
automatically fix it. Just you have to
say, I'm getting some error while opening my app. So can you please resolve it? So it will say. So if you want to create
your app more accurately, then you should
use planning mode. So we will select planning. Okay. Now finally, we are
going to create our app, and you can see my prompt. I want to create text to
image generator website. Please provide three
different UI version first. Okay. So firstly, it will
provide three different verson. Let's hit the enter button. Now it will do market research. It will analyze our project. And at the right hand side, you can check its progress. So you can see each
step one by one. Like currently it is
generating first image, and after that, it will
generate second image. Okay. So you can
totally monitor that. And at the center of screen, it will provide us
implementation plan. Okay. So this is the
beauty of planning mode. So with the help
of planning mode, you can simply discuss
with AI agent. So on the basis of
our first command, it has created three images. You can click on image and
you can see the quality. Okay, so you can choose
any of them. Okay. And at the center, you will see task tab. So if you will
click on Task tab, then it will sew you number
of task, it has to do. Okay, so currently we are in present design to
user for selection. We are user, and
here we will select which design we have to
choose for a building. Okay. So when we will
select our design, it will go on in salise
project if needed. Okay. And after that, our selected UI
will implement it. Okay. So now it is looking nice. So I will select first design. So I will mention its name. So its name is minimalistic, clean modern and simple.
So I will type here. Just go with so now you can pause this video
and you can read my command. Just go with minimalistic, clean modern and simple design, which was first image. Okay. But before building app, add some features
like number of image. And also, I have mentioned
that maximum image, it will produce at a
time will be four. Okay. And changing a spect ratio, image style, download button. Just you have to
mention which feature you want in your app. You have to mention everything. Now, let's Click on Send. Okay. Now again, it will apply same
method. It will think. Also you can read it. Also, you can read
its thinking process. Planning implementation. So you can pause your
video. You can read this. Okay. Now finally, it has created implementation
plan for us, so you can read it. Okay, so goal description, create a clean modern
and minimalistic text to image generator website. The app will allow user to
generate image from the text. Okay. So you can read this. And if you are not
satisfied with something, you can simply comment on
a specific part. Okay. So scroll down, scroll down. Okay. And here it will ask
you to accept some task. So you have to
accept it manually. So whenever it will ask you to requesting your
permissions terminal, you have to accept everything. You have to accept everything. Sometimes it will install
extra plug in or software, so you have to always
click on except button. It is, again, asking
for permission. You can read this
and let's click on Except. It will take some time. Now it is creating UI
component, header, image card, generation
for image gallery. Okay. Also, I want to
type here So new design. First. So it has automatically launched a new tab in browser to show me UI design. But at this time,
I'm getting error because process is
not completed yet, but I want to see UI design. That's why here we
are getting error. Okay, so it will
automatically fix it. I don't need to worry about it. So it is currently on progress. Okay, so we have to wait for it. So currently I'm getting this error because process
is not completed yet. But after the
completion of process, if you still getting this error, then you can go on antigravity and you can ask to
resolve this issue. And if you want to
see its progress, then you can go on task. So currently it is in implement minimalistic
UI with features. Okay, so it is implementing
some features, okay? And whenever your app building
process will complete, it will give you some
prompt or command, which you have to
enter in terminal. But if you're not a
technical person, then how you will do it? In order to run your app, you have to type some
command interminal. Okay. But if we are not
technical person, if we are too lazy, then what we will do, we will go on prompt. We will go on prompt, and we will type here. Please generate link to
open this app simple. It will create a single link in which you will click
and your app will open. You don't need to type any
prompt or command in terminal. Okay, so if you are not a technical person, you
can easily do that. You can see the
progress starting development server and
capturing screen sort of UI. Okay. So you can read all of this you can analyze
its process. So currently only one agent
is performing our task. But if you have to assign multiple tasks at the same time, so you can go on agent manager and you can assign different
task to each agent. So it was taking too much
time to implement everything. So I simply type here why
it is taking too much time. Okay. So it said that
I apologize for delay. I encountered
configuration error with styling engine, okay? I'm fixing it right now and will show you design
immediately after. Okay. So you have to accept all. You have to click on accept all. So you can talk like, he's your friend or colleague. Okay? And also, it
will apologize. So let's end this lecture here. So this is my last prompt
of this particular video, simply create app and
launch on my browser. And agent said that we
were getting error because of stable Verson tiin CSS. I don't know about it. Then
I will immediately start the development
server and launch the application in
browser for you. Okay, so it has asked
for permission. So let's accept Okay. And once it will complete, I will record next
lecture in which we will check our app
is working fine or not. Also, if we have to change
anything in our app, then how we will do it? So we will explore everything
in next video. Bye bye. And if you like this lecture, then don't forget to give
me good positive rating and comments so that I can motivate
myself. Okay, bye bye.
6. How to Run Our app ?: In a previous video, we were creating AI text
to image generator app. Now finally, process have
been completed successfully, but still I am confused
that how can I run it? This is a second day of
recording my lecture series. So when I opened
Google Antigravity, it said that your process have been completed
successfully. Now you can simply run it. But as I have already told
you that I am a lazy person, I don't know how to run. So I simply type here, please run my project. Or instead of that, you can simply ask for Link. Just give me link to run my app. So after a process of ten
minute, I got this link. So with the help of this link, I can easily access my app. So when I tried to
open this link, I encountered with error. Whenever you will
get any kind of error while running your app, you can ask for it
is sewing one error, please identify it and solve
it as soon as possible. And after that, it will start debugging error and you
can easily read it. It will scan your whole project if you are getting any error. Now finally, it has identified
and fixed our error. I identified a syntax error, so we were getting syntax error. Okay. Now it have been
fixed successfully, and now it have already provided
one working link. Okay. So finally, we have
a working link, so simply click on it and let's see our app is
working fine or not. So, okay, guys, finally, we have a text to
image generator app. So now let's use it. And first of all, let's see it has added all the
features or not. So we have asked
for image count. Maximum image we can
produce at a time is four. Also we have a
aspect ratio option. With the help of aspect ratio,
we can change the resol. And finally, we
have a style. Okay. So in the next video, we will add many things. But here, let's
use, first of all, let's select the
number of image for aspect ratio 16 ratio nine
and make it realistic. Okay, so now let's
type anything here. Now, let's type
Simpson in Egypt. Okay, so let's hit
the enter button. Let's click on generate. Now, finally, we would have four different image
created by our EI tool. So finally, we have a output, and you can see the quality. So let's try to download it. Let's see it is
working fine or not. So let's click on Download. So when I click on
Download button, it has opened the new page and it is not
downloading our image. So I think this is an
issue which I should note. Okay, so I will fix this
issue in the next video. Okay. So first issue is
it is opening new window, and our download
button is not working. So this is a two issue
which we have to fix. And also, we are not
getting good quality. It is a little bit blurry. Okay, so we will also
report about it. And suppose you have to change
anything in its UI design, you can easily do it. Suppose if you have to change
its brand name or logo, you can easily do
it by prompting. Just you can go on,
antigravity and you can mention that simply change
the name of my app. Okay, so you can
also type instead of image AI try
something creator AI. So it will change
the name of app. Okay. And suppose if you want to change the color of your whole app,
you can still do it. We will explore everything
in the next video. Also, we will add
some new features like up scaling option,
image up scaler. We will also integrate it here. Also, inside the
styling section, we have only few option. Okay, so here, at least 15 different kind
of styles should be appear. Okay, so we will also add
different art form like Gibilart, okay, Simpson art. So here we will add many arts. Okay? And currently, our design is looking
too much simple, so we can also decorate it like, uh you will see in
the next video, monkey is doing meditation at hell and let's change
the style to the anime, and it should be 16 sue
and number of counts four. So let's click on
generate image. Also, we can add
some loading view. When image is generating, then here we should have round animation
or loading animation, which is necessary if I
talk about user experience. It is producing good result, but quality of the
image need to improve. Let's type Kratos is
fighting with monster. Make it realistic and
hit the generate image. Lord Hanuman is standing
at top of the hill. So I got this result. Okay, so we have to improve many thinging in our design and app. This is why you have to use planning mode while
creating your app because you can't create perfect app with the help of single prompt. Maybe you need to add
something or remove something. Maybe you have to
change the color, background theme or complete UI. So, guys, if you
enjoyed this lecture, then don't forget to give me good positive rating
and comments so that I can motivate
myself. So okay. Bye bye.
7. How to Modify our app ( part 1 ): In a previous video,
we encountered with some issue with our text
to image generator app, and here we're going
to resolve it. So first of all,
let's think about it. What was the issues? So first issue was download
button is not working properly and second issue was
image quality is too bad. Okay, so now let's go on Google antigravity and
let's type prompt. Download button is
not working and image quality is
too bad of output. Okay. Resolve it and let me know.
Hit the enter button. Now it will take
some time to fix it. Firstly, it will resolve issue, and also it will explain
why download button is not working or why we were
getting low quality image. It will also display the reason. So whenever you will ask for any kind of changes in prompt, you will also get the reflection of your change in
implementation plan. So suppose we have mentioned
here download button is not working properly and we are
getting poor image quality. So we are getting
the reflection of this prompt in the
implementation plan too. So you can read
implementation plan after the prompting. Okay. And here, let's see. It has finally analyzed
what was the issue. So it has provided the reason behind Download
button is not working. Download button, the browser
block direct downloads from the other website. I'll fix this by fetching
the image first. Okay. So this issue will
solve automatically. Now, second issue was
poor image quality. I will increase the resolution, example to full HD two K and add ultra high resolution to the
generation prompt. Okay. And here, you have to accept
everything, every changes. Otherwise, it will not work. So let's click on accept all. So whenever it will
um apply anything, it will ask for changes. So you have to accept it. Okay. So whenever you will
change anything in your design or app, you will get different
implementation plan. Okay. So, or you can say that it will automatically update
your implementation plan. So here you can read this. Okay. Also, currently we are
in implementation plan tab. Currently, we are in
implementation plan tab. So if you will go on task tab, then you will see all
the task it has to perform like investigate
download button, Iu investigate image quality
ISU after the investigation, it will fix download
button issue and improve image
quality, and verify fix. Okay. And suppose you are not
satisfied with something. Okay. Suppose you are not satisfied with
implementation plan. Okay, so you can
change anything here, like for an example, for an example Suppose here you have to add
different resolution. So you can mention your
comment like this. Here, you will see comment. So whenever you will
cover any text, it will ask you to comment. So let's comment here. And instead of 2048 resolution, if I want 4,000 cross 4,000, it will also do it for me. Okay. But this is only for
demonstration purpose. Okay? So I will not
apply this, okay? So you can comment
on any text, okay? So finally, our process have
been completed successfully. Now let's try to test our app. So let's type Wonder
Woman in Egypt. I'm typing Sam prompt
for reference. Okay. So let's
click on generate. So you can see that first issue have been resolved successfully. Okay, which was blurry
image or low quality image. So finally, we are getting
good quality image. Now let's try to
download our image. So let's click on
Download button. And again, it is
still not working. So again, what we will do, we will go on antigravity
and we will type here. We will type here. Please resolve following Iu. Please resolve following
Iu download button is still not working. Fix it. Now it is
asking for permission, so let's accept all. I identified why the download
button isn't working. It's due to browser
security restricts. Now let's type fix it. It is not working because
of the browser restriction. So this was the
main advantage of planning mode where you
can discuss with AI agent. You can discuss
about whole problem. You can ask for identify
the problem and you can again request for
solving your problem. Now finally, I got this message. I'll apply the fix
for download button. I should I should now work correctly by fetching the
image data before downloading. Okay, so let's try. So let's go on our app
and reload our page. Okay, so now let's try
to create anything. Kung Fu Panda Kung Fu Panda. Okay. Number of
image would be four. Aspect ratio would
be 16 ratio nine, and it should be realistic. So let's click on
generate image. Also we have to add
loading animation here because it
is looking blank. Okay, here, at least
we should have loading animation while
it is creating image. So you can see the quality. It is working fine. Now let's see Download
button button is working properly or not. Okay, so let's click
on Download button. So it is working fine. Image have been downloaded
successfully in PNG format. You can see that. Okay, so it has been downloaded
successfully. But what we can do, we can create better UI
for Download button. Okay. So it is looking
too much simple. So now let's change the
UI of Download button. Let's make it more
user appealing. Make Download button,
UI unique and also add loading animation
while Images processing. Okay. Instead of blank page, we should get loading animation while it is creating
image for us. So let's click on Next button. So again, we got requested, so we have to accept all. So let's click on Accept A. And here we again get
implementation plan. So simply click on Implementation
Plan. Let's open this. And this is a new
implementation plan for our download button. So you can read this. And suppose you have
to change anything, you can simply add up comment. Okay, so let's read.
Let's read it. Improve the visual appeal
of download button to make it more unique and
provide feedback. Okay. Uh This is a logic. Okay. You can see change button style
to be more distinct, larger, maybe feel safe, okay. Okay, fine. So Now, let's do it. Now let's do it. And you
can read all the process. Thought process. Now, turning my attention to the
image card component I'm going to add is downloading, you can read all of this. Again, it is asking for request, so accept I will update
the download button. Now feature a unique
pill shaped design with glass morphism effect and shows a loading spinner while the image is being
prepared for download. Give it a try. Now I think, uh, we have to reload our page. Let's reload our page.
8. How to Modify our app ( part 2 ): Let's type Spider Woman. Spider Woman, aspect ratio 16 ratio nine,
it should be realistic. So now let's click
on Generate button. So loading animation is not working properly,
you can see that. So we have to report
about it. Okay. Now let's see download UI
is working fine or not. So download effect
is looking good. It is a glassmrphism effect. Okay, so it is looking
better than previous one. So let's click on
Download button, and our image have been
downloaded successfully. So it is working fine. Now we have to report about
the loading animation. Okay, so now let's go on
antigravity and type here, loading loading animation
is not working. Loading animation
is not working. Review it and fixed. Okay. Now, firstly, it will again, identify the problem why the loading animation
is not working. Okay. So let's see
what is the reason. So it has simply
fixed our issue. I'll add a slightly delay to the download progress process. This ensure the
loading animation has enough time to appear. So you can clearly see
the button is working. So let's track old Monk In hal. Old Monk inhal number
of image 4169. Oh, guys, it has
accidentally added loading animation when we
click on Download button. So if we will click
on Download button, loading emision will pop up. That's why you have to give prompt very
accurately, otherwise, maybe sometime it will
misunderstand this. Now let's add more styles
inside style panel. So let's go on antigravity add more than ten
different art style in style section. Okay. Now, again, we got
review request. So first of all,
let's accept all, and we have a new
implementation plan. So let's open this. So now we will get
following style. Okay. And suppose you have to remove any style or replace. So how you will do that? So suppose instead of abstract, suppose you want Giblart. Okay, so let's select abstract,
hit the command button. Or N type here, Jib art. Click on Add comment. So whenever you will click on Add command at the top side, you will see Review button. Let's click on it and
make sure to submit it. Now it has submitted
successfully. Now it will update itself. Okay. So don't forget
to go on review. You have to accept
from review also. Now, let's go on
prompt and type. Let's apply all. Or instead of that, you
can type just implement. Just go with that. Okay. You have to pass the order. Just do it. All the art styles, including Gibi art
have been applied. You can now select from
following 15 style in Drop Down. Okay. Enjoy Create. Let me know if you
need any other change. Okay, so first of
all, let's go on our app and reload our page. Now, let's go on style section, and finally we have
more than ten or 15. I don't know. Now, finally, we have
a different style, including Gibilat. So let's select Gibliad and select uh what should I create? Retos from God of War. Okay. Let's click on Generate Image. Okay. So it is
actually working fine. You can see the quality. Now you can easily
download anything. So let's click on
Download and download Animation appears and it has
downloaded successfully. Now let's try another style. Let's select pixel art. So what should I type? Black Vido Black
VI Do in X uncene. Hit the generate image. So this is a pixel
art of Black video, and you can see the quality. It is looking amazing. So
let's download this. Okay. Now let's try another art. So let's click on Cyberpunk. And let's keep it same. Prompt will be same. Okay, so let's click on Generate Image. It is working nice. Now suppose if we have to add
upscale Opson in our app, then also we can do it. Simply go on Google
antigravity and type here, add escale image feature in app. Hit the under button, let's accept all And again, we got implementation plan. So let's open this.
Okay. Let's open. So you can read this
implementation plan for image up scale. Okay. Uh Okay. Now let's type here. Implement all. You can type implement all, apply, just go with it. Okay, simply create app.
You have to type like this. So now it has
completed its process. You can read. I implement
the image upscaling feature. You can now click
the Upscal button on any generated image to regenerate it at two
resolution, give it a try. So let's give it a try. Okay. So let's go on our
app and reload this. Now let's paste same prompt. 16 so nine and make
it cyberpunk style, and let's click on Gente image. And now, finally, we
have a upscale opson. Okay. Now wait for image. So image have been generated
successfully. So now let's try to upscale it. So let's click on upscale. Now let's wait for it. I don't know it
will work or not. And if it will not
work, then again, we will report in
Google antigravity. So let's wait for it. Okay, got it. I think it
has upscaled our image. Now, the quality is looking
better than the previous one. But still, we can
ask for improve it. So let's go on
antigravity and type. Uh improve upscaling. Again, it has created
new implementation plan. So now let's open new implementation plan and
you can read this. Okay. Now, just apply except all. So it has boosted now.
You can read this. I boosted the
upscale in quality. Now when you upscale image, it will automatically add
details like SAP focus, HDR and four K resolut sun. Okay, so now let's do it. Let's reload our page. First of all, let's
copy Same prompt, and let's reload our page. Reload. Now let's
generate image again. Now, quality is looking
better than previous one. So let's click on upscale. And let's see it will
work or not. Hm. So finally, it is working fine. It has upscale now. Now we can download it. And let's open our image. It is looking good now. Now upscale, this one, it is looking blurry. So everything is working fine. And also, what you can do, you can do some small edits like when we click
on Upscale button, then we should have
loading animation so you can add similar like we have
added in Download button. Okay. So, guys, this
is how you can create your own app or website
in Google antigravity. And this was only one
example what you can create. You can create many
kind of thing. Just imagine any
tool and you can create with the help
of Google antigravity. No coding is required. I have covered every feature of Google antigravity and it
is not a rocket sense. So if you really
enjoyed this lecture, then don't forget to give me good positive rating and comments so that I
can motivate myself. Okay, bye bye.
9. How to ADD or Remove Anything with the help of ScreenShot ? : Hello, everyone. So
welcome to all of you in my full Master series
on Google Antigravity. In this particular lecture, I will teach you
how can you remove any specific part
from the UR app? Suppose you have created
app and you have to remove any specific
person from that app. For an example, I have created
a screen recorder app, but there are some
useless feature that I don't want in my app, and I have already marked which
feature I have to remove. So suppose you have to remove any feature from your app,
then what you will do. Obviously, you will go
on prompt section of Google Antigravity and you
will specify specific button. Suppose you have to remove
SAR button from your app, so you will go on prompt
section and you will type, please remove the Seer button. We have another way also by which we can easily
remove any specific. So instead of
writing long prompt, what you can do, you can take
a screen sort of your app. And after that, you have to mark those area which
you have to remove. So I have already marked which elements I have
to remove from my app. Now I will open
Google Antigravity and I will attach
that screen sort. And after uploading IcrenSOt, just simply type, please
remove these marked elements. With the help of this technique, you can minimize long prompt. Actually, with the
help of IcreNSOt, you can add or remove any
specific thing from the UR app. And if you will not use Screen sort method to
add or remove something, then you have to
explain each and everything in a very
detailed manner. And with the help
of a screenshot, you can easily communicate
with Google Antigravity. So with the help of this method, you can go near the accuracy
and you can minimize errors. So finally, we have
a final output in which we have already
removed unnecessary element. So with the help of
IcreNsOt you can easily communicate with
Google Antigravity. Suppose you have acreen
sort of Dummy app. Then you can upload that
IcreNSOt and you can easily convert it into the fully
functional website or app. Suppose you have created
something in Figma. Then you can download
a image and you can attach a file in
Google Antigravity. So this is how guys you can execute anything with
the help of IcrenSOt. And if you enjoy this lecture, then don't forget to give
me good positive rating and comments so that I can motivate myself. Okay, guys, bye bye.
10. Create Text to Speech app like Elevenlab: So finally, here we are going to create app like 11 Lab in
which we will type text, and on the basis of text, it will generate audio. So let's see it
will work or not. So for better practice, I will use Cha GPT to
generate input prompt. So this is a M prompt, and you can easily
read I want to make a clone of 11 lab
inside antigravity. So write input prompt for
me on the basis of prompt, I have to create app. So please specify each
features and function, and let's hit the Enter button. So finally, I got input
prompt for antigravity. So with the help of this prompt, I can easily generate
app like 11 Lab. Let's read it. Create a fulisticEI web
application similar to 11 Lab. Okay. And core
features user sign up, sign in, text to speech. Okay, so just what I will do, I will copy from
here. Scroll down. Final output would
be production ready, modular and easy to extend. Okay. So let's copy this. Now we will enter our prompt
inside the antigravity. So let's paste our
prompt here. Okay. And again, here we
have a two option, planning mode and fast mode. I will go with fast
mode because I have generated the prompt
with the help of Cha GPT, so there is no need to
plan. I will go with fast. So let's hit the Enter button. Now you have to accept. You have to give
all the permission. Again, it is asking
for permission. So let's accept Except changes, except I think I need
to change my theme. It is looking ugly. Okay, so let's go on
theme, theme color, and let's choose
dark eye contrast. Now it is visible. Okay. Except. Whenever it
will ask for permission, you have to accept it. And if you like my
lecture series, then you can also look for another lecture on
different tech and topics. It is still thinking now. Now finally, it has
completed successfully. So here you can see that open this link to view
your new application. So let's click on this link. And Okay, I'm getting one error. So let's resolve it. So it is not opening. Fix it. Okay. So whenever
you will get any error, you can easily type like this. Now it will go through your app. Currently, it is analyzing
what is the issue. So still I'm getting this error, so I will copy this. I will copy this and let
past in antigravity. Still, I am getting this error. So I simply asked for a can you fix it and install necessary
things by yourself to fix it? So it is currently installing nodes JS in my computer
automatically. As you can see that
it is installing necessary file which is
required to run my app. Okay. So whenever you
will stuck at some point, you will simply ask to
install necessary file. Now it will install necessary
things to run our app. So, finally, Iu have been
resolved successfully. So whenever you
will get any kind of error while creating app, so simply surrender yourself
to Google antigravity. Just simply type in your prompt. I'm not getting anything. You can simply say, I don't know why I am
getting this error. Even you can also mention
the name of error. Sometime Google antigravity
will suggest you to install this particular
software or this plug in, so you don't have to install
this software manually. You can simply ask to
install it by yourself. Okay. You can simply
ask Google antigravity. Hey, Google antigravity,
can you install necessary things which is
required to run this app? Google antigravity will automatically install
necessary apps, so you don't need
to worry about it. So our app is ready, but it is not
functioning right now. So we will again go on
Google antigravity and type. It is not working
fully functional. Now, it will taste our
app before submitting. Every process has been
completed successfully. Now we can open our
app with the help of this link and our
app is ready to use. Now let's click on
generate speech. Intelligence is the ability to adapt to change with voice lab, your content adapts
to every audience. Still there is one big
problem with our app, which is we don't have option
to type custom text here. Looking like Dummi
version of 11 Lab. Here we can type
our custom text, so we have to
enable that option. Now in Google Integravity, let's type still I'm not
able to type my custom text, please provide that option. Now let's run our prompt. Now finally, every
process have been completed successfully
and finally, here you can see that you should now able to click
and type freely. The app is still
running at this link. Now let's open this link. Let's open. Okay. Now here you can see, we have option to type our custom text. Let's use ChargePt to
type custom text here. For demonstration
purpose, we will use this custom paragraph. Let's copy this
let's paste it here. Let's paste. Also from here, we can change the voice. Let's select Rev and let's
click on generate speech. They said the house was
empty, abandoned for years. But the moment the door closed, the walls began to whisper
every night at exactly 3:17 A.M. Footsteps
echoed through the halls. Mirrors reflected shadows
that weren't there, and a child's voice
called from the darkness, begging to be let inside. As fear turned so guys, if you enjoy this lecture, then don't forget to give
me a good positive rating and comment so that I
can motivate myself. If you enjoy this lecture, then don't forget to give me a good positive
rating and comment. This is how you can create
any kind of app for free. From the now, you
don't need to purchase any subscription for
any particular service. You can create any kind
of app by yourself. I will see you in the
next lecture. Bye bye.
11. How to Make EXE Setup of your app: So hello, everyone. Welcome to all of you in
my full Master series on Google Anti gravity. So in this particular lecture,
I will teach you that, how can you create your own
offline setup of your app? Suppose if you have to
run your app locally. Okay, then how you
can create its setup? So that you can share
your setup to anyone. So we will have everything
in this single video. So you have to watch
this video till the end. So first of all, what
do you have to do? You have to go on
Google antigravity and you have to type, please create set up for me. Okay, I will mention
the exact prompt. You will copy this
prompt and you can paste it so that you will get the
full setup of your own app. In a previous video, we have created this app. Suppose if I have to make
a setup of this app, then what do you have to do? So first of all,
go on antigravity. So this is a my prom. You can read it create a setup dot x of this app to
install and run in computer. On the basis of this prompt, it will create setup
for you so that you can install your app locally in your computer
or other computer. Suppose your setup is
not working properly, then also you can type, it is not working, it is not opening. So whenever you will
get any kind of error, simply informed to the
Google antigravity and it will automatically
fix your error. Okay. So now let's
see how it will work. Ally, my EXT file is
created successfully, and I will get this file
inside this location. I have to open this path. Okay, so let's copy this
location. Let's copy. Let's copy this path. Let's copy and open this
path in my computer. Let's press and hit
the inter button. Okay, so this is a EXT file, which is recently created. So let's double q
and as you can see, now you can see that
it is working fine, and I can pay anything. Hey, kiki Click call
generate speech. Hey, k. So it is working fine. Now, you don't need to open Google antigravity
to run your app. You can create
independent setup. Okay, so that you
can run anytime. Even if you don't have
Google antigravity, you can still access your app. This is the best part. Okay, so if you got any
help by this video, then don't forget to give
me good positive rating and command so that I
can motivate myself. So okay, guys. Bye bye.
12. How to Create own Audio Enhancer Web app: Hello, everyone. So
welcome to all of you in my full master series
on Google anti gravity. Okay, so the thing is, I were working on my new course. Okay. So during the
recording of video, okay, when I jump
to the editing, then I notice that there are some background
noise consist in my video. Okay. So I exported
my audio file so that I can refine my audio
with the help of 11 Lab. But I lost every
credit in 11 Lab. Okay, so I'm not able to remove background noise
from my video. Okay. So I decided to create my own background
noise removal app with the help of
Google antigravity. But right now, I don't know that it
will work fine or not. Okay, so let's go on Google antigravity and let's try to create
something like 11 Lab. Okay, so let's start. Create a website
background noise. Hit the enter button. Let's see what will happen. It is asking me
to run a program. Let's allow that. I don't
know it will work or not, but if it will work, then this will save lots of
amount of time and effort. So finally, process have
been completed successfully, and now we have our own
background noise removal app called Aura Audio. So let's try to
upload my audio file. Okay. So it is
analyzing that file. Okay? This is original one. So now let's try to
create something. So I have already
written my prompt. You can read this.
This was original one. Now let's listen clear audio. So now let's try to
create something. So I have already written my
prompt. You can read this. Create a website
designed for ELN ONG, it is crisp and clear. You can listen this audio. This is like UIUX
designing fil Mora, video editing, affinity, graphic designing and
chat GPT master course. Okay. Here, I will click on web from now I will
not use ElemALb. I will use my own app and
easily I can download this. Okay, guys, download process have been completed
successfully. Now I can go on my cap card
and I will import that audio. Because because this video has many background noise, okay? So I created my own background noise
removal app. That is good. So let's mute our
original track. Okay. Now, let's play. So now let's try to
create something. So I have already
written my prom. Okay, guys, so it
is working fine. It is actually working. Okay, so let's export my video. Now let's type, create my local setup for this app so that I can
share that EX file, hit the Enter button. And whenever it will ask
you to run a program, then you have to
allow that program. You have to click
on Run program. Otherwise, it will not work. So whenever it is asking
you to assign permission, then you have to assign
that permission. Like this, we have to
click on accept all. Again, it is asking
permission, accept all. Now, it has created EXE file, but I'm not able to get
it. I will paste here. Give me that EXE file path. Basically, it has
created EXE file, but I'm not able to
determine where it is. Okay, I think this is a
address for my audio enhancer. I should copy this
address. Okay, guys. This is a address where
I will identify my EX. C user. So this is
a following path. K Jami, C, user, nk Gemini, then antigravity
antigravity Cratch here we have audio
enhancer. Okay. I think if I will
click on Index, then, Okay, guys, finally, we have a full excess of our background
noise removal app. Okay. So whenever
I will open index, it will pop up. Okay. So I can make a
shortcut in my PC. Or instead of that, I
can copy that folder. I can copy that folder
and I can share it to anyone who need it. Okay. So let's paste it here. Okay? This is a
following folder. And whenever I have to increase the audio quality or
remove background noise, I will open that folder and
I will simply open index, and I can upload any audio file and it will
increase the quality. Okay, so it is super awesome. Okay. So if you
enjoyed this lecture, then don't forget to give me good positive rating and comments so that I
can motivate myself. But before that, just listen. Final output quality.
So first of all, I'm getting this design system. On the basis of
this design system, it will generate whole website. This is my primary color, this is secondary tersary
and we can change this color later on our class. From here, you can see that
we have a primary button, secondary button,
inverted outline. This is our whole design system. Now it has started
creating screens. And if you enjoyed this lecture, then don't forget to give me good positive rating and comment so that I
can motivate myself.
13. How to create youtube title generator app: Hello, everyone. So
welcome to all of you in my Full Master series
on Google Antigravity. So in this particular lecture, I will teach you that
how can you create a YouTube title generator app? Okay. With the help of
YouTube Title generator app, you can create title tag and
description for YouTube. Okay? Just you have to
put your video idea, niece or category, and it will create title tag
and description for you. So let's see how it will work, how we can create it. So okay, guys, I have
already written my prompt. Create a YouTube title tag and
description generator app, give a prompt box where user
will type about video topic. And on the basis of that, apps would create ten unique
title sort and log tag, comma wise, and log description using the
focus keyword and topics. Okay. Now, let's hit
the Enter button. Now on the basis of that, it will generate app for me. So whenever it will ask
you any permission, you have to accept all. Okay? So this is an
implementation plan, how it will implement. Okay, so you have to
allow everything. Okay? So simply I will type, create app and give
me link of that app. Okay? You have to execute
that process, actually. Now, you have to accept all accept all except. Now, you can see that app have been generated
successfully, but it is giving me prompt
by which I can play my app, but I don't have time to
read all of this stuff. So I will type. Please give me link so that I
can open that app. Okay? I don't have time
to do manual work. Okay. That's why I'm
asking for direct link. Okay. Let's click
on Run and boom, this is our app. Okay. So let's type anything here. Figma, tutorial, I Hindi. Let's hit the Genret magic. Okay. And this is
a ten tu title, and obviously we can copy that. Okay. And at the same time, we have a title tag
and description. So this is our tag, and everything is in comma wise. We can copy whole
tag from the top. And you can see that
it is working fine. And here we have a
description. Okay? Let's search for anything. God of four gameplay. Click on Generate Magic. And it is working fine.
You can see that. Here we have a tag, and
this is our description. Let's search for Google stitch, will replace Figma. Hit the Generate magic button. And boom, again, we have
a ten unique title. And suppose if you have to
change anything in your app, then you can simply go on Google Antigravity and you can ask for that
particular changes. Suppose you have to change
the layout of your app, you can easily do it. You have to change the logo, color design system of your
app. You can easily do it. Just you have to go
on Google Antigravity and you have to ask for
that particular change. Okay. So, okay, guys, this is how you can create anything with the help
of Google Antigravity. Just you have to explain
what you exactly want. Okay. And on the basis of your prompt, you will get desire
app or website. Okay. So if you
enjoy this lecture, then don't forget to give me good positive rating and comments so that I
can motivate myself. So, Okay, guys, bye bye.
14. How to Create SAAS app with Google antigravity AI: Hello, everyone. In this particular
lecture series, we will learn how can we create SAAS app software
as a service app? In this particular
lecture series, I'm going to create a screen
recorder app like this, which can record our screen with our webcam with
Auto Zoom feature. Whenever I will move my mouse, then it should Auto Zoom. And whenever I will
not move my mouse, it should zoom out. So this is a feature of my app. Okay? So I'm going to create this app with the help
of Google Antigravity. So let's see how
we can create it. So first thing that
you have to do, you have to create a new
folder for your separate app. Okay? So let's
create a new folder. Whenever we will
create anything, it will store inside
that particular folder. Don't forget to create
a specific folder. Otherwise, it will
merge with other app. So let's make it systematically. Now here I'm going
to type my prompt. Create a screen recorder for me, which can record screen
which can record a screen webcam and webcam and Mike give us option to select all of them. Add room feature whenever
I'm trying to set something. Add Zoom feature whenever
I'm trying to sew something. Basically, you have to
explain what you want. And you can pause this video and you can read full prompt. I'm explaining everything
in a very detailed manner. Actually, you can pause
this video and you can read full prompt so that you
can get a similar output. Hit the Enter button. Now, it will create an
implementation plan for Okay, so finally, we have a
screen recorder app. So let's see it is
working fine or not. Okay? So auto zoom
feature is working fine. And from here, I can
select my entire screen. Okay. From here, I can
select my microphone. From here, I can
select my web came, and this is a background
when screen will zoom out, then this background
will appear. Solid dark. Okay, so let's
start the recording. Okay? And let's move my
mouse cursor and let's stop. Okay. So my video
have been saved in this particular path. Okay. I think we need to
type something like It is working fine. And
this is a output video. So let's play this.
Actually, video quality is little bit poor, so we have to improve this. Whatever problem you are facing, you have to specify
that problem. If you will not specify
particular problem, then how it will solve. You have to make sure
that whatever kind of problem you are facing, you have to exactly explain
what you are facing. And whenever I'm
typing any prompt, you can pause this
video and you can read it so that you will get a clear picture of how to
write good quality prompt. So basically, I
want that whenever we will click on start
recording video, then it should transform into the floating
bar window. Okay. And also, I have written every problem which
I'm facing right now. Okay? Like video is blurry, output quality is
not in 60 apps, so I have covered
everything in a prompt. Okay. And let's see our video recorder can convert into the
floating bar or not. So finally process have been
completed successfully now, you can see that it have been converted into the
floating bar window. Okay? So it is working fine. Giving one by one prompt, you can change the UI. You can add a mini
feature in your recorder. Okay? So this is how you
can create your own app. And if you enjoy this lecture, then don't forget to give
me good positive rating and comment so that I
can motivate myself. Okay? I will see you in the
next lecture. Okay. Bye bye.
15. How to Create whole app from the UI Designing to the Development ?: So hello everyone. Welcome to all of you in
my full Master series on Google Antigravity. In this particular lecture, I will generate UI of our app with the help
of Google Teach, and after that,
we will implement that UI into the
Google Antigravity. So this would be mega lecture
where you will learn, how can you generate
UI of your app and how you can implement it
in Google Antigravity. Okay. So without
wasting any time, let's start our video. So if you don't know how
to use Google Estech, then you can visit
this lecture result. So if you don't know about
what is Google Estech, so Google Estech is the
best alternative of Figma. Okay? Were you can
create UI design of mobile app or website
with the help of prompt. You don't need any
coding knowledge, even you should not
have any kind of design skill to
learn Google Stitch. It is totally beginner free. So you can visit
that course also. Now let's talk about
our main topic. So in a previous video, we have already created a
screen recorder app for our PC. But suppose if you have to
improve UI of your app, then how would you do that? Obviously, we will
use Google Stage to create UI of our app. So first of all, let's
open Google Stage, Okay, and sign in with
your Google account. You will see simple interface of Google Steeg and at the center, you will see prompt box. Obviously, here you have to
type what you exactly want. So you can create
any kind of design. You can create a mobile app, you can create a
web application. Okay? Just you have to type anything in a very
detailed manner so that it can create
desire output. Now you can see that I have
already written my prompt. You can pause this video and you can read
it for reference. Basically, this is the
same prompt which I have already used in
my previous video. And if you will
read this prompt, then you will understand
how it will work. Create a screen recorder for me with local setup with
following properties. Recorders should capture
screen webcam and mic give option to select a
specific device respectively, add Auto Zoom effect in screen when we click
anywhere with Muse. Okay. So on the basis
of mouse click, it should be Zoom in or Zoom. Okay. So I have
explained everything, which kind of designs would be, okay, which kind of
colors should be used. Okay? So I have
explained everything, which is required to know. So on the basis of my prompt, let's see what it will create. So finally, I got the
design system, okay? And also, I have a
four different page for my screen recorder app. Now you can see the
quality of all page. Okay? And if you are satisfied with this,
then you can go with it. Okay? Just what you have to do, you have to download
all the images. Okay? And after
downloading of all image, you have to attach all of this image into the
Google Antigravity. So first of all, you have
to download all the image. So select all of them and right click and hit
the download button. Your file will be downloaded. After that, you
have to attach all of this file into the
Google Antigravity. You can type like,
please create our app using this UI or you can
say turn this UI live. You can say that convert this UI into the fully
functional website or software. You have to type
something like this. And on the basis of
your image and prompt, it will finally convert
your whole design into the fully working
functional website. Whenever you will do big
change in your existing app, inside the Google Antigravity, then maybe some feature
will stop working. You have to check
all the features are working fine or not. In my particular case, my video starts lagging. So whenever you will
see any kind of issue, you have to report them into the Google Antigravity so that Google Antigravity can fix. And finally, our app have been created
successfully. Okay, guys. So now let's record a sample video with our
own screen recorder app. Right now, I'm recording my video with my own
screen recorder app. Okay? So let's see it
is working fine or not. It is lagging or not. Okay, it is smooth or
not. So let's see. Okay, let's open Google. Okay. And this was my project. Okay. And I hope so. My recorders would
work properly now. Let's stop our video. So okay, guys, this
is how you can generate UI for your project. Okay? This is how
you can generate UI for your project with
the help of Google Itch. And after that, with
the help of that UI, you can generate fully functional website
with Google Antigravity. Okay. So, guys, if you
enjoyed this lecture, then don't forget to give
me good positive rating and command so that I
can motivate myself. Okay, guys. Bye bye. I
16. How to ADD Custom logo in Our Own APP : Hello, everyone. So
welcome to all of you in my full Master series
on Google Anti gravity. In this particular lecture, I will show you how you can add your custom logo in your
own app or software, which you have created
with Google antigravity. Okay? So without
wasting any time, let's start our video. Obviously, you should have
your own logo to attach on your software because
there are copyright issue. I mean you can't use others logo in your
software, obviously. Which means you need to
create your own logo. So you have a two opson. Either you can hire any graphic designer who can create logo for your software, or instead of that,
what you can do. You can visit this
lecture series, and with the help of
this lecture series, you can learn graphic
designing completely. So for logo designing, I will use affinity software. So I think if you are
a content creator, developer, video editor, then you should have basic
graphic designing skill, and you should have good
command in any one software. And I don't want to
waste your time. That's why here I'm not going to teach you how can you
do graphic designing. So if you have to learn it, then you can visit
separate lecture series. Now I am assuming that
you have your own logo. And right now, if you don't
have your custom logo, then for practice, you
can use any other logo. But whenever you will publish
your own app or software, then you have to make sure that you are using your own logo. You don't have to
use copyright logo. Okay, guys, so finally,
we have a logo. And now what I will do, I will upload this logo
in Google antigravity. Also, I will take
a screen sort of my recorder in which I will mark where I have to apply logo. If you will not specify
position of logo, then it will automatically
arrange it position. But according to
me, logo positions would be left side
of software screen. Okay? So what I will do, I will firstly take a screen sort of my existing
recorder and after that, I will create a red
rectangle area so that I can specify posison where
we have to apply logo. With the help of this technique, you can easily communicate
with Google antigravity. Now you can upload both the
image and you can type, please use this logo
inside my software. Or you can say, add this logo at the top left corner of my app, and it is not necessary that you will get desire output
at a first time. Maybe sometime it
will give you error. Sometimes it will add two large logo or sometimes
it will add too small logo. So basically, you have
to fix everything with the help of prompt
whenever it is needed, and you have to keep fixing with prompt until you
get desired result. So finally, guys, I have added logo in my
screen recorder app, and it is looking
awesome, right. It is actually looking good. So, guys, if you
enjoyed this lecture, then don't forget to give
me good positive rating and comment so that I
can motivate myself. And if you want to learn how you can do graphic designing
with the help of affinity, then you should visit
this lecture series. If you are a content creator, then you should not
depend on anyone. I think if you are
a content creator, then you should
know all the works, how you can edit video, how you can create a poster, how you can create a logo. You should know all the works. You can also check my
other lecture series to upskill your skill. Okay, guys, I will see
you in the next lecture. Okay. Bye bye.
 Ankit Shrivastava