Transcripts
1. Introduction to Getting Past Feeling Frustrated: Hi. Now, do you often find yourself guessing stuck on a painting that you've done all the groundwork. He got the first lays down and then you wonder what on earth do I do now? So in this class I'm going to show you how you can move a painting forward. I'm going to show you some tricks and some techniques to get you unstuck if you like, to help you through this process of completing your painting. Now I've got 22 paintings here which have got the ground, don't got a one layer on. And I've just drawn into too little. And then it can tend to get stuck if you're not careful, what do I do now? So this class is going to show you how exactly to do that. I'm going to go through and show you different ideas and all the materials that you'll use and how you can really have confidence to attack any old pizza that's been lying around that you think What on earth do I do with this? So I'm saw this class will be helpful for you if you're in that dilemma. So let's get started and jumping.
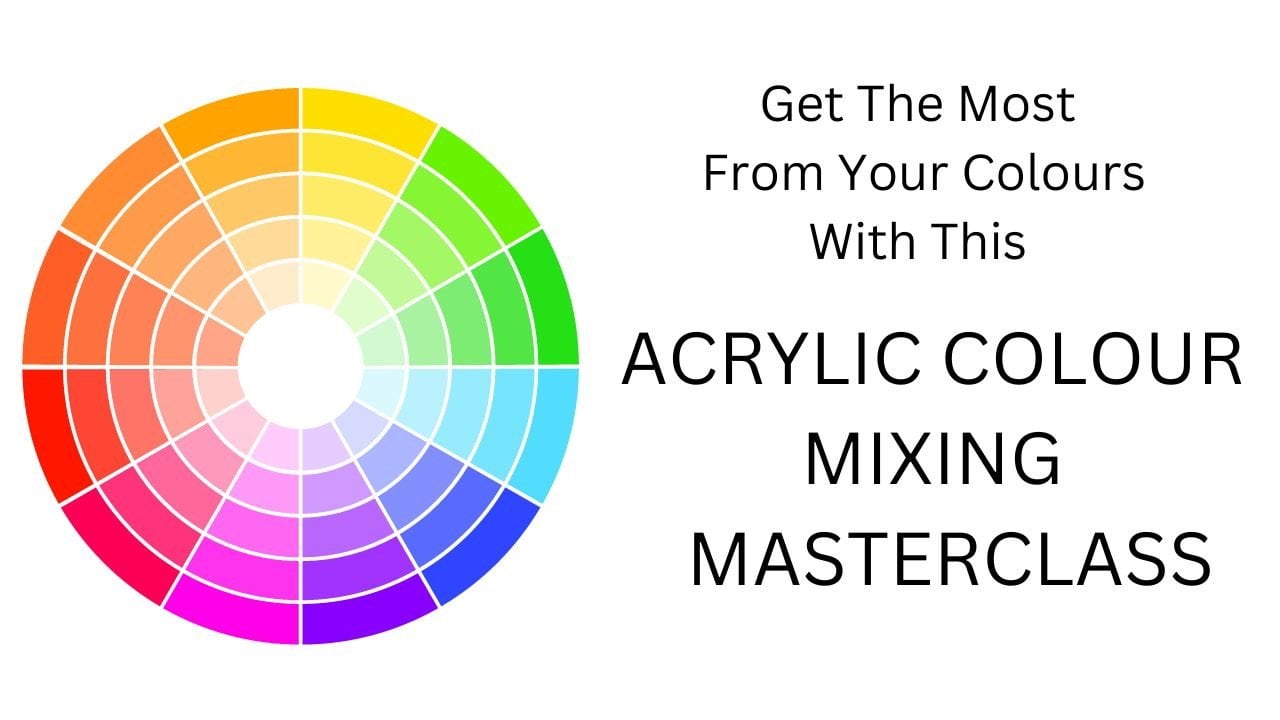
2. Materials : Okay, well you can see here I've got my palette of paintings. I use this little box which I think was probably used for sewing. And I've got it in the DIY shop and it's great for putting my paints in. And it's easy for me to access them when I'm painting. I've got some flat brushes, some small ones, and a little bit big guy got a palette knife, I've got my China marker, and then I put some scrapers here. This one is actually no credit card, and this one's a little bit bigger. I just have these at hand in case I want to use them. I don't always, but sometimes. And then I've got a roller which sometimes they use, sometimes I don't, but I like to have the things that I like using around me. So if the mood text me, I've got it at hand. And then I've got just an array of different brushes. These are really nice Gesso brushes. I love those. That one's a bit bigger and another flat brush. So you know, the brushes that you use that you, your friends, my brushes and my friends. And I like using them and feel comfortable with them. Obviously, I've got some water and some paper towels, but, you know your colors. I've obviously got our basic colors of yellow and blue. Then I've got white and black. What some different blues here. A teal blue, which I love, and I bought some orange. So the colors that you like, you know, you have ready and obviously I've got my palette. So, you know, again, just have the things around you that you like using so you feel relaxed to move into them. Oh, and I also have a spray bottle of water. So let's let's get started and see what we're going to do now.
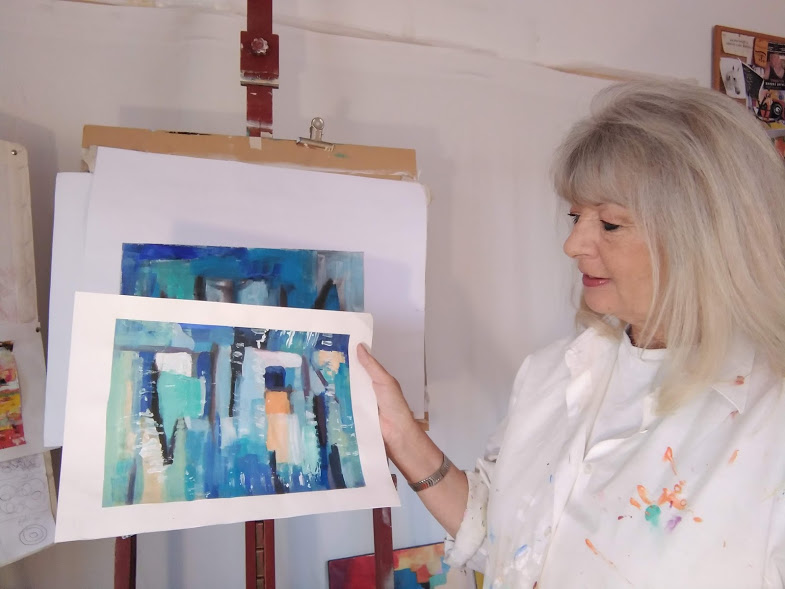
3. Starting the Process : Okay, So one of the first tricks that you can try. So you don't have to dive in straight away to the painting because, you know, you're a bit nervous, you wondering what to do and how to do a hint. One of the tricks is to actually fund to coffee, take a photograph of the painting. So for example here I've got to have done to photocopies of this one. And I've got to photocopies of this. So what you can do then is work on the coffees just to kind of break into the painting. And I know it sounds a bit crazy, but actually it really works because the idea is to get back into the flow of the painting and not be having any expectations or you're going to mess it up. And, you know, it's got to be something we want to seriously get into play mode and experiment mode. And the right side of our brain mode, where our creativity is as soon as we swap to the left-hand side, we're in deep water with thinking and judgment and it's not good enough and it's not gonna work And I don't know what I'm doing and all that negative blah, blah. We want to kind of push that away, get into the right brain. And have some fun. Basically painting because we want to have fun and we want to enjoy it. Yes, Any your painting after all. So to play with it, then this is a really interesting trick that actually you might land up having three different paintings that you've done from this original. And you can turn them into cards. You can put them into a nice series of frame pictures. You can do numerous things, so it's really good fun. So what I'd like you to do is get your photocopies and then put them on a board, whatever. And then have a play. You know, this one is this way round. But you know, what I might do is changed around the other way. So it's upside down apparently. Does it matter? Low? Doesn't matter at all. So, um, I think I can see different things going on here, then I can here. And I can see different things in here, the Michael here. So what it's doing is it's widening your idea and your perspective. And it's taking you out of the groove of thinking it should, must be, could be anything. And that's the exciting thing. So you can tell it this way, see how you feel. You could turn it on its side, how you feel you do it the other way round. You know, different things are going to happen when you fiddle around with it like this. So it's very good trick because then you can go into it without any preconceived ideas and play and see what happens. So I'm going to work on these two. And you can see what I'm going to do. I think I think I'm going to work on them this way. Because I kinda like that idea of this just being this way around. There's kind of some interesting shapes going on the left. So I've been sort of agitate a little bit on it, just absorb it and see how it feels a lot, the colors. That's one of the things that I, when I know that I first started it, I wanted to do some things with blue, whether it stays blue or not, I don't know. Let's see. But, you know, take a little bit of time, think about it. Look at it. What, what do you like? What don't you like? What's resonating? You might just paint over the whole thing, but it doesn't matter because we're not actually hang on. We're not actually doing the real picture yet. We're going to play, see what works and then we can use that feeling into the actual painting. So I'm going to have a think about it. You have a photocopy of yours. You think about it too. And then we'll come back and we'll start to work on it.
4. First Painting Experiment : Okay, So I had to think about it now and I'm just going to allow the thing to unfold. I've got my China marker and you know, I like some of the shapes that are already here. I think they're interesting. But doesn't mean to say I'm going to keep it. But just working it's just working on a small little thing at the moment. And, you know, you could do this standing up or sitting down and just see how you go with just putting some marks on it, basically. And then when I was putting my Talas out, I, I thought green was really nice. So I'm thinking that I might do adequate agreeing with it. And some wives. And I kinda quite like that idea. And I just feel I'm going to go over the edges too. I just feel like, you know, see what might happen. Just playing with a few of the different colors. Put some more white in. And again, we'll just kind of wait and see. Now, one of the things to remember is whatever you're doing, whether you're playing or doing the actual painting, is to be mindful of how you are putting the color on. So I'm using it over here. I might need a little bit over there. If I'm doing something light, I need some different term value. So when I'm thinking about it in that way, I'm doing some thinking about how, how I'm using this color and you know, what, what balanced it has. And C. So I'm going into this blue, kinda quite like that. Louis green. And remember, I'm just playing. Nothing is going to be certain, stony or it's just kind of seeing what kind of painting you feel. How are you feeling, you feeling happy, are you feeling sad, you feeling anxious. Usually our brand serves all that's going to kind of come through in the painting and the colors that you, you're going to be using. So be mindful of that really, I guess, would be the right way to put it. And remember it because we're working in acrylics. Just paint over it anyway, you need so many my paintings or paintings over paintings. And some worked, some who hadn't worked. And then you can just go in and go back over it again. So I'm quite liking this at the moment. And it's something and nothing isn't it? But I'm, I'm quite liking the way it's going. I'm not thinking about it. I'm just feeling wherever that color light to go, where would discover like to go. So just kinda missing. And that is the beauty about doing these things on the coffee's because doesn't matter for that. So then I'm kind of thinking a little bit, just even on this little one about competition. We want a focal point. We want our eye to go around it. Now you can use the rule of thirds if you want. So our focal points would be here. Or you can use dynamic symmetry, which is different. Again, really you want com spaces and then interests spaces. That's what the focal point is about because you'll go into the focal point and then you want that to take you around the painting. So I'm kind of a little bit mindful of that, even as I'm doing this and playing, you know, where and I like say for example, this dark against the lighter blue. So, you know, that's of interest. Your eye's going to that space, isn't it? So we might kinda capitalize on that and add more to it because I kinda like that idea. That's sort of interesting. And then We're might put you out here somehow. And you might come up here. So wherever your lines or your eye is going to be following. And that's what you've got to kind of consider when you're looking at your composition, where is your eye flowing to and what, you know what is happening there. Now, again, if you feel stuck again on color. Sorry, I'm just going to get this. You can come back to your color wheel. A warrior. Our colors, what? We're are opposite. So if I'm kind of having a look at these blue greens here, you know what's going to be opposite that blue-green if you put these fingers and thumbs. So if I'm looking at my blue-green, you know, my office, it's two here are these kind of rather subtle orangey reds. So I might throw that in as a popping point. You see what I'm saying here? So again, if you've got these colors, go back to cholera, what can I use that word? Give it a cop. So let's have a triangle that justice in the exercise and see what happens. So I'm going to, actually, I'm going to go mad and I'm going to put a little bit, Let's see. Let's see what would happen if I put some orange in. You see how it brings it alive. Suddenly, you've got a focal point. Now need to balance that somehow. So I need to calm that down a little and maybe add a little bit of white to just subtly down not too much. Because that might come around. What might that feel? It could come maybe just over here somewhere. But this might change. But what I'm just saying is you can play around with it to get these feel of balance and color balance and tone value. I'm a great one for taking photos. Because you can see if you did a photograph of this and then you did it in black and white. Well, you turn values are, and it's a really good little exercise. So maybe just for now, I'll leave that to dry off. And then I'll have a go with the other one and see where that might take me. It might go in a completely different direction. But that's what i'm, I'm hoping you're just experiment that mean mindful of your colors, your color balance. What's the dominating color here? It's blue. What's the complimentary color when I've gone to this orange alert, strictly not complimentary, but it's going to, it's giving you a pop. And then I'll experiment a bit more on the next stage. So interesting, isn't it? Let's have a go with the other one.
5. Second Experiment : Okay, so now I've got the other one here, and it's a whole different ball game on this one. So I'm going to just attack it in a different way. I kind of like, you know, these contrasts here. But obviously it's going to change. What I'm going to do with this one. Instead of drawing with the China market, I'm going to actually paint some of the lines in here. I kind of like this idea of the shapes. Just see what might happen if I just defined. And it's a bit more here. And it's a whole different feel to me, this painting, this picture, this way around. And I'm going to actually take them up to the top, I think. So again with yours, feel open to trying something different. It doesn't matter. Honestly. It might just not work at all, but it doesn't matter. It's the experience of doing it. That's the important thing here. So I kind of like that idea. I think it needs something down here. And they just working off your intuition. And what feels right to you. I do like the blue, so I'm going to use the agreeing so much as I did before. I'm going to try Mr. coupling because I think this area contrast here with rather nice. So I'm going to put that dark blue in there. And then I'm going to start with some white and just playing. But it's foreign and we're allowed to have fun. Now men, Let's put this in here. So let's do question in experimentation really and see how you feel. And painting. It's always about how you feel and the paintings that you like or about how you feel. You know, when you see an exhibition or you're looking at Pinterest or Instagram or wherever paintings that you like jump out at you. And one of my things there is to save those. And then look at what it is that you like. What is it that goal, God, I really like that. And maybe take that thing that you like from that painting and not copy it. But use that for inspiration for your own painting. And I love doing that because we can't reinvent the wheel come we already there. So it's important to kind of think what do I like and why. It's the why, the reason why. And when you look at the paintings that you like, it gives you a clue. And you know, as I said, we're not necessarily in a copy it, but we can use it to bounce off for our own painting just to for fun. I really love doing that. You know, I take a lot of pictures of Pinterest and thing. That's really nice. You know, how, what do I like? What could I use? Why do I like it? Should the color compensation? Is it the energy in it? Paintings are about the energy that you feel. And I think that's kind of one of the important things about it. So you see this coming together totally different from the other ones and thought. So if you were to go straight into your other painting, you know, the original. I mean, you can probably keep working at it until such time. But even doing this gives you kind of a different experience, which is interesting now again, I'm being mindful of my tone values and how that's working. Well, where's going more? So you can see, can't you, how Different that they can be deaths from having the first one that you're doing, that you've done how you can really change that and and enjoy it. I'm really, I'm forgetting the among the video. Escaped completely carried away. So I'm hoping that you're gaining some valuable information here about freeing up, enjoying what you're doing, and not worrying. I'm about what it looks like. Is it going to be a work of art? Am I going to be able to sell it? Know who cares at this stage, this is our personal enjoyment of the process of painting. So such a lovely way to release your kinds of things or stuff that's going on at the moment. Lockdown, it's been an absolute godsend has left to paint. How lucky are we to be able to have painting as our outlet and time pairs. And you know, you go to bed feeling WHO have done something creative today and love that feeling. Lying in bed thinking about it, thinking all men, then I think, you know, what else could I do with it? What else might happen? Now this is getting a bit blackish to me, but that's okay because, you know, I might just then draw back into it once it's dried. I feel it's needed some extra extra. But I'm not went to worry because it's just all part of the process. We compare that to warn you the two different forms so far. You can see that then. So incredibly different from the same painting. And I'm hoping that you feeling excited about this because it's such an interesting way to develop your own style and your own way of approaching things and experimenting with it, being creative and really enjoying the whole, the whole thing. So in the next one, we'll go to the other painting that's completely different again. And then we'll come back to these and see what happens. Okay.
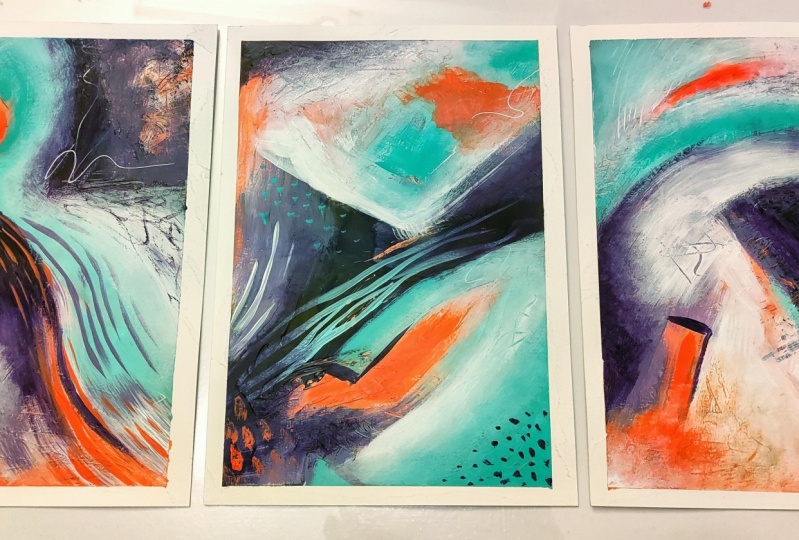
6. Third Experiment : So now we're going to come to the other two and have a play with these. And let's do something kinda different. And this is the thing that you want to be thinking about when you've got your original picture. And then you do your copies. It's freely an opportunity to experiment with what style you are leaning towards. Now obviously, I have my stack hill and you will have yours. But, you know, it's interesting to experiment with other ways of doing it. So this is an opportunity to explore that. And let's see what might occur with doing that. So these are the two that we're going to do. And again, I've turned them upside down just because they're completely different again. So we'll start with this one. And I'm going to go instead of headfirst into doing a lot. Not the same as we did before. I've, I feel like I want to be much bolder with it. And, and to get a feel of what might be underneath the painting, as well as what we're going to put on top. So we get a bit of some different textures. It's kind of just see another method of doing it of what, you know, what might happen if you did x, y. So I'm kind of doing something, you know, a lot more bolder and little bit more stronger. Just too. See the difference and what might occur. Now, it's interesting because when you're doing this and you have different emotions and different moods and I'm good. So what I was when I originally did it, so let it take you in the way that you, you know, you feel you could really attack it differently. So I'm just putting in a lot of this. I mixed some white and some yellow or craft and a tiny little bit of lemon yellow but not much, but mainly the FCRA and the white. And I sort of feel that it wants to do something completely different to what we did before. And this is the opportunity, literally the opportunity to go. Okay, let's, let's dive in and see what else I can create. So it's kind of fun when you're, when you're thinking about it like like that. So I'm just a carpenter's feel like I'd like to do some beak shapes. And with a lot of paint, It's very thick paint. Just but you know, some of it's kind of coming in behind. Let's see. But it is kind of interesting when you, when you do this kind of thing. It's very freeing. You know, you kind of get some freedom going. And it's loose and it's not, you know, it's not restrictive in any way. I'm going to go a little bit more yellow in here now and see. And I might just use my water bottle. So I'm going to put some of this on here. Just spray it a bit and see soft. You say I'm getting what's underneath, which is what I rather like. And obviously this is paper, so it's not going to hold a lot, but it's something that's the key. So let's kind of carry on this theme a bit. I feel like this wants to come over here. And it'll be very sort of contemporary issue and just completely different. But this is, this is the thing that I want you to kind of explore, is the, the different things that you can do make it very interesting. And let's just have a bit more of this. Maybe put some dark in here, darker going on. I like that blue, that black behind. And it's just kind of playing. The field is I want you to get is to be doing something completely different and enjoying that process. It bring some white over here. And then what I might do is just take somebody out here. I kind of sometimes interesting to draw in and see what happens with the picture. And then you've got this stuff that's going on behind, which makes it kind of interesting. So that's very different to what we've done before. And we've got the color behind. And that kinda makes it fascinating. So as simple as that, I mean, it's easy-peasy, isn't it? Rarely, but it's completely different. And that's the point, That's the whole point of this exercise. What I'd love you to do is put your pictures in the projects, you know, But if the original, the one that you feel stuck on and then the photocopies of what you paint. Like we've been doing, it would be really lovely to see if you can do that. I'd really like to see them. Okay, so now we will just let that dry and then come back to it. Maybe there's just one thing I feel I'd kind of like to just experiment with. I'm just going to put, I've got a little bit of black on here. And I'm just want to see if I just do something a bit more drastic. How does it feel? Unfortunately, justice, I was putting the black on my camera cut out, so I just wanted to show you what I've done. So I really dusted like a swish here unless wish there. And it looks kind of given it a bit of an impact.
7. Forth Experiment : Okay, so now let's work on the second one and see what, what comes up with this. I feel very differently about this picture and I'm going to be interested to see what I do. So I'm going to go back into some white and the yellow okra. I really like those colors. And let's have a feel of why this wants to go. So I'm just going to start up here. And I like this color behind. And again, go really through your own process of experimenting. You know, how you feel about, you know, what, what's going on. I'll allow that. It's also the teal color. So I'm going to read that with a little bit of white. And C here. Bring it up over here. You see, you'll find, you'll find your own depth in it. Really, that's, that's the point. Is, you know, through this exploring process, you'll you'll find your own way with it. And that's, that's really the point, is to be developing your style and what you naturally move towards. And then sort of with the exercise that we did before, you know, your, your experimenting with new things. So it's sort of like a combination of both really. And that's what I want you to, to be focusing on, is don't be afraid to just see what can unfold. Because you just never know. And you know, when you look at the great masters, I mean one of the, the, the artists that I like us to kerning and you know, you consider, you can kind of feel his development of his work and it's very much worthwhile going. Having a look, you know, as I was saying before, go in and look at the paintings and the artists that you love. Because that will give you that sense of what you're leaning towards. Especially with abstracts because, I mean, you know, so free and easy and anything goes no. Talked about that before. There's nothing that stops limit. You can do anything that you like. And you'll find out what you like by experimenting and exploring the possibilities. So this one is obviously very different, but I'm liking the space in this, you know, there's kinda quite a lot of quiet space going on, which I like. And then when you, you feel confident about it, you can then translate that into your painting, that the real painting. But you've gone through this sort of interesting process to get there. And it will give your painting a lot of depth and you will feel more contented with it really. I think that's the, that's the point. You've got to feel good about it. And doing this stuff helps you to do that. We know without getting frustrated because these don't matter how many, you know, you can go over there. So a 100 times, It's of no consequence. But the enjoyment of it have doing this is really is lovely. But that's what I love about it is that, you know, there's no there's no right or wrong or good or bad or just 40 tears and how it will develop. And you will develop your style as you go. So that's what we're hopefully heading towards with this whole process. And then it'll come, you know, time when when you when you've you've done a picture and you can, you know, you don't have to bother with this because you know exactly what you're doing and how you're doing it. So you can see this is turning out very differently to the other one. And i'm, I'm enjoying this. It's such a nice. Kind of calming thing to, to be doing. A bit of blue in here. You can try different things. You could get your own scrapers you wanted to and just be scraping into it. And again, seeing what might happen if you do that. I'm not sure whether I liked that or not. No, I don't. So I'm going to go back over that. So you can see, we're not we're not restricted with anything. We can literally do what we want. And that's the funny part. That's why we like it. That's why we're here. So yeah. Okay. At out at an iPad, Glen 19 a bit. That's kind of interesting. And out of this new things, well, what evolves? How it will come together? On my paintings. I loved blending. I loved blending the colors in so you can't see one from the other. And that's another interesting point to make is that when you're thinking about edges, you want to have a combination of soft edges and hard edges. The hard edges give you again stopping points when you're looking at a picture. And there's a difference between those soft edges and the holiday edges. So that's another thing to be looking at. As your eyes you're going, so there are a few kind of hard edges going on, which are interesting. Now what I like about this is that you've still got some of the original, but it seemed to have come together in a very interesting painting. I like that now how that's working. And you might just go over some of these once this is dry, but you can see how different to the other one just by experimentation. And that's the point. So now I know we've done this, these exercises, now we're going to go into the actual painting. But before you do that, what I want you to do is to look at the ones that you've done and what will you take out of that? Personally, for me, I like the way this is going and I will interpret that in the big painting, the blue one, I haven't decided yet, still contemplating that one. But by the time we come to do that on the class, hopefully our look decided what direction that's going in. But certainly for me, this is a direction that I like for me that I can translate. So I hope you found that useful. So go way, have a look, meditate on the ones that you've done, see the parts of it that you really like. And then you can then translate that into your big painting. So we'll come back and start on that on the next video.
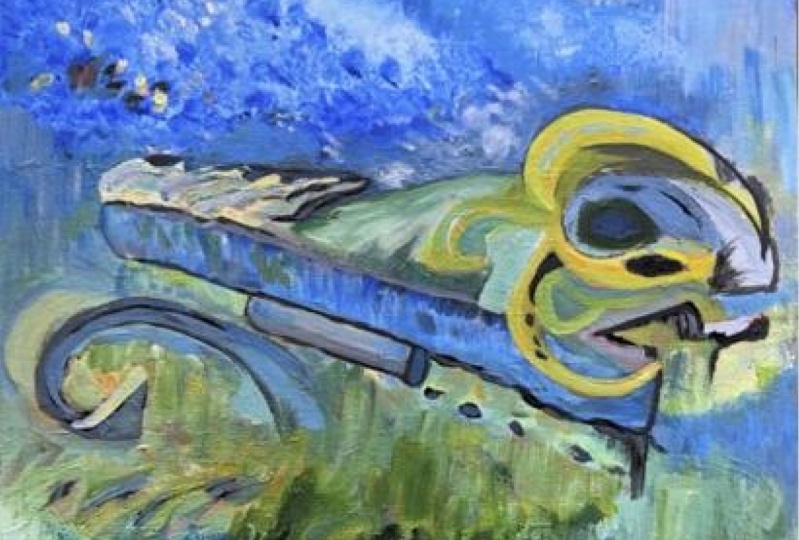
8. Starting the First Painting : Okay, So I'm going to actually start on this 1 first because this one I feel the most resonance with and that'll get me in the flow for the electron to the blue one. So here was the one that has plagued with on the photocopy. So what I've been doing is I've been looking at this and then I went back to my color wheel and I'll put a color wheel for you in the resources, but I am sure that you would have one. So if I, to look at these colors here and find my complimentary color, which is the one that's going to give it the pop and the focal point. If I look across here, I'm, I'm sort of in this rain, maybe honestly little bit lighter. And I'm coming over to this other side, which is the orangey red and the different terms here. So if I'm looking at this deep color here, if I put a little bit of this into the painting, it's going to give it some real strengths. So when you're having a look, your paintings, have a look at what your, you know, your, your colors are if you would, if you like. The dominating color here is more of the ocher colors. But I didn't want to do parallel. So I've kind of moved that I'm sort of in-between there really, if you like Gmb sort of there. But I'm going to concentrate on seeing what my color balance is on there. So I've got these sort of yellow across for come around here, come here. It's in that zone or my opposites are in this zone. It'll be interesting to see how that plays out, but we want to get some popping colors. The other one that I've put in here also is a little bit of yellow. So if I move this round here, obviously my opposite color is, is violet, is purple, but my interim color, you can see here, are these here. So I find it kind of interesting when you look at the color wheel just for a guideline, it doesn't it's not, you know, it's rule of thumb. It's not set in stone. So you can play around with it to get your color balance. But that's kind of where I'm feeling that this list going. So we'll have a go at that and see what happens. But you do the same with your painting that you color. We'll have a look. What's resonating with you, how you feel like painting is going to come alive if you like. Because that's what we want. We want an interest point. We want to be drawn into it. We want to stop and look, you know, we don't want it des bond, we want some entity in it. So let's get started and I've got some paints ready. So I'm going to start in this upper corner. And I'm going to go with some of the mixture of this is the yellow okra and some white. Now, I'm not going to necessarily cover everything up. And I think this is one of the nice things about when you're, when you're layering. You don't have to cover everything. It's nice to see those things going on underneath. So I could go a little bit darker into the corners. Now, when you're looking at a painting, it's nice to have the corners a little darker, so it brings you in. So that's what I'm doing here, but I'm, I'm staying in the flow. I don't want to kind of intellectualize it too hard. I want to kind of stay with, you know, how it's going, the direction it's going in. In my sort of intuiting it really, I'm going to bring this down a little more and just see what might happen. Now I'm just using this flat brush. Kinda like, uh, like the effects of this and you can use it in different ways and see what happens now I've got that happening there. So I might bring this over here as well, just to balance it out. And again, you don't have to cover everything up if you don't want to. I mean, it's, you know, you're open to adding any ideas that you feel. I'm going to come a bit darker down here. I'm going to go right into here. And I want to kind of keep this space because it's nice to have the open spaces. And then they, you know, the interests spaces. So we're kind of working on on both, if you like, as we go up here. So rather than stay with the whole painting all the way me go and quite solely what I'm going to do now is I'm going to just do a voice over on it. And what I'm doing in speed this up a little, but explain as I go what we're doing. So basically, you know, just building up the layers and going with how I feel the balance of the painting is going. And looking at the tone values, you can see here with this lovely blue, I'm balancing that from, um, you know, the right side down to the left. And when you're doing these kinds of paintings on really actually any painting, you just want to make sure that you have your bands of color and your turn values. You don't want all, all the blues to be the same. You can add white with them. You can obviously add other shades of blue with it. Maybe add the darker blue to give yourself some nice variations of the color which make the painting, you know, very interesting. And this applies to whether you're doing something with the landscape or what are you doing still alive? You know, you need to have those kind of nice variations of dark to light and the tone values. One of the other things that's interesting when you're doing any of these kinds of paintings is to have your edges. You want some sharp edges and some softer edges. So again, you get a nice variation, which makes the painting very interesting where you have sharp edges. You know, your eye naturally goes to so you, you can create points of interest in those sharp edges. And then do you go to the softer edges? It gives the painting a lot of depth and interest. And that's what we're looking for. To draw the viewer in, to have that feeling. You know, what, what are you feeling when you look at a painting? And those hard and soft edges, those term values as point of interests, you know, provoke you to feel different things. I find these kind of paintings very intriguing because, you know, I don't have a preconceived idea about them. They just sort of naturally come to me. You know, I do a lot of free drawing and then translate those free joins into paintings. And I always call them my Enscape. Rather than landscapes or cityscapes that escapes. They give me an insight into something that's going on inside me. And I think that's just the absolute magical thing about abstract painting. Because it brings something out that is completely unique to each person. And I have developed my style over many years. And I can paint in different styles. But when I'm free to do what I want to do, it's these kind of things that come up to me, my Enscape. And I find it fascinating. When I look at the collection of these, these particular paintings, there's a relationship between them, which I can recognize in myself of what's going on in my mind. So when you come to be doing yours, feeling about, you know, how it feels for you, what is it giving you? What's it telling you? And you'll obviously be developing your own style. And through these experiments, you will really discover that and make it completely unique to you, which is a wonderful part of the whole process of painting and gives you so many huge dimensions to yourself and you'll self-awareness and your consciousness of what's going on with you.
9. Finishing the First Painting : So I've put some finishing touches on this now I kind of was looking at his overnight and thinking. So I think it's come together quite well. And then if we go back to what I translated it from, it's not that far away. It's slightly different, but it gave me the right zone, really the ceiling to get back into it so you can see what happens if you, if you play around with it. So now we'll go to the blue one. And if you kinda have a look at yours and see how it's moving around the, around the picture. If I have a look at this fall term value for contrast, for focal point, I feel is if it's working quite well, we've obviously got focal points with this sort of, I don't know what would you call it really kind of Mars red. I used with some white and a little bit of yellow in it to keep it warm. So obviously these are our focal point. So it's tending to take his round. The two corners or three corners really are darker and this color is reiterated. So when you have a look at your painting, see why you're traveling around. And I love a good idea for your composition and your term value is one, take a photograph of it. And because when you see it in the picture, it's different. And then the other take a black and white to see your turn valley. And then you might try different things. You know, what you might do is you might turn it around and see what happens. If you do that. You'll always be amazed tenant around the other way. And, you know, it becomes a whole new different picture. This, on this way round, this is definitely the focal point, the white. So it's kind of fascinating when you, when you mess around with it like that. I've actually sold a couple of paintings, which I've done as landscape. And the person buying it loved them as as a portrait. So that's what they did. So you never know what you'll discover by having a play around with it and see what happens. So now let's go on to the blue one and see what goes on with that.
10. Starting the Second Painting: Okay, so now we're coming to the blue one, heritages and I you know, I did these two pictures from the third to copy. Now I've been looking at these thinking what I like and what I don't like. I think there's too much green in here, but I like the composition. I like this. These, these areas, the strong areas. Whereas with this one, I actually did it that way around. And although I quite like that, I think compositionally this phone is working better. So I'm going to kind of translate that a little into this painting. So it gives us some possibilities to play with and see what works and what doesn't. This is why I like doing this kind of thing because it, it helps us structure the painting. So I'm going to have a little drawn here. Just if I'm having a look at this composition, I've got this nice strong line here. So I feel as if I'm going too do something without love. Has I've said before, it can change because I get into the feeling of it and see where it goes. But looking at this, I like this composition. I like the definition here of this. Here. It's, it's on our composition scale. So again, talking about composition, we've got two ways of looking at it, but actually there's a million ways of looking at it. But if we were to divide this into our friends, Len, our point of interest, Our here. So that's, that's the rule of thirds. On the other hand, if we looked at dynamic symmetry, That's a completely different way of looking at issues, a little bit more complicated. But what it does is follows where your eye goes with the painting. So if you have a look at dynamic symmetry, and I shall put that into the information, into the resources. It's basically if we did a cross here and then we did our high angles here. Basically what happens is our eye naturally comes down to the left and goes around the painting. So we can think about where else are focal point, could be if we were to look at it that way. The most important thing about composition is not to send your eye out of the painting. You can send it out as long as it comes back in, but you don't want to send it out and away if you understand what I'm saying. So when you're looking at your own composition, the rule of thirds gives you a bit of a guideline. But it's not setting stone. It's got to go with the feel of the painting. And provided you've got your color balance and your values, and your spaces and your interests point. Your interests points are around those focal point hints. Then the painting comes together. I, personally, I don't like to be inhibited by that because the painting takes you and it takes you for a reason. And usually that reason is absolutely right. You're in, your intuition is nine times out of 10, if not more, is usually right. So going off that basis, that's what we want to be looking at. Okay, so when I have a look at this, so I'm going to be thinking about that. Not thinking about it linearly, but thinking about it intuitively. Where am I going? How does it feel? And, you know, the feeling of a painting is what it's all about. It's our emotion. It spits when we look at a painting, you know, something, who knows if we like it resonates, It's an emotion, it's a feeling. And that's what we're going for in our own painting, is how does it feel? Okay, so I'm now going to prepare my paints and we'll get started and let's see where it goes.
11. Second Painting Process: So I've started to build on the layers again, now, keeping some of the color from underneath. But you know, it helps to give the painting a lot of depth when you've got lots of different layers on. And you can see I'm blending it in here. And what you've caught underneath gives the painting a lot of substance and interest in keeping some of the color behind. You get a feeling that it's a very and interesting painting. And the thing I think that's so wonderful about the acrylics is that you can keep building it and get that feeling of depth. It's not like when you do watercolor and you want a transparent background. This is so different. And I think if you've just do one layer and acrylics, it contempt to look a little bit flat. So building it up in this way, in a mix to feed the painting feel powerful in many ways. Now. Now so putting this yellow one and when you're doing the different color, the color, make sure you do some of the differences with it so the yellows aren't all the same. You know, someone's got a bit of more white, someone's got bit more blue. And the same with all of it because that variation creates a really lovely interest, an impact to the painting. And I'm, I'm moving towards this, the teal blues mall and the ultramarine and the cobalt blue. But I'm still blows my favorite color. So I always tend to move towards that. But the combination of all of them is, is really pleasing to the eye. It's very fresh and bright and sunny. And I live in Spain and it's mostly sunny here. And so I suppose that's reflected in my, in my paintings. So you can see how this composition is building and getting some more interest points. I'm going to increase the spacing because it's still not enough space and difference between the focal points, the interests points, and the space in between. But that comes slowly, but surely. Some adding some blacks in here, some darker colors and gives you some really nice contrast. And a little bit more detail, which I might go over a little later. But for now it's that's what it's moving me towards and that's what you need to go towards with yourself, with your own painting. Go with how it feels and you really can't go wrong with it if you stay in when you're on the right track and you'll find that it will slowly but surely come together. I've added a little bit here of Mars red and some white. Just for variant of color. Not very much, just a little. And I still feel I've got a lot to do with this painting, but it's moving in the right direction. And you will feel the same about your sagely go. You feel bits that are really working and debts that you still want to do things with. And the more you look at it back and look and feel how it feels, why your eyes moving. You'll get the right thing to do. The right thing will come to you. You'd see blending in these colors of the blues. I love blending. So we want to make sure we've got some soft edges and sharp edges, again for all focal points. And making it very interesting. And you know, as you progress, you'll feel it for yourself. And you get into that zone where it's telling you what to do, what it wants.
12. Finished Blue Painting: So now I finish this painting them quite a lot since I first started painting, done quite a lot of layers on it as you can see. But more importantly, you know, this class is about you and how you've got over the stumbling block of moving your painting forward. I hope that I've given you enough information for you to be able to take that forward for your painting. It's such an interesting process. I mean, you know, I, I look at this, I feel that it's more or less fair and, and you will feel the same about yours. But, you know, I think you need to kind of sit with it for awhile and just see how it feels to you. And, you know, certain things will come up and saying, Well, maybe I could do more without maybe I could do more with that. But you do come to a point or you can say, I think it's finished. So I think it's finished at the moment for this one. So I hope that you'll get to that place with your painting too.
13. Recap and Reviewing Your Painting: So now we've come to the final of this class and I wanted to share with you now, you know how the project has gone, but more importantly how it's gone for you. And this is about your painting, about you getting unstuck and finding new ways to get over that block and move a painting forward. And we've been through such an interesting process, starting with the, these are the two originals that we began with, the blue and the craft. And then we did the photocopies, if you remember. So these are the blue ones and these are the terracotta ones. Now what I've done here is just to show you and I'll come to that in a little bit as I've put a frame around this, but I'll talk about that in a second. So then to continue photocopying, to see as you go how the painting is coming together for you. And also I remember I was talking about black and white. So here's the black and white of this one. And black and white of this one. So it gives you an idea of your tone values of how when you look at this in black and white, you can see more clearly if you like, the composition because it kind of separates you from the picture. And you can see it more objectively, which is what you want to be doing with your painting obviously. So it's kind of really progressed. Finishing with blue one here. When I look at the original way under painting where we were stuck, We're gone too. It's an interesting jumps. And the ones that were played with here, the some reflection of that in here. But then because you build the confidence by doing these little ones, when you actually come to do your picture, you feel much more confident about doing it and not worrying about messing each hour, Paul, what might go wrong? So it's such an interesting process, this one take to con, you know, quote a lot more than I had expected. I'd sort of subtle minute looked at it, came back to it overnight to have a look and see here that was how it was. And then it sort of grew into this. Now what I want to talk to you about is what I've done with this one. And what I suggest you can do with some of your SSIS was if you remember, one of the very bold ones that I did, that was interesting. I'll put a frame around it. And what you can do with yours. Yes, I thought I made just out of paper, some little frames. And you can have a look at your pictures to see what might stand out to you. And you could make a nice little collection of abstracts because it will have continuity because of the copies that you've done and you've painted on those or be some continuity. So you could do some really nice little series of little paintings. So you basically you use everything that you've been doing. And it's so interesting, even with the, you know, even with the black and white ones, you can do something ways. You know, you can find areas that you like. So it kind of like an ongoing process if you like, by exploring the possibilities. And that's the whole point of this, of this class is helping you kind of expand out of getting sort of stuck on the painting to open it up. So you can really kind of experience a whole new way of coming to it. And then as you do that, then you go on to do other paintings with that experience. And that makes the whole thing very exciting. So please put your paint pictures in the projects. It would be lovely or even in the discussion, if you've got any questions, let me know I'd love to connect with you and, you know, tell me about your experience of doing this, how you felt about it. And, you know, it's always nice for me to get the feedback. So I hope you've enjoyed this class who had been through quieter, a learning curve of how to really expand your work and your perspective and your understanding of how you can move through those blocks with some amazing results. And if you've enjoyed the class, do leave me a review and follow me because then you'll get a notification of the next class is coming up. So thanks very much for watching and I will look forward to seeing you next time. Happy painting, Bye for now.
 Joy Fahey, Joy of Art