Transcripts
1. Course Introduction : So I'm Candice. It's
really nice to meet you. I am a watercolor
artist here in the UK. I live in Drotwich Spa, which is fairly close to the Morven Hills,
to the Cotswolds. So lots of areas of nice, outstanding natural
beauty for inspiration. So for today's course, we're going to be
exploring liquid charcoal. We're going to be painting
quite abstractly, and we'll be doing three
complete projects, so three landscape
painting start to finish. This course is suitable
for any level of artist. So whether you're a
beginner or more advanced, this will give you a real taster of painting with
liquid charcoal. And by the end of the course, you'll be able to take away three complete
paintings where you've really explored the abstract
nature of painting. So let's run through the
few materials you'll need, and I'll see you in
the first lesson.
2. Course Materials: So welcome to our
materials section, where we'll run through
what we'll be using today. So I'm using cold press paper. I'm using a pad, which I've
then cut down to size. So we've got our three pieces. So our first one will be
a square five by 5 ". The second one will be
five by 7 " in portraits, and then we'll finish
with the landscape, which is ten by 4 ". So you can cut these down to size if you've got some sheets. So even though I'm using sh
paper, you don't need to. As long as it's 100% cotton, then this should work
absolutely fine. And I'll put in the description
underneath the course, all of these materials
that we're using today, just so that you've
got them to hand in case you need to
refer back to them. For our first little project, you'll just need a
piece of scrap paper. So again, watercolor
paper, 100% cotton. And you'll just need that to run through the feudal
techniques that we're going to be
doing just to get us used to that liquid charcoal. So you'll also need some tape. So I use ordinary masking tape or sometimes I use
washy tape as well, if I'm fancying something
a little bit more pretty. Brushes, the all
important brushes. So a lot of these
paintings will be done with a three
quarter inch flat brush. This is Jackson's art own brand. It's their synthetic
short flat brush. And I find it really useful for getting
those large washes in, keeping those brush strokes and those brush marks
nice and large. Then we'll also for
our first painting, use a number 14 round. This can be any make, any brands that you
have, nothing specific. My number six silver brush. That's also a round brush, and it has a lovely point to it. So it is one of my favorites, and it's really versatile. Then we'll be using a
couple of small brushes. So the zero liner brush. That's great for getting
in those little grassies, those little stalks, just that tiny bit of detail
at the end of your painting. And then we'll also use
a fine detail brush. This is a three slash
zero, very small, and we'll just be
using that just for a few little sections
right at the end. My trusty palette knife. This is a Windsor
and Newton one. So you can use whichever
palette knife you have. But these are great
for scratching through your thick rich paints to
get that nice texture. And demonstrates we'll have
a little demonstration in a moment where we go through
our little practice session. So for the liquid charcoal,
I'm using Schmink. This is grape seed black, so it does come in a few
different types of black, and this has a very
slight bluish tone to it, but it is quite a true
black charcoal color. So, very nice. We'll go through
the consistency, and a lot of our paintings will be used with it
straight from the tube, so without any
water being added, because it is a
little bit thinner than tube watercolor paint. Then a tiny bit
of white gouache. That'll be for our
little moon and then maybe a little
bit of spattering for our final project. I'm using this little
ceramic pallet today. I don't use it very often, but it does really help to really focus on a
limited palate. So I tend to use
it when I'm only using a few colors or like today where I'm only using some white gouache and
the liquid charcoal. Then you'll need some
tissue, paper towel, tissue, little towel, whichever you need,
just to dab off. You'll also need a little bit of tissue just to put
over the cap of one of your tube paints so
that we can press out that sun into our wet wash to give that little
white circle. And then two water pots,
whichever you have, I have a large one and then
a slightly smaller one. This is my travel one.
And that's our materials. So I'll pop all of that into
the description underneath, so you've got it to hand. But we're not using too
many brushes here today, even though we're doing three
projects, three paintings. We're going to use and stick
to these for all of them. And we're only going to use this large round brush
for our first project. Okay, so let's move on to our little practice session
with the liquid charcoal.
3. Practice Exercise: So for a practice session,
a little exercise. I'm taking some liquid charcoal
straight from the tube, and I'm going to be adding
very little water to this. So if I bring it up
closer to the camera, you'll be able to see that it's quite watery inconsistency. So if I just put my number
six round brush in there, it's very, very light. There's no water here at all. And you can see that
it's fairly loose, so looser than watercolor paint. Now, what we'll do
first is we'll do a little gradient wash. Now, I'm not going to wet
the paper first. I'm just going straight
in, wet on dry. And then what I'll do is add just a little bit of
water to my brush. Just so I can start
to bring that down. Now, even with the paper
being completely dry, it's really diffusing and
running down, which is great. So just bear that in
mind when you come to do your projects
for your paintings, that it is very loose, you do not need very
much water at all, which I've found to my detriment sometimes when
I've added too much water. So you can just soften
that up at the bottom, and you can get a really
light pale wash. Now, I'm doing the same gradients, but I'm wetting the water first, and this should give you an
idea of how much it does bleed and diffuse in that
water that's on the paper. So again, taking some of the
completely tube consistency, I'm dropping that
into the top of the water section and then
just running my brush down. And you can see it moves very
quickly and very easily. Adding a little bit
more to the top. And you can see that it's
really diffusing down into the rest of that
water and charcoal. So you can keep going over it just to get a
nice smooth wash. It is a little bit
more difficult to get a smooth gradients
with the charcoal. You do need to work at
it a little bit more, and you might need to use
your spray bottle just to re wet it if it looks like
it's getting a bit stripy. But we'll practice this
in our first project, and we'll get a really
nice gradient going. So now with a little
bit of dry brush. Still, I'm using the
number six round. I've dabbed off a lot of that charcoal off my
brush, so it's very dry. And I'm just using the side of it to start to sweep it down. And we'll be using
this technique for our little
waterfall sections, and as though we've
got little moss for our third and final project. And then you can use the
tip of your round brush, as well to make the stroke much smaller as you come
to the bottom of that. So you can keep
adding not paint. I need to stop calling it paint. You can keep adding the charcoal to get it nice and
dark and rich, not adding too
much water at all. And then you can use
the tip of the brush as you come down
to get that nice, dripy sort of dry brush effect. So I definitely
recommend practicing this technique just so that
you're ready for the project, and you're ready to really
start getting going with that second one when we do the big waterfall
landscape painting. And you can do these lighter. You can do them smaller. So I haven't added quite as
much paints to this one. And then just doing
another little one to show you that you
can go very light, very pale, use a
light touch with your round brush
as you come down. Now for our rich dark sections where we're going
to add texture, I'm just using the
tube consistency, and I'm just randomly wiggling that around so that
we've got some nice, dark charcoal on the paper. Then what I'll do is
take the pallet knife. And you can really
see that that's scratching through to
the white of the paper. And if you flick it up
above where that paint is, where that charcoal is, it will also drag that
paint up as well to give you the suggestion
of grass and stalks. You can do little
horizontal marks as well to get in some extra
texture for the rocks. And then taking the three
quarter inch flat brush, which we'll be using for misty trees and a lot
of these projects. Just putting in a line of really dark charcoal and
then some water on my brush, you can watch as that bleeds
up into that water above it. So this will give us
some misty trees effect. And then you can go over it a couple of times
just to smooth it out and give a really nice
gradient and misty feel to it. And then you can
run that water up above it just so that
it's nice and smooth. We haven't got a hard line. And then you can
drop in a little bit of extra paint at the bottom, as well, a bit more
of that charcoal. And that will bleed again, a little bit more if you add
that water above it again. So this gives a
really nice effect. I love the misty trees. The charcoal is so versatile. And then you can just do a
little broken line underneath. You can just give it that
little bit of extra. So then, finally,
just practicing our little moon that
we're going to be adding into our gradient skies. This has got quite a bit
of water added to it, so you can see that
it's quite light. And then you can use one of
your caps of your tubes, add a little bit
tissue over the top, try and get it as
flat as possible, and then just lightly
press that into the wash. Don't worry if
it's broken like mine is, you can just then use the
side of the tube cap, just to rub it in and just remove that little
bit of extra charcoal. So those are our practices. Those are the little techniques
and the brush strokes and the palette knife marks we'll be using today for our projects. So let's start on
our first project.
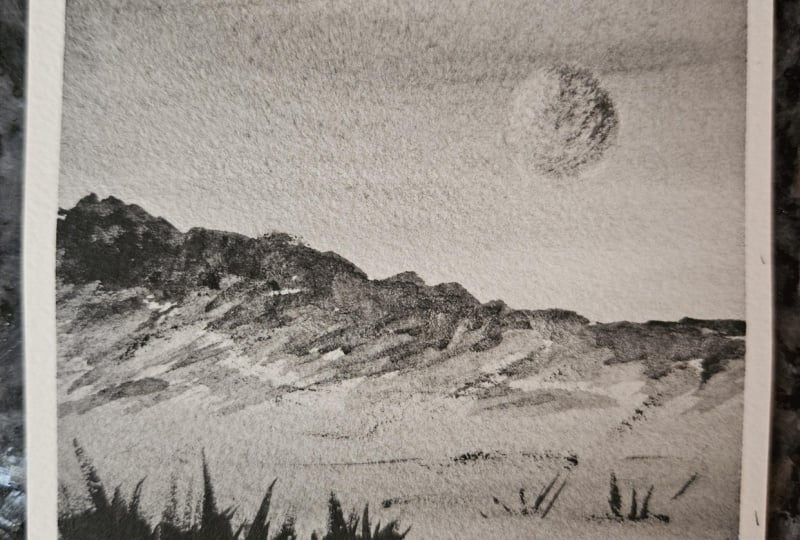
4. Project 1: H so starting off with
our first project, we're using our five inch
by five inch square paper. It's taped down to my table. And what we're doing
is just having a quick look at that
liquid charcoal. So you can see it's almost got a little grainy effect
to it, and it's very, very water down here by just adding the tiniest
touch of water to it. You can see that
little grainy effect. So I've squeezed out some
tube consistency charcoal. I've completely wet the
paper all the way over, all the way down to the bottom. And I'm using my three
quarter inch flat brush. Just to start to brush in that watery mixture of charcoal. So it is really bleeding into the water
that's on the paper. And we can use smooth
left to right motions of our flat brush just at the top and the
bottom of the page. So it's almost like we're
creating a vignette, so it's darker at the
top and the bottom. And then adding
some extra water, we can start to pull
that down the paper and then also bring it up.
From the bottom, as well. So try and keep your movements
quite light, quite smooth. Try not to add too
much water just enough to get it flowing and to
give us that nice gradient. So you can put in a little bit
of extra tube consistency, charcoal, and you can start to darken up those areas right
at the top and the bottom. Adding a little bit more
into my mixture now, and I'm just continuing until I'm happy with the
gradient that I have. So when you're doing it,
it's for your painting, just try and make
sure that you've got a nice smooth gradient. And you can do this by adding little extra bits of
water and just running it up and down so it's covering the whole of the page so we
don't get any tide marks. So bringing it
down to the bottom and then also working my way
down again from the top. So just to be wary, the liquid charcoal can
create some streaks, so it is a little
bit more tricky to get that smooth gradient. So just keep on lightly running
your brush left, right, and then adding a little
bit more water to make sure that it's nice and
soft and it's diffusing. So when you get to a certain stage where
you're quite happy with it, you're quite happy that you're suitably dark at the top and
the bottom of the paper. You can just finish
with your gradients. And I think I'm nearly
happy with this. I don't need to fiddle anymore. I've completely
dried off my brush, and I've just smoothed
it out mainly in the center of the painting
to stop any lines, any sort of hard edges forming. So taking some tissue. This is where you're
going to put your sun or rather your moon
into your sky area. So hold the tissue nice and tightly and then just
firmly press it in. If it's not a completely
smooth circle, so I have a little bit extra there on the right hand side. What you can do is
then go back in with your tissue and just give
it another little dab. Until you're quite happy with
the circular shape of it. And then with just
a very, very clean, slightly damp brush, you can just smooth
that out, as well. So there we have our little
moon, nice and easy. So what we'll do now is
just let it completely dry. I'm just smoothing out
those little sections as we come into the
middle of the painting. Now that's completely dry. We can take our large round
brush, so our number 14, and we can take a rich tube consistency mixture and start to put in a little mountains that'll be kind of in the
midground towards the back. So putting in one
little line first, you can then just use
the side of the brush just to paddle in and dry
brush in some little texture, some little shadows
into those mountains. Now, the idea is
not to fiddle here, so we want it to be quite loose. So just keep on dabbing your brush into your water to
take off some of the paint, and then do little
sweeping movements as you come down using the
side of your brush. You can darken up certain areas that you think might need
a little bit more shadow, and just keep on making
sure you're taking off that charcoal from
your paint brush. So we want it to be lighter
and sweepier as we come down towards where our sort of horizon line underneath
our mountains will be. Then my brush is completely
clean now, pretty much. And all I'm doing is pulling that paint and dragging
it across diagonally. So we get those little
sweeping movements. And then you can just
use the tip to add in any little extra darks until you're happy with
how your mountains look. So this is the exercise
to get us used to the consistency
of the charcoal. It is a little bit lighter. When it's tube consistency, it's not quite as thick, so it is a little bit thinner. You don't need quite
as much water. And then we're going
to use another very rich mixture here of the charcoal to get that dark section in
right at the bottom. So using the side of the brush, still sticking with
the round brush. We're just putting in that
really dark rich charcoal. It doesn't need to be exact. Just make sure it's
a little bit broken. You're wiggling
your brush around, and then you have some
little lighter sections in there for texture. So switching to the
zero liner brush now. And all we're doing
is pulling up that paint with little
flicks of the brush to give those
suggestions of foliage and little grasses as we
come up into the painting. So you don't putting
very much paint on your brush just a little bit, and then you're pulling
it from the rest of the charcoal
that's on the paper. And you can give it
a little wiggle, as well if you want them to be a little bit
less symmetrical. And the few smaller
ones as we come down into the bottom right hand
side of the painting. So this is a little
bit lighter now. I've added a little bit
of water, just a touch. And I've made these
little grasses slightly lighter so they look like they're
a little bit set back into our landscape. So this is quite
obviously a landscape. It hasn't got an
abstract feel to it, but hopefully this
should give you an idea of how to work with the charcoal before we start doing anything a little bit more technical and a little bit more abstract. And you can just use
it liner brush to give a few little wiggles
for a bit more texture. So taking the palette knife, we're now going to
scratch through some highlights into
that dark section. So exactly the
same as we did for our little warm up exercise. We're lightly scratching through that dark charcoal to release the white of
the paper underneath. And then you can do some little horizontal movements as well. And just getting smaller
down on the right. So switching over to
our white gouache now. And we're going to
use this just to put over the top of
our little moon area. It's pulled out an awful
lot of the paint when we used our tissue earlier on, but it still is a bit
a little bit dark, so it helps to just add a little bit of extra
guash at this point. So making sure it's
still quite thick. You're only loosening it up with a little bit of water
so that it's workable. And then switching to a
number six round brush, you can start to just
painting over the top. Now, once we've completely
covered that moon area, and it's all nice and
white, as it's wet, what we can do is
then drop in some of the liquid charcoal
in a watery mixture, so not very dark,
and we can start to drop that in onto the right
hand side of our moon. So just carefully finishing that off using the point
of the round brush, making sure that it's
nice and symmetrical, and then we can start to drop in some slightly darker paint. So putting it mainly on
the right hand side, and that creates a little
bit of a shadow to our moon and makes it look just a little
bit more realistic. So once you've put in
a little bit of gray, you can smooth it
out and soften it, and then you can take a little
bit more on your brush, and you can also drop
that in as well, just to accentuate
that little shadow. And there's our
finished painting. So nice and simple
just to start. We'll get a little
bit more technical in our next two projects, but I hope you found
that useful as our first little introduction
to liquid charcoal. The differences between
this and watercolor paint and just how you need to just treat it
slightly differently.
5. Project 2: So welcome to the
second project, where we're going
to be a little bit more abstract with this one. So the paper is five
by 7 " in portraits, and it's take down
against the table, taking a very light
watery mixture of the liquid charcoal. I'm keeping the paper dry, and I'm starting
to sweep that in to about two thirds of
the way down the paper. So a little bit lighter
as we come down. And then taking that water, you can run it back up through your wash just
so it's nice and even, and we have a nice gradient. Making sure that it's
not streaky again. So the same as our
first project, and then running it all the way down to about two
thirds of the way down, and then finishing off at the bottom with a
little bit of water. And that just makes
sure that it's a nice, even gradient and we don't
have any lines or hard edges. So sticking with our three
quarter inch flat brush, we're going to start putting in some misty trees
right at the back. So this is in the
middle of the painting, and we're just using the
flat edge of the flat brush. So it's nice and straight. And we're just dropping in that rich liquid
charcoal into that paper that's already wet from our first wash. You can put a few tiny little
lines underneath, which just add a
little bit of texture. And then taking
some clean water, start to sweep it over the
top of your misty trees. Then you can go back over it
again just to smooth it out, and then try and run it
all the way back up, all the way to the top of the paper so that it's
nice and even and smooth. Then I've taken a
little bit more of the watery liquid charcoal,
started at the top, and then brought that
down just to darken it so it looks a little
bit more atmospheric. So taking some clean water, I've started on the right
hand side underneath. And then cleaning off my brush, I've just swept that in
a diagonal movement. Then with a clean damp brush, I'm just neatening
up that hard line. So it's nice and even and smooth underneath
our misty trees. So taking some more of
the liquid charcoal now, so a little bit richer, not tube consistency, so it
still has some water in it, and we're just darkening up the bottom of that tree section. So it's nice and rich. And now taking the flat brush, I can start to add in
that paint again on the right hand side and start to sweep it down into the
bottom of the painting. It doesn't need to be
exact at this point. So when I first started, there wasn't really a
plan for this painting. I shouldn't really
say that, should I. But because it wanted
it to be abstract, I wanted to get some
charcoal onto the paper and then just see how it
evolved and what emerged. So I started doing some horizontal movements
with the flat brush, pulling that charcoal down. And then coming in from the left hand side
with a richer mixture, just using the tip on the
top of the flat brush, I started to create a few
little lines and then decided to accentuate those stripes coming down on the
right hand side. With the charcoal, I
really like the sort of grainy effect that
you get with it as it catches on the
cold press of the paper. So it can be really
interesting when you drag the brush
across the paper, when you let the bristles
separate in your brush, so they're quite separated now. And you can just start to
dab in those little lines. So doing some little
horizontal marks, then taking a bit
more paints and just thickening that up so it becomes more noticeable
with more contrast. Then with that paint
still on your brush, you can start to
then drag it down. Mmm. Then coming in from
the left hand side, a little bit further down. So now it looks like
it's coming down into a little bit of a waterfall
with a rocky section. Still using tube
consistency here. So it's nice and rich. And just use that flat brush to get in those little marks, those little horizontal sweeps, making sure that it's very rich, that it's very dark, and we're really building
up that contrast. These are all random
little marks, so please feel free to be quite expressive and loose with how you're putting this
into the painting. Then you can start to bring
it down a little bit more, some little sideways movements we almost want it
to look like rocks. And then just carrying on
with that dry brushing, we can start to set that off so that it mimics
the right hand side. Nice and light. So
we're not adding any more paint or charcoal
to our brush at this point. We're just using
what's already on there and keeping it quite light in the
middle of the painting. So we're doing all of this with our flat brush to begin with. And then once it's dry, we'll switch to our
small number six rounds to get in those little extra get those little
extra contrast sections in. So now I'm just building up
the texture for those rocks. I keep dipping into
that charcoal. And I'm doing little
downwards movements. Sometimes I'm doing a
little horizontal movement, so it looks like a little ledge. Now I'm using the tip, but coming down vertically. And that just builds up that
contrast and those values in the painting and gives us
a focal point in the center. So just using up there what
was on left on my brush. And now I've cleaned it
off, so it's only damp, and I can start to soften those little lines and drag them down a
little bit further. Taking a little bit
more of the paint now. I'm calling it paint,
but really it's liquid charcoal, but you
know what I'm eating. And we can just carry on with those little dry brush
sections as they come down. Darkening up a little bit more on the right hand
side at the back. Little horizontal movements,
so it looks like we have ripples and little rocks or foliage coming into that
water area at the top. So we're just building
up the scene now. We've put in our base layers, and now we can start to add
in a few more little details. So keep building up those layers with your little horizontal
and vertical movements. And then you can use
your palette knife to do some little highlights, so scrape through that charcoal. And it makes them look a little bit more rocky on
the left hand side. So little horizontal movements, little vertical movements,
and just scratch through. And you can drag that paint
down a little bit, as well. So the pallet knife
is great for this. Even though the paint
isn't as rich as our little practice
or our first project, you can still take off quite a bit of it using
the palette knife. And if you put in those
little sideways movements, they almost look like
little ledges in the rocks. And you can also do that in the rest of the
painting as well. So I'm doing it here in the center and then just pulling it down
slightly, as well. And you've got those little
vertical lines coming down. Then doing the same on
the right hand side. And then you can put in some
little horizontal stripes as we come down into what
would be our waterfall. So almost like little
ripples in the water. And then just scratching a few little highlights at the top, where that thick paint still
is from our little trees. So I've completely dried
off the painting now. And what we can do is just build up a few more of those values. So you're still using the
three quarter inch flat brush. We can really pull
down that paint, so it's very thick, it's very dry, and
it's going to give us that lovely dry brush
effect as we pull it down. Sometimes my brush hovers
where I'm thinking, where should I put this
bit of paint next? And that's the idea
with abstract. You don't really know
when you're picking up the paint exactly where
you're going to put it, but you can just assess the
painting, have a little look, maybe even take a step back
for a minute and think, Okay, I need a little bit more
contrast in this section, or this area looks
a little bit bare. And you can just slowly
gradually build up the scene. As long as it has a
landscape feel to it, it doesn't need to be
detailed and exact. It doesn't have to
be a replication of something that you've seen. You can just gradually
build it up. So I just decided to bring
that down just a little bit in the center because
I think it gives a nice focal point for you
to look at in the middle. But we've left lots
of nice white areas, and that really
makes the rest of the painting look quite
dark and atmospheric. So the idea with darks is if
you leave lots of lights, then your darks look much darker and the other way around, your lights look much lighter when you've
got that contrast. So I just finished off with
the number six round brush, just a few tiny little
darker sections, and then added a few birds in the sky with the
fine detail brush. So this was the
three slash zero. So very tiny. And because we had
quite a large sky area with not an awful lot going on, I thought a few
little birds might look quite nice just to
finish off the scene. So you can add more
birds if you want to, or you can leave it
without birds if you're painting if you
feel it doesn't need it. That's completely
optional, but I think it just finished off the
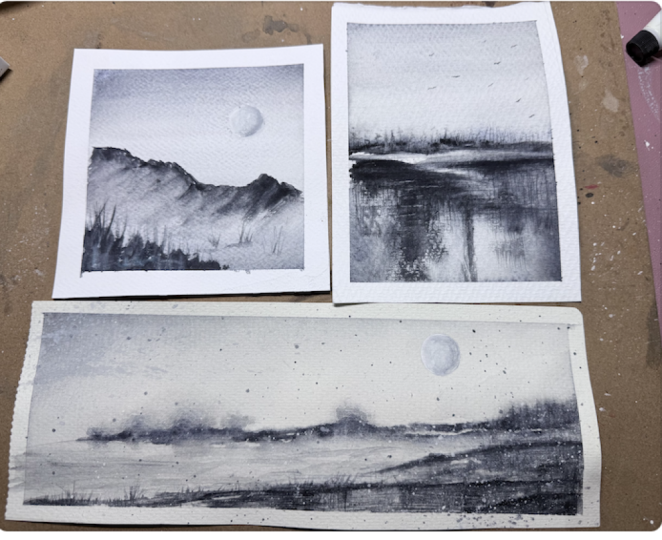
landscape quite nicely. And there's our
finished painting. So I hope you enjoyed the slightly abstract
feel for this one. And it gave you a few ideas
about how to build up your own semi abstract sort of scene without it being
too highly detailed. You're just concentrating on the values really
and the contrast. And we'll move on to our
project number three.
6. Project 3: So this is our third
and final project. And we're going to use the skills and the techniques
that we've used in our previous two projects to build up a slightly
more technical scene. So this is ten by 4
" landscape format. And I'm wetting the sky area to about two thirds of
the way down the page. Still using my three
quarter inch flat brush because that's my
favorite brush. And we're going to take
a very watery mixture now of the liquid charcoal. And we're going
to start to brush that in to our sky area. So we want another
graduated wash just to add some atmosphere, and we're going to have
it slightly darker on the left hand side
of the painting. So just lightly washing in that color with those
smooth movements. And then we can use
up what's left on our brush as we bring it down
towards our horizon line. We're going to darken up
that left hand corner again, smoothing it across the paper, and then just moving a bit more diagonally as we sweep it down
towards our horizon line. So again, this is
a very thin wash. We want it to be very light. It's just creating a little bit of a mood for our painting. Taking a little bit more
of the charcoal now and just doing a final layer to
darken it up on the left, sweeping it again
across our sky area, bringing it a little
bit further down, making sure that it stays nice and light on
the right hand side, and then as we come
down to the horizon. So we're taking a tube
consistency now of our charcoal, and we're going to start
doing our misty trees in exactly the same way
as our previous painting. So little horizontal movements with the tip of the flat brush, just dropping it into
our horizon line, and then it will start to
bleed up into the sky. You can manipulate it
so you can lift it up a little bit higher
on the right hand side, and then put in those
tiny little movements and swipes of paint underneath. Taking lots of clean water, that'll just bleed
down from the top down into that water
area underneath, giving us those
extra little blooms. And then you can smooth
it out coming from the left hand side
all the way across. Adding in just a tiny
little touch of paint underneath to encourage those little
blooms down into the water. And this has a very abstract
feel to it at the moment. We're not painting anything. It gives the impression of
misty trees in the distance, but we haven't needed
to actually paint them. We're just doing the suggestion. And then just a tiny little
dab on the left hand side. So it looks a little bit
further away in the distance. Dabbing in that paints, encouraging those little blooms. And still using a really
rich charcoal here. So it's nice and dark, and we're really
getting that contrast. We can start to bring in a little bit of a scene
from the right hand side. So this section does
take a little while to paint because this is where the most detail
is going to be. It's going to really set
the scene for our painting. So exactly as this
previous project, we're going to start to sweep
in that paint so it comes down vertically
down to the bottom. Making sure there's not too
much charcoal on the brush, but it's also not
too watery either. You can just use the very tip to gently manipulate that paint. So it comes down in a
nice smooth movement. Then adding some richer
paint as we come across. And this all looks like
we have some banks and some little ripples coming into a water area on the
left hand side. A little bit more
paint this time, still using the
corner of the brush, pulling it down so we've got a darker top layer over
our lighter layers. And it's just catching on
that cold pressed paper, so it's giving us that
lovely dry brush effect. I do like a bit of dry brushing. It's very effective and you
don't really have to do very much other than make sure that there isn't too much
paint on your brush. So we're going to start
to sweep in a bit of light charcoal now, little
horizontal movements, a broken line as we bring it down over to the
left hand side, and then adding a
little bit more and some texture just on the left. So still with a very dark
dry mixture of the charcoal, we can put in a few
extra little ripples as they come over
into the water, and then we can start to add in some detail as we start to
come down the painting, and we'll work our way
across over to the left. Little sideways movements again. So we've got the suggestion of some little rocks and
some little ledges, exactly the same as we did
for our waterfall previously. And just make sure
you're reserving some of that white
area of paper. So that will give us
a lovely contrast with the darks and lights. So we need to get
those values in, so we've got those
really dark values. And then you can do some little
sideways movements again. Let's though you've got
some little ledges there. So it's always best to try and stick with this
large flat brush. I did mention at the
beginning that I use it an awful lot because it means you can be quite limited
in your brush movements. Because of the
size of the brush, you don't really need to keep on moving it from side to side. You can just do some very, very small little movements. Now, I'll speed this
section up in just a moment so that you can get a feel for how I'm
building up the scene, but using the same techniques
that we've been looking at. So I'm using my palette knife
here again to pull through that rich charcoal and give us those suggestions of
little bits of foliage. And then you can use your
sideways movements as well to drag through
that thick charcoal. A few little flicks. You don't need to use
a very firm touch. You can be quite light. And we can just
keep on scratching through and bringing in those
ripples into the center. Then we're going
back to our layers. So this is all still wet. I shouldn't be too wet now. You don't need to dry it off. And we can just carry on
building up the scene as we come our way to the
left of the painting. So just some lighter sections of charcoal now in the center. We want it to be a little
bit lighter underneath, so it looks like we
have more of a ledge. And then just taking
some thicker mixture with our large flat brush again, we can start to put a
border to our water area. Again, using the
corner and the tip of it to keep it
all nice and level, so it gives a
suggestion of rocks. And you can start
to sweep that down a little bit as we
come over to the left. So just carrying
on with the same little movements with the brush. I've just gone in with
the palate life now just to start scratching
through a little bit of foliage and then using it horizontally to pull across
some little stripes of paint. I've taken a thick mixture
on my large flat brush, and I'm darkening up that edge now as we come over to
the left hand side, putting in a little bit
more of the charcoal. And the little
sideways movements. So almost like little ledges, little rocky ledges as we come to the bottom
of the painting, making sure that
they're rich and dark and they're building
up that contrast. So I've completely
dried the painting now, and we can start to put in those finishing touches
over the top of layers. So the same as we did for
our waterfall previously. We're going to use the
number six round brush to dry brush in that
thick, rich charcoal. So we've got those little dripping sections
as they come down. So making sure that we're
dry brushing and that we're using the tip to get those
little pointy sections. So these could look like moss. They could look like
water dripping down. The idea is that
it's semi abstract, and it can be whatever
you want it to be. So just really
gradually building up those little sections of
dark through the painting. So that we've got a nice, pleasing finish that looks a
little bit like a landscape. So just add these where you feel that your
painting needs them. You can also use the
tip to start to put some little stripes in up
underneath our misty trees, and then little tiny movements, very gentle, little ripples
coming into that water area. And you can give them a little
smudge with your finger. So just darkening up
that section right at the bottom, lots of contrast. And then switching to
the zero liner brush, we can start to flick up those few little grasses they give the scene a little
bit more believability as being a landscape. So this can still be quite a rich mixture of the charcoal, add enough water just to
very gently loosen it up and add those extra ripples
in still using the liner. So we're going to
add a little bit more atmosphere to
our water area. So I have a very small
amount of charcoal, very watery on my brush, and I'm just sweeping it
across into the water. I can then drop some very
slightly darker sections in using little
horizontal movements to make it look like
it's a water area. And then we can sweep
in a little bit more from the left hand
side to darken it, which is where our
sky is darkest above. So it mimics that. Almost like a reflection
in our water. Then switching back
to the liner brush, you can add in a few more
little bits of foliage getting smaller as you work your way up into the
middle of the painting. So just tiny little flicks here. Now taking the top of
one of my tube paints, I'm just drawing round
it with a pencil, and this will give us
the nice circle circle, sorry for our moon. And then I've just given it a little rub out so it's
not too noticeable. So using our white
gouache again, we can just paint
in that little moon so it gives us the
nice blank canvas. And then we can drop in that darker watery mixture of charcoal on the
right hand side, and we're painting it
in exactly the same way as our previous project. So creating that shadow and that texture on
the right hand side, and then just softening it with just a damp brush so
it's nicely blended. And then you can drop in just a tiny bit more if you
want to darken it, make it look a little
bit more noticeable. As long as it's nice and
soft, it'll look good. So now I'm taking some
more of the white gouache, and I'm going to spatter
this into the bottom of the painting to give us
those little highlights. So I'm just knocking
my brushes together. And I don't mind if it goes over the rest of the painting,
that doesn't matter. It just gives that
extra atmosphere. And then to get some thicker
sections of spatter, what you can do is just use the top of your finger
to flick the brush. So you've got a little bit
more directional spatter, and these tend to be
a little bit bigger, as well, and a bit
more noticeable. And there's the
finished painting. So I hope that that painting
has brought together the skills and the
techniques that we tried with our
previous two projects. But it's given a more complete, semi abstract landscape for
you to try out and practice.
7. Final Thoughts: I hope you enjoyed the liquid
charcoal. I definitely do. I don't really tend to
use different mediums, but the liquid charcoal, it's so close to watercolor, and you can get still those
lovely, thin, watery washes, the transparent nature of it, but then really build up
those darks, as well. So it gives that contrast. So I find it a really
nice medium to use. That's somewhere between watercolor tube
paint and gouache. So thank you very
much for watching, and I'll see you in my
next course, bye for now.
 Candice Small, Watercolourist