Transcripts
1. Hello & Welcome: Hello, and welcome to this Beginners Brush
Calligraphy course. I'm so happy to have you here. My name is Alena. I'm a full time
calligrapher myself, but I'm also a calligraphy
teacher and educator. I'm here to teach you
everything you need to know to get started with
this beautiful skill. I hope you're feeling excited, welcome for taking
that first step and being here and
watching this. Getting ready to learn, I think sometimes
it's really hard to take that step,
but you're here. We're about to practice together and it's
going to be beautiful. This course is split
into short lessons just to help you practice
each topic individually. You also get a workbook
which you can print. The first lesson,
you will learn a little bit more about the
tools and all the supplies. If you're not sure
about what paper to use or what pen to use, just watch that lesson. And it'll be all clear. But yes, I got I
introduced myself. I've been lecturing since 2015, and it's just been a wonderful
journey for me personally. I started lecturing
just purely as a hobby. I just loved the look of it. Yeah, I just found
it really relaxing. I loved putting
on some music and lecturing the lyrics
of that song. I just found it
really therapeutic. It has really helped my
mental health a lot. That probably was one
of the reasons why I persisted and
continued with it. So yeah, it's
really therapeutic. It's really relaxing. I'm sure you're going to find that out by yourself
by practicing. Just let you know
you're in for treat. If you're feeling ready,
let's get started. I can't wait to de tu, so let's begin with
the first lesson.
2. Materials Needed: L et's talk about the supplies you'll need for
brush calligraphy. The good news is that you
don't need a ton of supplies, you literally just need
a pen and some paper, and you can always try different colors
in different pens, but to begin with, all you need is one pen
and some smooth paper. These are definitely
tested and proven to be the best tools for brush calligraphy, I'll
say personally. The pen I recommend
for this course is this tumbo for the
ski brush pen. These come in a soft
and also a hard tip. It doesn't matter which one
you try. I love them both. The hard tip might be a little bit easier to lend with maybe. While the soft one
just glides better, so you can get either, you can
try them both if you like. But either one you get will
be good for this course. You can see that it's
got a really fine tip. We'll definitely create like
thinner look lettering, and it looks quite classic, quite elegant, which is lovely. You see how thin it is. It's definitely not one of those really chunky lettering styles. The thing is, I highly highly recommend starting to
learn with this pen. There's just a fine
tip pen in general. There's this pen, which
I highly recommend, but there's also a very
similar pen called pentel, brush sign pen by pentel. This is very similar. You can see that I've
got really similar tip. So the thing about
the pentel brush pen, I think it's a little
bit smooth, I would say. It also comes in lots
of different colors. I mean they both do, but
I just particularly love. The brands colors a lot. I Tumb is fun as well. You can also get these pens in different colors and
I'll add all the links, you can always find them Dumber. There we go to two pens, tumbo for the sookie and
Pentel brush sign pen. Wonderful, wonderful
pens for beginners, and you can go through
this course by just using one of them or
a combination of both. I think I'll do a bit of both. We'll see what happens, but yes, that's all you
need in terms of pens. Of course, you can also
try something thicker. If you prefer a thicker lettering style
that looks a bit like this. It also makes the lettering
a bit bigger in a way. So these pens are great and they have
their place, I'd say, but I personally wouldn't
recommend learning with them just because it's
definitely a little bit harder to control
and when you learn, you just want to get that technique right before
you try these chunkier pens. This tip here is
really flexible. And that's what we want
in brush Cligrapy, but it's quite It's
quite a big tip. Obviously, it's a little
bit easier to learn with something that's a little
bit thinner. There we go. But if you'd like to try these, thes are called tumbo
dual brush pens, ABT pens, and it's got a
beautiful thicker side, and it's also got this
monoline like a fine tip, which is great for
monoline lecturing and if you or if you want
to do some capital letters, sometimes, this can look
really good as well. I love that it's
got these two tips. It's quite useful to be honest. And it's also good
for drawing if you want to do some lovely
drawing with these pens. That's also quite
fun. But there we go. Thinner pens, thicker pens, and all of these pens
come in different colors. But for this course, I
highly recommend using black just because it's
really contrasting, and that's what I'll be using. When it comes to paper. Another really real
important topic. When it comes to paper, you
want to use something smooth. Please don't ever use copy paper because that's just now going to
aid good results. Your pins are going to bleed because copy paper
is really rough. It's really textured in a array, so it will fray your
pint really quickly. This is what happens with
this pint eventually. They'll fray, which
means that you won't be able to get a
nice thin stroke anymore. Although they do last a while at least a couple
of weeks for sure, but I'll say up to a month, it depends how
much you practice. But you'll start
it out it's just hard to control your pressure, and that just means that
you need to replace them. But if you use copy paper, you can fray your pens in like a day, We don't want to do that. It's a smooth paper. I particularly recommend
HP color choice paper. It comes in different
thicknesses. The one I'm using is 160 GSM. My printer takes this weight, but maybe yours doesn't. There's also a
thinner version of this paper, like 120 GSM. You can definitely
try that the printer, if you want to print worksheets. So that's what I recommend, or I also love these rowdy pads. These are just like rule, you can get them
rolled or dotted or plain and also in bigger sizes, this is quite small.
These are great. The paper is really
really smooth on here, definitely really really
good for calligraphy and it's quite smooth and it's quite pleasant and
satisfying to let it on. Yeah, you can definitely
also get this if you prefer having all of your
practice in one Node book. I know some people do. But if you're practicing
with worksheet, you can just put them all
together into one folder. But this is really good for free hand practice, I would say. There we go. These are the tools. That's
everything we need. Occasionally, we'll
need a pencil and a roller to draw some baselines
and an erase as well. If you want to try doing some greeting cards
with me at the end, you can also get some
blank blank cards. I'll add some links for you. You can always come back and
check them if you need to. But there we goes,
those are the supplies. Make sure that you print the
workbook before we carry on. For the fast last
sin, we'll need this basic stroke worksheet is really good to
practice with guidelines. Make sure to get this ready, and we'll continue in
the next last sin.
3. Basic Strokes / Calligraphy Drills: This lesson, we're
going to learn all about the basic strokes
of calligraphy. You've got this worksheet
and it might look a little bit scary or just
a little bit strange. You might be wondering,
why do we need to practice these
individual strokes. The thing about
calligraphy is that we're trying to think of
lettuce shapes, and by practicing these
individual strokes, we are starting to think of those shapes and we'll later
put them into letters. We're going to
start by practicing downs stocks and stocks fast. You can see there's a
little grade out area here which you can trace from these guidelines
are just really really helpful because if we
get the base line, you can see where
the bass line is. We have the top
and bottom lines, acen and D sender lines. This is for letters like J, for example, or like D, the ones are stretch down or up. And we also have
this waste line, which is where the lowercase
letter normally would sit if it doesn't have this A
sender or the sender shape, like let's C, A Ei, all those letters
and you got it. This space here might also
be referred to as x height. That's maybe something
you've had before, x height. I just thought I mentioned that. But there we go so,
let's begin practicing. I'm using my tumble for
the aski brush pen, and let's just learn
how to hold this pen. If you're left knee,
everything I'm going to say is going to
apply to you as well. So to hold the pen, we want to grab it with our
thumb and index finger, and maybe have our middle finger resting underneath
supporting it. I should feel nice
and comfortable trying to squeeze your pen. We are also going to hold
our fingers really low. It's not kind of in
the middle of the pen, but fairly low down. What's really important
is that we want to try and get into the
slanted position. This is a 90 degree
angle, straight up. We want to get into
a 45 degree angle. The pen is definitely
at the slant. This is really important,
so it does want to be at the slant because
that's the only way how we're going to get
axis to the side of the pen and get a
thicker stroke. This is the position, the
side of your hand is nightly rested on your Try to
rest your elbow as well, so that will just give
you some extra support. Make sure your feet
are on the floor. Don't cross your legs. Things like that can really
affect your lettering. Try not to lean over
too much as well, try to keep your back fairly straight, and most importantly, just relax, try to relax, drop your shoulders,
make your hand heavy, and this is the feeling. That's the position and feeling we want to
have before we start. Right, so there's one very
important role in Calgophy. All of the downstrokes
are thick and all the upstrokes are
thin in caigophy. We're going to start
by practicing that. We're going to do it
this fast down strokes. I'm holding the
pen at the slant, and I'm going to apply
very heavy pressure to get this thick. Stroke. Gliding our hand down. I click if we want
to glide our hand. This is exaggerating, obviously, I can't really do it
with this size let ring. But just try not to engage
your wrist too much. Imagine you're doing these gliding motions by your hand and your arm are moving together,
if that makes sense. Let's just do a couple of more. Let's ignore these
ab strokes for now, Let's just do These
down strokes, may be leaving a bit of room
for upstrokes in between. We're pressing down really hard. Try to focus yourself
before you do each shape. Try to go fairly slowly. And just press down really hard. Don't be afraid to press down, you can't ruin
your pena promise, they're designed to bend. This is our downstroke, well done. So try a few. Now we're going
to do an upstroke and this might feel
very different. I just want you
to know, don't be afraid if they're really shaky. That's not about what
it looks like here. It's about just
practicing the technique, building the muscle memory. There's one very
very common mistake that a lot of beginners make, which is very
natural, very normal. So What I often see in my beginners
classes is that people tend to change the way they hold their pen when they go upwards. We went down in this position, and I often see that when
they do an upstroke, they go upwards like that. We don't want to do it. We want to keep our
pen where it is. We want to be at the
slant, just where it was, when we were doing
a down stroke, and we're going to go faster. Let's go a little bit quicker upwards to create
these thinner strokes. As I said, there might
be a little bit. Bobbly or shaky. I just want you to know
that that's very normal. Try to go super lightly,
very light pressure. We're not pressing down at all. Very quick and light movements. They can be fairly
slanted or straight. It doesn't matter right now. You can follow the slant
lines if you like, but you can also
keep them upright. There we go. Very quick,
very fast movements. Now we're going to do some
of these shapes where we connect thin, thick and thin. We're going to start
from this point of halfway through
this up stroke. We're starting here,
we going thin, dropping down and doing this really heavy thick stroke
and connecting thin again. Let's try again. Thin, thick. Thin. Try to notice how slowly
I'm going at the end here. It's very common again to
flick, flick your strokes. If you're doing this, and if you're seeing the di
strokes square thick, try to slow down a little
bit more towards the end and don't take your pen
off the paper right away. I'm going up, thick down. As I finish, just
keep your pen for a second before you pick it up. These transition
points are tricky. This is where you want to change that pressure right
in the middle. T h, I'm already thinking
about the thin stroke again, when I'm halfway through
this down stroke. Think about the next
strike in advance, and this is going to help a lot. Try to go a little bit
slower wherever you are. Try to go slightly slower, checking that you're
holding your pen correctly if he has wandered
off to a different position, which is fine, correct yourself, recognize it and
reposition your hand. But there we go. Try to press a little bit
harder when you go down just to get that extra thick stroke and try to go super lightly
when you go up. Well done, let's try
some of these U shapes. Here, we're going to change
the pressure halfway through the shape and
also here at the top. These are called
underturn and overturned. Undert let's start
the thick stroke. Slow down at the
bottom and finish this finish this up
stroke really slowly. Then we starting this thin
one by going upwards and then dropping and making
this downstroke really heavy. Let's
do a few more. Down. Oh. Thin up, thick down. Now, something that
might be happening and just again recognize
if it is happening. I often see this where
students do this, open the stroke too much. That's not what we
want. We definitely want to keep our
strokes parallel. L we'll train tracks,
try to do it that way. Again, thick down nice
and slow, thin up. L's another one,
thin, thick down. I'm feeling that control in
my fingers. Try your best. It's definitely be
tricky. If you're seeing a lot of wobbly
and shaky strokes, I just want you to
know that it's not about what it looks
like on this sheet. It's all about just trying and learning and just
getting into it. If it's the first
time you're doing it, it's absolutely normal. If it's a little bit
wobbly, that's normal. Let's do some of these
compound curve shapes. Quite similar to
underturn and overturns, but we're just going to
connect pre strucks together. We're going to go
down thick, thinner. Thick down, that's one of them, or we can also do it in reverse. We go up, we go down
and we go up again. What's important about this? Again, you don't
want to keep them. You want to keep them parallel instead of opening
them up like this. A good way to do this is
just to follow the slantl. Maybe you can start
the next shape on this slant and try to
follow this slant. As you do all of these shapes. Again, I'm starting
the next one, maybe on this slant line, just to help me get into the position and I can just
follow it and make sure that all of the strokes are
parallel to one another. Again, quite a few
transition points here. Remember not to flick
your pen at the end. Try to go a little bit
slower at the end, Don't pick up your
pen right away, and Also slow down before the
transition points happen. Try and think of your
shape as if it's going Like to the right
here a little bit. There's a bit of a
horizontal stroke happening. That might help. When you're at the top, just go a little bit to the side and
when you're at the bottom, just go a little bit to the
side again before you go up. This might just
give you a bit of time to change that pressure. You can think of it that way. But just thinking in advance. It does take a lot of focus. When I'm halfway
through this stroke, I'm already thinking about
this thinner stroke. And when I'm doing
this thinner stroke, I'm already focusing
on this down stroke. I always always thinking
in advance and preparing your hand for a certain
pressure change. It's like the information is
traveling from your brain to your hand, which it is. It just takes a
bit of time. So do think about it in advance. Okay. Beautiful,
well done everybody. That's not an easy exercise. Now we're going to try some of these decen and A sender shapes. As I said, this could be
the letter g, for example. If you think about it, it's got this little loop shape
like this or the letter B, you do the letter B, it
stretches upwards like that. An example, just to give
you a little example, so you know what
we're doing here. There we go. We're going
to start with this one, we're going to go down thick. Slow down at the bottom and then do this upward
stroke, this thin. Remember that
everything that goes to the side or up in
calligraphy is always thin. Everything that goes
down is always thick. That's tally like the number
one rule to remember. Let's practice this together. Again, starting this one, it's important that
you start this loop with this right side,
with the up stroke. We're starting here going up
and then all the way down. Let's just carry on free hand. Remember to try and finish
your loop at the baseline. When you do this downward one, and when you do this
top loop shape, try to start the loop
at the waistline. There we go. See if you can make your loops a bit more
narrow or a bit more open. This will depend on your style, but it's quite nice to start
experimenting a little bit. You can make them really
wide or you can keep them very narrow there. There we go. I just
want to say well done. Now that I'm making
it look easy. It's not my intention. I have been doing this for so long, remember that have
been practicing pretty much every
day since 2015. Just now, it doesn't
mean that it will take you a long time to learn, but by doing these exercises, you're strengthening
your muscle memore and the more you do
them, the better. I highly recommend just
going through this exercise, five times as many
times as you can to really really let it all
sink in before we carry on. This is one of the
best exercises you can do as a beginner to
help you progress. Well then, everyone, and I'll
see you the next lesson.
4. Building Up Letters Out Of Shapes: This lesson, we're going to go through this locase alphabet. I know that this
sheet looks scary. Again, just make sure that
you print this sheet. I know it looks scary. It looks like an algebra
exam or something, but all it is is just
deconstructed Locase alphabet. I just want you to
start and understand how all of the
shapes we practice, there will be some other
shapes like this one, which we have really practiced. It's like a reversed C shape, you can take without
B. I just want you to start and understand
how shapes build letters. Calligraphy is really different
from handwriting because when we write in cars
we join everything up, whilst in calligraphy, we try and pick up our pen in
between the shapes. Just to demonstrate, let's say I'm just doing
the wide mode. Now this is how I'm picking
up my pen from the page. After I do certain
lettes or shapes, I don't join everything
up in one go. This just makes it
easier for you to literally breathe
and take a pause. But also that's just
how click if it is. We will never ever ever join one word and try to
do it all in one go. Always try to think
of your words as if you're
lettering shapes and you're putting
shapes together into lettes. These are the shapes. All these pink shapes are
the shapes that form lettes. How about if we just go
through them together? To do the case A, we're going to start
with this C shape. We can trace together,
in thick thin. All it is is just we are adding this little conf half U shape. We're going to do this first and then go back to the letter. When we put this together, so we do a C shape, and we pick up our
pen for a second, and we do the second
part of the letter. We just divide it
into two shapes. That's the Locase A, C shape, picking up
the pen for a second, and then finishing
with the u shape. There we go. That's
the letter A. Of course, you can stylize it in a different way.
We're going to go there. It is a beginners course, but all you need to
know is that letter A consists of these two shapes. Now, let's do the letter B, and again, we're going
to do the red first. You're going to start with
this shape. Do you remember? It's an a sender shape
we've practiced this to. This a sender loop shape is the first part
of the letter B. Now we just need to add on this little like a reverse s shape, but it also has a little loops. I got to slide this
up down to the side. Thin up, thick down, thin to the side. If we combine both of the go
so that's the loop shape, we stop in between, and then we add on this shape. You get the letter B. Again,
this is one way of doing it. I mean, you practice
tracing the alphabet in the next couple of
worksheets. You'll see that. It's possible to stylize these letters and they
don't always look the same, but they do consist of
these two shapes mainly. You could do your letter B with a beautiful entry
stroke like this and maybe done like a
smaller loop shapes. It's really up to you, but this is a really really good
way of practicing it. Now, some letters
like letters C, they just flow in one go. We're not picking
up our pen here. We're just doing this
letter as it is, so thin, thick, thin,
and there we go. That's the letter C. So
Let's do the letter D, we're going to start with
these red shapes again. We're starting with the C shape. That's a first shape
with the letter D. You can also do it as an shape. You can connect it all the way. But I just do mine like this. We're going to we're going
to do the sloop shapes, that's the second
part of the letter D. It also has this a
shape at the end. Quite a few shapes
we can find in here. When you do your letter D, you want to do the
C shape first. There we go. We're
starting here, and then we stop. And then we start
with the slope. And we just attach this down
stroke onto this loop shape. So we're going straight
into this u shape as well. So just to do it again. We're doing a C shape
to begin with or shape. Then picking up the
pen, we're starting, kind of trying to
eyeball it in and make sure that this down stroke
is attached to this C shape. So we're starting here,
leaving a little gap, and then we're
just going through that gap with a down
stroke to hide it. Okay. So let the letter E is
one of those letters, again, the flows in one go. So we're going up in thick down to they
got just how it is. Let's do this letter
F. It's one of those letters that
stretches up to the A sender line and also
down to the decender line. It's a very tall letter. We starting with
this thinner shape and going all the way down. You can do it in one go, or if you want to have polls, you can divide this
letter into two shapes, so you can pick up
your pen and then you can do this shape afterwards. Again, might look a bit strange. This is all thin. I might
look a little bit strange, but when you put it together,
it got to make sense. So that's the first shape. You can stop here,
pick up the pen, go back in, or you can
choose to do it in one go. But maybe in your learning, it's quite nice to just practice it separately.
There we go. Next up is the lettic G. Again, it starts with this shapes, very similar to Letts A and D, so that's pretty
much the same shape plus a descender shape. The one that goes
all the way down. Remember we did this already, but now we're just
adding on like an extra little up stroke here. There we go. If the
abstrak is really long, you can always divide
it into two parts. You don't have to do
it all in one go. Just to show you that. You could do this, the first shape. You can pick up the pen and
then we do the loop shape, you can finish it here, and then pick up your pen and stretch the rest of
the exit stroke. The last stroke of the letter, is called the exit stroke and the first part of the letter
is called the entry stroke, and it's quite nice to
make them quite long, so you can see the entry
stroke here of the letter B. It's quite long and the exit
stroke of the letter B. It's quite long as well. Begin to chat about at before. Let's do the letter
H. Starting with a beautiful entry
stroke and then doing a loop shape so thin and thick. Letter is my favorite letter. I just I just love
the shapes in it. I love the shape,
and then we're also doing this compound
curve, that's the shape. When we join this up, when we do this first part, we pick up the pen, and then we do the second part up down up. We get the letter H. This alphabet is done in more of a bounty
lettering style. Bounty just means that it's
like a bit more modern, it has a bit more character. It has a bit more
movement to it. Some of the letters
stretch up or down below the baseline, some of the letters are bigger, some of the letters are smaller, and I love it because
it just makes the lettering look so
interesting, so stylized. See just notice how we drop this stroke below the
baseline a little bit. Letter. The letter I normally is just one
stroke like this. But you can of course also add the little entry stroke to it, so that would make two. So you do this entry stroke,
you pick up your pen, and then we do this
little U shape and our little dot,
of course, as well. You can also do your letter a bit more round at the bottom. Again, different lettering stars will look different, obviously. For example, this star
is a bit more classic, while this star is a bit
more bouncy looking. All right. Let's
do the letter J. Again, one of those letters that is normally done in one, G. Although you can stop here. If it's too much
for you to stretch this up stroke all
the way to the side, it's a bit of a handful. You can stop here, divide
the stroke into two, and do it this way. It
will look like this. You go down and finish this descender loop,
pick up the pen, and then you can finish this
little thinner stroke and stretch to the side
and dot of course. There we go. Right. Letter
K. Not an easy letter. A lot of people really
struggle with it and it's actually also the letter that I used to struggle with a lot. Let's take it slow. It starts in a fairly
straightforward way. We just do a sender shape, and then we pick up the pen. But then here we get this
like a reverse C shape, very similar to the
letter B shape this. There we go. Then we
make a little loop here, and then we stretch down and up. It can be particularly hard
to do this down stroke, holding the pen in
the correct way. If you notice that
your pen is doing some strange things and
wants to come up a bit more, make sure you're
still holding it at the slant and try
to practice this. Down stroke, that goes at
the slant all the way down. I'm going to combine
these two shapes, so we go up and down.
We pick up the pen. I love to go back to
the middle here of the stroke and start
these shapes from here. That's the first one,
making a little loop, all the way down
with a tricky stroke and finishing slowly
the thinner one. You'll practice this more,
so don't worry for now, but it's just quite nice
understand the shape. Let's have let L. Again, one of those lets
just slide the letter E. It's normally
just done in one go. Let's just practice
that thin up thick down and finishing this
little exit stroke. Don't forget about it. We don't want to
chop the letter off, we definitely wants to
have a nice ending there. Beautiful, well done.
Take your time. If you feel like you need
to go slower. That's fine. Just take it slower,
take it easier. Let's do the letter
M. So the letter M has three shapes in
it. That's quite a few. It's definitely one of those
letters where you find yourself just lifting
your pen up for a second. Let's do the first shape, which is just a
simple down stroke. Then we get this
upside down U shape. Plus a compound curve shape. And again, I'm bouncing it down a little
bit. There we go. Quite a few shapes. Let's try combining them, so let's do a down stroke. We can pick up our
pen. The first shape. Now I'm starting it from the
bottom of this down stroke. I'm going up. And down to
the middle of the left top. Now I need to go back to this point where I
finished and just do, go up and down and finish with a beautiful exit stroke that would normally
connect on the let to. So try to think of it
that way. There we go. The let n is very similar. It's just short, so we skip
in this middle stroke, but it's pretty much the same, just what we've done. Now, try it down stroke. Picking up the pen,
going up down and. Just like we slowed down towards the end when we
were doing the shapes, try to slow down as you do
the end of each letter again. Shape. We did like an shape,
but it was a bit different. I normally do my like this. I start with down stroke and change the pressure
at the bottom, and all of this is
done in thinner. Thinner stroke, very light, down stroke and then just very slowly with a focused movement, we are continuing
with this loop. Nearly there guys well done. You're do a great job. It's not an easy exercise. Let's try the letter P.
Letter P consists of an acen loop shape plus this
little vas C shape again. Up down, little
loop at the bottom. Just like the letter
B, is the same shape. We've done it one already. Let's combine this together. That's the fast shape, beautiful loop,
all the way down. Then we're going back to here, maybe where the baseline is. We can also do higher up.
It's really up to you. Again, it will depend
on your style, and we're just attaching
this little shape and very slowly doing this up
stroke at the end Mt. Let a cube, so we get a C shape. And something that
looks a bit like letter F. You're going to go do thick, thin up, wrap it around with a little loop and
stretch it to the side. Thick down stroke, and then we do it is like a
really narrow U shape, and then adding a little loop. How that makes sense?
So we try putting this into an actual letter. C shape, being up
the pen, going up, you can make the loop cross, your down stroke if
you like. There we go. And stretch to the side. Letter r. Letter r
can be really tricky. It can be one of those letters
that will take a bit of time to just truly sink in.
But let's just give it a go. To do the letter
r, we're going to break it up into two parts. This is the fast part. We do
this little thin loop fast. What's important here is to finish with a horizontal stroke. We're not finishing with a
diagonal or vertical stroke. We're finishing with
a horizontal stroke, and we're just attaching
this little U shape. So let's try to get there. This is the loop finishing. Horizontally, being
up the pen here. Let me adding on this a U shape, but min is a bit
edgy, a bit angled. That's again, just because
it's done in a bound style. A few more lines. Letter S. Letter S
flows in one go, so we go up, take a loop at the top, and then also a
loop at the bottom. Let's try it again, so thin, a beautiful wiggly
loop that goes, true. Like a gly loop. Again, not too easy
to do because it does require a bit of slanting. What I find helps is really
singing into your pen, starting from here,
and just going in a very thick waves you go down. I find that just makes it flow a bit better.
You press down harder. Right. Let's do the
letter T. We just do a straight down stroke and then we need something to
finish the letter. We're doing this like up stroke. Forsc, it's a U shape. There's also a cross line. Don't forget about a cross
line when you do your ts. It's quite nice to
do a thick line down and a little up stroke, and then pick up the pen
and then do the cross line. Let we go. Then let we
can start the letter U with an entry stroke and
then do this first U shape. Then pick up the pen,
so that will be here, but we pick up the
pen on this point, and then we're adding
on another U shape. Looks a little bit strange. But let's just see what it looks like when we do
the actual letter. We start with the,
do the U shape. Then the fir part
of the letter u, and now we just need to overlap this little up
stroke a little bit. As we go down, we overlap it, and just do another U shape. That makes sense. Yeah, there's definitely a bit of
overlapping going on. Now, let's do the letter V, so we start with up
stroke and then go down. Again, in this little
tricky tricky shape, that slants this way. It's definitely a
slanted movement, and then we just do
the second part, trying to form like a little triangle
shape here in between. When we do the actual letter, obviously becomes a
bit more natural, so we do the first part, go back to this base. Pick up the pen and then
start we finished and just add on The second
part of the letter. All right. Let's
do the letter W. We're starting with
this entry stroke, going down thick and
then finishing thin. It can be as edgy or as round as you want it
to be here at the bottom. Mine's definitely edgy here, but a bit more round here. We're going to do
the second part, do, thick and then thin
up and very slowly, we're finishing with this
horizontal stroke again. Well done. Let's
connect them together. Go up down to the middle, we'll pause, then start in the
next shape up to the side. Well done. The letter
x is a bit tricky. So it's quite interesting
because they're normally starting with this
shape, this shape. And then all that's left to do. After we do this is
this little upstroke. If you look at
this, it's kind of like a compound curve shape, but it's definitely a
bit more like up and down up so the upstrokes
are not as long. But if you add longer upstrokes, that's all it is if you
remember the shape. So that's what we do first. Let's do together up down up. And then just pick up your pen and all you've got to do is add this little upstroke
and it can be either straight or av like
this, a bit curved. It's really up to you again, it will depend on your style, but that's how this
letter is formed. Right guys, do more
letters. You've got this. We can do it. Letter y, I love starting it here with a little up stroke just to show that normally there's a
connection stroke before it, and that's the first part, and then this second part is just a straightforward
the sender shape. Again, 100 if you've practiced already in the fast lesson, if you remember, that's the one. If you combine them together, we get the letter y. You can also start your letter y with a little loop like this. If you'd like to try that, that could be quite interesting. There we go. Let Z. We're going to talk
about the loops, entry strokes a bit more soon, but I thought I just
mentioned it, and the letter. Let Z split right in the middle. That's the first part, and
this will be the second part. I a little bit
like number three. That's one way of doing this. I know some people do
the letters like this, which is something you can try. But this is a bit
tricky because it's quite hard to connect to
join it to other letters. I might make it a bit difficult. But that the doable, I think it's quite nice for
these for it to be like this. We're going to do
the actual perce Laset going to practice them. But this is just a really
good exercise to begin with, and let's carry on with the alphabet. Well
then, everyone.
5. Lowercase Alphabet: I know that lecturing free
hand can be very difficult. In this lesson, we're going
to follow some worksheets, and I actually really, really recommend tracing because it's the best way to
train your muscle memory. The more you trace,
the less you have to think about the
actual letter, because you're simply
following the guidelines, and it just trains
your hand to do these movements
automatically after a while. So I highly highly
recommend using these worksheets and tracing them as many times as you can, at least doing
each of them once, is going to make a huge
difference for you. I highly recommend
focusing on the alphabet this week and using these worksheets to squeeze in as much practice as you can. So we're going to start with
the lower case alphabet, this lesson and just
like we practice before, combining all of the
shapes together. In this lesson, I want you to
try and focus on picking up your pen from the page when
constructing each letter. So we're not going to do
each letter in one go. So just like before, we're going to
have those moments where we do pick up our pen, have a little pause before
we start the next shape. Although some letters
do flow in one go. Just like we've
practiced before, for example, the letter C, just flows nicely in one go, as well as the letter E, as well as the letter
J or L. But most of the letters do require for you to pick up the pen in
between the shapes. It might feel a little
bit strange at first, but calligraphy is all about separating strokes
which build letters. So you will often find that
when you're doing a word, you actually are picking up your pen from the
page very very often, and that's just the
nature of Caligrapy. And eventually, that will also help you with your
lettering flow, and you will develop
a good rhythm. It will just feel natural. You won't even realize
that you are stopping. So we're going to start
with this first letter. I'm just going to trace it and try to think of the
shapes as we go. So Starting with the C shape, as we already know this
from the previous exercise, Try to do this as
slowly as you can, pick up your pen here and
continue with the next shape. Essentially, this is a very similar exercise
to the previous one, but this time we're tracing, so we can fully focus on
the pressure changes, transitions, from light
pressure into heavy pressure, going up very lightly, going down very heavy. You don't really have to
think about the shape of the letter because you're
following the guidelines. You can use the arrows
to guide you as well. But do notice how slowly
I'm going here and try to copy my pace
here. Very slowly. Doing each letter
with so much focus. Slowing down before
the transitions, and actually trying to
finish each lector, a little bit slower. So being extra careful on each
last stroke of the lector. Starting with a lot of focus, maybe then going a
little bit quicker, when you reach the
middle of the, picking up a bit of speed, making a little momentum there, and then finishing off with a very focused and
slow movement. Maybe the second
time you do this, you'll start to
notice that you are starting to develop some
kind of lecturing flow, that it looks a bit
more rhythmical, that you are making
those pauses, and they're all
similar in a way. It's like you're
following a beat. That's what it feels like
when you get into that flow. It's all rhythmical and flowing. To take your time here. You can refer to this
video if you're still unsure about some
of the letters. You can follow. Should
be nice and clear here. Every single movement
for each letter, but I hope that the
arrows are helping you. It's fairly straightforward. Keep reminding
yourself to slow down. I can't stress this enough. You do want to go very slowly. Slower is better than fast for sure when it
comes to calligraphy. Especially when you're learning, you want to really really get
used to shape each letter. If you're still getting
used to the pen, being slow will
help you to let it sink in a little bit
better I promise. I get slowing down
towards each exit stroke. The exit stroke is the last
stroke of each letter, and we're really
slowing down there. When you get to the middle, when you're half way
through the alphabet, maybe try and
imagine that there's another letter attached
to each of these. When you're doing the last
stroke of each letter, just imagine that there
would be another letter. You don't necessarily need
to do it or letter it, but it all starts with
thinking about it. Thinking in advance.
That's how you train your mind,
train your hand. They're not doing letter
connections just yet, but starting to be a
bit mindful about it. They'll maybe help you to
pay a bit more attention. You do it maybe a
bit more carefully because it will be connecting to another letter
eventually anyway. There we go. Nearly
done with the sheet. I'm sure that you're doing a great job, well
done, everyone. Feel free to print this as
many times as you need. Literally, this could
be such a good exercise to do every day or every other day or
at least every week to help you and continue
with your practice. It's just an excellent exercise. If you ever have any break
from practicing and you need to get into the
swing of things again, this is going to
help you so much, just focusing on basic
strokes and the alphabet. Is the best thing you can do. And it'll help you to
ease right back in, I promise. So here we go. This is the lower case
Alphabet, well done, everybody. There's a bit of room here. If you want to practice some letters that maybe a
bit more difficult for you. For example, the letters
K or R or letter E or D are usually the ones that require a bit more practice.
That's very natural. Use the space to just
maybe pick those letters out and practice them
a bit more free hand. We'll focus on the uppercase
alphabet in the next lesson. Well done, everyone see soon.
6. Uppercase Alphabet: In this lesson, I'm going to use this worksheet that says
uppercase alphabet. They're going to trace all
of these uppercase letters. They are slightly big up because uppercase letters are
bigger than the lower case. Lettering in bigger size might actually help you
to get into a flow. Now this is what
it feels like if you find it easier or harder, and you can follow
the arrows here. Remember to pick
up your pen often, remind yourself to fit nice and straight, rest your elbow. Make sure you're holding
your pen correctly, just troubleshoot
from time to time. If something doesn't work out, just maybe now is that maybe the position of the pen
has gone a bit off, or maybe you're not dressing your elbow and your
hand is up in the air, or maybe you're using
your wrist too much, or maybe your back
isn't very straight, so it makes your hand
a bit more tense. Things like that.
Relax your grip, take a deep breath, and
let's try this together. We're going to start
with the upper case A, a nice little entry stroke here. Nice and thin, and
I'm going to have a little pause here before I carry on with the next
part of the letter. When you do the cross line, you can actually separate
it into two parts. You can do this. You can then pick
up your pen and then you can start again. If it's a bit too long, sometimes it's easier to
separate it into two, or you can just do a quick
thin movement all at once. It's up to you. Let's start the letter be nice
entry strokes. We're really focusing on
longer entry strokes here. Trying to really extend them. This will make our letters
look a bit more complete, a bit more professional, right from the start, and same
goes for the exit strokes. We want them to be nice
and long like this. I find that lecturing in
big scale is a bit easier, when you have more room, it's like you can glide
your pen a bit more, and it just helps a lot, doesn't it you can move freely instead of focusing
on very small lets. If something doesn't go right, maybe your upstroke
looks a bit shaky, or maybe you just need to color in your downstroke
a little bit more, so it looks a bit
more consistent. Remember, you can always go back and find two
in your letter. You can always go over
your downstroke again. Maybe color in some
parts of very thick. Remember, you can
definitely do this and it's quite normal to
make a little mistake or sometimes your
strokes won't be perfectly thick or thin because
this is hand lecturing, we need to allow
for human error. You're not a computer, you
can't make these perfect. If that happens, just use
the tip of your brush to gently correct
some of the letters. T F. In the letter G with a nice entry stroke
again, nice and thin. Take your time here
wherever you are. Slow down. Remember, if you
do want to go very slowly. If you're half way to
the alphabet already or if you're much further along, it probably means you're
going a little bit too fast, so just try to pace yourself, try to find a calmer softer and slower rhythm
for your lettering. You'll just notice
that it helps it and everything just starts
to look a little bit better. Also, remember that this
is purely my style. There are other ways
to do these letters. So if some of them
look a little bit strange to you or
very unnatural, remember that you don't
have to use this style. I will attach some
more worksheets, so you can try some
different styles as well, but you might also notice But there are different
alphabet stars out there, and maybe you'll see a person doing it in a different way. So I think your style
is always evolving. I also have some letters that I do completely
differently from When I started
lecturing back in 2015, and there are some
letters that I still do in exactly the same way. So I think with time, you just kind of pick
up some more styles, and then maybe you change the way you do your
letter M or the letter T, you know, and then you
kind of go back to it. So I can also tell how my
style is always changing. But currently, this is what I used for my uppercase letters, and I hope you enjoy
practicing this as well. Very similar to the lower case, but just bigger. Here we go. Same with the letter P, pretty much the same
as the lower case. Just making it a bit bigger. Relax your hand, try to
focus as much as you can. You're doing a great job. The let nice little tail here, so nice little entry stroke. Try to make your down
stroke smooth and thick. Should feel quite nice
and smooth paper. It will feel very unnatural if you're using a textured paper. Do make sure you're using
good quality smooth paper. I love this HP color
choice card because it's so smooth and brush
pens just glide on it. I really love it. The letter, little reminder, so we do this fast
and then we go over this up stroke with
a down stroke to hide it. Few more letters to go. There we are. The letter. Remember, we're starting
with this stroke first. Finishing with this
quick nice and thin. I love the now if you have some favorite
let here as well. Picking up the pen
here, halfway through. Please please do not try and attempt to do these
complicated lettuce in one go. That's just going to be
very, very difficult. I was talking too much,
and this is a bit shaky, so I'm just going
to use the tip of my brush to very carefully
go over this a stroke again, just to smooth it
out a bit more. There we go. And the letters. This up stroke is very long. Just like I did here
with my letter A where I separated this long
stroke into two parts. I'm going to do the same
thing with the letter. Picking up my pen here and I'm continuing this stroke from here after having a little rest. Like this. There we go. I hope
you enjoyed it. There are some other
styles to try. Just check the next lesson
for some more worksheets, and I'll see in our
Facebook group on Sunday and I'm
going to go through a different alphabet style that you all using a ficker pen,
that's going to be fun. Please please join. I would
love to see you there. Good luck with this week. I'm here if you need me, have
fun and happy lecturing.
7. Connecting Letters: So I thought that we
could do this letter joining exercise together. So you've got this worksheet, which is designed for five pen, and it's just wonderful to
help you trace and practice. So you can always practice this. You can trace this part,
but today together, we're going to go through
this exercise where we join four letters at the time before we try
to do the whole chain. So we're going to begin
with this letter A, and we are still remembering to divide each letter into shapes. So I'm doing the fast
part of the letter. Picking up my pen. Then
let's do the U shape, finishing the letter A. Now that time I'm
stretching my exit stroke into this down
stroke of the letter B. You can then always hide it. Even if you dig into it a
little bit, that's fine. Because when you
do your letter B, you can go over it and
just hide it a little bit. We're going to carry on of
the letter B nice and slow, doing a down stroke and hiding that
connection stroke down. Picking up the pen, carrying on with the second
part of the letter B. These are quite small,
so it definitely gives you a really detailed
practice here. I think sometimes it's
good to practice small as well because it can be quite
hard to do in clicker P, especially if the brush bend. Let's do the letter C. Again, I'm hiding the
connection stroke. See how it got hidden
behind this down stroke. Letter D starts
with the C shape. We're picking up the pen. Then we're doing
this acendo shape. Let's cry on with a letter E, starting with an entry stroke. How we will pause after
you finish the letter, then we're starting
the letter F here, and then we're connecting
the down stroke. To the letter E.
Doing the letter G, nice around, picking up the pen, going down, touching
the sender line. Again, digging in that
stroke into the next letter. You can see how it's
digging in the letter H. Now I'm starting this
next loop shape, hiding that little stroke. My pens fairly new, so I keep like
correcting my strokes. Because it's a bit stiff still. Let's finish off with
this bouncy letter H. Love live. We're going to
start with a letter I, the next little set of letters. I'm going to go straight
into the letter J because it is that one of those
letters of flows in one go. Again, I'm digging in my stroke. Digging it a bit longer than I need because I know
that we can hide it. Now I'm starting with
this little loop, going up and down, picking up the pen again, doing the letter K, I'm stopping after every
single letter. After I do this exit joke, which is also the
Corrections joke, I stop. Let's try doing that together. All right, let's do the letter A and finishing off again with a beautiful exit
stroke. Harding dots. Let's carry on, let's do the M, down stroke, picking up the pen, doing this upside down U shape, and the compound curves are
breaking it down into shapes. Again, doing this longer
connection stroke, even if it goes a little bit longer than
we think we need. We can always use the next down stroke to hide
a little part of it. Carrying on with a
compound curve for the letter n.
Picking up the pen, doing the letter and stopping. This is quite interesting
when we connect. A the letters to the letter. The stroke can be
quite horizontal. It's just interesting
to observe. Do the letter p to
finish this line. We're finishing with
this long stroke. Imagine there is another letter quite similar to the letter. Oh, this letter P
connection stroke is quite horizontal,
I would say. All right. Let's do a letter Q. C shape or shape, stretching down the second
part of the letter, and we're going to go straight into the letter r because we know this is where we divide
the let into two parts. The first part is
this, and we've gone straight into it and now
we're resting. So pause. Let's do let r to
finish letter r, and finishing with the letter. I doing three lets, we're approaching the
end of the alphabet. We're going to do the letter t. Again finishing this letter tape with a beautiful like
a U shaped stroke. Now when we start
the actual U shape, we're going to hide part of
this connection stroke again, and again a fast shape. Second shape and finishing
with the letter V. You might be wondering, why do I pick up my pens so often? I think is obviously
it might seem like it's a lot and it
feels a bit strange. This is what differentiates
calligraphy from handwriting because when we
write in cars if we connect, we join everything up in one go. In Calligraphy, you'll
probably never join more than three I Maximum
four strokes at a time. Let's do a W. This is interesting.
Letter x goes like this, going to finish the W,
and then we're going to go straight into the
letter x this way. If you think of it being this
compound curve like this, imagine this is the letter x. Then you'll see del stroke
as a connection stroke. In this case, it's really short. But let's say we have letter. Before the letter x. For example, then it's
much more obvious, it definitely goes up, down up, and this is where we can add the second part of
the letter x doing this. We get a beautiful
connection stroke here. I hope this makes sense. Let's say we have
the beforehand. Again, beautiful compound, This is the first
part of the letter x, and then we just odd in a
little lop stroke there. There it comes to a
little loop stroke. He just W and X is a
bit strange because this connection here
is really short, but it's a very uncommon
letter combination, so don't worry. You're not going
to see that often. I've gone straight
into the letter Z, but I'm only doing one part
of the letter Z before I pick up my pen and
before we finish, now we just finished with
a beautiful legit stroke, just to make the letters
ad look complete. There we go. That's
what it looks like. I thought I would
just show you how I would do the alphabet in flow. I'm going to talk
here and maybe this is something we can
try together as well. You will see how often
I pick up my pen, but I'm doing it in such a, such a rhythm that it doesn't actually feel like
it's a long pause. It's definitely a
really quick movement. I'll finish a lesson
by doing this, and maybe you can
do it together. I think it's nice for
you to see that rhythm. There we go. So I
thought I'd just show you and I know
that make it look easy. Please don't look
at this and think, Oh, my goodness, I can't do it. You know, my lines don't look smooth and all those things. It's very normal if you're learning to please
remember that. I've been or what is
it now, nine years. That's crazy. So of
course it'll feel natural to me.
That's very normal. Yes, print this worksheet off, practice as many times
as you can this week, just going through
these exercises. That'll be real really powerful, really helpful for you to
build your muscle memory here. Yes, the last thing
you can do is try to join everything
up in one go. Pas please please
remember to divide each letter into shapes and
think about those shapes. The only letters that flow in
one go are letters like C E L J S. I think that's it really. The definitely you don't have to pick up your
penn in between, you do those ones, but the
rest do have parts to it. There's one part.
There's a second part. So please try to spot those parts just like we've practiced in
the previous lessons. There we go, Well,
then, everybody, I can't wait to
see your practice. Let me know how you get on.
8. Short Word Lettering: Once you've practice
connecting the Lettie, joining the ette and
you're started to understand the concept of
finishing word letter, extending its exit
stroke and then starting the next letter with
an entry stroke, and that's where the
connection happened. That's the joining up part. The next step is to put
those lettes into words. We are going to try some
lovely short words here, you can pick to do a few or you can do it
them all in one day, it's really up to
you, but I just want you to remember
to go slowly. We are tracing here, so we're just going to go
over this grade out area, and just remember to go slowly. Remember to pick
up your pen after every shape or
after every letter. This will depend on
the letter shape. But I thought I'd just god you through a couple
of the words. You can see my pace and you can see how often I'm
lifting up my pen. I'm starting with the letter D. We're going to do it to b dream. And I'm starting with the letter D. I'm starting
with the C shape. Picking up my pen,
and I'm going to start this shape
with a little tail. This is actually called
a detached flourish. Be the next shape, and I'm going straight
into the letter r, and I'm going to stop here, divide this let into two parts. Finish the letter r,
pick up my pen again. To the letter E.
Pick up the pen, do the letter A.
Pick up the pen. I just notice how
I keep lifting up my pen to divide each
letter into shapes. Lovely. As we finish the wd, we're going to extend
this last stroke of the letter to the side
with a lovely tail as well. Getting ready to do
the wide believe, so I'm going to
start this letter with a beautiful entry stroke. It starts quite horizontal, so definitely goes to the side. Then I'm going to pick up my
pen and finish the letter B, so the second part
of the letter B. Lift up my pen for a second, do the letter E. Stop there, start the letter
L with the loop. Finish the let L.
Pick up the pen. Finish the letter and
pick up the pen again, and notice how I am
making those stops. That's really really important. Halfy by now, it starts
to become quite natural, but it can also take time. Please don't worry if you still feel like rushing a
little bit or if you still feel like you want to join up more than two letters at a time or even more than
1.5 letter at a time. It's good to recognize,
if that's happening, just remember to go back to that worksheet where we divided
each letter into shapes. There we go. And finishing with the beautiful exit stroke. Definitely a lot of folk that, trying not to rush that part. It definitely takes
a bit of time. You're going to do the word
relax and doing the letter r, starting with the first part, picking up the pen, doing the second part of the letter r, stopping again, doing the
letter E. Quick we'll stop before we start the letter L. Then doing the letter A, stopping again,
and we're going to flow into the letter x
with this compound curve. Connecting quite a
few shapes here. Before I pick up
my pen again and then we go through
this letter x. We'll upstroke just to
complete it. There we go. The more words to go, doing the letter S
for the wad shine. Picking up the pen.
Starting the letter e. That's the first part of the
letter H, stopping there, doing a compound curve shape, and it's quite nice
to recognize all of the shapes as you go. Letter I is pretty much
U shape. I'm doing that. Stopping again. Letter
n, started a downstroke. Stopping there, then adding
on this compound curve, which we're bouncing
down a little bit. We're definitely adding a
bit of bound to the latte. My style is naturally
really bounces. There's something that's
called bounty cagrapy, and it just means
that you are changing the height and size of your lette to make it
a bit more playful. You can see how for example, the letter n stretches
below the baseline here. It's normally a lette like M, N, or even A, they can stretch down and then bounce back up
to catch the next letter. You can also do that
to letters like H. I just show you
a few examples. Again, bouncing it down. These are quite common to
bring below the baseline. Let's finish here
with a letter E extending it to the side. Let's try this really really
short phrase to get though, so we're going to do B kind. Starting with the acenda shape, picking up the pen.
Stopping there. Doing the letter
E, what B is done. Starting to what kind. Starting with a beautiful
sender loop shape. Stopping there, doing the letter K. Before we stop again, let I. Quick stop, let n, down stroke, picking up the pen. Up down up, a beautiful
compound curve shape. Let D started the C shape. Picking up the
pen, and finishing the letter with this
beautiful a sender shape, the tant into U shape
here at the bottom. Well done. This is not easy. If you never joined up letters before or
maybe if you have, but you aren't quite sure
what you were doing. This can take a bit of
time to really sink in. But as I said, the
most important part here is to divide
letters into shapes. Remember to have the
stopping points, remember to go slowly, and also remember to extend
the exit strokes of the word. Adding like a little longer
tail at the end of each word. You can try doing
this little phrase, get inspired, free hand, see what happened.
But there we go. I hope you enjoy this little
worksheet and it's given a little insight into
how my rhythm, my pace. You might feel like I'm
going really quickly here, but just remember that I've
been doing this for so long and it will take
a bit of time to build up muscle memory and, you know, kind of try
and make your straws look neat and make sure
your letters look balanced, then it all comes with time. So I hope you enjoy the process, but just remember you will get better with every
time you practice. So that's just
something to remember. Well, then for doing this.
9. Freehand Lettering: Plenty of resources, plenty of worksheets in the course
that you can trace. These here are for practicing, doing your own greeting cards. Very useful, some really common phrases like happy
pathic, congratulations. You can trace these before
you tar in free hand. Again, tracing will really really help with muscle memory, and that's something
I really really recommend doing quite a
lot when you're learning. I thought for today's lesson, we can do a bit of
free hand lettering and I can teach you a
little bit more about planning your phrases and arranging them nicely on a page. The first thing you want to do when you have your phrase ready, and it's easier for shorter
phrases, of course, but when you have something
longer like this, the first thing you want to
do is decide how many lines you're going to have
when you letter it. I recommend having more lines and making your designs look more I vertical rather than spreading them wide
because very often, if it's a long phrase, we'll
just take the whole page and it's not going to look good if it's like in two lines, look like a rectangle
on your page. By doing it this way, you can make your lettering bigger and it'll just look more effective on a card on a posted design. Se that's something I
highly highly recommend. The next thing you
want to decide is what words are the
most important words. You can try and keep your
non important smaller. And more important
words pick up. In this example, all of the
words are quite similar. But if you wanted to
emphasize certain words, that's something you
can try and do, you can use a different
color for it, you can make the word picker, just to get the message
across a bit better, and it's just easier to read and it can look thetically pleasing. But for this
example, we are just practicing this
really basic layout. I just want to guide you tru it and maybe we can
do it together. The fast thing to do when you have a blank page
or a blank card, you want to mark the area
where you'll be lecturing. Normally do these
four lines and I know that I cong over these lines, it's
like a little frame. It just helps me to structure
my lecturing right away. Also, try to remember that it's quite hard to let
it in small scale. We some people find it easy, but for most students, from what I've witnessed, it's quite tricky to keep
your lecturing small. Maybe le try and
be conscious and just remind ourselves to
go smaller than we think. And also try to imagine that
you have your center line in your little frame that will help you to know
where the center is. We're going to start
with a word belief. Because it's the first
word of the phrase, we don't really
have to think too much about the actual layout. Obviously, try to
keep it right in the middle of where
you want to do it. A little bit strange
here because we're not actually using a page. We're just using this
little side of the page. We don't really have
a proper background or factor, so making one up. I think I'm just going to
make my frame a bit quicker. I didn't do it correctly. There we go a bit bicker and
maybe a bit smaller here, so it doesn't overlap. Then. On the second line, we have what you can, and
it's a bit of a longer line. I'm going to try
and position here. Once you have your first line, you can then refer to it and try to balance the
rest of the lines. Planning it is a really
good thing to do. Now I'm thinking, I'm
trying to imagine that I'm going to position
my line here so that it looks balanced. I'm going to do you. Just like you're
space in your lattes, you also want to space
your word obviously, that don't look too cramped. Definitely doing a lot of bound lecturing here.
It's quite bound. Now the next line
is a bit longer, so I need to account for that. Again, I'm planning,
Haping to fit it in here. What we want to get ideally is like the s gap on each side. Try to again imagine
that as you lets. I'm going to start a bit more
to the left to get that. And be really mindful
of all of the loops. Now the time keeping the
lights quite close together. That can also mean that some of your descender shapes like
letter y in this example, might interfere with your
ascender shapes like letter D or letter H. All
the letters stretch up. Try to work around those slopes and try to position
your ascender loops. When they are like
tucked in a little bit. They're definitely
not below the loop, so we want to avoid
doing this way. We do the letter y
and then we will do the letter D this way. That'll just create
a really big gap in between your lines. We always want to try and
tuck it in a little bit. And you A. And there we go, we
have three lines. We have two more to go.
On these two last lines, we only have individual words. To make them blend in
a little bit better, I love using the entry
and exit strokes to just help and make it look as if the
line is a bit longer. Blend in a better. We
don't want to have empty spaces on either
of these sides. Imagine if I finished, this letter y, just with
a very short stroke. If I started the letter H, with like a really short stroke. You'll just get this big gap on the left and on the right. That's not something we
want. It's quite nice to start with a longer
entry stroke. And finish with a longer
exit stroke as well. You're doing great.
This is not easy. If this is the first time
you're lecturing free hand, you can feel scary doing it, but you're doing a
great job for trying and every time you do it, you'll get better and
better. Just remember that. Again, stretching the
last stroke to the side. I'm definitely not following
my frame too much here, but it'll make more
sense and we do a card. But for now, it's just
for guidance really. We need to do one more word. We need to be careful again, so we have letter T and
H that are quite tall, and we also have this big drop here from the previous
line of the letter F. You can also do this for
you plan it a little bit. I definitely want
to position t and H here to avoid this
big descend lop. There we go. This way, we can keep the lines being quite close to one another
and that's what we want. It just makes it look
much better when they are quite close and we don't
leave big gaps in between. But there we go. That's
the first phrase and you can do the
same with this one. You can practice
this bit easier. I thought we could do
this one together. But these are all the
techniques you want to follow to create beautifully
balanced compositions. I hope you enjoyed this
and in the next lesson, we're going to make
this beautiful card together, so let's get ready.
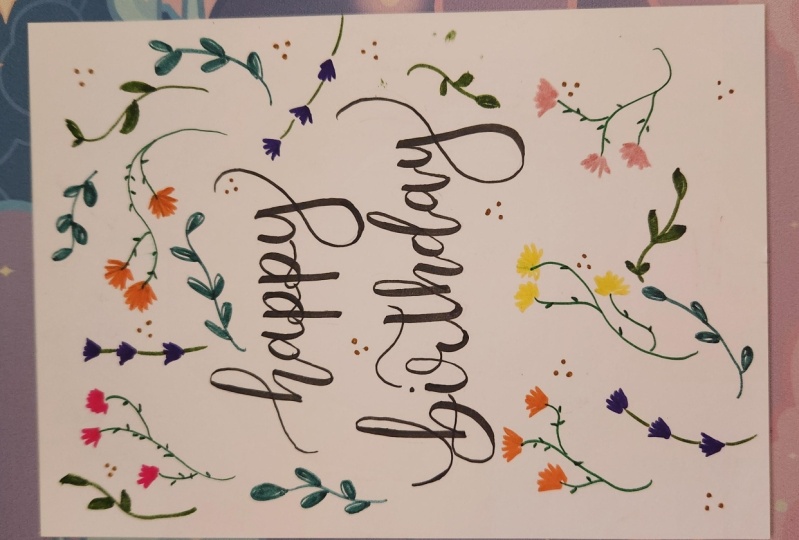
10. Designing Greeting Cards: I've got this blanket
reading card here. These can be bought
in hobby crafts, of link. Just be careful. Some of the card paper is
not great for calligraphy. It can bleed with
your brush pens. It star to do a little
test in advance, but most of the
time, it's all good. I haven't had many examples where it bleeds and I
can't use certain cards. You definitely don't want
to go for any coated paper. It wants to be just
matt, smooth card. Sometimes it says the package. Yeah, that's definitely
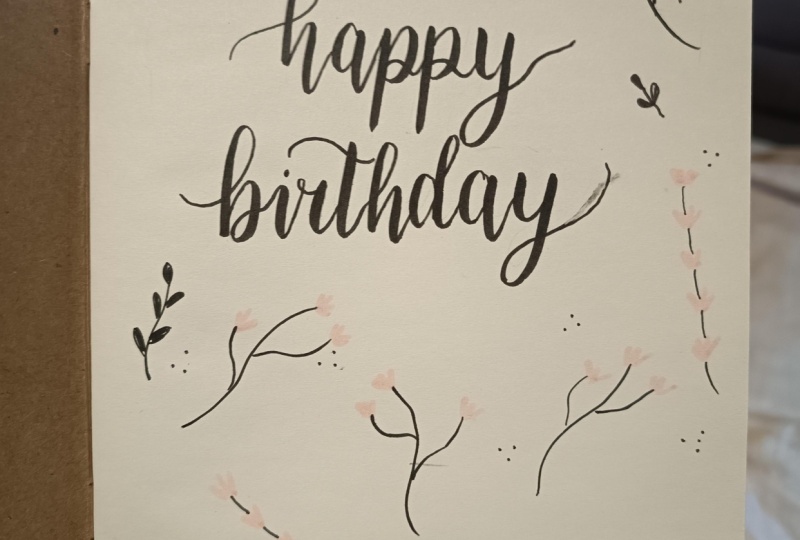
a safe option. Let's do a birthday card. Be going to use this
technique again, where we just draw
a little frame. I'm just using my
pencil just to do this. Just to give me a
little frame there so I know that I don't want
to go over these lines. You can use a pencil. Let's think about
the center line, so the center line
is somewhere here. Again, I eyeball and you can of course measure measure
it out properly, but I think just doing this
is also really helpful. You can You can plan
it with a pencil fat. I'm just scribbling
it slightly here. Doing the white happy.
My card is quite big. My lettering is
also a bit big up. I'm going to do the
white bath underneath. I'm just doing
lower case really. The bath day is quite long. Again be mindful of
your letter y and D, so they don't overlap. You can achieve that by being
control of your spacing, maybe a big cross
line on the letter T. Having this little draft can
be really really helpful. I am planning to draw maybe
something at the bottom, so I'm not worried that it's
not perfectly in the middle. But if you want it to
be right in the center, you can just erase and
try again until it is. I'm just going to start going
over now with my brush pen. It's so much easier when
you have some guidelines, especially if you're doing card, if you're practicing, it's
nice to practice free hand. But if you're doing
something important, if you want to let
a birthday card, you do want to do
a bit of planning, and that's very normal.
Everyone does it. Even I've been doing
it for so long, but I do find that
sometimes it's just nice to sit
down and prepare and plan your design properly
before you actually do it. To take your time. You can
do this at your own pace. Just go through tracing and
going over your design. You can always erase your
pencil light afterwards, but make sure that your
pen has dried completely. We don't want to smudge it. There you go I might do
a long cross line here, just like I planned. You can always go over
some of the up strokes. I if they look a bit too shaky, if you want to correct any, that's definitely doable and You can erase the
pencil lines as well. I really love using brush
pens to draw something. Maybe you could try it together. If you have a green pen
of any sort to be honest, we can try doing
these little stems. Imagining that these
c flower stems. These are definitely very thin. I'm doing them in
a really thin way, but I'm curving them. I'm definitely making
them like curved. I'm just doing this like
curved line and then extending a few
stems out of them. I've got these thicker
pants and I really love drawing with them and we can try this really simple flower, but we just do this little
up and down motion, and we just do it out on
every end of the stem, and you can use
different colors. I might do some in yellow. It's like a little wild
flower design I'd say. This is just like a really
quick and simplistic example. Of course, you can
draw something more and take more time. But I think even doing
this can look really good. I just thought I'll show
this little example. My heart's fairly big, so it might take
a bit of time to fill it up properly
to fill it with Drawings. I'll see how many I'll do. Instead of leaves, you can
add these little lines. I'm using a green brush pen, but you can use any fine tip
pen or any pen you can find. But these definitely want
to be quite thin though. I adding these lines
here and there. Now I think my lettering is dry. I might just erase
all of the lines so I can see you can do
the same just so I can see the whole
design properly and we know about to
add some more drawings, if anything needs changing. You can take a bit of
inspiration from me. I'm just adding this
lavender stems. I'm just doing the same motions, but like in one line, and then I'm adding a
little thin step like this. This can look quite good. Like this. Oh. You can take it as far as you like with the drawing
and I really love that these tumble pens have a
fine tip to draw with. I think it's really helpful, so you can do different
types of leaves and you can outline the shapes that you're drawing and then you can color in with the thicker tip. Super useful. I highly recommend getting some of these if you feel like you would like to do a bit of
drawing as well. But of co you can use cool pens. They don't have to be
any professional pens. You can take this
as far as you like. Maybe you want to
keep your cards playing and just do a
bit of calligraphy. I think that's beautiful enough, but if you'd like
to embellish them, this is just something
fun you can try. I hope you enjoyed this with me. To remember to erase all
of the pencil marks, to complete the look of
your card, and there we go. That's your fast little
project, well done. And I hope you enjoyed it, and I would love to see yours. Feel free to share
with an Instagram, or tag me, or just
drop me an e mail. I would love to see some of
your work. We than everybody.
11. Tips for Continued Practice: I just want to say, well done
for completing this course. You've done a lot of work, going through all
these sections, practicing consistently. You've done an amazing job, and I would love to
see some of your work, so you can tag me on Instagram and maybe shared.
I'll be amazing. We also have a really
wonderful community space. It's a private
Facebook group called Calligraphy Beginners
on Facebook. If you haven't joined yet, it's a beautiful
space to be part of. Everybody is so friendly. And it just makes it so easy
to share your work and maybe get feedback or just get
inspired by other calligraps. Definitely a very
beginners friendly group, which is nice, I think. Now it's all about keeping
the practice going. Keeping that spark
going and remember, take one step at a time, every practice session
will accumulate and will make your
progress a promise. Just do short practice sessions, maybe 20 minutes a day. Don't overwhelm yourself and try to be very focused
when you practice, don't just practice
over and over, but practice the things that
you notice need improvement. Instead of doing the whole
alphabet, for example, take out the letters that
need a bit more work, that will just result
in more productivity. Thanks again, everyone
and I'll season.
 Alina Snepste