Transcripts
1. Intro: Hi there. My name is Jessie, and I'm here today to teach you some easy ways to organize your art supplies as an artist myself. Sometimes I kind of cringe that cliche that says all creative types or messy. But let's face it, there's a lot of truth to that. When I'm working on a project, I tend to leave my supplies out until I'm done with them, and that can sometimes get a little out of control. But the good news is, I also have some systems in place so that I can see what I have. And it doesn't take over every surface in this class. I'm gonna be giving you specific tips and suggestions for helping keep your art supplies together so that you can more easily find them when you need to use them. This also helps you maximize your creativity because you're spending less energy trying to figure out what you have and where it ISS. And since many of you asked me how you can store your supplies if you're working from a shared space like your kitchen table instead of from your own officer studio, I have specific tips for you on how you can blend your supplies into the background rather than letting them become the focal point of the room. So if you're ready to learn some simple organization techniques to help you preserve your sanity and your time, let's get started.
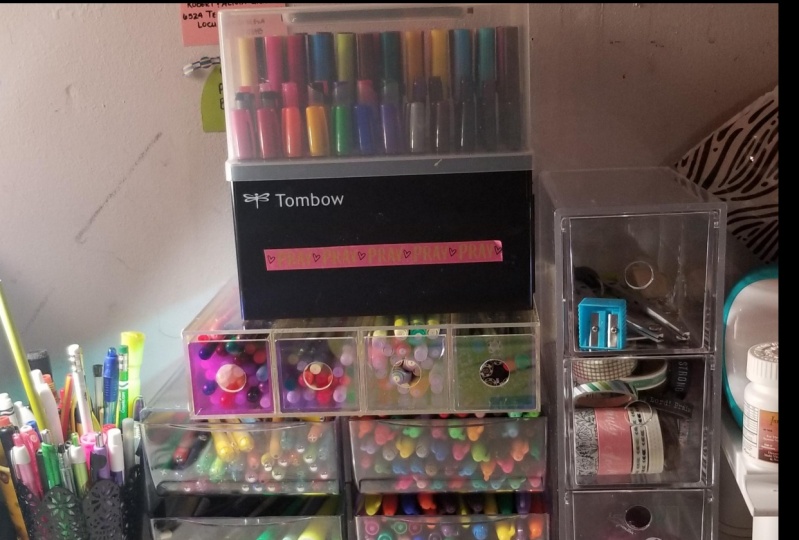
2. Pens: those of you who took my previous class on colors watching already know that I have a pretty large pen collection, and a collection like this requires some serious organization. There are three main ways that I keep my pence organized. The first is baskets. Sometimes I prefer to store set in its original packaging, and a basket is the perfect way for me to do that. Most of the containers aren't the same size, so it would be nearly impossible to stack them on top of each other and access them without knocking everything over. But by putting them in a basket, I can still keep them all contained in one area and easily use them. Plus, there's extra room to store my swatches, or I can keep them in the packaging itself. Baskets are relatively cheap. I got a set of these at a home store, but they also sell a good variety in craft stores. In fact, I bought these bigger ones to help keep stuff contained in my bathrooms. Something else you can try if you have the space for it, is this dish drying rack. This could come in really handy if you need to store your pens horizontally, or you could use it to store your washi tape. There's plenty of room for them on the spindles, so you can organize them however you want and still see everything you have. Plus, you can use any extra slats to store some movie artwork. Another way that I store my pens is by using Pen Caddie's caddie's air great for storing multiple sets of pens outside their packaging. They can also work well for other art supplies to like pencils or paintbrushes. I especially love these lazy Susan ones because they consider on the shelf, and I can easily access whichever pens I want just by turning it. Candy is also take up a contained set, a space which is great. You can maximize the amount of things that you have within a smaller area. Here's an additional tip for distinguishing pens within your caddy. Sometimes I have an old pen that isn't quite dead yet, but I've had to get a newer replacement for some bigger projects. Teoh easily tell them apart. I simply use Washington that way. I can spot my newer pens at a glance if you don't have enough pens to Philip, an entire caddy. Why not use an old jar? Instead, It serves the exact same purpose, and you may already have some around the house. This is literally an old pickle jar. I couldn't even get the label off by final tip For Penn, storage is the classic pencil case. These are easy to find, most places pretty cheap and come in a variety of sizes. This kind of case is the perfect storage for a bigger set of pens that doesn't come in a reusable package, and they're perfect for stacking on shelves or even for fitting inside other boxes.
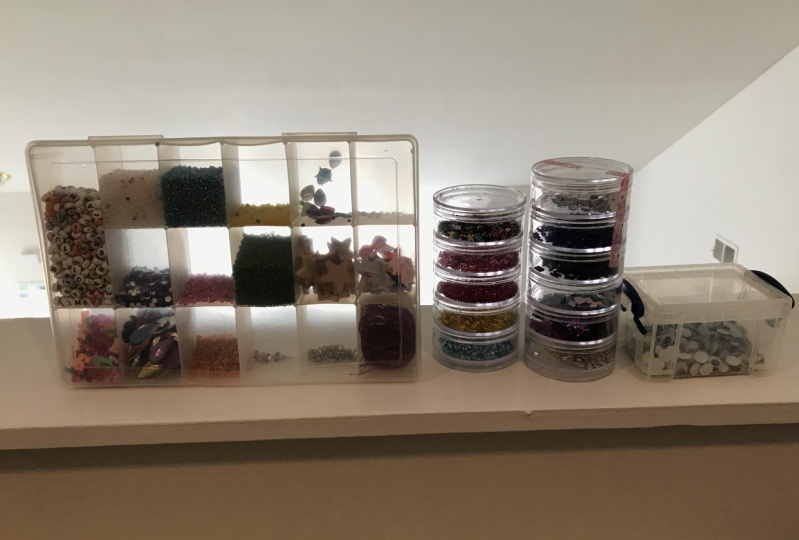
3. Paints: another significant collection of art supplies that I have is definitely my paints. I have a massive amount of acrylics and craft paints. And now, thanks to my newer hobbies, I also have a substantial set of watercolors. Let's start there one of the easiest ways to get started organizing your watercolors. Is Bice watching them? If you need more info on Weiss, watching is helpful. I recommend that you go back and watch my previous class, but the basic premise is that it helps you keep track of what you have when you buy water colors. Sometimes they come with a SWAT sheet for you to fill in, but other times you'll need to create your own. The great news about making your own is that you can customize it to fit whatever container they'll be living it. Just cut the paper to fit the lid and fill in the colors accordingly. That brings up my next question. What do you do if your watercolors don't come with a 10? So for all my watercolors that didn't come in their own containers, I actually just went to a dollar store and bought a bunch of metal pencil cases that being said, we do have other options. This next suggestion actually came from Instagram. I asked my followers if they had any storage tips for me, and a couple people actually suggested using old candy tents. So since I was determined to do my own research, I went and bought as many different tins as I could find, just so I could show you the variety that's out there. F Y I holidays were a really great time to try and find these. One person specifically mentioned using them to store calligraphy Nibs, and when I saw that they made such small containers, I knew that that would be perfect. So this is now. We're all on my Nibs live for calligraphy, and another tin that I found was this adorable sprinkled doughnut. And I obviously bought it because it was Q and unlike anything else that I found. But it's also functional, too. I could easily fit a bunch of water color pants in here, and since it's metal, all the magnets stick to the back and the pan stay in place, and same goes for this, which had Tabasco chocolates in it, which, by the way, were delicious And even though it's a pretty shallow container, it's surprisingly fit a bunch of pans inside, even with the magnets on back. And I think it could house a lot more. Similarly, if you're just looking to use something you may already have around the house, I'm a big fan of using Charlotte's. This was just from a jar of sauerkraut that I had, but since it's got a metal back, I can also put the watercolor pans in here, and I can at least keep them contained, even if they're not in a full container. Justus. An additional side note. I also have a tendency to save other capsule. It's because they make great pallets in a pinch. Finally, this outward container is the perfect size to store set of paints because it's basically the exact same dimensions as the tins that I've gotten with other sets of paints that I've purchased. And if you don't have a need for one just yet, you could still get started with the prep work. And if you're watercolor pans didn't come with magnets. That's an easy fix, too. You can buy a strip of magnetic tape at an office supply store cut a piece to size and stick it to the back of the pan. You can even put a magnet on the back of your swatch to help hold it to the lit or just tape it in place for my tube water colors. I keep them in a small, clear plastic container where I can easily find them. You'll be hearing a lot more about clear plastic containers, so get ready. As I mentioned earlier, the other half of my paint collection is acrylics. These take up significantly more space than the water colors, and I have a few different ways that I store them for my craft paints, which are all basically the same size. I keep them in a shallow, clear plastic tub. Upon first glance, I immediately know what's inside. And thanks to a tip from an art teacher, I can easily tell which paints or what, because each bottle has a sample of the paint on the lid. This has made it infinitely easier for me to find a specific color without having to take everything out. Another place I store these is in these small containers I got from Michael's. They don't hold too many bottles, but they are stackable containers, which is awesome for storage, and they can certainly fit other things besides paints. I keep my tube acrylics together in a clear plastic container because they're easier for me to go through this way and some of my paints air still in the original packaging. This combination of different kinds of storage is what works for me, and hopefully I've introduced you to some new ideas that may help you out. But if you already have a system that works for you, there's no need to change it. If you keep all your paints in your grandpa's old toolbox under the kitchen sink and you know that's where they are, then, hey, you're organized.
4. Paper: a lot of people were curious about the best ways to store their paper. So here some of the ways that I do it, let's start with scrapbooking paper. I have a massive collection of scrapbooking paper, some of its individual sheets, but others I bought in giant books. Great news is that Michael cells containers specifically for them. These are the exact size of standard scrapbook squares, and as you can see, I have quite a few of them to store all my paper. There's no real organization to them, but just by having it all in one place, it keeps things a little less chaotic. And these containers air pretty versatile, too. I also use them for my tissue paper and felt collections. Next up is wrangling your practice sheets. If you're anything like me, you've got tons of tracing paper and loosely practice pages from brush lettering or another discipline. These aren't necessarily things that I'm going to need regular access to, but I also don't want to get rid of them. Here are two ways that I store my practice pages. First off, I have this many shelving unit on my desk. It's perfect for stacking papers and keeping them altogether rather than having them out and piled on the desk. Which does happen anyway. The great thing about this shelf is that it's open so I can see what I have without hunting through things. And when I want to add a little more structure to this method, I can easily paperclip my papers together. Next, I'd like to introduce the accordion folder. Yes, this is the exact same thing you might already be using to store your bills. You could buy in any office supply store or even the office section of a story like target . The great thing about them is the amount of paper you can store in such a small surface area. Unlike those desktop shelves I showed you earlier, this can easily be turned sideways to take up even less space. Perfect if you're trying to store them in a shared area. So inside the folder, each of the pockets has a tab, so you could mark them by month by project. Whatever. Obviously, you should label your projects, however, works best for you. But I would recommend working their way from the back of the folder up to the front. That way. Whatever you're currently working on is always gonna be the first thing that you see. For example, I'm currently in the middle of working on my 100 day project, as maybe many of you are, too. But I'm also in the regular habit of doing a daily calligraphy practice. So the way that I've sorted my folder is I have my calligraphy practice sheets in the first pocket. I put my tracing paper for my 100 day project in the middle pocket, and the front pocket is where I'm storing my worksheets because those are the only ones that I actually need regular access to. Oh, and here's another tip that I sort of learned out of necessity. If you're having a hard time keeping your folder open and putting things inside it, try folding it in reverse. All you have to do is betting the lead over backwards and take the elastic and fasten it from the inside. That way, you'll be able to easily keep the lid open and have both of your hands free to put your stuff inside before they actually also make accordion folders that are big enough to hold your scrap of paper. So if you had a lot of individual sheets of paper, it's super easy to store them in the pockets. Here, finally, my pads in standard paper, as you can see all my pads or stacked together on a shelf, which is another key tiptoe organization, it helps me keep track of what I have, and it makes it easier to find what I need. As for the reams of colored paper, I don't really do anything special with them. Since they're all together with the other paper, that's good enough for me.
5. Office and Studio: one of the tools that I find most useful for storage is clear plastic containers When I store things in a regular box, even if I labelled the outside, I'm not always 100% sure what's on the inside, because sometimes I might lump things together. That made sense to me at the time, but won't what? I'm actually looking for them. So for a clear plastic container, not only is all of my stuff contained together, but I can actually see what I have in each of the bins, and they come in so many shapes and sizes that they can even fit your most unusual storage needs. Which brings me to tip Number to keep all your similar items together as best you can. All your papers, all your paints, all your stickers, etcetera. It makes things so much easier to find when it's all in the same general area. It just makes sense to store these things close together because chances are you'll look for them together in the same spirit. Try and keep your supplies where you know you're going to look for them. I'm always looking for a pair of scissors in my desk drawer or in my kitchen, so that's where I try to keep them. But I also keep one in my pen caddy and another in my toolbox. So that way, I don't accidentally wander off with the pair and forget to put them back, which I still dio. Tip. Three. Keep things that I level that you'll use most frequently. Something's lend themselves to lower shelves because of size or weight, like my box of yarn. But other things that you know you'll be going back for frequently just makes sense to keep higher up. For me. That's my paper markers, reading cards and glue. I know where all my other stuff is, but it's important to me that I see these things first. If you're just starting out, you'll wanna set up a system that's more specific to your needs. Really, it's about whatever works best for you and what you're using. Most often, This next tip doesn't just apply to my office, but one of my favorite ways of story things is by stacking them on shelves. I love shelves. I seriously cannot get enough of shelves with shells. Things could be stacked without creating one massive pile plus many units come with adjustable shelves, so you can create spacing that works for what you need. That being said, I also keep some bigger boxes tucked underneath my desk. I've got all of my cables and stuff on my computer stored in this plastic box. I've got more things under there, and the only place I can't store stuff is in the middle. So I still have room to move my chair in and out, and I can still sit at my desk. And these storage tips work for office supplies as well, not just art supplies. One final thing that I really love for you to take away from all this is knowing that sometimes just having a system really helps with organization, even if you're not always using it. That may sound a little crazy, but I think just knowing where I can put things when I'm done with them makes the idea of cleaning it all up a little less daunting. I think a lot of my art supply overwhelmed came from not knowing where to put anything, but now, even if all my pens air all over my table because I'm working on a project, I know that there's a specific place for them when I'm finally ready to put them away
6. Shared Space: My final lesson for today is on ways that you can still store your art supplies even when you're working in a shared space. As I mentioned in the previous section, shelves are my number. One suggestion. Just like in my office, I got a set of bookshelves from my living room to help keep all of my stuff contained in one area. I prefer my shelves open so I can see everything. But you can easily find units that have cabinets Fun. Fact. This used to be in my bedroom, but now, at houses, all of my kitchen supplies. One key thing to remember about shared space shelves is that you don't need to designate them to just your art supplies. You can store whatever else you need to store, and it can still be done in a way that creates visual harmony. My second tip for a shared space is using smaller containers. Small containers help me to blend things into the background more easily and also helps me to limit what I keep their things like. Baskets were great for this. Even if everything inside the basket is in chaos, you can't see it from across the room on that note. If you do have room elsewhere in your house that you can store your supplies, try to only keep what you're currently using in the shared space. My final suggestion for storing your stuff when working in a shared space is to use pretty containers. That's right, unlike in my office, where I have my collection of giant clear plastic tubs so I can see absolutely everything. I use opaque boxes for my living room. Looking at a beautiful photo box is much more pleasant than seeing everything openly piled on the shelf, and so many places sell them. Plus, they're easy to label and construe or a lot of stuff more. I've come across some really unique ones, so I know that you can have a lot of fun finding them to suit your needs.
7. Final Thoughts: thank you so much for joining me today as I showed you some of my favorite ways to keep art supplies organized. Hopefully, by now, you better understand the impact that you can have on your own efficiency when you take a little bit of time to store your things purposely and some clear solutions on how to actually do it. Whether you have a new system for organizing your individual items so that you could still see them or a new way to keep your shared space is still functional. I hope you took something away from this class. And if nothing else, maybe I've just given you a list of new ways to spend money at Michael's. Now it's time for your final project. I want you to show me how you've taken my suggestions and put them into action by uploading photos to the class project. I would love nothing more than to see your pens neatly organized in a caddy, your new collection of clear plastic containers or your family finally able to eat at the dinner table again. And if you're not really sure where to get started, maybe it would help you to upload a before photo to the class project. That way you can use this platform and your classmates achievements to help inspire and motivate you to get your own organization started. And if you're not ready to tackle any of this just yet, that's totally fine, too. Maybe you just need to sit with this information for a little bit of time before you're going to be ready to implement any of it. And that's totally fine. Everyone does things in their own time. Just remember, taking this class is already a huge step towards having a more organized workspace. That's it for today. Thank you so much for taking this class and choosing to spend your time with me. If you have any questions or comments, please leave them in the class discussion below. If there's anything I didn't cover in this class, or if you have any tips and suggestions for me or your classmates, I'd love to hear those in the discussion as well. Until next time. This is Jesse Parker signing off
 Jessie Parker, Sparkle Enthusiast