Transcripts
1. Intro class: Hello, I'm Blue, and welcome to the first class of
my skill Chacos. I'm not big on having asset
rules or following them as there are many different ways to approach art
and interpret it. And I think that's
what makes arts fun. So, let me introduce myself. I'm blue biscuits,
but I go by blue. I'm a character illustrator, and I make silly little
art tutorials on YouTube. I've been drawing for
around eight years now. I've known since
I was young that creative field is where
I wanted to end up. I have ADHD, so I have
a very simple way of approaching things that
help my brain stay focused. So in my lessons, I try and keep that in mind for my other fellow ADHD
avers out there. In this class, I
hope to show you how to do digital art as a beginner, how to get used to
drawing tablet, what fundamentals to learn, and how to study
these fundamentals, and why they would be important
for your future artwork. I've always been a bit of
romantic and use my art to express myself in ways that I can
understand myself better. So I'm all about
drawing things that you love and to fall in love
with your art press. If you've decided to
take these classes, then I'm guessing
you're beginning artists trying to get
into digital art. So that's exactly what I'm
going to try and show you. I am trying to keep in mind from where I was when I started and where my struggles were and everything that I've learned
over the last eight years. So I'm excited to
be your teacher. Thank you so much for taking
the class, and let's begin.
2. How to use art programs : Hello, I'm Blue and
in today's close. I'll show you about art programs and how you can use them. It doesn't matter which
art program you use, I'll be covering the basics that every art
program should have. I'll be showing examples in both CP Sudo paint and P grade. The art program you end
up choosing to be your first can be the one that
you use for many years. Because deviating from one
that you already used to can be quite scary
and uncomfortable. When choosing an art program, consider the features,
Is it complicated? Does it have an easy
interface? Is it affordable? There are some great
art programs out there that are free,
such as these. So then consider
the compatibility. If you're on mobile or computer, you'll have access to
different art programs, and some of the art programs
that work better on mobile, don't work better on
PC and vice versa. I definitely suggest trying as many art programs
as you can to see which ones you like the most and which you feel
more comfortable for. So let's get started. Some art programs allow you to rearrange the panels
to your liking. I find being able to
customize the art program, to suit yourself
makes the workflow a lot easier and
feel more personal. So paint, for example, allows you to remove some
panels and add some panels and allows you to rearrange
the brushes to categories. This is how I have
arranged my clipsio paint. So everything that I reach for is closer to my right hand. Since I am right handed, and everything that
I don't reach for as much is on the left side, so further on the canvas. You can pull out panels, so they're kind of loosely
put on the canvas, which is what I prefer, since I feels like the canvas
is a lot bigger. If you close a window
on ipsa paint, you can easily open
it again by going up by window and then
finding it in this panel, and it will reopen
on the canvas. Procreates interface is
a lot simpler already, so there's not a lot of
customization that can be done. What you can do in Percrate is rearrange brushes and
have them in brush sets, so they're easier to find, and you can have your
favorite ones in one column. You can also drag out
panels in Percrate, so you can drag out
the color wheel, so you just grab it, pull it out and it's stuck on the canvas, so it's easier to work with. Now you can just put it
back when you're done, so you have a bigger
canvas space. Next, we have shortcuts, which helps speed up the
art process by a ton. Shortcuts are handy for quick access to tools,
brushes, and options. You won't believe how much
time it saves having it on a button rather than having to reach for it and find
the tool each time. Or maybe it's just the
lazy in net talking. During tablets have this
neat button on the side that you can assign
brushes and tools to, like the color dropper, or
canvas slip, et cetera. You can have shortcuts be
set to the keyboard as well, which is what I do, since
I find that a lot easier. You can have the
keyboard shortcuts be used for Procreate as well if you link a bluetooth
keyboard to your iPad. Also, please ignore my
missing keys on my keyboard. My cat ate them off. Yeah. That's all I'm going
to explain about that. For Pcate, you can also
use finger shortcuts, so like, using two
fingers to undo. You can go in over
here, a PN Procrate, and you can reassign the different finger gestures
to different shortcuts. For Clip Studio Paint, you go into the
shortcuts over here, and this little
menu will pop up, and then you can just click on the tool and then
assign it to a button. There are some default
shortcuts that you can use. So if you don't want
to go in and edit and just learn these ones
instead, you can. So the first thing you're
going to want to do when you start is open up a canvas. In Clip Studio, it's in files, and then you press
new, but in Procreate, it's up here on the
corner, you click it, and you can press
the list over here. One of the issues you'll run into if you use the
default sizing of the canvas is your
brushes are going to be very pixelated on both programs. So you're going to want
to make the canvas bigger to avoid pixelated look. I normally do a
3,000 by 3,000 and a 350 DPI for both procrate
and clipsdo paint, since this makes the canvas a lot bigger and makes more
room for the pixels. I set my canvas color too gray, so it protects my eyes
because the weight of the canvas can start to
hurt your eyes after a while. Let's get into one of the
most important parts, brushes and tools. There are different
types of default brushes that you can pick from. There are sketch brushes, which are no softer,
smaller brushes, great for well sketching. There are pan brushes,
which are harder, better for linework
and laying out colors. Then there are painting brushes. Then is soft and have a
bit more of a blend them, great for painting and blending. Each of the categories will have different types of
brushes in them. Like watercolor or
inking brushes, or Yeah, you'll see. I'll definitely
suggest going through the default brushes and seeing which ones you like
and which you don't. So what I do when I find a brushes that I like
in the default brushes, I just bring them into
a separate category, so I have all my favorite
brushes in one section. So to fold brushes
are normally okay, but downloading
different brush sets is a lot more exciting. You can find brushes
and brush sets online for programs that
you're using like Clips you paint and Procreate. Search brushes for Insert
art programs name, and you'll find a
bunch of options. For beginners, it's great to play around with different
types of brushes. You can really see
what will work for your art style or which kind of direction
you want to go for. On cluster paints
in tool properties. You can resize the brush, so you can make it
smaller, bigger. You can turn the the pacity, which means the
brush will either be very light or very dark, and on procreate, it is
these settings on the side. So the top one is
resizing the brush, and the bottom one is lowering
or highing the opacity. The air brush is a really
soft, fluffy brush, which is great for adding
shading or gradients. Next tool is the eraser tool, which is pretty
self explanatory. It's just an eraser, so it'll erase whatever is on the layer. Speaking of racing,
there's undo and redo, which will undo what you
just did or put it back. Now, please remember that
Undo and Redo do have limits, so you can't go
infinitely back at times in most of the programs. The smudge tool, which is
up here in Per create, and in this tool over here on Cosi Paint will blend and
smudge two colors together. I don't always use
it, but I know a lot of people do really
like the way it looks. You can change the way
the brush smudges by selecting from one of
these brush options. If you're using procrate, you can use your fingers
to move around the canvas. If you're using clips
paints on like a PC, you can use space bar and then you can move
around your canvas or you can use the
navigation bar and move it around and zoom
in and out over there. The liquefying tool is
a really cool tool that allows you to manipulate
sections on a canvas. And then the bucket
tool allows you to full lines that are
connected with each other. For P crate, to use
the bucket tool, you grab this little circle
up here where the colors are, and you drag it onto the
place you want to full. Now, there's different ways you can full with
like the layers, which I will show
you in a second. Now, selections or laser tools in these art programs
allow you to select shapes and then be
able to manipulate or resize or move them
around on the Canvas. So the laser tool clip
City paint is over here, and the laser tool on
Procreate is up here. So if you select something, you can resize it for clip
City paint in tool properties. There will be options for
how you can resize it. So you can change the
center or you can change features on the scale it or deform it or
something like that. And in Procreate, the options
will be down over here. At the bottom, so you
can either deform, scale, resize, and
all that stuff. That is the basics on the tools in clip sido paint and P grades. Now I'll move on
to explaining how layers work and the neat
things you can do with them. Next, we'll tackle
layers. Layers, man. They took me a hot minutes to figure out when
I first started, but I'll try and explain them so they are a little
bit easier for you. The easiest way to explain
layers is to think about them as sheets of gloss stacked on
top of each other. All transparent and see through unless there's something
at the top layer. Everything on separate layers
cannot interact with each other or be interacted with unless you're on
that specific layer. So you can stack them
like this, sketch, color, shading, line
work, and then extras. So layers are really
easy until you have a spot with like
70 different layers, and you can't figure out
where on earth this spot is. And then it becomes a mission. Use this button to
make a new layer, and then you can
drag them around, so you can drag them to the top or to the bottom
or to the middle. Now, let me introduce
you to clipping masks. Clipping masks are so useful. And then we'll make
the art process like ten times easier for you. For clips that you paint,
this button over here sets a layer to clipping
masks, and procreate, you have to select it, and then in this little options
bar that pops up, it will say clipping mask. If you have a layer that's at the bottom with something on, the clipping mask layer
that is above will not be able to leave the area the bottom layer
has been set to. This is great for coloring a line art or coloring
a base filling. I'm sure you've seen a bunch of artists color there drawing gray first before they
start adding base colors. This is done because
they're using that gray layer for
a clipping mask. So they'll clip layers above that to be able to
add base color, kind of like the example
I'm showing here. You can group layers and rename them to make
things a lot neater, so you can use something
like a folder or a group. In Procreate, you drag them and then group
them over here. And then in clipsit you paint, the folder layers over here, so you click it,
and then you can drag all the layers
into the folder. Oh, you can just be like
me and have the layers be completely and utterly
chaos. 99% of the time. I have no idea which
is on what layer, and I do not have the
brain power to care. You can select layers, so this is basically almost
grouping them together, and then you can
move them around, and only these
layers that you've selected will be affected. With selecting a layer, you click this little
error on clips of your paint or you
swipe it on Procreate. If you've selected
a couple of layers, what you can do is now
use liquefying tool, and it will only affect the
layers that you've selected, so you can liquefy a whole drawing if you
select all the layers. This also applies
for the laser tools, so you can select
multiple objects and then move them if you have
them on all separate layers. You don't have to
merge everything down. Along with that, let's
get into how you can use the bucket tool
on different layers. So this neat thing that you can do is set a layer to reference. It is this little lighthouse
onto stereo paint, or you have to select it
like this on Procreate. Basically what this
means is now this is the layer that the bucket
tool will focus on, so you can be on a different
layer at the bottom, and it will focus on what's on this layer instead of what's on the
layer that you just had. So you can have the coloring
on different layers. Make sure that the
bucket tool in like tool properties and closer paint is referencing the
reference layer. So this lighthouse over here. Make sure this is selected, and it will reference back to the layer that you
set to reference. On the same note as layers, layers have really cool things called layer blending modes. There are neat settings
that you can sit a layer to to make it react differently
with the layer beneath it. These modes affect how colors on one layer blend the colors
on the layers below, creating various visual effects. In clip city paint, the
color blending modes are on the strop bar over
here, and on Procreate, you'll have to select a
layer and then select this little layer to be able to open up the color
blending mode. I definitely suggest you
going through these and seeing how they interact
with the layer below them. But my favorite ones
that I use is multiply. Multiply darkens the colors
on the active layer, making it appear as if looking through a translucent
dark glass. It is often used for shading
and darkening effects. And then there's
overlay combines the darkened effects of multiply and the lightening
effects of screen. It enhances contrast
and saturation. It's really fun to use
with like a airbrush. Like I mentioned, there's so many more for you to go through, and I highly suggest just scrolling through and
seeing which one you like. There are other
layer effects that you can use like gradient map, which is a really
powerful tool to adjust the color and
tones in your image, providing a quick and
effective way to achieve a stylized or autistic
color scheme. For clip to paint, how you find gradient maps is by right
clicking on a layer, going to color correction mode, and then you'll find color
gradients at the bottom. All of these are actually
really interesting to you, so I definitely suggest
going through these. And in Procreate, you'll find
it at the top over here. They can also be adjusted like I did with the
clip so paint one. The next is the color wheel, which is really
self explanatory. So the outer layer is the hue, so that means the colors, and then the inside is the
saturation and values. So you can select how
dark or how light or how saturated or unsaturated the color would be by
selecting it in the middle. And then you can just change the color with the outer side. In one of the classes, I'll
go over how to use color and how you can use
the color wheel to make a color scheme. So when you're done
with the art piece, or you would like to have a
safe file for the art piece, you're going to create a
file to save your work. This is for PC, of course. So I made an art
file called art, and then I have the
years that I use. So we're in 2024 now, so I going into 22 24, and then I just
save it in there. There are two different types. There is PNG, which means everything is going
to be merged together, and then there is the
clip sider paint file, which means it will have all
the layers still intact, so you can come
back to it later. On Procreate, it's
a bit different. All you have to do is go out and that will automatically
save the Canvas. But do note that if you go out, you will not be able to
use the backspace anymore. And then when you want
to save it as a PNG, so a flattened image, you go up to here, you press share PNG, and then it will save
it to your files. Now, there are many
more convoluted things you can do with art programs, but this is just the bare basics on Clip ster paint
and Procreate, and this is the bare
basics that I use. I don't really have a
too complicated process. So this is what I use
in all my art pieces. There's nothing much else. So thank you so much, and I'll see you in
the next classe. Bye.
3. What art Brushes to use: Hello again, and
welcome to this class. Today we'll go over
the different types of brushes and how
they can be used. There are many different
types of brushes, and each can be used on
their own creative way. Side feel stuck with
their default uses. For example, the calligry for brush clips paint is
intended for writing, but I enjoy using it for painting because of
the shape it has. There are four types of brushes, sketching, painting,
airbrush, and pain brush. I'll go over each of them. Sketching brushes are
usually very light brushes. They're easy and
fast to use because of the stabilization
being lower on the brush. Next, there is painting brushes. These are a lot
softer and sometimes even have some kind of
blending built into them. So normally they're
the round brush. Air brushes or these
really fluffy, soft light opacity brushes, which are great for
adding softer shading, or adding gradients to
your drawing. Fun tip. If you use the laser tool
and the airbrush together, you can create really
interesting textures and gradients like this. And finally pen brushes. These are solid brushes, normally with high
stabilization and no blending or low
opacity at all. Sometimes pen brushes can even have no pressure or
sensitivity at all, too. And then finally, there
are textured brushes. These are another type of brush that help add texture
to your work. If that's something
you're interested in. They normally have brush packs
or brush textures to them. Can I like these ones?
Now, each one of these brushes have
their own default uses. But like I said before, you can have them
used for anything. So you can use like the
air brush for painting or you can use the
painting brush for sketching or the pen
brush for sketching. And yeah, so there's no real
rule to how they're used. For sketching, I do suggest
lowering the brush stability. The brush stabilization means how much control you'll
have over the strokes, the lower the stability, the less stable, and the
higher, the more stable. Sketching with a low
stabilization will make it a lot easier because that means the brushes will have
a lot more control. But if you're going
to do lineout I do recommend hiring the stability. Different art styles will
require different brushes. If you see an art
style that you like, you can always ask the artists what brushes they're using. But just because you
have the same brush set as an artist, doesn't mean you'll be able to achieve the exact
same art style. Because brushes still require a technique to use them to
achieve a certain look. That also goes on
the opposite end. If you also don't
have the same brushes as the artist or art
style that you like, you can still achieve
it with other brushes that you have by learning
different techniques. At the end of the
day, the brushes you use aren't going to
be that big of a deal. It's how you use them. You can make about anything
with the most basic brushes. That's up to you to figure out though which
brushes work for your old style and how you'd
like to learn from them. So now I'll show you
the brushes I use, and then the techniques
I use for them. So the brushes I used
for clips CD paint and Procreate are linked over
here, as you can tell. I have how you can download
them and where you can find them online if you want to have the same brushes I have. I use the sole brush for
sketching and painting. The sole brush or any
brush that is the same, must have a bit of
transparency to it, so it means it's slightly see
through with a softer edge. I prefer minimal
pressure sensitivity, where the size doesn't change
much, but I press harder. Instead, I prefer the
pressure sensitivity to be affected by the
consistency of the paint. So the lighter I press, the lighter the
paint consistency, but the harder I press,
the darker it will be. You can also manually adjust the brushes transparency with like the bar over here if you don't have the
same brush as I do. There should be no
blending at all. The second brush is a hard parent brush with no
transparency or blending. It's a square angle shape with no pressure
sensitivity at all, meaning the consistency
stays the same in general. Your art program should have a clygraphy brush by default. If not, it's basically
just a square brush. And then every now and then, I'll use a different
texture brush. So I'll has something
like one of these ones like
these painty brushes to add a bit of texture. But that basically sums up
all the brushes that I use. As I have mentioned before that these brushes don't
have any blending, and my art style is
a bit more painty. So when I would like to
blend two colors together, I would turn down
the brushes opacity, so the paint density
will be lower. And then I will just color pick. So I will pick one
color and then go over another color and then pick the color in the middle
that I just put down. And eventually it will start
blending out as it goes. Another really cool
blending technique that you can use or to add texture is b using the laser tool and
then using a airbrush. This creates a really
soft blending effect. And plus then you can also have a harder edge if that's
something that you need. When you first start
out, sometimes you kind of want to rely
more on one brush, and I would suggest
going out and finding different brushes and trying out as many as you can. But then I would also say
contrast to that is to have a set of brushes that you use and get
comfortable with. Because if you keep going out
and trying different ones, sometimes you can't really learn the techniques that are needed for the brushes that you have. Remember, brushes
are just the tool and not the actual painting. That was a pretty short lesson, but that sums up most of the things that you should
know about brushes. Now on to getting
used to our tablets.
4. Getting used to an art tablet: Hello again, so you just scot or are planning to get
your first drawing tablet. Making the change
over from traditional to digital can be
difficult to get used to. So I have to show
you an easy way to get used to using one. First, there are three different types of drawing tablets, each of their own sets
of things that you can use, pros and cons. You can switch them
either and they will have their own sets of challenges
to get comfortable with. There's screen list, ctikes, and iPads and tablets. Screen list is probably the one that's the hardest to grasp, but they are very great to use, and I honestly prefer them
over most screen tablets. One, because it makes
you sit up straight, which house may posture. I'm not ******* over the screen. And secondly, my hand isn't
in the way of the actual art, which is something that I found quite annoying with cytiques. Another issue that
you'll find if you start with the screens tablet is the fact that there's
a disconnect from actually drawing and
seeing your artwork. So you'll be looking
at the screen in front of you instead
of looking down. Which can be a little bit
disconnecting at first, but it will eventually
start becoming easier, the more you start to use it. I used the tiny
screenls tablet for the first six years
of my art journey, and I loved it, and
it made great work. So you don't have
to go for the most fanciest to be able to start digital art and to be
able to make art easily. So one thing about
screen the tablets, people assume you use
it like a track pad, when it's in fact
the whole screen in the area of the tablet. It takes a minute to navigate. The next is the sytique, which is a tablet with a screen. There's a slight
confusion sometimes, you need a computer or something to connect
the cyniqu to. It's not just a
standalone computer. Or a tablet. It is basically
just a extra monitor. Cyniqus are great as I feel you're more
connected with your art. But then your hand
is also in the way. And I feel like I
shrimp over them, and my posture is kind
of bad with cyniques. So if you get a cynique, I would definitely
suggest getting a different stand that like, elevates it bit more, so you're not like hunched over. Then there are
tablets and iPads, which you're able
to carry around, but the only thing with them is they only come in
like a certain size. Because you have to
carry them around, they aren't as big as like a syntqu or a screenless
tablet can be. But the plus those,
you don't need a computer or anything
to connect it to. So one of the biggest
things with getting an art tablet or getting
into digital art from like traditional art is
the disconnect you'll feel with your art because you're not really interacting with it as you would
with traditional art. Here are some
practices I suggest, when you start doing digital art regardless of which
tablet you get. Use your shoulders
instead of your wrist, especially if you're drawing on a surface that is smaller. What this means is like instead of pressing
your hand down on the table itself and using your wrists for
movements and strokes, use your shoulder
for the movement and hover your wrist
over the surface. This will help with having lines being longer and
in more control, as well as protecting you from wrist injuries and also
help with your posture. Injuries is another thing that new artists tend to
forget about or overlook. You have to look after
the way you draw so that you won't have any
pains in the future, as drawing is a
repetitive thing and can lead to injuries
further down the line. And if you have injuries
further down the line, it will hinder your art journey and getting better as things go. As for the actual drawing, I understand that
getting used to art programs and tablets at
the same time can be very, very stressful and a bit weird. But this is going to
sound a bit goofy, but the way you can get
used to drawing with the tablet is drawing
circles and connecting them. This will help with eye
and hand coordination. It's also great for control
on the brushes and pens, and it's also great to learn the pressure and stabilization. When you're drawing
them, I want you to use your entire
shoulder instead, and I also want you to
try drawing them as fast as you can and making sure
that you connect them. So trying to connect the circle. You're just going to draw these over and over and over again, and if you want to
keep practicing this, you can draw different
kinds of shapes, but try not to spend
too long on them, just draw them really quickly. This is great for
if you're trying to get used to using a tablet. I would also suggest
rather than going straight into trying to
finish full pieces, doing little doodles and
little sketches here and there to get used to everything
will be a great help for you. Getting the hang of how
awkward a drawing tablet can be can take up to two to three weeks,
get comfy with it. Even if it feels a bit
impossible at first, give yourself some time and practice and with
simple drawings, and you'll eventually
get the hang of it. It's exciting to get started and wanting to make full pieces. But the more you
allow yourself to do doodles and have mistakes, the faster you'll get
used to using it. Thank you so much for watching
this video and now on to the next class about
references and studies.
5. How to use Refrences : Today's lesson is
all about finding references and how to use
them effectively in your art. Whether you're using
them for studies or to enhance your drawings, references are powerful
tools for any artist. References are
important to use for both studying and
creating final pieces. By looking at a reference, you can perfect your work and ensure it's accurate
and detailed. Here's why references are
so important for studies. Understanding anatomy,
proportions and details. Using references can help
you understand anatomy, proportions and finer
details of objects. It also aids in learning, some light shading and
colors, improving accuracy. References are crucial for improving accuracy
of your drawings, especially when
anatomical correctness. Regularly studying
references enhances your ability to notice
subtle details, which is key for creating realistic arts or being
able to stylize them. Using references to improve your art style or to
actually get an art style is a really effective way
to build your art style. Artists can mix and match
different references, elements to create
a unique art style. This encourages
experimentation with various textures and patterns. I definitely recommend
using other artists reference as well alongside
realistic references. So where can you
find references? I prefer using pinterest for
references because it's like a site where everything is put together onto one site that
you just scroll through. What I look for
when I am searching references is like
art references, anatomy references,
portraits, values. I have a whole pinterest
over here with a bunch of references that I personally
use for my studies, if you're interested in going down the rabbit
hole with this one. Now let's get into how
you use references. When you're going in,
it's about observation. Start by observing where
things lay in your reference. Take note of the
proportions, angles, and key features,
break down the piece. Simplifying complex
forms into basic shapes. This makes it easier
to understand the structure and composition. Normally, I will draw on top of a reference to get
the idea of what's actually going on beneath all the details and
simplification. After you're done
drawing the basic form, gradually add more detail. Simplify what you see makes the drawing
process more manageable. So if you do an arm, breaking it down into two
shapes makes it the easiest. And then you can
take the study a bit further and study the
muscle on top of it. Now you don't need to learn each muscle group to be able to study something or learn every
detail in a reference. Now, I don't just use
references for studying. I also use references when
I'm drawing final pieces. So if I am unsure of
how a pose will look or how something is supposed
to interact with each other, I will go look for
a reference that best represents the
pose that I'm doing, or I take a photo of myself,
and then I reference that. Since you don't always know exactly how the anatomy
is going to react. And sometimes it's really hard to imagine it and perfect it. Unlike if you just
used a reference, which makes the process
ten times easier. If you can't find the reference
that you're looking for, you can use three D models, which is clip CDR
paint really useful. There's also sites like
these ones where you can download three D
models and then pose them, which will help you
be able to put or at least have an idea of what the pose is supposed
to look like. You can do it with
backgrounds as well. I know a lot of people
use blender to be able to make background so they can reference it in their drawings. You also don't just have to use one reference if you're
going into drawing, you can use multiple of them. So if one pose has
the right angle, but it doesn't have
the right arms. You can mix match two
different references, one having the arms
that you like, and the other having the body
proportions that you like. So feel free to have a
collage of references, I normally have a mood
board or something. And then that's kind
of what I go off of. And that wraps up today's class. And that wraps up today's class. Remember references
are your friend, and the only way you'll ever
get better is by using them, so don't be afraid to use
them as much as you can. All right. I'll see
you in the next one. Bye.
6. What to study : Hello, and welcome.
In this clause, I'll guide you on what to
study, to improve your art. I will cover the topics in
detail in separate videos, but I believe it's crucial to
understand the whys first. As in why is it important?
Where will you use this? Where can you see
this in other media, and the house will come later. Why fundamentals matter. What I'm talking about
are art fundamentals. You've probably heard
of these terms before. Anatomy, lines, colors, forms,
values, and composition. They might seem
intimidating at first, almost impossible to master, but even a basic
understanding of these concepts will make the
art process so much easier. Many new artists
jump straight into creating art without
understanding the basics. This can hinder their progress. Let's break down the
fundamentals and understanding why
they're so important. The practical how two lessons will follow in separate classes. So first, we have form. Form is the foundation,
and in my opinion, the most important element. It's the building of blocks for everything
else you'll learn. Form refers to three
dimensional objects that enclose volume having
length width and height. So In basic words, form is creating a three D
shape on a two D surface. You're going to create
form by using shading, values, lighting, just
shape in general. So why is it so important is because once you learn
how to do three D shapes, you'll be able to master things like anatomy
and perspective. Next on the line,
we have anatomy. Anatomy is a popular starting
point for many new artists. When you start
drawing characters and to say look a little odd, that's your cue to
start studying anatomy. Anatomy is about understanding the human body and
all its shapes, curves, muscles,
and proportions. To Excel in anatomy, you must first grasp form well since the body is
a three D shape. Learning anatomy
helps your characters look more natural and lively, as mistakes in anatomy can make a piece
look a bit awkward. Next, we have lines. Lines, the basic elements
used to create art. Becoming confident how you draw lines and
understanding line weight, the heaviness of
the lines can make the drawing process feel more natural and
easier to tackle. As new artist, your lines
might lack confidence. So you have chicken
scratch lines or your lines that
really connect well, or there's no proper form in the way you draw
with the lines. But with practice,
you'll improve your line placement and gain the confidence with the stroke. So having longer strokes and making things
to connect better. The next fundamental is colors. In traditional art,
understanding primary colors and how to mix them to create
different color palettes, to put them on to the
canvas is fundamental. But that also applies in
digital art, but differently. In digital art, you
have the color wheel, which already has all
the colors on them, so there's no need
to mix colors. But there's more to color
than just selection. Using color to draw
attention or create harmony in your art
is actually crucial. The knowledge is important
because it helps you create the intended
atmosphere and directs attention to specific objects
or areas in your work. The next fundamental is values. Values refer to how light
or hard dark colors appear. It communicates
the light surface, focal points, and depth. Using shades of similar values together creates low contrast, while varying values create
points of interest and depth. Understanding values
is important for showing shape through
lighting and shading. Values are also used to draw
attention to specific areas. For example, if
you have a darker background and a
lighter character, the character is going to
stand out and vice versa. When you can see value in color, you can create
dynamic pieces with both attention to
values and colors. This is why studying colors and values at the same
time are important. And then the final
one is composition. Composition is about
how different elements of artwork are combined. It focuses on arranging key
subjects, poses, objects, colors, and cropping,
so they all flow seamlessly
together in one piece. Composition can tell stories
or create atmosphere. When you're first
starting out, composition doesn't really seem
that important, or it can be hard to grass, but I will show you
later that it's actually pretty easy to create
flow in a piece. In conclusion,
these fundamentals are the building blocks of art. Understanding and
mastering them will make your art process smoother and
your piece more impactful. In the following clauses, we'll dive deeper into
each topic and learn how to apply these
concepts practically.
7. Form : Hello. In today's lesson. I'll be showing
you the importance of form and how
you can learn it. So what is form? Form is an element
of art that is three dimensional and
enclosures volume, including height
width and depth. It's cubes, spheres,
pyramids, and cylinders. Form also includes
getting good at using shading and lighting to
show depth and shape. There are different types
of form, geometric form. These are precise and regular like cubes, spheres,
and pyramids, often found in
human made objects, and then there's organic forms. These are irregular
curvy and asymmetrical, typically found in nature like trees, plants, and animals. Form involves three
d shapes used to create depth and
perspective in your work. It's important
because everything around you is made
out of shapes. By simplifying
anatomy into shapes, drawing becomes so much easier. For example, a hand
can be simplified into basic shapes like
a square and cylinders. Knowing how to draw
these basic shapes make it so much easier to
comprehend and draw the hand. So how do you learn form? First, you need
to start thinking in three D. When drawing, don't think of it
as a flat image. Think of it as a three
D shape with form. With art, you're
trying to capture three D shape on
a two D surface, creating depth and a
flat piece of work. Form isn't just about the depth, length and width, it's about the color and
lighting as well. You can create form by using
good shading or lighting. For instance, a cylinder
might look flat, but with the right
added shading, it can appear like
a three D form. Drawing three d
shapes, try drawing a rubber band around them to
show where the centers are. You want these lines
across the shapes, which will help
you keep track of the proportions and the
middle of the shape. I call this the rubber band. This technique is also useful
in perspective and nach me. Help me understand
the angle better. For example, the cylinder has
two rubber bands on them, and no matter where
I turn the cylinder, there will still always be a
constant two lines on there, but it helps me keep track of
where the shape is turning. The rubber band will
help you when you start drawing perspective
to do for shortening, which is turning the shaped towards the viewer and
becoming shorter like this. The best way to
learn three d form is to draw three d shapes. Stop or drawing cylinders, squares, rectangles and
different perspective. You can draw them using
this squad as reference, which shows cubes in all angles. You can replace them
with different shapes. This might seem a bit silly, but it'll help you when
drawing the fs of the body. Ss anatomy is made out of shapes piled on
top of each other. I feel like even by doing just
one or two shape studies, and then I tackle
an atom me after. I have such a bit
of grasp on how the body works and how the shapes interact
with each other. So I always recommend doing shape studies before actually
studying like a full piece. Getting back to rubber bands, a great way to
practice them is by imagining a shape cut in half and then
drawing what you see. For example, imagine a cylinder
cut in half and draw it. This will help you grasp three
D shapes bitter on paper, and it will also help you
understand rubber bands. The next shape to practice
is the organic shape, which is like shapes that
aren't typically geometric. Having a more loose idea
of how to put a shape that isn't exactly geometric into different positions will help when you start
breaking down different objects or during backgrounds or during anything that isn't perfectly
symmetrical. A good way to start
grasping form is also to use three D
modeling or sculpting. By simply just looking at a
shape or forming a shape in a three D program will help you grasp it and put it
into your memory better. I don't forget to go in
and shade them as well. There's plenty of references online of different
shapes with shading. This will help for
when you go in and want to shade something. You'll know how the shape
is going to look because each because each shape will have a different
type of lighting. For example, a
cylinder will have a software lighting because it's round and there's no
hard edges catching it. But a cube will have
a more solid shading, but more of a solid shading
due to it having solid edges. There's everything
for this lesson and now into the next one.
8. Lines: Hello. Welcome back
to another lesson. And in today's lessons, I'll be talking about lines and how to be more
confident with them. And when you first
start drawing lines can be very intimidating
because it takes a long time to build the
confidence and being able to put down the lines correctly
and in the right place. So today, I'll show you how to improve your
confidence with lines. I want to suggest you avoid. So the importance
of confident lines. Lines of fundamental and art, and having confident lines can significantly
improve your work. Confident lines are more
intentional and can better convey the form and
structure of your subject. When starting out, it is
common to use shorter, hesitant strokes, often referred
to as chicken scratches. Well, this is a natural part of learning, transitioning
to longer, more deliberate strokes
can make your lines appear more confident and
your work more polished. So here's some techniques
for confident lines. So have longer strokes. Try and avoid the
chicken scratch lines, which are short and hesitant. Aim for longer,
continuous strikes. This doesn't mean every line
has to be long and perfect, but work on making
each strug purposeful. Work from your shoulders,
not just your wrist, to achieve smoother,
more controlled lines. Remember how I said in the tablet video is to work from your shoulders
and not your wrist. If you work from your shoulders, you can have more
confident longer strikes. But if you tend to
work from your wrist, you'll have more
chicken scratch lines. Plan your lines. Before
putting down a line, know where you want
it to go, visualize the path of the line and
the form it'll create. Practice ghosting the line by hovering your pencil or
styles over the page or paper before making
contact. Connecting the lines. In digital art, many artists struggle with connecting lines. Practice making sure
your lines mean to create complete
shapes and forms. Sometimes if your lines
aren't connecting well, you can lose form pretty easily. For example, look at these
two different drawings. One has more hesitant non connected lines
and the other does. This doesn't mean
that you can't have good non connected lines
and make it look good, but that comes with
skill and practice. Another thing with
lines is a lot of new artists struggle
with spacing, so there's not a lot
of space between the two lines to
create well the shape. Practicing drawing
shapes and things, but making sure
that there's enough space between the two lines to show the form and the
shape is very important. So here are some exercises
to improve line confidence. Doodling and sketching.
Allow yourself time to doodle and
sketch freely. These informal drawings can help you loosen up
and gain confidence. Don't worry about perfection, focus on the flow and the
connection of your lines. When you start drawing, I
know that you really want to create beautiful
completed pieces, but it is very important
to really warm up and get that
flowiness to sketches. But the only way
you'll do that is by allowing yourself
to doodle more. Every time before
I start drawing, I normally do like a doodle
page and that helps a lot. So line weight in variation. Practice wearing the weight of the lines to add
depth and dimension. T thicker lines can
indicate areas of shadow, overlap, while thinner lines can be used for details
and highlights. Take a look at
these two drawings. One has line weight,
and the other doesn't. One looks a little bit lifeless, while the other looks like
it has more depth to it. Another example, I if an
arm is resting on a disc, the lines with the arm
is touching the disc will be thicker because of
the weight and the contact. This is just one simple
way to add line. Here are some practical tips. Zooming, when drawing digitally, avoid zooming in too closely. This can cause you to lose sight of the overall shape
and composition. Keep your canvas at a comfortable
distance and regularly zoom out to check
the overall balance and proportion of your drawing. Then creating space. Use lines to create space and separations
in your drawings. For instance, of a drawing a
character with a background, leaves space between
the character and the background elements to make sure the
character stands out. Clean space lines can enhance the clarity and
readability of your work. Then there's line practice. Practice drawing is
straight and curved lines, both free hands
and using guides. Experiment with different
types of lines, straight, curved, zig dag, and wave lines can all convey different
emotions and textures. By focusing on the technique and tips outlined in the video, you confidence in your lines. Remember, practices key, spending time
doodling sketching, and experimenting
with different lines and weight styles that goes
along with brushes too. Over time, your lines will
become more confident, adding a professional
touch to your work.
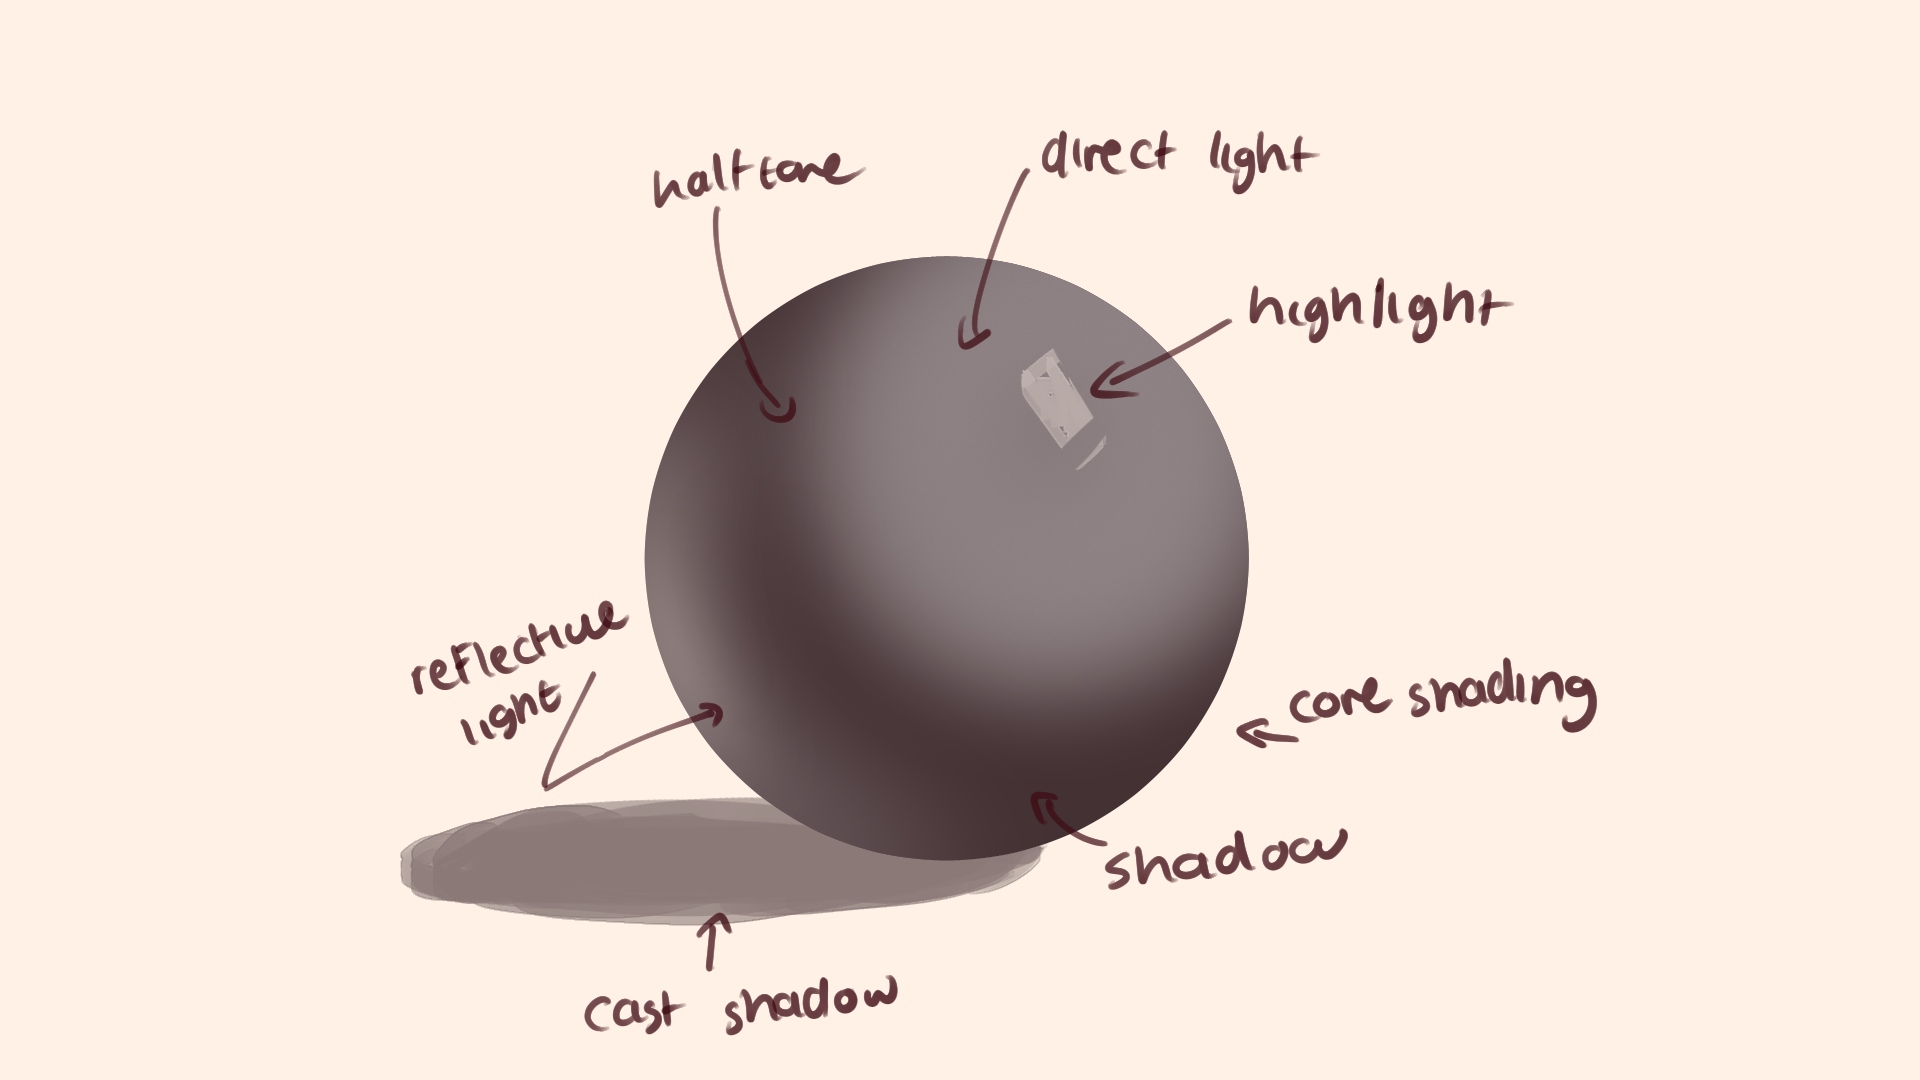
9. Values: Hello, and welcome
back. In today's via, I'll be talking about
values and how to use them to improve your
lighting and shading, which is crucial for creating good contrast and
atmosphere in your art. Why values matter? Values are all
about the lightness and darkness of a color, and they play a vital role
in making your artwork pop. By mastering values, you
can guide the viewers eyes through the drawing and direct their focus to where
you want it to be. For example, if your
character blends into the background due to similar
values in the colors, They will become muddy and you won't be able to
see them very well. By adding a lighter ele outline or background to the character, you can make the character pop
and stand out immediately. You can use values
to create contrast. Contrast is key in making elements of your piece
distinct and engaging. Without a good range of values, your art can look
flat and muddy, causing important
details to get lost. Using contrasting
values helps to define form and create
a sense of depth, making your work more dynamic
and visually appealing. You can create contrast
by using values, so a very light color and a dark color can
contrast each other, or you can create contrast by using different
saturated colors. So for example, if this is a very monotone low
saturated piece, but if I add a very high
saturated color to this piece, there'll be a lot more
contrast of colors here. So your eyes will trail
around the piece. Or if your piece is
very high in saturation and you use a very
low saturated color, you can create high
value sections. Values aren't just
for black and white. They are crucial
in color work too. Even if you have
contrasting colors, if the values are just similar, the piece can still
lack definition. For instance, contrasting a
dark blue with a light yellow can create striking effect if
the values are well chosen. Here, for example, this piece looks like it has
different colors to it. But if I turn on a black
and white filter of this, you can tell that there's
barely any values, which will make the
piece of get lost. But here I am changing up
the values of the colors, and you can already see
there's a big difference. So creating depths of values. Values help to create depth. Which is in turn
enhancing the form. By effectively using
light and shadows, you can turn flat shapes into
three dimensional forms, adding realism and
interests to work. So for example, this
is a flat circle, but by adding like two
or three lighter colors, I can already make it look like a three dimensional shape. So how do you study values? Gray scale drawings. Stop by redrawing your
pieces in gray scale, focus on identifying and replicating the darkest
and lightest areas. And focusing solely on that, not on what you're
actually drawing. For example, if I am
drawing this teapot, I'm concentrating on
the darkest values, the second lightest values, and then the lightest
lightest Lightes lies. I kind of just bulled
up from there. This exercise will
help you understand the value structure without
the distraction of colors. And number two,
observational studies. Practice observing
values in real life, like at objects and notes and lighting in the darkest areas. Look at objects and note the
lightest and darkest areas. Try sketching these objects
using only the shaded black and white and gray to capture the essence of the form
through value alone. So this is more of an
intense lighting study. So what I want you
to do when you're studying like this is
to look at the image and try and find out how
you can translate this into a solid black and
white line into a piece. So this will help you
really get down values, and it will also help you really understand the form of a piece. And when you're going
and drawing something, you'll be able to curate the object without having
to think too much about it. And then there's
painting studies. When you're doing
traditional oil paintings, it is always suggested
to start with the darkest colors and
then build from there. Now, this is a practice
for traditional work, but if you start doing
it in your digital work, it will also help build
this value mapping for you. This technique helps in creating a solid value foundation and builds depths
from the ground up. This will come in handy
even for digital work. By mastering values, you can significantly enhance the
visual impact of your work. Values guide the viewers eyes, create contrast and
add depth and form. A great way to really practice
values is to occasionally turn your piece to
black and white when you're laying down the
shading and the colors. You can see if your
values are doing well. You can also practice this out beforehand in a thumb nail form. You can have where you want the lightest and darkest
colors to be in your drawing. You can plan that
out in a thumbnail, like a smaller
version to the side. Thank you so much for watching, and I'll see you in
the next class. Bye.
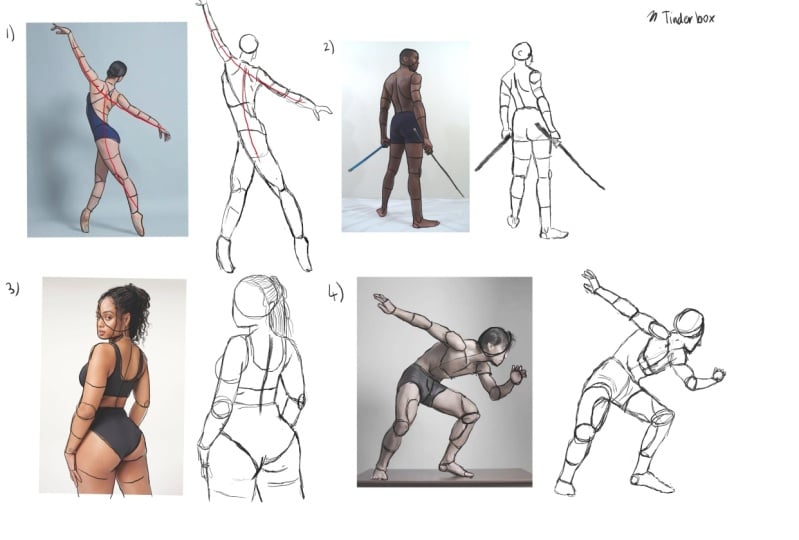
10. Anatomy : Hello. Today's
lesson will be about anatomy and the shapes that
are used to draw anatomy. So why is anatomy important? Anatomy is fundamental if you're going to be
drawing character art. Having accurate
proportions in anatomy for your characters will help them feel more realistic
and in depth. If your anatomy is off, it's often noticeable, even
to people who can't draw. They can sense that
something is wrong. Anatomy is probably one of the first things you want to study when you
start learning art. Because it's likely one of
the first you struggle with. Finding good
references is crucial. I made a whole video
of where I can find references in the
previous classes, but I usually find
mine un pinterest. I always use realistic references
when studying anatomy. Since these references
are more accurate. I break down anatomy into
simple shapes like cylinders, cubes and squares and circles. This is where knowing form is important to be able
to study anatomy. How to study anatomy.
Using reference. Take a reference image and break down the anatomy
into simple shapes. Identify, and draw
the basic shapes, the cylinders cubed and
squares over the reference. When doing this, think over
the shapes are pointed, the perspective,
the rubber bands, and the shapes in three D. Redraw the reference
to the side, paying attention to the position of the limbs and proportions. For example, where the limbs and joints fall
on the reference, and try putting that where
it's supposed to be. So the redrawing picture to the side is normally
to practice getting the hang of the
proportions on your own without so heavily
relying on the reference. It's building muscle memory. The second one to study
is gesture drawing. Gest the drawing involves
drawing the figure as a stick figure with
flow and weight. Break down the body into the simplest shapes
or flow lines. Focus on where the shoulders and legs and spine and weight are. When I say weight,
what I mean by this is the body leans in a
direction or a point. This helps capture the
flow of the anatomy, which is essential when adding the anatomical
shapes on top of it. Both these will build up to
drawing an nature better, so I suggest doing both. Here's some additional
tips to studying anatomy. Understand the joints. Pay attention to
where the joints are and how they function. For example, understand
where the elbows, knees, and ankles bend and
how far they can bend. Study muscle groups. Well basic shapes will
help with the structure. Understanding majority
muscle groups can add realism to your drawing. Learn where muscles bulge
and contrast on movement. Practice regularly,
consistency is key. Regular practicing these
techniques will help you internalize the proportion and structure of human anatomy. Use three D models. Utilizing three D
models can give you a better understanding of
anatomy from different angles. So what are the basic shapes
that are used for anatomy? For the head, start with the circle for the
back of the skull, and the face is of paper
wrapped around the skull. The neck is a cylinder
that connects to the torso and the skull. I use a spine line to figure out where the neck will be aligned. The torso uses a combination of rounded shapes and triangles to represent the
chest and the palvis. The chest can be represented by a boxy shape or egg shape, using the spine to
figure out where to add the chest and where it will sit, like the
direction of it. From there, the mid section is a smaller cylinder
and then the crotch. Remember, there are three shapes to the torso, not just two, a lot of people forget
the mid section, and then their torso tends
to be a lot shorter. And then the crotch
are like boxers. The arms, start
with the cylinder for the upper arm and
then the cylinder for the bottom arm. The elbow is a little circle, which sticks out
from certain angles, and then the hands are
a little rectangles. The shoulder connects
the little torso. I use the middle
line at the top of the torso to determine where the shoulders
are going to be, and then I also use them
down the side of the torso. Here the middle of the torsos sits is where the arms will go. This will help when
I'm trying to bend the torso in a
different direction. I can tell where the
arms are going to be, or if I'm going to be able to see where the shoulders are. For hands, a flat
malleable square for the palm with cylinders
for the fingers. The thumb is an additional
shape attached to the square. For legs, this one's a
little bit more easier. Use a straight curve
straight line method. Each leg can be broken down
into cylinders and shapes. So for this, I mean,
if you look closely, it will always be
straight line, curved, curve, straight line, no matter from what angle
the legs are from. This makes it a
little lot easier just to tackle it in general. So you can see me
drawing a bunch of different arms and legs here, and they all have
the straight curve straight curve method. Attaching that is the feet, feet is something
all struggle with, but I normally look
at them as like a little triangle that
attaches to the ankle and also don't forget about how feet can bend from
the joints and stuff. By breaking down
complex forms and disemple shapes and
consistently practicing, you can improve your
understanding of anatomy and create more realistic
and dynamic characters. I see in the next class, by
11. Outro: Hello, and welcome to the
final video of our class. I can hardly believe it's
already come to an end. It feels like I've
been working on these videos for
such a long time. I truly hope they've been
valuable and inspiring to you. As you continue on
your artistic journey, I wish you all the best. My hope is that you
discover your love for creating art and find
happiness in your work. Remember, art is deeply
personal and evolving process. Allow yourself to grow and embrace the unique
path you'll forge. It'll be very
different from mine, but that's what makes
your art really special. Thank you so much
for allowing me to be part of this
learning experience. I've had a blast creating these videos and sharing
my knowledge with you. I'm incredibly grateful for the opportunity to
host these class. Keep pushing the boundaries
of your creativity, stay curious, and most
importantly, enjoy the process. I would pe you again in
the future until then, best of block of your
art and take care. Goodbye and happy creating.
 Bluebiscuits, idiot with a pen