Transcripts
1. Intro to Floral Cross Class: Hi, I'm Sally pinning. I am a church communicator who is in love with Bible journaling, and I'd like to share that with you. You may think that you need to be an artist in order to do Bible journaling, but that's really not true. Today. I would like to lead you through a step by step technique where we make a beautiful watercolor floral cross in your Bible, and I want you to learn that it's really easy as going step by step in the lesson. Today we will learn how to draw all of the flowers in the cross and will. We'll do some watercolor techniques and even learned some faux calligraphy so you can have beautiful hand writing in your Bible. When we go step by step, you're gonna find that it's really easy and so much fun in a wonderful way to spend time in God's word. Today we're going to study the resurrection, and we're going to draw Flowered Cross that will go on a page in the Book of Mark. It's gonna be lots of funds and come on, let's get started
2. Supplies for Floral Cross Class: the first supply you'll need for this class is your journaling Bible. There are two main kinds of journaling Bibles. The first is called in early. With this Bible, you have a blank page between each two pages of text. It gives you plenty of room for taking notes and artwork. The next kind of journaling Bible has a two inch column on the side of each page. With this Bible, you'll have a little less space and may choose to make your design go over the text, the other supplies you're gonna need or a pencil on a wider racer. A black micron pin. The micron pin is permanent. EQ, and it doesnt lead through Bible pages. A ruler, you'll need some watercolor paints, a cup of water, a small brush and some paper towels. When you have all your supplies together, come back for the next lesson where we'll start drawing
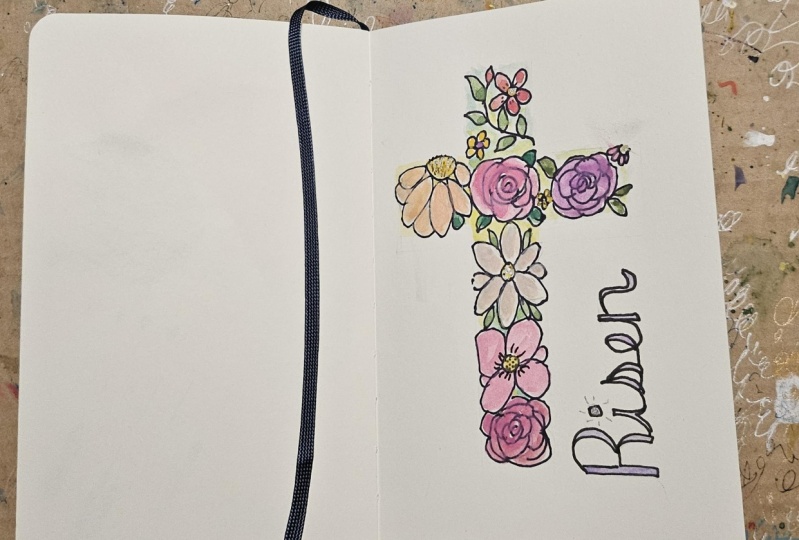
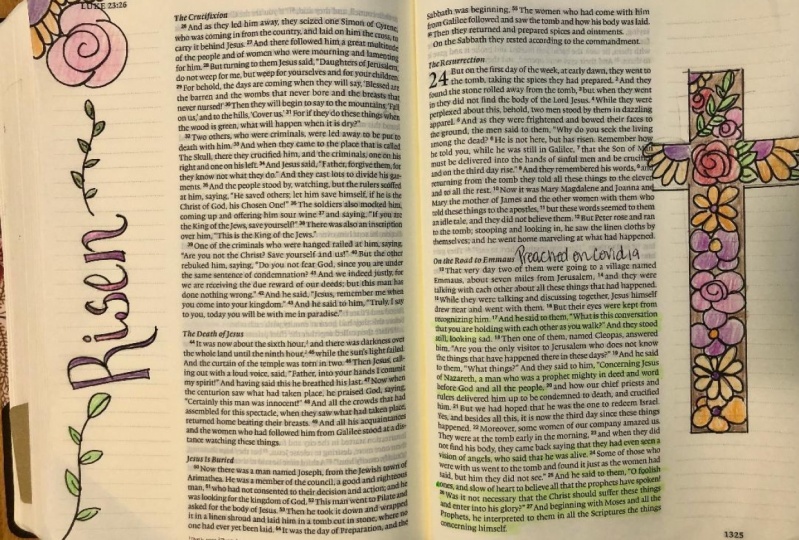
3. Drawing Floral Cross Class: the scripture that I'm going to be journaling is Mark 16 6 You are looking for Jesus, the Nazarene who was crucified. He has risen. He is not here. I'm going to start by drawing the cross in my Bible. I'm doing it very lightly in pencil. And as you can see, I'm going to go over the text of the Bible a little bit. This is a personal choice for me because I'm using watercolor that is transparent and because I'm not covering the entire page of text, this is OK. I would like for my designed to stand out a little bit and by making it larger, it will do that. I'm going to start my first flower, which is a rose in the way I'm going to draw the roses to start with a tight spiral. I draw that with my pencil, and then I make overlapping scallop shapes around that spiral, and they form the pedals of the rose. The more I add, the larger the flower will get their just sort of a semi circle shape, and they get a little bit larger as we get away from the center of the flower. It's a simple rose, but effective. Next, I'm going to start on the other flowers. I'm going to draw a daisy, starting with a circle for the center and then making pedals come outward from the circle. I am making pedals different ling so that I can keep the flower within the shape of the cross. After I finished the daisy, I'm going to start on the next flower, and this one is going to be just a simple flower with a circle in the middle and four large round pedals you issue could see. I'm making it go under the daisy So the flowers look like they're overlapping each other thin, Another rose, the same spiral shape with the overlapping scholar pedals going around the edge, and I'm working it to the edges of my penciled in cross. Now I'm going to make another daisy, but this one would look as if you're seeing it from this side. So you don't see the full center and you don't see all the pedals I'm making what looks sort of like half a daisy and then at the top, I'm going to make the center sort of a dome, and that is the way of flour would look if you looked at it from the side. Then I'm doing another rose. It's a little difficult to see this one, but I'm using the same technique, and I added a leaf to the side. And then in that little space between the flowers, I'm just putting another simple petal flower. Simple petal flower goes up in the top corner. This time I'm using five pedals. Always start with the center of the flower, and then I'm making a vine. It's just a curved line, and my leaf shapes are on oval with points at either end. I'm filling in the space with a tiny flower, and now I'm going to start adding more leaves to the design just to fill in some of the extra spaces. - Now you can see I put a piece of copy paper under the Bible page just to protect the pages below. There shouldn't be any problem with bleed through because I am using the micron pin. But now I'm just using the pin, and I'm going over all my outlines to make a crisp shape. The micro pin I'm using is a size 08 Any size will work, but I like sort of ah abroad. Tips of my outline really pops. When you have this outline already put together and you start painting, it's almost like painting in a coloring book. It's a need effect, and it's a nice, simple way to add the design to your rival. You can see, though I am not doing the outline of the cross itself. I'm letting the flowers form the shape of the cross rather than outlining it. Now that that is finished, I let it dry, and then I'm going to come back and erase it, and I'll be ready to start paving.
4. Painting Floral Cross Class: Okay, now we can start the fun part of coloring in our design. I'm doing this in watercolors, but you can use colored pencils if you prefer, or watercolor pencils. Watercolors are great for Bibles because the color does not bleed through the page and mess up the back side. I would caution you about using markers because most markers do believe through your Bible pages. So what I'm doing is just basic watercolor. I've picked just a few colors, and I am just moving around the painting, doing different flowers in different colors. That one thing to know about water color is that a little bit of water gives you a bold, bright color. And the more water you use, the more diluted or lighter your color will be. You don't need to be super careful about staying in the lines, because actually, this is a real casual looking peace, and, um, a few little out of the line places just make it look like a tan dun. I am using a size four brush, which is fairly small, and the pointed tip helps me get into those little bitty places on the page.
5. Lettering Floral Cross Class: The last thing I'm going to do to this page in on Bible is to add text. And I've chosen to add the word risen. So what I'm doing is writing it out and cursive, um, very lightly with pencil. And I'm trying to leave a little space between the letters. Now I'm going to go back and broaden all the down strokes. This is called faux calligraphy. It will give the look of calligraphy without using a special pin or the skill needed to do real calligraphy that any time your hand would have made a down stroke while writing the word you're gonna sick in that line and then leave the strokes, the up strokes, the thin like they would normally be. So I'm going through the whole word. And as you can see, I'm just thickening that stroke just a little bit. Okay, So, normally in calligraphy, when you use a calligraphy pin, you're you use very little pressure on your up strokes in their thin line, and then you use more pressure on the down strokes and they become thicker. So we are mimicking that look just by drawing sicker lines. Now I'm using my same my front pin and I'm outlining the letters. Just go and carefully around each letter and making an outline. When you can see the outline, you can see how the what would be the down strokes on the letter are thicker than the the thin lines you see around the curves or when your pin would go in up position. So the iess sick that going into the S is going to be a thin line. And then there's a thick line coming down from the S, then going from the S into the E than the down part of the E is thicker. And without knowing any special skill, you can make your regular handwriting look very much like calligraphy just by using this technique. Okay, I'm gonna finish that up and then I want to go back, and I'm gonna color it in with my watercolors. So making a few little adjustments right now, I am underlining my verse in my Bible. That's something I always like to do. And then I'm going to go back with my watercolor and I picked the pink and I'm going to go back with that same brush and fill in the letters
6. Project Floral Cross Class: Okay, That's it. We have been through all the steps of creating our floor across. We have learned how to draw the rose and the other flowers lightly in pencil. We've learned how the micron pin can make everything stand out in pop. We've learned how to water color and fill in all the shapes. And we've learned our focal a graffiti How to add the text to our pages. So now I cannot wait to see what you do. Please post your projects. If you have any questions, please post those two. And I would love to get to answer them. And I'm so excited to see what you do. Thanks for taking my class.
 Sally Penning, Create it! Make it!