Transcripts
1. Introduction: What if your gel prints weren't the end but the
beginning of a painting? Welcome to the studio. It's Freule here. I'm a mixed media artist, and I've been painting and
exhibiting for over 30 years. I am deeply passionate about empowering you to
create great art. And in this class, I'm going to show you a way
of working with the gel plate that moves beyond printing
and into painting. Now, this technique grew out of my class 12 of 100
days of collage. Where I was exploring a more abstract
expressionist approach, loosening control,
responding to color, and allowing the
paint to move freely. And somewhere in this
process, something shifted, and the gel plate became a process of painting,
not just print. I'll show you how I
work directly onto the plate with rich flowing
color, how to pull, lay it textured prints, and then how to take one of
those prints and transform it into a finished mixed
media painting on canvas. This is really
about moving beyond the print and discovering
what it can become. If you love gel
printing, collage, and mixed media and you're ready to take your
work a little further, I know you're going to love the process
experimentation, fun. And exploration of this
fantastic technique. So join me in the studio. Let's gather our materials, and let's make art.
2. Material List: Right. So the materialist, of course, we have to start
with the gel plate. Now, I've got a 16 by
20 inch gel el plate. You don't have to use this
particular size plate. You can use whatever it
is that you have already. And it doesn't matter
what brand it is. Of course you need a brayer, but you'll also need
some paint brushes or something else to put
the paint on the plate. I don't even use a paint Ruth. I can't wait to show you. This is going to be so much fun. Now I've got my collection
of acrylic paints. And yes, these are all
my favorite colors. You don't have to
use these colors. You can use whatever it is that you've got or your
favorite colors. They may not be these
luscious, rich, warm, and metallic colors
that I prefer, but make sure you're creating with something
that makes you happy. I've got a few different
types, different brands. I've also got a
few acrylic paints in different viscosities. So I've got the
fluid paint here, and I'm using some
high flow as well. Can't wait to show you what
we're doing with this. I do have one of my
favorite I zinc sprays, although you can't actually
get these anymore. So disappointing. And talking about spray paint, I do like to use the liquitex,
acrylic spray paint. You don't have to use this, remember, if you don't want to. But what I do like
about this spray paint is it's compatible with all
the other acrylic paints. So much fun, especially when you're using it
through stencils. And talking about stencils, you do want to have a few different stencils in different shapes or styles
that you want to work with. Now, I've got some
fabulous lunar paste. This is like a stencil butter. It's just a thick acrylic, paste like beautiful
metallic colors. Love them. Well, there's a bit
of a theme here, using all my favorites. And I've got some of this
glorious acoso paper, handmade, beautiful
paper from Thailand. I'm using this to actually
pull some prints today, Cart weight to show you. Turns out stunning. I'm also using some
wet string tissue. So, a variety of paper, it doesn't have to
be these papers but it does make a
different effect, depending on what you're using. I've also got some satin varnish because we're going to be putting our fabulous gel prints, gluing them onto a canvas
as a finished artwork. And, of course, I
couldn't stop at one. So I'm going to show you how I varnish them,
how I finish them. It's so exciting. There's so much to explore with this fabulous new technique
that I'm totally loving. Right, we've got all
our basic supplies, and there is a list in your class notes if
you want to know exactly what these paint names
are and where to get them. So pull out all your paints
and your beautiful papers. Grab that gel plate. We're going to have so much fun.
3. Gel Plate Painting: H a few years ago, I started on my gel
plate Adventure journey. I was using the
particular technique for creating collage paper. It makes fast and furious papers very easily, very beautifully. And then I started developing stencils and stamps
and adding layers. I kept trying different
techniques and ways to create beautiful prints that
I used for collage to create fabulous
mixed media artworks. Then as time went on, I added more elements
to the gel plate. I added some collage
and some gold leaf. And the adventure was
absolutely fabulous because gel plate
printing is so versatile. There's so many possibilities. There's so many ways to create absolutely beautiful
original artworks with simple technique and not
too many art supplies. So, in today's class, I'm going to take you into my adventure of my latest
technique with the gel plate, doing what I call a gel plate. Painting. I'm going to show
you how I create some absolutely beautiful papers on the gel plate in a
painting application, and then we're going to put a fabulous collage
together on a canvas. So I've pulled out my 16 of
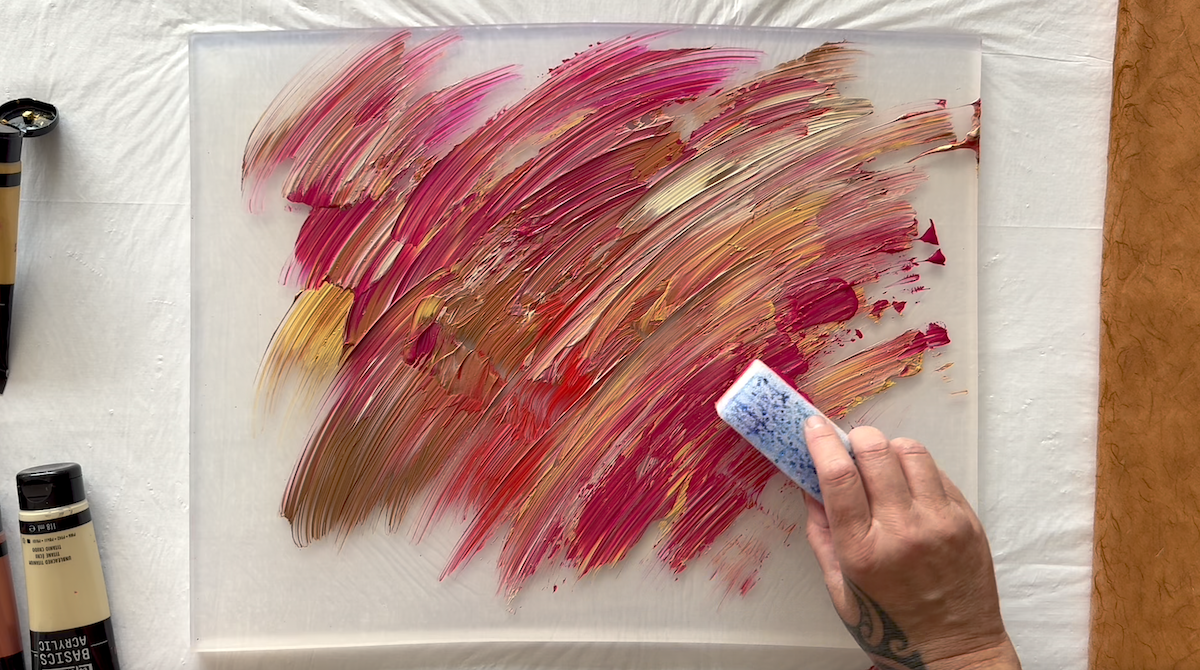
my 20 inch gel elf plate, and I'm starting with my
absolute favorite colors. I've got Quin Magenta, liquitex in the bronze, copper, unbleached titanium, and,
of course, metallic gold. We have to have the I've also put on a little bit of
the Nath pal crimson. Now, I'm using a really
interesting tool here. It's actually a piece
of foam from packaging, and it's one of my
absolutely favorite tools for creating this
fabulous technique of gel plate painting because
I'm just scraping the paint across the gel plate very
abstract, very opulent. I'm moving it with
my piece of foam. Then I squeezed on
a little more gold, a little more magenta, and ran that fabulous tool through all of the paint
covering the gel plate. And I'm putting on a piece of Coso paper in an
amber brown color. It's a beautiful
textured handmade paper from Coso studio. I'm putting it
straight on the plate, straight across all
of that paint layer, and then I'm pulling
it off straight away. We're not letting this one dry. We're not letting
it sit there too long because this is very soft. Fibrous paper. And if you leave it on your
plate too long, it's going to be destroyed. So I just give it a quick rub over and pull it
off the plate and then turn around and put it on the floor behind
me in my studio. Now, you can see there's a whole lot of paint
left on the plate, and it's created this beautiful texture putting that paper on, pulling it off,
and the paint that remains is going to take
another beautiful print. So next I'm putting
on a piece of wet strength tissue straight
on the paint again. I'm giving it a good rub over. This time, I'm rubbing
it a little bit harder, so it picks up more
of that paint, and this paper is a lot stronger than the
handmade curso paper, so you can get a little
more rough with it. Once I've given it
a good rub over, I then pull the wet strength, tissue off, and I have
another beautiful print. Now there's a lot less
paint on the gel plate, and we can continue to create the next print like we normally would for any other technique. I'm adding some stencils with the beautiful
liquitex spray paint in this gorgeous red color. And then I'm also
adding a pop of orange. So now, whatever
you put first on your gel plate is going to be on top when you turn it over. So the layers we're adding now are going to build
fabulous textures sitting behind the
glorious colours of paint that we've
already put on the plate. So I poured out some gold in
the liquitex spray paint, and I'm spraying that on, but the nozzle was clogged. Don't you hate that I hate. I hate that when the
nozzle clogs up. It kind of made a textured splattery paper
mark on the plate, which was okay, but it didn't
do what I wanted it to do. I wanted it to spray
nice and evenly. Oh, man, but we push
on. We don't give up. We roll with the punches and see where the
creativity leads us. So now I have this
beautiful textured layer of splattery paint colors. Now you have to wait
for this layer to perfectly dry before you
roll on your pickup paint. And I'm using a very pale, pinky tone just so it adds to the background of the
print pull it up. And I'm using the wet strength
tissue for this print. Now, I did leave it sometime
before I pulled it up. Hm, it would have been
a couple of hours, and then I pulled the print. Tara, Tara. It looks absolutely beautiful, and you can see all of
the fabulous layers. Now, I do find that, especially when
there's a buildup of lots of paint
and lots of layers, that if you pull
the gel plate off the paper instead of the
paper off the gel plate, it comes away easier. Especially if you've
left it long enough. Don't forget you do need a longer time for
the paint layer to dry before you pull
it up if you've got lots of layers like
I had on this print. And it does depend
on where you live, the temperature of
the day, is it warm? Is it cold? If you're pulling your print up
and you're finding there's too much paint left on the plate or it's
sticking or it's tearing, you didn't leave it long enough. So make sure you leave it long enough so that
when you pull it off, it comes off clean
from the gel plate. It doesn't tear,
it doesn't stick, and you'll be a lot so now the second print that I pulled on the wet
strength tissue, I decided to add a little
more color to the background. Look how fabulous
the design is of that paint that we put on the
gel play. I just love it. So I've pulled out
some golden high flow. Now this paint is very
fluid but really pigmented. So I'm using the quin magenta
and the transparent red onoxideT of my favorite putting it into a
little container, and I'm adding a little bit of water just to thin
it out even more. So it's more like a
watercolor application, but because it's the high flow, it's so extremely
pigmented that the colour is going to be very
saturated, which I love. So I'm brushing it on around the paper where there
is the blank space. And then when I covered it
all and I was nice and happy, I gave it a spritza
with some zinc in the gold mine just to get
a little bit of shimmer. And what do you think? Isn't it absolutely beautiful? I love how this
print turned out. You can see now the
texture of the paint. From putting the paper on and pulling it
off straight away, it creates all of this texture of the
wet paint. I love it. I think it looked beautiful. And then this one has that
glorious added texture of the water coolory look with the high flow that I painted
all around this section. I think it's just beautiful. And because it's on
the wet streak tissue, I can easily now glue
this onto a canvas. It's nice and soft. It would stick super easy, and it would bend round
the corners of the canvas, as well, which I really love. I think this print
it's very successful. What do you think about
my gel plate paintings? I love this new technique, and I do get a little carried away when I'm exploring
a new technique. This was the other print of the third print from the plate. Which way do I like it? I think I like it this way. I like the wohing
of it like that. You can see all the layers here from the spray paint
through that stencil. But I love these shapes from the paint that was
put on the plate first. And it's so fabulous because you couldn't really
paint it in by hand like this with the
texture underneath coming through with that
fabulous stencil mark. That's what we love
about gel printing. You've got all of
those fabulous layers. So I'm loving this one, as well. This one's on the carnival
wet strength tissue. It's a little bigger. It
takes up my whole plate. Which is fabulous. And this would work
really well in a collage. Any collage either
as a background or parts of the piece or some of it or add it
with something else, I just absolutely love
these textured shapes. I think this is such
a fabulous technique, and there's so many
possibilities. Look how beautiful all of
these three prints have turned out with just one paint
application on the gelply.
4. From Print to Canvas: Right. So with the first print that I took on the
beautiful coso paper, I decided I'm going to
put it on a canvas. And the first thing I did was spray it with the liquitex in the orange spray
paint just to give the base of the canvas a
little more depth of color. Then when that was dry, I put on a layer of the
liquitex matt gel medium, spread it across the canvas, brushed it so that it
was completely covered, and then put on my beautiful
print from the gel plate. Now I did print this
onto the coso paper, which is very soft. Oh, beautiful and fibrous, but you do have to be a little bit careful when
you're gluing it on the canvas because it's quite easy to rub it too much
and tear a hole in it. I know I have done that. You've got to push it
down so that it adheres nicely to the canvas and push
out all of the air bubbles, but you can't push it too much
that you tear holes in it. So gently, gently Get the
paper down nice and firm. And then what I like to do
is put the matte medium on the side and wrap the
paper around the canvas. It looks finished, it
looks professional, and you're going to love it in the end when it's
hanging on the wall and all of those edges over the paintings are covered
in the same colour. It's very easy to do. You just put on the matte medium and you turn the paper over and you tuck it and fold it like you're
wrapping a parcel. Super easy, but it does give
it a really nice finish. I absolutely love how this
print looks on the canvas. It's just beautiful. And you can see the
glorious fibers of the Coso paper
coming through, but I wasn't so happy with
the tone of the orange. So I poured out the
high flow again in the magenta and the
transparent red iron oxide, watered it down a little
in the container, and then I brushed
it on the canvas. I just wanted to deepen the
tone of that background, and it turned out beautiful. These paints have
worked so well for this particular
technique because they soak in to
that cosot paper. They cover the area beautifully, gave it a bit of a
sprinter of some water, so it spreads out,
bit watercolor like, and it's covering the
paper beautifully. Now, just make sure you
don't try and do anything to that canvas with the
paper on it until it's perfectly dry
from being glued on. Otherwise, I'm telling you, it's going to tear to shreds. So once it's perfectly dry, add a little touchu of colour, deepen the colours,
and it's beautiful. Now, I love how the
canvas looks with my gel plate painting on
it with the Coso paper. It's just glorious. It just has such a
beautiful texture to it. And the color that
I deepened it with high flow paint just
turned out so well. So I just want to finish
it now with a focal point, some kind of texture
to add to it, to give the paint depth
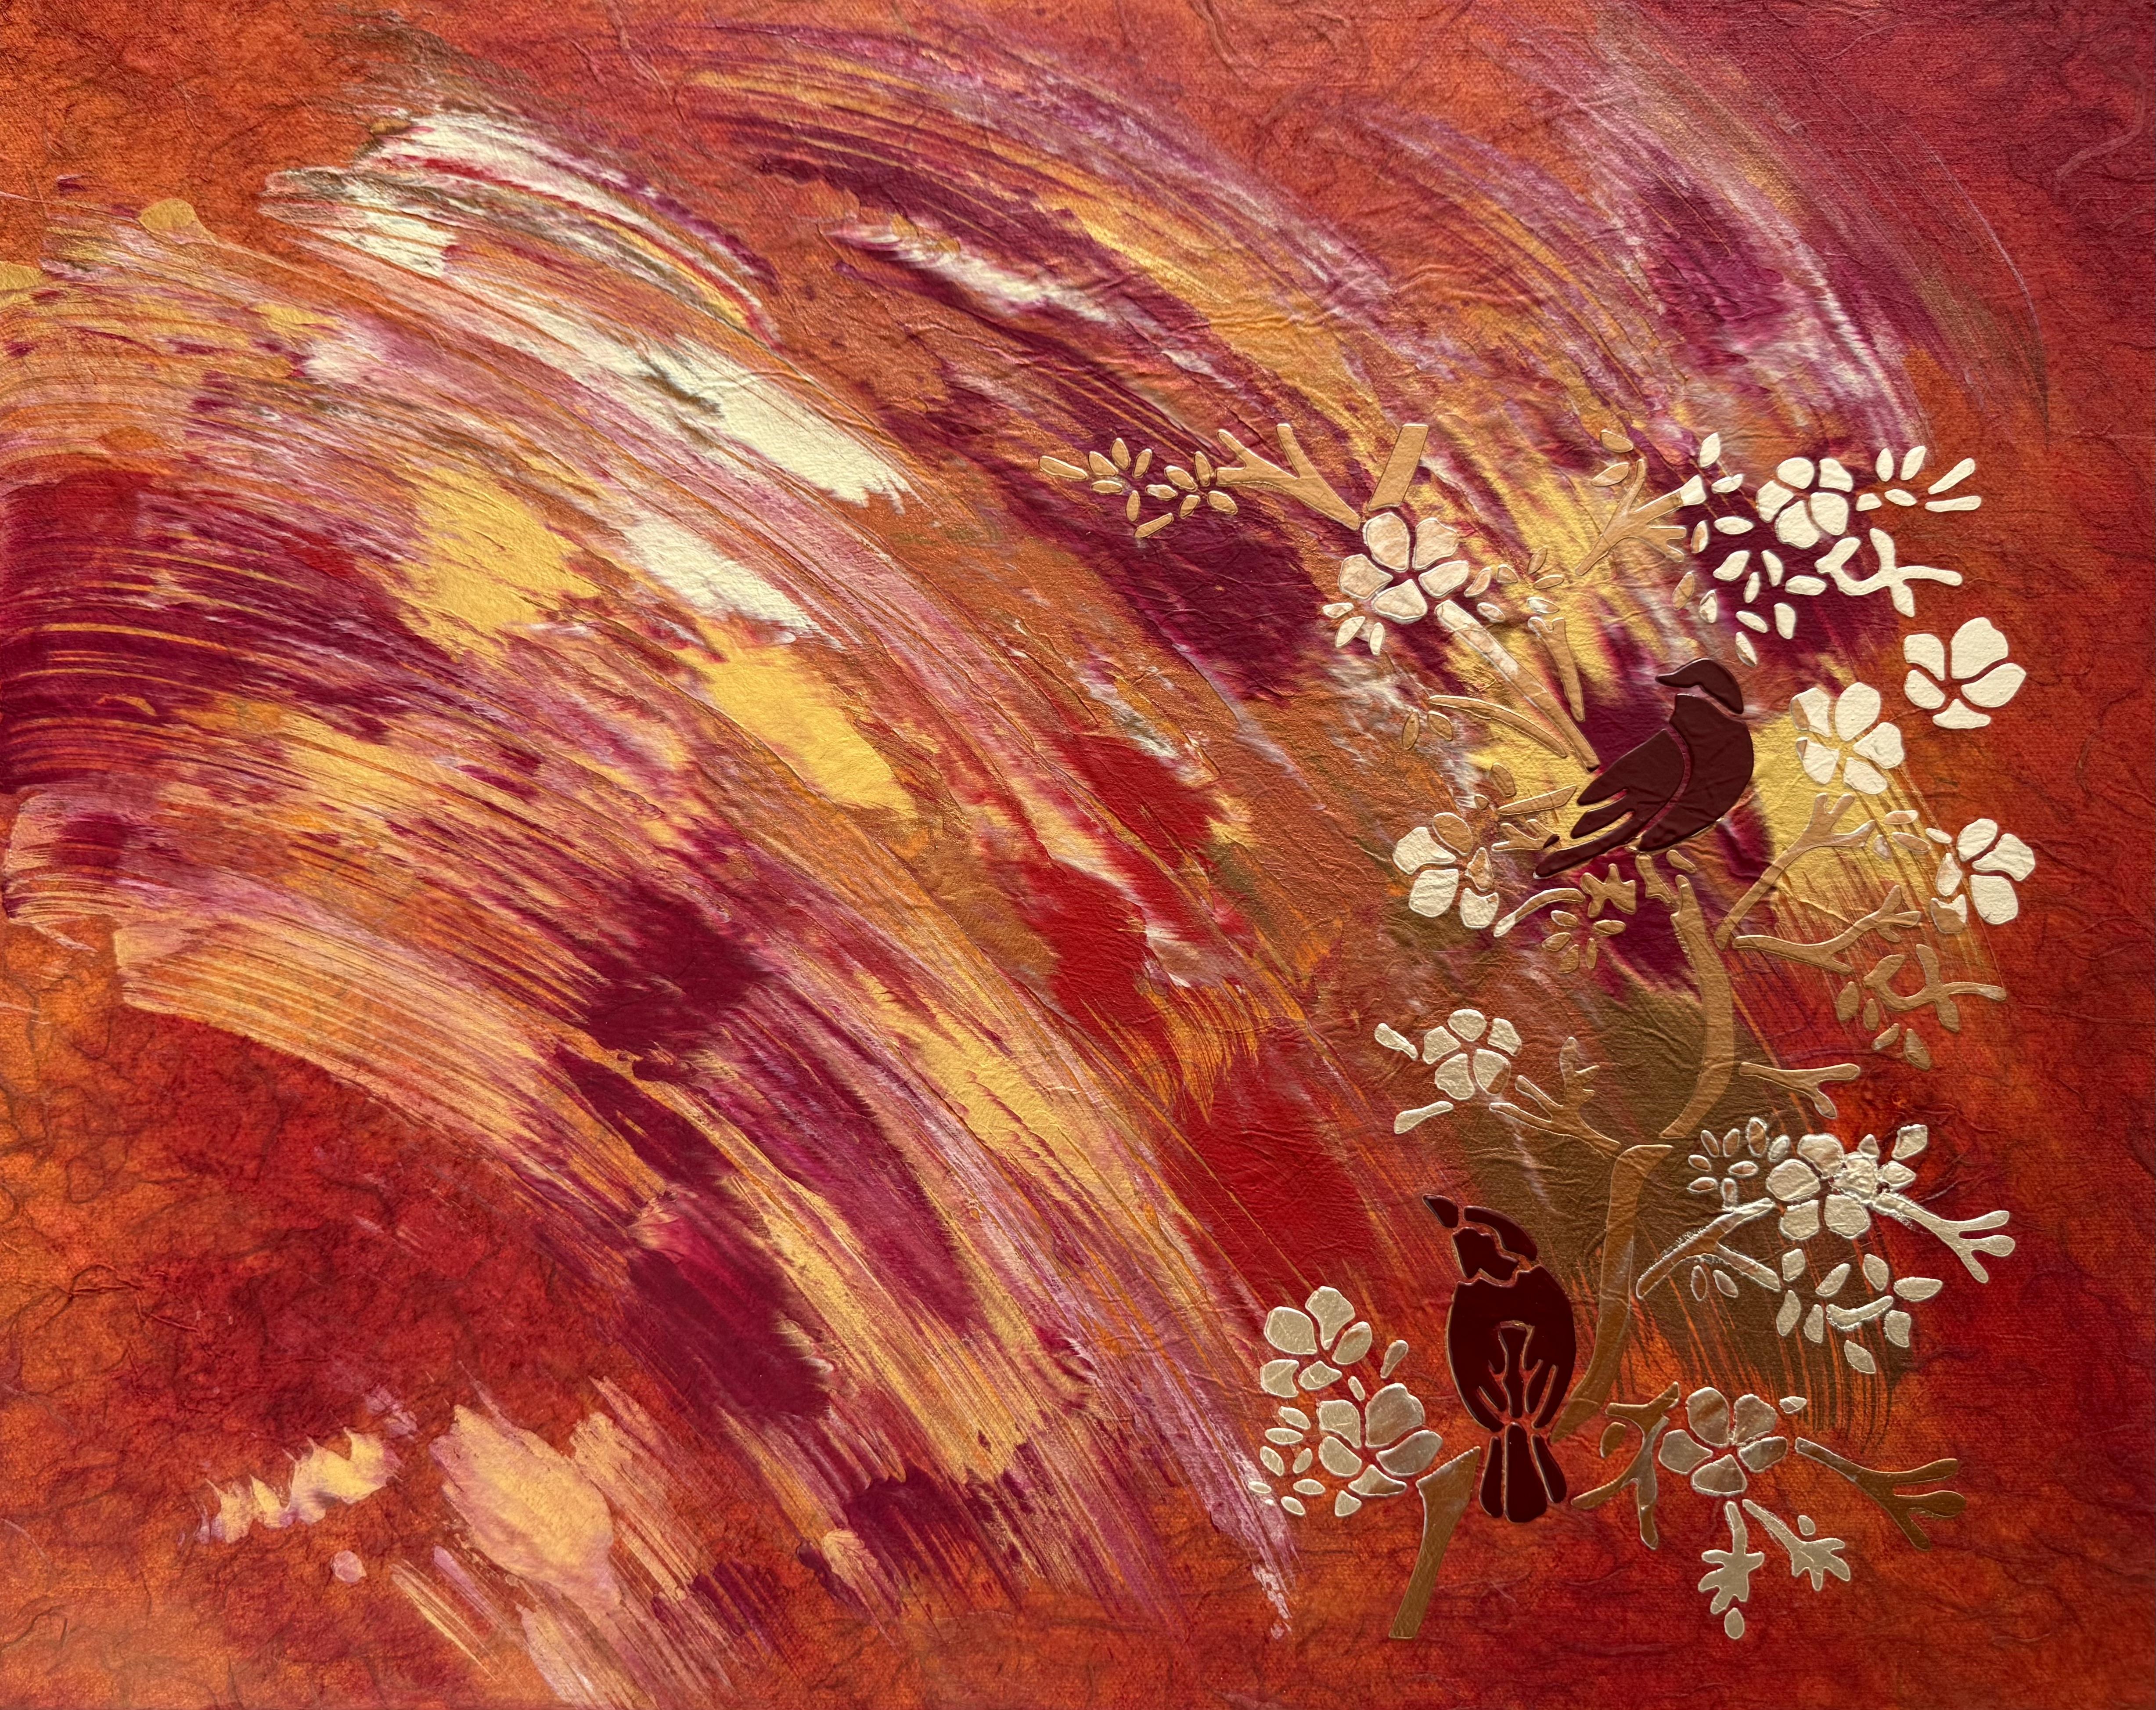
and some meaning. So I've poured out this
beautiful stencil. It's got some birds on some
branches with some flowers, and I think it's going to suit the style and feel
of the painting. It's very pretty, and I think
it would suit the colors. So I put some low tech
tape on half the stencil. I only wanted half of it. I didn't want to cover
my entire canvas. And then I'm putting it
on with lunar paste. Now, this is like
a stencil butter. It's acrylic and
it's very thick. You open the tub, you
pull it out. Tara, ta da. It's already ready to go, and it has a beautiful
metallic shem. I'm using a cookie dough, color, which is the light one, and then the refined copper, which is in that
beautiful coppery color. I'm putting on the two
different colors in the sections with the flowers and the branches with the birds. You do have to make sure
you hold your stencil still and steady when you're
putting on the lunar paste. But when I pulled it up, ta da da, it looks beautiful. I think the colors match really well and the feel
of the painting, I think that's really working
with our gel plate print. Now I did really
love the look of it, but I did feel that the
birds were a little lost. So once the first stencil
was completely dry, I put it back on in
exactly the same place and put on some permanent lizarin
to deepen the bird color. So they stood out a little
bit more from the background. What do you think about it now. I am so happy with this project. I think it looks
absolutely beautiful. I think deepening the color of the birds was a
really good idea. It stands them out a little
bit from the background, and look at the beautiful
metallic shine of the paint. It's worked so well
on the coso paper. I love this gel plate painting. I think it's turned out so well. What I love about it is
that you can still see the texture of the Coso
paper coming through here. And the shape of this
paint layer is so unique because we took that
print off the gel plate. The stencils working. Beautiful. The birds are much happier now in
the deeper tone. I think it's absolutely
stunning. I'm so happy with it. So when it's completely dry, I'll probably spray varnish just to make sure
everything's covered, helps with UV protection. And I'm really happy with this. I think it's going to look
stunning up on the wall. It's such a fun and
experimental technique to try to take your gel
plate printing further, going further than where
you've been before and actually creating a
painting application. Very successful
idea. I'm thinking. So, I decided that I wanted to do a second
one, and this time, I wanted to have a deeper
color of the coso paper. And
5. We Can't Make Just One: Of course, we had to
do a second print. I couldn't let you think
it was a one time deal. And this time, I want to use a deeper color of the coso paper to see how well that's going to look with the
paint application. So I'm starting with the
same colors of the bronze, the copper, and the
beautiful gold. I'm also adding the
crimson and the magenta. And the only thing
extra I'm adding this time is a little
bit of naples yellow, and the naples yellow reddish. Soft pastel colors in with the mix of the
other strong colours. I'm thinking it's going to give it a little bit of a lighter and brighter on my
deeper coso paper. Again, I'm using my favorite
piece of foam packaging to move the paint across the gel plate and create
that fabulous textured mark. Then I'm putting the ruby wine colored coso paper straight
onto the gel plate, giving it a light rub and
pulling it straight off. And that's the trick. You do need to get that paper off paint layer straightaway, if you're using something that's so soft and fibrous
and textured, it would be the same
if you're going to use rice paper or some of the
other beautiful soft papers. Straight onto the paint
layer and straight off, put it down somewhere to dry
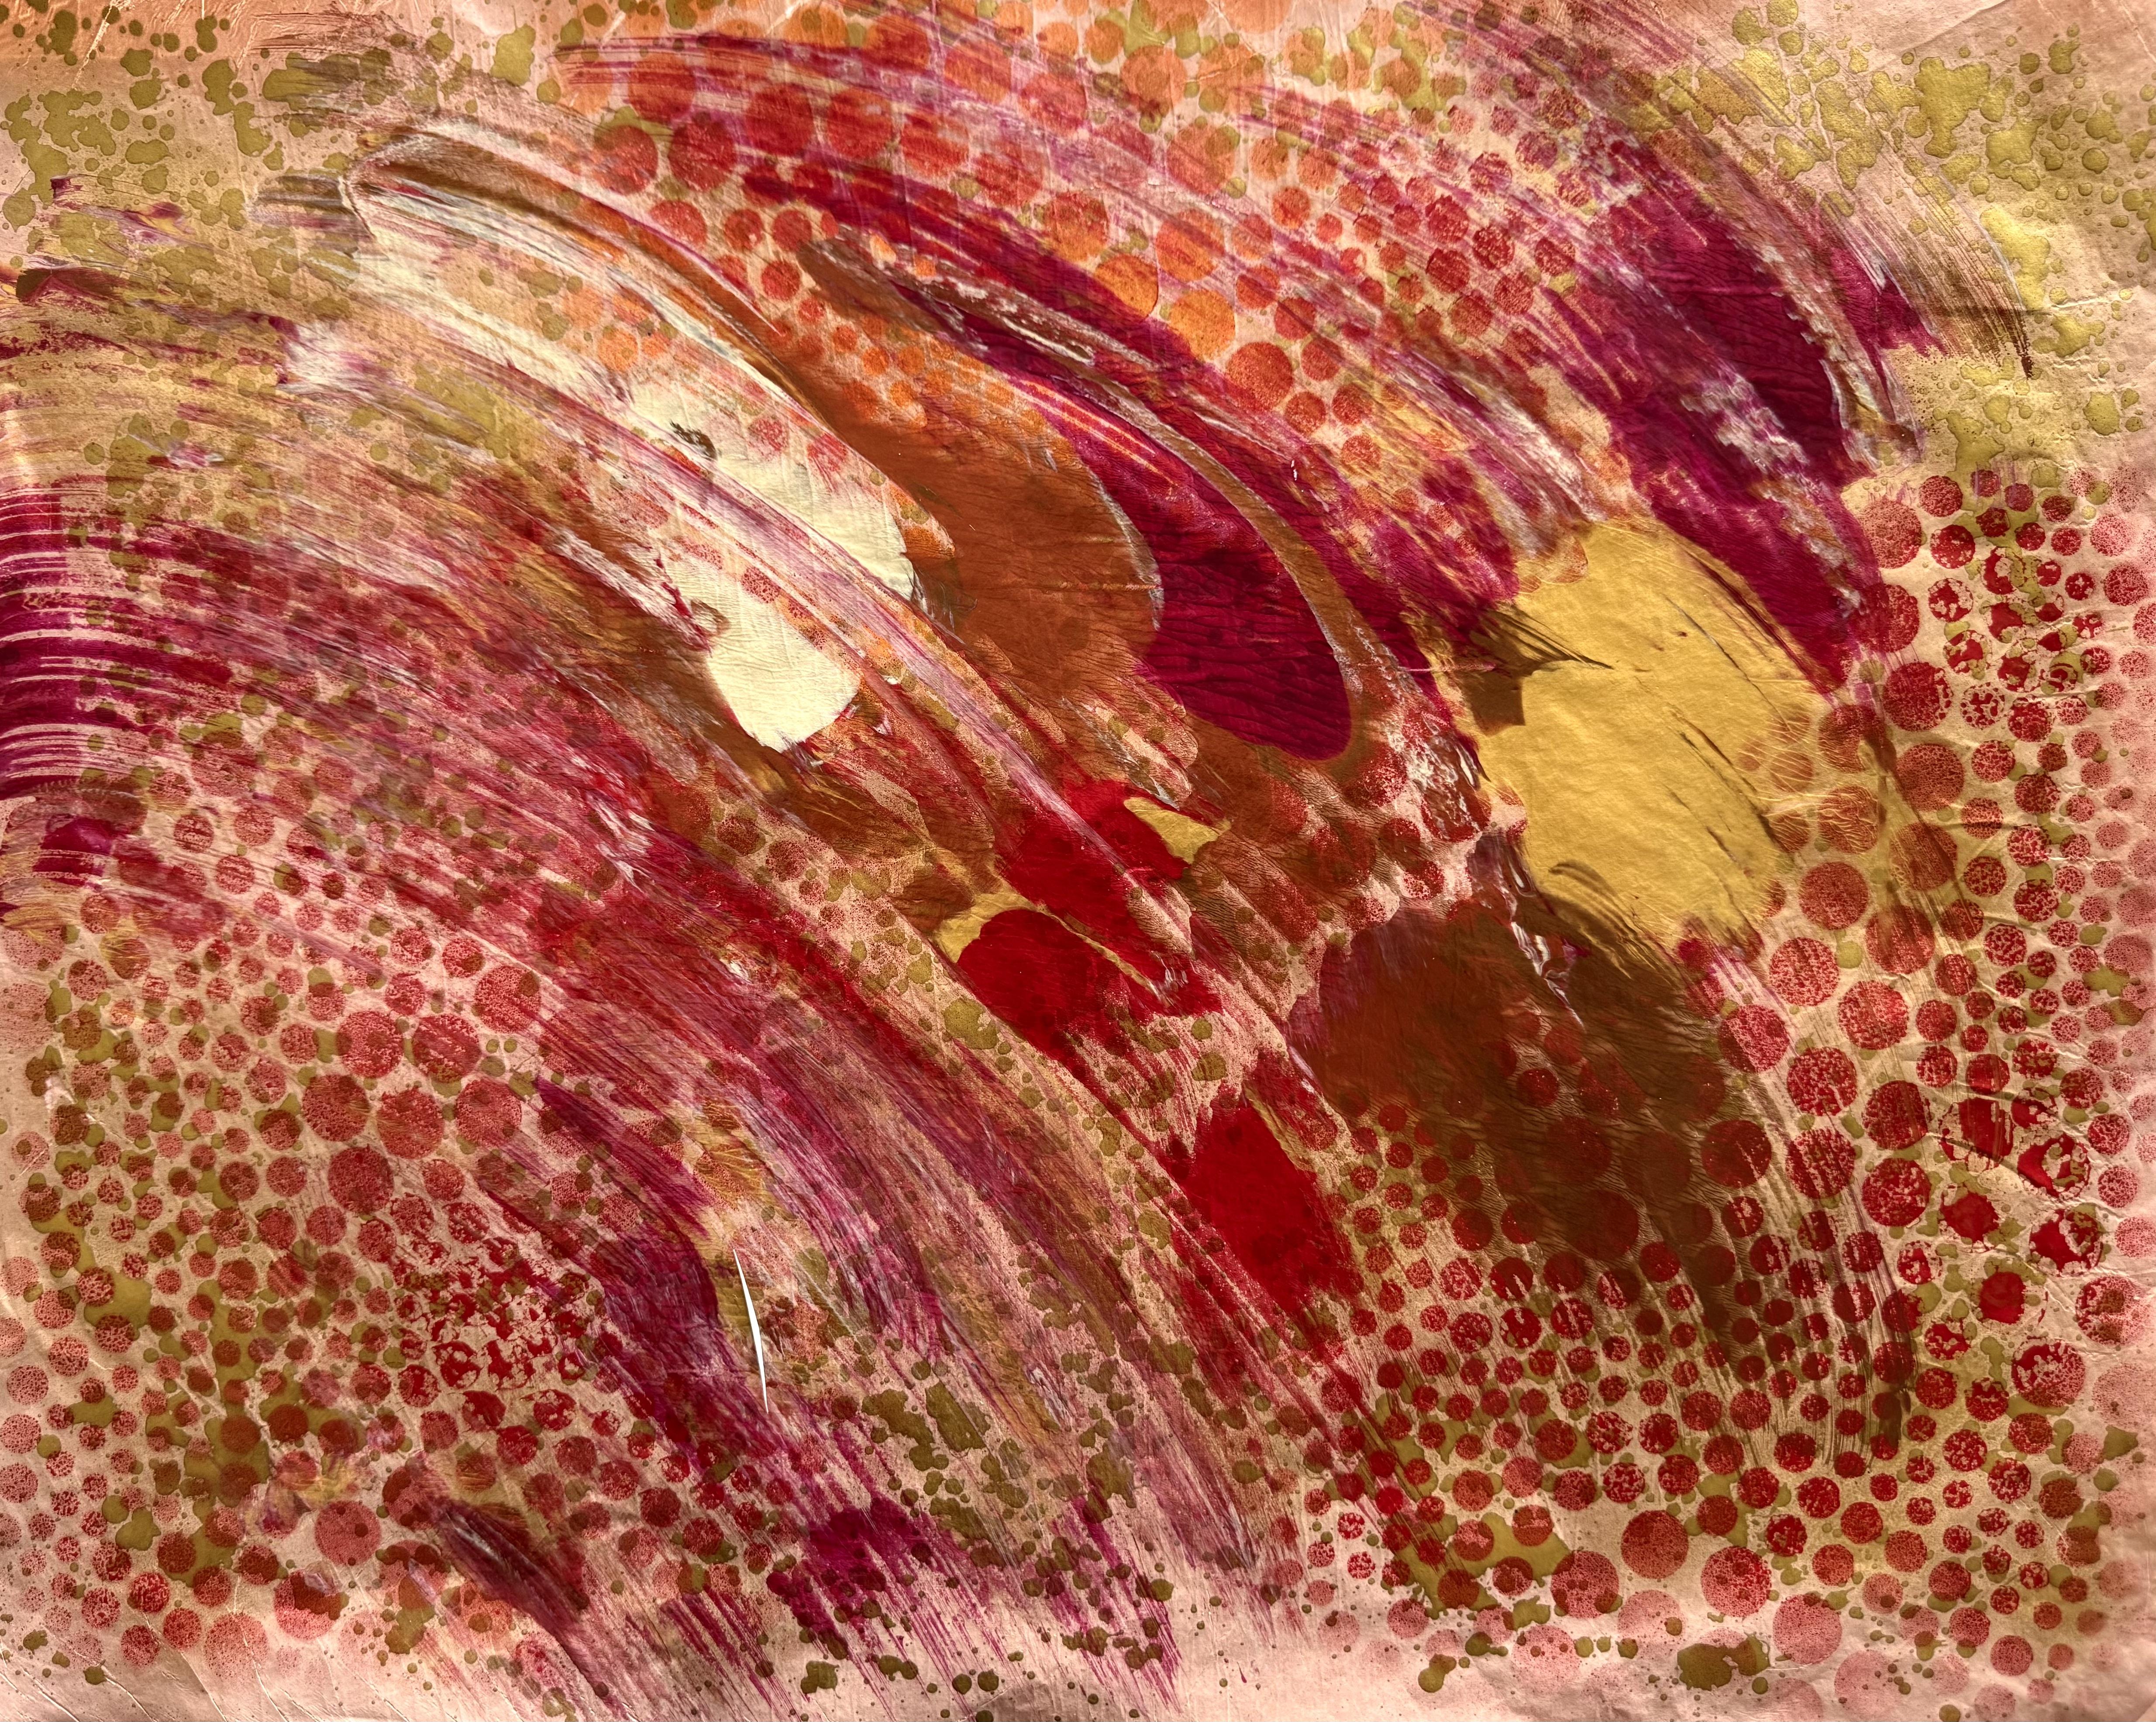
and then don't touch it. Now, the second print
I'm doing this time, I'm using plain coso paper. I want to see how well
this one's going to print. I give it a firma rub across that paint layer because I
know this paper won't tear. Then I pull that paper up and see what I've got left
on the gel plate. There wasn't actually so much left on the
plate this time. So I've rolled over some
transparent red iron oxide, and I've given it a
spritz up with some water just to create that
fabulous watery technique, break up the paint so that you see other layers coming through. Next, I did the same with
the beautiful quinn magenta, and I'm using the golden
fluid paint so it's light. And it's easy to roll
across and sprits up with the water to create
that textured layer. Then I add some of my favorite iridescent bronze
fine onto the surface, just in a few places
across it so that you pick up a little bit of a shine
once the print is pulled. Then I added a little bit of the iridescent gold
across the surface, and when it was all
completely dry, I put on a layer of unbleached titanium
to pull the print. And this time, I'm using
the plain coso paper to pull the print to see how well this idea
is going to work. Now I did leave it sitting on the gel plate for
a couple of hours so to make sure that it dried properly with all
of those paint layers. And this time, I
pulled the paper off the gel plate because
I was fairly sure that this coso paper was
going to be strong enough to pull up without
tearing and have a look. It's absolutely beautiful. What a stunning print. You can see all of
those glorious layers of those fabulous colours. Now, when the second
print was dry, I added the beautiful
high flow again with the magenta and the
transparent red iron loxide. And I really like this print
in the vertical format. I think the composition
looks beautiful. The way I added the paint to the original gel plate layer works really well in
that vertical format. Have a look at how beautiful all three of these prints are. I'm so excited for
this technique. I think there's so
many possibilities, and they have turned out
so incredibly beautiful. Now, I'm thinking that any of these three prints would
work well for a collage. This one looks
particularly beautiful on the deeper shade of the ruby
wine of the Coso paper, and I could put
that just like this straight onto a canvas
in a ernical format, and then I would
have to decide if I'm going to add
anything else to it or I could leave it as an abstract painting
quite easily, tuck it round over the sides. I think it would
look just beautiful. This is the second print that I added the high flow paint to, and it is just as beautiful. And I think this would work really well for a
collage, as well. I could either use
the whole piece or I could use some of the
piece I really like the metallic shine of
the paint on the surface here and the way that it has
pulled up off the gel plate. Now, the third print from this particular printing
has worked just as well. It's absolutely beautiful. Look at all of those
layers of color. This texture here is
from the watery spray, adding that watery spray to
break up the paint layers. I really love that technique. It's one of my favorites. And the bronze and the gold
on it is just glorious. This piece also would
make a fabulous collage. I could easily glue it on
the canvas just as it is, or I could add it in
sections to something else. So we have so many possibilities from one printing
on the gel plant, three beautiful prints
all really different, but they would all
work well either as a whole piece on a canvas or
on a different substrate, even if you just wanted to
put it onto watercolor paper. Or I could take sections
of it and create a whole new mixed media
collage with any of them. So many options. What are we going
to do with them? Well, I think it's such
a great way to create really unique and beautiful
prints a little bit different by using the
painting application. Oh
6. Where Light Finds Us: I am so amazed at how beautiful these print
paintings have turned out. This technique is so simple
yet so incredibly effective. This is the one on the
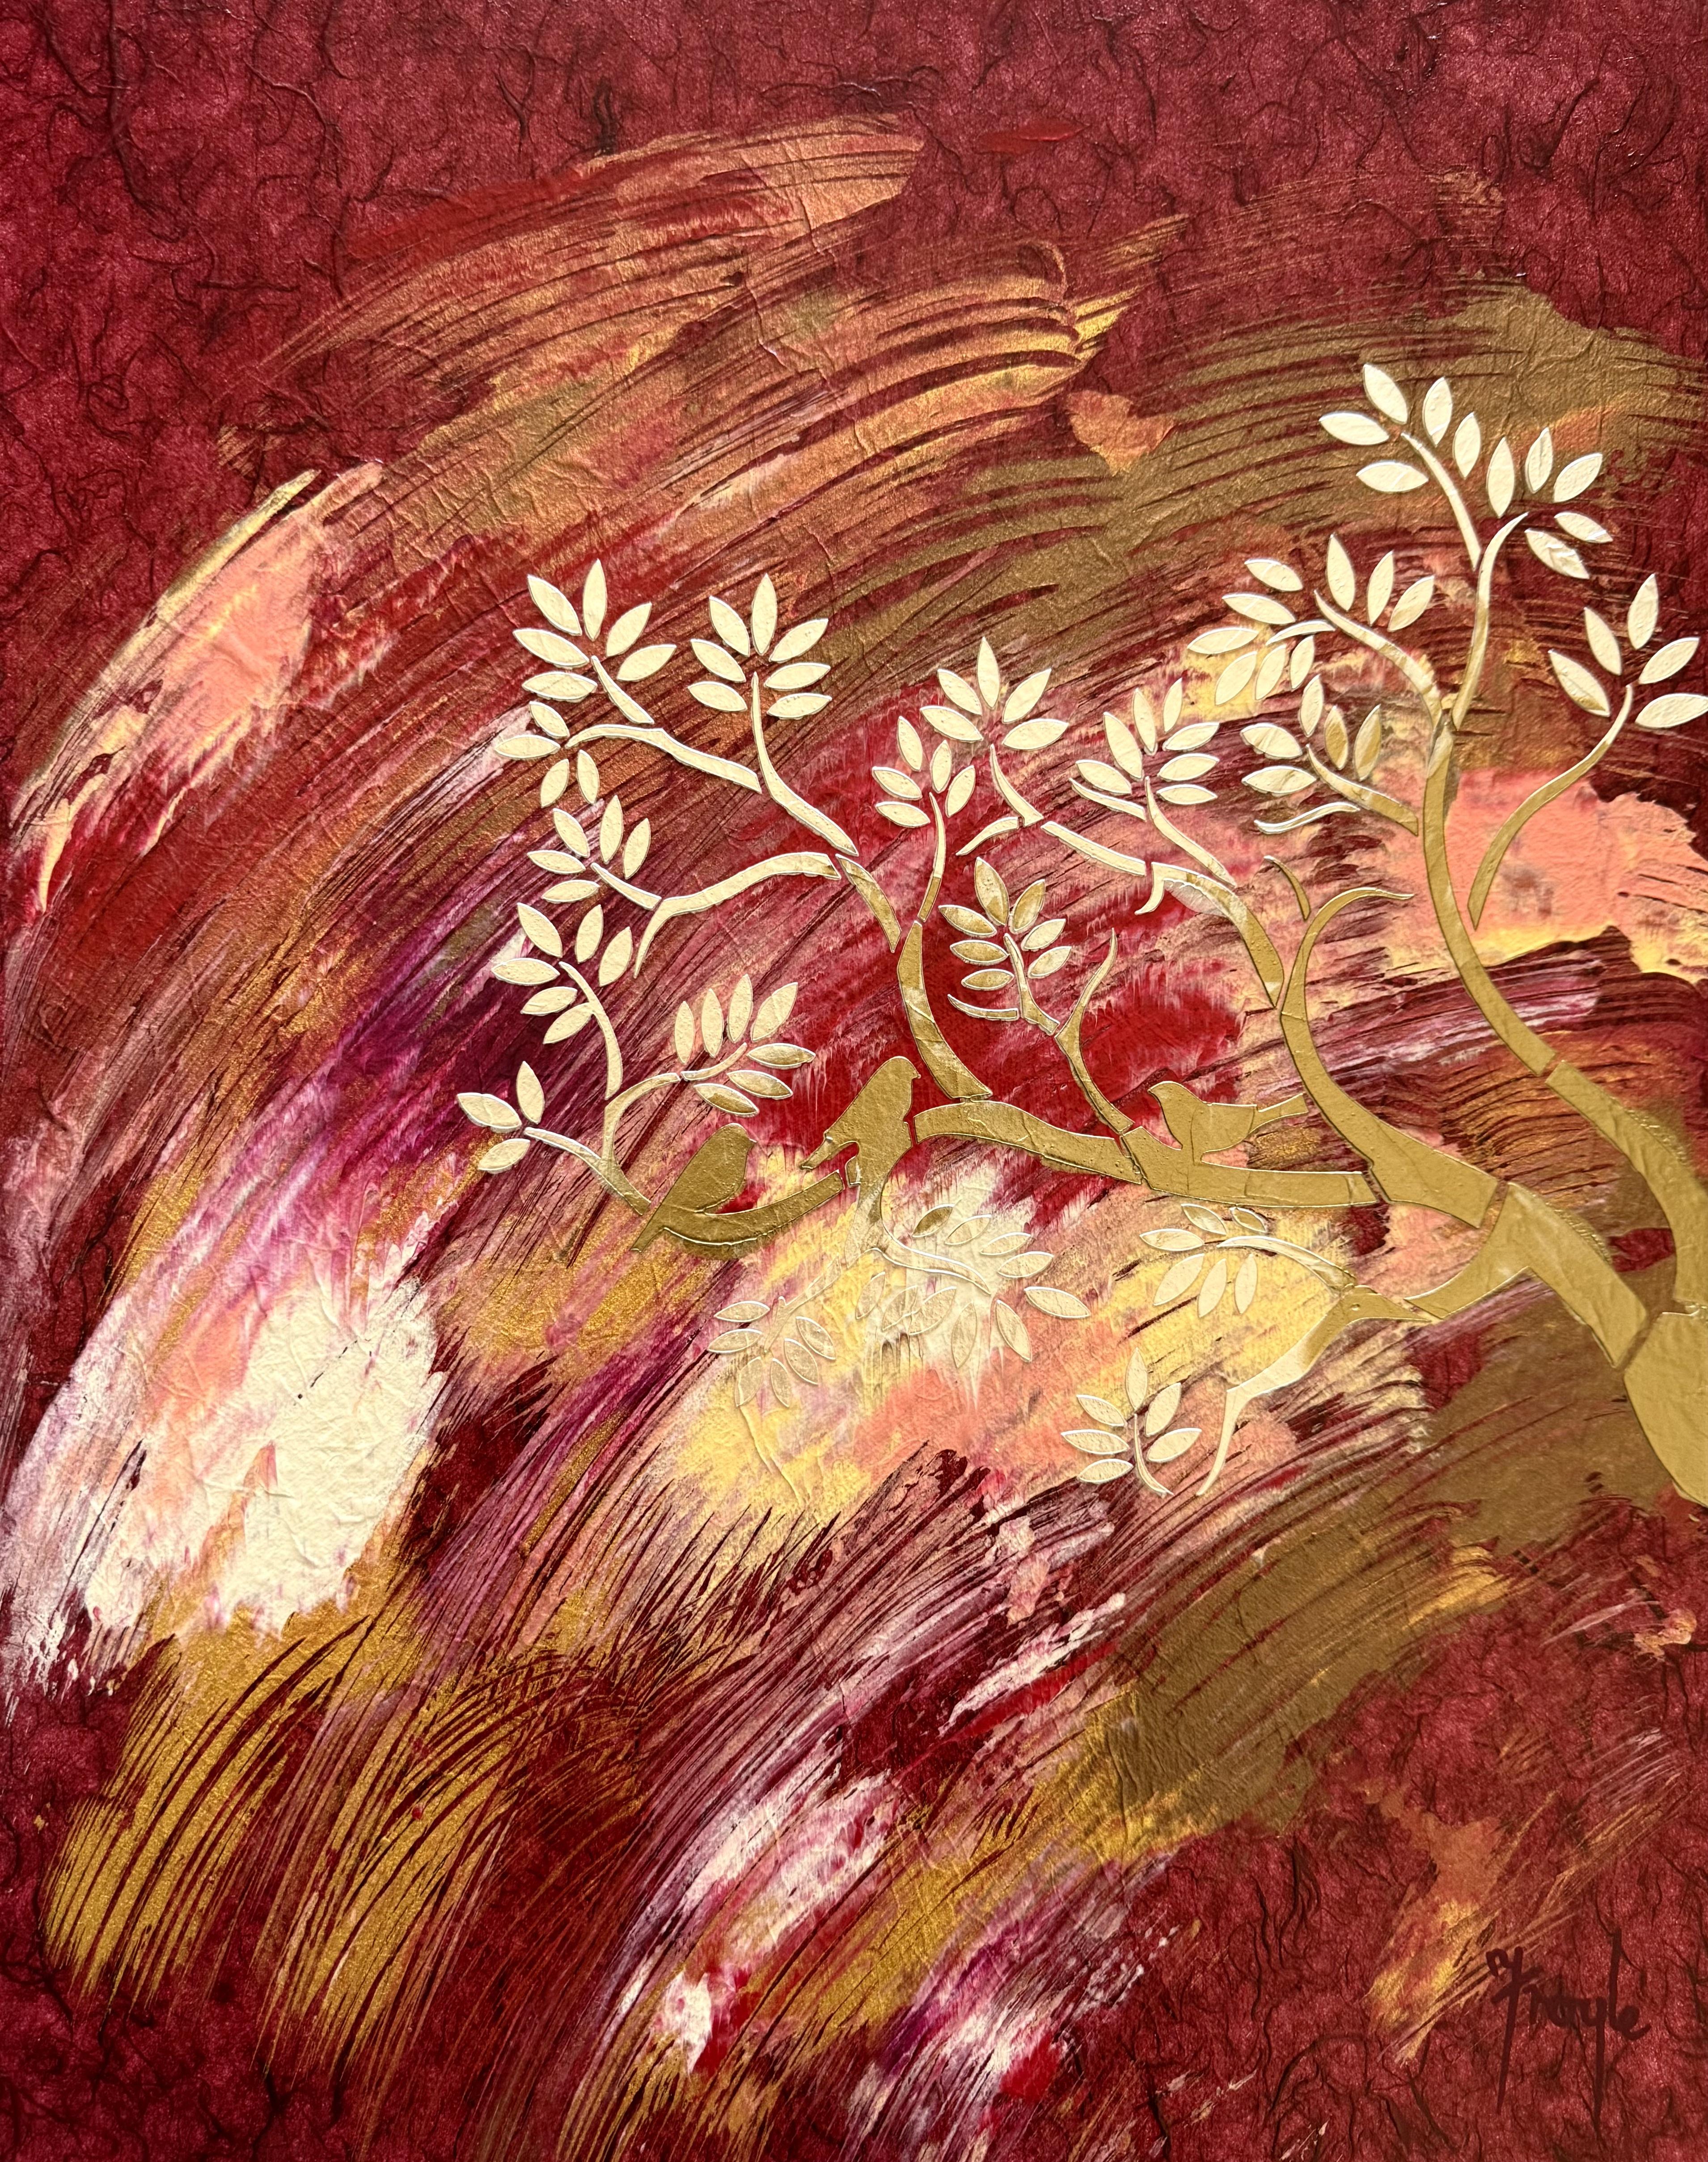
beautiful Ruby wine Coso paper. Look how glorious it looks. A I'm so excited. I'm going to put this on a canvas and I'm
going to put it on a 16 by 20 inch canvas that is the same size as
my piece of paper roughly, I'm just going to
glue that down, turn the excess over the sides
like how simple is this? I think then I might look at it in a vertical
format because I really love the way the lines
go like this up this way. Like that. Then I'm just
going to have to decide what focal point I
want to put on to finish the beautiful
painting collage. I just think it needs
a little something, but not much because I
absolutely love the textures of the paper and the colors and the design of the lines
from the paint application, just a little something. Maybe about there.
That's the idea. I'll glue it down first
and then when it's dry, I'll think about
something probably another stencil because
stencils are so easy. This time, I'm going to
use gloss medium because this cosot paper is so thin
and porous and beautiful, I didn't think that
I really needed the thickness of the gel
like I did last time. I'm just going to
use the gloss medium to glue the beautiful
cosot paper down. Super easy, super fun
and then we'll have a fabulous painting
on paper to develop. Now, I do find the gloss
medium was easier to put on the coso paper than the gel medium I used
in the first painting. I think because it's
thinner, it's more fluid, and the coso paper
being so fine and textured like this really
doesn't need a thick gel. So that's a better
idea. You see? That's why we have
to do things twice because there's a second
time we get better ideas. Now I'm going to
let this dry and then I'm going to think
about what I want to put on. I am going to put some gloss
medium around the sides, tuck those sides under. You know how to do
that, easy peasy. Then we'll see what
we're going to add. Just going to add a
little gloss medium to the top and also by brushing
it is just going to help push the paper down to get all those air bubbles
out if there is any. Now, it does wrinkle a little because it is
so soft and textured, but I don't mind that too much. I like the texture. We are creating collage
with paper after all, so you do have to expect
a little texture. Just thinking that the
gloss medium might help embed the paper
more onto the canvas. You know, it's
just another idea. And we have to try these things. I finished all the wrapping
the paper around the sides. It's looking beautiful. We'll see how it dries and
I really still do like the idea of putting
it up this way and creating something
in a vertical format. That's what I'm thinking about. I'm going to go and
have a rummage through my stencils and just put
a little something on it. Once it's dried, of course. Right, so the paper dried
up beautiful on the canvas. I'm really happy with
how it glued down, but I don't like
the super gloss. I don't think it suits the beautiful texture
of the paper. I think it's just too shiny. So that was a good
lesson to learn, that I don't like
this paper or shiny. It's very good to
learn these lessons and it's very easy
to change things. I'm going to put
the same medium, but this time it's
a fluid mat medium. I'm going to put that right over the beautiful painting
before I continue. Then I have to decide what
it is I want to add to it as a focal point
or a purpose. What do I want my
beautiful artwork to say? Does it have a
message or a meaning? What do I want to add? I'm just going to
put the fluid medium over it to knock back the gloss. Because I just don't like it. But now I know that next time
I'll straightaway jump to the fluid matte medium
when I'm gluing the paper down and it worked
really well with this paper. It was very easy to glue down with the
beautiful thin medium. That was good
experience to learn. And then just like
that Easy PZ now has a coating on mat on the
top instead of gloss. I'll let this dry. Think about what I'm going
to add to it because I do really like having
focal points in my artwork. I like them to have an
uplifting, hopeful message. That really is how
I am as a person, so I'm going to go
and find something that'll make me happy with
this beautiful painting. Now I think this looks
so much better with the matte medium instead
of the gloss medium. I just think it really
suits the textural paper. I always seem to
like things glossy, but this time on this
particular technique, with this particular paper, it just didn't look right, so I'm much happier with that. Now I want to add something on the beautiful
background design, and I've pulled out this stencil
with branches and birds, similar to the first one I used, but different and what
I'm going to do is tape off half of it because it's just too
much I'm thinking. Then I'm going to put
it from this side. Sweeping out over here, maybe take off that bird, I'll take out areas I don't
want and then I'll put it on with some beautiful
metallic lunar paste. That'll look beautiful. Then
to finish the whole piece, I'm going to put a
satin varnish over all of it and that will
give it not a matte flat, but not a super glossy. It really is in between
and it works really well with these beautiful
textural pieces. So that's the plan of how I'm
going to finish this piece. I think these papers and prints have turned
out incredibly well, so much better than I expected. And I'm absolutely loving
the artworks that I'm creating from these beautiful
gel plate paintings.
7. Time in Motion: I've got so many
beautiful prints from this jelly
printing technique. Have a look at this one. I think they're
absolutely beautiful. I think all of them
were successful, which is so exciting. Now, this time, I've got
a 12 by 16 inch canvas. And what I'm going to do
is put my piece of paper. This was printed
on the so paper. And then I'm going
to wrap, of course, the color around
the side like that, and then I'm going to decide what I might
want to do with it. I'm really not super sure, but I'm going to do something. Again, going to
an a focal point, maybe some stencils or
some more collage paper. Haven't actually decided, but what a beautiful place to start for a mixed media
collage painting. This time, I'm going to use
the mat gel medium because the paper is a little thicker than the beautiful
soft textured one. Good covering of
the mat gel medium. Put the paper straight
on. Easy peasy. I'll wrap the paper
round the sides, it's going to look fantastic. Right. So that is
looking really good. This Czo paper glued
down really well. All the sides are
looking fabulous. Look how great they look with the colors turned
over like that. Now I just have to decide
which way do I want the painting to go that way or that way because
it's abstract, it really could go any
of these directions. So I'll have to think
about that while it's drying and think about what
else I want to add to it. I really like the texture
of the paint on this paper. That water spray technique works so well and I really like
these shapes of color. I'll have a little
think about it. But the paper glued down
actually better than I expected. So that's really good to know. Each print is another
experiment and more ideas. The more you create your
art and make your prints, then the better it
will become because you learn what you like
and what you don't like. You also learn
different techniques and different materials. This paper didn't wrinkle at all because it's a little bit
thicker than the other paper. It glued down really well
and I'm very happy with the texture of the surface
and the paint looks fabulous. I'll let that dry and think about what I'm going
to do with it next. I'm amazed at how perfect this paper glued down
onto the canvas. It was the first time I
used this particular paper, and it has worked
absolutely fabulous. All continued around the sides. The canvas is looking beautiful. Now, I've decided I'm going to add a clock stencil onto it. I think it just
suits the coloring and feel of the painting
that's on there now. I'm going to put this one on though I might mask
out some of the number. I don't think I want
that section there, so I'm going to put
some tape over it to mask that out and I
haven't decided exactly. Maybe I'll take that out. I really like this section through here and I
like the clock face. I really like that bit there. But I do think the yellow is a bit strong for what I want. I'm going to put perhaps a
little bit of this color, which is naples yellow reddish, I might just put
scumble a bit over it to knock back the
brightness of that yellow, I think will look
just a bit better. And then I'm going
to use a bronze. Haven't decided which bronze. One of the bronzes
that I've got, either a strong coppery
bronze or a brassy bronze. I'll have to have a look
and think about it. Once this is dry, I'll
put the stencil on, but I am absolutely loving the way the
paper has stuck down. Just putting a little
quinn violet over the naples reddish because
I just wanted to blend it. It's going to be sitting behind the stencil of the clock face, but I just wanted to blend it in a bit more to what
was already there. I'm pretty happy with that now. I better go and decide on
which bronze I'm going to use. Okay, so I've pulled
out some lunar paste, which is a stencil butter. It's quite thick. I really
like using it with stencils. This one is gold rush, but it looks quite antique gold, and I think the color
will work really well with the feel of what's
on the painting here. Now I've also taped off the areas that I
don't want to paint. A bit of low tech
tape on the stencils, the areas that I don't want
the paint to come through, and I think I'm going to
put it slightly off center. Like that. That's my plan. So perhaps I'll put
a little bit of tape on the top to hold
it where I want it. I'm using a palette knife, and it's a matter now of just putting on a
beautiful lunar paste. I do try to do as least
amount of number of swipes with the paint
as possible because if you go backwards and forwards like this
on your stencil, it can catch underneath. I mean, you don't have
to use a palette knife. I do because I like
it nice and thick. You could use a brush
and put it on thinner. More delicate, but, you know, I'm so not all about delicate. I like it thick and chunky. I like fat art, and that's just how I am. I put it on with a palette, nice and thick and try to get it on in
a nice smooth layer. Just like that. Let's see how we did. Tana ta. I am pretty
happy with that. Look how good that looks. I think the colour
blends in beautifully. I'm really happy with how this beautiful
painting has dried up. The stencil looks great, the color looks great, and I just so love. The painting on this paper that's been glued
onto the canvas, I think it's so special. So I'm just going to finish the artwork by using
a satin varnish. I don't want it super glossy. I don't want it flat, so satin varnish
is the way to go. I like this atilio one. I put it on with a brush, super easy, super quick, straight over the top. What I like about
varnishing the artworks, especially when they're
on paper like this, is that it seals the
paint and the paper. I also helps with UV protection. You can wipe it over with a slightly damp cloth
to get the dust off it, it will look beautiful for years to come and
that's the plan. Once this is dry, I'm going to tape and string it, and then it's going to look
stunning up on the wall. I think it looks
like time in motion. How incredibly exciting. I think it's absolutely beautiful and I'm so
happy with this piece.
8. To Finish: So what did you think of my fabulous new technique
of gel plate painting? So here we are with our
finished paintings. What began as a simple print has now become
something layered, expressive, and
completely original. And that transformation is really what the
process is all about. I really hope this
class has shown you that gel plate printing
can be so much more. There's so many directions, so many exciting possibilities for this fabulous,
creative medium. Every print holds possibilities, and it's just a matter of
seeing what it wants to become. Now, of course, you
don't have to use the colors that I've
used or the stencils, or even the style and application of
putting the paint on. Explore for yourself what
you're passionate about. What are your colors? What are your textures? What do you want to create
with this fabulous process? Try different colors, different palettes and
definitely different papers, 'cause they all do respond differently to that
paint application. There's so many ways to
finish the prints and turn them into exciting
mixed media artworks. I can't wait to see
what you've created, so make sure you show me. Now, don't forget
if you do want to know exactly the
materials I've used, have a look in your class notes. I've got a list there for you. And if you have any questions or problems, you can email me. You can find out more of
who I am on frol.com, and don't forget to check
out my other classes. I know you'd absolutely love the massive beautiful journey
of 100 days of collage. It's quite funny, really, how this particular class
came out of that series. I was so passionate about this technique when
I stumbled into it with my abstract
expressionist style that I had to take it further. I had to create these
beautiful paintings, and I had to share it with you. I'd love to see what
you're going to create. It's so special to see
how everybody responds differently and takes the
idea in different directions. You can also join my
Facebook group and show me all of your
fabulous artworks in there. There's so many
wonderful people. It's a great community for
sharing our creativity. Right. So it's now back to the studio to develop
some more ideas, and I can't wait to get started on our next
creative adventure.
 Froyle Davies, Mixed Media Artist