Transcripts
1. Envelope Art Intro: Beautiful autumn colors
are now brought to life on your outgoing happy
mail envelope with simple gel plate prints, make a matching card
and you will have a stationary set that would do well male do friends and family, or sold in a craft bizarre. Then use the gel plate
techniques in your journal. Tags, tent cards,
collage media artists, trading cards, or a
framed desk art piece. Hi friends. It's Tammy prayer. Thank you for joining me today. In today's class,
we are going to use leaves and leaves and be sure to go out
and get some leaves. I'm using leaves on our gel plate to create
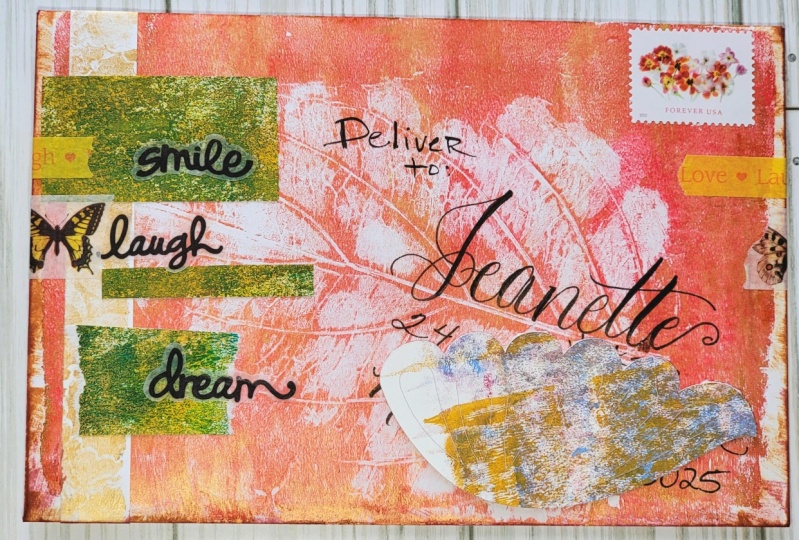
an envelope art. Look at that print. Isn't it fabulous. This envelope art will
make great happy male. And as a bonus, we are making
matching stationary. This is a blank
card that you can use with your happy meal
to send out to a friend, to a loved one, to make their day very special. Now in October, that's a
huge month and my family, lots of birthdays,
weddings, anniversaries, and sending cards is
a great way for me to keep connected and sharing
the love and the envelope. Oh man, since I started learning about mixed media and collage, envelopes have been a must. I definitely decorate
my envelopes. I'm a self-taught artist, and I began with brush lettering and that led into watercolor. And lo and behold, I'm playing with my gel
plate more and more. It's an easy way to really
make your gift shine. Whether it's going on top of a package or you're just
sending it through the mail. In a really brighten
someone's day and it's just a
little bit of effort. Get your gel play doubt. And just a couple of acrylic
paints and your leaves. We will make some great prints. I'll explain how to care
for your gel plate, how to Breyer on your
paints and make them really come alive with multicolor ways of using
them on your gel plate. And as you can see, these are really stunning. Anyone would be so
excited to have a piece of your
art in their home. And they may even
save the envelope. I know my family have. You can find me on
Instagram or check out my other classes where I use
a gel plate in other media. I have used acrylic
paints and other media. I have done different
envelope art classes. Check those out and please share what you've created in
the class projects section. I would love to see
these and share in the joy of
virtual, happy male.
2. Class Project: For your class project, I want you to make
an envelope art. Take a print of a
leaf on an envelope. Now whether this
envelope is going in the mail or on top of a gift, It doesn't matter, it will work both ways just beautifully. And if you make matching
stationary extra points for you, please share that with me. Just take a photo. And when you're on your
laptop or desktop computer, you can upload that photo to the project section
of this class. Now you just need a few
things for your project. A piece of copy paper or card
stock that you can practice on or go for it and get an actual envelope that you want to
make a print with. Find some leaves, have a
very pliable softer leaf. And you'll be able to make
many prints from one leaf. A few colors of acrylic paints. I'm sticking with
the fall colors. I have a couple of reds and orange and definitely
gold paint. I think that looks really
fabulous on a fall collection. But use what you have. Do you have different
greens to have different browns are
different yellows than I do. Go ahead and pull those out and experiment on making prints. Leaves. Take your print and share
that photo with me. I'd love to learn from you
what your experience was like. And I would love
to cheer you on. Thank you again for
sharing that with me.
3. Supplies: Supplies. Hello. Look at these supplies,
including our leaves. To make a matching set of card and envelope with leaf
print on our gel plate. Going to need a gel plate. I keep mine hidden
between a piece of paper to keep it nice
and smooth and flat. And a piece of paper, several pieces of paper. We're going to do
a practice and we need one to clean
our Breyer width. And that is really helpful to have an extra
piece of paper to then obviously envelopes
and card stock. I happened to have card
stock that was pre-cut with a score line and mine don't even match
perfectly, but that's okay. Use what you have. Use your gel plate, use whatever papers you have. Cut your own card
stock if you have too. Leaves. I went out collecting
leaves and I really fell in love with
extra large deep veins leaf. Make sure they're still pliable. Nothing hard, brittle,
something very pliable still. This would work really great. Look at those veins
in that leaf. Different shapes. So you can experiment and play and pens if we're going to outline the leaf
or right on your leaf, go ahead and find some
microns or a brush tip pen. You can address your envelope. I'm using acrylic paint
on the gel plate. I have a couple tubes
of Liquitex basics and a Master's Touch,
acrylic, Antique Gold. Fact I think I'm almost
needing a new tube. I use this so often. I just picked up a couple of extra colors that
seemed like fall to me. You could go with greens, you could go with
Brown's, add a yellow. But I used to rusty looking reds and I have an
orange, cadmium orange hue. So use what you have. We are going to use the
end of a paintbrush. If you have a pen that you could just use a rounded tip of
a pen that would be great. Also, going to draw a leaf
with the tip of a paintbrush. I use baby wipes to
clean my gel plate. So you may see me
pulling one of these out after I'm done
with my gel plate.
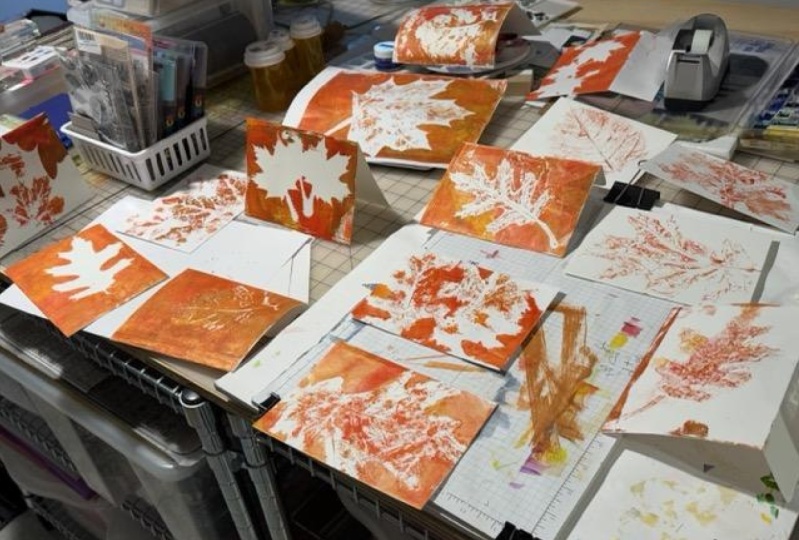
4. Gel Plate Basics: I wanted to show you some
samples of my gel plate. My very first experiment,
my second experiment. And even using without a leaf. And then I moved on to actually getting it onto an envelope. Trying out different
color combinations, always using a bit of my gold. And finally came up
with a style I think I really liked and I
wanted to share with you. We're going to start our job
plate using a few colors. Definitely my auntie gold
and some reds and orange. Now, a little bit
about gel plate care. I keep a clean job plate between an eight-and-a-half
by 11 piece of paper. And I just peel that back. And fact, I don't even
mind staying on the paper. I kind of liked the white
background that it gives. And I have my scrap
paper for breaking off. And let's experiment using this
naphthalene crimson. This is Liquitex acrylic
color and its basics. A little bit. Fact that might
even be too much, but that's what
our brayer is for. I just truly love
this Antique Gold. Just a blob on there. Look at that. Isn't that beautiful? I think I'm going to
take some of that off. We're gonna keep
Breyer bring it, thinning it out just a tad. And let's see if
this is even a look. We're going to be happy with taking a piece of paper and I'm going
to pull a print. You can evenly press on your job plate to make sure all your paint can
come up and you peel away. We have a pretty good color. I like this. I think that's going
to be good for us. And there's a little
bit left on your plate. I actually prefer that. I'm okay leaving that on there. In fact, I could even take another print to
help clean that off. And it didn't quite
completely come off. Now before I store my job plate, I'm going to clean it. I have a package of baby wipes. I found this at my dollar store, so it's really nothing special. And I can just wipe away
that leftover paint. And one of the things that
I want to have happen is all the bumps and
marks taken off of there. So that when I go to wrap my paper around it again,
it's completely flat. I saw a little bit
of water on there. I just pulled up a bit. It seems to be a little
bit of smoke there. Okay. I'm good with that. Let's take a piece of clean
paper and lay it over. It's completely flat and
just such to write up. And I'm going to cover it up. And it'll be ready
to go for next time.
5. Leaf Prints: I have some leaves. My granddaughter and I
went leaf collecting. I found several leaves
that I thought might work. I want something
that's still pliable. Maybe not too dirty, probably could've
dusted these off a bit. But something not crunchy,
crackly, very stiff. Something that's still pliable, will work perfectly
on the gel plate. For the look I'm
going for today. I went with this big broad leaf because I loved
the veins in here. And I ended up
using the veins as address lines or a name line if it's just not going
through the mail. And I thought that
was kinda clever. I wanted to recreate
that with you today. And this is how I did it. When to grab my
nafta crimson again. Take just a touch. And I love the goal. Really just seems
like fall to me, but dresses things
up really pretty. With my brayer. Let's move this paint around. Move that goal around. I think we've got a
good base right there. I'm going to clean
this off a bit. I'm turning it sideways
to mimic my envelope. I have my envelopes
here ready to go. I'm taking my leaf. One thing that always
seems to confuse me is if I want my address to have some at least
straighter lines than my leaf needs to look like this or a bit like this. And they have it all scrunched
over to the side here. Well, the envelope is going to be placed
upside down on my plate. So is my leaf. So I'm going to lay my
leaf this direction. And I'm thinking about
these veins right here. And I'm going to
touch that down, make that imprint on the
job plate and lift this up. Now, it took some of the
paint and left an imprint, and I want to capture that. Now. My envelope is slightly ever so slightly smaller
than the gel plate. And a tip that a lot of job plate artists use is to
take a scrap piece of paper. So you can press very
evenly all across your job plate without
getting your hands too messy. And then up comes this
print of the leaf. Look at that and I completely
missed the bottom. We could come back on here and press a little
harder on the bottom. Let's see if we
can pick that up. And I'm giving it
a good Squeeze. Here we go. Let's see what happened. A little bit more. Not too much. Let's go back and add paint to what we
have on here already. In fact, we could
even change colors. One of the fun things about job plating is that beautiful, incredible texture you'd get with multiple layers of paint. Let's take this across. Now. It looks like
my liquid techs is a little thick, chunky even. But this Master's Touch, acrylic is very fine. It goes across really neatly. Remember our stem
went on this side. And let's try another print. Gently lift that off. I have my next envelope
right in here. I'm lifting that flap open
just in case I can get a little bit of paint up over
the top of the envelope. Really want to press
hard and evenly take your brayer
and run it across. Let's see if that did the trick. Here's our big reveal. Good there. Now these lines are definitely more
defined than these, but I can still see them. And I think there'll be
perfect for addressing. So let's do one more
using a darker red. This one is called alizarin
crimson hue, permanent. It's going to be a bit darker. And like I said, gold, gold, gold, gold,
gold, gold, gold. One more print. You have it in your leaf. Or should we try a new leaf? I think I'm going
to try a new leaf. I'm looking at these lines. So I'm going to keep
it more to diagonal. And I'm pressing those
veins down under there. If we add an extra
leaf in there just for some I'm fact I'm even
going to use this side. A little bit of texture. Lifted up quite a bit. And one more over here. Okay, let's take our
print envelope ready. We're going to lay it
right down to the bottom and rubbing that
neatly and completely. And I got a little
pain on the back. And you know what? That's because we're artists. We can paint everywhere. Let's take this print. Oh, fun, fun, fun. I see three good lines
to address right here. Wow. That's a fun print and I really liked that darker red
on there, don't you?
6. Hand Drawn Leaf: Jump but still has
some paint on here, and that's fine with me. I want to show you
what you should do if you don't
have leaves by u. Let's just draw them in. I'm going to mix
up my colors here that as you can see from
my leaf collection today. So many multi colors we could have even gone
with a bit of green. Let's make this fun combo
into something really neat. Now this is a bit thicker
and that's perfect. That's exactly how I want it. I am taking a paintbrush and thinking about a leaf shape,
different leaf shapes. I'm going to draw it in. Let's go up and not enough
all the way across. Adding our address lines. But these ones on top
don't have to be. Now what if we have an
extra leaf over here? And another leaf over here? You can just draw those in. Now let's take this print. This lined up the best I can. In fact, I think I'm
going to use paper cover. Press as firmly and
evenly as I can. Let's see what we've got
here are big reveal, very distinct lines
for writing on. And that just looks fun. Really. You can do anything you need with the bottom
of a paintbrush, or very gently with a
side of a credit card. Or maybe you have a pen that you can doodle with without
using the ink, of course. And look at the shimmer. Really happy with this print.
7. Coordinating Card: To make complimentary
stationary, we have our sample envelope. So we're going to just
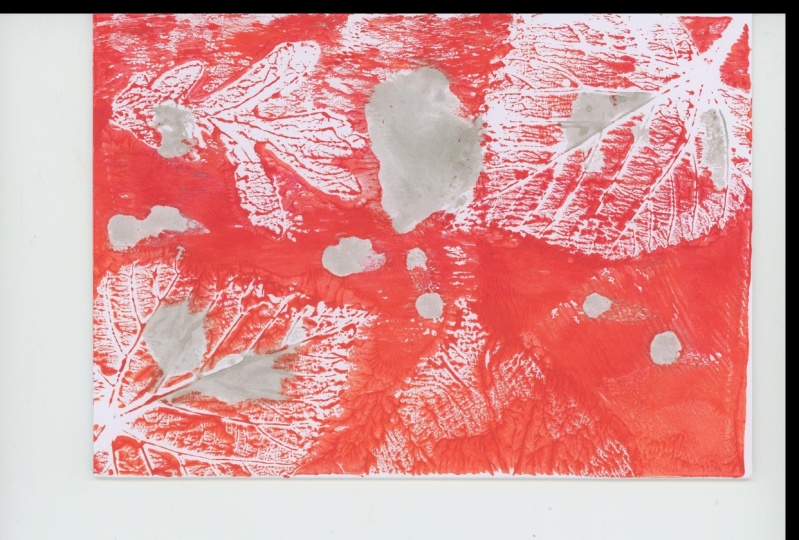
use the same colors in our stationary. Now here is a sample. This is using a negative
space technique. And here is after
that's removed, removing the leaf and having
that imprint right there. I thought it would be
fun to create our cards, to go with the envelopes. I found these card stock. They are pre scored already, so just fold them on that score
line and you have a card. But I've got two, so I can make a
negative space card and one with the leaf imprint. So let's try these two effects. And I'm going to start
with the darker red. My acrylic paint. Just a touch there
on the gel plate. And keeping with my gold
theme, just to touch, they're also, now let's get this paint
across my gel plate. And then it looks like my
brayer is not rolling. So it looks like I'm
just smearing right now. May need to do something
about that in the future. I'm going to take my leaf. Actually, yeah, let's
do it this way. We'll take our leaf and
our card stock and you're going to see it's not going to fit completely side-to-side. So I'm going to use
an extra piece of paper to be able to lift off that extra paint. I'm going to fold
that because I felt just a little bit wet to me. Purposely rubbing
along the edges and pressing nice and
hard on the leaf. This was my extra paper
taking off the edges. Here is our print reveal. Look at that, that
negative space. This would be a great
place to write a message. Maybe of a greeting
you want to write, or birthday wishes, you could do it right
inside that leaf. Carefully lift my leaf up
and take another print. I'm going to rub extra hard. And let's see how our printed. Wow, that came up really well. I like that look. Can even see deeper
creases of the leaf. So here are two card ideas. To go with our envelopes. We have a matching set of card and envelope anyone
would love to get. Now one thing we haven't experimented with is with
all these extra leaves. Felt like making a print with
these extra shapes I have. And I really want to see
how they're going to play with the fall look or do. Let's move this paint. Wow, that's a lot, a lot, a lot of paint. I'm going to take
that excess off. Still taking that paint off. Alright, let's see
what we can do here. I'm going to gently tap
that in and lift up. How about this oak leaf? Gently tap that in and lift up. And let's see, you
have a long shape. How about a skinny, skinny shape right
across the top? Tap that in an off. Maybe just at the
corner and off. Very good. I have my card
stock ready to go. And extra paint for good luck. Helped my card
right at the edge. And like I said, let's go ahead and rubbed off that extra
corner is right there. And take our print. Let's see how we did. Wow, that's fall right
there. Don't you think? You can see my oak leaf
and the skinny leaf? That's fantastic.
8. Wrap Up: Wrap it all up. Thank you for joining me. I hope you've learned a few
things about your gel plate. A few things on how
to take prints and negative space and prints
of just the leaf itself. That you will take
those skills and create more and more
and tried new elements, different things
on your gel plate. And how to care for
your gel plate, and how to make gifts
that friends and family will really
appreciate and think, while this is stunning
and yet you and I know it was really
simple and fun to make. Please share your project with
me in the project section, I want to cheer you on, and I want others to see and be cheered by your creativity and we can all learn
from each other. That's the biggest takeaway. Check out my other classes on more envelope are techniques and more gel plate techniques. Have a great day.
 Tammy Prara, Making Matters