Transcripts
1. Photography with Midjourney Website: Hi, and welcome to
another incredible class. Mi journey is getting more
powerful every release. And now with the V six model, you can really create standing images that
looks like photography. This class is to help you master M journey to create
future photography. This class is about giving you the right information to start creating
photography with Mure. It now it's possible to create images that are distinguishable
from real photography. This knowledge will be more and more in
demand in the future. First of all, let me introduce
myself and then we'll see the structure and the content
on this amazing class. I'm Ricardo roca, I'm a professional
multimedia designer and teacher here on Skillshare. In the last two years, I've created more than 120,000
images with my journey, helping thousands of people to get the most out of
these incredible tools. I've helped people learning
how to create poster, how to use Majury to
create standing AR images, that's the future and
I've already created a master class on how to create
photography with mejore. But Mjourny evolves and evolves the information you have to master to get the
most out of it. That's future photography.
In this class, I will show you
how really you can get standing
photography from Major. Now let's see how this class is structured and what you will
learn in the next lessons. First of all, I will give
you an introduction to Majority Physics
and to the website. In fact, when the latest
release is possible to create directly inside
the website of Majority, so you no more need
to go on this court. Create images and this
class will show you how to get the most out of the
website in Majurny. I will show you the best
setting to get the most out of the power in
rendering with maturny. I will show you how to build
your photographic prompt to create standing
photography with M journey, and I will show you some
example so you can really get started very quickly into creating photography
with Matury. Then we'll go to the
core of this class that understanding how Majurny can render decomposition
for your image. I will show you how to
choose the correct frame and camera angle and light
for your photography. You will get all the
information you need to start creating photography
like you were a photographer, but without the camera, just with M journey
and your prompt. I've created so many images and photography with M journey. Really, I can tell you
this is my blowing and it will be always
more realistic, and more impressive,
what you will be able to achieve with the future
release of M journey. Lastly, I will show
you how you really can achieve the next
level in styling your images by using some crazy new function released with M journey
like style reference, character reference,
image prompt and mixing together the reference from other photographer to
create your unique style. So without losing any more time, let's start this amazing
journey together. See you in the next lesson.
2. Share your Project: Welcome to the
Project class lesson for this amazing class. I'm tried to Avia, and I want really you to
unleash your power with Mjurny. I've chosen four
different subjects for your photography project, and I'd like to see what you can achieve with
the information we share. So you have to choose one
of these four team and create your first amazing
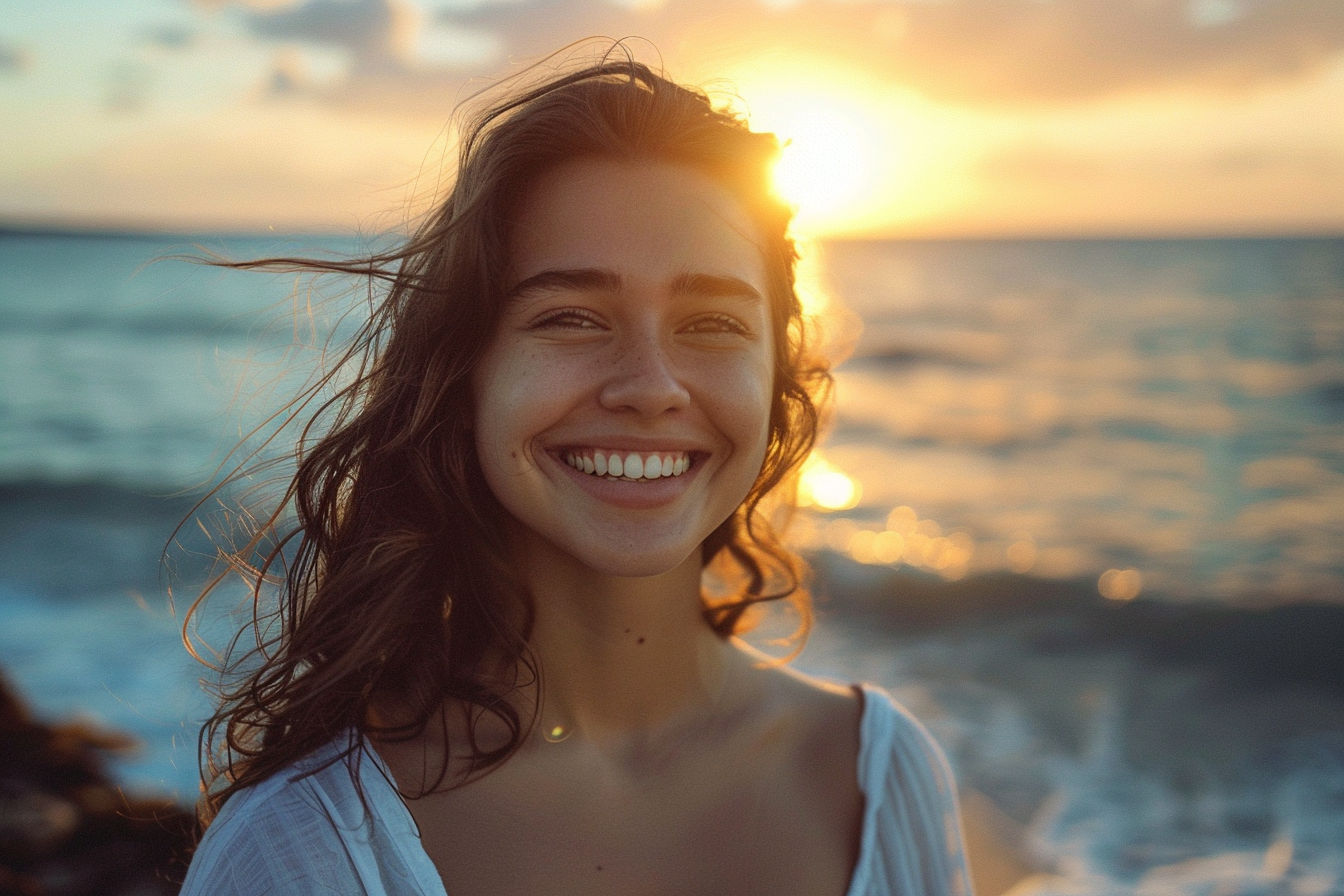
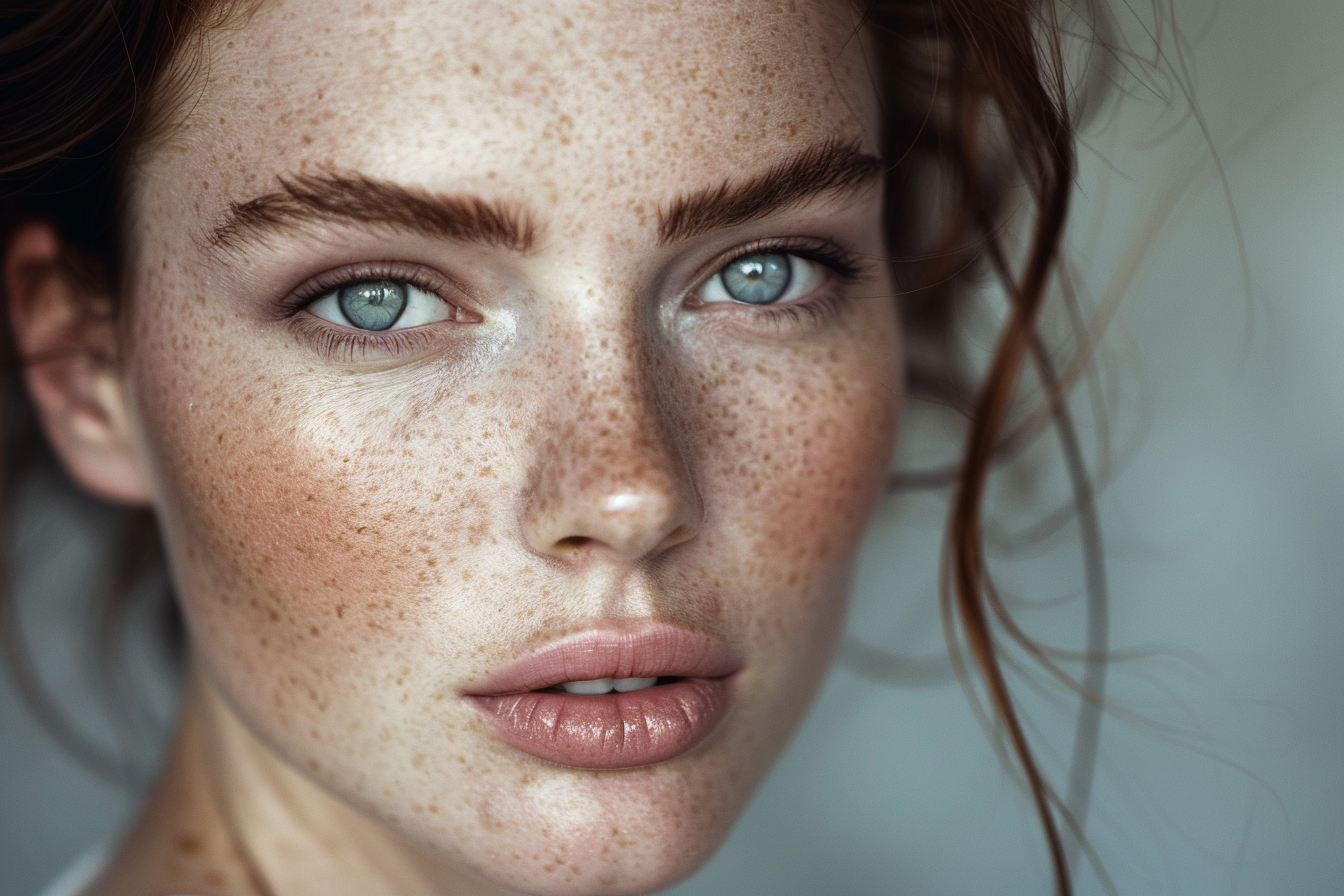
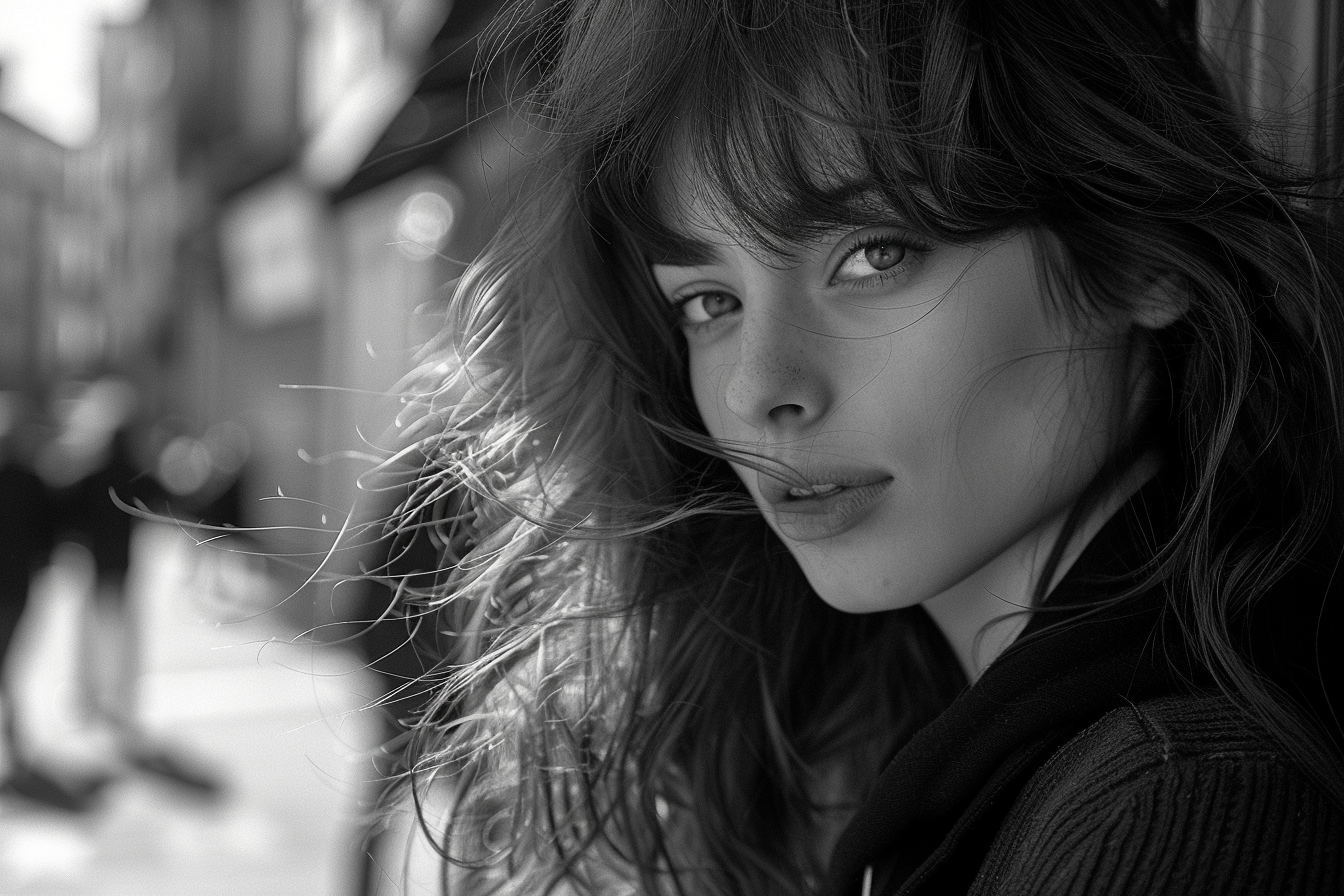
photography with M journey. Fourth subject for the images
are portrait photography, so you will be able to create
a standing portrait of real people that really can be undistinguishable
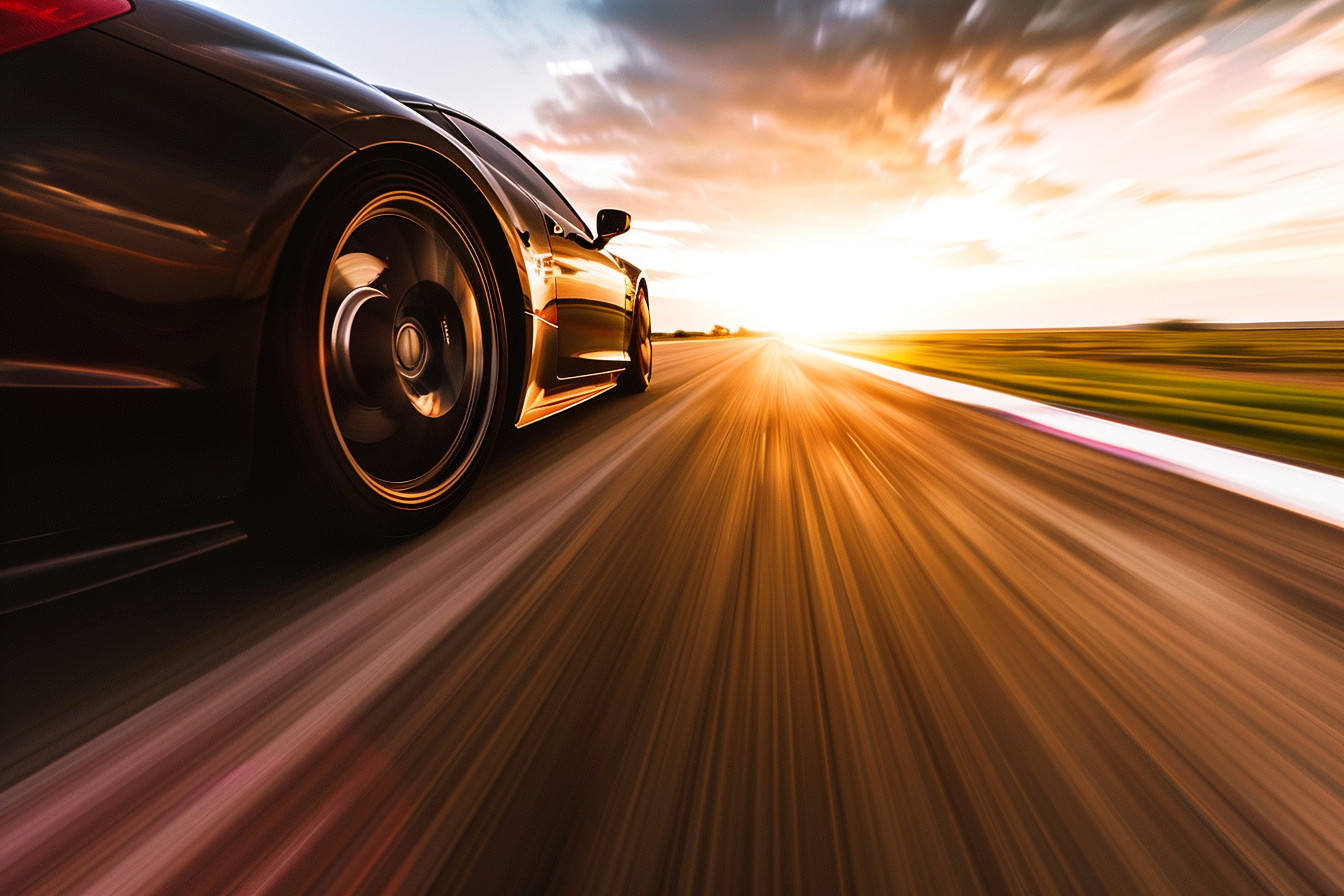
from reality. The second theme is automotive photography
and really I will show you how to create amazing images of
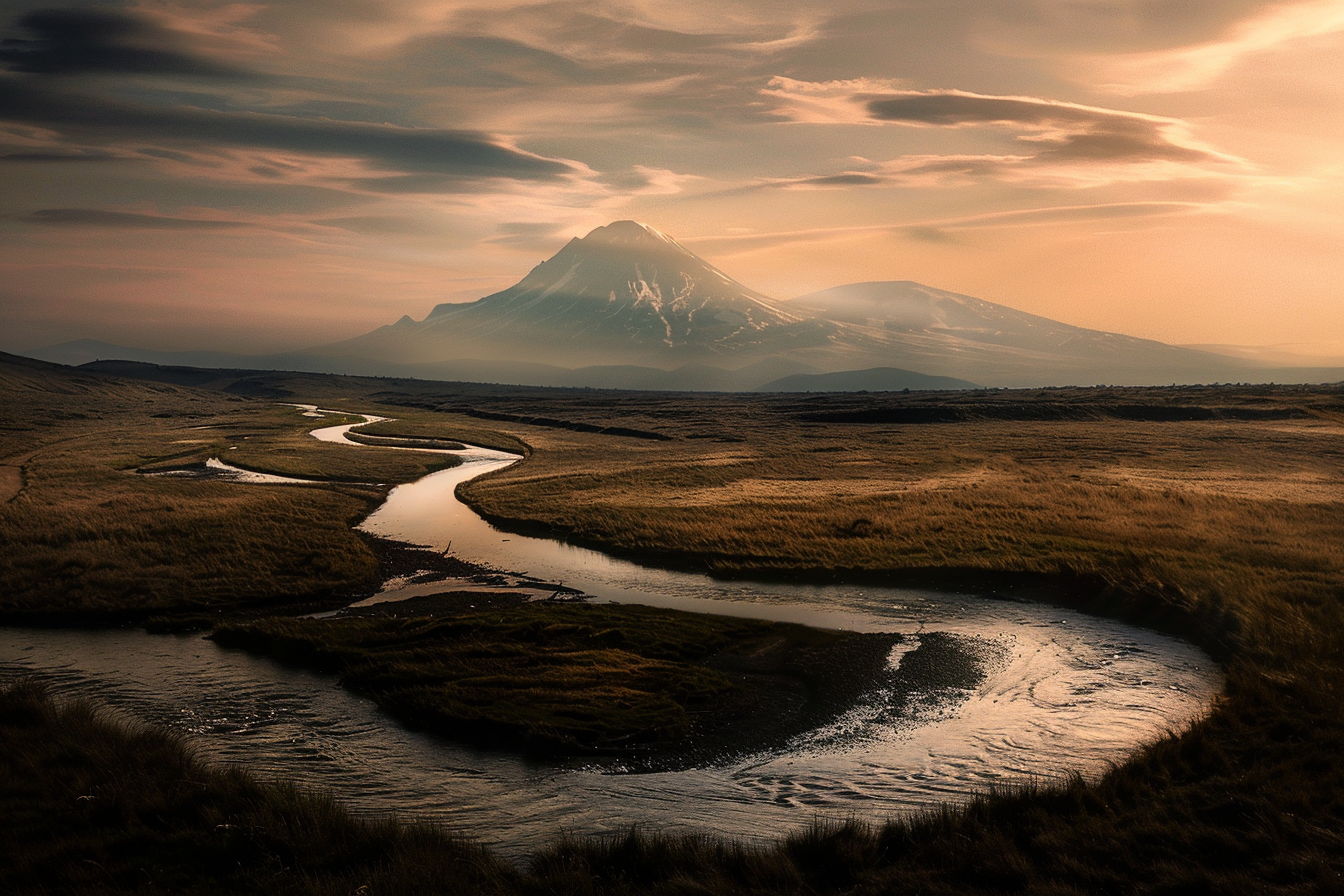
your preferred brand of cars because Major really knows how to render almost any type of car vehicles. The third team is
landscape photography, and I will show you how to create breathtaking
landscape, imaginary, for you to share for you
to print art on your wall. Because really there are
endless opportunities and endless possibilities if you get all the right information to express your creativity
and your vision. I will show you many
different landscapes and how you can really
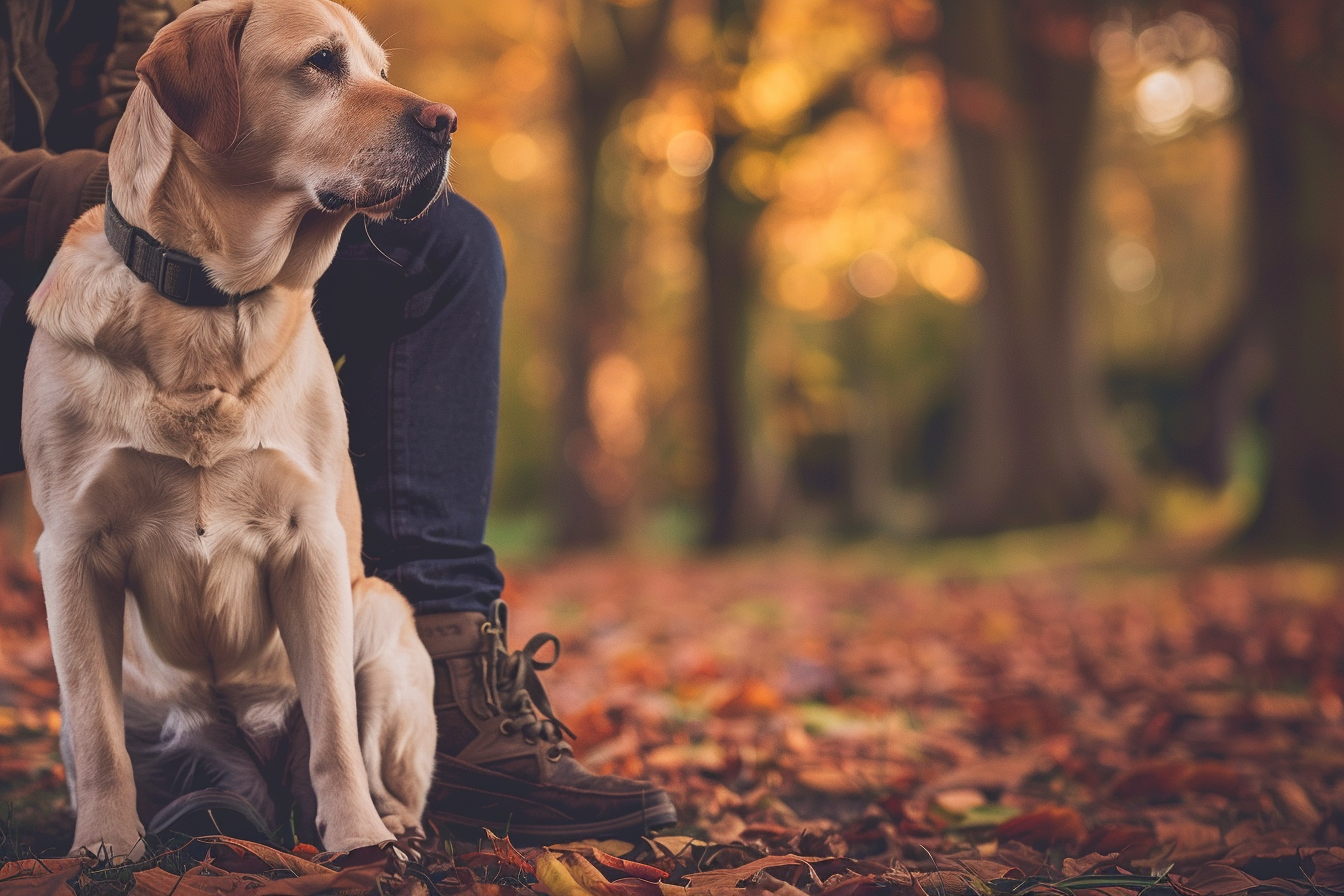
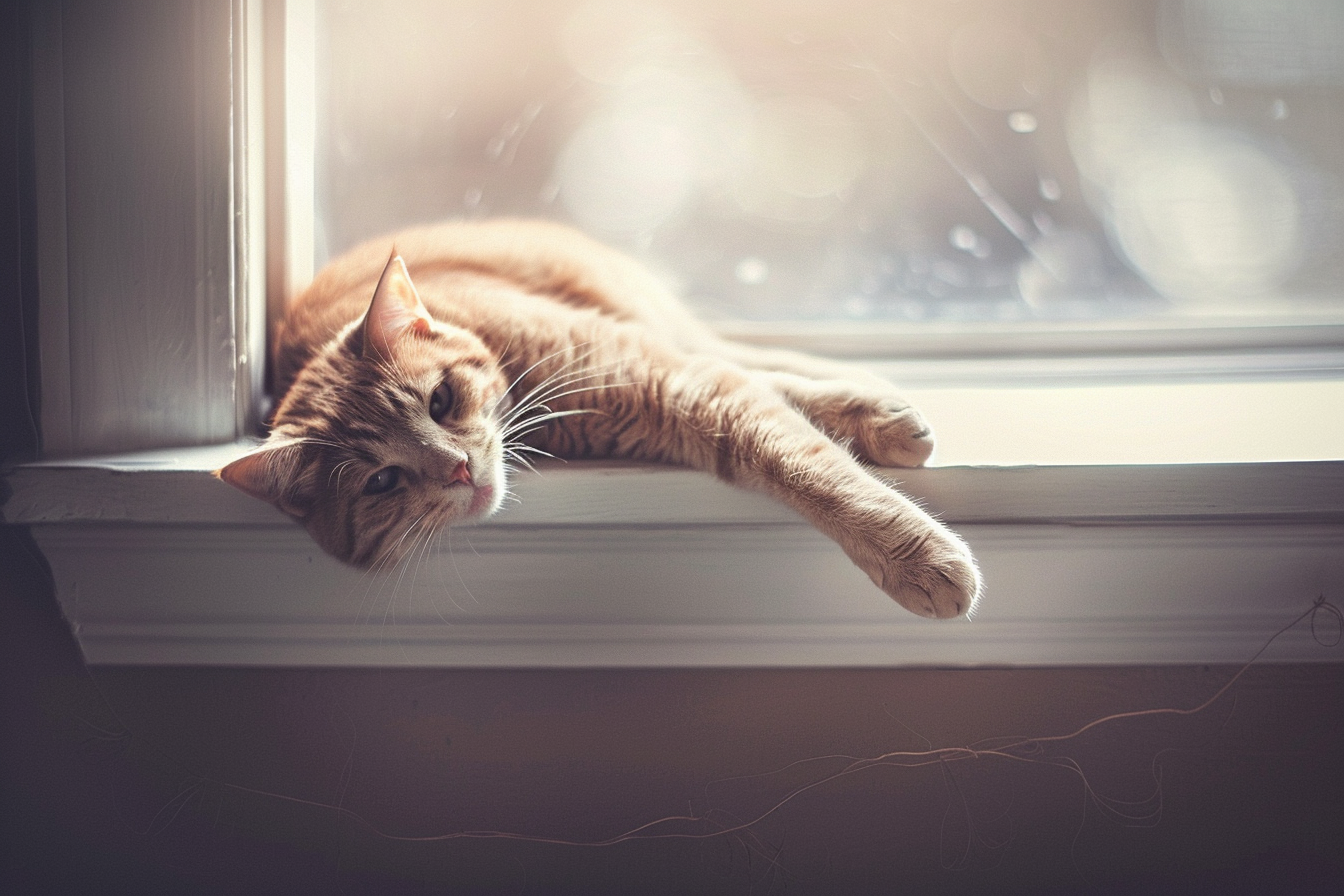
create your unique word Fourth team is pet photography, and I will show you
some powerful prompt to create standing pet
photography and imaginary, for your passion, for your
friend, for your heart. You can use really in
many different ways. When you learn the basic on how to create this kind
of photography, you can apply to every
different breed, every different
species of animal. I promise you will
have a lot of fun into creating the photography. Now it's your turn to create your first photography
with M journey, just choose one of these four teams and
express your vision. Remember, the key is to create a great prompt that is
descriptive and specific because this will
allow M journey to make your vision
real and sharable. Once you created your images, please share with the
community of a student, share your project
in the project tab so that we can review
them together, and of course, you can inspire a park the imagination
of other students. I can't wait to
see the images you will create and the
stories you will tell. See you in the next lesson.
3. Midjoruney's website: Hi, welcome to another
incredible lesson. In the last month M journey, exchange so much and release the opportunity to create images directly
inside the website. This is an incredible
new evolution in the way you use M Journey and made everything much
more user friendly. In fact, now most of the operation and function
you would do in this code, using code, you can do
directly inside the website, just clicking the right
button on the interface. Without losing any more time, let's go on my computer and see the new website
interface of Majurny, because this will allow
you to be faster and more effective into the
generation of your images. We are on Majury website, and here we have the familiar
home with the explored app where are all the best images generated by the
community of Mjurny. Here you can of course, lo image, that's
the new interface. You can scroll all the images. Here. These are
interesting buttons because you can use the
prompt of this image. You can use this
style or you can use even this image because the new interface allow you to create directly inside Mj
that's amazing because here, you can create directly
your new images. These are all the settings. You can choose the image sides with different aspect ratio. You can choose the aesthetics with the stylization
witness variety. You can choose the model
and the standard or mode, the model of Mjurny. Personalization is something
you can turn on and use when you have already rated
at least 200 image, and it's an information
that Mjurne took from that rating to create
your own personal style. Rack image, you have
to click on task. You can track images, and when you decide which one
is the one you like most, these will influence when you turn on a personalization mode. As you can see, images
are really wow. That's really amazing. Coming back here, you
can create your images. This is all of the image I
generated for this class. That's your archive
with all your images. From here, what you can do, you can just create
anything like image play with circus. Pixar style
illustration. Of course, from here, you can set up the way you want the
image to be generated. Let's enter and as you can see, it will automatically
start generating your images and it will
add to your archive. What syterecing is that you
can drag and drop your image. You can use a reference as image prompt or
a character style. These are all
different functions. You can explore with
new journey interface. As you can see,
look how amazing is our dog playing the guitar. Circus, that's so beautiful. From here, you have
both the function. You add in this
cord, you can vary, subtle and strong, you
can upscale, you can run. The frame is very interesting
because allow you to recreate the image with
different aspect ratio. You can even add a zoom. You can edit the prompt
like from the remix mode. Let's say we want to create a wider cinematic
version of this. We can submit and we create
other images from that. You can use image
because you stay, you can use prompt the
paint is the vari region, so you can paint your image and change
just whatever you want. You generating our variation for the aspect
ratio modification. Here, we are instead
inside this cord and that's the normal
interface, here, you have to type image and
your prompt the parameter, so it's a little bit
more complicated. I suggest if you
are a new user of M journey to do it
directly inside the website because
it's really so much easier and faster to
generate a meeting a case. By the way, if you can't, let's copy the prompt. We are inside this code, what you have to do just to write the prompt to
change the aspect ratio, you have to write at
the end of the prompt, data, A R aspect ratio, and the option you want. In general, you can use 32
for zonal image or two, three for vertical image, or any other different
aspect ratio. Here my journey, we
generate your images. Look at this talk.
How cus is this. I generate these images for one of my news letter of Ki share. I invite you to
check it out because it's really interesting
about permutations. Look how tender and
cute are these guests. Let's see our dog
in pizza style. The quality of the image
is exactly the same is different way you can
achieve your images. Look how amazing is this. These are very beautiful. Of course, you will find the new images here in the
archive. There we are. In this lesson, I
show you how to use the web interface of Mjurny to start creating
your unique images. In the next lesson, I will show you the best setting so you can get the mo out of Mjurny to create
standing photography. Of, I will show you
some examples on how to create standing images
directly in the website. See you in the next lesson. O.
4. Stylization & Raw Mode: In this lesson, I will
show you how to set up correctly inside
the website of Mjurny, the generation of your images. This is very intuitive
and it's much more easier than typing the function
inside the discord. I suggest you to do it directly
on the website of Mjorne. Without losing any more time, let's go to my computer and see how you can really achieve amazing images setting correctly the generation
inside the website. We are again inside
Majurny website, and we will see
today something very important to find your image and get the results you desire. We see the difference between a very important
parameter that is stylize and how this impact
the result of your request. Then we see the
difference between the mode row and the mode standard in the
generation of your images to, but because it's very
important for achieving the most realistic and
photo realistic output. Let's go into our archives, and let's have a
look at this image. In this case, what I
wanted to create is a ported photography of a young man sitting
on a park bench, reading a book, No run
light, soft focus. As you can see this
image looks like coming straightly from
candid photography. Here, for this image, we utilize the
parameter stylize zero. By default, the parameter
is stylize 100, but we force M journey to go the lowest possible number
for this parameter. As you can see, the four
images are all different. There are like a normal
people average people reading a book on
the bench in a park. But let's have a
look what happens when you rise up the
stylize parameter. We have the same prompt, just different stylize value, and 1,000 is the maximum
you can put as a parameter. In this case, what
we can see is that All the four images
have these good, gorgeous looking
man reading a book. This is because M
journey, in this case, apply aesthetic way more
strongly than with stylit zero. Fact slize is the value
that represent how much the aesthetic on
which has been trained, me journey is applied
to your image. The lowest value, the
less will be the input that will me journey will
put inside your images. In this case, this
is with style 100, so the regular value. As you can see, all the
four images are candid. And if you want to
achieve normal people, not model or super
gorgeous character, what you have to do is
to lower the style. In fact, as you can see slezation influence how strongly the major static is applied. Low stilzation values
produce images that are closely match the
prompt, less artistic. High stazation create images
that are very artistic, but less connected
to the prompt. This parameter will
change how works majory. Let's do another test. In this case, we can create a prompt for a girl walking
in the street of Barcella. Let's see how the style
change the result. Let's run the first
one with style zero. Then let's run another one with Style 1,000 and
let's see the difference. Great. They are arriving. These are the one
with style zero, and they look street
photography images. There is not so much definition. Style zero is not something
I recommend to use. These are instead the one
than styles. As you can see, The model are gorgeous,
very, very beautiful. There is a very strong influence of the aesthetics of M journey. What I suggest you to use is not stylized value zero,
but something 200-500. This range, you can
obtain and you can get the most out
of me journey in terms of quality in terms of
adherence to the prompter and not so high artistic
stylized images. Look how gorgeous are these. These are really beautiful. Let's see our stylize 500 girl walking in the
street of Barcelona. This is really gorgeous. Look how amazing is the light. As you can see, we have a mixed result somewhere
in the middle 1000-0. I suggest you to use a value
for szation between 100, that is the standard and 500. Unless you want to achieve a more perfect idealistic
not so real output from M journey. Because it will be more
creative and artistic. Let's do another test
with value of 300. Here too, we have a mixed
result between something more realistic and something
more stylized by journey. By the way, I love this image, look at those eye and I
love this black and white. Now let's see the row mode
over the standard mold. The difference is
that row mode replace the fault aesthetic of some
M journey model version. Using it can help you create
more photo realistic images, cinematic scene or
utter characters. This is useful if
you want to create something more realistic because me journey will
generate an image that is rich in terms of aesthetics, reta feeling to the image. Let's try with the new prompt as sailorman under the
Lighthouse at Sunset. Of course, we can say
portrait photography of a sailorman under the
lighthouse at Sunset, Let's roll the prompt. Let's create a vertical one. Both standard and row.
Let's see the result. L et's see the difference
between row and standard image. Raw will be less edited, somehow more realistic
in the result. They're coming. We are.
So let's have a look. This is very powerful
and interesting. This is quite strange. This is sometimes me journey do crazy things that
we can't understand. But these are they
look like you know, you can see editorial
style of image. More detailed. There are more definition
in the details. Yes. My journey really
is very great in creation of this portrait. Romo can enhance and give you a more realistic
touch to your images. Depending on what
you want to achieve, you can use the standard
mode or the row mode. Look, how beautiful
is this settleman, in its natural human being. Now let's see some other
images created with style row and slides to see
the difference in the result. In this case, we have
reported photography, a young woman gazing thoughtfully out of the
windows in a modern apartment. Natural light close up shot, contemporary and
reflective style. These images are generated with stylize zero and style row, and you can see that they
looks very, very real. I love this image. They are so emotional. These are instead
created with style zero, but default mode,
so no style row. I must tell you that the one created with style
row looks more real. This one instead is a
landscape photography, a large green valley covered in morning
dew during spring, wide angle, short,
vibrant colors, fresh and invigorating style. In this case, we create
this image with style zero. Instead, this with style 1,000, and the one with Stylize 1,000
are richer, more creative, more artistic, more than the
one created with style zero. As you can see. Generally, using a value of slits will
change the output, making it more creative. These are all with Stylte 1,000. Let's see this pet photography, Curis kicked and exploring a flower garden on a sunny day, macrosot, brand color,
cute and playful style. These are the one created
with Stylte zero, and I like this cut. The one with stylte at 1,000, have a different approach
to the color and Here, you can see how much impact the aesthetic of M
journey in these images because they are all these
very cute atmosphere, these colors, they are
closer to the cat. Instead, thes are more natural. This looks more like
real photography. Instead, this one are a little more sophisticated
in the output. In general, stylize 1,000
gives you more editorial, more creative, more artistic. In the direction that has
been trained me journey. So be careful about this
because using nigher value of stylits will give M journey more freedom to change the
output with the style. M journey has been
trained on and this can change and affect
the overall results. These are pet photography, dog and is faster. Let's see this one because
this is very interesting. These are pet photography of two puppy playing
in the field. These are with Stylize zero. As you can see, all the
puppies are different. They are having
fun and the image are overall really
cute and charming. Instead, this with Slizs 1,000. In this case, you can see that the top breed is
almost the same. They are more flattery,
they are cute. This looks like more an editorial shooting
of pet photography, maybe a little less realistic. I don't know, then this one, that looks more natural. Probably could achieve
something similar with the row versus the standard
mode of me journey. Choose a value that is 200-500. If you want to
achieve the best and most realistic images
with me journey. In this case, style 1,000 show less of
adherence with the prompt. In fact, we wanted a motion blur for the
velocity of the car, but the images with style
1,000 are more editorial shot. The car is not moving as fast
as the one with style zero, and there is no
speed no movement. Okay, great. In this lesson, I show you how to use the
different setting and how to set up correctly to get
the most out of M journey. In the next lesson, I will
show you how to build the photography prompt to generate standing
photography with M journey.
5. Midjourney's prompt formula: Hi, and welcome to another
incredible lesson. Today, we'll start diving into the rabbit toll of creating
photography with Mintury, and I will show you how to
create standing photography, using a very basic
structure for your prompt. So we'll see together how to
create and craft prompt that can generate standing
photographies with Minturn. So without losing any more time, let's go to my computer
to see the presentation, and I promise it
will blow your mind. We are on my computer and
in this presentation, I will show you how to build photography prompt
with Major V six. We are in future photography
with Major V six, and now I will show you the basic prompt structure
that is very simple but powerful to create the perfect photography
image with mejory. The basic structure is type of photography plus
subject plus action, plus setting plus photography
information plus style. Type of photography, of course, is the type of image
you want to create. In this case, it's a
parted photography of a smiling girl in front
of the sea at sunset. Soft natural light,
shallow depo field, warm, inviting
evocative atmosphere. Let's break down this prompt. Por the photography
is the type of photography of a girl smiling is the subject and the action
in front of the s at sunset, is the setting of this image
with soft natural light. Shallow depot field is the
photography information, and warm and inviting evocative
atmosphere is the style. Everything together will help you achieve this amazing result. In this case, we have
this beautiful girl that is smiling in
front of us at Sunset. The light is soft natural. Let's move to the second one. In this case, we have
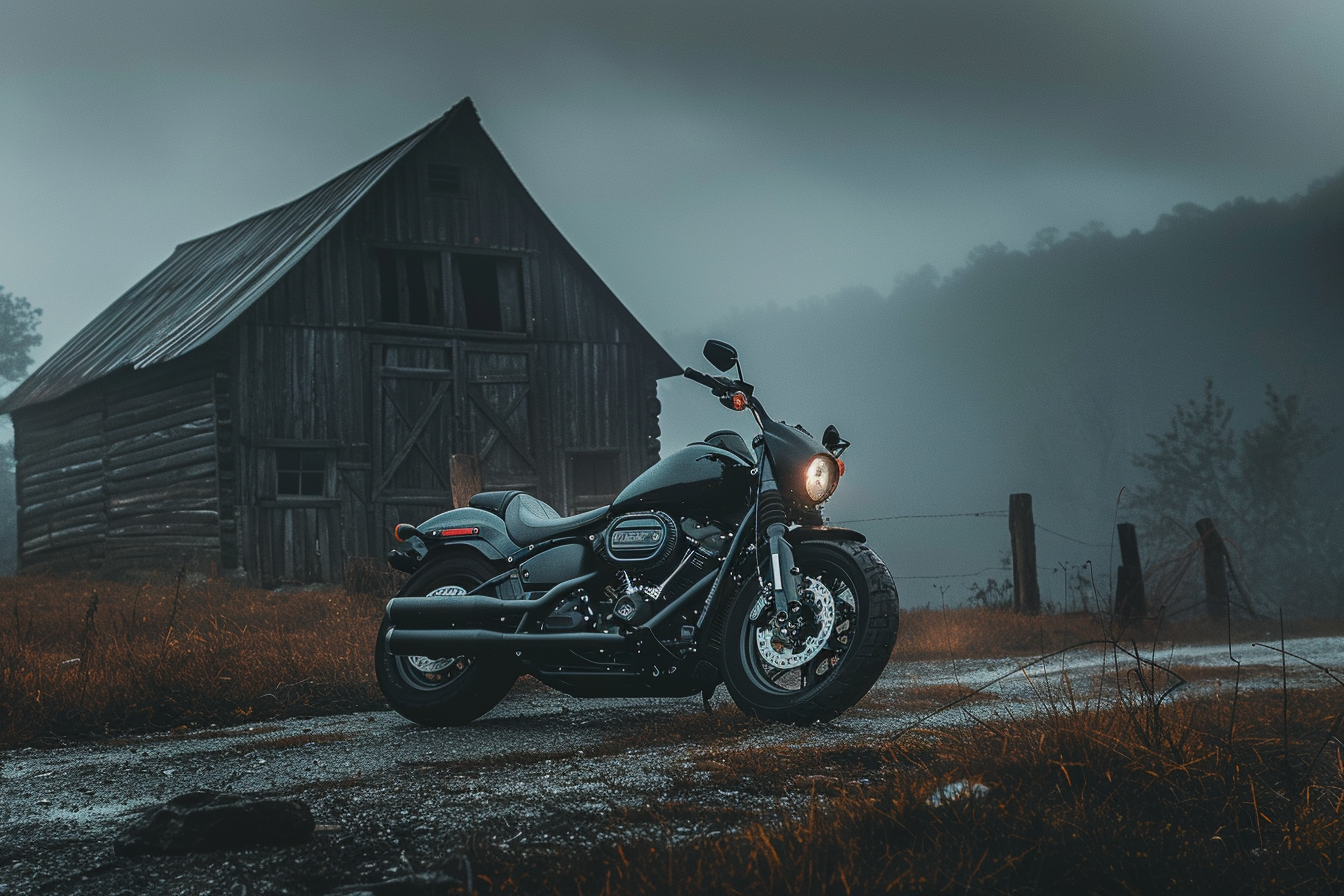
automotive photography and Arlie Davidson
motorbike park beside a rustic barn in a stormy
night with misty and fog. Wide angle shot blooded
light fills the background, cinematic lighting, da da tu. In this case,
automotive photography is the type of photography, and Ale Davison motor
bike is the subject, parked beside the rustic barn
is the action and part of the setting in a stormy
night with misty and fog is the setting
for this image. Wide angle shot is the
photographic information. Blue light field the bagron is something added
to the setting. Cinematic lighting
is the atmosphere. Now we have another image, a pet photography
of a playful puppy running through a field of
daisies on a sunny day, high shot speed to
capture motion, bright and vibrant, joyful
and energetic style. Da da 32. In this case, pet photography is the
type of photography. A playful puppy is a subject. Running is the action through a field of daisies on
a sunny day setting, High shot speed to capture the
motion is the photography, information, and bright and
vibrant, joyful, and energy. Style is the style of the image. That one is the last one,
Landscape photography, as rain mountain like reflecting the
surrounding pika sunrise. Crisp and clear with mist
rolling over the valleys, wide angle shot in the
style of as adams. Here we have the same structure,
Landscape photography. Serine mountain lake reflecting the surrounding
peak at Sunrise is the subject action settings with crisp and clear with miss
rolling over the valleys. This is all setting.
Wide and or shot is the photography information we gave information about the
field of view of our image. We want a very large field
of view to see a landscape. A here, we added in
the style of Asda. At adams is a very famous
American landscape photographer that create this amazing black and white landscape photography. Of course, M journey
can mimic the style of any almost any
famous photographer. You can add this as a
reference to style your image, and we will see in
the next lesson how this is possible,
how these work. Just have a look at ogen. Let's have a look for Ansel
Adams. As you can see. These are all the images
from Ansel Adams, and look how beautiful
are this landscape, and how close is our landscape to the style of this
amazing photographer. Me Journey is very, very powerful and can
create unique visuals. Unique photography,
these are amazing. Let's look at some other
images for our puppies. Look how tender and cute these. These are our lays. This is quite strange
because there's this third wheel
sometimes happen, but it's something easy to
fix with a photoshop or in painting because
sometimes M Journey does this kind of error. This is our lady smiling. Look how realistic
and really natural and photography looks
like this human being. These girls are amazing and
looks so real. Okay, amazing. In this lesson, I'll
show you how to craft your prompt to start creating amazing
photography with M journey. Now we'll break down each
part of the prompt stature, and I will show you
in the next lesson, how to frame and compose it correctly your images
inside M Journey. See you in the next lesson.
6. Frame & Composition: Hi, welcome to another
incredible lesson. Framing and
compositing is one of the most important
thing if you want to shape your vision and
share with the world. With M journey, you can set up everything just using
the right words. In this lesson, we'll deep
dive down in this field. Without losing any more time, let's go to my computer and
start crafting your me. We are back inside
M Journey website, and in this lesson, what we will see is
the different way you can create your image framing and choosing the composition. This is very important because understanding the
composition will help you create a visually
compelling images that row the Vesi and tell
a powerful story. We will see four different
k compositional techniques like the rule of thirds, negative space, center
composition, and leading lines. Let's begin with
the rule of irs. This is one of the most fundamental principles
of composition. Image your image divided into nine equal parts by two horizontal lines
and two vertical lines. The idea is to place the
most important elements of your scene along these lines
or at their intersections. The roof third create balance and interest
in your photos. It helps avoid placing your
subject in the center, which can sometimes make the image feel static
or less dynamic. In this case, we have a
landscape photography, a certain lake with a
mountain backdrop at Sunrise. The lake is positioned
in the lower third and the
mountains are along the upper third with the tree at the intersection of the
vertical and horizontal line. What we can do, we can take this image and bring
it into photoshop. Now we have the image
inside for the shop, and here we can draw the
lines to create the grid. The grid is made with the two third on the
horizontal and vertical side. This is the center of our image. Let's create the other
two lines. Here we are. So we have create the grid. As you can see, Journey
is very skilled in creating composition that
match the requirements. In this case, we can draw a
box around the upper line to see that the mountains are in the area of the
higher per third. They are perfectly
where we wanted M journey to put them to draw
the attention of people. Then we can see that
the bottom part of our image where there is the reflection is
in the third area, and we can see that the three, we wanted M journey two generate is in the
area of the third. Every element is exactly in the place where we ask
a mi journey to put it. That is very important and
very powerful because we can drive the attention of the viewer
towards the element, we want to give more importance. In this case, the tree
in the foreground, and of course, the monta. As you can see, these create a more dynamic
composition that will give emotion that will give a sense of dynamism
inside your images, and it's very
important to make them seems less boring or static. Then we have negative space. Negative space refers to the empty or open space
around the subject. Negative space can
give composition, a sense of simplicity
and elegance, allowing the viewer to focus
more on the main subject. Spaces to aight the
subject and can evoke feelings of
calmness and tranquility. In this case, of course, we have our subject, a person standing in
a vast empty desert. The person is positioned in the lower third with the expansive negative
space around them, emphasizing isolation and scale. In this case, our
lonely person is standing in the lower
third and all around, there is this vast emptiness. This is very important
because it can help us understand correctly
the distance. It's a way to emphasize
the importance on the subject and at the
same time give a kind of Sense of calm, tranquility, sense of isolation,
and of course, can understand the
sides of things. Then we have center composition. In this case, these draw attention to the
center of the image. In somehow is opposite
to the rule of third, But it is very powerful
when used deliberately, placing the subject in the
center can create stability, focus and shines when there
is symmetry in the image. It can be particularly striking in a symmetrical
or simple scene. In this case, we have an
automotive photography, a classic car centered
on a log street road. The car is positioned
in the sack center of the frame with the road
leading directly toward it. Emphasizing the car's
presence and seamlessly. The star of our
image, of course, is the car that is in
the center of image, so every elements concur to give the car a way more
strong presence. This is very beautiful. It's so balanced.
As you can see, the car is in the
middle of the root and it's perfectly balanced
between all the lines and the elements capture our attention because we want to focus of
course on the subject, where we are using
center composition. As you can see, look at this how amazing these
photos in black and white. We can put in photoshop, and let's create the grid. As you can see, the car is perfectly aligned to the
middle of our image. Min Journey is very good in creating exactly
what we ask for. We have to learn how to use
this information to make our vision more powerful and create something that
is really unique. Last technique is leading lines. These are lines in the mad the viewer's side
towards the main subject. Lines can be anything from road to rivers to fence
to shadows and can be useful to draw the viewer's attention into the scene and toward
the focal point, creating a sense
of deep movement. In this case, we have a
landscape photography, a win river leading towards
a distant mountain. The river starts
in the foreground occurs through the image, guiding the viewers side toward the mountain
in the background. As you can see, have
this river that brings our attention to the background from the
front to the background. If we follow the
path of the river, we will go and look at the mountain that
is in the background, that is the subject. We want to draw
that attention to. Two. These are all very
beautiful and you can see how M journey is really great
into interpreting our prompt. We have this river that
go to the background creating this line of view that points
towards the mountain. Very well. In this lesson, I show you the
different possibilities you have in the field of framing and compositing
the subject inside your photography
images with M journey. In the next lesson, we'll see another key aspect of creating your unique
vision that is the light. So see you in the next lesson.
7. Illumination & Light: Hi, and welcome to a
very important lesson. Today we'll see how M journey can understand the
importance of light to create unique images and to craft your
unique personal style. Light is very important
and can really change dramatically the output
of your work with mejore. Without losing any more time, let's go to my computer
and see how the light can really change your images. We are back on my computer. We are on the Majurny website, and what we'll see
in this lesson is the fascinating
word of light, one of the most crucial
elements in photography. Understanding how to use
different types of light can enhance your images
and set the right mood. Today, we spo different
type of light, natural light, cinematic light, The concept of time of
the day light versus soft light and the back
light silhouette style. Let's start with natural light. Natural light is the light that comes from the sun and it's one of the most versatile
and accessible type of lighting for photography. Natural light can change
throughout the day, providing different
qualities and mood. It's very helpful understanding this key concept because using this in your prompt
will gives you beautiful, natural looking light
for your image. It's perfect for portrait, landscape, and everyday scenes. In this case, we
have a portrait of a person standing in a forest
during the Golden hour. Golden hour, is the
moment of the day just before the sunset
that creates golden light warm and so in the prompt we brought the warm natural light filters
through the free, creating a soft eeial globe. As you can see,
all the image have this amazing ethereal atmosphere
with light that's coming from the sun that
is going down and create this magical
gold atmosphere. Next, we are talking
about cinematic light. This type of lighting mimics the dramatic and
atmospheric lighting often seen in movies. It can include the mix of natural and artificial
light sources to create moved and depth. Cinematic lighting is very interesting because add drama
and motion to the images, making them feel like
scenes from a film. In this case, we have an
automatic photography, a vintage car parked in
an old garage at night, illuminated by a
single overt lamp, The dramatic shadows and highlights create a moody
cinematic atmosphere. As you can see, the light
create an atmosphere that makes our image looks
like coming from a movie. This could be like a Triller
movie or an oral movie or a vintage movie set in
this old vintage garage. Of course, you can
play with the light to create every type of
atmosphere you want. Cinematic is very
interesting because makes your images much more interesting adding this
dramatic atmosphere. Next, we have time of day using a reference
to the time of the day significantly affects the quality and color the
light in your images. Different times of the day of the offer unique
lighting condition that can enhance your
photos created with major. Standing how light
change throughout the day helps you plan your image and shape your vision to achieve
the decided effect. In this case, we have a
landscape photography, an beach ad with
the first light of the day casting a
soft pink issue over the water and sand. Of course, a down, the light is very
Soft, it's pinkish, the opposite of what you
can achieve at sunset, where is very warm and yellowish
and can help you achieve this serene pacific quiet
relaxing mood for your image. You can play with
the time of the day to create different output. Let's strike the
exact same prompt, but adding a reference
to the sunset. As you can see, this
will change the output of my journey and we create a different emotion.
Let's have a look. We are, they are coming. Of course, we left the
information about the pink issue. As you can see, we
see a similar use of colors, probably
perfect sunset. Shot we should have add different
keywords to our prompt. But as you can see
the image is way different because the light
condition are very different. Let's move to the
next concept that is art light versus soft light. These are two fundamental
types of lighting that can create very different
effects in your image. Hard light creates strong
shadows and eye contrasts. It's great for dramatic
and energy photos. As you can see in this case, we have reported photography, a person under a
spotlight in a dark room, creating shadows
and eye contrast, giving a bold and dramatic look. Of course, with hard light, we can create these low key
images in which there are very strong difference
between the part that are in light and the
part that are in shadow. This, of course,
create dramatic effect and feelings and emotion
linked to the image. Look how harsh is in this case, this image with the back
light. This is beautiful. With the light
coming from out of the windows and light and
the face of our model and leave the rest
completely The opposite is soft light that produces gentle shadows and low quarters. In this case, we have
the pet photography a cat lounging on the windshield illuminated by soft diffused
light from an overcast sky, create calm and code
the atmosphere. Of course, using soft light, will help you achieving this soft cozy atmosphere
and the shadows are lighter. There is way less
difference between the part that are in lights and the part
that are in shadows. Look how different are the mood, you can achieve with these two different
types of lighting. Of course, it depends from what you want to
achieve with your images. Last, I want to explore the
back light and silhouette. B lighting is when the light source is
behind the subject, often creating a
silhouette effect. That is when the
subject is black, dark against a
bright background. This technique a the sense of
mystery and drama to image. I like the shapes and
outlined and of course, can drive the attention
of the viewer toward what you want to
give more attention. In this case, we have
landscape photography, a long tree on a hill at sunset with the sun
directly behind it, creating a striking silhouette
against the vibrant sky. Of course, here, there is a very sharp contrast between the sky and the
tree that is black. We don't see the colors and
the details of the tree, but just a dark
silhouette of the tree. I really love this
mood and image. Okay. So let's see some
other test I did playing with different light
condition. In this case. We changed the subject
of the hard light, and we added a denser. So let's see how this create a sharp contrast between
the light and the shadows. In this case, this
is the sunset and it's a view of the beach
with different colors. Let's see another silhuette. In this case, we changed
the subject with the rows, and as you can see, the result is the same. We have this car that
is our focal point and the light comes from behind the car creating
these amazing silhouette. In this lesson, we saw how works light inside Min Journey, and now you're ready to discover another important field in the creation of images and photography images with M
journey that is camera, angle, and shot because this is another important aspect that will change
completely the output of your work with M Journey. See you in the next lesson.
8. Camera Angle & Shots: Hi, and welcome to another
incredible lesson. Today, we'll see
camera angles and shot because there are so many
different possibilities, and this will help you
crafting your unique style. So without losing any more time, let's go to my computer
and see how you can change the angles and how you can use different
types of shots to create your unique
vision with M joy. Are back on my computer. We are back on the
mitere website. In this lesson, what we'll
see is how you can improve your images generated
with mitere choosing the correct
camera angle and shots. Understanding how to use
different angles and shots type, concretely enhance
the storytelling and the visual impact
of your images. Today, we'll have in
different concept related to the camera
angles and shot like hate, rotation, focal
length, field of view, various types of shots, including cools
ported medium shot, full body long shot, wide angle, because any one of these is characteristic and change
the output of your prompt. Let's start with this image. I really like this
intimate image of this young toddler
playing in the garden. The prompt ported photography, a child playing in a garden
shot from a low angle to make the flowers and child appear larger and
more enchanting. In this case, we told the
majored to create a low angle, low eye shot with a camera that is
basically at the level. At the ground floor
to create an image that bring us inside the scene. In fact, we are at the same
level of this little baby. We saw the flower, we saw the baby and everything
is very interesting. Playing with the high will change the point of
view of the view of your image,
lowering the high, and putting it at the same
level of your subject will create a sense of more
presence in the scene. You will put your viewer inside the scene with the subjects. As you can see, all these
four different images created from the same prompt, share the camera at the
eight of the children. These create a more deeply
connection with the subject. It's very important
to choose the Creta to generate this link with
the subject in your image. The next theme is rotation. Tilt your camera can add dynamic
elements to your photos. A slight tilt can create a
sense of movement and an ease, depending on the context. In this case, the prompt
is automatic photography, sports speeding down
a by road captured with a slight tilt to
emphasize the speed of motion. As you can see the
origin is not straight. The camera is stilted to add some more dynamic
to the scene. The sense of speed, the sense of movement. Look low amazing is this image. It could be straightly out of Mercedess Bands advertising. It's very important to play with the rotation of the
camera if you want to add some sense of
movement to your image, damis this really enhance and make your image
way more powerful. Then now we are looking
at the image of this amazing landscape
and for this image, what we want to announce
is the focal lens. Fog lens refers to the
distance between the length, the image sensor
and the subject, and affects how much of the word you
capture in your frame. Having a shorter
focal lens provide a wider field of view, instead having a
longer focal lens of a more zoomed in perspective. Of course, if you want to create image of
landscape in this case, adding the information of wide angle lens will
help you capture the fastness and to capture much more space
inside your composition. The next theme is field of view. What is in focus inside your
image and what is blur. This is very important to
separate the object in foreground from the background to drive the attention
of the viewer. In this case, we have
a pet photography, a cat lounging on
the window sill, capturing with a narrow
field of view to focus closely on the cat's facial
expression and details. A narrow field of view will
help you have a much more different between what is in focus and what is not in focus. This help drive the attention to the details you want to
drive the attention. In this case, look at this amazing cat that are
resting on this window shield, and we can make the people
look at the face and details of the cats because that part is in focus and
the other is not in focus. Now, let's move to
the types of shots. There are different
types of shot, each one has characteristics
and type of look. In this case, we have
a ported photography, a close up of a personal size highlighting their
emotion and expressions. Close Up is an image that capture a details a
part of a subject, and it's used to give a lot of detail of
objects, of people, so it can really convey a lot
of information and emotion. We have portrait portrait, show the subject from shoulders up and focus on the
expression of the face. In this case, we have
portrait photography, a person smiling
warmly shot from the shoulders up in
a well lit studio. Portrait is used for people, but can use for animals too
or any kind of subject, but mainly is of
course for people. Usually, it's not a
full figure body. Of the subject, but just from
the shoulders to the head. This is another type of image. Pet photography, axity bidently capture from the waist up
with a blue red background. In this case, we give the information to
capture a portrait of this dog with the
blue red background that helps driving the
attention to the subject, in this case, our dog, since the dog is smaller, we can capture the
full body of the dog, even we've had the information that we want from the waist. Look how amazing
are this image and look really like
real photography. Then we have an image that
is an established shot, the capture all the scene. In this case, we have a subject, the lone cher standing
at the base of the bat mountain and these
establish the scale. So thanks to the small human
being in the foreground, we can set the scale and the dimension of the mountains that are in the background. In this case, you can
use some elements to set the correct sides and scale of other elements
inside your image. This is an interesting
image of wide angle. It's an architectural
photography, a wide angle shot
of a mod skyscraper capturing the entire building
and its surroundings. This is very cool
because it's shot taken from the basement with
the camera all rolled to up to capture the high and all the building to create this sense of
greatness and height. It's very interesting
because this really looked like photographing a
building from the basement, sky scriper from the basement. There are a lot of image
like this you can find. Of course, using keywords like
architecture photography, wide angle, captured
entire building. This can help you achieve
exactly the image you want. Let's see a fashion photography, a model posing in
the stylish outfit shot as a full body image
against a city scape. In this case, we want majority to capture
a full body image. Even if we don't get
exactly the full body shot. In fact, this is more a
medium shot or portrait shot. We were able to tell
me journey to create a fashion shooting
style image with this model and a stylish
outfit against a city scape. Look how beautiful
are this image. Even this one, is a
little bit strange, but those two are
really amazing, looks like a real editorial
shot on the top of a, a really low that So mastering
different camera ngs will significantly
enhance your ability to tell a compelling
visual story. You can use hay to
alter perspective, rotation to a dynamism, focal to change
the field of view, and you can explore various type of shot to fit your narrative. Each technique of a unique
way to enhance your images. In this lesson, I show you so many beautiful
images, and of course, I show you how to get the
most out of me journey using the correct words and the cor information
for your prompt. Now you're ready to Start styling your images and
create your unique vision. So the next lesson will
be very, very important. I can't wait to show you all the information
I gather for you. See you in the next lesson.
9. Create your Style: Hi, welcome to this key lesson for your career as a
photographer with Megure. Here today we'll set how you can really create a unique
style for your images. I will show you many
incredible functions that Mure has released
and how you can get it. The most out of them to create unique photography
and unique artworks. So without losing any more time, let's go to my computer and
start styling your images. We are back on my computer again in the website
of M journey, and here is the moment
where you start exploring how to define the mood and the
atmosphere of your image. Using some interesting function. Inside M journey, that style reference,
character reference, adding a reference to specific photographer
or photography style. Four different steps to
achieve your unique style. First of all, you have to define the mode to choose the
correct atmosphere for your image because it can change significantly what you can
achieve with M journey. Then of course, you can use the site reference, the
character reference, and the reference
to a photographer, if you want to copy the photography style of
a famous photographer. Let's see everything together. The first step in creating a captivity image is to define the mood
and the atmosphere. This sets the tone for your entire composition and guides all your
creative decisions. The mood and the atmosphere of an image can evoke
specific emotion, making the photos more
impactful and memorable. Let's start with the
landscape photography, a misty forest at De with soft difus light
filed into the tree, creating a serene and
mystical atmosphere. What we want to
create is an image of serine calm
atmosphere, mystical. Now, let's copy the prompt and use different information to change the mood of this image and the feelings
link to the image. Let's change and add a very dark shadow
and or atmosphere. Let's change and add
some detail, like, a ghostly scary and
mysterious atmosphere. Let's see what happens. These are the images generated
for our first prompt. As you can see, we can
create an atmosphere of calm mystical atmosphere, look at the light of this place and they can convey
calm relaxness. Instead, these are the
images generated with our different specification in the mood and in the
atmosphere of the image. As you can see, the
output is completely different because these images
convey a sense of terror, a sense of desperation, a sense of a scary atmosphere. The prompt is the same. We change the details about
the mood and the atmosphere. Of course, the output is
completely different. Look how different
are these two forest. It's very important to define what is the mood you want for your image because
this will change the impact your images
will have on your viewer. Now, let's try to use the style reference
function that is a function that
has been released in the journey a
couple of months ago. It's very important because
it allows you to specify a particular style for the image using reference, another image, and this help to ensure
consistency and coherence in your work to achieve a constant style across
different images. Let's use this prompt
port photography, a woman in vintage stress
shot in the style of 1940s film noir with eye
contrast and dramatic lighting. Then we can drag and
drop an image and see how these impact the result. In the image, we have
three different buttons. The first one is
for image prompt. The one with the human shape
is for character reference, the attach is for
style reference, and the image is
for image prompt. We can use the
three different way to create an image
transferring style from A reference. We will see how
much change if you choose these three different way to interact between a
prompt and an image. Let's start with
the image prompt. In this case, we will choose
the button of the image. Then we can copy drag
and choose in this case, the attachment to use the
style reference of the image. We will see how this
impact the result. Because you can use any
image as a reference, and this will generate an output that is related
to the first image, but there are different ways. Let's see just the prompt. In this case, what we achieve is really
an amazing image of this lady dressed in a vintage way shot as
a film wire of 1940s. These images are
really starting. Look a beautiful. I
love the first one. This one too is very
interesting, the light, how M journey can replicate
any kind of style. ER is with image prompt. We use the image as a reference for the
generation of the new image. As you can see the journey
blend somehow the background of the forest and our woman
with a vintage dress, creating this surreal
illusionated images fiel. Instead is style reference. In this case, what we journey
do is to take the color, the style, the mood of
the original image, the reference, and
transfer to the prompt. As you can see here, we have our portrait of a
woman in a vintage dress, but there are elements in the colors in the mood
in the atmosphere that are taken from the original image.
Let's do another test. Another image and use
as a style reference. In this case, I choose the landscape photography
of the beach Don, and we will see that the color of our image will be chosen, and the style will be chosen accordingly with the reference. Now, let's take an image as reference for
character reference. Again, our prompt, let's choose the human figure at the bottom of the image
put as reference, and let's roll the
prompt this way. Let's see what happens. This case, what we
can expect is to have a subject a
character that has the physical information and characteristics of the
image character reference. As you can see, lookout, the colors are affected by the image reference with the
style reference function. As you can see, we have
this pinkish soft look that is given by the style
reference function. As in the previous example with the forest with the dark
tones and or atmosphere. Yeah, we are has arrived our images in which we use
the character reference. As you can see, the character
the portrait created share with the reference
a very similar look. This is very important
if you want to create consistent character
across different images. Because with this function, you can create character that are very similar
to the reference. Of course, it's not perfect yet, but you can adjust it in
both production and change, of course, how you
achieve your result. Let's do another test
with another character. We can take this red
lady, for example, be careful to choose
the human figure to achieve and to use the
character style reference. This is very important. We will see how this will
affect the output and how changing the image
use as a reference, we change how Mj
generate our image. Let's try doing
something different. We can use the same
character reference. Changing the subject.
In this case, we can create an image
of a woman drinking a cup in a t shop in
Budapest, in the style. And here, we can add the style of a movie director
like Wes Anderson. Let's see how this impact in
the generation of the image. Are the images generated
with character reference, the lady with the red A and ad. As you can see, in this
case, two M journey, create four different images using that reference
and creating a character that is somehow close to the
character reference. Let's see the woman
drinking a cup of tea in a Barn Buda base in the style of West
Anderson movie. M journey sometimes have
some problems with Ns. Let's do the same,
but in this case, a reference for the character. Let's see if we can achieve the same character
across different images, or we can get close to
achieve that result. In this case, as you can see, the image are interesting. You have the West
Anderson Luke and feel. There are some problems
like this way, we have a problem with the eyes. The ends is a
little bit strange. Sometimes me journey can
have some strange behavior. You have to fix them with vari region or re
rolling the prop. As you can see, the subject
are close to our reverence, the same air, the same
kind of lips and y. Of course, this is
still not perfect, but as you can see, is very different, what
you can achieve giving me journey a reference
for the character or not. In this case, all
the four women have the same kind of eyes,
the same kind of hair. Are not perfect,
but they are very close to the original reference. This works way better if you use as a reference an image
generated with me journey, not a real photography. Just as an advice. Now, let's speak
about our last team that is using a photographer or a photography style.
As a reference. In this case, we can ask Mjione to create
ported photography, a young woman posing
gracefully in ornate vintage rooms of
the f light inspired by the photography style
of Any Ebobs with rich details and a warm
intimate atmosphere. We are asking Mijeni to generate a photography in the
style of Any Ebobs, that is a very famous
fashion photographer. As we change the name
of the photography, we want to create a reference. M Journey will generate a
different style of image. I can try using Mario Testino, that is another famous
fashion photographer. They are coming the results. These are the images in the
style of Annie Lebowitz, and you can see,
they're very beautiful. They looks like an
editorial shooting. They feels at the same
time very natural, like shot with available
light Instead, these are the images generated with the
reference to Mario Testino, that is all the same
fashion photographer. But the images are way
more post producted, way more editorials style. Look at this image
heavily retouch. Instead, the one reference sing to bots look more like natural. This is another example images with the reference
of David Lach pen, that is another famous
special photography. In this case, we have
the problem with majory generating this
model with three harms, and this N two has some problem. Sometimes pen. In this case, what you can do, you can
use the paint function. Highlights the part you
want to regenerate with Mturny and just
submit the new work. In this case, Mjurey, will generate four
different proposals with the same image, just changing the
area you selected, So in this way, we
can fix when me journey create these
art facts or problems. As you can see, we are having
four different proposes, and we can choose the one that is more natural or
works better for us. This is not bad. This is a little bit to strange. These other two are
correct, probably. This one is the one that
feels more natural. Of course, you can
keep repainting your image till every
detail is perfect. This can be very interesting because you can step by step, change and solve problems that have been created
with majority. Strange behavior of ends ends with too many
or too few fingers, problems of elements added to your images that should
not be there and so on. There are many
different ways you can style your image and mastering this technique will help you achieving your unique
and perfect style. Amazing. In this lesson, I show you how you can use
the different function, M joes recently released to
create your unique style, and of course, to shape your vision and
share with the word. Now, your path is
almost finished. See you in the last lesson.
10. Well Done, You made it!: Well done, amazing. Now you are a future
photographer. You have learned in this
journey with me how to master my journey to
create standing photography, and now you're ready to explore. You're ready to play and
create something beautiful. I'm really happy that we
arrived to this lesson. So now you are officially
a future photographer. I'm really that you have decided to spend
this time with me, and I really love
all the time I've spent creating this
class for you. Now it's time for
you to play with your creativity to share
with the world, your vision, hope you will share with other student in the
project class what you've learned because this will inspire other people,
and of course, you will be able to get some feedback so you can
improve and of course, create always something
more beautiful. Maybe start using M journey for one of the endless
opportunities it will create. In the future, it will be
always more requested, a figure of a professional who can create with me journey. I invite you to check out
all my other classes, Rods K share because there are so many incredible contents. If you haven't done yet, you can learn how to
create standing posts, understand how to create standing videos and AR
images with me journey, how to get the most
out of photoshop. To fix and enhance journey
images with Focal Shoppie. There are so many classes
to ignite your creativity. If you want to follow me, you can find me on TikTok, on YouTube, on Instagram. I'm creating contents to spark creativity
of my followers. There is a newsletter
that I share with new ideas, updates
and everything. That can really boost
your creativity. This is just a starting point. From here, the
possibilities are endless. I'm really happy that
your veidea well done, now you are ready to
create your unique vision. Hope to see you in
the next class.
 Riccardo Scrocca, Follow me in a crazy new world!