Transcripts
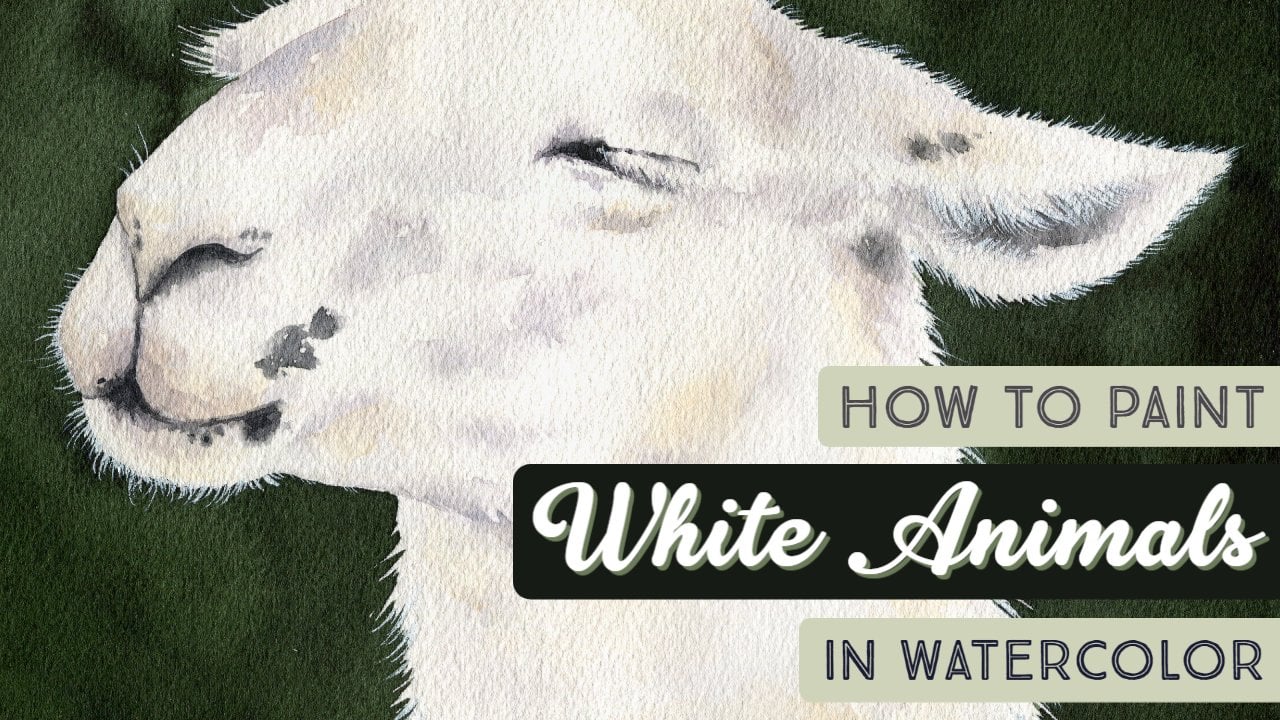
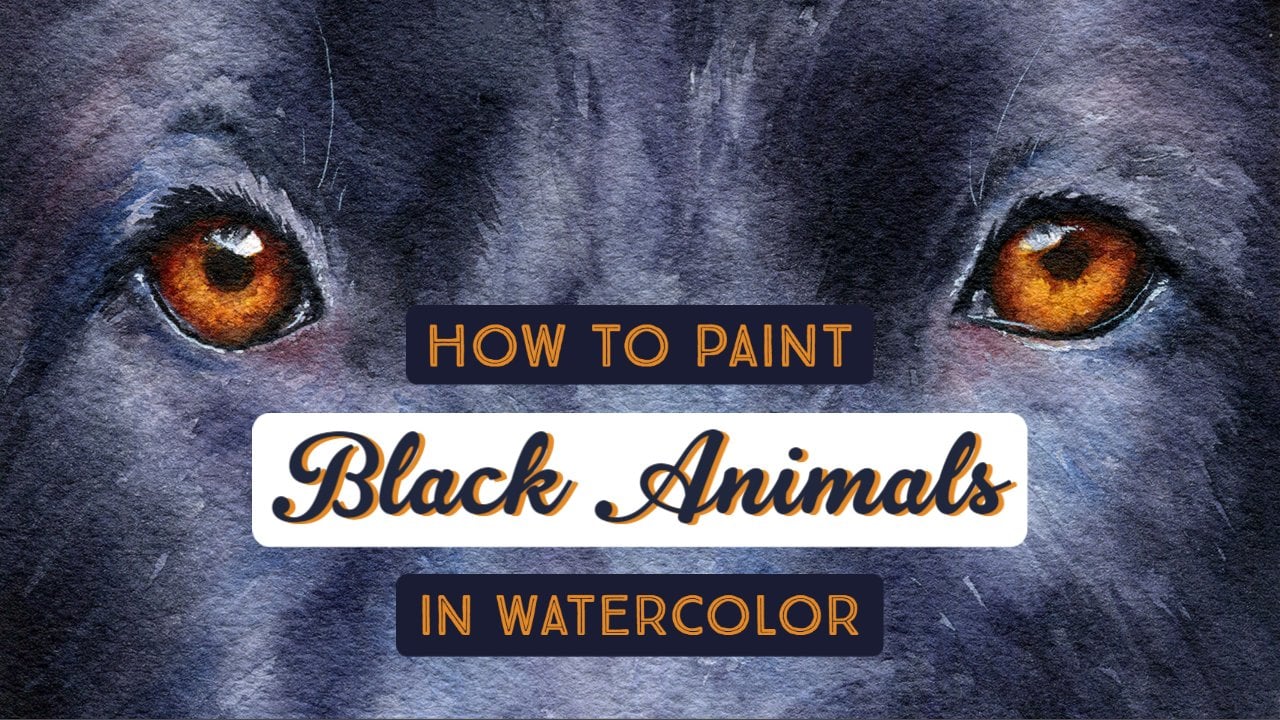
1. Class Overview: Hello, everyone and welcome to fur, feathers, and scales: painting animal textures in watercolors. My name is Denise Soden and I'm a Wildlife Water Colorist and educational content creator. You may have already taken some of my other classes like Mastering Water Control and how to draw and paint animal eyes in watercolor. In this class, we're going to continue to grow our wildlife watercolors skills by learning how to create the illusion of fur, feathers, and scales in watercolors while still retaining the ethereal quality about them. With this medium, I don't aim for photo realism as I personally feel that other mediums land themselves better to that style. Instead, I prefer to find a balance between including enough details for the subject to read as a real animal while still letting the watercolors do their own thing. For this class, I have curated a wide variety of textures in order to cover as many bases as possible. While I couldn't possibly hope to cover every texture in the animal kingdom, this class has seven individual texture demonstrations, three on fur and two each for feathers and scales. These demonstrations will reference each other and build upon reoccurring techniques. So I do recommend for at least your first time through the class to watch them in order without skipping around to get the most out of the lessons. There will also be three full class projects to practice each of these new skills with a full painting, I intentionally chose animals for these pieces that would allow you to flex a variety of textures within each category, such as including short, medium, and long for all in the same painting. I also took care in choosing animals that were predominantly one color so that you could focus as much as possible on the textures themselves without over complicating things with other factors. This is an intermediate to advanced level water color class that assumes that you have basic working knowledge of watercolor applications and techniques. If you haven't already taken my class on mastering water control, I highly recommend saving this class. Go ahead and take that one and then come back and join us when you're all ready to go. Plus the class project in that class is of a rhino who has some really awesome wrinkly skin, which is yet another animal texture to learn in watercolors. I sincerely hope that you enjoy this class and that the tools that you'll learn here will help you tackle any animal texture you come across in watercolors.
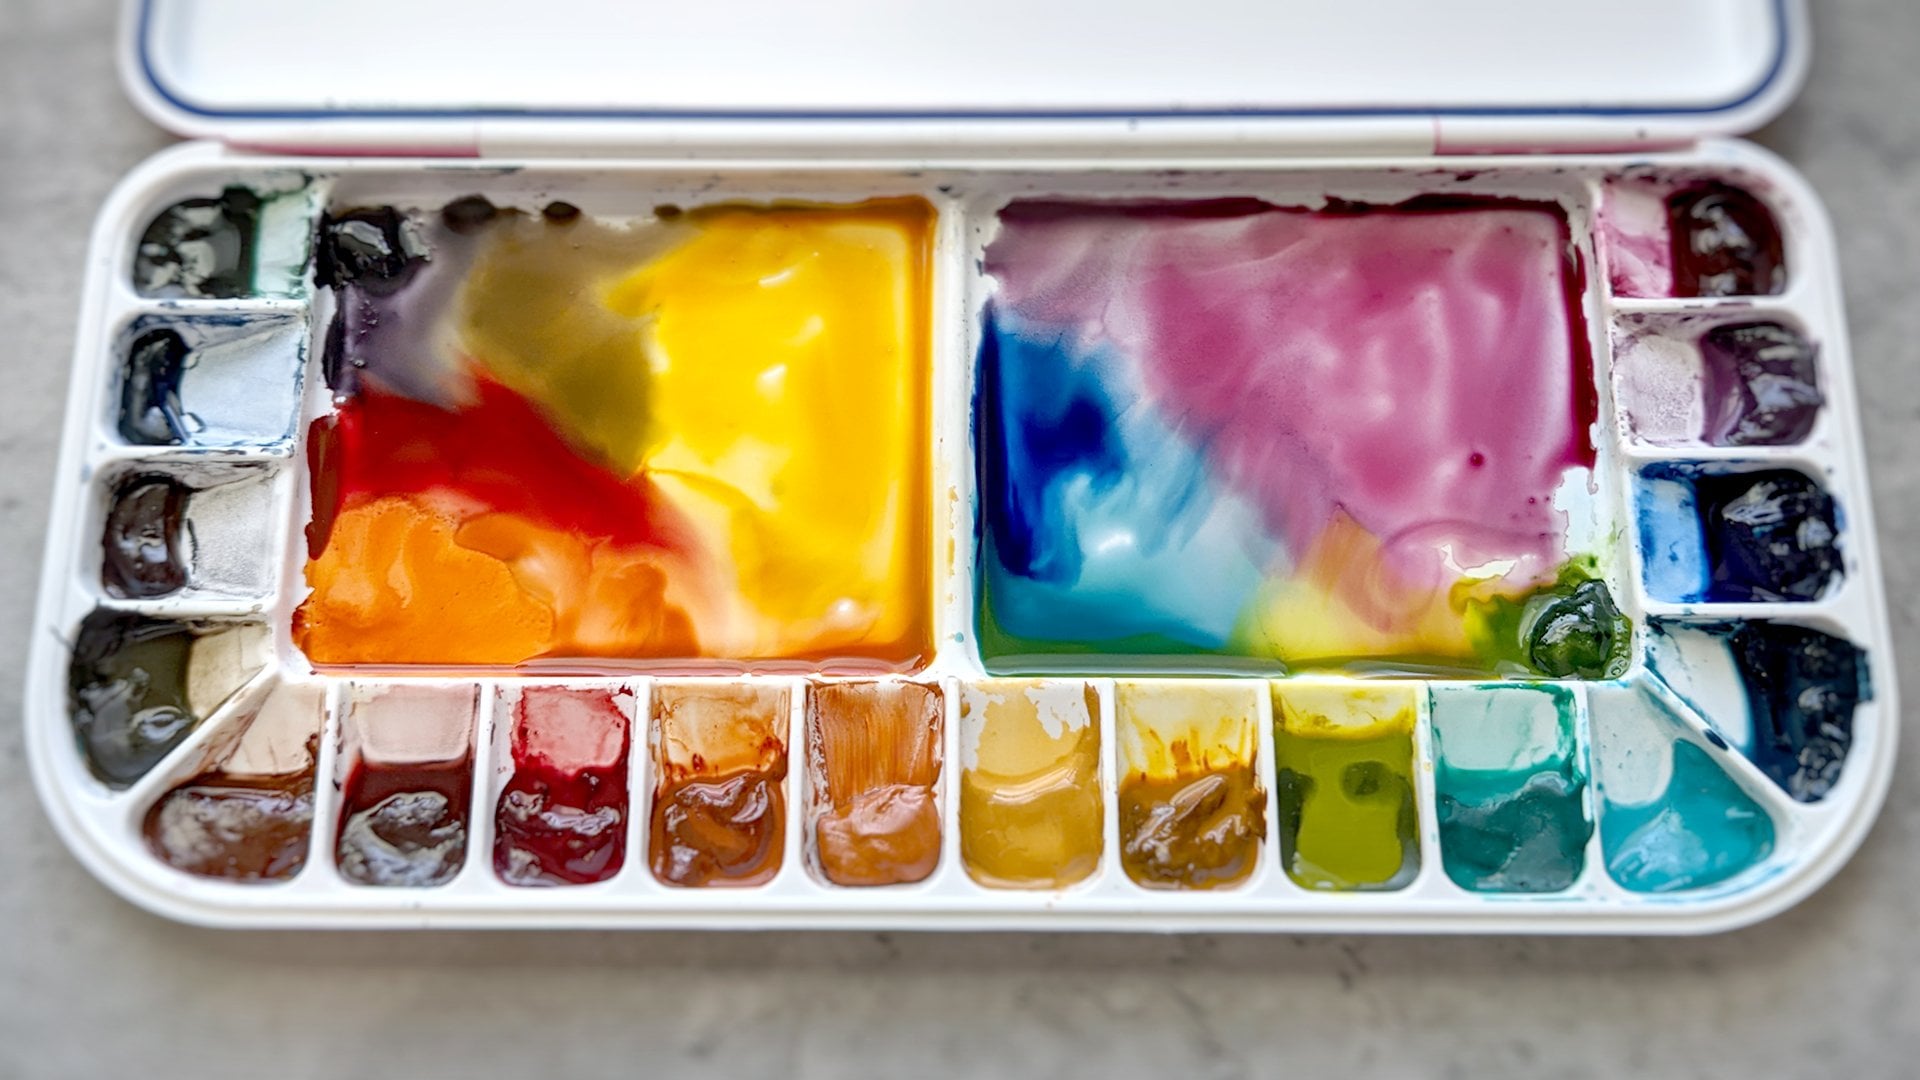
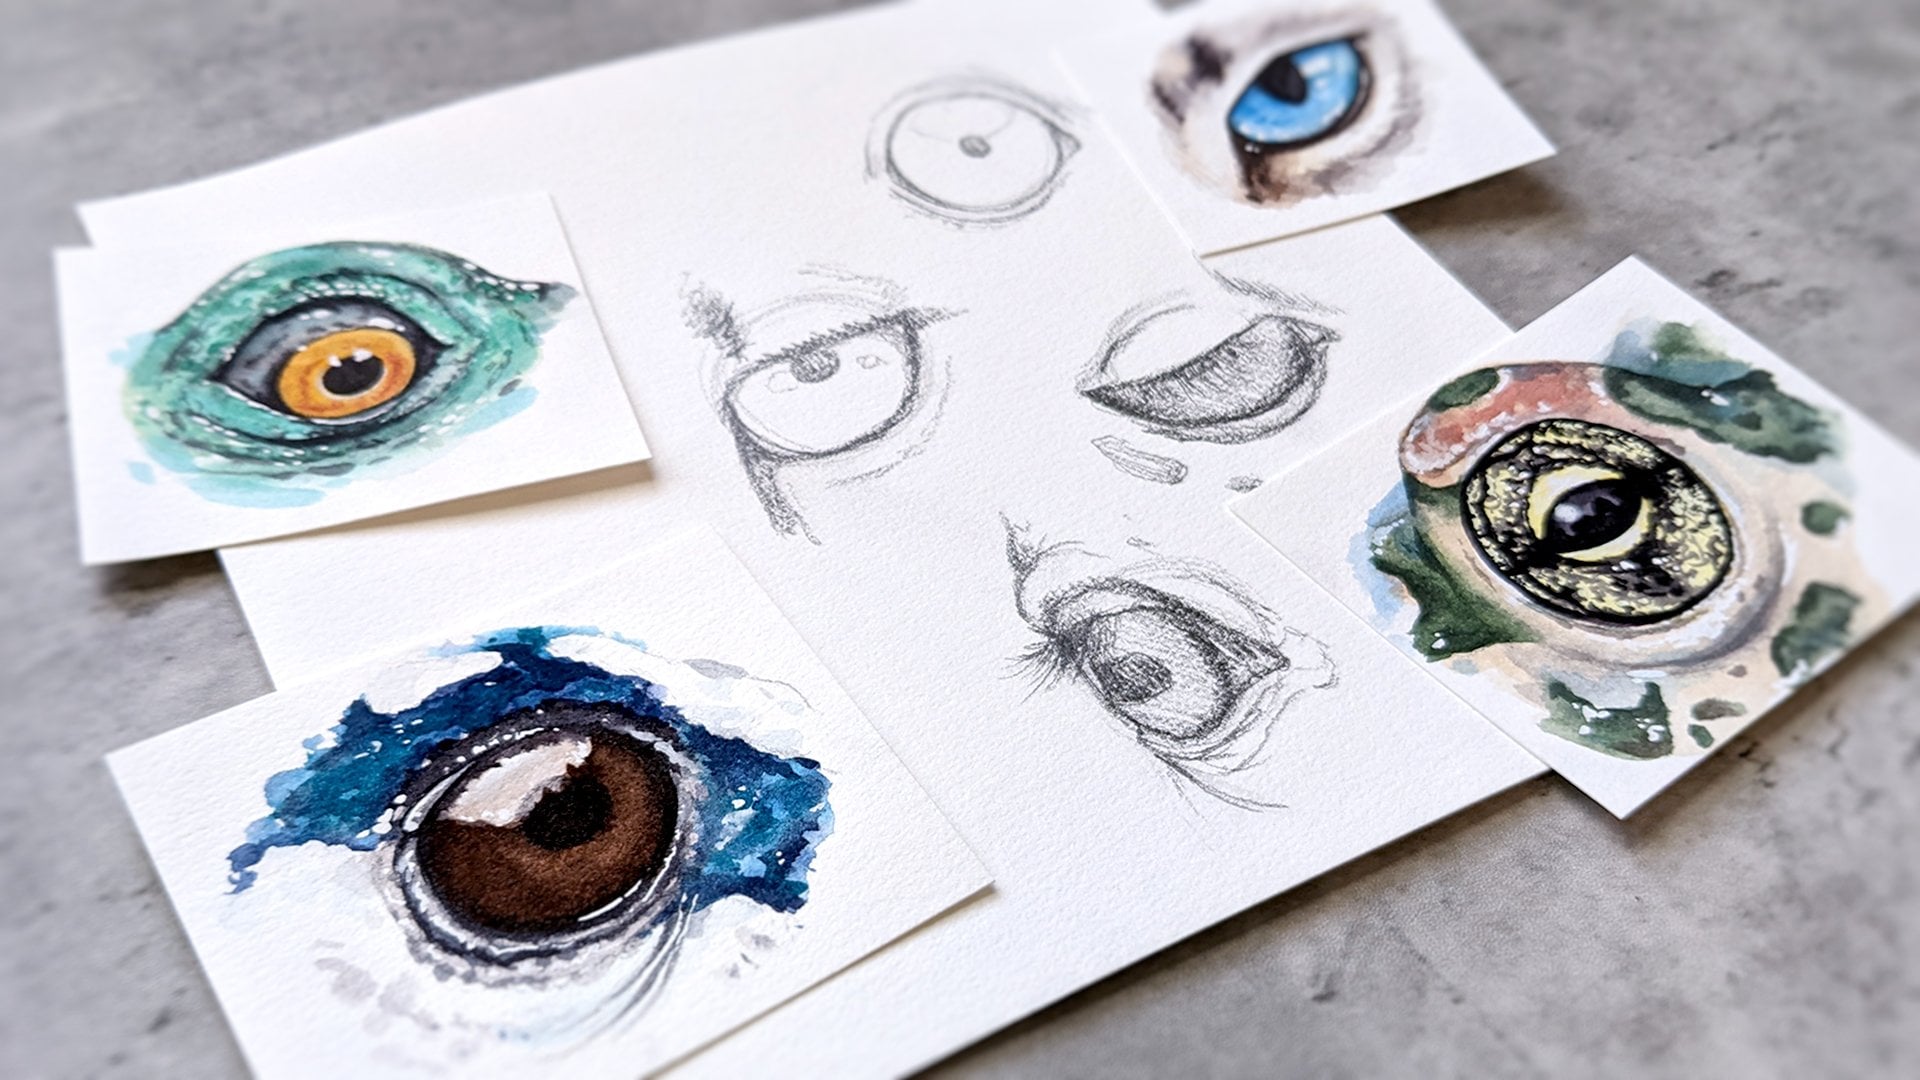
2. Materials & Resources: In mastering water control, we thoroughly discussed each of the basic watercolor supplies, including paper, paints and brushes. In this class, I will let you know what I'm specifically going to be using. But if you want more information on the why, feel free to visit that additional class information. If there are any of these supplies that you don't have on hand, feel free to make substitutions. I want you to use what you're comfortable with. Though, if you do run into any issues throughout the class regarding your papers or brushes specifically, you might want to try these exercises again with different supplies. For this class, I will be using Arches, 140 pound cold pressed cotton watercolor paper. You'll need two sheets of nine by 12 inch paper and three halved sheets that measure six by nine inches. Silver, black, velvet, round watercolor brushes in size eight and four. You could get by on a single size eight, but you will see me using two of the size eight's throughout this class. I like to keep one loaded with pigment and a second that I use with clean water to soften off my edges. This prevents me from having to waste extra pigment by constantly rinsing off my brush in-between paint applications and soften off edges. The size four is entirely optional, but I use it for fine details. Denise's earth friendly Da Vinci watercolor palette. You can use any water colors that you have on hand or prefer. But in each lesson, I will be giving you the paint names and pigment numbers that I'm using from this particular set. Most of the colors are fairly common, so replacement should be reasonably easy to find. But if there are specific pigments that you don't have access to, just find another color that is similar in hue. Two water containers, one to rinse your dirty brushes off and one for clean water to soften off those edges. A clean, reusable towel or paper towels for blotting your brush on. You can use masking tape, to tape your paper to a rigid backing board so that your paper doesn't buckle, though those are both optional depending on how you prefer to work. You'll need a pencil, a good eraser, and optionally a needed or gum eraser for lightening your pencil lines after transferring them onto your watercolor paper. Throughout this class, we're going to be using a number of copyright-free reference images that were sourced from pixabay.com. For the texture demonstrations, I've cropped each of these images that you can see exactly which areas of the photograph I'm focusing on for the study. I've also made two versions, one blank and one with guidelines of worksheets to make things even easier for you. You can use the blank templates to draw your own guidelines for your studies or trace the ones that I've made. The ones that I've sketched out convey the information that I personally use while I'm painting, and leaves out any extra details that I don't want and graphite on my paper. There are also three class project reference photos cropped to six by nine inches. These do not have sketched templates for them because I want you to either practice using your own drawing skills entirely or to practice tracing what information is valuable to you for your own under drawing. All of these resources can be found under the project in resources tab on a web browser. Materials are listed under the project description. Reference images and templates can be found under the resources area. You can upload your textural studies and class projects to the area titled Your project. Don't feel like you have to wait until you're completely finish with all the exercises in this class in order to upload. Feel free to upload as you go so that you can share and discuss your progress with me and the other students as if we were all learning together in a classroom. One last thing, don't forget that if I'm ever moving too quickly for you within a lesson, you can slow down the playback speed in the bottom-left corner of the video. Now, I think we're all set to go.
3. Demo: Short Fur: The first of our individual studies will be short hair on a domestic dog snout. For this study, I will be using the colors burnt sienna, burnt umber, and ultramarine blue. Step 1, wet on wet. The first step is to create a wet and wet wash for our initial layer. The water is tinted over so slightly in this video clips that you can see where I'm applying the water, but yours can be clear. As we learned in the mastery and water control class, the white paint will only spread as far as the water extends on the paper. Using burnt sienna, add pigment to the wet wash, starting with the most pigmented into our darkest valued areas of the study, for this painting that is near the front of the muzzle, underneath the eye and along the curves of the lips. The wet on wet technique will allow the paint to spread on it's own. Once the darkest areas have been placed, I help things along by rinsing off my brush and spreading out the pigment that is already on the paper with a clean, slightly damped brush. Once the midtones have been filled in and while the paper is still wet, I go back in with more pigment and add it to our darkest areas once again, to balance everything out. This first layers is what I call my value map. Our darks will eventually get much darker, but this will at least let us know where to focus our attention in future layers. Step 2, add local value. In our second layer we are going to be creating specific localized value by painting with wet paint on dry paper and then softening off our edges. This allows us to place a paint exactly where we want it without creating too many harsh edges. For this technique, I often like to use two brushes, one brush has pigment in it and the other I use with plain water to soften off the edges. This way I do not have to rinse the pigment off of my brush every time that I alternate between the two. For a short fur texture, some will be areas of mostly flat applications like the first two sections you saw me create here, while others may be painted more precisely with the direction of the fur, like here under the eye. When trying to add any length of fur onto a painting, after applying the specific fur lines, I like to soften some of the edges off while leaving others harder. This allows for some of the texture to show through while still retaining those lovely watercolor textures that I aim to include in my paintings. This technique will require a lot of practice to find that perfect balance as you will see throughout these studies. It may take a few tries, but don't give up. Step 3, add texture. After allowing the second layer to dry, continue to build up textures using the same techniques over and over again, getting more refined as the painting progresses. Step 4, add darks. Once you are happy with the burnt sienna tones of the dogs fur, begin placing the darkest values using a mixture of burnt umber and ultramarine blue. Starting on the leftmost side of the study, apply a wet paint to dry paper, taking care to create a soft, short fur texture along the bottom edge of the lip, soften off the interior edges as you have been doing with a clean brush of water. When you get to the shiny part of the lip, take care to go around the highlight as best as you can, though do remember you can always add highlights back in with ink or wash at the end of the painting if needed. Continue throughout the study, placing your darks around the nose, eyes, and whiskers as appropriate. There are multiple ways to approach the dark spots near the whiskers, though regardless, I really paint them with hard edges. For this particular painting, I put a wet paint on dry paper and then I carefully spray just once with a fine mist spray bottle to soften off the edges. Then, I use a paper towel to lift some of the pigment and ease the contrast. Step 5, adjust midtones. Once you place the darks in your painting, more likely than not, you'll probably need to go back and readjust your midtones. To do this in this painting, I re-wet the muzzle with a soft brush, taking care not to reactivate the paint underneath, and then place some burnt umber to ease the gradient between the darkest values and the lighter burnt sienna. You can continue to add this color to other areas of the painting that require additional value adjustments into a full texture. Step 6, reinforce darks. Using just the tip of a very fine brush, you can reinforce the darkest areas around the lips and even place tiny little hairs and whiskers along that bottom edge. Step 7, final adjustments. Finally, you'll assess and adjust any final details in your study. Here I am continuing to adjust my midtones and final textures with burnt sienna. You'll want to add your most important details at the end of the painting to ensure that they're not covered up or softened by your other layers. We want to be sure to add a few moments of those really strong fur textures to pull everything in the painting together.
4. Demo: Medium Fur: The second ever individual studies will be medium length fur on a domestic cat's cheek and forehead. For this study, I will be using the colors cerulean blue hue and Indian red, which mix into a lovely soft gray. Step one, Base Layer. Please note that I have already painted the cat's eye, which is covered in my other skillshare class called How to Draw and Paint Animal Eyes in Watercolor. I also missed the first little bit of recording here, unfortunately, due to an error with my filming equipment, but I promise that was more of the same technique that we're about to cover. Medium length fur is probably my favorite fur texture to paint. I feel like there's such a pleasing balance between hard lines and soft edges. For this gray cat, I'm going to skip the initial wet on wet layer that we did in the last painting. But if you were to paint a darker animal, you'd want to do that step here to set the overall tone of the piece. To create medium fur, I first put wet paint on dry paper using the tip of my brush. We will then soften off some but not all of the edges. Be sure to leave some of the white of the paper to show through if you're painting a lighter haired animal like this cat. Additional pigment can be dropped into the wet and wet washes if needed to create darker values, but be sure not to add too much water or you'll risk losing the textures you've already created. All of this stroke should go in the same direction as the fur in your reference photo. But note the direction of the fur will change depending on what form it is curving around. For instance, the hairs over the eyebrow fall down towards the side of the face, but the fur on the temple begins to sweep upward towards the ear. Follow these contours, slowly building up value and form, but be careful not to let two wet edges run into each other or you could risk a bloom. You can find more information on preventing blooms in my mastering water control class if you haven't taken it already. Step two, Developing Texture. After the first layer is completely dry, continue to build both texture and value through adding additional layers of fur. For fine hairs, use only the very tip of your brush when applying the pigment, though you can be more generous in using the rest of you brush when softening off the edges. Step three, Negative Painting. There isn't a ton of it in this particular painting, but often with fur and particularly when painting ears, you'll need to use negative painting. Negative painting is when you paint a darker shape around a lighter one to create the lighter shapes edges. Since we don't use a lot of white in watercolor, it's often necessary to practice the skill in watercolors, perhaps a bit more so than you might with opaque mediums. I will still end up using white gouache at the end of this painting to place a few highlights. But I will do my best to paint around the lighter areas of fur to make less work for myself later. We will get more practice with negative painting in our class project for the mammals. But for now, we can practice this simple version of this technique with the dark inner corner of the cat's ear. Step four, More Texture. You're going to continue building layers on top of each other until you end up with both the desired texture and values that you're looking for. I won't show you every bit of that in this painting as it would get a bit tedious, but just continue to study your reference image and layer with alternating hard and soft edges as we have been doing this entire time. Step five, Adding Details. Take care with the details, especially around the focal areas of your painting. Make sure that your darks are dark enough, that your lights are light enough, and that transitions are handled with care. Step six, Adding Depth. Something I try to keep in mind when I'm working with a single predominant color in any painting, is to add hints of a second color to make the first one really pop. We've been painting this cat with a gray mixture from cerulean and Indian red. By adding more Indian red to that same mixture, we will get a desaturated brick red color that is still related to the original gray. This can be placed in select areas to make the painting look more dimensional. I use these added colors sparingly and try to study the reference for hints of where to place them. In this particular case, I place them where there is slightly less fur hinting at the skin below. Step seven, Adding White. Depending on the painting and how well I've managed to preserve the whites of the paper, I will sometimes finish a painting with white gouache. If you prefer, you can use masking fluid to protect the whites of the paper. But for this medium length fur, I actually prefer using the gouache over the darker areas for a more seamless luck. For this task I've switched to a size four brush to make sure that those hairs are really fine.
5. Demo: Long Fur: The final of our studies in fur will be the long fur of a Grey Wolf snark. For this study, I will be using the colors burnt sienna and ultramarine blue which mix into an earthy gray. Step 1, base layer. Much like the last study we completed, in this study we will be laying down a fur texture across the page. However differing from the previous study these brushstrokes will be longer and more loose. We will eventually allow more of the brush strokes to remain on the paper without softening them off to create the illusion of longer fur, but this first layer will still be rather soft overall. Always paying attention to the direction of the fur, we can alternate the strength of the pigment as we go to create our value map once again, which will help to guide us in future layers. We will also be using negative painting to create sections of white fur that are visible only due to the contrasting shadows beneath them. To do this, you use the tip of your brush and figuratively curve in the shadows leaving the white of the paper to represent the long fur on top of it. Step 2, value and texture. After the base layer dries continue to add value and texture to the painting and additional layers. Use long brush strokes concentrating on the darker values and soften off the edges a little bit less than we did on the first layers. Step 3, adding depth. Once the dark gray values have been added, we're going to add some light brown tones, much like we added the light glaze of indian red to the cat in the last study. Adding more of the burns sienna to your gray mixture and watering it down considerably, apply light creases to certain areas of the painting using the reference photo as your guide. The second hue will give more dimension to the overall piece. Step 4, final details. This one came together pretty quickly in part due to the fact that its white fur, which means we have less physical paper to cover. We have a few last minute light and dark details to place what they finally tipped brush, I switched down to my size 4 round and then delicately flicking add some dark shadows as well as adding some whitewash for highlights. These final strands of hair will be less blended out than the others, giving a longer hair texture.
6. Demo: Body Feathers: moving on to feathers, we are going to be doing two studies, body feathers and a wing feathers. There's so many different looks to feathers that I couldn't possibly hope to cover them all in a concise class including other textures. But hopefully this foundation will allow you to extrapolate to other subjects. For this first feathers study, we will be painting the body feathers of a Sun Conure with Arylide Yellow, Hansa Yellow Deep, and Da Vinci Red. Step 1; Flat Wash. Our first step is about as simple as it gets. We'll be painting a light yellow flat wash using Arylide Yellow or any other slightly cool yellow that you have on hand. Unlike the first studies, we do not need to adjust here value at this time as the yellow will be the lightest value in this particular study, and we will build depth in subsequent layers. I am intentionally chosen a bird with only one color family for this study, but if you are painting a bird with various patches of different colors, you'll want to create a flat wash, using the lightest color in each of those individual color families, such as using this light yellow for yellow patches, or a very pale diluted blue, for blue patches of feathers. Step 2; Creating Texture. Once the first layer dries, we will be adding Midtones and a slightly fluffy, feathery texture over the next several layers. To achieve the desired look, hold your brush parallel to the right and left sides of the square that you are working in, with the tip facing the top edge. Mark the page in an up and down motion while moving left to right or right to left, if you're left-handed in a crescent shape. Repeat this pattern making sure to randomize both the individual marks and the way that the feathers lay on top of each other. However, you don't have to follow the reference precisely. Once you have a few on the page at a time, use a clean damp brush to soften off each of the bottom edges. This approximates the shadow falling onto the feather below, leaving the feathers that are on top with a hard bottom edge to define them. There are a couple of things to keep in mind here. One is that you should be turning the paper itself to create the correct angle that you need to make the texture comfortable for your arm and wrist to paint. This isn't always rule for me, but especially here where the direction of the feathers is the entirety of the texture, it's important that you don't fight with the angle of your own paper and your arm, so make sure you get nice and comfy before starting. Secondly, this particular study is magnifying these feathers, much larger than I would ever really paint them on a finished piece. In the introduction for this class, you may remember seeing the painting of two Sun Conures. If you go back and look at that reference image, you'll see that there are hints of this type of texture, but on a much smaller scale. This particular exercise will help you in practicing to get this texture. But keep in mind that most of you probably won't be painting so large and then it won't be so amplified in your final pieces. You can always repeat this exercise on a different scale to see what works for you. Step 3; Repeat with Midtones. Repeat this process with your Midtones, adding depth along the shadows that you've already started to lay down. It's important to note that you're not creating new shadows, but only adding to the ones that are already existing. In the case of the Sun Conures our Midtone is just going to be a warmer yellow, which is Hansa Yellow Deep. Applying this into the shadows, we need the feathers and starting to concentrate more heavily in the bottom corners or the birds start to transition into tones that are more orange. Step 4; Add Darkest Tones. Mixing a little of Da Vinci Red into the Hansa Yellow Deep. We are going to again layer darker tones into those shadows, focusing on the lower two-thirds of the square and especially those bottom corners. Once again, and we are going to be blending off the bottom edges of each of these washes with a clean, damp brush to create smooth gradients, but still leave some hard edges to define the feathers that are laying on top. As you move up, further the piece, make sure to use a delicate hand to lay down the pavement only in the shadows that you've already mapped out and take care not to be too heavy handed. Over the course of building up these layers, we should begin to see a nice smooth gradient of color that goes from a light Arylide Yellow at the top to a deeper orange on the bottom. This nice smooth gradient color will work with our texture to create a beautiful transition rather than fighting against unorganized values and layers placed haphazardly.
7. Demo: Wing Feathers: [MUSIC] Next we are going to study a section of feathers on the folded wing of a Blue and Gold Macaw. This will give you practice for painting the more defined feather texture which can be applied to both perched and flying birds alike. For this study, we will be using cerulean blue hue, phthalo turquoise and indanthrene blue. Before we launch into the painting, let's go over some quick feather vocabulary so we can try and clear up any confusion about the descriptors that I'll be using in this lesson. The feathers that were going to be painting on the wing of this macaw are called vaned feathers, as opposed to the soft, fluffy down feathers that you'd find closer to the bird's skin. The line down the middle of each feather is called a shaft or a rachis. Barbs come off of the shaft and when aligned, create the flat, smooth surface of the feathers that we call the vane. Sometimes, barbs of the feather may separate, causing a small gap that breaks up the outline of the overall feather. When you see birds preening, they are usually straightening out the barbs of their feathers so that they can be aligned for proper function. Step one, gradient wash. This blue is a mixture of mostly cerulean blue hue with a touch of phthalo turquoise. Similar to how we started off the last study, we are going to be starting this one off with a wash. However, instead of a flat wash that is similar in value all the way through, we are going to be creating a gradient from dark to light. The goal is to create an under wash, the lightest values in the painting. However, due to the wings natural curvature and the lighting of the photograph, the feathers towards the bottom left are quite a bit darker than the ones in the upper right closest to the light source. By creating this gradient wash, it'll help to guide our values as we build up our textures. We're hardly going to see this wash by the end, so don't worry about it being perfect, but rather use it as your value map moving forward. [MUSIC]. Step two, define feathers. After the first wash is dried using a more concentrated version of the pigment we were just using in step one, begin to define the feathers by using a fine tipped brush to fill in the areas of shadow. Note that I mentioned areas of shadow and not simply to trace the outline of each feather as if we were drawing it. We want to soften over edges like we did in the last study to create delicate gradients and textures. Using a clean damp brush will immediately soften off the bottom edges of each shadow, leading the upper edge mostly intact to create the room of the feather above. Unlike the last study, we are going to take this painting feather by feather. We will work mostly from the feathers closest to the viewer, down to the feathers that are underneath, to imply that there is a shadow being cast by each individual feather. However, we may need to jump around the painting in order to let certain areas dry before moving to the feather right next to it. For the sake of brevity, I won't be leaving every single feather in this video footage. However, I will try to leave in a variety of different feathers and angles so you can apply them to your various paintings moving forward. As you go through this video and your own study, pay close attention to the reference photo to see which feathers overlap which. They won't always be going in the same direction. Make sure that those shadows are in the right places to help solve the values of your painting. You can also use the tip of a brush to include little areas where individual barbs of a particular feather have separated in order to break up the tips of your fathers. None of the feather will be completely perfect with nice rounded tips and including these imperfections will make far more realistic rendering. [MUSIC] Step three, deepen shadows. Mostly used in indanthrene with a touch of phthalo turquoise. We're going to start getting really bold with our shadows and make this study feel more dimensional. Using the value map in the previous layer, really anchor your shadows with these dark glazes to add some contrast. I continue to use the tip of my brush to slightly add texture to some of the feather tips so that not every feather a smooth and round. Don't be afraid to leave some hard edges and places of highest contrast around the main focal area of this piece. [MUSIC]. Step four, adding details. Using the same mixture in step three, at the shafts to the most prominent feathers. We don't have to do this to every single feather. Just make sure to focus on the areas that you want the viewer to be drawn to. In most cases, for my fluid watercolor painting style, I don't want the shafts to be rigid, solid lines to divide my feather in half. But rather soft lines that may start and stop to enhance the overall texture that I'm aiming for. Depending on the species, the darkest values in this step, maybe the shaft itself like for this macaw, but other times it might be the grooves along each side of the shaft. Make sure to study your reference for guidance. I also like to pull paint away from the shaft in the direction of the barbs to suggest extra texture without over detailing. [MUSIC]. Step five, adjust values. Using primarily indanthrene blue, adjust the darkest values in the study, making sure to leave the lightest areas untouched. Add any final details and you're done. [MUSIC]
8. Demo: Small Scales: Like the feathers we're going to do two scale studies. The first will be a loose study of small scales on a lightly colored leopard gecko to imply a softer texture. The second will be more defined scales that you might more strongly associate with reptile paintings. I have to admit that and apologize for that this first study isn't the cleanest example and we will be using a wider variety of colors than I would have preferred for a tutorial. The colors that we will be using include Arylide Yellow, Gold Ochre, Burnt Umber, a bit of Red Rose Deep or Quinacridone Rose, a light glaze of Quinacridone Burnt Orange, and a gray mixed from Cerulean Blue and Indian Red. Step one, loose wet on dry. This study has a different approach for our base layer. We're going to be creating a loose wash, starting by applying wet paint to dry paper using Arylide Yellow and Gold Ochre. We're going to focus our applications to areas with the darkest values in the photograph, such as over the crease of the eye, across the top of the snout and between the eye and nostril. Each time we put pigment down, we will soften off the edges and keep things as loose as possible. Once the area has been mostly covered, we can continue to adjust the values by dropping in pigment into our damp washes. Once the yellow's have been placed, we will move down to the area around the mouth. First we'll use a very diluted mixture of Rose Red Deep and Gold Ochre to bring a bit of life to the skin and scales in that space. Then using a mixture of Cerulean Blue and Indian Red to create a gray, we will add some of the gray flex and shading and again soften off our edges for this initial wash. Step two, create texture. To start building texture that implies small soft scales without painting them individually, we're going to paint an irregular scroll pattern with the tip of our brush. Mix a bit of burnt umber into your yellow mixture to create a raw sienna or dark yellow ochre light color. Apply this texture around the eye and in areas of the image that look like they are most in-focus. Use a clean brush to soften off some of the edges using the same loose style from the first wash. Repeat this technique but in a wider or looser pattern as you move further away from the focal point, making sure to still leave some areas of the white paper to show through for highlights. Step three, add darker scales. To create a variety of implied scales sparingly add a bit of burnt umber into the still wet wash of the scribbled pattern. If an area has already started to dry, like here above the eye, you can use a barely damp brush to soften up the edges without causing water to bloom, if you're careful. Moving down the painting, now we can use the gray that we mixed up earlier to define the larger scales around the mouth. However, just like we didn't want the shaft of the feather in the last section to divide the feather directly in half, we will want to gently break up the outline of these scales and soften off their edges in some places. You can switch between a pigment loaded brush and a clean damp brush so that you don't waste any of the pigment by constantly rinsing off one brush in your water. Step four, refine scales. Well, we're not going to refine these scales very much, we do want to continue to reinforce a texture that suggest scales into the focal areas of our painting. Continue to place the yellow and burnt umber mixture in the darkest areas of the painting. This is mostly using the same scroll texture, but occasionally you'll end up closing the loop of the circle or placing a solid dot to imply more solidified scales. Step five, add a pop of color. At this point, I felt like our little gecko Freidman was looking a little bit to drab, so I wanted to clays in a bit of quinacridone burnt orange to brighten things up. This color looks more vibrant when it's wet than when it's dry, so don't be too afraid of it when you first initially put it on the paper. This transparent color will not cover up the texture that you've already placed as long as you're using cotton paper, a soft brush and a light touch. Continue to loosen up the edges and keep the wash consistent with the textures that we've been creating so far. I also made sure to add a little bit of interest in the painting by using some darker grays to create some more contrast. Step six, add highlights. The final step to finish off this lightly colored gecko was to add back in some white highlights on the scales. I did this sparingly using whitewash along the top of the nose, around the eye and in a few places on the scales around the mouth. If you don't have whitewash, you again could use white ink, white acrylic or just stop at the previous step. I mentioned earlier in this class that I don't like using masking food for fur, but I do find that it's easier to use for round scale highlights. That's also an option if you prefer to do that as well.
9. Demo: Defined Scales: [MUSIC] For our final study before the class projects, we're going to be working on these define scales of an iguana. We're going to be using raw sienna, red rose deep or quinacridone rose and a gray or black mixed from burnt sienna and ultramarine blue. Step one, Peachy Scales. Start with a diluted mixture of raw sienna and red rose deep. Apply the paint, wet on dry, to the areas of the largest scale starting with the areas of highest saturation first. Using a clean damp brush, soften off these areas, occasionally leaving patches of white paper showing through for added texture. You're going to repeat this technique on each of the peachy colored scales in the reference image. Some areas may require more raw sienna in the mixture than red rose deep, so you can adjust your mixture accordingly and continue throughout the painting until all of the scales have a little bit of color on them. For areas with very small scales, you can put a broad whitewash over the entire area. After you let it dry, we'll define them later with the black mixture and turn them into proper scales. [MUSIC] Step two, Define the Scales. In small sections, begin to place your dark gray mixture between the larger scales. Use wet paint on dry paper like we have been doing and then very carefully to the inner edge, soften off the edges to curve around the shape of the scales. This technique will require you to move more carefully and most likely more slowly throughout the piece as you continuously check your reference image for guidance. Do your best not to rush this step as your treatment of each scale will make or break this entire technique. Occasionally, the scales will have darker patches inside of them as well, and it's okay to start laying down background work at this time using the same technique. You can also dot in black speckles into the wet washes where appropriate. I do want to make a note here that some reptiles have the opposite coloration or the skin between the scales is going to be lighter than the scales themselves. For that type of pattern, you'd want to invert this entire process using a light wash over the entire surface that matches the color of the skin in between the scales, and then form the darker scales on top of that layer once it dries. [MUSIC] Step three, Softening Focus. Hyper-realistic artwork that details every single scale or feature of an animal are amazing works of art. However, if you're aiming for a loose watercolor piece that has some areas of detail and others that soften off to the paper to retain that watercolor fluidity, it's extremely important to carefully and intentionally choose which areas of the painting are in focus and which are not. If you intend to paint every single scale and then get lazy halfway through, I'm speaking from experience here, you and everyone else who views your painting and will be able to tell that your painting is unfinished. However, if you intend to focus on one specific area of the painting and soften off the other details so that they don't compete for focus, a painting can be really successful using this approach. In this study, as we move further away from the larger main scales, we're going to intentionally soften off some things around the edges so that our eye doesn't get confused on where it's supposed to look. We can do that by using fewer hard edges and darker colors overall, as bright colors are more attracting to your eye. You can still define some of the scales in these areas, but in general, you will be using more wet on wet applications than you did before in order to allow adjacent areas to flow into each other. You can wait for a wet wash to be into dry slightly and then add concentrated pigment into the damp wash. This will allow you to add scale shapes that will soften on their own. For areas of scales that form rows, you can place the overall shadows in irregular lines first and then coax out scales within those line forms. This will bring some structure to the area but not give too much attention to these smaller scales. Just to make sure that these scales still stay somewhat irregular, and that you're not simply crosshatching with your paintbrush. [MUSIC] Step four, Shadow and Form. We've been focusing a lot on individual scales, and now it's time to focus on the painting overall. By focusing on the overall values in your piece, we can adjust the values throughout the painting to suggest a more three-dimensional form as the animal itself. In this case, I'm adding shadows to the crease on the left side of the page as well as a slight curve of the jaw just to the right of that. Later, you will also notice me adjust the overall value of the scales that form the jaw on the right side of the painting. [MUSIC] Step five, Adding Highlights. For this particular example, adding white gouache ink acrylic is entirely optional. If you are able to preserve the highlights in your painting, you can skip this step entirely. However, if you want to add a few extra areas of lighter highlights that were perhaps lost during your painting process, you can do that too. Just like we've done in the other studies in this class.
10. Class Project: Fox (Part 1): We finally made it to the first of our class projects and it's time to put all of our newly learned or brushed up skills to use. Before we get started, let's go over a few things to prepare you and your workspace. Make sure that you have watched the demonstrations on short, medium and long fur textures for this class. On a computer, find a reference photo of the fox under the resources area below the class, the image is cropped to six by nine inches, which is half of a nine by 12 sheets of watercolor paper. You can either draw your own sketch or traced the copyright free photo using a light box or brightly lit window. Using kneaded eraser to lighten your sketch if needed before painting. Make sure you have all the colors that we'll be using ready to go your fingertips. For this painting, we will be using burnt sienna, quinacridone burnt orange, gold ocher, or you can use yellow ocher or quinacridone gold, burnt umber, and ultramarine blue. Prepare the rest of your workspace. My palette is to the left of my painting due to camera angles and try not to block your view. But if you are right handed, I recommend keeping your palette to your right. If you're left handed, I recommend keeping your palette to your left. You'll also need your two containers, mine is at the top center of the screen when you see me reaching in that direction. There's a usual blue rag to block my brush to the right of my screen. I recommend watching this tutorial on a larger computer or television screen to get the most out of it as opposed to a small phone or tablet. For most of the tutorial, the camera is set that so you can see me interact with my entire workspace. But that does mean that the space that I'm painting in will be physically smaller, so keep this in mind. This is a primarily visual tutorial which will be concisely narrated but will not have music playing in the background. Feel free to put on whatever best suits your creativity while you work. Finally, the tutorial will be playing at 1.5 times my real painting speed. But you can always adjust the speed of the tutorial in the bottom left-hand corner if you want me to slow down or speed up. As for our first subject, I thought long and hard about what image I wanted to use. I wanted to make sure that the animal would allow us to practice all different lengths of fur and the profile the fox won't complicate your perspective. While we will need to paint some white fur will mostly be working in shades of burnt sienna and burnt orange to try and keep the color story uncomplicated as well. One final note more so than in either of the other two class projects, I do highly recommend using a silver black velvet brush or brush with a similar point for best results as the fur texture that I paint will heavily rely on the shape of my brush. We're going to start off with burnt sienna, wet paint on dry paper. Will soften off the edges just like we've done many times before in this class as well as in the mastering water control class. You're going to continue around the face of the fox, putting pigment down first in the areas of darkest value and then softening off the edges. These will not be the darkest values in our finished painting, but we'll provide that value map for us moving forward. I do want to put a little note in here and that this entire real-time painting took a little less than two hours to complete and that format doesn't fit skillshare perfectly well, especially with three class projects. I do know that this is moving a little bit quickly. Once again, you can slow down the speed of the video if you need to. I do recommend taking this layer by layer. You could watch me paint a layer, then pause it, and then go back and then paint along with me, and then wait for your painting to dry and watch the next segment and so on. For the forehead, we're going to start putting in a fur texture already by flicking up our brush into little short hairs along that ridge and then just soften off the bottom edge just like we've been doing before. As we move back towards the cheek, we are going to soften off this edge where the fur gets a little bit lighter. Then immediately behind that we're going to get darker again with more burnt sienna to create these different layers of fur. Occasionally, when you see me put down too much pigment on the page, I'll use a thirsty brush or even my thumb. I think you saw me use a little bit earlier to pick up some of the pigment that is left on the paper. You can do this just like we covered in the mastering water control class, by drying off your brush and making sure it's nice and clean and then soaking up the water that is already on your page. Luckily, burnt sienna is a pretty lifting color and that means it's fairly forgiving when you're working with it on watercolor paper. As we move up into the ear, we're going to continue that fur texture that we started on the forehead, being really careful to create our edges here. You will see me struggle a little bit with this back line throughout the painting, not just in this first layer and there will be a little bit of backtracking as I pick up some water, pickup some edges, soften off other hairs. Overall, I'm going up for a nice defined fur texture, but one that isn't out of place with the rest of the painting. Some of those hairs are still softened off. The tip of the ear is going to be black, so we don't need to paint that right now. As I move down to the neck, we are going to be opinion a really loose wash, reminiscent of that small reptile scale tutorial where we're just putting everything down in a nice loose wash of wet on wet. Well, it started wet on dry and then we got to wet on wet pretty quickly here. We're going to be putting down various colors and this will get darker as we go, just like the rest of the painting. You want to make sure you continue that hair texture up to through the back line that get a little wispy are here. It's really important to use just the finest tip of your brush. Again, you'll see me backtracking when I have made things a little bit too thick and want to refine them in future layers. This layer doesn't have to be really refined right now because we will be doing several more on top of it. You're going to wait for that layer to dry and then go in with your second layer. We've got burnt sienna and gold ocher mixed up on our palette and we're going to use that for areas of the fox that are a little bit more yellow in color. You can place that color along the ear using a fur texture and softening off of your edges once again. There are some areas of the painting like the ears here that you will see me getting a little bit fiddly with. I'll go back and forth between adding the yellow or adding the burnt sienna and playing with the textures, waiting for the paper to dry a little bit. All of this is by filling and if you lay it down the first time correctly, you won't need to do those adjustments, but I did want to leave in here to show you that I struggle with that as well. Moving on to the ear in the foreground, we're going to mimic the same types of areas we put down on that back ear by putting the gold ocher and burnt sienna mixture down in these similar areas. Next we're going to glaze in a little bit of that yellow ocher mixture on top of the fur that we already have, but we're going to leave more of the fur texture intact, meaning we're not going to soften up the edges as much as we did on the layer below. I find that adding these areas of yellow into the burnt sienna make fur some nice visual contrast. Otherwise, it would get very monotonous, just like we saw with the medium hair cat painting, where we had the gray and wanted to make sure to add in another color to vary things up. We're going to add this yellow throughout the painting so that it's not only on the face by putting some of this in the neck area too. I am going to glaze in some of this really light diluted yellow mixture over the white toughs of the fur and the ears. Once we had our darker tones, this is going to seem very light, but I wanted to have a cohesion not with the rest of the painting and not just be the white of the paper. Along the lines of cohesion, I also wanted to make sure to add some of the yellow paint down in the fur along the neck. Moving to the muzzle, we are going to be mixing up Indian prin blue and Indian red to make a soft black when it's diluted down. We want to be really careful with this mixture. If we look at the reference photo, most of the white fur is not white at all, It is in fact very gray, but if we start off too heavy handed, it'll be hard to backtrack. We're going to start off a little bit light here and then we can add in a little bit more texture as we go without getting too dark. I want to make sure to define the lip area as well as the chin. Then you're also going to see me adding a little bit of this gray mixture to that little piece of red fur that comes down behind the whiskers. I felt it was really important to blend our colors together and again, for that cohesion factor that we didn't just have a grace notch that we haven't blending in to the other fur textures. You'll see that gets stronger as the painting progresses. We're just going to continue with really light glazes of this gray behind the lip and under the chin. The grays, we'll get a little bit heavier as we move down the neck anymore shadowed regions and you want to make sure to use the tip of your brush, so would make that fur texture as we move through the different areas. Using negative painting, we are going to start to carbon the little furs in that first little section of her behind the eye, you've got the two different tiers of fur there, so the medium texture to the left of this area is what we are going to be trying to create this moment. It is going to be soft enough quite a bit and we'll come back later to reinforce that. We are going to start to put in the dark tones in the ears as well, making sure to use the tip of your brush to flick upward and make sure to continue that furry texture along the back of the neck. This area should transition into your burn CNS, so make sure not to be too harsh with that transition. Turn your paper so that the angle that you're working on is more comfortable for your wrist and pull in some fur texture that defines the right fur from the rest of the ear. This is easiest when your wrist can move at a natural angle and when you're pulling towards yourself versus horizontally or away from yourself and softening up the edge that is to the left and less so to the area on the right. I add a tiny bit of that light gray texture to the white of the hair on that ear and then we can move on to the second ear. Using the same type of technique we are going to negatively paint in those white furs, all the way down the edge and then using a different brush, we're going to soften off the far edge on the left so that it transitions into the rest of the fur a little bit more seamlessly. As we get down to the base of the ear, I'm going to take things more slowly and carefully to make sure that those longer furs are accounted for. Then we'll come around to the back side and match the black portion on the back of the other ear. Here, if you look carefully, you can see me rotating my brush every so often so that when the tip of the brush bends a certain way, I can account for that by twisting the brush and having it move in the other direction. You constantly want to be watching the tip of your brush, especially with softer hair brushes like this squirrel blend and that way you can always get your fur going in the right direction. Switching back to burnt sienna, we're going to lay in some much stronger mid tones. We are going to continue or strengthen rather our fur texture from the bottom launch that had very little of that and really start to define the different areas of the painting. Make sure you check your reference photo for which direction the fur goes in each respective area of the animal. We are going to bring some of that burnt sienna up into the ear to help with that cohesion that we talked about earlier. This is an area of the painting that I struggled with a little bit and it seems silly because it such a small area, but defining the back eye ridge from the bridge of the nose was a little bit tricky for me. You want to make sure to add your darker values to the far edge, but not into the middle of the nose where the fur gets much lighter. Then we are ready to move to the foreground of the painting where we can start to lay in those tones as well. I am going to start with burnt sienna, flicking the tip of my brush and then softening up the edges as we've done before. Make sure to be watching this area over the next couple of layers as it will start to come together and take form. I am going to concentrate pigment in the inner corner of the eye, behind the eye, and under the really tiny little cheek bone that is so nicely carved out by some soft highlights in our photograph. Because this photograph is lit from the left side of this painting and behind the fox, the front side of the nose from our perspective, is going to be mostly in shadow. We can start to lay down those tones now to help us in future layers, I do have a rather slow approach to my animal paintings, and it is possible to do these in fewer layers, but this is just the way that I work. So I hope that you enjoy seeing the process come together. I find it much easier to add to the layers and build up definition and color rather than putting too much down accidentally at first and having to fix those mistakes. Here, I'm switching back to a little bit of the gold orchre just to bring that onto the muzzle a little bit further as well. Coming back over the eyebrow ridge, we're going to start to paint in some of those longer fur textures or the medium range rather and we're going to paint those in with single lines and then soften enough right away so that we can gently transition them into the other areas of the painting that we already have established. A lot of times I put down these harsh paint lines and then immediately soften them off and you can almost not tell that they were there before and that might seem strange to some people, especially if you're just starting off with the medium. But this is how I find, I get the best results for these textures where I can put the paint down exactly where I want it and then soften it off as much as I would like to. We can always go with future layers to put more refined fur textures that build on these underlying tones and textures. Here I am bringing in a light glaze of the gold occur on the forehead, which will warm up those tones a little bit and then on top of that, I'm going to be putting some really fine flicks of the burnt sienna, which will soften off, but still leave a little hint of that fur texture that we're looking for. I can't recall if I fully let my page dry here or not, but a lot of times when you're moving around in these really light layers, the paper will dry pretty quickly. If you're ever in doubt and think that paper might be too wet to work on, you can set it aside for a few minutes and let it dry or use a heat tool. We are going to dark in that inner corner of the eye to really get some of that definition. Here I am taking a few extra moments to just really delicately with just the very tip of my brush, put in the little bottom lid line where the fur kind of bends around the eye. Around the temple is a tricky transition area where the furs are going up and around the forehead and then coming back towards around the neck. Take your time with it and make sure that you lay down the fur in the the appropriate directions,but also remember that it doesn't have to be perfect. No one is out there brushing this wild Fox. Here we are going in with burnt sienna around the ear and is really trying to anchor that shape into the rest of the form. For our second layer around the muzzle, we're going to try and be a little bit more delicate and more specific on where we're putting our pigment. We want to get darker tones in here that read correctly, but we don't want the entire white of the Fox to disappear. It's also important to go in specifically around the areas of transition, by the cheek where the white fur meets the red fur, to make sure that there isn't a hard line between the two, you want the first kind of overlap in both areas. Till you get the areas are the whiskers attached to the muzzle, we're going to do a little bit differently than we did in the dog demonstration earlier. Instead of putting down the pigment on dry paper and then spraying with a spray bottle, I've already wet the area with a damp brush with the other layers that we've been doing. They're naturally going to start to spread out on their own. You can even see me going in here for the areas that didn't soften off as much as I wanted to, to kind of coax them out of their rigid little circles. You might be thinking that I'm spending a disproportionate amount of time working on the white fur down here. While it is a very small part of the painting, not the focal area, by making sure that I take the time to have it soften off in the ways that I want it to and not call more tension, it'll make the painting more successful overall. We're finally going to put a light glaze over the nose in the most shadowed regions. We will soften off after that and cover most of the area, leaving small spaces for highlights.
11. Class Project: Fox (Part 2): While I won't be featuring the full eye in this painting, I did want to let you know that the eye is made out of the gold ocher and quinacridone burnt orange. If you have quinacridone gold on your palette, you can use that instead. Switching back to burnt sienna, we're going to continue to build textures in the fur with light brush strokes and softening off the edges. We're going to add additional layers of the gold ocher mixed with a little bit of the quinacridone burnt orange to bring in the color of the eye into the rest of the painting. This includes not only the forehead but under the eye, above the temple, and on the bridge of the nose. We're going to continue to deepen our colors by adding burnt umber to the mix with our burnt sienna to put in the darker shadows on the red fur. Using this darker mixture, we'll also bring in areas of burnt sienna to transition between the areas of shadows and midtones. Adding a little bit of ultramarine to our burnt umber but not quite reaching black, we can put in shadows on the ears and other areas the fox that require a darker tone but that we don't want completely black. Switching down to our smaller size four brush although can still use the size eight, we're going to flick in fine textures of fur along the ears with the other colors that we've been using so far. Because there isn't a background in this piece, we do want to make sure that the ears are well defined against the white of the paper. We'll continue to use our smaller brush to add in fine details to the focal areas of the piece. Value is all about relativity. So as we darken the areas of red fur the white is going to start to look too light if we don't adjust it as well. We can continue to use negative painting to curve in some of the white furs around the face. We can again turn our page to get a better angle to work on difficult areas like the fur on the ears, Making sure that you're using the point of your brush to curve in the fur texture and pulling towards yourself rather than pushing away or pulling horizontally. I believe that some of the footage of the nose got lost, which I apologize for. But essentially we're doing a similar type of thing of building up value through different layers, although we're not using a fur texture. Instead we're using a bit of a stippling pattern to suggest the soft, fleshy nose of the fox. This next part is going to get a little bit scary in that we're going to start putting some bold shadows in on the neck. In this reference photo, a lot of the neck is in shadow and there are lots of clumps of fur that have dark shadows in between. You could take your time to build up layers of burnt sienna and burnt amber like we did in the rest of the fox. I thought I'd start this area by putting in our darker shadows and then filling in the mid tones afterwards. We're going to use a combination of laying down our wet paint on dry paper, softening out the edges, and occasionally using some negative painting to put in a couple of defined hairs here and there. We'll continue adding texture to this area by introducing brain sienna into the wet washes that are already on the page. It's important to note that I'm not aiming to replicate every patch of fox in our reference photo, but rather give the impression of what I feel the photograph is giving off. We can also note the areas of small and larger areas of shadow and just get the overall feeling of this very fluffy texture and shadow. I need a bit more burnt umber to our gray mixture to get a dark sepia light color. We're going to do some more negative painting along this second range back from the cheekbone of fur to create more of that long fur texture that separates the face from the neck. You'll continue to go back and forth with your dark mixture in your brain sienna on the neck until you have the tones that you are looking for. The final thing that we're going to work on in this piece are the whiskers. We're going to use our size four brush to get really fine lines, but we want to make sure that that size four can hold enough water that the lines won't skip across the page. I find that silver black velvet are the best brushes that I have used for this task. You'll need enough water to make sure that there is a good flow of pigment coming out of your brush, but not so much that they turn into liquid, watery lines. I make sure to hold my hand at the proper angle to get the right sweep and you can turn the pages necessary. I'd like to note the start and end points of my whiskers and that way I can look where I'm going as I'm painting and try and end up in the right direction without going so slow that it makes my lines skip. There are a couple of more hairs right over the eyes and then we'll be wrapping up.[MUSIC]
12. Class Project: Flamingo: For the second of our class projects, we are going to be working on several different feather textures of a flamingo. While I understand that this might not be exactly what you first picture when you think of painting feathers, I chose a precisely for that reason, in addition to a few other key factors. Make sure that you have watched the demonstrations on body feathers to find feathers and medium for textures for this class. On a computer, find the reference photo of a flamingo under the resources area below this class, the images crop to nine by six inches, which is half of a nine by 12 sheet of watercolor paper. You can either draw your own sketch or trace the copyright fee photo using a light box or brightly lit window. Using kneaded eraser to lighten your sketch if needed before painting, especially for this painting which will have very light values. Make sure that you have all of the colors that you'll need to use, which includes gold ocher, though you can use yellow ocher or rosiana as an alternative, red rose deep or quinacridone rose, anti-black mixed from indanthrone blue and Indian red. Prepare the rest of your workspace. My palette is to the left of my painting, due to camera angles am trying not to block your view, but if you are right-handed, I recommend keeping your palate to your right and if you're left-handed, I recommend keeping your pallet to the left. You'll also need two containers for water, mine are located over the top center of the screen and a reusable rag to blow off your brush and mine is to the right. I recommend watching this tutorial on a larger computer or television screen to get the most out of it as opposed to a phone or small tablet. For most of the tutorial, the camera so as you can see me interact with the entire workspace though I did try and zoom in where applicable. This visual tutorial will be concisely narrated and will not have music playing in the background. Feel free to put on whatever best suits your creativity while you work. Finally, the tutorial will be playing at 1.5 times my real-time painting speed. You can only speed up the tutorial or slow it down using the bottom left-hand corner of the screen. For our avian subject, I wanted to choose a solid but colorful bird that had a variety of feather textures, including some that we didn't exclusively cover in the earlier demonstrations. All they're aren't any strongly defined veined feathers. This will demonstrate how you don't always have to paint what you imagine to be feathers while painting a bird, depending on the species. Between the two earlier demonstrations in this class project, you should be well-equipped to tackle many other bird species throughout your work. We're going to start by mixing red rose deep with gold ocher and we want to mix up a fair amount so that we don't have to re-mix too frequently. After you mix up the pigment, you're going to want to add a fair amount of water so that we can take this down to a very pale pink. Starting with the face, even though I know this is on the right side of my paper and I will be working left. I felt I needed to work from the head to the tail so you can decide what's best for you. I am going to start laying down my wet paint on dry paper and in softening off our edges very gently. At this point, it is more about your value map than it is about textures, so don't worry too much on adding further texture just yet. As we get to the forehead area, we will want to flick our brush outward to create the edge of our feathers. You can start to keep that in mind at this time. Coming back to full view, we're going to start moving down the neck, placing the darker shadow underneath the cheek. We do want to be careful not to let the area that we're painting now run into heavily into the area that has already started to dry. So just be careful with your water usage. It's most important to pay attention where your shadows and highlights are. Again, since we are mostly working on our value map at this time, we're going to use a combination of wet on dry and wet on wet, depending where we are in the neck. I like to put down a little bit of paint and soften off the edges and then bring in some more pigment into areas that need a little bit of oomph and continue working like that. The light source is coming from above the flamingo, so keep that in mind that as we are placing the highlights and shadows that we are making sure that the lighting is consistent throughout the piece. It'll be hitting the top of the head, the top of the bend of the neck and the top of the bag. I am starting to put a little bit more texture farther along the edges as we move closer to the chest as they become more prominent. I end up doing the body in a couple of different chunks and I will let you know as we get to that, but the first little area that I'm working on are some of the longer feathers that start at the top of the wing. Those are going to be more strongly pigmented and gently soft enough. Then we'll let the paper dry and do the next portion. We're going to move under the belly and start to place the very soft, gentle feathers that go from the chest to the wing area. These are really soft and silky looking almost like a fur which is why I mentioned at the beginning of the tutorial to make sure that you've watched the medium for texture video. We are going to have some of those techniques used throughout this painting. I'm placing pigment in the shadows of each of these areas and then softening them off so that they're barely visible. We don't want these to be hard outlines, but just soft transitions. Around the belly is where the darkest values in our painting are going to be on the bird's body. So we are going to start lane in the values for that now. Let your painting dry and then it will work on the next step. Using your silver black velvet brush, almost how we put in our fur textures and some of our past paintings. We're going to place in some loose texture on the wings that start to hint at feathers but are very soft at this point and we'll use negative painting later to carve some of them out. Allow this to dry as well. Coming back to the area underneath the chest, we're going to place some more fine details and when we soften off this time, we'll do so less than we did the last time. Continue to use the tip of the brush to draw in the areas that you want the pigment in and the belly of the brush as you soften up your edges to make sure that you have a nice smooth gradient. Here we still have the damp paper and we're going to put a concentrated mixture of pigment into that, it'll soften up slightly but not too much. You just want to make sure that the pigment that you're adding has very little water in it. It's time to mix up some more of our light pink color, and this time I mix up a little bit too much. Rather than wasting the paint on my brush, I'm going to use an empty well at the top of my palette to dilute this with more water to create a lighter mixture. We're going to begin to put in some of the feather texture over the wing using our pigmented pink, drawing in the shadows and then sloughing off with the brush. We're both trying to place our shadows as well as curve out some highlights because the back of the flamingo is very light in color. Continue to turn your paper as needed so that the angle of your paper lines up at the angle that is most comfortable for your wrist. We're going to put in some strong color underneath the wing towards the back of the bird that will help set the overall value for that region, and using the tip of the brush, we'll carefully curve out the feathers underneath the tail. Here I'm adding more pigment to the wet wash that is already on the page just to create a little bit more shadow underneath the ridge of the wing. We're also going to take the tip of our brush and start to draw in the shadows of a couple of feathers that are stacked on top of each other. We're going to use the tip of our brush to start drawing in the feathers that hang off the back of the flamingo. I believe these are actually the tips of their wing feathers, and then we're going to be painting around the tail which you'll see come into picture a little bit later. You'll soften off this stronger pigment using lots of water to blend it seamlessly into the rest of the feathers. We're going to carefully curve out the feathers of the wing on the back side of the flamingo painting around where the tail is going to be. The tail is going to be in that white triangle below where I'm currently painting. We're going to continue those feathers on the other side of the tail so that they remain consistent throughout the painting. With a very dilute mixture, we'll paint in the tail finally in between those other spaces using a very light touch. Coming back to the front of the flamingo, we're going to start laying in our second layer of color. I've switched to my smaller size four brush so that we have more control over this small area of the painting. We're going to be flicking in this texture in some range between a fur texture and the body feathers that we did earlier in the demonstrations. We want there to be a soft small texture here but given the scale of the bird and how small these feathers are, we don't want to paint each of them individually. We're going to do the same thing behind the eye and the area of feathers that are shadowed in that space. We want to make sure that we can see both the forehead and the cheek defined by this shadow. To tie the bill in with the rest of the painting, we are going to put down in very dilute mixture of pink over the bottom portion of the bill, softening off the edges thoroughly. The texture that connects the bill to the face is more of a skin texture than a feather texture, so we want to make sure that this area has a different fill than the rest of the painting. We'll bring some of that color up onto the upper bill and then we'll define it later with the black after the paper has dried. Switching back to our size eight brush, we're going to continue to place in texture along the neck, getting a little bit more defined with our feathers as we go. In this second layer, we're going to start laying down short little lines somewhere in between that fur texture as I mentioned and the body feathers to create a soft, short feather texture. We want to concentrate this texture in areas of shadow since we can naturally really get darker in those spaces. The highlights we have to be a lot more delicate with, so those will require a lighter hand. As you can see throughout this painting, there isn't a lot of difference between a short fur texture and the flamingo's feathers on the neck. What is going to define this animal in this painting is going to be the other features that we make look realistic and put them into context. Coming back to the wing feathers, we are going to start lining some darker tones to separate the wing from the underside of the body. I'll be laying down pigment with the tip of my brush, soft enough with the belly of my brush and occasionally using my dry brush to pick up excess water. The few obvious feathers that stick out in the painting are areas that we do want to spend some time on so that they do come across as feathers. Using the very tip of my brush and switching between a size eight and size four, we're put in some of the details in and starting to negatively paint some of the wing feathers to the right of the painting. We'll add darker shadows to those feathers that are falling in the background of the painting again, to make it look a little bit more three-dimensional. Moving to the feathers of the wing, we're going to turn our paper once again to create the right angle for our rest. We're going to place a few of the more prominent feathers, but a lot of feathers on this area are very long, silky, and smooth, rather than a rougher feather texture that we did in our course study. We'll blend the shadows up from the areas below that we had already been working on so that it has a little bit more of a transition similar to the photograph. That's pretty much all there is to it until we get back towards the face, we're going to be continuing to layer in pig paint in areas of shadow and areas that we need definition and softening up the edges. Using a mixture that has a little bit more at the gold ocher, we're going to place another layer over the beak. Then we're going to bring in a diluted wash of our Indian green blue, and Indian red to start lane in our shadows starting with the face where they are the lightest. We're going to put in delicate washes of gray, just to suggest that skin texture that I mentioned earlier. Use whichever brush feels most comfortable to you in the space that you're working in. Then we're going to use the same diluted mixture to start laying shadows over the pink areas of the flamingo. This really cool black that has undertones of blue or purple will complement the pink nicely. We want to make sure that it's very diluted so that it doesn't risk staining the areas that we just want gentle washes over. Certain areas of shadow we can be more precise with, but otherwise will soften up the edges appropriately. We want these shadows to be really subtle and just a slight variation from the pinks that we have been using. In contrast to the shadows, we're going to use a mixture of the pink and gold ocher that has more of the gold ocher in it to use over some of the highlights and provide some visual differences from the colors that we've already been using. After that layer dries, we can go in with our dark black mixture and put the final touches on the face. We're going to do this in two layers. The first layer will go down and just map out where we're going to be putting this and then we'll do a second layer to darken those tones. Also make sure to take care of the shape of the dividing line between the upper and lower bill. It might not be where you necessarily expect it to be. Flamingos have really funny shaped bills, and that's something that I'd certainly like to entertain in another class if you guys are interested. I think it would be really fun to look at the different shapes of bird beaks. Let me know what you think. We're going to be placing a very pale yellow iris on the bird that will later go over with a black pupil. Here we're putting now that second layer I mentioned over the bill, making sure to only cover the areas that we had already mapped out for ourselves in the previous layer. We can define areas like the nostril, the pupil in the space around the eyes. Here I'm making one last final adjustment to the pink that's on the bill, and that'll do it. I hope you enjoyed this flamingo tutorial.
13. Class Project: Snake (Part 1): For the final of our class projects, we are going to be working on the close-up image of an Arboreal snakes face. Before we get started, make sure that you have watched the demonstrations on small and define scales from this class. On a computer, find the reference photo for the snake under the resources area below this class. The image is cropped to nine by six inches, which is half of a nine by 12 inch sheet of watercolor paper. You could either draw your own sketch or trace the copyright-free photo using a light box or a brightly lit window. Use kneaded eraser to lighten your sketch if needed before painting. Make sure that you have all the colors that we'll be using, which for this painting will be Arylide Yellow, Cerulean Blue Hue, Denise's Green or your favorite Earthy Sap Green, Perylene Green and Alizarin Crimson Quinacridone. Prepare the rest of your workspace. My palette is to the left of my painting due to the camera angles. I'm trying not to block your view, but if you are right-handed, I recommend keeping your pallet to the right of your workspace. If you're left-handed, keep it to the left. You'll also need two containers for water minor to the top center of the screen when you see me reaching in that direction and there is a reusable rag on my right. I recommend watching this tutorial on a larger computer or television screen to get the most out of it as opposed to a phone or small tablet. For most of the tutorial, the camera will be set so you can see me interact with my entire workspace. But that means that the space time actually painting and will be much smaller,so please keep this in mind. This primarily visual tutorial will be concisely narrated and will not have music playing in the background. Please feel free to put on whatever best suits your creativity while you work. This tutorial, we'll be playing at 1.5 times my real painting speed. But you can adjust the speed of the tutorial further in the bottom left-hand corner of the video, if you'd like to speed me up or slow me down. I know snakes can be a touchy subject for some, but I couldn't pass up the opportunity to work on this gorgeous reference image that provides so much detail for us to paint from. There is so much texture within each of the scales in the foreground and the depth of field will make a great way to practice often enough, are focused towards the background. We're going to start off our painting with two different ratios of the same two pigments mixed together. In my Top well, there is Arylide Yellow mixed with a little bit of Cerulean Blue Hue. Then the second well there is a mixture of Cerulean Blue Hue with a bit of the Arylide Yellow. We're going to start with the lighter mixture first that leans more towards yellow and we're going to put a wash over the entire area of the snake. Add more water when you want the color to appear lighter or thinner and add more pigment when you want it to be darker. This is going to be a little flatter and more consistent than some of the other first layers you've seen me put down in the class projects. However, we are still going to adjust for values by using a thirsty brush to lift out highlights along the ridge of the snake's nose and above the eye. We'll drop extra pigment into areas that are darker like underneath the eye and on the far side of the face. As we get to the neck, we're going to add in some of the darker mixture that has more of the blue. This is a very vibrant green and we will need to play it down a little bit, which will deal with future layers. But for right now we want to put it along the ridge of the spine that suggests that that area is darker than the rest. You can add back in the lighter mixture to blend it to the other surrounding areas. If you wanted to use a larger brush for this task, so you'd have less trips back and forth to your water cup. You're absolutely welcome to do that. But for the sake of the tutorials and simplifying our supplies, I did stay with the size eight brush throughout the entire base wash. Here I was deciding whether or not I wanted to go out of the way to the edge of my tape or if I wanted to stop short and have a more organic looking edge, I ultimately decided I wanted the snake to go all the way up to the top of the paper, which required a little bit more adjusting in terms of the pigments that I was laying down. We'll also put a bit of this darker green in the eye as a base layer. I have been cutting out the footage of the eyes for the other tutorials for the sake of brevity and sticking to the point of this topic. But there is a little bit of a catch with snakes and that their eyes are covered with a transparent scale. Maybe I'll throw you a freebie here and we'll work on it. Next, we're going to take a mixture of Denise's Green, which is an Earthy Sap Green and Perylene Green. We want just kind of add a desaturated at rich dark green that we can start to layer into some of the scales. I'd like you to think of this scales as somewhat of a grid method as if you were just transferring a drawing. We all remember those In coloring books. Even if we haven't used them in our artistic adventures where you create a grid and then create a drawing based on copy and a picture will lined up with the grid. We're going to look at our reference photo and we're going to take each scale individually in painting the textures that we see there. For this one, the bottom of that scale over the top of the mouth is darker towards where the mouth opens and then gets lighter towards the top of that region. In order to balance that out, we play some of the light error highlights color on the top, and then we can drop in a little bit more that darker green for some texture. We're going to continue this scale by scale method throughout the entire face of the scales that are in focus. We want to look at the hues and values of each scale to make sure that as we go one-by-one, that they still look like a cohesive unit within the snake overall. You can start with your lighter colors and then drop in darker ones or if you know a scale is particularly dark, we can start with darker pigment and dropping the lighter ones like we did on the front. I'll include footage of about the first half of this next space. Then for the sake of brevity, I will cut out some of the footage so we can continue on with the rest of the painting. But rest assured, every scale that I approach is similar to these ones in the first section of this tutorial. There is some concern that if you work scale by scale and you're working on adjacent scales that you could cause blooms to go into the area next to where you're painting if it's already a little bit damp. To avoid this, you want to make sure that there is a small, tiny little gap in between your scales and/or you can also just go with the flow and have them nicely blend into each other. I do like these front four scales as the inner corners, kind of make this really cool tile-ish type pattern, where you've got these dark spots towards the inner corners of them and then they get lighter as we go. Along this front edge of the face, we also want to keep in mind that there is a strong highlight that goes along that entire region. So from scale to scale, we want that to be consistently in the same spot and look like it continues as a highlight throughout the face. Occasionally you'll see me drop some of the yellow from the palate into the painting, and that's just if I really want a much lighter area than I have mixed up. So if you see my brush go off to the side and grab a color from the palettes and then add it to the page, it's most likely that our light yellow. If you ever get too dark within a particular area, you can use a paper towel to lift your pigment and adjust afterwards. I'm alternating between three greens that we have here based on each individual scale and what they call for. As we move closer to the eye, we want to account for the fact that the scales actually curve at that point. There's going to be a shadow around that ring out where it's at its deepest. Then it'll get lighter and have a highlight right around the rim of the eye. I probably could have done a better job at this on the bottom three scales. That first one that I painted and the two that'll eventually be towards the right of that. But I did do an okay job on the left side of the eye and over the top. So you can look at those areas for better examples of what to do. This will be the focal point of the entire painting so we do want to keep that in mind as we add our details carefully. We do want to still keep in mind that highlight that runs from the nose to the eye and keep that intact. There is a little bit of a shadow directly in front of the eye along that ridge, and in that highlight is going to taper off at the top of the eye and there'll be another dark area behind the eye as we move in that direction. I don't tend to gravitate towards paintings that require high amounts of detail and accuracy. I prefer a loose, flowy style that I can add elements of realism to. However, for this snake, the way that I was able to push through everything and make sure that I was having fun with the process is to not only take into consideration the scale that you're working on at that time, but how it fits into the bigger puzzle. If you do enjoy that really detailed painting where we're going to scale by scale, or detail by detail. Hopefully you'll enjoy this tutorial and it'll be a nice change of pace from our past tutorials that were a little bit more loose and free. Here I'm going to add the dark inner corner of the eye and it's going to stay like this for a while. We're not going to come back to the eye until the end of the painting. But placing these darker values really sets a nice anchor point for the other values in our piece and will be helpful for adjusting or values later. We're going to place this dark paint along that corner of the eye, and then we want it to curve into those scales. The shadows go into those grooves as we move around the eye will surf enough the inner edge, but leave the outer edge hard. For this I'm using mostly the perylene green. Here is where I cut the footage and finish the rest of the scales around the face according to our reference photo. Moving on to the neck and body of this piece, we're going to be laying down a wet area of water so that we can do a wet on wet technique that naturally helps us to diffuse and soften the areas in the background. We'll use some of that civilian blue hue mixed with a little bit of the light yellow to gradually helps smooth that transition between the lighter and darker colors on the neck and make it look more cylindrical. This photograph in particular I mentioned at the start of the tutorial is one that I was really excited about because the photographer did a wonderful job naturally closing down the aperture and making sure that the photograph was already ready for us to diffuse that focus. We didn't have to do any guesswork on it. Once that wet layer is down on the page, we can drop in our darker colors in a skill like a fashion that'll diffuse on its own. Again, we want to deepen those colors along the neck to suggest that the neck has form and curves around that area. I didn't do an amazing job at this and could have done a little bit better, I think on a second pass, a second study. So make sure that you're looking at your reference. The top ridge of the spine itself isn't as dark, but the groove right next to it is. So you might want to leave a little bit more highlight in that dark area. I'm also going to drop in some very vague scale patterns in the side here. In the photograph you can see that there are some crescent lines, some curved lines that hinted a scale texture, which I'm just trying to do here by gently softening off the edges, and I will go back to that later in the painting as well to help solve that a little bit better. There's a really deep shadow where the different parts of the body overlap. So I'm going ahead and putting some perylene green in that area and we'll lighten back off to what is a very light portion of the underbelly of the snake. As we move further away from that shadow, we're adding more of the Denise's green and more of the civilian blue mixed with the arylide yellow so we can get a range of these different greens that we've been using in the painting. Using more are allied yellow and civilian blue hue, we are going to start placing them brighter greens on the belly of the snake to lighten that whole area, since it is a pretty vibrant area of the photograph. We don't want it to compete for focus with the face. So you will see me desaturate this a little bit in a future layer where we add some more of the [inaudible] green to just bring down the overall value. Because this piece is going to be on white paper, which I might want to reconsider and revisit at a later time, but for the sake of this tutorial, we are on white paper in the body actually disappears into a shadow. But for the sake of the tutorial, we are just going to darken that area off with some Denise's green so we can soften the focus. Now that future Denise is watching this seeing the end product. I think I might actually want to go back and put in a darker background. I think that would be really fun. So if you decide to include the entire dark background with either a perylene green or even something darker, I would love to see it in your class project section. For that, you would just carefully outline the face and then as you come to this back portion of the body, you'd softly transition between the dark and the body. I also dropped in some Denise's green into our whitewash already but didn't like how I put that down. So you're just seeing me trying to soften it off here. We will come back to that later and make adjustments in a future layer. Going back and forth here just trying to lay in the right overall shapes, while this isn't in focus, we do still have to make sure that it looks accurate to the animal. A lot of the lines that I put down at first were too skinny and I had to use my brush to coax them into wider flatter scales. Unlike the scales on my side of a snake that are relatively small and overlapping, the scales on the belly of a snake are wide and flat.
14. Class Project: Snake (Part 2): Once your first layer is entirely dry, we are going to start glazing in some shadows to create the forms and curvatures of the snake.I am going to start with Perylene green on the bottom jaw, softening off the edge, to try and give it a rounded appearance that curves around underneath.You can use a clean brush that has mostly dried off, to lift up some excess paint and then we are going to glaze in some more of our lighter green color to soften that color off, on the top. You can move back and forth with your brush between the two areas to plan them seamlessly. Moving to the top portion of the head, I want to add in some brighter highlights using mostly the lead yellow.While we want to leave most of that brightest highlight untouched, we can put yellow on either side of it, to really enhance the effect. The area around the eye is where we want the greatest focus to be, so by adding this brighter yellow color, we will draw the eye to that area more naturally. Continue to evaluate all the different areas of your painting, and add color where needed to tie everything together. We are going to begin defining the scales with the very tip of our brush using Perylene green. The area between this animals scales, is darker rather than lighter, so it will be easy for us to start to carve out these areas. Although we do want to be sure not to outline them cartoonisticly, which I might have bordered on the edge of here, but I held back just enough, I think, I hope.Also be on the lookout for little areas of irregularities like on that front scale, there is a little piece of darker border that goes into the scale, and we will see a couple of those areas throughout the painting as well. Adding in those extra little pieces will help to break up the outlines and have them not look too fake. If an area gets too thick or dark, you can clean up your brush and blend out the edges to soften it off. This process of going over everything again is going to take a while, so get cozy with your favorite audiobook, podcast or music, and we will work our way through the piece. In order to make the nostril look more realistic, instead of doing a circle of just dark paint, make sure to soften off that back edge, so it blends into the scale next to it. I just want to gently chime in for a moment even though I don't have a whole lot new to say just to remind you to take a break if you haven't already, stretch out those limbs and make sure you are in a good mental and physical state to finish off this piece. It's a lot of scales, and we can kind of get lost in them, so just make sure you're taking care of yourself. The parallel in Indonesia is green and to our mid green from earlier to make just a nice neutral midtown, we're going to start to place in some of the shadows and contours on the face. This will help to merge our highlights and shadows together for a full rounded piece. We're going to add some really fine speckled textured or some of the scales that have little details on them that break up the monotonous flats tones around the eye in particular. This will make it look a little bit more real and [inaudible] not look so flat or one-dimensional. Coming back to the eye we're going to put in those dark shadows on the upper portion of the eye. This time with powerline green, will use a different brush to soften off the edges and really helped to make this look sphere. Make sure to go between each of the scales with a little shadow. In addition to the triangular highlights in the front of the eye, there's also highlighted the back of the eye, which will also help us look more sphere calls. So make sure not to cover that up entirely. If you do, you can add white later on. Here I went a little heavy handed, so I used a paper towel to lift that pigment app and then we'll try again. Will connect to the upper inside shadow to shadow. We've already put down to complete the sphere. While you're waiting for the iris to dry, you're going to mix together paralleling green and Alizarin crimson quinacridone to mix a nice deep black. We can place it throughout the painting in areas that we want to be a little bit darker and have more contrast and we'll also use it for the people in just a moment. Coming back to the pupil, we're going to draw it in with the tip of a very fine tip to brush so that we can be really accurate around those highlights. Once the pupil is in, we are going to take a clean damp brush to just gently touch the edge and breakup that outline so it doesn't look so out of place. We can add some of this black mixture to the corners of the eyes as well to bring everything together. Moving back to the body of the snake, we're going to use some of this dark mixture once again to place it in that darkish shadow. Using our mid tone green, we're going to place one more layer over the area of the neck, and then we're going to drop in some darker tones to further define the scales. This again is the mixture of Perylene green and Denise's green. We're going to follow those lines that we put in earlier, but do a little bit more work to carve out some individual scales in a somewhat cross hatched pattern, but don't take that too literally. We'll darken the tones on the right side of the neck so that it looks more cylindrical just like we did on the bottom of the jar. I'm trying to fix some of my mistakes from earlier by fixing that spine that I mentioned. I didn't leave quite enough highlight for it, but you can go ahead and avoid that mistake by doing it right the first time and learn from my mistakes. Moving to the belly of the snake, I've laid down some water already and we're going to gently drop in some Denise's green into those belly scales for separation. We'll rinse off this brush and then with a clean brush will make sure that those areas aren't too harsh and that they blend together, and are out of focus. I'll continue making a few adjustments to the body until I'm really happy with the way at looks. I know that was a lot of work. Thanks for sticking with me and I hope that you enjoyed this tutorial on painting scales. I would love to see your paintings in your class project, so don't forget to upload them.
15. Final Thoughts: Thank you all so much for taking my skill-share class on fur, feathers and scales. I hope that you enjoy the class and that you learn something new. Don't forget to upload your class project to the class project section and let me know if there's any critique that you'd like on your work. Feel free to check on my other sculpture classes for other watercolor goodness and let me know in the class discussion of this class if there's anything specifically that you'd like to see about watercolor in the future. Until next time, happy painting.
 Denise Soden, Watercolor Artist & Content Creator