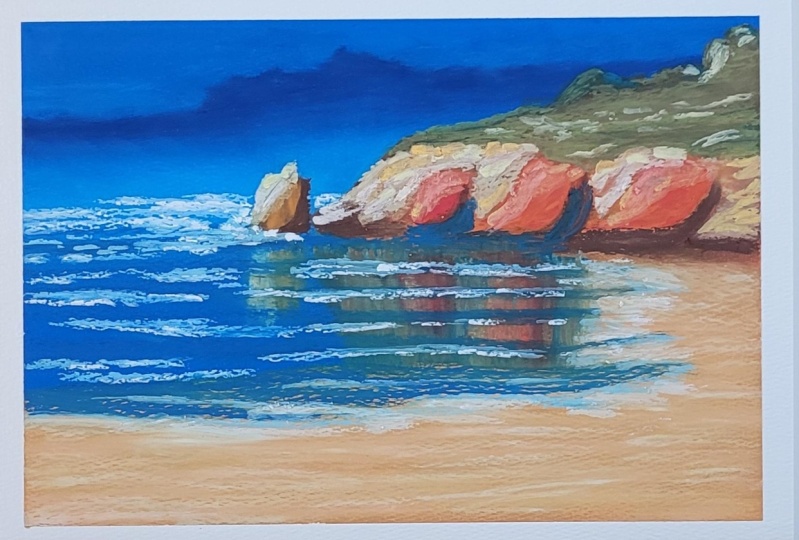
Transcripts
1. Welcome: In today's class, you
will learn how to make this wonderful
seascape would over ten years of experience as a professional artist and more than five
years of teaching, both online and
in-person classes. I've developed a very
easygoing and fun method of teaching. Hi, my name is George, and today I will
be guiding you and encouraging you to make
a wonderful painting. You might think this is a
very complicated seascape. However, with some
step-by-step encouragement, you will understand everything you need to know to create it. You'll understand how to
keep things simple and focus on having as
much fun as possible. For this, you will need a
canvas board in order to rehearse the challenging
parts of this painting, you will be learning
about key concepts like color, perspective,
and contrast. Not only that, but you will
be doing all of this with one single brush in order to better understand
brush handling. If that sounds exciting to you, welcome to the class.
2. Materials: This seascape, you'll
need a few materials. You will need a canvas that
is 40 by 30 centimeters. You will need one brush. This is a round
brush that can have a tip that he can use to make thin lines for the waves
and the cliffs will also need some paper
towels to clean the brush, as well as a mixing
plate to mix the colors. Some water just to make
some transparent colors. This is Amsterdam acrylic paint. This is carmine, red, this is brilliant blue. This is primary yellow,
some titanium white. And on top of that, you will need a canvas board to create some beautiful exercises.
3. Rehearsal : Before we start, we
should talk about one of the most overlooked
things in painting, and that is the rehearsal. You should always have
a canvas board nearby. And now you'll
understand how to use it to improve all
of your paintings. This is your practice board. You start painting on
it loosely, freely, just on areas of
the painting that you feel that they
are difficult. Musicians do this all the time. They repeat the same song
over and over again. That's why when it
comes time to perform, they've done it a
thousand times. Of course you don't have to do something a thousand times, but if you do it at least twice, you will ensure that
it will look great. And don't worry, you don't
have to have 100 of these. After you finish. You put some water on it and you wipe it down
with a paper towel. And now let's see
how we can use it. As you can see, the beautiful
canvas board has been used a few times and wipe down. Don't worry if it's still
colored after you use it. You don't have to make it white. Again, this is just a ground, a beautiful neutral color. For the next sketches. You don't really need to make
this exercise completely. You just need to see it. And if you have a canvas board, you can practice it as well, taking some blue and some red. This will be a very
fast exercise just to explain how things
will lay down. The top side will be the sky. It is made with
the blue and red. And on the downside, it will have some
darker mountains. Those will be even darker. And then the reflection
of the sky will be on the left-hand side, as you can see here. And over here, just loosely
putting some paint down, cleaning up the
brush very loosely. As you can see,
this is the chest, so we can understand how the composition and
everything works. These are very, very
simple concepts, just putting down some colors. And this way you will
learn how to let go a little bit and let the brush do its
thing and create beautiful and interesting
colors and textures. Adding some yellow to the plate, mixing it in with
a tiny bit of red. And right to the left of
the middle of the canvas. Adding this wonderful rich, now, taking some more red to make the darker part of the stone. And on the lower side. And then going down into the blue to create
the reflection. Now let's make the
highlight once again onto the left side, clean up the brush. You can start to see how with
just a few simple strokes, you can create a
small composition to see if the colors go well. You can understand
where to apply them and how to apply them. Taking some white and mixing it in with this beautiful
orange just to give a better highlight onto the left side of the
cliff and at the bottom, grabbing that white
with the finger, the reflection needs
to be a little bit longer than the cliff itself. Okay? Going at taking some reds and
mixing it in with the blue to create this wonderful
dark blue shadow. And in the reflection as well, concentrating a little bit
more on the bottom side. And then let's
create this shadow for the cliff on the right side. The cliff that will appear soon, taking some more blue. And let's start to create
some beautiful lines. Start to see them as some waves. These will converge
a little bit. They will be curved towards
the cliff on the right side. Let's take some more
blue and mix it in. Right behind the cliff. It's not actually behind, is just on the
right and the left, but it does give this
impression of being behind it. Now, taking some white and
mixing it in with the blue, you will create some sea foam. And just with the corner
and the tip of the brush, Let's create some
clashing waves onto the cliff and just
below the dark lines, creating some more waves. A simple reflection
with waves and see such an easy
process to make. And you don't have to
worry about messing it up because it's
just an exercise. Very, very easy. Let's add a few more
lines as waves. Let's clean up the brush. This is a very
simple composition. And now let's
integrate the cliff with the sky by
adding some blue into the cliff color and
adding get chest on the right side where the shadow
and the light part meat. And at the top and adding it at the bottom of the
reflection and on the sea just a tiny bit so it gets integrated with the cliffs. And there you go with
this wonderful exercise. Remember to always scrape
down the paint by adding water with the brush and
then with a paper towel, just taking it off. If you take anything from this
course, this should be it. It will change the way
you paint forever. If you want to
practice a little bit before you start the painting, you will find a reference
image on the resources page. And now let's start
the big painting.
4. Blue sky and water: Now that you understand some key concepts
about the seascape, we can go and painted. Adding some brilliant blue to the mixing plate onto the
left side and some red. This is carmine red, just slower adding
some more blue, since this is a big boy Canvas. Taking the brush and
mix it into the blue, adding some red, just
a tiny bit of red. Just to create this
beautiful dark blue. Taking some water and
mixing it into the paint, going just above the middle
line of the canvas and adding two lines that go a
little bit to the right side. After that, you can just
fill in with this color, the top side, loosely
and as fast as you can, trying to keep a right to
left and circular motion, adding some more reds and
some more blue to create more color and a little bit of a different tone in the sky. And covering the corner on
the left side just over here. Don't forget about the sides. Tried to scrub them
down until they feel nicely covered on the top and on the left going and taking some more color and adding
it at the bottom just to increase a little bit of
the area of the sky and some water just so this
area's stays a bit more wet. It's important for when you
will put the mountains, adding some yellow
and taking some red, mixing it in with the
blue and the red, adding some yellow just to
create this interesting brown. And now with this dark
purple brown color, you can go from the left and add some beautiful small mountains. And as you go to the rights, they follow the slope of
the sky and become bigger. Tried to make them just
as simple as you can and avoid repeating the same
geometrical shapes. Don't make them all
triangles tried to make them a little
bit more varied. Let's clean up the brush on
the lower part of the canvas, onto the left side, picking up more
blue and adding it over that dark patch
you just created. And over taking it in making this beautiful sky
reflection onto the sea. Going even lower
with some water. Perfect. Taking some more blue
and adding it at the bottom of the mountains and putting some
more beautiful blue onto the water just below, creating this wonderful
surreal look to the painting. Now let's go a little bit
over the mountains and blend that color into
the newly found blue. And also focus a little
bit more on the edges, making them nicer
and more crisp. Let's add some more
blue at the top. Just so we can touch up the
edges from the top side. We can blur a little bit
the edges of the mountains, just so it seems like
there may be rain or a storm coming and covering those mountains already
since this guy is so dark. Okay, Let's focus on moving from right to
left with the brush, just so we smooth
that sky a little bit more and a little bit of light. Onto the left side. Just over here. Let's clean up the brush and take that color and mix it in, again, creating
some more textures. And let's brush
that into the sky just so it seems a
little bit more chaotic, blending a little bit
of the mountains. And there you go.
With this first step, you can see how easy it is
to cover a lot of canvas and make a beautiful sky
in just a few minutes. You've done that by
first looking at the exercise and then knowing exactly what
you want to do, as well as just
letting the brush do its thing and create beautiful
patterns in the sky. You've also touched on Lost and Found edges
on the mountains. This gives the effect of
a storm in the background and it's a very useful
thing to know and painting. And now let's go
to the next step.
5. Sandy shore and cliffs: Now with the help of
some brown and orange, you will finish the
whole composition. That's right, the
whole composition, we'll be finished
by the second step. The composition is very different than the
finished painting. This doesn't mean the
painting is finished, just that all the big elements are there in case
of this painting, the sky, the distant mountains, the glyphs, ceci, and the sand. This is also the step where the painting looks
a little bit funky, but don't worry, you will have a great
painting by the end. Let's go into it. At this stage, the
painting is still wet. Let's grab with this
beautiful brush, some red and some yellow, making this dark
brown color right next to the red and
mixing it very well, taking some water
and mixing it in just so it flows a
little bit better. Going into the blue
on the right side, starting from the right side. This time with a
little bit of a slope. You will try to make
those mountains a little bit different than
the ones in the background, not only in color, but in shape as well. Mixing it in with that blue just so they seem a
little bit darker. Going and jumping a little bit onto the left side and
creating some more. This wonderful cliff. This is just the top
side of the cliff, okay. Now, at the bottom, you can start to
clean up the brush just because it picked up a little bit of
blue from the top. And let's twist this
wonderful plate and make a beautiful orange
with some red and some yellow and
some water as well. Going into the brown. And over the patch
we just created. Now, just below this patch, we can create a
more intense slope. So with chest curves a
little bit to the left. So it now seems like
a wonderful cliff. Okay, going and smoothing
a little bit of the color and onto the left. Let's create another cliff. This time. Just having a little bit of a shadow
going to the left. This will be important
at a later stage. Now, let's cover
all the canvas onto the left and bottom side
with this beautiful color. Let's clean up the
brush once again. So we have a more
beautiful orange that we can make the sand width perfect, grabbing some more
red and water. This can be a very watery mix. Okay, be careful not to go too much into the sea so it doesn't blend with those blue colors too much because they
will become much, much darker and greener, covering everything above and below the cliffs
and the left side. This will be just
a wonderful color to paint on with details, but those are all
the big shapes. Okay, going and touching that
beautiful line of the C, you can start to look at it as a curve that goes
towards the clefs. You can practice a little
bit of the waves by making a beautiful line with the tip of the brush just going
into the blue. Now covering the bottom
of the canvas completely and mixing up a little bit
of this brown and taking, and putting it here and there on the cliffs on the right side, creating a more
interesting shape for the cliff on the left. Such an easy and simple step,
as mentioned previously, this looks a little bit funky, but don't worry, if you
studied art history, you would even find paintings that look kind of like this, just a little bit messy
and not a lot of details, believe it or not, this kinda look used to
be popular in the past. And now let's bring
those beautiful details and colors into the next step.
6. Red rocks and shadows: In this step you will cover just a bit of the canvas
that is still showing up, as well as adding some
more color variety in the shape of two boulders and
some gorgeous reflections. Then let's go into this step. The clean brush, you
can take some yellow and mix it over with some reds. Making this wonderful
orange light color and ride over the
mountains, mix it in. As you can see, that
painting is still wet. Let's go and cover some
of those blues as well. Since this color is a
little bit thicker, just a little bit of colors
so we can have something underneath to create
some wonderful textures. And on the big rock in
the middle of the sea, just add two lines
right in the center. Going and making some more
interesting textures. Just going from
side-to-side cleaning this brush on the shore, adding some white to
the mixing plate. And now taking some
yellow and some red, just so we can create
a wonderful orange. Once again. This time, a little
bit more reddish with this beautiful orange
chest on the middle of the mountains create a
wonderful round shape with a little bit of a
texture onto the left side. And on the right side, just a tiny cliff that
goes to the left, kinda like a shoe. And if you have some color, you can go over the blues and cover them just a
tiny bit so that they don't show up lower below the cliffs going and
making a darker reds. And another beautiful cliff
onto the left-hand side, as well as on to the
right of the cliffs, adding this color, taking
some blue and some red and mix it and get over this orange
to create a darker tone. And right under the
newly found boulders, you can create a
shadow and going up a little bit onto the
right side because the light comes
from the left side, creating this wonderful C-shape. It's more like a J shape and going with a line and
going towards the right. As well as making this
wonderful reflection just below the beautiful folder. You can also make this shadow just below the second bolder. Onto the left. Maybe a little bit smaller. And the C-shape indicating the shadow onto the right side, as you can see, the orange
being a little bit wet. It picks up into this shadow and some shadow chest
near the end of the cliff on the left
side, just over here. Going a little bit onto a slope. Now going above the stone in the middle of the
sea and below it. And on the right, let's just clean
up a little bit of the brush onto the canvas and make this wonderful cliff
a little bit more smudged. You can also put your
finger and smudge it away. This will be the shadow of
the boulder onto the cliff. Okay. Going with a clean
brush and adding some blue just over here in between the first,
just over here, in-between the big cliff and the middle see glyph
just covering closely, trying not to pick that
brown up going onto the left side as
well and trying to blend it in with the background. Grabbing some more blue
and now going into the sea and where there
is a little bit of white, we can cover it nicely with some side-to-side motions and a little bit of circular
motions if you want as well. Perfect. And there you go with
this step as well. In this one, you've
learned what it means to tighten up
the painting with just a few colors and covering the white spots of the canvas. Painting looks so
much more detail. That is one of the secrets
of painting, color variety. And now let's go
into the next one.
7. Highlights on cliff and shore: Now comes one of the most
interesting parts of painting, and that is the highlights. You will be creating
some beautiful light on the boulders as well
as on the cliffs. This will bring all
the painting to lie, just a few touches and the
painting will look gorgeous. And let's not forget about the
reflection into the water. Before we start, you should make sure that the water is dry. Let's add some yellow
to the mixing plates, put a clean brush,
taking some reds. And on a clean
part of the plate, mixing a beautiful orange and making it lighter
with some white and more yellow with some yellow adding even more
yellow and some red. Just to create this
wonderful orange, yellow color, very, very light. This will be the highlight
on the first Cliff. On the left side. Focus just on the light
part of this cliff, just on the top left side. And now moving towards
the right clefts in the middle of the canvas
with some beautiful cuts. Just going on a slope
towards the top. Don't touch the top. Just make a little
bit of a ridge just below the top of the cliff. That's where we will put
some green later on. Now, going on to the boulders with a tiny bit more
of an orange color, just making this
beautiful highlights. Now on the big boulder, just at the top and
a little bit lower, leaving a bit of
texture to the middle. Don't forget about
the reflections. Just going down,
adding some more red and some more yellow
to saturate that color, go a little bit into the
darker part of the reflection, just so you cover it, so it doesn't seem like
it has too much shadow. Now, let's go with a
little bit of this color. Just onto the cliff
behind the boulders, creating some more
color variety, as well as onto the
single cliff in the sea chest where the shadow
and the light part meet, creating a transitionary color. And at the bottom of the
cliff on the left side. Now, with this color, you can go ahead and
add it to the sand, smoothing out a little bit
of that water texture. That's very light, thin layer of paint adding some more
white and covering this, making it smooth with
side-to-side motions. From left to right. You can even add more
white into the orange, creating an even lighter tone as you go down from the
middle of the canvas. And going on the left
side, taking more color. And in the middle, just next to the sea, taking some water
just so you can spread that color around, keeping a little bit of
the color underneath. Don't forget about the
edge at the bottom, smoothing out that texture. It doesn't have to
be perfectly smooth. As you know, sand is very coarse and adding some yellow to the color just so you can have some more intense highlights
going on the cliff, on the left edge of the cliff, as well as right next
to the small bolder, just kinda making
a cut out of it. As you can see, the colors are still wet so they mix together, creating a wonderful texture. Let's not forget to make some reflections
on to the seaside. Of course, going
onto the right side, right next to the small
bolder reflection. Let's grab some red and some yellow creating
those orangey tones. Just because the color was
a little bit too yellow. And now let's go in
between the small bolder and the big boulder
creating the cliff. Don't forget to leave a little
bit of a patch at the top. So it has a wonderful edge where the grass will be added
onto the left side, going on the small cliff, adding some highlights onto the top left side and some reflections with
some orange as well. Drag them quite low and
adding some more light onto the left side and some lighter tones on the left side since the
light comes from there. And that's all for this step. You've now touched upon adding
some beautiful highlights. You can start to see that the
highlights are very thick and there is a big difference between them and the shadows. This creates a lot
of contrast and gives the effect of
light on the painting. You've also practiced
a little bit of brush direction
on the cliffs. You went towards the right
end a little bit out, but under reflections you went with vertical brushstrokes, thus creating a beautiful
vibration into the artwork. Let's go into the next one.
8. Green hills and blue shadows: In the last step, you've made
some beautiful highlights. Now it's time to make
some wonderful shadows. These shadow will create even more detail and
contrast into the painting. You will also
understand how to make a little bit of those
gorgeous waves. And on the top of the cliff where you left a
little bit of a pet, you will add some grass. Now, let's go into the step, cleaning up the brush
with some paper towels, grabbing some yellow, some blue. Just so we can create this
wonderful rich green. And at the top of the cliff, you will start to add
this wonderful color. Rotating a little
bit of the brush, Let's add some reds. So we cut that green just a tiny bit so it
becomes less vibrant. And on the right side, going into the middle of the cliff and just
cleaning up the brush over the wonderful brown going
and taking that green and spreading it around
at the top of the clef, adding some more blue
and some more yellow, just creating some new patches with this wonderful turquoise. And since it has more blue, it integrates better
with the sky. Taking some yellow and mixing it in with some red and some white, creating this
wonderful sandy color. A little bit more yellow, very, very light yellow color. And adding some
more highlight just on the left of the big cliff. Just going with beautiful lines. As you can see,
they are very thin, as well as adding this
highlights to the left side of the cliff in the middle of
the sea and to its center, right in the center, and in the reflection
at the bottom. And right next to
the big boulder creating a beautiful outline. And to the right of it, accentuating that
shadow part, outline. Don't forget, there is a shadow here that goes up the hill. So we can actually outline in a little bit,
but not completely. So it doesn't seem
like a outline. And going to the right onto
the edge of the canvas. Now into the sand
with the same color. Let's create some reflections. Just over here and right
next to the boulder, just a tiny bit. And onto the sand you can
clean up the brush so you can add more color
variety to the shore. Grabbing some more
and spreading it a little bit more at the
bottom of the sea. Let's spend this plate
a little bit and create a beautiful shadow with
some blue and some red. Mixing it very well, grabbing a tiny bit of water and mixing
it into the color. And going at the bottom of
the center cliff and a little bit down into the reflection and higher up on the right
side of the cliff, trying to make a
separation in-between that wonderful C and the cliff. And going higher up
on the big cliff with some thin lines as well as maybe a little bit
under the grass. Now we can do the
same right next to the small bolder
and underneath it, bringing those blues
back into the mix. And on the big boulder as well. Just not covering all the brown. Now for some beautiful waves, just over the reflections creating some lines that
go towards the right. You have to remember that they
converge a little bit and curve as you go
closer to the shore. And they can become a little
bit thicker as you go down. So the higher up you are
on the sea, that thinner, they get going towards the right and curving
them a little bit more. Maybe we can make another
one just over here. You can start to see
the brush has picked up a little bit of that
wonderful orange. Now at the bottom where the
c connects with the shore, you can add another beautiful
wave just connecting it and going towards the cliffs on the right side
with a broken line, cleaning up the
brush and trying to add some water over this
wonderful wave in the middle, making it a lot longer. Another one near the cliffs, picking up more color to make some distant lines
that are thinner. Cleaning up the brush. And there you go with
this step as well. In this exciting step, you've learned something
new about shadows. If the light is warm than the shadows will be
cool in this painting, this translates to yellow, orange highlights
and blue shadows. You also touched upon a little
bit of perspective width, the lines on the sea, the higher they are, the thinner they become because
they are in the distance. And as they move
closer to the shore, they become a
little bit thicker. And now let's go
into the next step.
9. Waves contouring: Now, for some even
more exciting stuff, you will be making some
beautiful highlights onto the waves. In this way, you will create some wonderful
contrast onto the sea. You won't believe how
easy it is to create those waves with
just a little bit of blue and some white. You will finish them in no time. Let's go into the step. Let's twist this wonderful
plate and add some white with the brush
properly cleaned. We can take some blue, mix it in with a lot of white, but keep in mind this color is not at all completely white. Now let's go onto the left side. And now onto the left side, just create some thin lines just above the
bottom of the cliff, thinner and thinner as they go higher below the mountains
in the distance. Now for some clashing waves
right next to the cliff, you can add some beautiful lines going right up to the cliffs. And of course, as
they get lower, you can add some more color
to it, some more white. Let's also add some
smaller ones to the left and then add
some more white into this color and make some wonderful
clashing waves next to the beautiful cliff. This is very thick paint. You can start to see
those flashing waves. Let's add some lines
onto the left cell. They don't seem
just out of place, creating a thinner
line, just going down. You should barely touch the
canvas and leave a trace of those wonderful
textures for the waves. Now below the darker parts you've created on the last step, you can add some of
this lighter tone, just going to the right and
curve it a little bit more. And going even lighter, mixing it in that color, trying to get it as
thin as possible. Don't worry if it gets
tiny bit thicker. You can put the brush on the
plate and rub it a few times until it creates this
beautiful, nice, straight edge. This is a very useful
trick that you can use to create
thinner lines with round brush going even lower and making some highlights
just below the waves. And now going on the seashore, just below this wonderful shadow and in the middle of the sea, wherever you see a darker color, you can go and add a thinner
line of white below it. Going closer towards the cliffs, barely touching the canvas, and going towards
the right side, trying to curve them
towards the cliff. Cleaning up the brush
with some water and some paper towels in order to create some beautiful
shadow color. To fix those thicker
lines in the sea, it's very important not
to cover all the sea with waves and darker parts. The reflection still need
to be quite visible. Now, going close to the shore
and adding some shadow, taking some water so
you can easily spread it and make it a tiny
bit more transparent. You can also make
the white lines thinner with this watery mix. Don't go overboard just where
it needs a little bit of a shadow and a little
bit of a fix onto the white and making another
wave just over here, right by the shore. And there you go with
this step as well. What a fun step this was. You've put some highlights
onto the waves. You've also learned how to make thinner lines with
a round brush. You've also went back
with the shadow colors of the sea and fix those waves. Just so they seem a little
bit more interesting. Now let's go into the next step.
10. Blending the layers: In this one, you'll
make the highlights even more crispy by adding some more color variety as
well as some thickness. Just the few more
details to make the artwork a little
bit more finished. Let's go into this step
with a clean brush, some yellow and some white. You can mix this wonderful
light yellow color. Let's take some blue
just so we can integrate those sky colors
into the highlights. Just a tiny bit of blue. And going on to the
middle cliff at the top, just touching the edge of the cliff with
this wonderful color. You can start to see
it's much lighter. Just a touch of
this color brings new life into the highlights. Now, let's go onto the
right side cliff and add just a few touches
at the bottom and near the grass and
right by the boulders. You can start to see it's
a tiny bit more cool. This color has a little
bit of blue into it. You can also touch up a
little bit of the reflections in case you've made
the shadow to take. Okay, let's go and
make some waves. Just to integrate those colors. Even more, you can start
to make some waves just onto the right side of
the waves near the shore. And they become this
wonderful color. Let's imagine that
these colors reflect onto the highlights
of the waves as well. So we can continue
the highlights of the waves just onto
the right side, revealing the colors underneath the reflection you've just created with the
bottom of the brush, just scraping that color
off and making some lines. Now let's get some yellow and add a little bit of red into it, creating this wonderful
orange color with some white, some more yellow to cover
the bottom of the canvas because there is some whites
still showing through them. Forget about the sides. Taking some more white, just so you can add
some highlight to that, orange and going
and spreading that beautiful color can also
go on to the first wave, just because the sand will
show through the wave, going a little bit more even
into the second wave and spreading that color around the bottom, cleaning the brush, basically taking some white and adding it to the bottom of the canvas and
some water just to create a smooth, beautiful sand. Taking some water and
some blue from the plate, just the dark blue to create some more
shadows onto the sea. Of course, this brush has a little bit of
orange still in it. So if you press harder, you can add some more
of this gray that is created by the fact
that there is blue on this C. Let's
clean up the brush, take some white, and start
making some highlights. Just continuing those
beautiful waves and adding some more thick faint on the
highlights already created, as well as creating
some new ones right here in the middle and above it. That's creating a new set of highlights and improving
the last ones. You can also go on
to the right side where you've created
those waves that are a bit more yellow
just to bring back that white and integrate
them even more, going to the middle and
then to the left side. Creating some new lines. Don't go overboard. Just a few lines will
create the effect. Let's add a thinner
one just over here and right next
to the big cliff. And there you go with this step. In this one you've
played around with some cool beautiful
highlights onto the cliffs. And just like that, you've added some sky
colors into the cliffs since the blue of the sky
is reflected everywhere, but that same cool
yellow highlights, you've created some new waves. This harmonizes the cliff colors with the sea even better. And let's not forget about those beautiful
waves where you've entered with the sand color just to create
more transparency. Now let's go into
the final step.
11. Highlights on rocks. Thank You!: Can you believe this
is the last step? Just a few touch
ups and you will have a gorgeous seascape. In this one, you will be
looking closer to see where you can add a little bit of
vibrancy to the painting. For instance, some saturated
yellows into the cliffs. Let's go into the step, cleaning up the brush
with some paper towels, taking some water so we
can clean it even better. Grabbing some red, mixing it in right where the white
is, and some yellow. Grabbing this beautiful orange, just so you can put some
highlights onto the boulders. You can start to see you're
not touching the edge, just leaving a little bit
of a line over there. Let's not forget to add some reflections into the
sea with this color as well. Go and continue those
waves just so it integrates a little bit
better onto the reflections. Grabbing some water
and blurring that down with some blue and some
water to create those waves. Perfect. Cleaning up
the brush once again, taking some white just so you can create some
highlights just over here into the waves where
we have disturb them. Cleaning up the brush, grabbing some yellow
and mixing it over this orange,
this light orange, you can start to see this
as a very saturated color and adding it to the cliff just here and there in batches, even under the beautiful
patch of grass, creating a more
interesting edge. Going right behind
the boulder and into the shore and maybe over
the waves a little bit, as well as on to the middle
cliff, just over here, on its left and on its bottom, connecting the waves
with the cliff. Let's not forget to
add this color to the reflection just a tiny bit so we don't
disturb the waves. And there you go with
this step as well. Congratulations, you've done it. You've finished another
beautiful class and another beautiful painting. Don't forget to post your
artwork as a project. Once again, thank you
for being part of this community and if
you are gracious enough, you can leave a review. See you in the next one.
 George-Daniel Tudorache, Together we will create amazing things.