Transcripts
1. Introduction: Hello, Welcome to the
Premier Pro course. This is an essential
course where you will learn everything you need
to know about the software. It won't be too
deep of a course, but it will be enough for you to make a video from
beginning to end. My name is called saucer law, though I'm an adopt
certified instructor and I've been teaching
for the past 17 years. As I teach so many courses of
Adobe Premiere in schools, I figured out a way that you can learn the most efficient way. So in my videos, you won't have any pauses
of this kind of fathers are where I begin to ramble about something or where
I can like talk in, make the course
really, really long. No, I took all of that out. I went really specific on
the things that you need to learn and what you need to do to maximize your
learning in software, even if it's too fast for you, you can always pause
in played it again. I did this way. Instead of having
a ten hour course, we'd videos that can
be really boring or not satisfying to learn, uh, made this this weight
so that it's really specific for you to learn
the fastest way possible. I really hope you
enjoy the course. If you have any issues, just let me know and I'll
see you in the first glass.
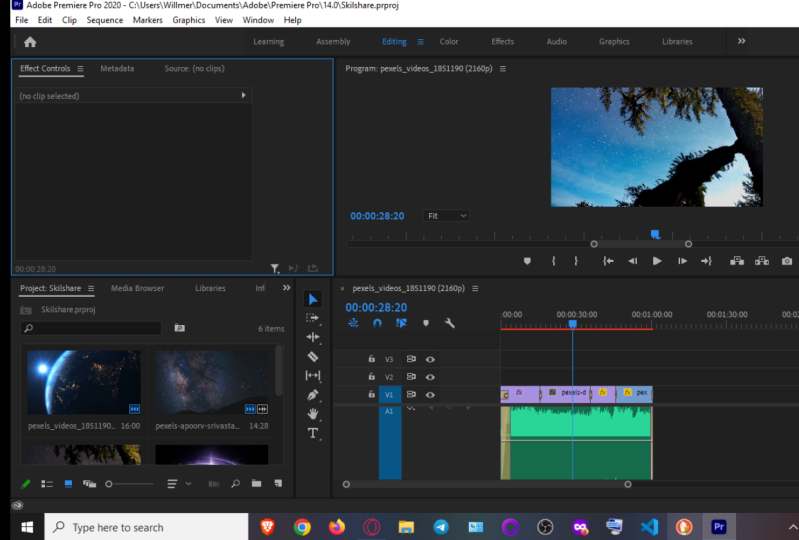
2. Starting your project: Okay, you have installed the Premier Pro and
now you open it, and this is the first window that appears when you open it. You can make a new
project or you can open a project in here is where
the old project will be. Let's make a new project. When you make a new project, you have to insert the name. It's better that way. And you can put the location where you want to put the files, the settings that
are set by default. They are ready to start and you don't have to make any changes. Just make sure if you
have a GPU at here, the GPU is selected. Let's start. Let's
first edit and press. Okay. This is your workspace, just to be sure that we
are on the same page. Choose editing workspace. You can press the
right button of the mouse Reza to save layout. This way you will
have the windows placed exactly as I have. You can resize them
however you want, and you can change
places of them. And if you want, you can go to RelativeLayout and go back
again where it starts. You can see that each
window has a blue line. This means that that
window is selected and it will have different shortcuts for each window selected.
3. Importing Clips: Now it's time to import
our first files. You can go down here, you
have your window project. You can bring your files
through here by dragging them. Or you can use the Media Browser to bring up the files
to your project. Let's bring some files. Now I have some files here. I'm going to choose
to import them, just breasts on the
file that you want. We achieved, you
can select all of this right button
and press Import. It'll be imported
into your project. Now you have a bunch of
thumbnails with your videos. You can resize the time
nails by going here.
4. Start your edit: To start editing, you can
do as simple as dread, the one clip into here. This is the timeline and you'll have your first
clip on the timeline. Or if you want to, you can go here on new item
and select a new sequence. This way you can choose
the sequence that you want regarding your camera. Just find the one that fits your needs and select
it and give it a name. If you drag a clip to a
sequence that is not the same, it will ask you if
you want to change the sequence settings or
keep the existing settings. I'll be choosing gen
sequence settings because I'll have the sequence we the same definition
as my flips. Now you can see on
the right side, this is your program. This is the window that reveals
what's in the timeline. On their left side, you have your source. This is where you can
double-click on Eclipse and watch the clip before
dragging it to the timeline. Now you can start
dragging clips on the timeline just
one after another. And you just made
your first edit. You can use your shortcut, the spacebar to play, or you can use the buttons
here to view York timeline. In here you have
the same buttons, but it's to view the source.
5. Working on the timeline: Now, if you want to resize the clips because you don't want the beginning and the end. You can recite them
on the timeline. You can drag the scroll bar and it will zoom on your clips. Now you can go to the
very beginning of the clip and it will
appear red arrow. And you can click
and drag and you're cutting the beginning
of that clip. You can do the same at the
end and it will as well. Now you drag the clip
to John Dee other clip, make sure you have the
snap button to snap in timeline so that the clips
will snap to each other. Another way to do it is select the space and press Delete, and it will delete the
space between the clips. Now you have your edits with
the times that you want. This is very easy as you
can see on this example.
6. Different ways to edit: Another way to bring the clips without cutting on
the timeline is to select the clip on the source n reviewed
the part that you want. Just go to where you want
to put the start end. You have the mark in and you can make the outbound
with the shortcut O. Now when you drag the clip, it will be cut in the beginning, in the end, you can drag
the clip on several ways. You can pick on here on the image and just drag
it to the timeline. You can drag on these two icons. You can read only video, or you can drag only audio, or you can even go back
to the project window, drag it to the timeline, delete the spaces, and
you have your full edit. You can even choose
multiple video lines to make the edit so that you
can hide one or another. I can drag this clip
to the second line. And if I don't want to see it, I just pressed the eye.
7. Changing clips properties: If you want to change any
property of the clip, just press the clip two times and we will open the
clip on the source. Remember to see if the source is at the sequence
and the clip name. This way, when you go
to effects controls, you have motion, opacity
and time remapping. In motion. You can
change position, scale, rotation, anchor point, and
to Flickr filter in position. This is the position in x and y. The scale is in percentage
and rotation is in degrees. Once you go over 360 degrees, you'll get one term
plus a 160 degrees. As you can see in the
image, 163 degrees. If you undo residue rotation, you just press the red
button at the side. You have multiple buttons
so that you can read at each end if you want to
read the whole thing, you have a recipe effect. If you wanted to
change the position, just change it here. If you want to change
a position directly on the program sequence,
just select motion. This way. You can
change the position directly on the program and
you can move and resize it. Or if you go right
to the corner, you can even rotate it.
8. Animation fundamentals: If you want to do any
kind of animation, you can zoom on the clip
or you can go here and just press on the beginning
and activate the chronometer. You will toggle the animation. It will give you one keyframe. This is a key point
that will give the values of the position. Next, I'll drag the play head a little bit enzyme and
drag the value on x. And you'll have an animation
to go back. Press Play. You have an animation of
the clip moving on x. If you wanted to
delete the animation, you just breast the
chronometer again. It will ask you if you want to delete the existing keyframes. You'll press Okay to
delete everything. Anchor point is the point
where you grab the image. You can change the anchor
point to the corner. And then when you go to
rotation, if you rotate, it will rotate based
on an anchor point. Then you also have opacity, where you can create masks and change the
opacity of the clip. For example, if I
just want a part of this image and create
a mask like this, and just drag the mask and resize it to the
part that I want. This way, I can put
another clip, none here, and I still have the same man on the clip on top
with the mask. Let me show you an
example where you can use the mask to make
it theorization. I have here this clip
that at the end, some people Best Buy and what
I want is to make a mask. To show the next frame, I'll put the beginning
of the clip, marking in and marking out
and brag the clip here, put it on the second video
line and their needs. I will put the next shot
for him to go through. For example, here you can see the shots have different sizes. You can press right button, scale to frame size, but this will stretch out the
image to the sequence size. So what you need to do is to have the eclipse all
be the same size. Or if you have different sizes, use the smallest size. But for this example, I'll just scale to frame size when it starts to
show this part, I want the next leap
to be already showing. What I'll do is this is
the last frame where it doesn't show any
image over there. So I can put the
clip right here. So now what I do is I'll go
to a little bit further, select the clip, go to effects controls to opacity
and draw the mass. This way, I can
draw the mask here around the bag and I
won't do it too precise. You can do this later. I'll just do it like this. If you need more space here, you can go to this
part where it says Fit and you can
resize the viewing. For example, 10 percent
will allow you to put points outside the frame. Now, as you can see, what I'm seeing here
is the frame beneath. If you can turn it off, you see the masking happening.
9. How is it going?: He's the way there I'm
talking in teaching, being efficient for you. I really hope so, but remember, you can always send me a
message and let me know. What do you think about it?
10. Masking: If you want to animate the
mask on the clip on the top, now you have mask one. You just need to toggle
animation on mask back. Then you'll have
your first keyframe. If you go back, you can drag the
mask to your need. You see here, you
can drag it to here, but you'll have to
change this points, this one, and pull it further. Now, you have two key frames
and you have an animation. It's far from perfect, but you can work on it later. You just have to put the
keyframes and go step-by-step. If you want, you can
resize the window to work better to the mask
so that you can see the points even closer. You want to go back
to the same workspace just to save layout and you'll get the
windows back in place. If you go on YouTube, you'll find a lot
of transition types that people have
done over the years. I wanted to go further
on the timeline. You can zoom it out or you can press shift and with
the scroll wheel, just go ahead and scroll
down the timeline. Now you can drag the
clip and put it here. Remember, if you have snap, it will grep to the
end of the clip, but if you put it on top of it, it will cut that part from the clip that it's
already on the timeline. Now, I'll show you
the transitions that are included
in the software.
11. Transitions: You go to the Window Effects. If you don't find it here, just go to Window effects
to video transitions, expand the folder and you have a transition like the
solve in this one, cross dissolve that has a blue line is the
default transition. If you want to change
the default transition, just pressed the right button and set it as
default transition. Do you use a transition? You just drag it to the
middle of the eclipse. See here, it won't go into
middle because there's no video on the right-click
to do the translation. So what you need to do
is cut a little bit, drag it back, and then you
can apply the transition. This is why people usually
record a few seconds before the action on the
camera so that they can have time to make a transition. As you can see now,
we have a transition. If you want to expand
this transition, just select it and you can
expand the size of it, are, you can double-click it and put the size
that you want. Or even you can go to the Window Effects
Controls and you have here the duration in here. You can also drag the size of the
transition on each side. Now, you can explore all
the other transitions. But remember that most of
the editing don't have any transition other than cross
dissolve or dip to black. Just go watch a movie and take a close look on transitions. What kind of transitions
you have on those movies.
12. Working with Effects: Now we're going to
talk about effects. You can shrink the folder,
video transitions in. Now you can go to Video effect. There's a lot of video
effects on premium grow. And for now, we can
change the workspace to effects so that we
can work on effects. You'll see the workspace
changing windows, and now you have your
effects on the right side. And you can expand
this we know so that you can see all the
list of the effects, many of these effects
you will ever use, but there are a few
that are really useful. For example, if you want
the blur something out, you can use Gaussian blur. And now you can go to effects controls or by
the shortcut Shift F5. And when you go to
Effects Controls, now you have your
effect gaussian Blur. You can put the
blurriness a lot or you can draw a mask on where
you want to put the effect, for example, to
blur something out that you don't want
people to see it. If you want to delete
an effect just like the name and breast delete, you will erase the
effect from the clip. For example, if you
scale to frame size, you can use a little
bit of sharpen to get more definition of me image. Be careful, don't
use it too much, or you will notice the effect. You have a lot of video effect. For example, you have
distortion effects like magnified on the
Effects Controls. Some of the effects. When
you select the name, you can change the effect
directly on the program window. Now, I'm doing magnified
on that person's head. I'll say the
magnification is way bigger and the size much bigger. For example, if you want to recall something on the image, this magnify works really good. You have other effects that you can go through them
in distortion, you have with the
warp stabilizer.
13. Stabilization: I just imported here different clip so that I can show you the
Warp Stabilizer. I have a little bit of footage and just drag the
video over here. As you can see the footage,
it's really shaky. Apply the Warp
Stabilizer to the clip. Wait to analyze. You continue on
in effect towards all how much time is
left. Now it's stabilize. Let's see the
difference. Much better. You can turn the effect
of by pressing effects. Now, you can see it did before. Let's look at the
after. So much better.
14. Green Screen: Another effect
that is used a lot of times is the chroma key. So you will have to go to King
and you'll have ultra key. Drag the clip that you have where you record
with the chroma key. Now you can drag the
ultra key to the clip, just go to effects controls, and on the key color, you pick the green
color on the screen. This will take the green out. And now if you put
something behind, you can see the image behind. You still need to
tweak the effect. Because as you can
see here on my shirt, you can see the road. So if you go to
the Effect again, there are some tweaks here on mesh generation
and matte cleanup that you'll have to do it. For example, the
pedestal will change a lot on the image in
here on the shadow. You can raise up because you want the whole shirt to be off, but you still have some
margins on the image. Because if you turn
off the effect, you can see those margins here, all you have to do
is create a mask on opacity so that you can put the mask just around
the character. And now you have a
perfect chroma key. Good advice to make
a good chroma key is that you don't go
outside the green. Tried to remember this when
you're doing the shooting.
15. Enjoying the course?: Are you enjoying the course? I really hope so.
Remember at the end of the course to give me a
rating for the course.
16. Color Correction: One effect that it's here, but you can change your
workspace to work on it. He's color grading or
call it correctly. And that effect is
the Lumetri color. If you go to the
workspace color, you'll be ready
for you to use it. Now if I go back to this image and I have my clip selected, wants us start
tweaking these values. It will change
automatically and we'll add the Lumetri color
effect to the clip. Getting into color correcting is like getting into a new course. There's a lot of stuff here that you need to work
on your images are now I'll just walk you through the simple basics of
color correcting. You'll need to check
up the white balance. Here is the white
balance selector. And for example, on my image, I note that this line is white. So if I peak there, this will do a correct
white balance. And if I'm not sure about that, are the image gets too blue. I think that the temperature, a little mark to the
yellows into Teams, you can change between
greens and purples. It's a good use to
correct color to have this image on
a second monitor. You couldn't go to
Premier Pro Preferences and go to playback. On playback, you'll enable mercury transmits to
the second monitor. And then you'll have
a full screen monitor with only the image that
comes out of your timeline. Now way, if you have
two different monitors, you can match up the colors
between the two of them. Color correcting is
the act of correcting the colors that are
wrong on your image. Color grading is giving it tone that you want to
spread your message. For example, on this image, I can use the Auto button to let Premier auto
correct my image. If you wanted to see
the effect on and off, just breast effects to turn
on and off the Lumetri Color. Which one do you
think it's better? Actually, I think the first, as it was recorded, is a little better than before. So if I don't like
the correction, I can just press it and get
back to the correction.
17. Luts and more: If I'm using the love that I bought that someone made for me, I can go to this list
and go browse my luck. You have some here, but it's only for
those specific camera. You can use them as V2 effect, but it won't work as good. And you will have some
part of the image that are ruin a lot is a lookup table. This means that on that table, if they say that
this green is red, it will change it to red. For example, one of the most used lots
is the orange into, you will find the left
like that free online. Down here, you have
the separation. If you put it to 0, you'll get
a black and white picture. And this is the tab
with basic correction. If you close the
basic correction, you have also the creative. You can explore some looks
in the creative tab. And as you go through the list, you have a lot of them. Just apply one of
them and you can work gain density less or more. And you have some other features here to change the
color grading.
18. Creating graphics: Now we're going to create some graphics as
we've done before. Let's change the workspace. Now let's go into graphics. In the graphics you'll have the essential graphics
on the right side here, you can browse
your own templates or you can get more
at the dope stoke, It's view for
example, choose free. There are some free
that you can use here, like the Halloween is coming. And let's use this graphics. What is doing is downloading
the graphics for you to use. Now you can just drag
your play head on top of the graphics,
select the graphics. And you can see on
the right side what controls you have to
change the graphics. On global control,
you can change the position or the size, or some other features like
left to right, up and down. These options will
depend on the graphics. Now, if we go to text controls, you have the title that you
can change to something else. You can select the font
that you want and you can even pick the letter
spacing or the color. Then you'll have the subtitle. Here you can see
lower third template. If we fold the effects
controls, you have style. You can expand the box for a bigger size so that you
can write more stuff, or you can change die
guns on the lower third. In here, you have
the icons changing. You have four options on the top and three
options on the bottom. Again, this will depend
on the graphics. Each graphics can have different options
on the right side. If you wanted to
browse more again, just good to browse
and you will have more titles if you want
to buy any of this, you can see the cart
on the right corner. You pressed the cart
and you can buy them directly from Adobe stock. If you buy an Adobe
Stock subscription, you will have access to this. If you want to create
your own graphics, you can create in several ways. One is going to the menu
graphics and have a new layer. And choose what type
of layer you can text. Vertical texts, rectangle,
ellipse, or from a file. For example, let's
do a rectangle. I'll position the rectangle
down here as a lower third. I can change up the size. And you have all the options right here on the right side, you can change the color, the stroke, the
shadow, the alignment, and you can even
do the lettering. This means that if you want to change the size to
make it text layer, you can add here on
the New Layer and now just put the text on
the position that you want. For example, if I select again the shape and I've been
to the new text layer, I'll pin it to the left side
and the right side once I write something different on the new text layer, for example, 12, you can see the size changing if I write
something a little bigger, you can see also
the size changing. This is the pain to remember. It's under shape to beam to the Adobe texts
on the graphics. You can also design shapes. You can use an
ellipse or retinal, or you can create
using this pen tool. If you start drawing, you can click to give a point or click and drag to
give a curved point. For example, if I wanted
to delete everything, I'll just go to
essential graphics. Select and press Delete,
Delete, and delete. I still have my graphics, but I don't have any layer. Now, I'll design
something like this. If you wanted to
change up some points, you can press command
to erase 1 or given other point just
by clicking on the line. If you wanted to
convert the point, if you press Alt, you can drag the points
to make it curve. And now we have a famous symbol.
19. Multicam Editing: Now let's look into
multi-camera with two clips. You can choose both of them. And if you have a
recording audio on both of them
at the same time, you can create a multi-camera, just press the right button, create multi-camera
source sequence. This will pop up a
window that will ask you what kind of
synchronization do you want? In this case, we'll use
our audio and the rest. You don't have to
change anything, just press Okay, and it
will synchronize by audio. Now you have a new
folder that it's we processed clips where
you have the two videos. If you go back, we have a
sequence that is synchronized. Now, you can put this one inside another and you
have only one video. But if you want to
see both cameras, you can use the multi-camera. Just go to the tool,
press multi-camera. And now you see the two
angles that you need. You can select one or the other. And the audio is only
from one camera. If you want to make live
edits, like changing, you just have to, as you play the video, you can select and you
can see the red line. This means that
you have selected this camera and
as it is playing, you changing the camera. It's really easy to do
multi-camera editing like this. You can change and
change and change. And once you stop, you'll see that you have your multi-camera editing
done on the timeline. If you want to open the multi-camera editing
as a timeline, you can press with the right
button and open in timeline. Now you can see you're
both clips synchronized. And for example, if you're using one audio and you
want the other, you just have to
change the mute, track me at this one, and remove the mood on this one. Once you go back
to your timeline, you now have the audio that you selected with all the edits. As you can see on
the right side, you have all the edits. It's really, really easy to use. Then if you close
the multi-camera, just go back to composite video. And as you can see, you have your editing done. If you have two video clips
with sizes different, what you can do is go to your
multi-camera and then this one just pressed with
the right button and press scale to frame size. Now it will resize to
the size of the other. Now you can see both images are synchronized
at the same time, and the audio is
also synchronized.
20. Synchronise audio: The sun is really,
really important. If you have a capture like
this with no microphone, and then you have the microphone sound separately
on another track. Because used external recorder, It's so easy to synchronize. You just select the both videos, press with the right button, and click on Merge Clips. Now, you will synchronize
the audio using the merge and you will remove
the audio from the video. Now you press OK. Once you
have your clip, this is merge. And now if you drag
it to the timeline, you can see that the video, it's using, the audio file
and not the original audio. And the quality will
be much, much better.
21. Audio editing: Now let's talk about audio. Again. We can change the
workspace to audio. In here you'll
have the essential sound on the right side. If you wanted to put some music, you have also Adobe stock
music where you can find all kinds of music's depending on each mood that you want. For example, let's choose happy and we have a
lot of happy songs. But here you need to
have the subscription if you go through your project
window and an important, a new sound, for example, I'm importing some
sound effects. Now you can see the
files that are green. And I can put a sound
effects down here. If you don't want
to use Adobe Stock, you can use your own
songs or sound effects. Just drag them to
the audio lines. If you want to edit the sound, just click on it and on
the Essential Sound, go to edit in here, you have a lot of presence. For example, for dialogue, you can make a podcast voice. You can clean up nicely dialogue from radio,
from television. Just go through them and see
what works best for you. Some of them, you can even pick yourself and use dialogue. And once you press dialogue, you have all the
different settings here. For example, if you want
to remove some noise, you have it on repair. When you have reduced
nice are Reduce Rumble. You have a lot of options to
get your sum much better. Also, you have your clip volume that you can raise
our low at it, or even muted if you want to change other
settings on the audio, you can also go to
effects controls. You have your volume, your channel volume,
and your effects here. And as you can see, you can have animation
on your audio. Just toggle the
animation button. For example, if you
have some music here, if you want to direct
some music here, now you have your layer
of music and you can select music and you
have some more options. For example, one good option a uneasy to do is that ducking, since you said
that this clip was the dialogue and this
one was the music. Once you use the
ducking inactivated, it will duck against
the dialogue. This saying that you're playing the music wants the
dialogue starts. It will be ducking
by 18 decibels. Once you have that selected, just breast generate keyframes. If you want to see those
keyframes on a timeline, you can resize the
audio lane in. Now you can see the keyframes that are ducking when
it comes the voice. This is a really easy
and useful effect.
22. Exporting your project: Once you have all this done, all you need to do is
export your video. Just go to File Export Media, or you have the shortcut Command M or on
the PC Control M. On this window, you can see
all your editing red here. You have a lot of
presence that are useful for your expectation. For example, you
can go to Format and you have all these
different formats. But if you press H.264, that is the most popular one. And you got the present. You have, for example here,
adobe Stock, Facebook, mobile devices, twitter,
Vimeo, and YouTube. And you have here most
of the resolutions that, those platforms, except you just need to pick one on
the output name. You press here to decide where you're going to
record your file. And you have here
a lot of options. But you don't need to change because the present is
already making that for you. Make sure you press here to
use maximum render quality, and then just press
Export and it's done. That's lessons. You have your video editing
and ready to upload.
23. The End!: Hey, you made it to
the end of the course, really help you learn the
basics of the Premier Pro. And now you're going to be making really, really
awesome videos. Serine, my next course.
 Gonçalo Estrelado, Video Certified Instructor