Transcripts
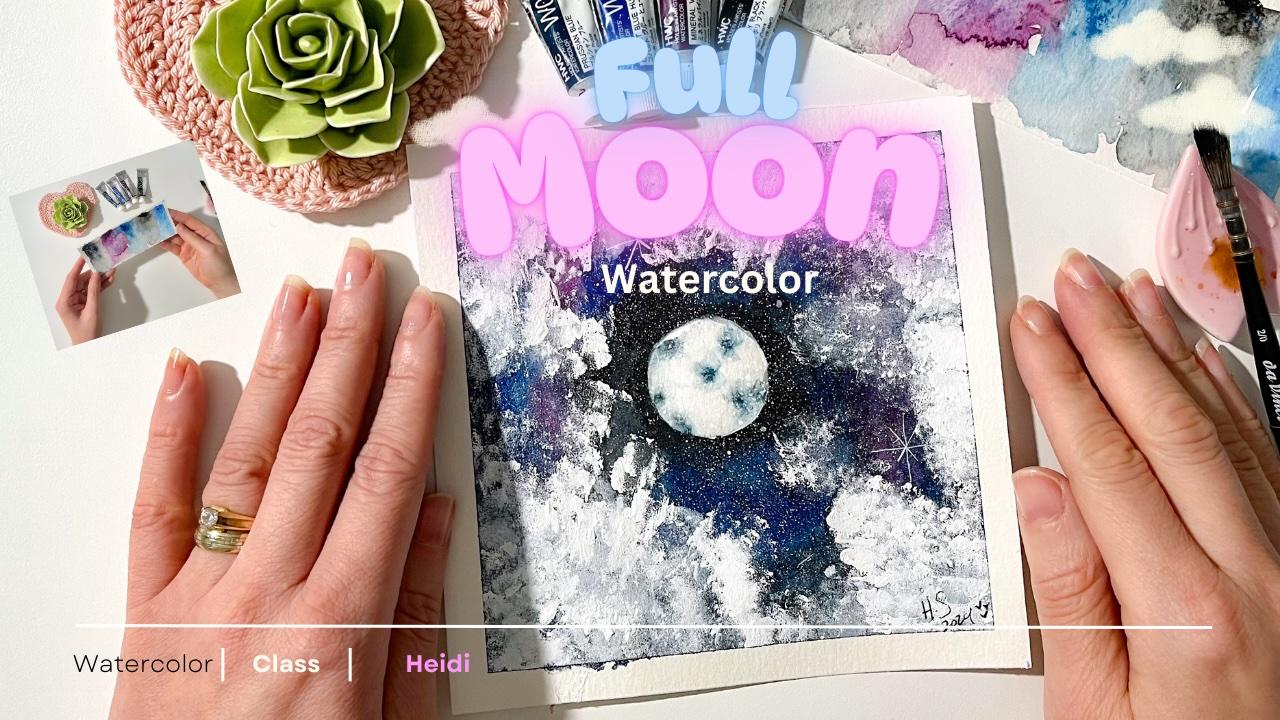
1. Welcome to the Class: Hello, and welcome
to this class. My name is Heidi and I am your
instructor for this class. We are going to be painting a beautiful sky mystique with dreamy clouds
and a full moon. I will be guiding you
through the whole process, starting with the blank canvas and creating or
watercolor chart, and then going through
the whole process of painting or watercolor
painting in layers. I will explain to
you step by step, so you can follow
up me step by step and creating at the same time. I hope you join me for this class and I can wait
to see what you create. I want to invite you
to follow me here on skill tare so
we keep in contact and we can exchange ideas or
doubts and learn together. So let's have this beautiful
creative time together, and I will see you
in the next video.
2. Supplies: Hello, and welcome to the class. Let's talk about the
materials and the supplies we are going to be using during the class and
that you need to have. But remember, you
don't need to have the exact brands or
types that I have here. You can just take this as an inspiration and use
whatever you have at home. First, we are going to be using two jars with clean water. This is to clean our brushes
and use on the painting. Watercolor paper. You can use any type of
watercolor paper you have. And I recommend just
using a cold press one, which will hold
better than water. We are going to be
using mush water. Do you need some washing
tapes or masking tape? A mixing pan and watercolors, of course, in different
shades and colors. I would be explaining
what color I am using during the class. A cling towel or paper towel. We are going to be
painting something, and we need a pencil. This one is a watercolor pencil. We need a flat brush and a bamboo stick to make the
stars using the white paint. Or you can also use wash for
the stars and the clouds. We also need some salt, the fine granulated salt to
make some little effects. You will need one or
two round brushes. Use a medium size will be okay and also a very small
one to make some stars. We are doing the clouds
with some sponges. I am using a makeup sponge here, and you can use a normal
sponge for cleaning the dishes or another
type of sponge you have. This will make a very beautiful
effect in your painting. We also need some cardboard to cover our surface so it doesn't get taint or with the watercolor
when we are using it. But you can also put a clean towel below
your watercolor paper, or you can just use your surface as it is
and then clean it up. We need also a roller and a
paper cutter or a scissors, whichever works best for you. To cut the paper
to the size we are going to be using
during the painting. So this is all we need. Also had at hand some fine
liners in color black or red. I think this is all.
So let's start. I will see you in
the next video.
3. Preparing the Paper: Let's prepare our paper to start working
or more painting. For this particular painting, I want a 15 by 15 size canvas. So I will cut the paper
using these measurements. You can do it bigger or
smaller if you prefer. I am looking for a
square type of painting. Okay, I just did
the measurements, and now I will just
start cutting with using a paper cutting tool. If you don't have a
paper cutting tool, you can use your scissors, being careful of that the
lines are steady and correct. As you can see, I am
using underneath my paper a cutting board so my surface
doesn't get the damage. Be careful about that as well. So our canvas is ready by 15. And now I will fix
this canvas on my cardboard so I can have
a surface ready to paint. And for that, I will be using my masking tape to fix the
paper to the cardboard. So my work stays on the right place while I
will be painting on the paper. Be very precise with the fixing your paper
because if your paper moves, then your painter
will be a mess. And as you can see,
I am starting on the bottom and the
upper side of my paper, maintaining this orientation
will help me get an easier peel off the tape
when the painting is ready. I do the down and the
up size of the paper, and then I do the sizes, left and right size, making sure that the
tape is well placed, leaving a one or 2 centimeters of millimeters, no centimeters. Millimeters of frame. So it gives the painting a more clean look
when it is finished. So our paper is fixed, I am making sure the tape is
well blue to the cardboard, and now we can start
with our painting. I will see you in
the next video.
4. Creating the Color Chart: First things we need
to do after preparing our paper is to do
our color chart. And this is the
most important part in every painting you will
be making from now on. And I will explain to you the colors we are going
to do the color chart. And they are mineral violet, cobalt blue, Prussian blue. Eye boodyblack and paints gray. These colors are the
ones we are going to be using to create our beautiful whimsical
and mystic sky with a full moon and beautiful
clouds that we are going to be making with white paint. Let's start with
the color chart, and this is very easy. We are going to take a piece of watercolor paper the
same as you will be using for your paint
for your painting, and let's fix it in a a cutting mat here
or in a cardboard, you will have your
water and your brush, and a clean towel. I have here the paper. It's just a stripe of the paper that I used to cut the canvas, and I will fix it in the
cutting mat with watch tapes. So it doesn't move
while I am painting or playing with the colors as
we are going to be doing. So it is fixed, and the technique that
we are going to be using during the painting
is wedge on weight. Wet and wet is when you wet
your paper with clean water, and then you apply the
color with the wet brush. And this is called the
wet and wet technique. You can take a look at
my other classes where I go in deep in depth on these subjects like making the color charts and using
the wet and wet technique. And so you can learn more about these topics on a
lens wide class. Starting with the paints gray, I am making my color chart
of this beautiful color. As you can see,
the paper was wet. And then I took color from the small pan and apply onto
the paper with the brush. Now I will do the same
with the other colors. I am just taking a little bit of the color on my mixing pan, and then we are going to proceed to play with this beautiful
color and see how they react on this paper and with the amount of
water that I apply on the paper and play at a bit with it before we
start painting or painting. That is the most important part. When you create a color chart, you get to know your colors
and the medium you are using. You can do a color chart
for any medium you use, and here we are pledging or doing the color
chart for water colors, and it will give me an idea
on how they will react when I apply less or more water and so on, or other techniques. So now let's continue with
the other watercolors. I apply already the paints gray. Now I will proceed
with the violets, doing the same thing,
wet on wet technique. I wet my brush and I apply
the color onto the paper. And then if I see
I need more water, then I just pick more water from the jar and
apply onto the paper. I am here just pulling
up the color and to see how it will be more lighter
as I apply more water. I will do this same stem with all the colors that we
have in our palette. Now, let's do this
with a cobbled blue. This is a very beautiful blue that you can really make
wonderful things with this when you apply water and pull up the color
onto the paper. And when you see that you have too much
color on your brush, you just clean it in your
towel and apply more water, and you will see how the
color get lighter or darker depending on if you
are applying water or not, or if the paper is dry or wet. Okay, let's continue
with the next color, which is the iboyblack. And we are going to be using all these colors on
the painting to give more depth and more dramatic
look to the painting. But then we are
going to be applying some splashes stars
and the clouds. And this will give really this mystic vibe
on the painting. I think you will love
it. And the last color is the Prussian blue. No, no. Is the Prussian blue? Yes, the Prussian blue, which is another type
of blue that is so beautiful when you use
in your paintings. Now I will see how they
mix together and play a little bit with it to see
how much water I need to use. And this is simple. You take water, and then if you see that
it's too much water, you can use a paper
towel and dry the color on the painting
and then reapply the color, or you just clean your brush in your towel and apply your
water or just color, depending on what you
want to get on the paper. Now let's play with the salt and see how they react and
for this technique. You just need to apply the salt on the most wet
spots on your painting. For that, it's very important
that you take care of the wet of your painting if you want to apply
this technique. If it is dry, it will
not do the magic, so it needs to be
a little bit wet. Let it dry and then remove the little drops
of salt crystals, the crystals of salt. And then the effect will
something like this, more or less when it dries. And then you can remove the salt only by just taking
it with your hand. I will see you in
the next video.
5. Paiting the Sky: First Layer : Have done all the preparation
for start painting. Now, let's start by
painting the moon. You need something circular and a watercolor pencil or a
pencil, normal pencil. So we are letting the
moon to last last. We are going to be
painting the moon. We are starting with the sky. And this is the first layer. For that, you need
your round brush. And clean water. We are then going to be applying
the wet on wet technique. For that, we need to
make our paper wet. How with your brush, you just start painting with the clean water using
your round brush. And as you can see, I am
painting just half of my canvas because we are starting on the left
side of the painting, and then we are going to be
moving to the right side. Our left side is wet, so let's start with our colors. Starting with the
darkest one you have, in this case, is the black. I will be touching
my paper here and there with my darkest color, starting on the edges and
then moving towards the moon. I will change colors as I go. Now I will clean my brush
and take the next color. In this case, is the violet. And I will do the same touching
my paper here and there. Let this be intuitive. You can place your color
as I am doing here, following my every step, or you can start making your
own decisions on the go. Now I am using the
pains gray and going near the moon because we want to
make the moon pop up, and the darker colors
will do this at the best. So in this first layer, the color will be not dark. But when we apply
the second layer, you will notice a very
big shift in depth. Moving the colors
and the waters. And if you see you have too
much water on the paper, remember you can use a towel or a paper towel to remove
the excess of water or use your brush to move the water to the
center of the paper. As I am doing here, you can
see it was too much water, then I use my paper. Now, following with
the next color, which is the covered blue, and this start to give to my painting a little
bit of dramatic vs. But we are not done yet. We are just starting. Now using the Bruch and blue, adding some touches
here and there. And as you can see, I am moving the water to the right side of the paper and the colors
are reacting to that. I don't see that I need to add more water on this
side of the painting. But go with your flow and see how your painting is asking
for more or less water. Adding a little bit of
darkest touches on the edges. Remember, we want
to make this darker towards the moon and on
the edges of the painting. But we will be
finishing this up on the second layer because
at the first layer is always choosing where
those dark spots will be or where those
more light colors will be. And in the second, you decide where to apply more or
less of these colors. As my round brush is super wet because they
absorb too much water, I don't need to get more water
for my yard from my yard. So going around the moon, making it darker on around it. So you start to see how this
circle start to pop up. Continue adding the
colors on the right side. Now I am adding the
violet on and see how my painting is asking for more colors and less colors. Remember when we are trying to just make the foundation
for the painting, it will make sense. By now, it looks like
something crazy, but you will see when we
finish this first layer and we add the second layers and the other highlights
to the painting, it will pop up so beautifully that you need to just
trust the process. Going here and there, adding colors and trying to
mix them a little bit. Using water to move the color if you need to move the color, then you just make
your brush wet and apply onto the
painting while it is wet. Making sure we go around the moon with darker
colors and not with the lighter ones and create some beautiful, cohesiveness
around it. It is a matter of just going
with the flow and having in mind that you want
the darker color to be around the moon
and on the edges. And trying to make layers over layers before you
apply the second big layer. Here we are just trying
to make those watercolors stay as vibrant as they can because when they
dry, they get lighter. So you need to be aware of this. And if you notice
that your watercolors are too too light in color, when they dry, then you
need to apply more layers. That's the solution
on these cases. And you will see that
the effect will be more vibrant and beautiful. In contrast, make contrast with the other elements that we are going to be applying
to this painting. So we are just going a little bit here and there
with the darker colors, trying to mix them on the
paper to create cohesiveness. And then after we think the first layer
is already complete, we are going to be doing something that it
is called glazing, and this is just going
with your wet brush with water above the whole painting from one side to the other. You can choose from left to right or from right to left
or from top to bottom. You will see. Keeping the lines, the circular lines
around the moon, so we don't lose the shape
of the moon as itself. So I will start making the glaze and I will see you
in the next video.
6. Paiting the Sky: Glazing: Okay, to finish the first
layer of the painting, we are applying the glaze. This is very simple. You just need clean water
your water and your brush, and then you are going to move your brush from one
side to the other, maintaining you just
want to make it even and then let it completely dry so we can apply the second layer,
as you can see here. I am just moving the color
from one side to the other independently if it is from the left to the right or
from the right to the left, or from up to down
or down to up. So we are creating
a smoother surface. Then when we apply
the second layer, the colors will stay
together and give us the foundation to make
our stars and the clouds. If you think you need to apply some colors on some points, then do that and continue making all the colors
blend together. Then we let this dry completely. You can let it dry a couple of hours overnight
and continue tomorrow, or you can use a hair dryer or a heating tool to
dry it quickly. We'll let this sit
for a couple of hour, and then we continue
with or painting. I will see you in
the next video.
7. Paiting the Sky: Second Layer: The first layer is
completely dry. Now let's use a clean water. That is, I have two
jars of clean water. You can have more if you prefer. With the brush, we are going
to start applying colors around the painting as if it is the first time we
are applying these colors. We are stating
with the violet in this case and going here
and there with the color. Remember, we want
to make the color pop up be more vibrant. So when we apply
the stars and we paint the moon and
we paint the clouds, the colors really make this beautiful
contrast and give us this mystic vibrant effect. Then applying the cobalt blue, on the sizes here and there. And you see the watercolor
is very, very, very light, and that is why you
need to make sure how your watercolor reacts and
how it looks when dry or wet. And then you can
decide if you need to apply more layers than
just two layers as I am doing here and see how the vibrancy of the
colors is on the paper. I am applying two layers
because I know my watercolors. I work with them very often. So I know how they
look with two layers. And for this painting,
specifically, two layers are perfect for the effect that
I want to create. Mintaining the rule, the
darker color around the moon. So the moon pop up, I am applying all the same
shades of colors I have, interchanging them and making sure I am making it cohesive and maintaining a rhythm on the colors and how
they look together. This is also another
plus point to always make your color chart before
you start your painting. So you know that the colors
that you are working with mix well together and doesn't give you an moody or
dirty effect on the paper. All these colors
that I have here, they look very well together. They are in the same category, so they pop up and
help each other out. So, get to know your
watercolors, play with them. Use a lot of water. Just use a little bit of water and see how
your colors react. And try to if you can, try to practice with
different brands of watercolors or the medium
that you work with and discover the ones
that are perfect for you. The painting is really taking a depth and I am liking how
they are looking right now. So I will start to think that this is enough of
color and then let this complete literally dry to proceed to the next steps
which are painting the moon. And I will see you in the next video where
we are going to paint the moon. I
8. Painting The Moon: To paint the mound were using the wet and
wet technique as well and salt and a
little bit of watercolor. Using Marin brush,
I will make it wet and go through the whole
moon surface with it. And then when it is all wet, I will pick up some watercolors can be whatever color you
choose from your palette. I am using with a
brush and blue, just touching the
paper with the tip of the brush and let it
run through the water. And immediately
applying some grain of salt on those spots with color. And then we need to let
this completely dry. And when it dry, you remove the salt grains with
your hand, that's it. We'll let this dry, and I will
see you in the next video.
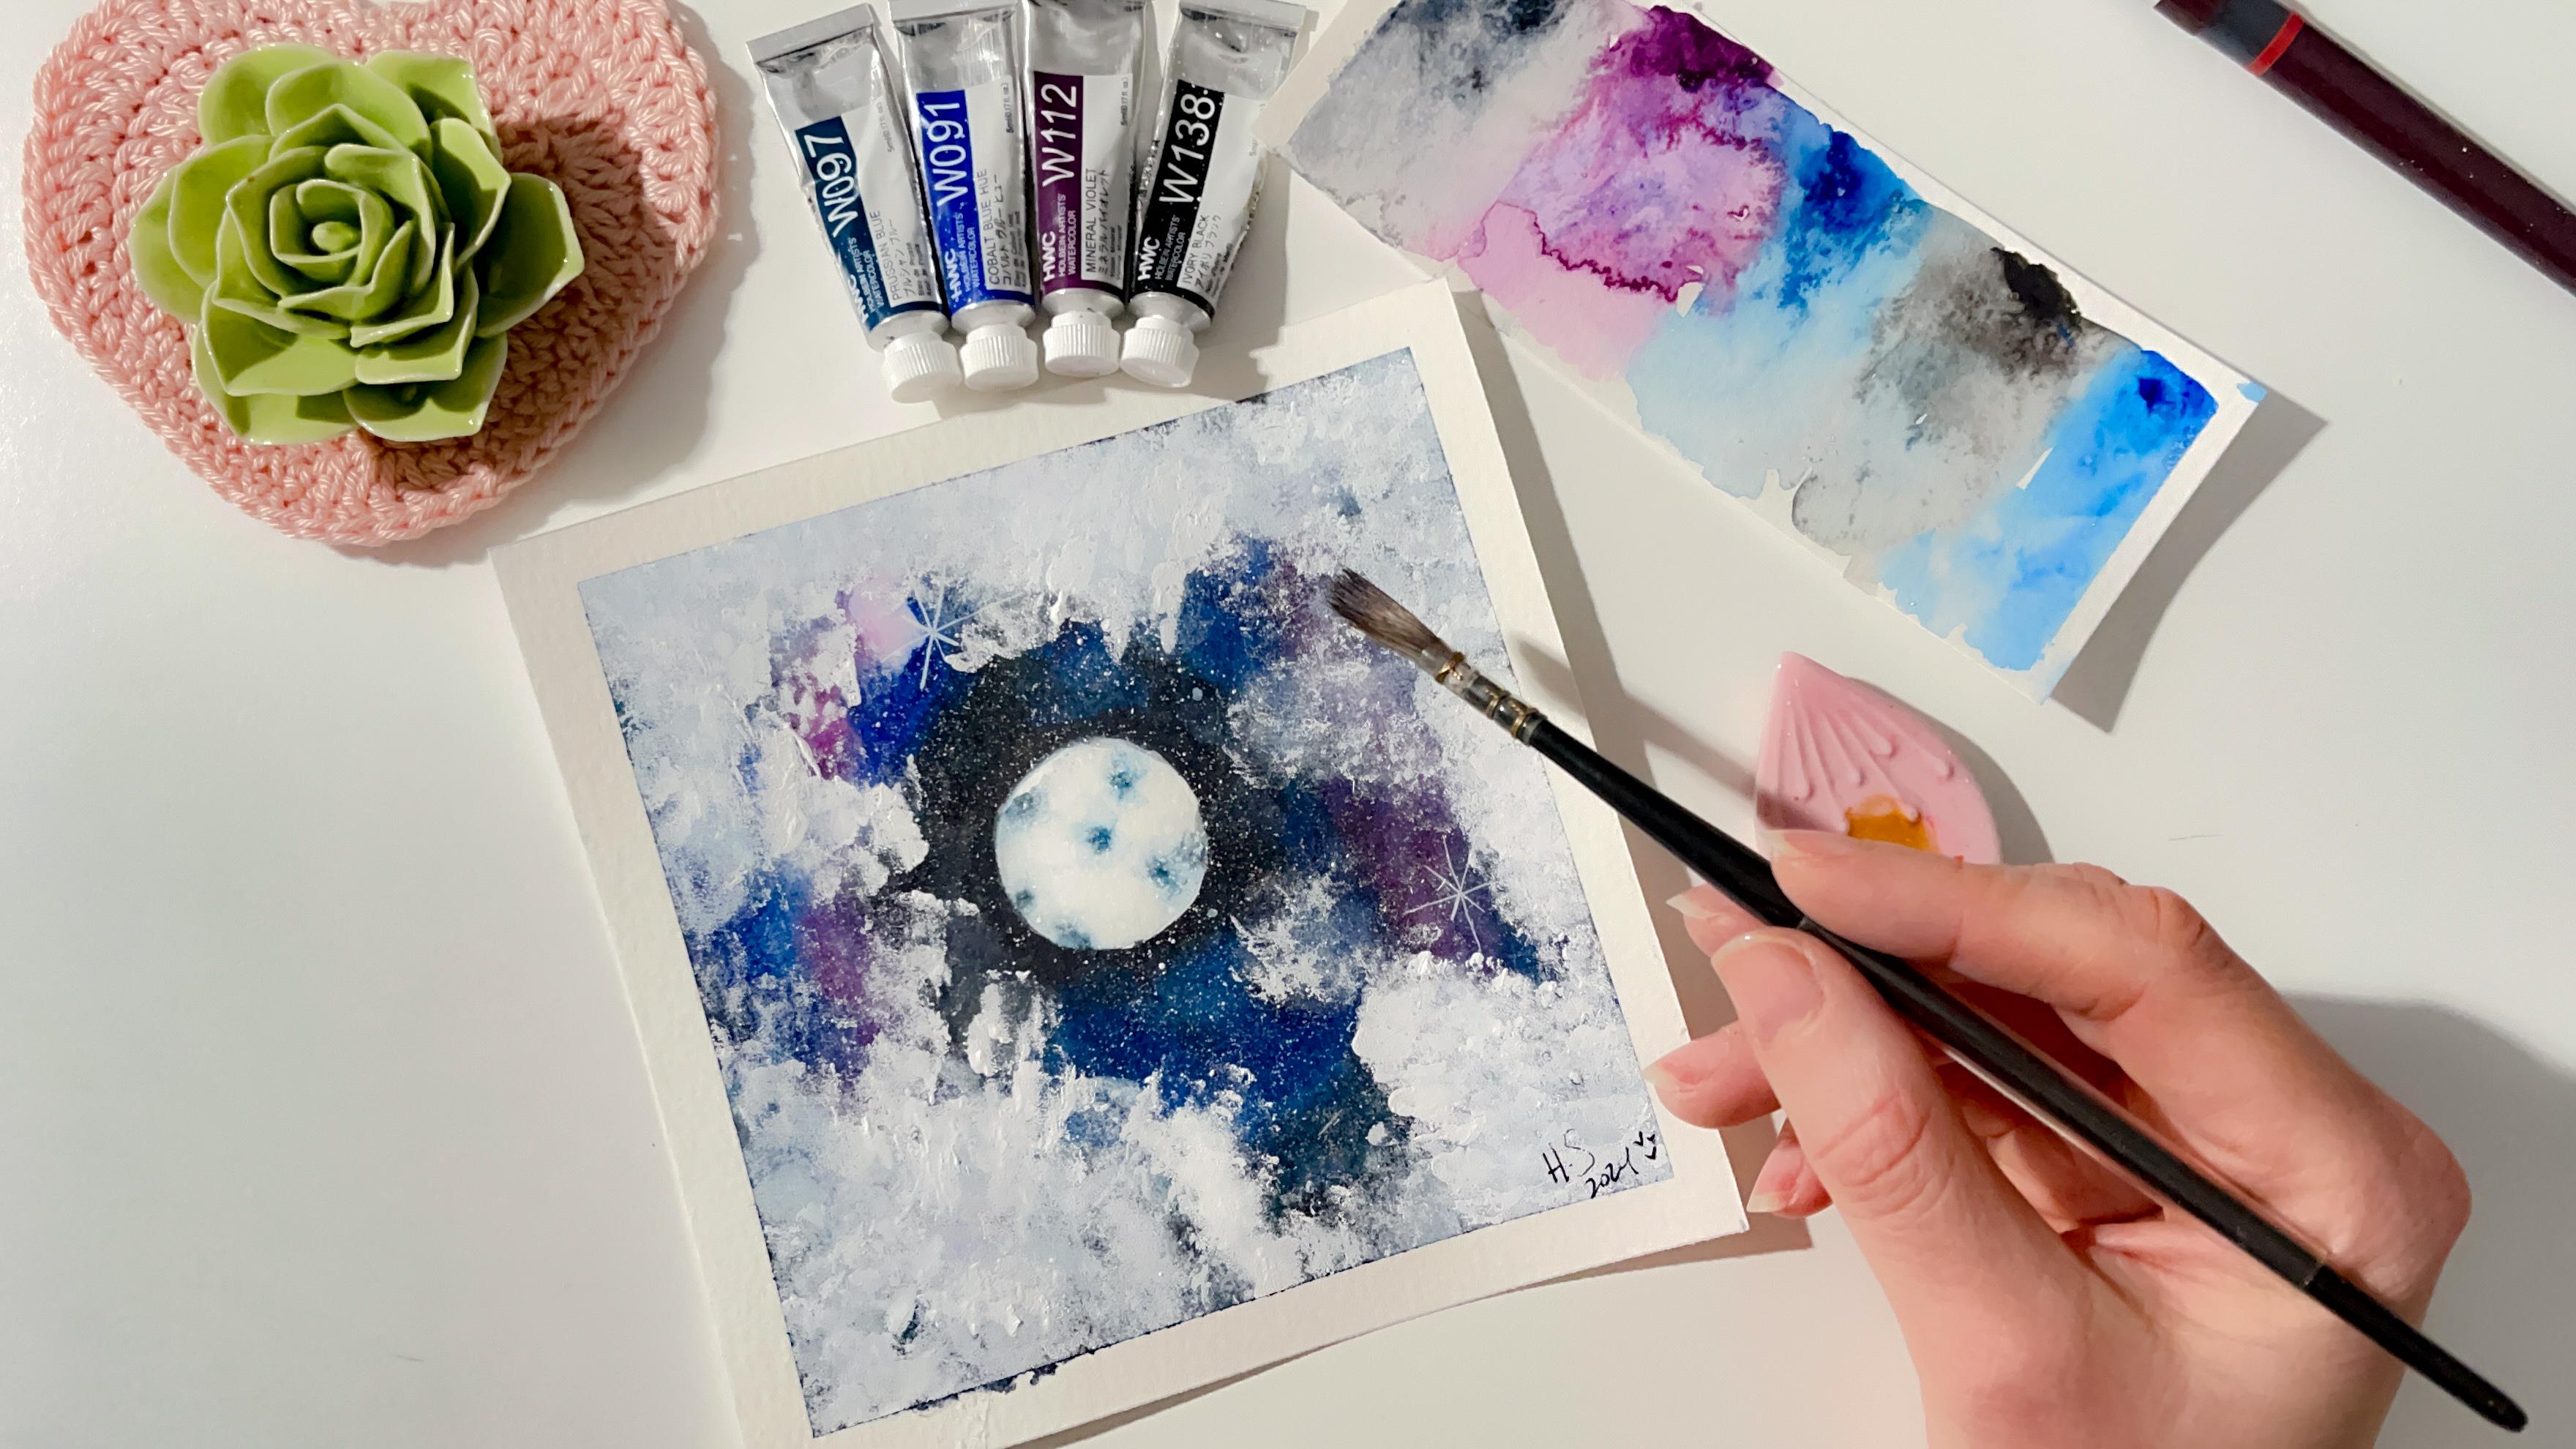
9. Paiting the Clouds: The moon is completely dry. I remove all the sol grains, and now we are
painting the clouds. For that, we need the
white paint or wash if you are using wash. And
with the sponge, we are going to make
some little touches, first on the edges, and then going towards the
upper part of the paper. Very gentle and
leaving some spacing between the clouds
that you are making. So it looks more realistic. Try to smooth the
painting with a sponge. And as you have more
painting on the sponge, it will look more like dry the effect and giving it a
look like it's popping up. And you also can see
how the moon start to come forward in the painting. We're going to go around or frame of the canvas and making the clouds look smooth
and very fluffy. Depending on the
sponge you are using, you will need more or less
painting on your sponge. Remember the sponge absorb, whatever it come
in contact with. So here the painting can get drain or absorbed by the sponge. So it is looking really nice. I like the look of
it and I will smooth the clouds so they look more
realistic and more soft. So to and you can see
also the contrast with the background and
the clouds as well. It's looking good, I think, and you can choose how much clouds you
want on your painting. So I will let this try and I will see you
in the next video.
10. Painting The Starts: Let's ask the stars. And for that, we are
using the white paint, the flat brush, and
a bamboo stick. And we are using the
splash technique. So the stars will be very tiny and they are really
perfect for this painting. Mostly, we are adding the stars on the center
where the colors are the blues and the
darker blue and violet. So it make this beautiful
mystic effect. Like this. You can also use the toothbrush if you don't have a flat brush and
with your finger, you can make the little stars. As you can see, it is looking
very magical already. Do as many stars
splotches as you want, and it will give this
beautiful effect, and stars are never too much. So have fun doing the stars. And next, we are
going to be using a very fine brush to paint some bigger stars using
the white paint as well, and this fine brush. Like this one. You can
also use a gel pen. It will be easier
if you don't have these fine, fine brushes. Yeah. Try to use what
you have at hand. And I am making two
beautiful big stars. You can also paint some little
choting stars if you like. But these two will give
such a beautiful effect. So our paintings
look really nice. And now I will add some
other more round stars, and I will see you
in the next video.
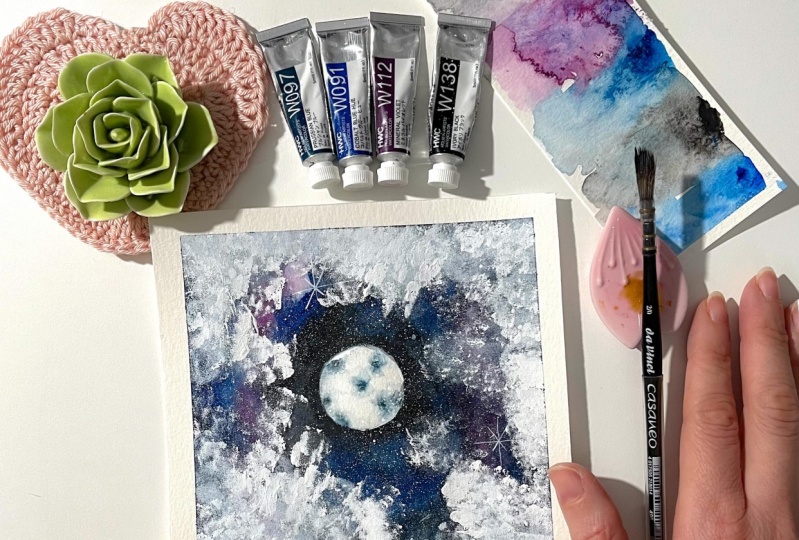
11. Finishing up the Painting: The most satisfying part, peeling of the pape. Let's do that and reveal
our final painting. This is looking really nice. And I can wait to
see what you create, how your painting turn out. And please please. Remember, you can always leave
a review for this class, and I will get in touch
with you if you upload your class project so we can chat on the common section
of your class project. And that's made me
really, really happy. So I hope to see your
beautiful creations and to get in contact with you. Look how pretty and magical and mystical this
painting looks like. Simple techniques that we use, and it really makes magic. So let's finish this up. And another important part of your painting is
adding your signature. And for that, you
need your fine liner. Look how pitiful
this painting is, and I can wait to see yours. Here, I will add my signature and remember to
add yours as well. Because this is your creation. So thank you for being
until now on the class, and I hope to read your
comments about the class. I will see you in
the next video.
12. Class Project: So for your class
project is very simple. You just need to upload pictures of your process, your materials, your final pieces,
your work in progress, and share that with me in the class project
section for this class. In this space, you can also get in contact
with me directly, and I will answer your comments and your ideas about the class. That will be very, very
important and very fun. So I can wait to see
what you create, and please charge your grass
party because that is the most fun and exciting
part for me as a teacher. I will see you in
the next video.
13. Thank You: Congratulations. You
finished the class. Thank you so much for
thanking it and to be at this point of the
class is so amazing. I am so happy to
have you in class. Let's talk about what you
learned in this class. What was the most new part. If you learn
something new or what was the most difficult and challenging for
you in this class? How was to do the stars or the clouds or working
in ledgers what's fun? What's new? What
is easy for you? Let me know in the
conversation when you upload your class project. Let me know how was it for you? Did you enjoy the class? Let me know as well
because that is the most important and
exciting part for me as a teacher to get to know what
you think about the glass, how you interacted with it, and if you learn something new and if you have
fun, of course. It was a beautiful creative time together and I love to
have those with you. Remember, you can follow
me here on skill chair, so you don't miss any update, any new class or any comment
or conversation that I share weekly or monthly with
you here on the community. It's a beautiful place to interchange or ideas
and to learn together. As well, remember
that's very important for me as a teacher
and for this class to get reviews or feedbacks and you can do that very
easily here in the tab which says leave your
review of the class and you can share with
all the community on other artists
and other students what you think about this class. Thank you so much from the
bottom of my heart and I can wait to see you in
my other classes and in my new classes. Keep creative and I will
see you in my next class. Bye bye.
 Artjourneywithme Heidi, ARTIST AND FACILITATOR