Transcripts
1. Class Intro: And Walton's class. If you're looking to elevate your animation process using
free programs like Creta, then this is the
perfect class for you. Yes, you do need to have some
basic knowledge of Krita, which again, if you didn't
know, it's a free program. Most people use it for
painting and drawing. But we are going
to make this frame by frame animation
from start to finish. Most of the videos in this class are around 5 minutes each. We are going to design
our characters, create the character
sheets, storyboards, animatics, and finally,
the animation itself. Your class project
will be to choose to animate one of the
scenes from the storyboard. If you think that's hard for
you, based on your level, you can try to follow along with the practice animation with
the pageant character. If you have any questions, feel free to ask them as a
discussion or as a comment. This class is aimed at
beginners to intermediate. You will need to have a joint
tablet of your choice, and, of course, Kriton as your
main animating program. You can download that
from their website. And of course, you need to have some time around 40
minutes to be exact, because that's how long
this class will be. When you start animating
your own animations, you probably take longer. But this class is
designed to help you from the beginning to the end
of your animation process, again, using Kriten see
you in the class. H
2. Character Design: Hello, there. In this course, I'm going to teach
you how to create tudo animations from
start to finish. All the process you will see and learn from
will be done using completely free programs such as Krita and the Victor resolve. To get used to the brush tool, let's start with some
simple drawings. I will be tracing back some of the sketches I have done while designing one of
the main characters for this course, the
pigeon character. And yes, I'm tracing
back the lines because I didn't recall
myself doing the sketches, so bear with me. There are some questions
we can answer to help us design our characters
while we watch this. One of them is why? Why your character
needs to exist? For me, the answer is simple. I need to come up with a simple character design
to animate for this course. I need to make him or her simple control so everyone watching this will
be able to follow along. For you, the answer
can be as simple as, let's say you have
a story to tell, and this character is
part of your story. Or you have already
designed your character, so now you want to animate it. Whatever is the case, answering a simple question like this can give you a
direction to start. Okay, here's another question. What's the character's
personality? And here, I'm just going to
briefly mention shape period. Even if you don't
know much about the personality of your
character, don't worry. I didn't know as well when I
was designing this pigeon. Once my design was final, I was able to come up
with his personality. In the meantime, I just wanted to make a cute and
lovable character. Even when this simple
idea of cute and lovable was enough for me to
experiment with the shapes. I'm not going to go
deep into shape theory. There's plenty out there
that you can read about. For starters, we can know this round shapes communicate that they are
friendly and affable, while triangular
and point shapes can be a bit more aggressive
and unpredictable. And square shapes represent
grounding and stubbornness. Is this enough for us to
design our characters, though? Well, it kind of depends. We can use the shapes as guidelines and combine
them with one another. Not every wrong
looking character needs to be good sometimes. Having this in mind,
let's leave now the pinching character aside and take a look at
our second character, which is the granny. For my story, I will need two characters that will
interact with one another. When I started designing
the curani character, I made a bunch of
different sketches. I was trying to use
different ideas. I knew I wanted to make the urani to be a little
bit stubborn, book friendly, yet
a little bit cocky. After I did the first sketches, I remember about my great
grandma how she was this little sweet granny
walking around with her cane and going to the park to eat
ice cream on the benches. With this image in mind, I came up with this
final design of a little modern grandma
with big headphones. Her whole body is
like a big bean. She has fin pointed legs. As I was doing the
granny design, I was looking at other character
design ideas until I saw this bean shaped and I knew exactly how I wanted my
little Granny to look like. So keep this in mind.
Looking for inspiration is also a good idea when
designing your characters. And having an example
as my personal story, you can also base your
characters on people you know, or you can take some of
the characteristics from other people and apply
them to your characters. So here's another question. What's the backstory
of your character? If you're still struggling to design your original character, you can try writing a few
sentence about their backstory. Before I finished the
Prision character, I did add some baggy eyes. Once I drew them, I said to myself, Yeah, he's tired after all the coffee and jumping around
the park benches. He is definitely
hyperactive and he likes to push his beak into people's
businesses all the time. That's how I came up
with this backstory by just adding a baggy
eyes to my character. For the Granny, the
backstory is this. She knows her new high tech
tools, as you can tell. She likes to be
informed all the time. So she never goes anywhere without her headphones
and her tablet, so she can Google
the latest news. And the Internet at her
place gets crowded, so she goes around the public spaces to steal
the Wi Fi if she finds some. And that's how I came
up with this backstory. I didn't know that before
until I added a bunch of elements to my characters and
the backstory old itself.
3. Colour Theory: Okay, let's talk about
color for you for a second. If you are struggling with colors to use for
your characters, I will show you why I chose the colors for the
pigeon and the granny. So maybe you can get in sparked. For the pigeon, I decide to use the typical
pigeon colors. Just grab a picture of the
pigeon and you're done. Now, I'm joking, don't
worry, I will elaborate. In the beginning
of this, I wanted first to bring the color wheel. It's called the Advanced
color selector. When we pick colors, we can clearly see
which colors are opposite on the wheel and
which are in close proximity. By holding control
on your keyboard, you can activate
the color picker. So if you pick the
pision colors, we will see it's a gray
blue on the wheel, and the eyes are dark purple, which again, on the color wheel is close to the blue color. The only color that's
far from these two is the color of the beak, the yellow color, and it's
opposite on the wheel. It's a complimentary
color to the blue. So when we pick colors, it's good to look at
the wheel and see which colors are close to each other and which are opposite. The easiest way I found
out is when I choose one main color and pick one or two close colors
to that main color. And for good contrast, I choose an opposite
color to my main color. So we have a nice contrast. With the grounding character, I had a different approach. I wanted to present her as a grounded character,
but yet playful. So when I was
cruising the colors, I was looking at the green
and brown colors as they are presented to be they represent
grounding and relaxing. Colors that you can
find in nature. But when you look at her head
scarf and the headphones, you see they are much brighter
and fun colors, right? So contrasting the
cloak colors that way, of course, it's up to you
which colors you want to use, so good luck, have fun.
4. Animation Principles And Character Sheet: Once you have designed
your characters, it's good to take some time
and draw the character sheet. The idea is to draw your characters from
every possible angle. So once you start
animating them, you can use your
sheet for reference. It will make your animating
process much easier. Also, if you're working
with other people, it's important to have
this character sheet, since there you will find the color information and
that's the characters details. The birth character, I did
the three quarters view, front view, back view,
and profile view. Well, for the credi character, I only did a profile
view since she won't be animated much
in the different poses, while the patient will have
more dynamic movements. Of course, this can change based on the scene I
will be animating. But for now, these character
sheets are enough. Before we jump into animating our main scene with the
two characters we have, I want first to do a small warm up animation
with the pigeon. Since the shape of the
character is simple, he's pretty much a
circ right a sphere. So let's animate him trying
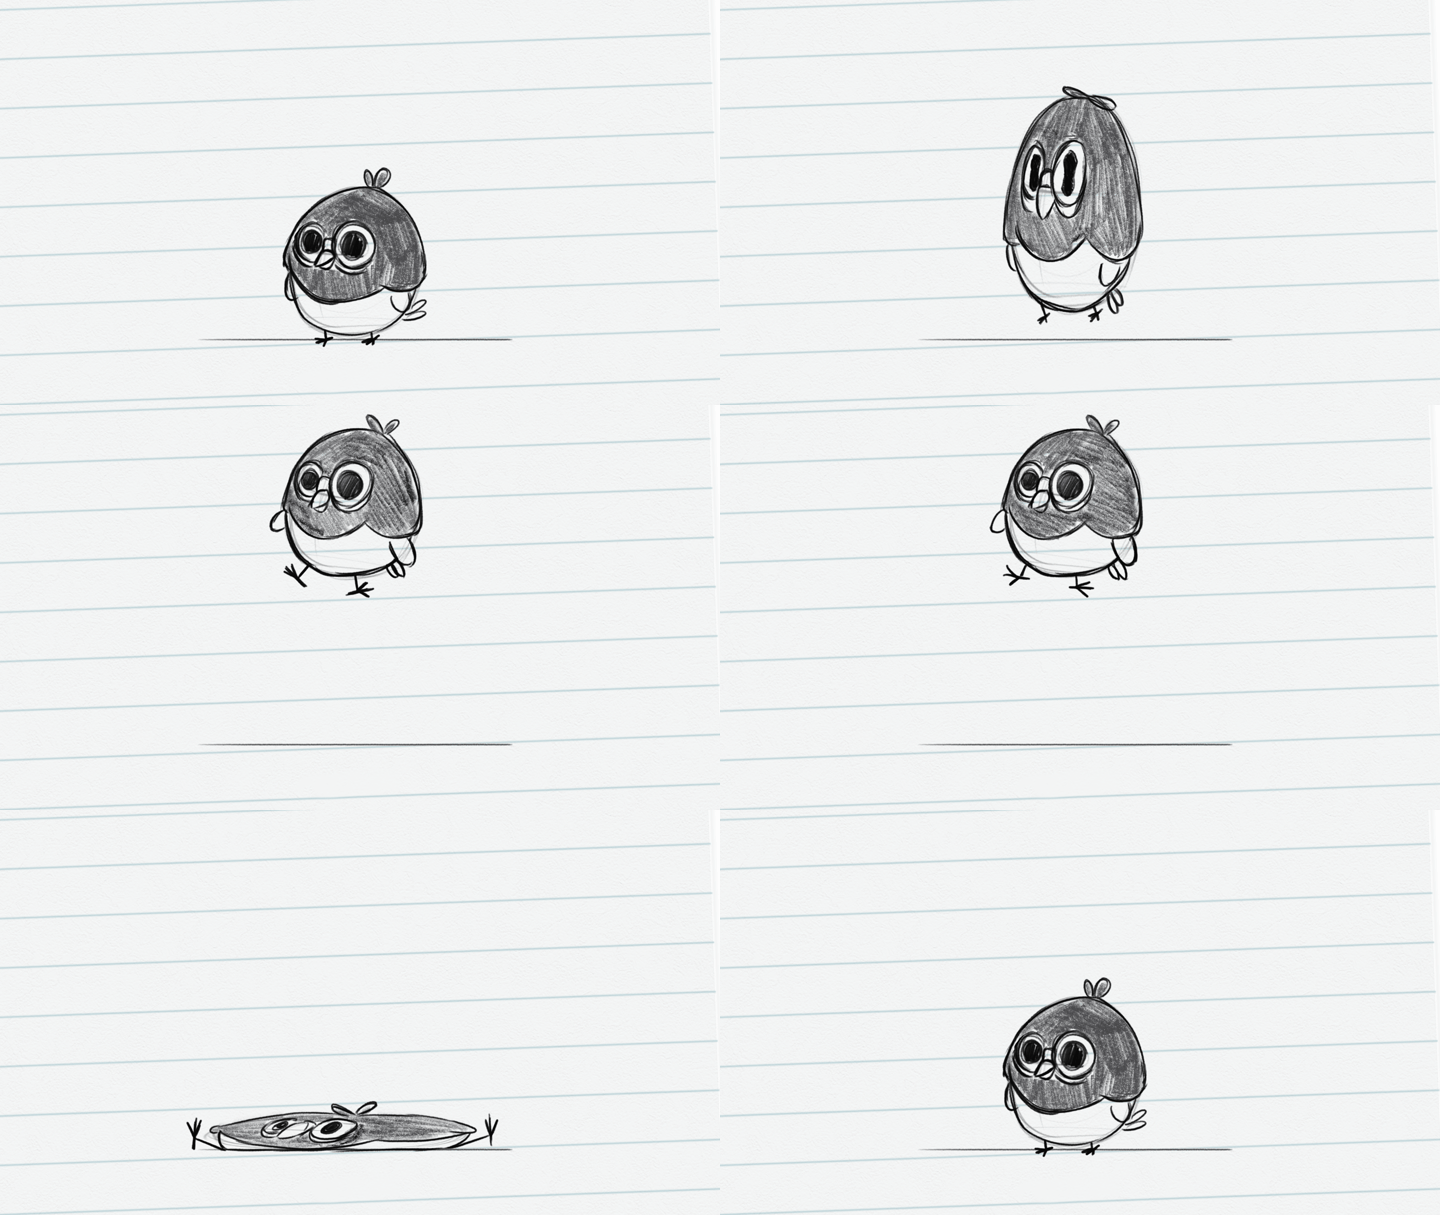
to fly from the ground now, I did a vary animation only by using the traced
shape of the character. And as you can see, I haven't
him my layers on the left. When we do our main scene, we will be a bit more organized. For now, if we look
at the layers, the lines on the ground, the pink layer one is the
reanimation and on pikayer two, I will be animating
the proper lines of the character by
adding the face, the beat, the wings, and so on. The first frame is static. Our bird is standing still. Okay, this is our staging. Before he jumps,
we need to signal that by adding an
anticipation pose. Think about when you
watch the Olympics and observe when they do the
activities like jumping, running, and frow stuff. For example, even when
you have to jump, first, you have to
go backwards, right? Running, walking,
boost things we do, even without thinking, there is a moment of anticipation
to all of them. When you wait to cross the street and the
light goes green, from a still position, the first thing you do is to go backwards and then forward
with your first step. In our case, with the bird we are going to squish
him a little bit. We will be using the famous
12 principles of animation. You don't have to know
all of them by half, but knowing how to use them can enhance your animation
to be smooth and alive. First principle is
squash and stretch. Right now, we're squishing our little character to create the illusion
of anticipation. On the next frame, instead
of having him in the air, we are going to apply
the stretch principle. We are stretching our character before he gets in the
position of flying. These principles can work not only for cartoon characters, but they are used even
for human characters. Some people use quotion
stretch when they don't want to draw
too many in betwes. And if you're asking
yourself, what are eptries? They are drawings in
between the key frames or we also can call them in
between the main drawings. So our stretch example is
an in between until we get to our main pose of the
character to be in the air. There's no rule how many
images you need to do as long as you achieve the desired movement
for your innovations. Once your character is in
the air flying up and down, at some point, we need to
land him on the ground. How are we going to do that? Well, gravity, yes. In our scene, we
will have gravity, but how are we
going to show that? This next frame is a
little bit exaggerated. His eyes are stretched
along side with his head. This is again an example
of portion stretch. In this case, we're stretching the whole body as
we did earlier, but this time, we can even draw a feather falling from him and add a little despair
in his eyes. This ram is visible
for four frames. Once he hits the ground, we again get another
extreme frame. He's almost squached
like a pancake. Trying to animate
simple characters like this one can help
us improve and break away the boring
shapes by drawing exaggerated body shapes,
eyes, et cetera. This creates the illusion of seemingly repeated animation. It starts and ends in
the same position, and we get something like this. Of course, you can add more
ivtris to your automation and maybe you can add
the flying feather that flies away from him. I didn't do that
because I wanted to showcase the main principles. But if you do, you can do yours
and make it better.
5. Animatics: Let's get to the four
part, the animation. First, we need to have a
scene to animate, right? Well, let's come up
with a scene then. For this class, I have created two characters as
you just witnessed. You can use them if you want to follow along or make
your own characters. First, we need to
come up with a story. You can write down as a
script if you want to, or if you're like me, you
can do a short storyboard. This storyboard I did on stream. If you can watch the full
version on my channel. But I don't want to waste
time here, so in short, let's first say what is
a storyboard and how you can come up with one to
use for your own animations. A storyboard is a series
of illustrations or drawings that show key
events in the story. If we follow our storyboard, we will see the story unfolding
in front of our eyes. Where this, you don't need to be extra detail with your drawings when doing your storyboards. And that's why I chose to draw
these shapes to represent the granny character as a big cube and the pision
character as a small sphere. If you need to present your storyboards in
front of a client, then it's good to clean them up and show the storyboard
with better drawings. I will leave a template for
storyboard you can use, but you can also make
your own encrypton by using the shape tools. Let's I made the first scene in our storyboard.
The introduction. We have a character
sitting on a bench with a camera panning from
the left to the right, and then another character
enters the scene. I start out a new file
with these dimensions, and then I open my storyboard as well from which I
copy the area I will be animating
and paste it on my scene where I
will be animating. I'm just using my right button of the mouse to
copy the selection, and then again with
the right button to paste it in the
other file I have. As you were noticing, I'm not very detailed
and technical with my explanation in encrypton
since this is basic stuff. If you're struggling with
any commands so far, there will be a shortcut
sheet to look up. If you still can't
find the answer, please feel free to ask. This course is for people who already know how to
navigate encryta. Anyway, now we have our
scene from the storyboard, so it's time to lower the capacity and create a
new layer on which first, we're going to draw our bench, which is part of our background. Critter has a line
too you can use. It will take the size of the
current bush you're using. So you can change the bush and then the line
itself will change. I can increase the burs size, so the light will increase or if it decrease then the
light will decrease. Once our bench is done, I will lock that layer and
lower the apacity again. Again, I do this so I don't
draw on top of that layer. I can see and create my
granny layer on top. I will be using single layers
for both of my characters. So with the granny, I want to make her help
to bop going back and forward to the sound of the music coming
from her headphones. Once I did my rough sketch, I will duplicate
the first frame. And then I will
take the selection to select only her head and
move it back and forward. Once I'm happy
with the movement, I will copy the two frames and not to be confused
which frame goes first, I will change the color with the second frame to go to
the next potential frame, we press the arrow there. So Crystal will show us where should be the
next key frame. When you hold Control
on your keyboard, you can select
multiple keyframes. Once you have select them, you can clone these frames. Make sure you are pressing k on your keyboard and move
them around your timeline. I will clone my key
frames a couple of times, so it will create this
looping effect on the head, and I'll be using
this multiple times across this animation. Okay, after the gran is done, I'm making new layer for
the little equation. The open window on the left is a separate program
called PureRef. It allows you to have your reference images on your screen. You can dolod that for
free, so don't worry. I will make sure
to leave links to all the programs I
use in this course. So let's get back
to the ematics. I have my character sheet open so I can replicate the
positions of my character. All I'm doing is
drawing the positions, and I'm using the transform
tool to move him around. Remember, at this stage, we're not looking
for smooth movement, but a simple movement, just to use it later
as a guideline, so we can see the
timing once we get back to do the earth animations
and then the cleanups. Yes, frame frame animations
have structures, and sometimes it can be a bit
tedious to go through them, but the end result is
definitely worth it.
6. Rough Animation Part 1: Okay, we are going to
do our animations. In this stage, we
are going to use the ematics we have done before, and on top of them, we can do our repass of our animations. I'm going to do the
Cision first since it's the character with the most
movement in the scene. Make sure once you create a new layer to double
click and rename it. It's important to keep
things organized, since we are going to end
up with a lot of layers, and if we want to make
corrections down the line, it's going to be impossible
to find the right layer. I will bring back my
reference program and I will open the character
sheet for the pigeon. I need to see the body positions of the bird so I can
redraw them correctly. Remember, it's
important to keep using your references in order for you to have better animations, better drawings, and
everything to stay consistent. Once I have my new
layer for the pigeon, I'm going to lower down the cracky of thematic
layer and I will try to add in between to make the movement smoother on
my of animation layer. I think it's important
to mention if you need to draw symmetrical
drawings, in this case, there's this option you
can turn on crayon, which is called the
horizontal mirror tool, and next to it is the
vertical mirror tool. Basically, one of them you can mirror vertically and
the other horizontally. Gives you a line
you can position anywhere on your canvas
and draw symmetrical. Obviously, not the whole body
of the bird is symmetrical. Well, actually, the bird's
body is symmetrical. But let's say the
eyes and the beak, I have to turn off the symmetry too and I have
to draw them separately. I have to delete some
of the lines that I did and draw them on
top because again, the body age is symmetrical, but then once we do the tail or the eyes and the
beak and the hair, we need to turn
off the symmetry. It's easier and less stressful to get the
perfect drawing that way. Also, remember, we are
doing animations right now. So don't aim for perfect lines. We just need to put down the
movement to feel smooth. Later we're going again on a new layer to refine the drawings and
finalize our light work. But as later, right now, we are just doing
some rf animation just to get the movement right. As you see, some of the
inbetweens are copies, and I just chose
from them to fit. When I'm trying to change
the view of the character, I'm drawing a new
drawing to fit. You don't have to redraw
every single frame. You can reuse some of them if the position of
the character is the same. W smart and not hard. I did spend a lot of time on this turnaround
of the character. Well, technically,
it's not a turnaround, but it needs to turn from
profile view to back view. And we need to draw a bunch of drawings in between
to make it smoother. Once I spent some time on it, I play the animation.
It's not smooth. But when I go through the
each individual frame, I think this drawing
is a little bit off. You can see the tails back. The big, it might be a little
bit big and the hair, well, I'll call this the
hair, the haircut, it's a little bit
weird looking drawing. I might redo this one. Another way for you to see
if your drawing looks good, it's symmetrical enough is to use the key on your keyboard. It will flick your cavas. That way, once your
image gets flipped, you can see if you have
made mistakes or not. This is like a technique
they used to do back in the days when they didn't have computers to use for animation. Most illustrators and animators will have a small
mirror on the desks, and they will use that
mirror to point at the drawings and see
the mirror image. That way, they will see if they need to make any
corrections or not. Today, we can simply do that by pressing M on our keyboard, especially in Krita
and you can turn back again the calvas to
normal by pressing M again. When you do close
to close animation, it's easier to keep
your draws consistent. But sometimes it's
easier to miss out and have some of the shapes
to be bigger or smaller. I can see once the verse
on the bench seems to be a bit smaller than when
it was on the ground. The way I spotted this
was when I was looking at my amatic layer and
my f animation layer. You can clearly see there's
difference in size. The other way to make sure your animation stay
consistent is to have a copy of your character or
drawing on a separate layer. And that way you can constantly refer using it as a reference on top of the current
frame that you're working to make sure the
proportions are right. That way, your character
or what you're doing, what animation you're doing
can be more consistent.
7. Rough Animation Part 2: Progress with our
little information, you see how much I try to reuse some of the positions
I have already made, as the Cision is trying
to jump on the bench. I'm basically mirroring
the closes I have already created on the first
jump to make the second one. Once we are happy with
the movement, later, we can redraw the closes, and of course, if we have to, and we can clean them up. But for now, I just want to save some time and finish this
as soon as possible. When you're doing
any todo animation, especially frame by
frame animation, if you don't have pens, your work can be frustrating and the end result will be suffering from a lot
of imperfections. I make great example
of how not to be, so don't be like me. Anyway, I will show you
the difference between a lone frame and a copy frame function in criton because
this is important. If we have two crone
frames, for example, and we decide to make a
change to one of them, that change will be applied
to all of the crone frames. Will, if we have two
or more copy frames, duplicate frames, let's say, and we decide to make a
change on one of the frames, that change will only apply to that specific frame we
have made the change on. As I said before, you can
multi select the frames on your animation timeline by holding Control to select
individual frames, or you could shift to select
multiple frames in a row. Once you have selected
your desired frames, you can press the
right button on your mouse and you
see the options. I use shortcuts, but
if you are new to this and don't want to use
shortcuts, don't worry. The gran character is more static when it comes
to animating her. There's not much
movement happening. So the way I'm going
to approach this, I'm going to draw every limp of the character on
a separate layer. The head will be on
a separate layer. I will animate the eyes on
a separate layer as well. My idea here is this
since her head will only move back and forth and she
will blink once in a while, I want to make the animations
for the mouth, the eyes, and core everything and make it into a single layer so I
can animate that layer. Of course, this type of
approach can be destructive since we might need later
to make some changes. Let's say to the colors, or maybe we need to change
the timing of the animation. Before merging the layers
because we can do that, by the way, either by
holding Control or shift and pressing
the right button and choosing the
option that you need. There is a shortcut for
that as well, by the way. Let's select the
layers for the head, and we button and press, we can either press Control G or button and make
them into a group. You can then copy that group and merge the copy of
the group together. So layers, the merger group will be the layers that will get into one layer
that we want to use. That way, you have a
copy of the rest of the layers that they are not like they're not
ruined in a way. They are individually placed. Let's say, the colors
on a different layer, the eyes on a different layer, we can make them into a group, so we'll catch that group, but we will have
individual layer with the copy of that group. So with that in mind, I will be animating the grammar movement in the ture resolve. First, I will try
to swing the legs by using twin
animation in Krista. How to do that, though. Select the layer you
want to animate. In this case, that would be the leg one of the
legs, let's say, press the right
button on your mouse and go to add and from there, Uh, press Add transform mask. Just make a small note here. This function in crystal crec motion training is
pretty unstable. So I don't really
recommend using it. If you want to make
smooth movements, then just choose a
different program. Let's say you make your
favorite fm animation section of the whole thing, and you can explore it as an image sequence and import it in a video editing program. And from there to click the element that you
need to be animated. Anyway, I did try my luck here, and I made the swing
of both the legs with the animation curves because we can't add any key frames
from the animation timeline, but we can add keyframes to our transform layer that we added on the animation curves. It's a bit tricky to use, but as you see what
I'm doing here. So again, I don't really recommend but you can
try and make crash. So keep that in mind. Anyway, the grannies
body and bench, I will render together
as a image sequence. Make sure you remove your
background layer to not be visible when you're
rendering like this. And I will import them
in the ictus of later. And together, I will animate
everything together, right? So her head animation, also the blinking
of the eyes will be rendered as a
second image sequence, and later, we're going
to combine everything. We're going to
compose everything in the victus alongside
with the pigeon. I
8. Colouring: Cowering. Okay, let's
call our animation. More specifically, that would
be the pigeon animation. The way I color frame
animation and rit is by simply duplicating
the animation layer. And obviously,
renaming that layer. It could be the layer we
need not the top one. And I did not do that
here. That's bad. Nobody like me. Make sure
you name your layers, and life will be easier. Probably this would
be a great quote by some sage somewhere. Uh, I guess, yeah, name layers. We are going to use
the felt over there, and we will call our drawings
that we have duplicated the layer of Make sure you don't have gaps
on your drawings. And first of all, I thought I would go and
clean up my formation. But since I'm trying to fix
this as soon as possible, I would do it in a soft way. But you definitely clean
up your animations, like your drawings, make a
new layer, do proper lines. Even though when I look at
my lines, they're clean. They're like, clean.
There are some poses, some drawings where
I need to redo them, but they are like singular. So I will use the field to to do that to fill
up my drawings. And the ones that
I need to redo, I will just redo. But they are like individuals. For example, when
the bird falls on the tablet on the granny
and then when it grows, there's another frame where
I have scribble lines. And when you have
scribble lines, that's not ideal because then the field to will
not do the best job, then you have to go
in and clean again. And yeah, make sure you have proper clean lines
on your drawings, and then you can, you know, duplicate them and color them. That's the fastest
way I file out the color animation
encrypt specifically. And the way I have decided
to pick the colors, I have my concept art. I imported that and I have
it as a separate layer, and I just I minimize
it a little bit, but not too much, just enough to be able to
hit control on my keyboard, pick the color I need, and then color the character. It's just faster that way. I did that for the gray as well. Have your reference
on your cavas as a separate layer
and you can review it whenever you need it and you can hide it
because obviously, you don't need to have it when you handle
your animation because it will be recorded
on your screen and that's not I mean, you
don't need it there, right? So yeah, that's
one of the ways I call novations and that
will take some time. I might speed up this for
you and hopefully enjoy. Then again, name your layers, do your cleanup drawings
with proper lines, and life will be
easier as they say. Once we have colored
our pission animation, to render it as image sequencing as the way
we did with the granny. Make sure you are
organized and create separate folders for each
of the animations you have. I have a folder only for the
granny's head animation, a folder for her
body with the bench, and now I'm going to make
a folder for the pigeon. Go to random animation and on image location where says
expo as image sequence, choose where to save it. Make a new folder only for
the pission animation. There's no need to export
this into a video. Also, as before, make
sure you have hidden your background and
only the pigeon is visible before rendering. We need our images to be
PNGs with no background.
9. Render - Class Project: Doing so, finally, we are at
our final step, composing. I will be using the
picture reserve since it's a free
video editing program, and you have plenty of effects
and options to work with. This is the ictureRsve
on the bottom. You will see seven icons. We're going to select the third one, which is the editing. Now, we're in the editing
space of the program, and we are going to
draw our animations into the media pool on the left. Open your folders and
select the first image, hold shift, and scroll down until you select
the last image. So we can import the
full sequence together. I will do this from the granny, from the cinchon
and pad the granny. If you hover on
top of that click, by the way, you will
see the image playing. Let's do this for the
other two and find a nice background
image as well to import again into the media
pool section over there. Now, we have everything, right? It's time to put it
into the timeline. If you don't see
your clips there, make sure to zoom in from
that scale over there. Or there's a shortcut
while you can hold open the keyboard and scroll with the middle
button of your house. I won't be using this short
combination quite a lot, so it makes my work
faster that way. After we have important all of our animations in
the background, it's time to sink the granny
head movements to the bird. Before we go there, here are
some shortcuts I'm using. If you press the middle
button of the mouse, you can move around
the timeline. Also, there's a shortcut for the cut tool in the
tus off, which is B. It's that small as
icon over there. If you want to use the arrow
key to move instead of cuts, press A, which is
that icon over there. To move your marker with
one frame at a time, you can press your arrow
keys on the keyboard. I'm moving my marker on
the timeline to find the start of the birth
animation to be accurate. And once I find it, I will cook the chinese head animation from there and move it to
the position I need. I know this is a
weird thing to say, but that's what
we're doing here. We're cutting heads, not
literally, of course. They used to type the head movement and the
birth movement together, and it takes a
little bit of time, but that's the way I
chose to do it because in quita that might have
resulted into you know, a little bit of
inconvenience for weak, especially when the
head has eye eye blinking and such
explanimations there. Finally, once we're happy
with the whole animation, we can add a adjustment layer. If you don't see your
effects on the left, you can press on the left corner on the text when it says
effects, and they will appear. I am adding adjustment clip, which I will zoom in and I'll try to make some
sort of movement. But before that, I will just move the granny animation
with the bench and the head. So it will create
this illusion of camera painting from the
right on the screen. Anyway, if we're happy with
our animation, simply, we can finally render it
of course you can add other effects as glow
effects and such. But right now, we want to render this because we're
happy with car clocks. The way we render
our finish clip in the ictuzove is by going to the icon that looks
like a rocket. First, you will be in
a different window. Well, you can
choose your seconds for exporting your final video. These are my seconds
that I'm using. Make sure you name your video and choose the video
location for that video. After all said and done, the only thing that we
can do is press render. In order to press
render, though, we need to add our clip
to the render queue, which is from that
button over there. Once that's done, you
simply can press render. Depending how long your clip
is, it could take some time, and finally, finally, we can witness our amazing animation. Enjoy. Okay, for your
final assignment, you can try to animate one of the scenes
from our storyboard. If you don't, that's fine. I hope this class
was helpful to you. Make sure you share your
animations with the rest of us. And if you have any questions, please do leave them, and I will be happy to answer
them as much as I can. And maybe someone
else can answer them. If you have any troubles or
you have any suggestions, make sure you leave
that share it with me, and I would love
to hear about it. Thank you. I hope you enjoy
animating with Krita. H
 Munkaa, Digital Artist