Transcripts
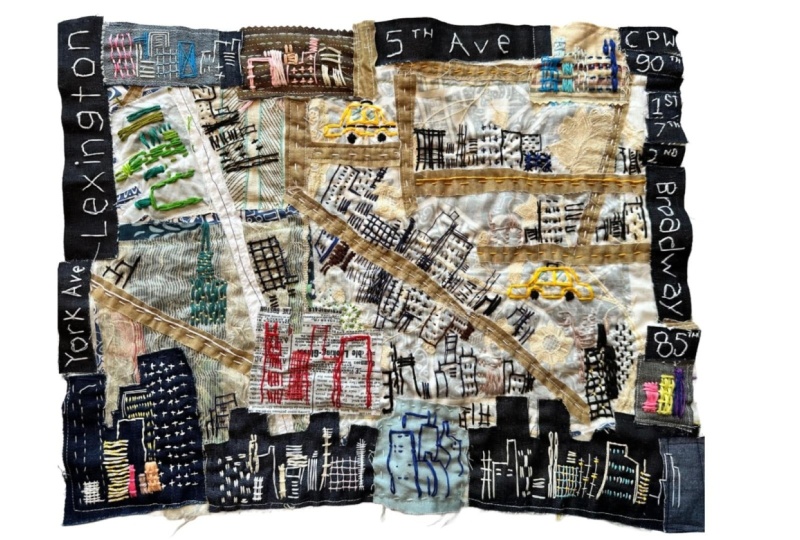
1. Introduction - From Scraps to Maps: City Scenes: Hello, fabric cartographers, and welcome to my class from
Scraps to Maps City Scenes. A class where we will
make a 12.5 inch by 12.5 inch fabric map using
mostly fabric scraps, thread, and other recycled
and found items you may have. This is a multi level class for anyone comfortable sewing
by hand or with a machine. It's very loose sewing. You don't have to be advanced
and I don't want you to be intimidated if your stitches
are a little bit wonky. That actually will work
great for this project. I'm Zoe, and I'm a multi
disciplinary artist. That means I have different
art practices and interests, and I teach a variety of them in my classes right
here on Skillshare, quilting and sewing, recycled and upcycled
arts and crafts projects, art journaling, and more. I have even had several of my fiber art pieces on display
in galleries and exhibits. This class is perfect for
the person who has access to fabric scraps in all sizes
and colors and textures, is interested in
collage style art and fiber art as a practice, is able to include hand
stitching or machine stitching, likes maps or is at least
curious about them. But please note, I
will not be going into detail about hand sewing
or machine sewing, but you will see many examples
and action shots of both. This city scene class is number one in a multi
part series where each class will focus
on a different type of map that we can make
from fabric scraps. And this class is
a starting point to get you on your
map making journey. Let's take a look at some of the basic supplies
and details about the project and also my handy dandy getting
started worksheets.
2. The Project & The Supplies: This class will focus
on a city scene, which is a great starting
point because cities tend to follow grid and
geometric patterns and shapes. The individual lessons in each class will focus
on elements that will make up your 12.5 inch
by 12.5 inch map scene. Your map can be a macro
view or a microview, meaning bigger items on a larger scale or lots
of little things, and it can be a combination
of micro and macro. You are welcome to work
smaller or larger. I felt this was a
great starter size, and the squares can be combined later for a larger project. Unlike real maps that often need to be exact for the user, these maps can be a little
less structured and precise. There are no rules this class is a
starting point to get you on your map
making journey. So get ready to let go and have your
imagination run free. Let's take a look at some of the basic supplies
and details about the project and also my handy dandy getting
started worksheet. The supplies include
neutral fabrics and quilting batting which will be used for the
foundation layer. Shear fabrics for layering
on the foundation layer, any and all fabric scraps. I even have some
denim in my pile, felt, which is a great texture. It's easy to cut out shapes and comes in a load of colors. Black fabric cut into strips, which will be used to
make roads and streets by adding yellow and
white lines, threads, embroidery floss in
a variety of colors, but definitely black and
white and yellow orange. And greens are
great for grass and plants. A cutting grid. I have the 12.5 inch
grid shown here, but you can work
with what you have or just cut a square
with a ruler. Cutting tools, pins and clips, and assorted items like beads, buttons, sticks,
wool, anything and everything you have lying around can be fun to
add and play with. A sewing machine if you
have access to one, or you can do this project
simply by sewing by hand. For hanging the
project at the end, you will need a wood doll, which can also be a
stick like driftwood, or a chopstick, a skewer, or a metal rod, clips,
wire, yarn, rope. My worksheet is a great
starting point to think about what you want
to include in your map. Trust me, when I say, you may forget as you get
into the project. Or the project may
take different turns, and you may need to remember
some items to put in. The worksheet will help
you organize your ideas, think of new ones, and have some resources in
your back pocket. When I take a look
at my worksheet, I know I'm going to be
working on a city map. My reference could
be the Internet, it could be my mind. I'm going to do a grid and I would like some
haphazard streets. I definitely like trees. I love putting grass
with stitching. Plants are fun also. For water
upon sky, I love clouds. I'll definitely include avenues, streets, a taxi
cab, my favorite. Maybe a bike or scooter. And, you know, I will add a pigeon because that
is a very city thing. And other things
that come to mind, the taxi. I
definitely want that. And I don't want to use too much black because I'm going to be using that in the streets. Throughout the project, this is a great sheet for me to
look back on when I'm looking to fill space and just remembering the things
I wanted to include. The worksheet is a downloadable
PDF and can be found in the projects and resources
section of this class. You'll find the supply
list there too, along with the building
Ideas sheet as well. Once you have your
supplies gathered, your worksheet filled out, or at least looked at,
it's time to get to the base layer or what I call
the foundation. Follow me.
3. The Foundation: The foundation is
the base layer of your map and will be made
up of a few elements. A solid or pattern
piece of any fabric, but possibly something on the subtler or paler side
is a good place to start, since we will be adding
a lot on top of this. A piece of batting that
will be the bottom layer. It can be added later or
right from the start. Personally, I like working
with a heartier base that has some structure and attaching your base cotton piece and the batting together
helps with that. Then some swatches
of fabric that can be neutral, they
can be see through. They can be another
color or pattern. This will start to make up
some zones within your map. Here are some examples
of the way I assembled the base layer with the
various differing materials. I cut a square using
a plastic grid. I use the 12.5 inch
by 12.5 inch size, but they come in
different sizes. So use what you have, or you can just cut a square
without a grid. I cut the batting
in the same size. Then I attach the
two pieces using a similar colored thread
with my sewing machine. I sewed a border around
every side of the square. Next, I gathered up
my shear and see through pieces of fabrics
for some layering. I cut various sizes and shapes and place them
on the base layer, then attach them with my
sewing machine again. But you can also hand sew
these layers to one another. Here's one with some
shear fabric and also a randomly shaped
green piece of cotton. And one more example with
some dark strips and a plain tan burlap fabric. Now that we have the
foundation assembled, let's move on to the
next lesson buildings. Since this is a city scene map, we are going to have
a lot of fun with different ways of
making buildings, skyscrapers,
brownstones, and more. Cities tend to take
on a geometric vibe, so let's square up and head
over to the next lesson.
4. Buildings: One thing I really like
about this project is that you can do
pieces of it on the go. For example, when making
a city scene map, I really like working
on little pieces by hand while watching
TV with my family, lying in bed with my dog, sitting outside, traveling
in a car or an airplane. For making my buildings, I like these three approaches. You can sew
rectangular pieces of fabric together to
form the buildings. You can sew by hand or machine and stitch the
outlines and windows of various sized buildings onto smaller pieces of fabric
that can be combined later. You can literally
reference a street from a photo or do it
from your imagination. I have a building shape guide in the resources section that you can download and
use for inspiration. For the fabric square buildings, I took a few different
colored scraps and cut them into
rectangles and squares. Then I laid them
out on a piece of square cotton to make
a rough skyline. Then I iron the scraps and
I pin them into place. I sewed them on using
my sewing machine, and I did outlines, some different stitching, and I cut through the
buildings, too. For the machine sewn outlines, I took a piece of fabric and drew some lines with
a white pencil. Then I followed the lines
with my sewing machine. I added windows afterwards with different size posca pens
in black and yellow. For the hand stitched on
many pieces of fabric, I took a scrap of denim
fabric and embroidery floss and sewed outlines and
windows with no plan. I enjoyed the
relaxed free flow of just sewing various lines and
seeing how they came out. I added Windows with
basic running stitch. Now it's time to assemble the
various building types and blocks onto my foundation
layer for the rough layout. I trim the edges off the
fabric piece skyline. I gathered up all
the pieces I have made with buildings in
the different styles, hand stitching and
machine stitching. Then I took all my scraps with buildings and started to
place them on the foundation. I have two foundations, which can be attached later, or I can keep them
as separate pieces. It's a little like putting
a puzzle together, although there is no
right or wrong spot for each piece of fabric. The swatches on the
foundation sort of break up the gray in the background and give the map some
interesting visuals. The green makes for a
nice park like area. Once I am happy with the layout, I will pin the building
squares into place. The buildings attached
like this will help me with the next
step of the project. Now that the buildings and structures have been
created and attached, it's time to tackle the streets. Let's get this show
on the road. But
5. Streets: Streets can be applied as
strips of fabric, often dark. And you can add
road markings, too, like dashed white lines, solid orange or white
lines, double lines. Returning to the project with the foundation layer and
buildings pinned onto it, I will take those black
strips of fabric in varying sizes and simply place them throughout
the project. Often at the base
of the buildings. It's good I didn't sew the
buildings on yet because it's nice to be able to tuck some
streets behind a building. I will pin the streets in place. Trim the excess, save those
scraps for other roads. Then I will make my way to the sewing machine
to sew them in place with black thread. Once the streets are sewn down, it's time to attach
the building pieces, but perhaps with a
different color thread. I have a weird little
edge of the fabric here, and I may cover it up with more black street or an
alternate embellishment. We'll get to that later on. I may consult my
worksheet for some ideas. And here I have a lot of empty space that will
need to be filled. Some extra angled
streets is a good idea, and some street signs may work. Next, it's time
to hand stitch in the streets with white
or yellow thread. And I can do different
colors on different streets. This is a great part
of the project to work on with my furry friend
Gabby hanging out with me. I like hand stitching using the basic embroidery
running stitch style, an up and down method that can be neat or even a bit messy. As you can see, the
street stitches really tighten up the project. Later, we will add the hand sewn street signs
to some of the empty areas, as well as some
greenery, like grass, flowers, trees, et cetera, to fill in the empty areas. And I will gather
up a variety of green colored thread to
fill in that green space. Now that we have the
buildings and roads in place, let's move on to filling some of those empty spaces and green spaces with parks
and other nature.
6. Green Spaces: Mm hmm. It's up to you if you want to include green space in your city scene. Most cities do have these areas, and it's a nice break
from the geometric of the City grid and
the concrete jungle. Trees can be created from
a variety of sources. I used vinyl and some old green scraps
to create these trees. Then I back them on black
felt so they would pop. Here, I've used popsicle sticks. You can use other
mixed media elements like sticks and cut
paper and green felt. I attached the trees with
brown thread in an X design. I also like the idea of gardens, which could mean
grass and flowers, which I have done with
embroidery techniques. The seed stitch, the
double rice stitch, the French knot for flowers, and seed beads or even
buttons for added dimension. And many green spaces have
water elements like fountains, ponds, lakes, rivers, oceans. For the pond, I used some V
stitches to represent water. For the Pacific Ocean, I use the running stitch along with some wave shaped
fabric pieces. You can see how some
odd shaped areas on your map can be
embellished with greenery. Grass, trees, flowers,
and more can be stitched on or attached with any mixed media bits
you come up with. Don't forget to consult
your worksheet to remind you of any ideas
to fill in spaces. As your map starts
to really fill in, you may see some blank spots, and this is where the fun
of embellishments comes in, like signage, transportation,
animals, people, anything. Let's find our way to the
embellishments lesson.
7. Embellishments: Embellishments. This can be the fun part where you add
embellishments and details. Transportation like
cars and buses or subway stations,
signage, street names, numbers, restaurants,
people or animals, certain landmarks can be
created and inserted. The sky is the limit. Literally, you can
include airspace items, too, like clouds, sun,
weather elements. Let's take a look at some of the embellishments
I've made for my maps. Here, I'm using felt to make a taxi cab
for my city scene. Felt is affordable
and easy to cut. I will place this car in that odd spot on my map
that had the frayed edge. I will hand stitch the tires and stripes onto the taxi
with white thread. I also made a felt pigeon, a classic city bird. Using green felt, I
can sew the names of any streets on to
make a street sign. And here I sewed onto denim
the street names and numbers. This one shows freeway signs
made out of felt with hand stitching for the letters and machine stitching to
assemble the pieces. Felt is great for clouds, too. I cut blue and white pieces, placed them down on my map, and sew them directly onto the piece with opposite
colored thread. Blue on the white cloud, white on the blue cloud. As you can tell, your
map is almost complete. Let's direct our attention to
the final step of backing, connecting, and
hanging your map.
8. Backing, Connecting, Hanging: Backing, framing and hanging. Once your square is done, it's time to finish it off. This means adding the backing
to cover the stitchw and batting and possibly combining a few of the squares
to make a bigger map, and finally hanging it. Backing. As you can see, the backside of your map
is looking a bit messy. Now, of course, that
may not be seen, but I think it's professional
to cover the back with another piece of fabric and add extra fabric along
the top that can hold the wood or doll or hooks, however you decide
you're going to hang it. In example one, I'm taking a piece of cotton the
same size as my map. I will use white
embroidery thread and a needle to
hand sew the edges. First, I will snip off
any straggling pieces. Then using the edge
blanket stitch, I will stitch the
map to the backing. In order to hang this, I can use clips and then hang the clips
from nails on the wall. I can attach a thin
piece of wood like a skewer and then add yarn, rope or wire to the ends. You can use a doll from
the hardware store. Chopsticks will do or
a metal curtain rod. I attach the wood rod with a
few stitches to hold it in place and I attach
yarn to hang it. Voila. For example two, the fabric for the backing was a bit
larger and longer. I left several inches
at the top so that I could sew a passageway to
hold my hanging stick. Around the edges,
the extra material makes for a nice border. First, I pinned and then sewed. I placed my map and I
pinned it in place, and then I sewed it down
with my sewing machine. You can hand sew
too if you wish. Finally, I threaded my piece of driftwood through
the passageway. You could put two nails in the wall and balance
the wood on them, or you can attach wire, rope, yarn, or string, and hang
the piece from one nail. Example three shows
one last method, and that is to make loops. Here's a mixed media
wall hanging I did and I simply made
loops that I attach on top and then threaded my piece of
wood through the loops. Oh there are loads more
clever and unique ways to frame and hang
your mapter pieces, which we will cover in some
of the following classes. In order to make your
12.5 inch by 12.5 inch fabric map project from
this class a bit larger, all you have to do is join
two maps with a road. You can sew them together
with black thread, and instantly your map
is twice the size. You can build up top two. Please share your
project whatever size, hanging style, and overall vibe in the project
section of this site. No.
9. Exit Notes: Thanks for coming with
me on this journey. And like all of my classes, I love to get feedback. I also really love to
see your projects. So please please share your work in the project
section of this class, or upload it to your
Instagram account and tag me. The next class in this
series from Scraps to Maps, will be the opposite
of City Scenes. We head over to the country
for farms, houses, and more. Follow me on Skillshare so you know when the
next class is out.
 Zoe Balsam Biggs, Memory Quilts & Other Fun Art Stuff